14 | DAILY START-UP PROCEDURES AND HUMAN MILK ANALYSIS Miris HMA™ User Manual Miris HMA™ User Manual DAILY START-UP PROCEDURES AND HUMAN MILK ANALYSIS | 15
This chapter describes routines for human milk sample analysis with the Miris HMA™.
For the rst start-up of a new instrument, refer to the start-up procedure in Chapter 1.
Follow the cleaning instructions in Chapter 3, zero-setting check procedure in Chapter 4
and the instructions for milk sample preparation in Chapter 5 accordingly.
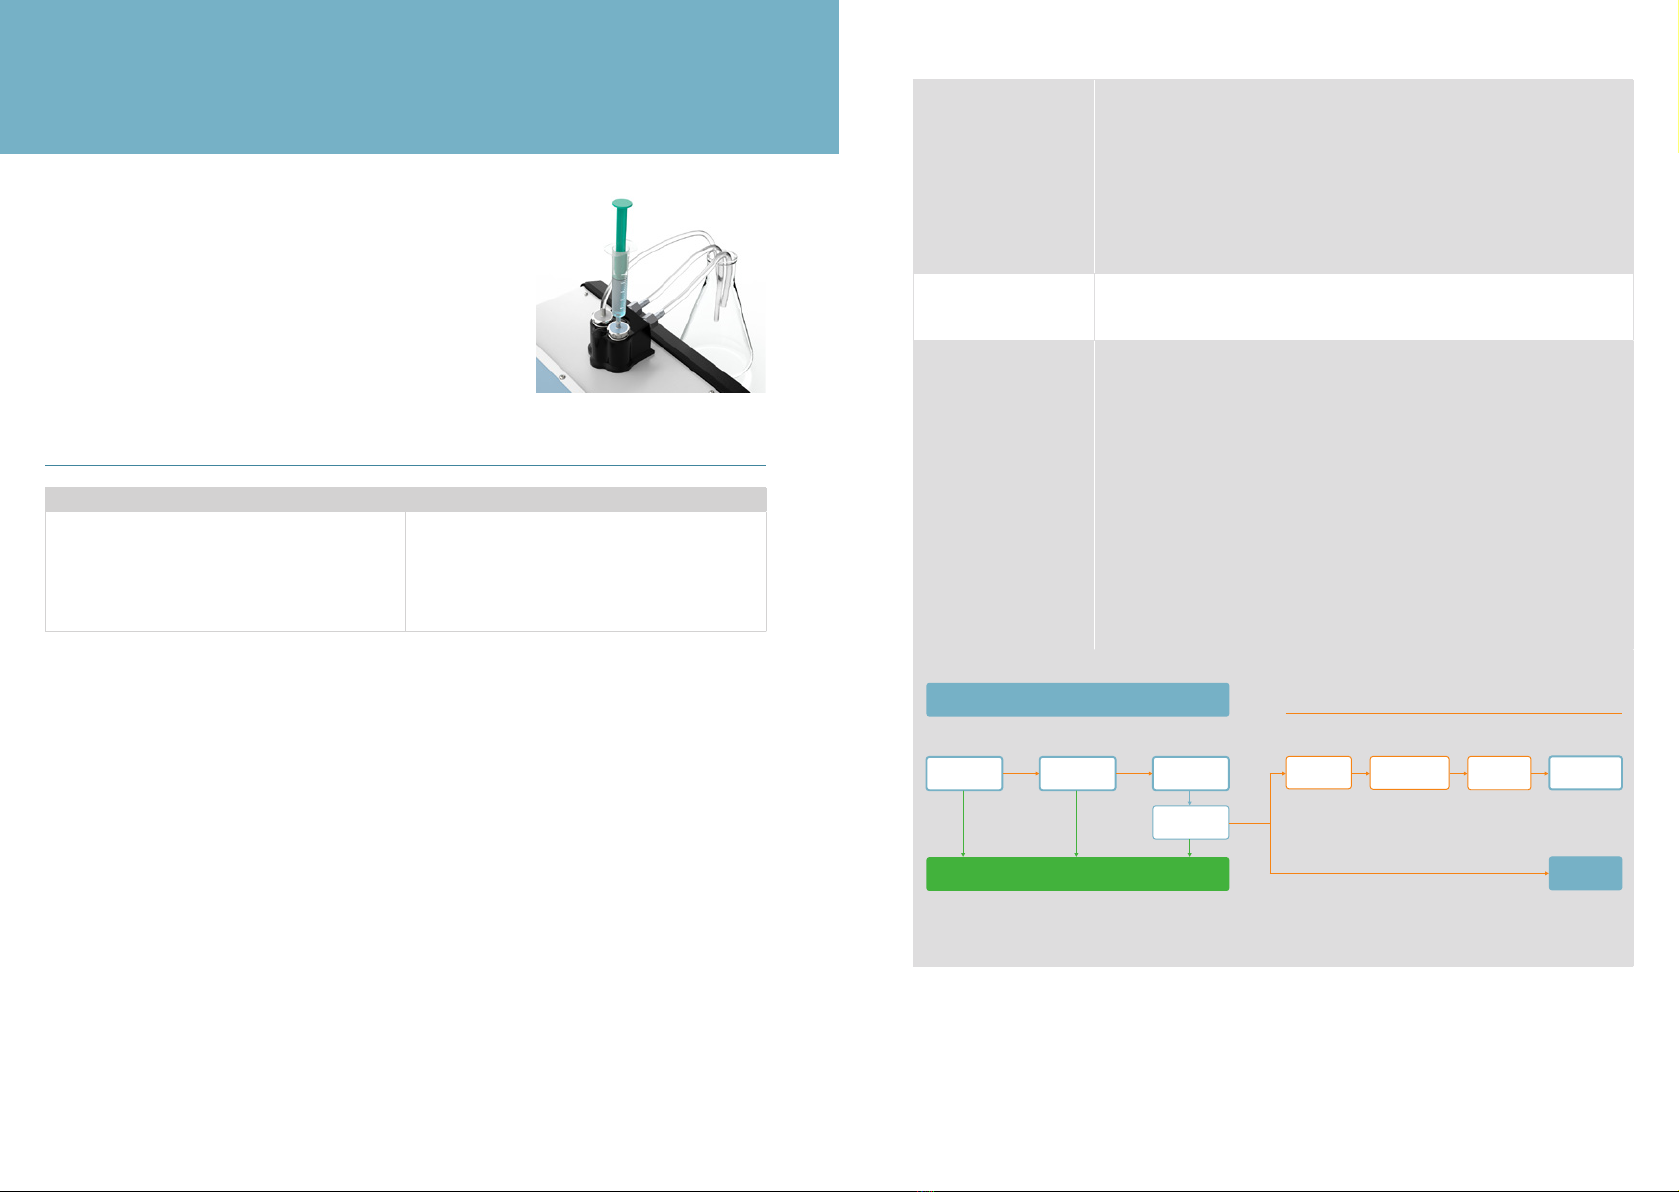
When performing a measurement or zero-setting check it is very important to leave the
syringe on the inlet for the entire procedure, see Figure 13. Leave some of the uid in the
syringe to avoid introduction of air into the cuvette, as this may lead to inaccurate results.
For detailed instructions, go to the specic chapters referenced
in this SOP.
For further details on use and handling of Miris Ultrasonic Proces-
sor, refer to instructions in the Miris Ultrasonic Processor manual.
Notes on sample handling (further information in Chapter 5)
Control the integrity of each sample before use by checking that
specied storage temperature has been maintained and that there
are no signs of leakage or breakage of the sample container.
Defrost frozen samples at room temperature or in a refrigerator, or
in a cold water bath.
Control the sample for quality issues: e.g. the milk is churned, if a
distinct smell from free fatty acids is noticeable, if during, or after,
preparation of the sample, white particles are visible on the walls
of the sample container, fat droplets oat on the surface of the
sample. If any of these issues are noted the analysis might not be
accurate and the sample should be discarded.
STANDARD OPERATING PROCEDURE (SOP)
Figure 13.
Leave the syringe on the inlet during
the measurement.
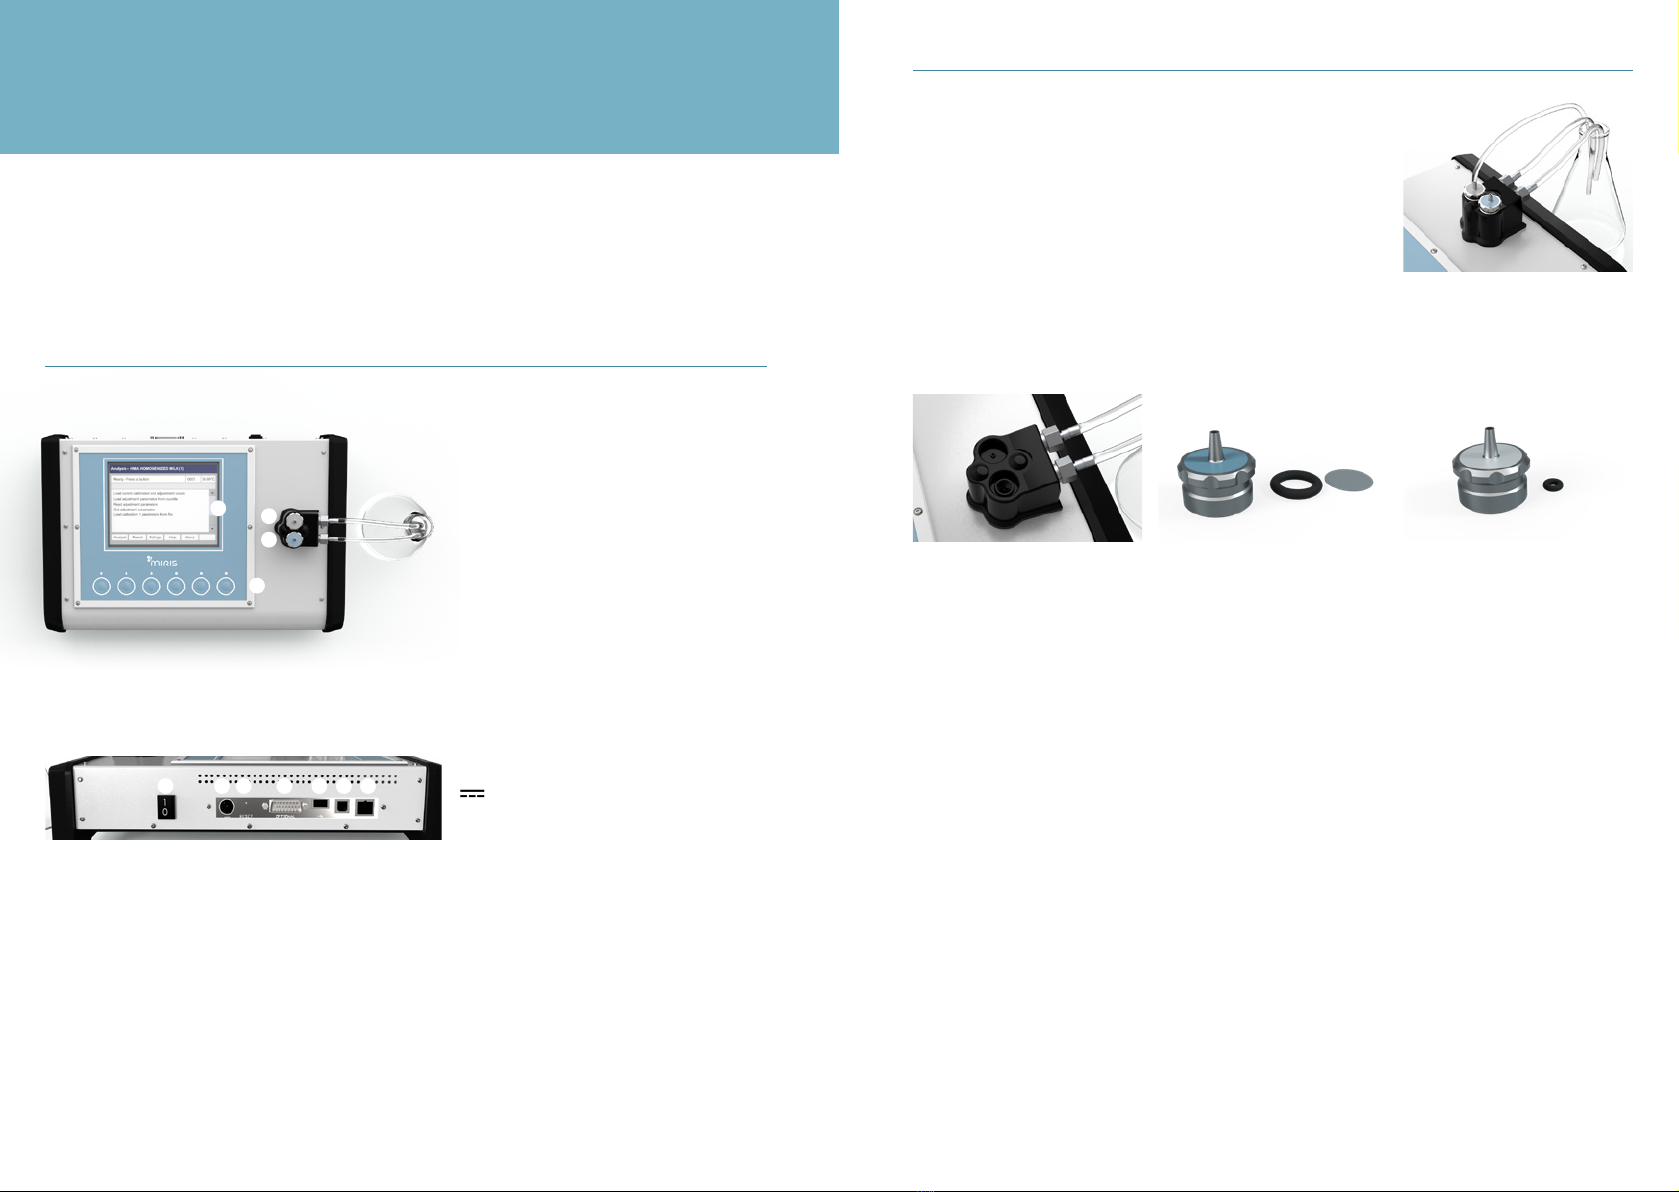
Equipment Consumables
Miris HMA™
Ultrasonic processing device, Miris Ultrasonic Processor
Heating bath at 40°C (104°F)
Thermometer (not provided by the manufacturer)
Note! All solutions must be 35-40°C (95-104°F) when injected
into the instrument.
Miris Check™
Miris Cleaner™
Distilled/deionised water (not provided by the manufacturer)
Syringes, 2 ml and 5 ml
Waste container (not provided by the manufacturer)
Emery cloth for the ultrasonic processing device
Miris Calibration Control Kit™
Always keep sample containers securely sealed in order to avoid
evaporation, only remove the lid briey to take out samples.
Mix the milk thoroughly by gentle inversion or swirling of the
sample container. No shaking in order to avoid foaming.
If foam is formed in the sample, this needs to disintegrate com-
pletely before sample withdrawal for analysis.
A sample withdrawn by syringe must be immediately injected into
the instrument and immediately analysed.
A new sample withdrawal and injection needs to be made for each
analysis.
Avoid multiple sample container transfers.
Injection technique:
make sure liquids are injected with correct pressure. Too high
pressure (>3 bar) will divert the liquid via the valve at the side of
the CPG (see Chapter 1, in- and outlets).
Table 1. Standard Operating Procedure A
A1. Set-up Defrost frozen samples at room temperature or in a refrigerator or a cold water bath
Turn on the heating bath to warm up to 40°C (104°F)
Prepare working solutions of Miris Check™ and Miris Cleaner™
Pour the daily requirement of working solutions of Miris Check™ and Miris Cleaner™, and of distilled water, into
separate bottles to use for the day’s work
Place bottles of distilled water, and working solutions of Miris Check™ and Miris Cleaner™ in the heating bath
Turn on the Miris Ultrasonic Processor and the Miris HMA™
Place a waste container by the Miris HMA™ outlet
Wait at least 30 minutes before proceeding to A2
A2. Instrument preparation Select ‘Analysis’ in the main menu
Set the Miris Ultrasonic Processor on the correct processing time (1.5 s/ml)
Control that the Miris Ultrasonic Processor probe is clean and that the tip is evenly polished
A3. Zero-setting check
Further information in Chapter 4
Watch the ‘Zero-setting check
procedure’-video at
MirisSolutions.com for details
Select ‘Analysis’ in the main menu
STEP I: Inject 3 ml Miris Check™
Press ’Check’ and wait for the result, approximately one minute
Display message “No adjustment necessary”: continue to A4
Display message “Adjustment necessary”: go to STEP II
STEP II: Inject 2 ml Miris Check™
Press ‘Check’ and wait for the result, approximately one minute
Display message “No adjustment necessary”: continue to A4
Display message “Adjustment necessary”: go to STEP III
STEP III: Press ‘Adjust’, wait for the display message “New adjustment done”
Inject 1 ml Miris Check™ Press ‘Check’ and wait for the result, approximately one minute
Display message “No adjustment necessary”: continue to A4
Display message “Adjustment necessary”: repeat STEP III
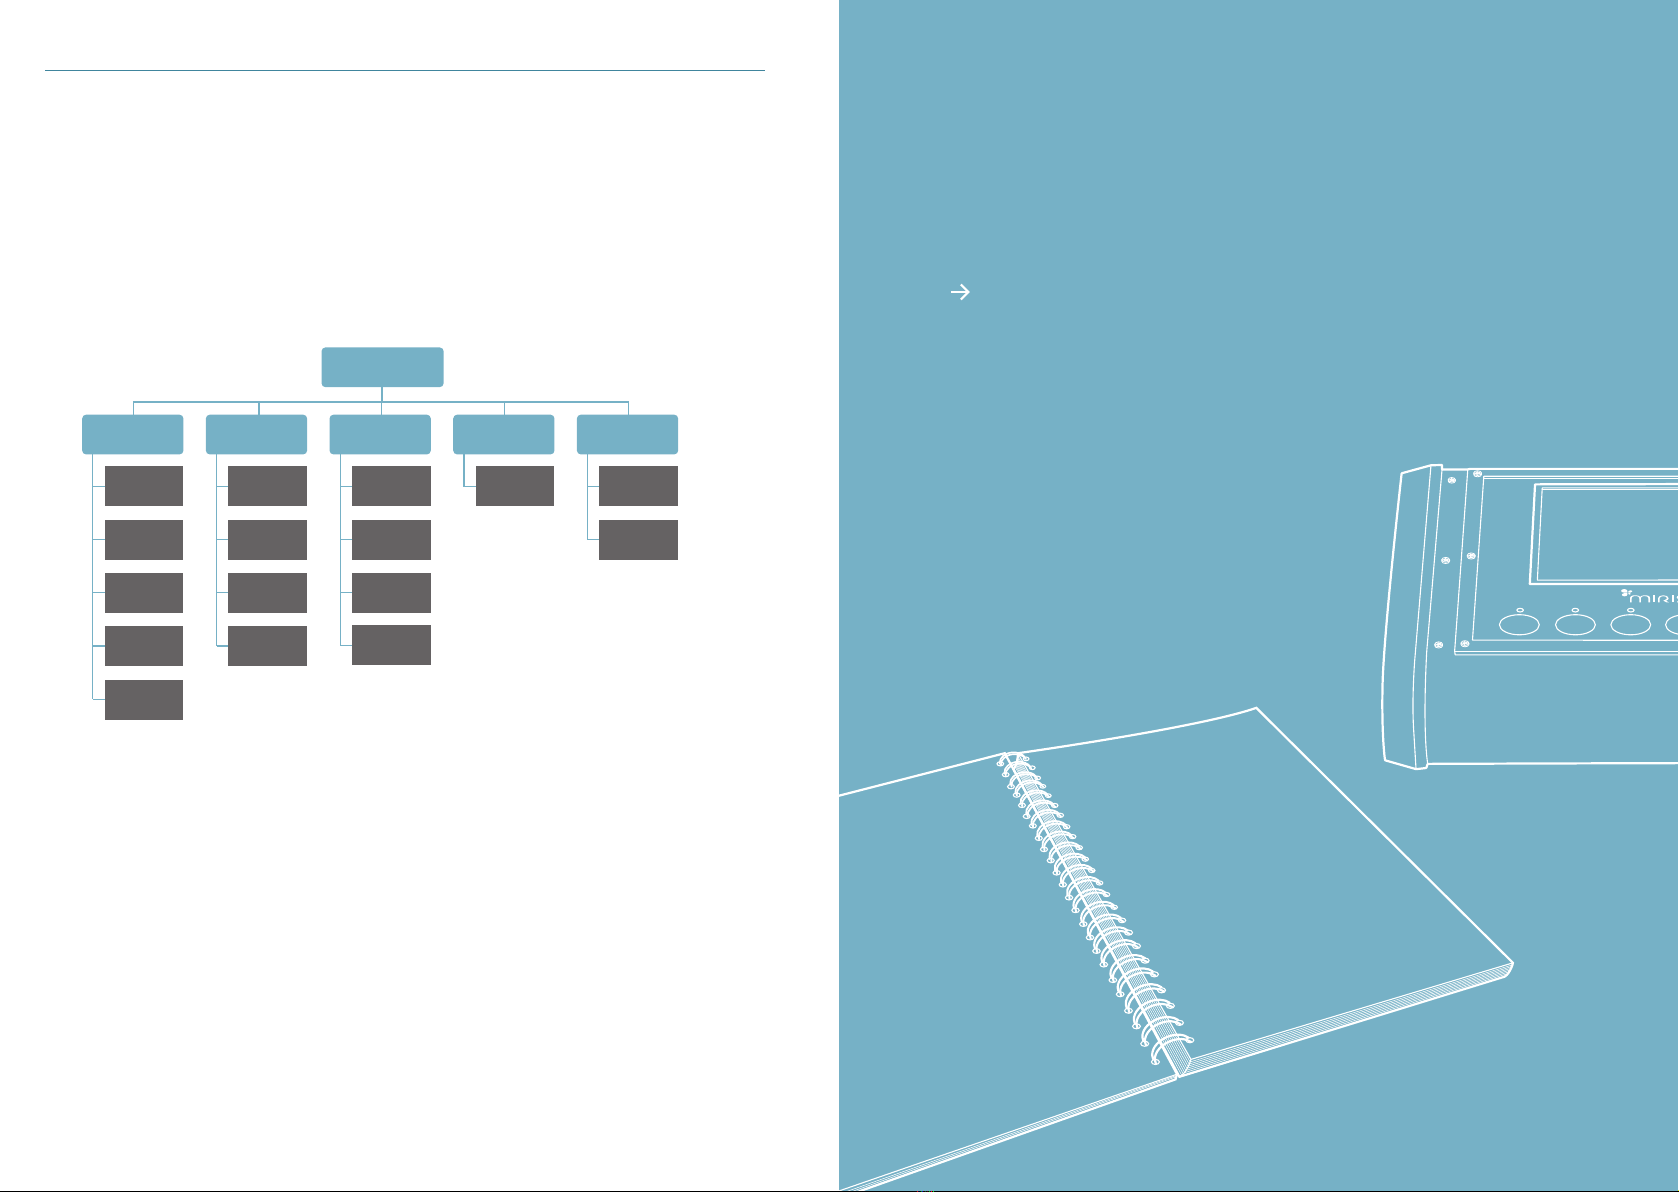
MIRIS HMA™ USER GUIDE
Chapter 2 DAILY START-UP PROCEDURES AND HUMAN MILK ANALYSIS
Check
zero-level
Start up / After 10 analyses and cleaning
Start quality control procedures / continue analysis
Check
zero-level
Adjust
zero-level
Check
zero-level
TROUBLESHOOTING GUIDE
STEP I STEP II STEP III
Not ok Not ok
Not ok
Ok Ok Ok
Clean the
cuvette
Prepare new
Check solution
Clean the
inlet lter
Repeat from
STEP I
Contact Miris
Support
After rst Adjust
After second Adjust
Overview of the Miris HMATM zero-setting check procedure with troubleshooting guide. ‘Check zero-level’ includes injection of Miris CheckTM solution and starting the
Check analysis. After completing the zero-setting check procedure, run control samples before any sample analysis.