Mitsubishi Electric MSZ-GB50VA Series User manual

SPLIT-TYPE AIR CONDITIONERS
OPERATING INSTRUCTIONS
INDOOR UNIT
MSZ-GB50VA
English
Deutsch
Français
Nederlands
Español
Italiano
Ελληνικά
Português
Dansk
Svenska
Türkçe
Русский
OPERATING INSTRUCTIONS For customers
•To use this unit correctly and safely, be sure to read this operating instructions
before use.
Bedienungsanleitung Für Kunden
•Um diese Einheit richtig und sicher zu verwenden, unbedingt diese Bedienung
sanleitung vor der Inbetriebnahme durchlesen.
NOTICE D’UTILISATION A l’attention des clients
•Pour avoir la certitude d’utiliser cet appareil correctement et en toute sécurité, veuillez
lire attentivement cette notice d’instructions avant de mettre l’appareil en fonction.
GEBRUIKSAANWIJZING Voor de klant
•Om dit apparaat op de juiste manier en veilig te gebruiken, dient u eerst deze
gebruiksaanwijzing aandachtig door te lezen.
MANUAL DE INSTRUCCIONES Para los clientes
•Para emplear correctamente este aparato y por razones de seguridad debe leer este
manual de instrucciones de manejo antes de su utilización.
LIBRETTO D’ISTRUZIONI Per gli utenti
•Per utilizzare correttamente quest’unità, leggere questo libretto d’istruzioni attenta-
mente e per intero.
Ο∆ΗΓΙΕΣ ΛΕΙΤΟΥΡΓΙΑΣ Για τον πελάτη
• Για να χρησιµοποιήσετε αυτή την µονάδα σωστά και µε ασφάλεια, βεβαιωθείτε
τι έχετε διαβάσει αυτ το εγχειρίδιο οδηγιών πριν απ την χρήση
INSTRUÇÕES DE OPERAÇÃO Para os clientes
•Para utilizar esta unidade correctamente, certiÞque-se de que lê estas instruções de
operação antes da utilização.
BRUGSANVISNING Til kunden
•Læs denne brugsanvisning før brugen så korrekt og forsvarlig anvendelse af
klimaanlægget sikres.
BRUKSANVISNING För kunder
•För att använda enheten på rätt och säkert sätt ska denna bruksanvisning läsas
innan enheten tas i bruk.
İŞLETME TALİMATLARI Satın alıcılar için
•Bu birimi doğru ve güvenli olarak çalıştırmak için, kullanmadan önce bu işetme
talimatlarını mutlaka okuyun.
РУКОВОДСТВО ПО ЭКСПЛУАТАЦИИ Для пользователей
•Для обеспечения правильного и безопасного использования прибора следует
до начала его эксплуатации внимательно прочитать данное руководство.

2
When the air Þlter is to be removed, do not touch the metal part of the indoor unit.
• This may cause an injury.
Do not touch the air inlet or aluminum Þn of the outdoor unit.
• This may cause an injury.
Do not put a vase or glass on the indoor unit.
• Water dropping into the indoor unit may deteriorate the insulation, causing electric shock.
Do not use an insecticide or ßammable spray.
• This may cause a Þre or deformation of the cabinet.
Do not put a pet or houseplant where it will be exposed to direct airßow.
• This could injure the pet or plant.
Do not place other electric appliances or furniture under the indoor/outdoor unit.
• Water may drip down from the unit, and this may cause damage or malfunction to them.
Do not leave the unit on an installation stand which is damaged.
• The unit may fall and this may cause an injury.
Do not step onto an unstable bench when maintaining the unit, etc.
• This may cause an injury, etc., if you fall down.
Do not pull the power supply cord.
• The core wire of the power supply cord may be disconnected and this may cause a Þre.
Do not charge or disassemble the batteries and do not throw them into a Þre.
• This may result in leakage, Þre or an explosion.
Do not operate the unit for a long time in high humidity, e.g. leaving a door or window open.
• In the cooling mode, if the unit is operated in a room with high humidity (80% RH or more) for a long time,
water condensed in the air conditioner may drop and wet or damage furniture, etc.
Do not use intermediate connection of the power supply cord or the extension cord and do not connect
many devices to one AC outlet.
• A Þre or an electric shock may result from poor contact, poor insulation, exceeding the permissible
current, etc.
Remove dirt from the power supply plug and securely insert the plug into the outlet.
• If dirt adheres to the plug or insertion is incomplete, it may cause a Þre or an electric shock.
Do not scratch or process the power supply cord, etc.
• Do not put heavy object on the power supply cord and do not scratch or process the cord. The cord may
be damaged and this may cause a Þre or an electric shock.
Do not turn the breaker off/on and/or disconnect/connect the power supply plug during operation.
• This may cause a Þre due to spark, etc.
• Be sure to turn off the breaker and/or disconnect the power supply plug absolutely after switching the indoor
unit off with the remote controller.
Do not expose your skin directly to cool air for a long time.
• This could damage your health.
Installation, repairs or relocation should not be done by the customer.
• If this is done incorrectly, it may cause a Þre, an electric shock, or injury from the unit falling, water
leaking, etc. Consult your dealer.
• If the power supply cord is damaged, it must be replaced by the manufacturer or its service agent in order
to avoid a hazard.
Do not insert your Þnger or a stick, etc. into the air inlet/outlet.
• Since the fan rotates at high speed, this may cause an injury.
• Young children should be supervised to ensure that they do not play with the air conditioner.
When an abnormality (burning smell, etc.) occurs, stop the air conditioner and disconnect the
power supply plug and/or turn off the breaker.
• If the unit continues to be operated in an abnormal condition, it may cause a Þre, trouble, etc. In this case,
consult your dealer.
SAFETY PRECAUTIONS .......................................................................................................................................................... 2
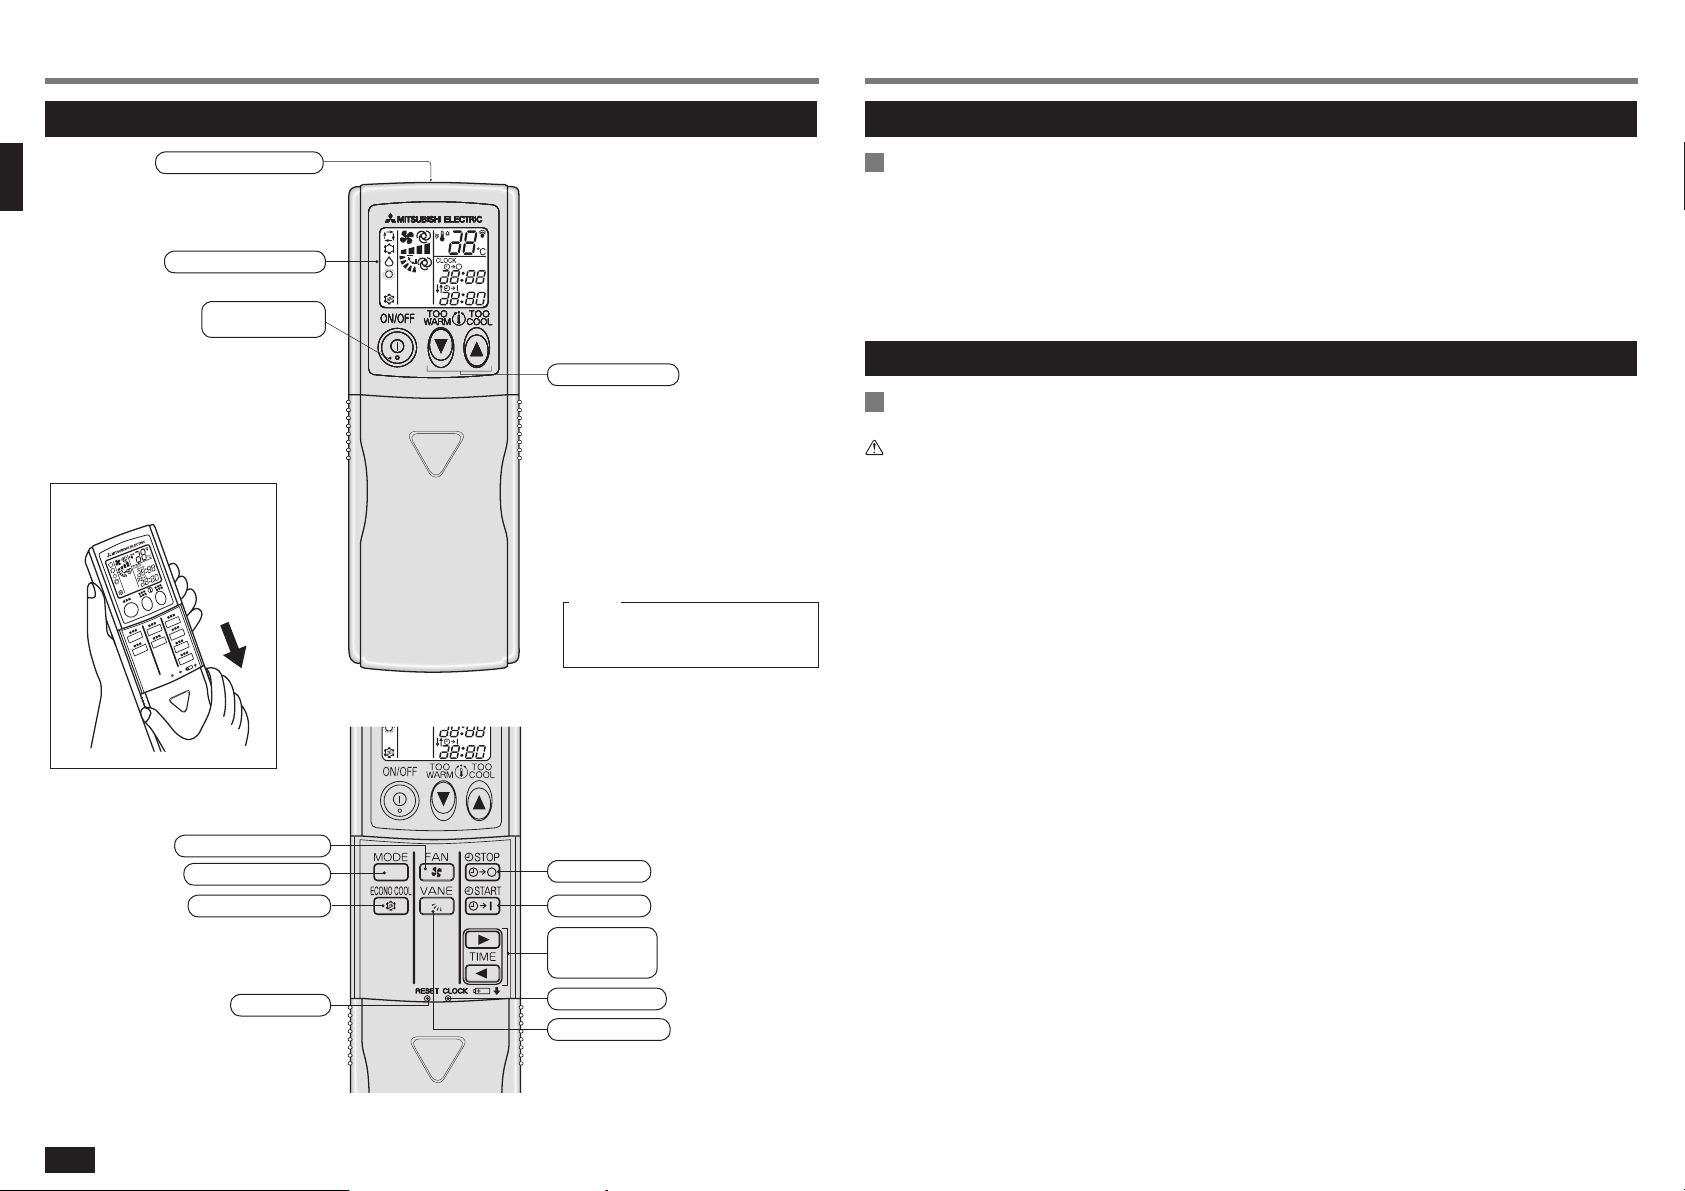
NAME OF EACH PART ............................................................................................................................................................. 3
PREPARATION BEFORE OPERATION ................................................................................................................................... 4
AUTO CHANGEOVER... AUTO MODE OPERATION .............................................................................................................. 6
MANUAL OPERATION (COOL, DRY, HEAT) ............................................................................................................................ 7
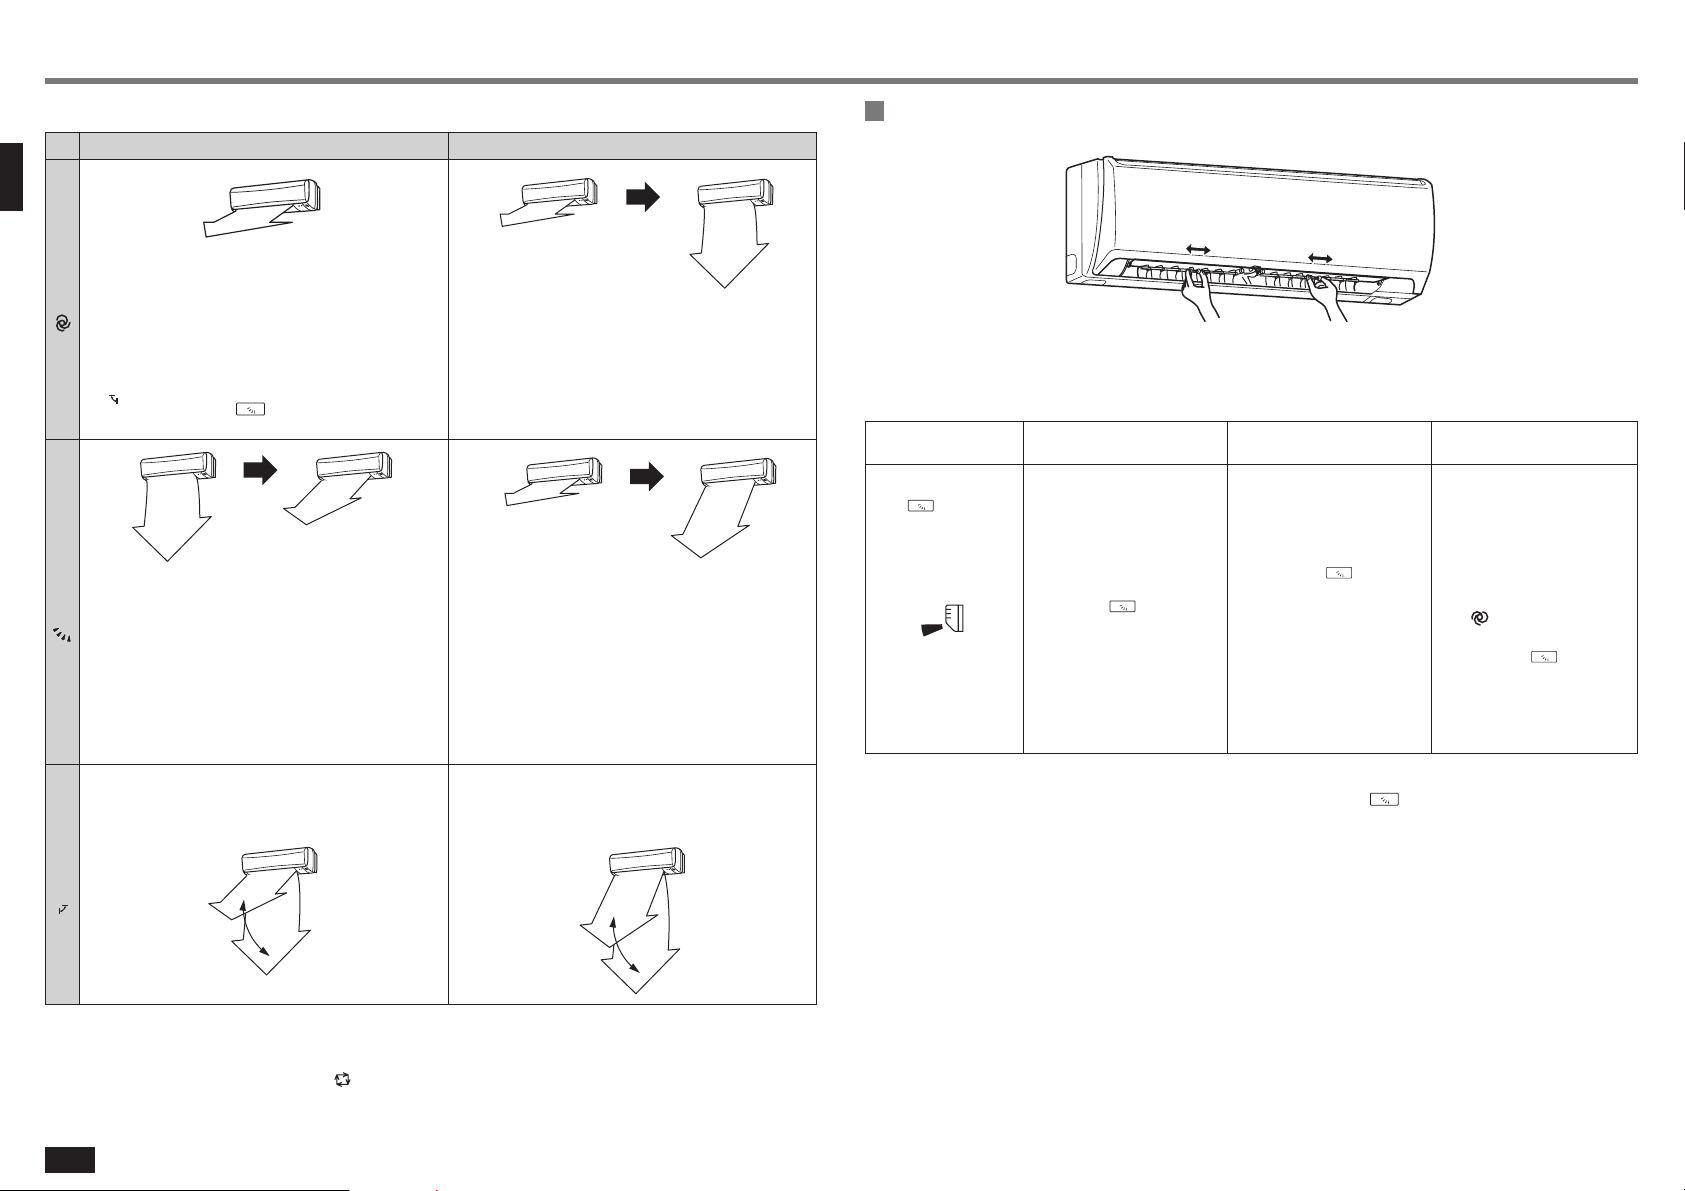
AIR FLOW VELOCITY AND DIRECTION ADJUSTMENT ......................................................................................................... 7
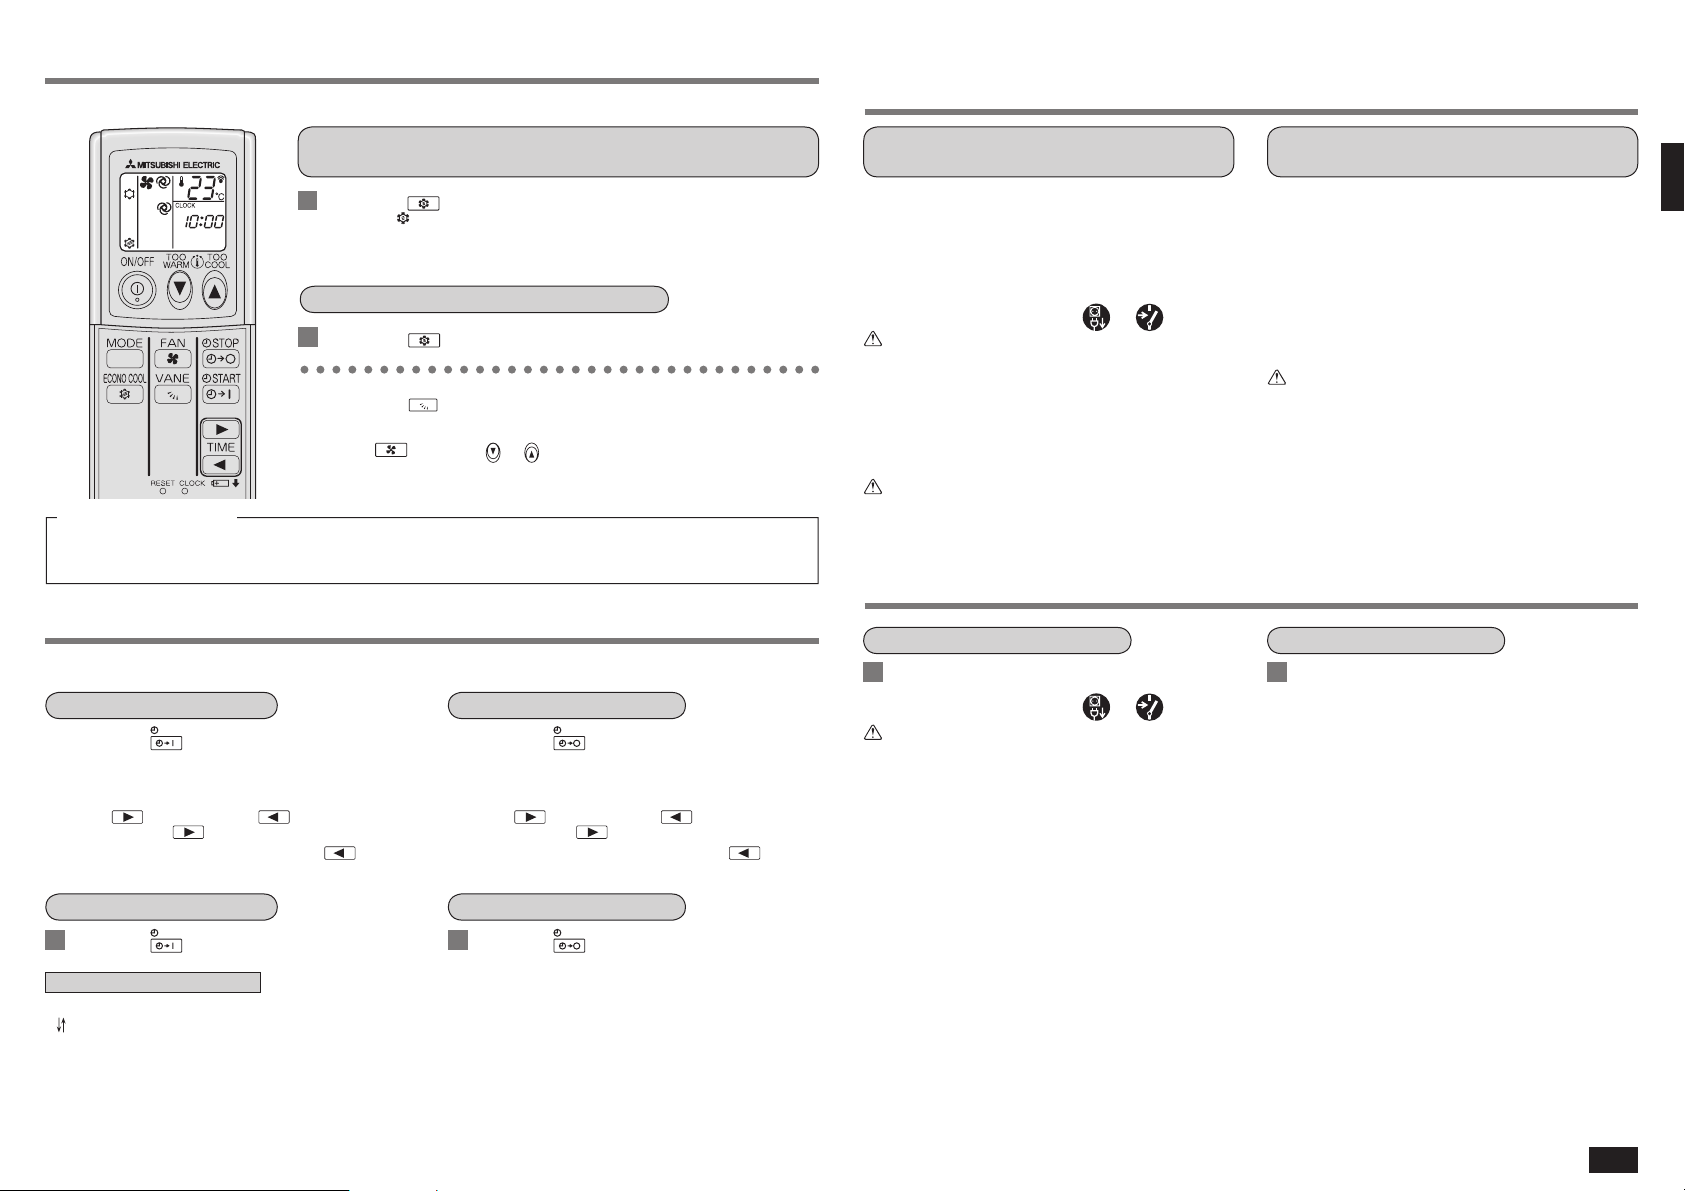
ECONO COOL OPERATION ..................................................................................................................................................... 9
TIMER OPERATION (ON/OFF TIMER) ....................................................................................................................................9
WHEN THE AIR CONDITIONER IS NOT GOING TO BE USED FOR A LONG TIME .............................................................9
MAINTENANCE ........................................................................................................................................................................ 9
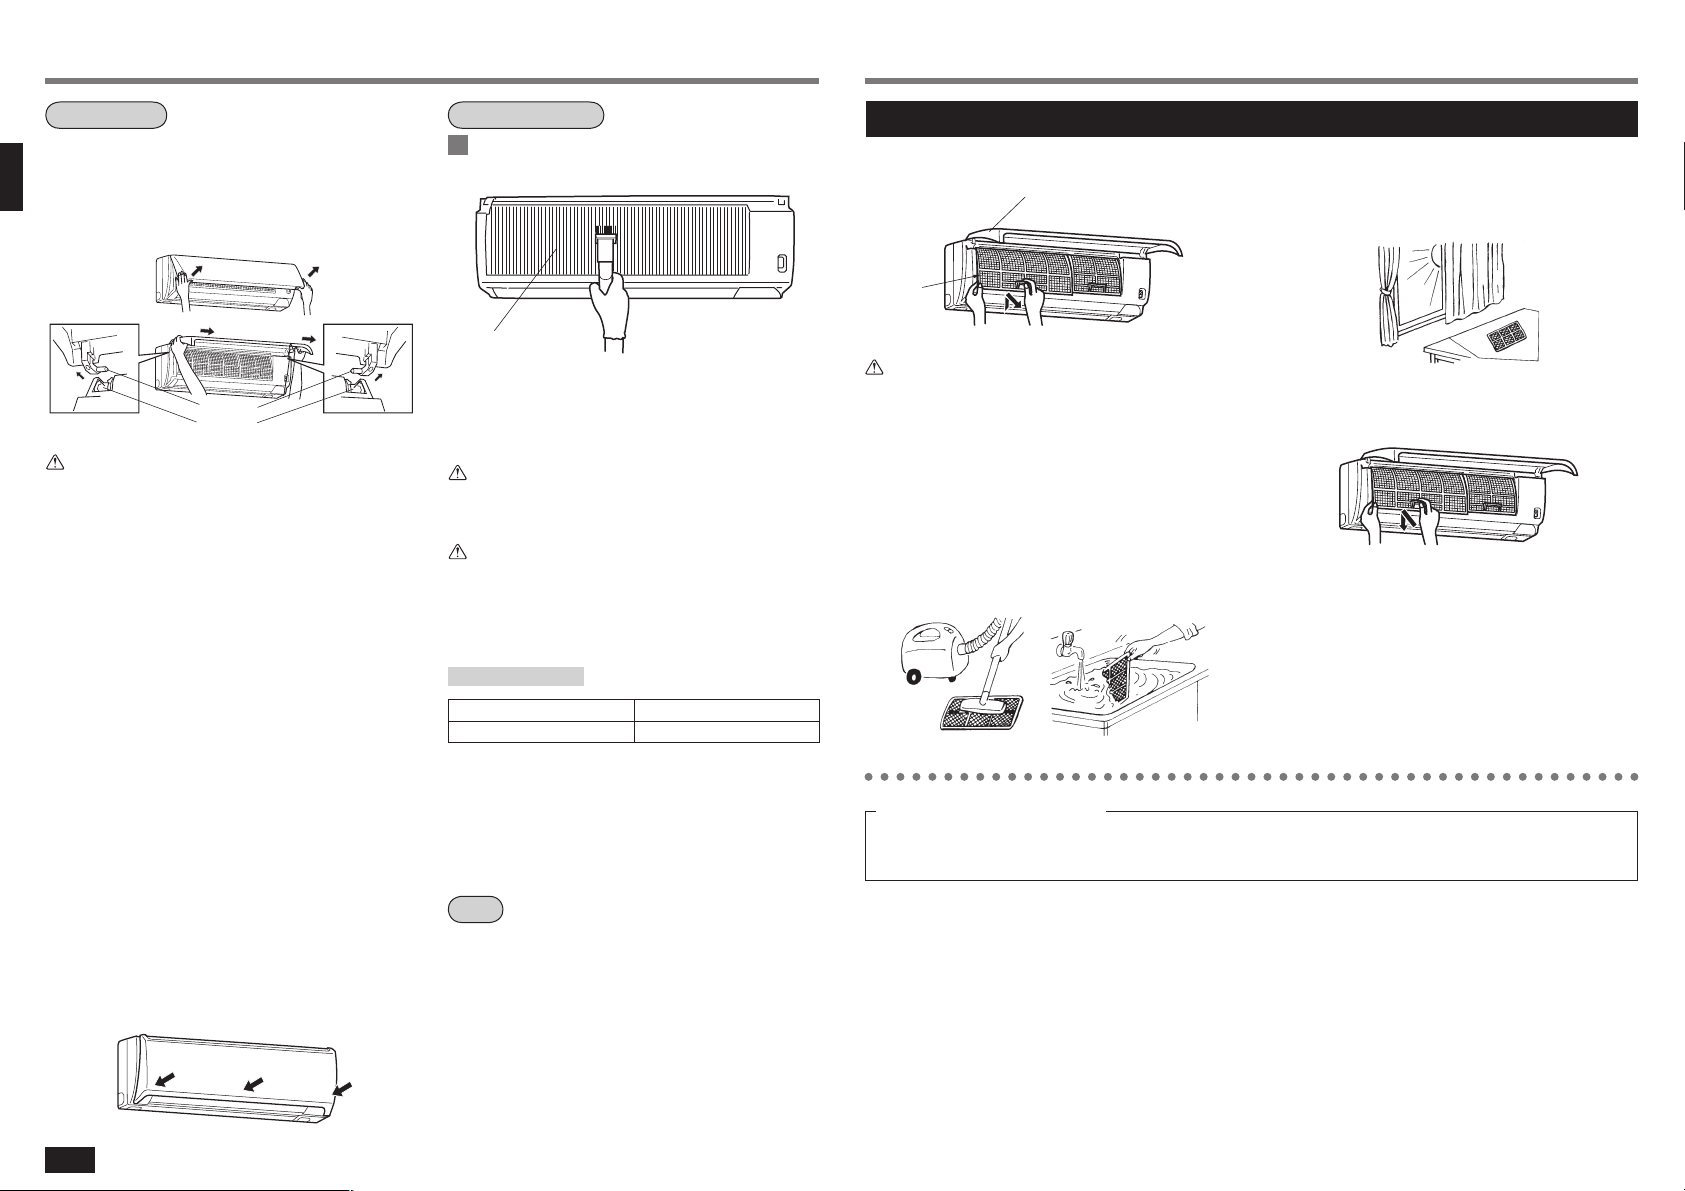
CLEANING THE FRONT PANEL, HEAT EXCHANGER AND FAN ......................................................................................... 10
CLEANING THE AIR FILTER (CATECHIN) ............................................................................................................................. 10
CLEANING THE AIR CLEANING FILTER (OPTION) .............................................................................................................. 11
REPLACEMENT OF THE AIR CLEANING FILTER (OPTION) ................................................................................................ 11
CLEANING THE AIR OUTLET AND FAN OF THE INDOOR UNIT..........................................................................................12
BEFORE CONTACTING THE SERVICE REPRESENTATIVE, CHECK THE FOLLOWING AGAIN .......................................13
WHEN YOU THINK THAT TROUBLE HAS OCCURRED ........................................................................................................ 13
INSTALLATION, RELOCATION AND INSPECTION ............................................................................................................... 14
SPECIFICATIONS.................................................................................................................................................................... 14
WEEE..................................................................................................................................................................................... 157
CONTENTS
SAFETY PRECAUTIONS
• Since rotating parts and parts which could cause an electric shock are used in this product, be sure to read
these “Safety Precautions” before use.
• Since the cautionary items shown here are important for safety, be sure to observe them.
WARNING: Incorrect handling could cause a serious hazard, such as death, serious injury, etc. with a high
probability.
CAUTION: Incorrect handling could cause a serious hazard depending on the conditions.
Marks and their meanings
Meanings of symbols used in this manual
: Be sure not to do.
: Be sure to follow the instruction.
: Never insert your Þnger or stick, etc.
: Never step onto the indoor/outdoor unit and do not put anything on them.
: Danger of electric shock. Be careful.
: Be sure to disconnect the power supply plug from the power outlet.
: Be sure to shut off the power.
• After reading this manual, keep it together with the installation manual in a handy place for easy reference.
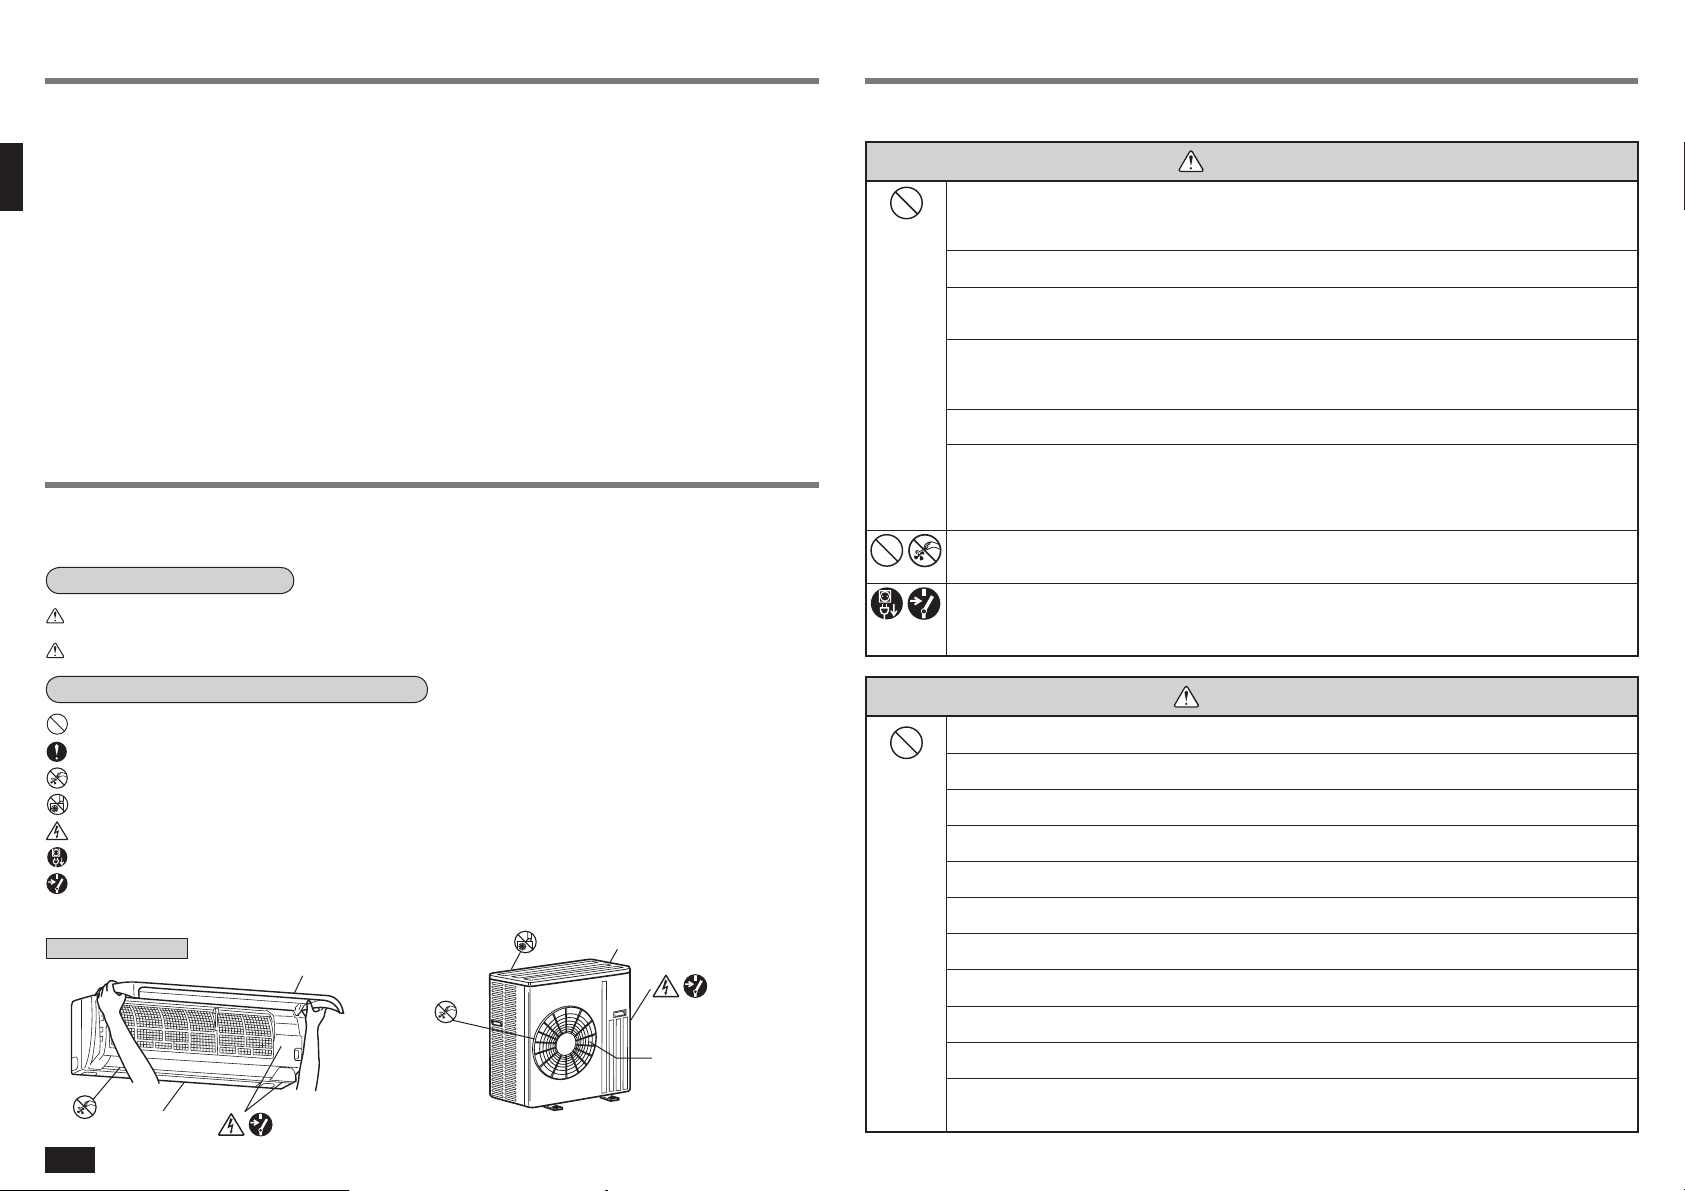
ENCLOSURE
Warning positions
AIR OUTLET
FRONT PANEL
ENCLOSURE
• This air conditioner is NOT intended for use by children or inÞrm persons without supervisions.
WARNING
CAUTION

3
WARNING
Do not use the unit for special purposes.
• Do not use this air conditioner to preserve precision devices, food, animals, plants and art objects.
This may cause deterioration of quality, etc.
Do not put a stove, etc. where they are exposed to direct airßow.
• This may cause imperfect combustion.
Do not operate the unit at low outside temperature (less than -10°C) in the cooling mode.
• In the cooling mode, if the unit is operated at low outside temperature (less than -10°C), water condensed
in the air conditioner may drop and wet or damage furniture, etc.
When the unit is to be cleaned, switch it off and disconnect the power supply plug and/or turn off
the breaker.
• Since the fan rotates at high speed during operation, this may cause an injury.
When the unit is not going to be used for a long time, disconnect the power supply plug and/or turn
off the breaker.
• Otherwise, dirt may collect and this may cause a Þre.
Replace the 2 batteries of the remote controller with new ones of same type.
• Using an old battery together with a new one may result in heat generation, leakage or an explosion.
If liquid from the batteries gets onto your skin or clothes, wash it well with clean water.
• If liquid from the batteries gets into your eyes, wash them well with clean water and consult a doctor at
once.
Ventilate well in using the unit with a stove, etc.
• An oxygen shortage may occur.
Do not operate switches with wet hands.
• This may cause an electric shock.
Do not clean the air conditioner with water or put a vase or glass on it.
• Water may enter the unit and degrade the insulation. This may cause an electric shock.
Do not step or put anything on the indoor/outdoor unit.
• This may cause an injury, etc., if you or something falls down.
SAFETY PRECAUTIONS
CAUTION
CAUTION
For installation
• Consult your dealer for installation of the air conditioner. Since special techniques and work are required,
installation should not be done by the customer. If this is done incorrecty, it may cause a Þre, an electric
shock, injury or water leaking.
Do not install the unit where ßammable gas could leak.
• If gas leaks and collects around the unit, it may cause an explosion.
Indoor unit
NAME OF EACH PART
Heat exchanger
Fan
Horizontal vane
Vertical vane
Air outlet
Air Þlter (Catechin)
Air cleaning Þlter
(Optional parts, Anti-
Allergy Enzyme Filter,
Blue bellows type)
Air inlet
Front panel
Remote controller
Fan guard
Operation section
(When the front panel is opened)
Display section
Operation Indicator
lamp
Remote control
receiving section
Emergency operation switch
Outdoor unit
Air inlet (back and side)
Piping
Drainage hose
Air outlet
Drain outlet
Earth the unit.
• Do not connect the earth to a gas pipe, water pipe, lighthing rod or the earth of a telephone. If the earthing
is incorrect, it may cause an electric shock.
Install an earth leakage breaker depending on the place where the air conditioner is to be installed
(humid places, etc.).
• If the earth leakage breaker is not installed, it may cause an electric shock.
Drain should be fully drained.
• If the drainage route is incomplete, water may drop from the unit. This may wet and damage the furniture.

4
Remote controller
NAME OF EACH PART
Signal transmitting section
ON/OFF (operate/
stop) button
Operation display section
Temperature buttons
Fan speed control button
Operation select button
ECONO COOL button
RESET button
Off-timer button
On-timer button
CLOCK set button
Vane control button
TIME set buttons
Forward button
Backward button
(This diagram shows an overall view.)
Open the front lid.
Auto restart function
PREPARATION BEFORE OPERATION
These models are equipped with an auto restart function. If you do not want to use this function,
please consult the service representative because the setting of the unit needs to be changed.
Auto restart function is ...
When the indoor unit is controlled with the remote controller, the operation mode, the set temperature and the fan speed are
stored in the memory. If a power failure occurs or the main power is turned off during operation, “Auto restart function” sets
automatically to start operating in the same mode as the one set with the remote controller just before the shutoff of the main
power. (Refer to page 6 for details.)
Insert the power supply plug into the power outlet and/or turn the breaker on.
WARNING:
Remove dirt from the power supply plug and insert the plug securely.
If dirt adheres to the plug or insertion is incomplete, it may cause a Þre or an electric shock.
Indoor and/or Outdoor unit
NOTE
Use the remote controller provided
with the unit only.
Do not use other remote controller.

Insert the minus pole
of the batteries Þrst.
Press using a
thin stick.
Press using a
thin stick.
Remote controller
holder
EMERGENCY COOL
EMERGENCY HEAT
STOP
5
PREPARATION BEFORE OPERATION
Remote controller
How to set the batteries and the current time
1Remove the front lid and insert batteries.
Then reattach the front lid.
Insert the minus pole of the batteries Þrst.
Check if the polarity of the batteries is correct.
2Press the RESET button.
• If the RESET button is not pressed, the remote
controller may not operate correctly.
• Be sure to press the RESET button not too strongly.
3Press the CLOCK set button.
5Press the CLOCK set button again and close
the front lid.
4Press the (Forward) and (Backward)
buttons (TIME SET buttons) to set the current
time.
• Each time the button is pressed, the set time
increases by 1 minute, and each time the but-
ton is pressed, the set time decreases by 1 minute.
• Pressing those buttons longer increases/decreases
the set time by 10 minutes.
Handling of the remote controller
• The range that the signal can reach is about 6 m when
the remote controller is pointed at the front of the
indoor unit.
• When a button is pressed, one or two beeps will
be heard from the indoor unit. If no sound is heard,
operate again.
• Use the remote controller carefully.
If it is dropped, thrown or it gets wet, the remote con-
troller may not operate.
When installing on a wall, etc.
• Install the remote controller holder in a position where
the signal reception sound (beep) can be heard from
the indoor unit when the
F
FO
/NO
button is pressed.
How to install/remove the remote controller
Installing :Insert the remote controller downward.
Removing :Pull it up.
Dry-cell batteries
nReference for replacing batteries
Replace the batteries with new AAA alkaline batteries in
the following cases:
· When the indoor unit does not respond to the remote
control signal.
· When the display on the remote controller becomes
dim.
· When a button of the remote controller is pressed, all
displays appear on the screen, and then disappear
immediately.
Do not use manganese batteries. The remote controller
could malfunction.
• The service life of an alkaline battery is about 1 year.
However, a battery whose time limit is approaching
may be exhausted soon. The recommended usable
time limit is indicated (month/year) on the bottom of
the battery.
• To prevent liquid leakage, take out all batteries when
the remote controller is not going to be used for a long
time.
CAUTION:
If liquid from the batteries gets onto your skin or
clothes, wash it well with clean water.
If liquid from the batteries gets into your eyes, wash
them well with clean water and consult a doctor at
once.
• Do not use rechargeable batteries.
• Replace the 2 batteries with new ones of the same
type.
• Dispose of exhausted batteries in the correct manner.
When the remote controller cannot be used (emergency operation)
1
Press the EMERGENCY OPERATION switch.
• Each time the EMERGENCY OPERATION switch
is pressed, the unit will operate in order of EMER-
GENCY COOL MODE, EMERGENCY HEAT MODE
and STOP MODE.
However, when the EMERGENCY OPERATION switch
is once pressed, the unit will operate in test run for
30 minutes and then the operation mode
shifts to
EMERGENCY MODE.
When the batteries of the remote controller run out or the remote controller malfunctions, the emergency operation
can be done using the EMERGENCY OPERATION switch.
• Details of EMERGENCY MODE are as shown
below. However, the temperature control does
not work for 30 minutes in test run and the unit is
set to continuous operation. The fan speed is
set to High in test run and shifts to Medium after
30 minutes.
• The operation mode is indicated by the Opera-
tion Indicator lamp on the indoor unit as following
Þgure.
Operation Indicator lamp
2To stop the emergency operation, press the
EMERGENCY OPERATION switch once (in
case of EMERGENCY HEAT MODE) or twice
(in case of EMERGENCY COOL MODE).
Operation mode COOL HEAT
Set temperature 24°C 24°C
Fan speed Medium Medium
Horizontal vane Auto Auto

6
AUTO CHANGEOVER... AUTO MODE OPERATION
An automatic cooling and heating changeover operation system ensures easy control and year-round
air conditioning.
Once the desired temperature is set, unit operation is switched automatically between cooling
and heating according to the room temperature. In addition, fan control of the outdoor unit enables
cooling operation at outside temperature as low as -10 °C.
When the set temperature is to be changed:
• Press the
O
O
TM
R
A
W
button to lower the temperature. One press lowers the temperature by about 1°C.
• Press the
O
OT LOOC
button to raise the temperature. One press raises the temperature by about 1°C.
To select the AUTO mode:
1Press the
F
FO
/NO
button.
2Select the (AUTO) mode by pressing the
E
D
OM
button.
Each time this button is pressed, the operation mode is changed in sequence:
(AUTO) (COOL) (DRY) (HEAT)
The set temperature is also displayed on the remote controller.
To stop operation:
Press the
F
FO
/NO
button.
After the operation mode is set once, the operation starts in the same mode as
the one set previously from the next time by simply pressing the
F
FO
/NO
button.
Description of “AUTO RESTART FUNCTION”
• These units are equipped with an auto restart function. When the main power is turned on, the air conditioner will start
operation automatically in the same mode as the one set with the remote controller before the shutoff of the main
power.
• If the unit was set to off with the remote controller before the shutoff of the main power, it will remain stopped even after
the main power is turned on.
• If the unit was in the emergency operation before the shutoff of the main power, it will start operation, when main power
comes on, in the same mode as the one set with the remote controller before the emergency operation.
• If the unit is operated in “ AUTO” mode before power failure, the operation mode (COOL, DRY or HEAT) is not stored
in the memory. When the main power is turned on, the unit decides the operation mode by the initial room temperature
at restart and starts operation again.
Information for multi system air conditioner
Multi system air conditioner can connect two or more indoor units with one outdoor unit. According to the
capacity, two or more units can operate simultaneously.
• When you try to operate two or more indoor units with one outdoor unit simultaneously, one for the cooling and the
other for heating, the operation mode of the indoor unit that operates earlier is selected. The other indoor units that will
start the operation later cannot operate, indicating an operation state. (Refer to the table of Operation Indicator lamp
below.)
In this case, please set all the indoor units to the same operation mode.
• When indoor unit starts the operation while the defrosting of outdoor unit is being done, it takes a few minutes (max.
10 minutes) to blow out the warm air.
• In the heating operation, the indoor unit that does not operate may get warm or the sound of refrigerant ßowing may be
heard. This is not a malfunction since the refrigerant continuously ßows into the indoor unit that does not operate.
Details of display on the indoor unit
The operation indicator at the right side of the indoor unit indicates the operation state.
Operation Indicator
Operation indicator lamp
Lighted
Blinking
Not lighted
Indication Operation state Difference between target
temperature and room temperature
This shows that the air conditioner is operating to reach the
target temperature. Please wait until the target temperature is
obtained.
About 2°C or more
This shows that the room temperature is approaching the target
temperature. About 2°C or less
This shows a state of standby for operation.
Please refer to Information for multi system air conditioner
above.
—
Description of “AUTO CHANGEOVER”
(1) Initial mode
1When unit starts the operation with AUTO operation from off;
• If the room temperature is higher than the set temperature, operation starts in COOL mode.
• If the room temperature is equal to or lower than the set temperature, operation starts in HEAT mode.
(2) Mode change
1COOL mode changes to HEAT mode when about 15 minutes have passed with the room temperature 2 degrees
below the set temperature.
2HEAT mode changes to COOL mode when about 15 minutes have passed with the room temperature 2 degrees
above the set temperature.
NOTE:
If two or more indoor units are operating in multi system, there might be a case that the indoor unit, which is
operating in (AUTO), cannot change over to the other operating mode (COOL HEAT) and becomes a state
of standby. Refer to the detailed information for multi system air conditioner explained on the right.

1
2
3
4
TAEH
L
O
O
C
YR
D
7
To select the COOL, DRY or HEAT mode:
1Press the
F
FO
/NO
button.
2Select the operation mode by pressing the
E
D
OM
button.
Each time this button is pressed, the operation mode is changed in sequence:
(AUTO) →(COOL) →(DRY) →(HEAT)
To stop operation:
Press the
F
FO
/NO
button.
After the operation mode is set once, the operation starts in the same mode as
the one set previously from the next time by simply pressing the
F
FO
/NO
button.
MANUAL OPERATION (COOL, DRY, HEAT) AIR FLOW VELOCITY AND DIRECTION ADJUSTMENT
When the set temperature is to be changed:
• Press the
O
O
TM
R
A
W
button to lower the temperature. One press lowers the temperature by about 1°C.
• Press the
O
OT LOOC
button to raise the temperature. One press raises the temperature by about 1°C.
In COOL operation
• When the outside temperature is low, the fan of the outdoor unit turns on and off frequently or decreases the rotation
speed to maintain sufÞcient cooling capacity.
In DRY operation
• The temperature control (temperature setting) cannot be done.
• The room temperature is slightly lowered in this operation mode.
The details of the display on the indoor unit are explained on page 6.
If the air conditioner doesn’t cool or heat effectively...
If the fan speed is set to Low or AUTO, sometimes the air conditioner may not cool or heat the air effectively. In this case,
change the fan speed to Med. or upper.
Change the fan speed.
Fan speed: Low or AUTO
Fan speed: Med. or upper
AIR FLOW velocity and direction can be selected as required.
To change the AIR FLOW velocity, press the
N
A
F
button.
Each time the button is pressed, the fan speed is changed in sequence:
(Low) (Med.) (High) (Super High) (AUTO)
• Use the (Super High) notch to cool/heat the room more efÞciently.
• If the operating sound of the air conditioner disturbs your sleep, use the
(Low) notch.
To change the AIR FLOW blowing direction vertically, press the
ENAV button.
Each time the button is pressed, the angle of the horizontal vane is changed
in sequence: (1) (2) (3) (4) (SWING) (AUTO)
SWING OPERATION
Use the swing operation for the air ßow to reach all corners of the room.
Recommended horizontal vane range
for more efÞcient air-conditioning
Use the (AUTO) position usually.
Use position (1) in the COOL or DRY mode and
use positions (2) to (4) in the HEAT mode when
adjusting to your requirements.

8
AIR FLOW VELOCITY AND DIRECTION ADJUSTMENT
COOL/DRY HEAT
AUTO
• The vane automatically moves to horizontal position.
It will not swing.
NOTE:
Air blows out upper than position (1).
• To constantly change the air ßow direction, select
(SWING) with the ENAV button.
• Immediately after the air conditioner starts operating,
the vane stays at horizontal position. Once the air
from the indoor unit becomes sufÞciently warm, the
vane moves to position (4).
• Once the air conditioner starts operating, the fan
speed increases gradually as the air from the indoor
unit gets warmer, and continues until the set speed is
Þnally reached.
MANUAL
• After around one hour of operation, the air conditioner
automatically moves the vane to position (1).
To change the air ßow direction to the original setting,
operate the VANE button on the remote controller
again.
• The vane does not move to the straight-down position
in the COOL and DRY mode.
• Immediately after the air conditioner starts operating,
the vane stays at horizontal position. Once the air
from the indoor unit becomes sufÞciently warm, the
vane moves to the position corresponding to the set
direction of air ßow.
• Once the air conditioner starts operating, the fan
speed increases gradually as the air from the indoor
unit gets warmer, and continues until the set speed is
Þnally reached.
SWING
• The vane moves intermittently between positions (1)
and (4). The vane stops for a brief period at positions
(1) and (4).
• The vane moves intermittently between positions (2)
and (4). The vane stops for a brief period at positions
(2) and (4).
When the air ßow direction is
set to position (2), (3) or (4)
Movement of the horizontal vane
)1(
)4(
)2(
)4(
Horizontal position
At the start
of heating
operation
Position (4)
Very small
air ßow
When air
becomes
warm...
Horizontal
position
Position (1)
After
around 0.5
to 1 hour
At the start
of heating
operation
Set Position
Very small
air ßow
When air
becomes
warm...
Horizontal
position
NOTE:
• Adjust the vertical AIR FLOW direction using the remote controller. Moving the horizontal vane manually can cause
trouble.
• When the operation mode changes in “ (AUTO)” mode, the horizontal vane is automatically changed to the
position in each mode.
To change the horizontal direction of the air ßow, move the vertical vane manually.
Adjust the vane before operation starts.
Since the horizontal vane moves automatically, your Þngers may be caught.
To change the air ßow direction not to blow directly onto your body.
To change the air
ßow direction When to use this function? COOL/DRY HEAT
Pressing and holding
the ENAV button for
2 seconds or more
causes the horizontal
vane to reverse and
move to horizontal
position.
Use this function if you don’t
want the air from the indoor
unit to blow directly onto your
body.
• Depending on the shape of
the room, the air may blow
directly onto your body.
• Press the ENAV button again
to return the vane to the
previously-set position.
The air conditioner starts the
cooling or drying operation
approx. 3 minutes after the
vane has moved to the hori-
zontal position.
• When the ENAV button is
pressed again, the vane
returns to the previously-
set position and the air con-
ditioner starts the cooling or
drying operation in approx.
3 minutes.
The air conditioner starts heat-
ing operation approx. 3 min-
utes after the vane has moved
to the horizontal position.
• Sometimes the area around
your feet may not warm. To
warn the area around the
feet, set the horizontal vane
to (AUTO) or the down-
ward blowing position.
• When the ENAV button is
pressed again, the vane
returns to the previously-set
position and the air condi-
tioner starts heating opera-
tion in approx. 3 minutes.
Horizontal
position
NOTE:
• If you make the air ßow not to blow directly onto your body by pressing ENAV button, the compressor stops for 3
minutes even during the operation of the air conditioner.
• The air conditioner operates with decreased air ßow until the compressor turns on again.

9
ECONO COOL OPERATION WHEN THE AIR CONDITIONER IS NOT GOING TO BE
USED FOR A LONG TIME
Use this operation when you want to be comfortable in COOL mode even with energy saved.
Perform the following operations while the unit is operat-
ing in the MANUAL COOL mode.
Press the
ECONO COOL
button.
When the
(ECONO COOL) operation is selected in COOL mode, the air
conditioner performs swing operation vertically in various cycle according to the
temperature of air conditioner.
Also SET TEMPERATURE is automatically set 2°C higher than in COOL mode.
To release the ECONO COOL operation:
Press the
ECONO COOL
button again.
• When the ENAV button is pressed or the operation mode is changed during the
ECONO COOL operation, ECONO COOL operation is released.
• The
N
A
F
button, the
O
O
TM
R
A
W
or
O
OT LOOC
button and ON/OFF timer (explained below)
are available.
What is “ECONO COOL”?
Swing air ßow (change of air ßow) makes you feel cooler than constant air ßow. So, even though the set temperature is
automatically set 2°C higher, it is possible to perform cooling operation with keeping comfort. As a result, energy can be
saved.
TIMER OPERATION (ON/OFF TIMER)
It is convenient to set the timer when you go to bed, when you get home, when you get up, etc.
How to set the ON timer
1Press the
START
button during operation.
Each time the button is pressed, the ON timer mode
alternates between ON and OFF.
2Set the time of the timer using the TIME but-
tons (Forward) and (Backward).
Each time the button is pressed, the set time
increases by 10 minutes; each time the button is
pressed, the set time decreases by 10 minutes.
To release the ON timer:
Press the
START
button.
How to set the OFF timer
1Press the
STOP
button during operation.
Each time the button is pressed, the OFF timer mode
alternates between ON and OFF.
2Set the time of the timer using the TIME but-
tons (Forward) and (Backward).
Each time the button is pressed, the set time
increases by 10 minutes; each time the button is
pressed, the set time decreases by 10 minutes.
To release the OFF timer:
Press the
STOP
button.
Programming timer operation
The ON timer and the OFF timer can be used in combination. The timer of the set time that is reached Þrst will operate Þrst.
(“
” mark indicates the order of timer operations.)
• If the current time has not been set, the timer operation cannot be used.
NOTE:
If the main power is turned off or a power failure occurs while AUTO START/STOP timer is active, the timer setting is
cancelled. As these models are equipped with an auto restart function, the air conditioner starts operating with timer
cancelled at the same time that power is restored.
When it is not going to be used for a long
time:
1Perform the FAN operation for 3 or 4 hours to
dry the inside of the air conditioner.
• To perform FAN operation, set the remote controller
to the highest temperature in the MANUAL COOL
mode. (Refer to page 7.)
2Turn off the breaker and/or disconnect the
power supply plug.
CAUTION:
Turn off the breaker or disconnect the power supply
plug when the air conditioner is not going to be used
for a long time.
Dirt may collect and this may cause a Þre.
3Remove the batteries from the remote con-
troller.
CAUTION:
To prevent liquid leakage, take out all batteries when the
remote controller is not going to be used for a long time.
When the air conditioner is to be used
again:
1Clean the air Þlter and install it in the indoor
unit.
(Refer to page 10 for cleaning instructions.)
2Check that the air inlet and outlet of the
indoor/outdoor units are not blocked with
any obstacles.
3Check that the earth is connected correctly.
CAUTION:
Earth the unit.
Do not connect the earth to a gas pipe, water pipe, light-
ning rod or the earth of a telephone. If the earthing is
incorrect, it may cause an electric shock.
MAINTENANCE
Before starting maintenance
Turn off the breaker and/or disconnect the
power supply plug.
CAUTION:
When the unit is to be cleaned, switch it off and discon-
nect the power supply plug or turn off the breaker. Since
the fan rotates at high speed during operation, it may
cause an injury.
Cleaning the indoor unit
Clean the unit using a soft dry cloth.
• If the dirt is noticeable, wipe the unit with a cloth
soaked in a solution of mild detergent diluted in luke-
warm water.
• Do not use gasoline, benzine, thinner, polishing
powder, or insecticide. The unit may be damaged.
• The front panel may come off if it is lifted up past its
level position. If the front panel comes off, refer to
step 3in CLEANING THE FRONT PANEL.

10
CLEANING THE FRONT PANEL, HEAT EXCHANGER AND FAN
Front panel
1Hold both ends of the front panel and lift the
panel up until a “click” is heard. (1) Holding
the hinges, lift the panel up until it is level,
and pull the hinges forward to remove the
front panel. (2)
Heat exchanger
Remove the air Þlter before cleaning the heat
exchanger.
CAUTION:
• Do not drop the front panel or pull it out forcibly.
The panel may be damaged.
• Do not step onto an unstable bench when removing or
installing the front panel.
This may cause an injury, etc. if you fall down.
2Wipe the front panel with a soft dry cloth or
wash it with water.
After washing the panel, wipe up the remain-
ing water with a soft dry cloth and let it dry
out of direct sunlight.
• If the dirt is noticeable, wipe the front panel with a
cloth soaked in a solution of mild detergent diluted in
lukewarm water.
• Do not use gasoline, benzine, thinner, polishing
powder, or insecticide and do not wash the front
panel with a scrubbing brush or the hard surface of
a sponge.
• Do not soak the front panel in water/lukewarm water
longer than two hours and do not expose the panel
to direct sunlight, heat, or ßames when drying it. The
panel may be deformed or discolored.
3Hold both ends of the front panel, keep the
panel level, and insert the hinges into the
holes on the upper part of the indoor unit
until they click into place. Then, close the
front panel securely and press the three
positions on the front panel as indicated by
the arrows.
You can sweep the surface of heat exchanger if you install
the brush of QUICK CLEAN KIT to your vacuum cleaner.
Please refer to the instructions described in QUICK CLEAN
KIT for details.
WARNING:
• Do not touch the heat exchanger directly with your
hands. Otherwise you may get injured. (It’s recom-
mended to protect your hands with a pair of gloves.)
CAUTION:
• Do not step onto an unstable bench when cleaning.
Otherwise you may fall down and get injured.
• Use only the brush of QUICK CLEAN KIT. Do not use
other stuffs. Otherwise the heat exchanger of the
indoor unit may get damaged.
Name of parts Quick Clean Kit
Parts number MAC-093SS-E
Optional product is available from your local dealer.
Optional product
Fan
Refer to page 12 for cleaning the fan.
NOTE:
The QUICK CLEAN KIT can only be Þtted to a vacuum
cleaner with a hose/tube diameter (inside diameter) of
32 to 39 mm. Refer to the instructions of the QUICK
CLEAN KIT.
CLEANING THE AIR FILTER (CATECHIN)
Cleaning the air Þlter (about once every 2 weeks)
1Remove the air Þlter.
CAUTION:
When the air Þlter is to be removed, do not touch the
metal parts of the indoor unit.
This may cause an injury.
2Remove dirt from the air Þlter using a vacuum
cleaner or by washing the Þlter with water.
• Do not wash with scrubbing brush or hard surface of
sponge. Otherwise, the Þlter may deform.
• If the dirt is noticeable, wash the Þlter with a solution
of mild detergent diluted in lukewarm water.
• If hot water (50 °C or more) is used, the Þlter may be
deformed.
3After washing with water/lukewarm water, dry
the air Þlter well in the shade.
• Do not expose the air Þlter to direct sunlight or heat
from a Þre when drying it.
4Install the air Þlter.
(Securely install its tabs.)
What is “Catechin air Þlter”?
The air Þlter is dyed with a natural material, catechin, that is contained in tea. The catechin air Þlter deodorizes
odor and noxious gases such as formaldehyde, ammonia, and acetaldehyde. Moreover, it restrains the activity
of the viruses adhering to the Þlter.
1
2
Open the front panel, then
remove/replace the Þlter.
Air Þlter
Remove.
Install.
Heat exchanger
Hinge
Hole

11
CLEANING THE AIR CLEANING FILTER (OPTION)
Cleaning the air cleaning Þlter (about once every 3 months)
1Remove the air Þlter (left one).
The air cleaning Þlter is not attached to the right side air
Þlter.
2Pull up the tabs on both sides of the air clean-
ing Þlter with your Þnger and remove the air
cleaning Þlter (blue bellows type) from the air
Þlter.
3Soak the Þlter together with its frame in luke-
warm water and wash it.
■If the dirt is noticeable, use a solution of mild deter-
gent diluted in lukewarm water.
■If hot water (50°C or more) is used, the Þlter may be
deformed.
■Do not use a scrubbing brush or sponge. This may
damage the surface of the Þlter.
■Do not use a chlorine detergent.
4After rinsing with water/lukewarm water,
shake off the excess water and dry the Þlter
well in the shade.
■Do not expose the Þlter to direct sunlight or heat from
a Þre when drying it.
Air Þlter
REPLACEMENT OF THE AIR CLEANING FILTER (OPTION)
Air cleaning Þlter replacement (about once every year)
When the capacity is lowered because of dirt, etc., it is necessary to replace the air cleaning Þlter.
1Remove the air Þlter (left one).
The air cleaning Þlter is not attached to the right side air
Þlter.
2Pull up the tabs on both sides of the air clean-
ing Þlter with your Þnger and remove the air
cleaning Þlter (blue bellows type) from the air
Þlter.
3Attach a new air cleaning Þlter to the air Þlter
so that all 8 tabs on the air Þlter are securely
installed.
4Install the air Þlter. (Securely install its tabs.)
Air Þlter
(Back side)
Air Þlter
Air Þlter
(Back side) 5Securely close the front panel.
Name of parts AIR CLEANING FILTER
(Anti-Allergy Enzyme Filter)
Parts number MAC-415FT-E
This optional part is for the replacement of the left side Þlter only. No optional part is available for the right side Þlter.
Optional parts Optional parts are available from your local dealer.
Air cleaning Þlter
• If the air cleaning Þlter is clogged, it may lower the unit’s capacity or cause condensation at the air outlet.
• The air cleaning Þlter is disposable. The standard usable term is about 1 year.

12
12Stopper
Insert this end Þrst.
Left
Lock.
Groove
Swing to the rightSwing to the left
Cannot be removed
Pull towards you.
Tab
Stopper
Unlock.
Right Unlock. Lock.
Upward.
12
CLEANING THE AIR OUTLET AND FAN OF THE INDOOR UNIT
Before cleaning
1Manually move the horizontal vane to the end towards you, and make sure the fan has stopped.
Switch the indoor unit off with the remote
controller and disconnect the power supply
plug and/or turn off the breaker, otherwise
you may get injured since the fan of the
indoor unit rotates at high speed during
operation.
Cleaning
2Remove the horizontal vane. Be sure to hold horizontal vane when unlocking the stoppers.
Follow the procedure, 1and 2, to remove the horizontal vane.
3Swing the vertical vanes out one by one.
1Holding the unit lightly with one hand, grab the tab
of each vertical vane with the other hand and pull it
downward to swing out each vertical vane.
2Hold the tab of each vertical vane and move the
vertical vanes in the directions of the arrows.
The vanes cannot be removed.
• Be sure to hold the tab to swing out the vertical vanes, otherwise the vanes can be damaged.
• Do not use excessive force to the fan guard during this procedure. The fan guard may be deformed and the vanes
may not work properly.
4Clean the air outlet and fan of the indoor unit. (Make sure the fan has stopped.)
• Be careful not to injure your hands.
• If the air outlet or fan is dirty, moldy, or dusty, clean with a wet or dry soft cloth or with the brush of QUICK CLEAN
KIT which is installed to a vacuum cleaner. If the dirt is noticeable around the air outlet, clean with a cloth soaked in a
solution of mild detergent diluted in lukewarm water.
• Please refer to the instructions described in QUICK CLEAN KIT for the details of the way to clean with the brush of
QUICK CLEAN KIT.
• Do not use gasoline, benzine and polishing powder.
• Do not use excessive force to the fan. Otherwise, it may be cracked.
5Put the vertical vanes back to their original positions one by one.
• Be sure to hold the tabs to install the vertical vanes, otherwise the vanes can be damaged.
• Do not use excessive force to the fan guard during this procedure. The fan guard may be deformed and the vanes may
not work properly.
• Put the vertical vanes back correctly to their original positions. Otherwise, condensed water may drip down from the
indoor unit or the horizontal vane could malfunction.
1Hold the tab of each vertical vane and insert the
vertical vanes into their respective grooves.
2Push each vertical vane until it clicks into place.
6Install the horizontal vanes. (Reverse the removal procedures.)
In procedure 2lock the stoppers until they click into place.
After Cleaning
Insert the power supply plug into the power outlet and/or turn on the breaker.
Check that all LED lamps are not blinking.
If they are blinking, the horizontal vane is not installed correctly.
In this case, disconnect the power supply plug and/or turn off the breaker, and then reinstall the horizontal vane by
following the procedures in step 6.
• If you operate the air conditioner after cleaning the air outlet and fan, do not get close to the air outlet as any remaining
dirt may be discharged.

13
WHEN YOU THINK THAT TROUBLE HAS OCCURED
BEFORE CONTACTING THE SERVICE REPRE-
SENTATIVE, CHECK THE FOLLOWING AGAIN
Question Check points
The air conditioner
cannot be operated.
• Is the breaker turned on?
• Is the fuse blown?
• Is the ON timer set? (Page 9)
All LED lamps on the
indoor unit are blinking.
• Is the horizontal vane attached to the indoor unit
correctly? (Page 12)
The horizontal vane
does not move.
• Are the horizontal vane and the vertical vane
attached to the indoor unit correctly? (Page 12)
• Is the fan guard deformed?
The room cannot be
cooled or heated
sufÞciently.
• Is the temperature setting correct? (Page 7)
• Is the Þlter clean? (Page 10)
• Is the fan of the indoor unit clean? (Page 12)
• Are there any obstacles blocking the air inlet or
outlet of the indoor or outdoor unit?
• Is a window or door open?
The air from the indoor
unit smells strange.
• Is the Þlter clean? (Page 10)
• Is the fan of the indoor unit clean? (Page 10)
The display on the
remote controller does
not appear or it is dim.
The indoor unit does
not respond to the
remote control signal.
• Are the batteries exhausted? (Page 5)
• Is the polarity (+, -) of the batteries correct?
(Page 5)
• Are any buttons on the remote controller of other
electric appliances being pressed?
When a power failure
occurs.
• Does the air conditioner start operating again?
If the air conditioner had operated before the
power failure, as these models are equipped
with an auto restart function, the air conditioner
should start operating again. (Refer to Descrip-
tion of “AUTO RESTART FUNCTION” on page
6.)
Even if the above items are checked, when the air conditioner does not
recover from the trouble, stop using the air conditioner and consult your
dealer.
In the following cases, stop using the air conditioner and consult your dealer.
• When water leaks or drops from the indoor unit.
• When the left operation indicator lamp blinks.
• When the breaker trips frequently.
• The remote control signal may not be received in a room where an electronic
ON/OFF type ßuorescent lamp (inverter-type ßuorescent lamp, etc.) is used.
• Operation of the air conditioner may interfere with radio or TV reception in
areas where the reception is weak. An ampliÞer may be required for the
affected device.
• When thunder is heard, stop operation and disconnect the power supply plug
or turn off the breaker. Otherwise, the electrical parts may be damaged.
Question Answer (not a malfunction)
The air conditioner
cannot be operated
for about 3 minutes
when restarted.
• This protects the air conditioner according to in-
structions from the microprocessor. Please wait.
Cracking sound is
heard.
• This sound is generated by the expansion/con-
traction of the front panel, etc. due to change in
temperature.
The air from the indoor
unit smells strange.
• The air conditioner may suck in an odor adhering
to the wall, carpet, furniture, cloth, etc. and blow
it out with the air.
The fan of the outdoor
unit does not rotate
even though the
compressor is running.
Even if the fan starts to
rotate, it stops soon.
• When the outside temperature is low, the fan
may not operate to maintain sufÞcient cooling
capacity.
The sound of water
ßowing is heard.
• This is the sound of refrigerant ßowing inside the
air conditioner.
• This is the sound of condensed water ßowing in
the heat exchanger.
• This is the sound of the heat exchanger defrost-
ing.
The sound as burbling
is heard.
• This sound is heard when the outside air is
absorbed from the drain hose in turning on the
range hood or the ventilation fan and that makes
water ßowing in the drain hose spout out.
This sound is also heard when the outside air
blows into the drain hose in case the outside
wind is strong.
The room cannot be
cooled sufÞciently.
• When a ventilation fan or a gas cooker is used in
a room, the cooling load increases, resulting in
an insufÞcient cooling effect.
• When the outside air temperature is high, the
cooling effect may not be sufÞcient.
Mist is discharged from
the air outlet of the
indoor unit.
• The cool air from the air conditioner rapidly cools
moisture in the air inside the room, and it turns
into mist.
Mechanical sound is
heard from the indoor
unit.
• This is the switching sound in turning on/off the
fan or the compressor.
The swing operation
of the HORIZONTAL
VANE is suspended for
about 15 seconds, then
restarted.
• This is for the swing operation of the HORIZON-
TAL VANE to be performed normally.
Question Answer (not a malfunction)
The air ßow direction
changes during
operation.
The direction of the
horizontal vane cannot
be adjusted with the
remote controller.
• When the air conditioner is operated in COOL
or DRY mode, if the operation continues with
air blowing down for 1 hour, the direction of the
air ßow is automatically set to position (1) to
prevent condensed water from dropping.
• In the heating operation, if the air ßow tempera-
ture is too low or when defrosting is being done,
the horizontal vane position is automatically set
to horizontal.
Water leaks from the
outdoor unit.
• During COOL and DRY operations, pipe or pipe
connecting sections are cooled and this causes
water to condense.
• In the heating operation, the defrosting operation
makes water frozen on the outdoor unit melt and
drip down.
• In the heating operation, water drips from the heat
exchanger. This is not a malfunction. However, if
you have any trouble with water dripping, consult
your dealer for drainage work. Please note that
we cannot provide drainage work in such climate
that the outdoor unit may get frosted.
White smoke is
discharged from
the outdoor unit.
• In the heating operation, vapor generated by the
defrosting operation looks like white smoke.
Air does not blow out
soon in the heating
operation.
• Please wait as the air conditioner is preparing to
blow out warm air.
The operation is
stopped for about
10 minutes in the
heating operation.
• Defrosting of the outdoor unit is being done
(Defrosting operation).
Since this is completed in 10 minutes, please
wait. (When the external temperature is too low
and humidity is too high, frost is formed.)
Hissing sound is
sometimes heard.
• This is the sound when the ßow of refrigerant
inside the air conditioner is switched.
The room cannot be
heated sufÞciently.
• When the outside air temperature is low, the
heating effect may not be sufÞcient.
In a multi-unit system,
the indoor unit which is
not operating becomes
warm and a sound,
similar to water ßowing,
is heard from the unit.
• A small amount of refrigerant continues to ßow
into the indoor unit even though it is not operat-
ing.
The air conditioner
starts the operation
only with the main
power turned on,
though you do not
operate the unit with
the remote controller.
• These models are equipped with an auto restart
function. When the main power is turned off
without stopping the air conditioner with the
remote controller and is turned on again, the
air conditioner will start operation automati-
cally in the same mode as the one set with the
remote controller just before the shutoff of the
main power.

14
INSTALLATION, RELOCATION AND INSPECTION
Installation place
Avoid installing the air conditioner in the following places.
• Where ßammable gas could leak.
CAUTION:
Do not install the unit where ßammable gas could leak.
If gas leaks and collects around the unit, it may cause
an explosion.
• Where there is much machine oil.
• Salty places such as the seaside.
• Where sulÞde gas is generated such as a hot spring.
• Where oil is splashed or where the area is Þlled with
oily smoke.
• Where there is high-frequency or wireless equipment.
WARNING:
If the air conditioner operates but does not cool or heat (depending on model) the room, consult your dealer since
there may be a refrigerant leak. Be sure to ask the service representative whether there is refrigerant leakage or not
when repairs are carried out.
The refrigerant charged in the air conditioner is safe. Refrigerant normally does not leak, however, if refrigerant gas
leaks indoors, and comes into contact with the Þre of a fan heater, space heater, stove, etc., harmful substances will
be generated.
Electrical work
• Provide an exclusive circuit for the power supply of the air conditioner.
• Be sure to observe the breaker capacity.
WARNING:
• The customer should not install this unit.
If installation is done incorrectly, it may cause a Þre, an electric shock, or injury from the unit falling, water leaking,
etc.
• Do not use intermediate connection of the power supply cord or the extension cord and do not connect many
devices to one AC outlet.
A Þre or an electric shock may result from poor contact, poor insulation, exceeding the permissible current, etc.
Consult your dealer.
CAUTION:
• Earth the unit.
Do not connect the earth to a gas pipe, water pipe, lightning rod or the earth of a telephone. If the earthing is
incorrect, it may cause an electric shock.
• Install an earth leakage breaker depending on the place where the air conditioner is to be installed (humid places,
etc.).
If the earth leakage breaker is not installed, it may cause an electric shock.
Inspection and maintenance
• When the air conditioner is used for several seasons, the capacity may be lowered due to dirt inside the unit.
• Depending on the condition, an odor may be generated or dehumidiÞed water may not drain out smoothly due to dirt,
dust, etc.
• It is recommended that the unit be inspected and maintained (charged) by specialist in addition to normal maintenance.
Consult your dealer.
Operating sound considerations
• Do not put an object around the air outlet of the outdoor unit. This may lower the capacity or increase the volume of the
operating sound.
• If an abnormal sound is heard during operation, consult your dealer.
Relocation
• When the air conditioner is to be removed or re-installed because of rebuilding, moving, etc., special techniques and work
are required.
WARNING:
Repairs or relocation should not be done by the customer.
If this is done incorrectly, it may cause a Þre, an electric shock, or an injury from the unit falling, water leaking, etc.
Consult your dealer.
Disposal
To dispose of this product, consult your dealer.
If you have any questions, consult your dealer.
SPECIFICATIONS
Model
Set name MSZ-GB50VA
Indoor MSZ-GB50VA
Outdoor MUZ-GB50VA
Function Cooling Heating
Power supply ~/N, 230V, 50Hz
Capacity kW 5.0 5.8
Input kW 1.65 1.70
Weight Indoor kg 9
Outdoor kg 53
Refrigerant Þlling
capacity (R410A) kg 1.50
IP code Indoor IP 20
Outdoor IP 24
Permissible
excessive
operating
pressure
LP ps MPa 1.64
HP ps MPa 4.15
Noise level
Indoor (Super High/
High/Med./Low)
dB(A) 48/44/38/32 48/42/36/30
Outdoor dB(A) 52 55
NOTE:
1. Rating condition
Cooling — Indoor: 27°C DB, 19°C WB
Outdoor: 35°C DB
Heating — Indoor: 20°C DB
Outdoor: 7°C DB, 6°C WB
2. Guaranteed operating range
Indoor Outdoor
Cooling
Upper limit 32°C DB
23°C WB
43°C DB
—
Lower limit 21°C DB
15°C WB
-10°C DB
—
Heating
Upper limit 27°C DB
—
24°C DB
18°C WB
Lower limit 20°C DB
—
-10°C DB
-11°C WB
To prevent the effects
of a ßuorescent lamp,
keep as far apart as
possible.
Inverter-type
ßuorescent lamp
The installation location of the outdoor unit should be at
least 3 m away from the antennas for TV sets, radios, etc.
In areas where the reception is weak, provide greater space
between the outdoor unit and the antenna of the affected
device if operation of the air conditioner interferes with radio
or TV reception.
Keep a space
to prevent the
picture
distortion or
the noise. 100 mm or
more
Well-ventilated
dry place
200 mm or
more
TV
1 m or
more
1 m or
more
Cordless
phone or
Portable
phone
Radio
3 m
or more
Wall, etc.

15
Wenn der LuftÞlter enfernt werden muß, niemals die Metallteile der Inneneinheit berühren.
• Anderenfalls kann es zu Verletzungen kommen.
Berühren Sie weder den Lufteinlaß noch die Aluminiumkühlrippen der Außenanlage.
• Anderenfalls kann es zu Verletzungen kommen.
Stellen Sie keine Vase oder Glas auf die Innenanlage.
•
Wasser, das in die Innenanlage gelangt, kann elektrische Kurzschlüsse verursachen und zu Stromschlägen führen.
Niemals Insektenvertilgungsmittel oder brennbare Sprays auf die Klimaanlage sprühen.
• Anderenfalls kann es zu Feuer oder Verfärbung des Gehäuses kommen.
Niemals ein Haustier oder Zierpßanzen dem direkten Luftstrom aussetzen.
• Anderenfalls kann es zu gesundheitlichen Schäden des Haustieres oder zur Vernichtung der Zierpßanzen
kommen.
Stellen Sie keine anderen Elektrogeräte oder Möbel unter die Innen- oder Außenanlage.
• Von der Anlage tropft möglicherweise Wasser herab, wodurch Schäden oder Fehlfunktionen an den
Gegenständen hervorgerufen werden können.
Die Außeneinheit niemals auf einem defekten Ständer installieren.
• Die Einheit könnte herunterfallen und Verletzungen verursachen.
Bei Wartungsarbeiten an der Anlage usw. niemals auf eine unstabile Unterlage (Bank, Stuhl, Tisch usw.)
steigen.
• Bei Nichtbeachtung könnten Sie Verletzungen erleiden, wenn Sie herunterfallen.
Nicht am Netzkabel ziehen.
•
Bei Nichtbeachtung kann die Leitungsader des Netzkabels getrennt werden, wodurch ein Brand ausbrechen kann.
Die Batterien nicht laden oder auseinandernehmen und sie nicht ins Feuer werfen.
• Dadurch kann Flüssigkeit austreten, ein Brand entstehen oder eine Explosion verursacht werden.
Die Klimaanlage niemals für längere Zeit bei hoher Luftfeuchtigkeit, z.B. bei geöffneter Tür oder
geöffnetem Fenster, betreiben.
• Falls die Klimaanlage für längere Zeit im Kühlbetrief in einem Raum mit hoher Luftfeuchtigkeit (80% oder
mehr) betrieben wird, kann in der Klimaanlage kondensiertes Wasser abtropfen und Möbel usw. naß machen
oder beschädigen.
Keinen provisorischen Anschluß des Netzkabels vornehmen, keine Kabelverlängerung verwenden und
unbedingt vermeiden, mehrere Geräte an einen Wechselstromanschluß anzuschließen.
• Schlechte Kontakte, schlechte Isolierung Überschreiten der zulässigen Stromstärke usw. können zu Bränden
oder Stromschlägen führen.
Schmutz vom Netzkabelstecker entfernen und diesen richtig einstecken.
• Falls Schmutz an dem Stecker haftet oder dieser nicht richtig eingesteckt wird, besteht Brand- oder Strom-
schlaggefahr.
Das Netzkabel weder verkratzen noch bearbeiten, reparieren usw.
•
Das Netzkabel nicht mit schweren Gegenständen belasten und weder verkratzen noch bearbeiten oder repa-
rieren. Das Kabel kann dadurch beschädigt werden, so daß ein Brand oder ein Stromschlag ausgelöst wird.
Während des Betriebs nicht den Trennschalter ein-/ausschalten oder den Netzstecker herausziehen/
hineinstecken.
• Anderenfalls kann es aufgrund von Funken usw. zu einem Feuer kommen.
• Dafür sorgen, daß der Trennschalter nach Ausschalten der Inneneinheit mit der Fernbedienung vollständig
ausgeschaltet und der Netzstecker aus der Steckdose herausgezogen wurde.
Niemals für längere Zeit direkt im Luftstrom der Kühlluft verweilen.
• Anderenfalls kann Ihre Gesundheit darunter leiden.
Der Kunde sollte diese Klimanlage weder selbst installieren, reparieren noch transportieren.
• Falls Reparaturen oder Neuaufstellungen falsch ausgeführt werden, kann es zu Feuer, elektrischen Schlägen,
Verletzungen durch Herabfallen der Einheit, Austritt von Wasser usw. kommen. Wenden Sie sich dafür an
Ihren Fachhändler.
• Falls das Netzkabel beschädigt ist, muß es vom Hersteller oder Kundendienst ersetzt werden, um Gefahren
zu verhindern.
Niemals Ihre Finger oder Gegenstände usw. in den Lufteinlaß/Luftauslaß stecken.
• Da der Ventilator mit hoher Drehzahl dreht, kann es anderenfalls zu Verletzungen kommen.
•
Kleine Kinder müssen beaufsichtigt werden, um sicherzustellen, daß sie nicht an der Klimaanlage herumspielen.
Falls es zu Geruchsbelästigung, Feuer usw. kommt, die Klimaanlage abschalten und den Netzstecker
ziehen oder den Trennschalter abschalten.
• Falls die Klimaanlage unter ungewöhnlichen Bedingungen betrieben wird, kann es zu Feuer, Störungen
usw. kommen. In einem solchen Fall wenden Sie sich bitte an Ihren Fachhändler.
VORSICHTSMASSNAHMEN...................................................................................................................................................15
BEZEICHNUNG DER TEILE....................................................................................................................................................16
VORBEREITUNGEN VOR DEM BETRIEB..............................................................................................................................17
AUTO-UMSCHALTBETRIEB ... AUTO-BETRIEBSMODUS ....................................................................................................19
MANUELLER BETRIEB (KÜHLUNG, LUFTTROCKNUNG, HEIZUNG)..................................................................................20
EINSTELLEN DER VENTILATORDREHZAHL UND DER LUFTABBLASRICHTUNG ........................................................... 20
BETRIEBSART KÜHLEN IM SPARBETRIEB (ECONO COOL) ..............................................................................................22
BETRIEB MITTELS ZEITSCHALTUHR (EIN/AUS-TIMER) ..................................................................................................... 22
LÄNGERE STILLSETZUNG ....................................................................................................................................................22
WARTUNG ...............................................................................................................................................................................22
REINIGEN DER FRONTPLATTE, DES WÄRMETAUSCHERS UND DES VENTILATOR ...................................................... 23
REINIGEN DES LUFTFILTERS (CATECHIN) ......................................................................................................................... 23
REINIGUNG DES LUFTREINIGUNGSFILTERS (OPTIONAL)................................................................................................24
AUSWECHSELN DES LUFTREINIGUNGSFILTERS (OPTIONAL) ........................................................................................24
REINIGEN VON LUFTAUSTRITT UND VENTILATOR DER INNENEINHEIT .........................................................................25
FOLGENDE PUNKTE NOCHMALS ÜBERPRÜFEN BEVOR SIE SICH AN DEN KUNDENDIENST WENDEN .................... 26
WENN SIE EINE STÖRUNG VERMUTEN ..............................................................................................................................26
INSTALLATION, NEUAUFSTELLUNG UND PRÜFUNG.........................................................................................................27
TECHNISCHE DATEN .............................................................................................................................................................27
WEEE.....................................................................................................................................................................................157
INHALT
VORSICHTSMASSNAHMEN
• Da in diesem Produkt drehende Teile und Teile und Komponenten verwendet werden, die elektrische Schläge
verursachen können, unbedingt die “Vorsichtsmaßnahmen” vor der Verwendung durchlesen.
• Da die hier aufgeführten Punkte wichtig für die Sicherheit sind, diese Punkte unbedingt einhalten.
WARNUNG: Falsche Handhabung kann zu ernsthafter Gefahr mit Todesfolge, Verletzungen usw. führen.
VORSICHT: Falsche Handhabung kann in Abhängigkeit von den Bedingungen zu ernsthafter Gefahr führen.
Markierungen und ihre Bedeutungen
Die Bedeutung der in dieser Anleitung verwendeten Symbole
: Nicht ausführen.
: Die Instruktion unbedingt befolgen.
: Nicht die Finger oder Stäbe usw. hineinstecken.
: Nicht auf die Innen-/Außeneinheit steigen und auch nichts darauf ablegen.
: Stromschlaggefahr. Seien Sie vorsichtig.
: Unbedingt den Netzstecker von der Netzsteckdose abziehen.
: Unbedingt die Stromversorgung ausschalten.
• Nachdem Sie diese Anleitung durchgelesen haben, diese Anleitung gemeinsam mit der Installationsanleitung
für spätere Nachschlagzwecke sorgfältig aufbewahren.
GEHÄUSE
Anordnung des Warnschildes
LUFTAUSLASS
FRONTBLENDE
GEHÄUSE
•Diese Klimaanlage darf NICHT von Kindern oder unsicheren Personen ohne Aufsicht benutzt werden.
WARNUNG
VORSICHT

16
Unbedingt die Klimaanlage erden.
• Niemals den Erdungsdraht an ein Gasrohr, Wasserrohr, an einen Blitzableiter oder an den Erdungsdraht
eines Telefons anschließen. Falls die Erdung falsch ausgeführt ist, kann es zu elektrischen Schlägen
kommen.
Einen Erdschlußschalter abhängig von dem Installationsort (feuchter Ort uws.) der Klimaanlage
installieren.
• Falls kein Erschlußschalter installiert wird, kann es zu elektrischen Schlägen kommen.
Abwasser muß vollständig abgelassen werden.
• Falls der Ablaßschlauch nicht richtig verlegt wird, kann kondensiertes Wasser von der Einheit abtropfen, so
daß Möbel naß oder beschädigt werden.
Die Klimaanlage nicht für Sonderzwecke verwenden.
• Diese Klimaanlage nicht für die Erhaltung von Präzisionsgeräten, Eßwaren, Tieren, Pßanzen und Kunstge-
genständen verwenden. Anderenfalls kann es zu einer Beeinträchtigung der Qualität usw. kommen.
Niemals einen Ofen usw. dem direkten Luftstrom der Klimaanlage aussetzen.
• Anderenfalls kann es zu unvollständiger Verbrennung kommen.
Die Anlage nicht bei niedriger Außentemperatur (weniger als -10°C) im Kühlbetrieb laufen lassen.
•
Wenn dieAnlage im Kühlbetrieb bei niedrigerAußentemperatur (weniger als -10°C) läuft, kann Kondenswasser
aus der Klimaanlage herabtropfen und Wasserschäden an der Wohnungseinrichtung etc. verursachen.
Wenn die Klimaanlage gereinigt werden soll, muß sie ausgeschaltet werden. Dazu den Netzstecker
herausziehen oder den Trennschalter ausschalten.
• Da der Ventilator während des Betriebs mit hoher Drehzahl dreht, kann es anderenfalls zu Verletzungen
kommen.
Wenn die Klimaanlage für längere Zeit nicht verwendet werden soll, den Netzstecker ziehen und den
Trennschalter ausschalten.
• Anderenfalls kann sich Schmutz ansammeln und ein Feuer verursachen.
Ersetzen Sie die 2 Batterien der Fernbedienung durch Batterien desselben Typs.
•
Wird eine gebrauchte Batterie zusammen mit einer neuen verwendet, kann sich Hitze entwickeln, Flüssigkeit
austreten oder eine Explosion verursacht werden.
Wenn Flüssigkeit von den Batterien auf Ihre Haut oder Ihre Kleidung gelangt, diese gründlich mit
sauberem Wasser auswaschen.
• Wenn Flüssigkeit von den Batterien in IhreAugen gelangt, diese gründlich mit sauberem Wasser auswaschen
und einen Arzt zu Rate ziehen.
Auf gute Belüftung achten, wenn die Klimaanlage gemeinsam mit einem Ofen usw. verwendet wird.
• Anderenfalls kann es zu Sauerstoffmangel kommen.
Niemals Schalter mit naßen Händen bedienen.
• Anderenfalls kann es zu elektrischen Schlägen kommen.
Niemals die Klimaanlage mit Wasser reinigen.
• Wasser könnte in die Klimaanlage eindringen und die Isolierung beschädigen. Dadurch könnte es zu elek-
trischen Schlägen kommen.
Niemals auf die Inneneinheit/Außeneinheit steigen und auch keine Gegenstände darauf ablegen.
•
Falls Sie oder ein Gegenstand von der Klimaanalge fallen, kann dies zu einem Unfall oder ähnlichem führen.
WARNUNG
VORSICHTSMASSNAHMEN
VORSICHT
VORSICHT
Für den Einbau
• Konsultieren Sie mit Ihrem Händler oder Unternehmer für eine Installation der Klimaanlage.
Die Installation soll bei der Kunde nicht durchgefürht werden, weil spezielle Techniken und Arbeit erforderlich sind.
Wenn die Installation fehlerhaft gemacht wird, kann sie ein Feuer, einen elektrischen Schock, eine Verletzung
oder ein Wasserauslaufen verursachen.
Niemals die Klimaanlage an einem Ort installieren, an dem brennbare Gase austreten können.
• Falls brennbare Gase austreten und sich in der Nähe der Klimaanlage ansammeln, kann es zu einer
Explosion kommen.
Inneneinheit
BEZEICHNUNG DER TEILE
Wärmetauscher
Ventilator
Horizontale Klappe
Vertikale Klappe
Luftauslaß
LuftÞlter (Catechin)
Lufteinlaß
Frontplatte
Fernbedienung
Schutzabdek-
kung für
Gebläse
Bedienungsfeld
(Wenn die Frontplatte geöffnet ist)
Anzeigefeld
Betriebsanzeige-
leuchten
Fernbedienungs-
signalempfänger
Notbetriebsschalter
Außeneinheit
Lufteinlaß (Rückseite und Seite)
Verrohrung
Ablaßschlauch
Luftauslaß
Ablaßauslaß
LuftreinigungsÞlter
(Zubehörteile, Anti
allergischer EnzymÞlter,
Blauer Blasebalg)

17
Fernbedienung
BEZEICHNUNG DER TEILE
Signalgeber
Betriebs/Stop-Taste
(ON/OFF)
Betriebsanzeigefeld
Temperaturtasten
Ventilatordrehzahl-Regeltaste
Betriebsart-Wahltaste
Rückstelltaste RESET
Ausschalttimertaste
Einschalttimertaste
Uhreinstelltaste
Taste zum Schwenken der
horizontalen Klappe
TIME-Einstelltasten (Zeit)
Vorwärts-Taste
Rückwärts-Taste
(Gesamtansicht.)
Den Deckel auf der Vorderseite
öffnen.
Automatische Startwiederholungsfunktion
VORBEREITUNGEN VOR DEM BETRIEB
Diese Modelle sind mit einer automatischen Startwiederholungsfunktion ausgestattet. Wenn
Sie diese Funktion nicht benutzen möchten, wenden Sie sich bitte an den Kundendienst, da die
Einstellung der Anlage geändert werden muß.
Automatische Startwiederholungsfunktion bedeutet ...
Wenn die Inneneinheit durch die Fernbedienung gesteuert wird, werden die Betriebsart, die eingestellte Temperatur und die
Ventilatordrehzahl im Speicher abgespeichert. Bei einem Stromausfall oder wenn die Stromversorgung während des Betriebs
ausgeschaltet wird, sorgt die “automatischen Startwiederholungsfunktion” automatisch dafür, daß das Gerät in der gleichen
Betriebsart wieder gestartet wird, die mit der Fernbedienung unmittelbar vor dem Stromausfall eingestellt war. (Einzelheiten
dazu siehe Seite 19.)
Den Netzkabelstecker an eine Netzsteckdose anschließen und/oder den Trennschalter einschalten.
WARNUNG:
Schmutz vom Netzkabelstecker entfernen und diesen richtig einstecken. Falls Schmutz an dem Stecker haftet oder
dieser nicht richtig eingesteckt wird, besteht Brand- oder Stromschlaggefahr.
Innen- und/oder Außeneinheit
ANMERKUNG
Benutzen Sie den Remotesteuerpult,
der mit nur der Maßeinheitversehen
wird.
Benutzen Sie nicht anderen remoe
Steuerpult.
Taste KÜHLEN IM SPARBETRIEB
(ECONO COOL)

18
Den Minuspol der
Batterien zuerst
einlegen.
Mit dünnem
Gegenstand
eindrücken.
Mit dünnem
Gegenstand
eindrücken.
Notkühlbetrieb
Notheizbetrieb
Stop
VORBEREITUNGEN VOR DEM BETRIEB
Fernbedienung
Einstellen der Batterien und der Uhrzeit
1Den Deckel an der Vorderseite abnehmen
und die Batterien einlegen. Dann den Deckel
an der Vorderseite wieder anbringen.
Den Minuspol der Batterien zuerst einlegen.
Überprüfen, daß die Pole der Batterien in der
richtigen Richtung
eingelegt sind.
2Die Rückstelltaste (RESET) eindrücken.
• Falls die Rückstelltaste (RESET) nicht eingedrückt
wird, kann die Fernbedienung nicht richtig arbeiten.
• Achten Sie darauf, die Rückstelltaste (RESET) nicht
zu kräftig zu drücken.
3Die Uhreinstelltaste eindrücken.
5Die Uhreinstelltaste erneut drücken und den
Deckel an der Vorderseite schließen.
4Die Stundentaste (Vorwärts) und die
Minutentaste (Rückwärts) (Zeiteinstell-
tasten) eindrücken um die derzeitige Zeit ein-
zustellen.
• Mit jedem Druck auf die Taste erhöht sich die
eingestellte Zeit um 1 Minute, und mit jedem Druck
auf die Taste verringert sich die eingestellte Zeit
um 1 Minute.
•
Wenn Sie diese Tasten länger gedrückt halten, erhöht/
verringert sich die eingestellte Zeit um 10 Minuten.
Handhabung der Fernbedienung
• Die Fernbedienung kann in einer Entfernung von bis
zu 6 m verwendet werden, wenn sie auf die Vordersei-
te der Inneneinheit gerichtet wird.
• Wenn eine Taste gedrückt wirdt, werden von der
Inneneinheit ein oder zwei Pfeiftöne abgegeben. Falls
kein Pfeifton vernommen werden kann, die entspre-
chende Taste nochmals betätigen.
• Die Fernbedienung vorsichtig verwenden.
Die Fernbedienung arbeitet unter Umständen nicht,
wenn sie hinfällt, hingeworfen oder naß wird.
Anbringen an einer Wand usw
• Die Fernbedienung unter Verwendung des Einbauge-
häuses in einer Position anbringen, von der aus der
Signalempfangston (Pfeifton) von der Inneneinheit
vernommen werden kann, wenn die
F
FO
/NO
Taste gedrückt
wird.
Einsetzen/Entfernen der Fernbedienung
Einsetzen :Die Fernbedienung nach unten einsetzen.
Entfernen :Nach oben ziehen.
Trockenbatterien
nHinweise für das Austauschen der Batterien
In folgenden Fällen die Batterien durch neue Alkaline-
Batterien des Typs AAA ersetzen:
· Wenn die Inneneinheit nicht auf das Signal der Fern-
bedienung reagiert.
· Wenn die Anzeige der Fernbedienung in der Helligkeit
abnimmt.
· Wenn nach Drücken einer Taste der Fernbedienung
alle Anzeigen auf dem Bildschirm erscheinen und
danach sofort wieder ausgeblendet werden.
Keine Mangan-Batterien verwenden. Dies könnte zu
Fehlfunktionen der Fernbedienung führen.
• Die Lebensdauer einer Alkalibatterie beträgt etwa ein
Jahr.
Da jedoch die Begrenzung der empfohlenen Nut-
zungsdauer (Monat/Jahr) am Bodem des Akkus an-
gegeben ist, sollte mann daran denken, daß ein Akku,
der sich nah am Zeitlimit beÞndet, schnell leer wird.
• Damit keine Flüssigkeit austritt, alle Akkus herausneh-
men, wenn die Fernbedienung für längere Zeit nicht
benutzt wird.
VORSICHT:
Wenn Flüssigkeit von den Batterien auf Ihre Haut oder
Ihre Kleidung gelangt, diese gründlich mit sauberem
Wasser auswaschen.
Wenn Flüssigkeit von den Batterien in Ihre Augen
gelangt, diese gründlich mit sauberem Wasser auswa-
schen und einen Arzt zu Rate ziehen.
• Niemals außadbare Batterien verwenden.
• Die beiden Batterien durch neue des gleichen Typs
ersetzen.
• Die verbrauchten Batterien an einer Sammelstelle
oder am Sondermüllplatz abgeben.
Wenn die Fernbedienung nicht verwendet werden kann (Notbetrieb)
1
Den Notbetriebsschalter eindrücken.
• Bei jedem Druck auf den Notbetriebsschalter wird
die Anlage in der Reihenfolge NOTKÜHLUNG,
NOTHEIZUNG und STOP MODE in die jeweilige
Betriebsart geschaltet.
Wenn der NOTBETRIEBS-Schalter jedoch einmal
gedrückt wird, arbeitet die Anlage 30 Minuten lang
im Testlauf und schaltet danach in den NOTBE-
TRIEB.
Wenn die Batterien der Fernbedienung verbraucht sind oder die Fernbedienung nicht richtig arbeitet, ist Notbetrieb
unter Verwendung des Notbetriebsschalters möglich.
• Einzelheiten über den NOTBETRIEB sind nachste-
hend dargestellt. Die Temperaturregelung arbeitet
jedoch 30 Minuten lang nicht im Testlauf und die
Anlage ist auf Dauerbetrieb eingestellt. Die Geblä-
sedrehzahl ist im Testlauf auf hoch eingestellt und
schaltet nach 30 Minuten auf mittel um.
• Die Betriebsart wird von der Betriebsanzeige der
Inneneinheit gemäß folgender Abbildung ange-
zeigt.
Betriebsanzeigeleuchten
2Um den Notbetrieb zu stoppen, den NOT-
BETRIEBS-Schalter (im NOTHEIZ-Betrieb)
einmal oder (im NOTKÜHL-Betrieb) zweimal
drükken.
In Betrieb KÜHLUNG HEIZUNG
Eingestellte Temperatur 24°C 24°C
Ventilatordrehzahl Mittel Mittel
Horizontale Klappe Automatisch Automatisch
Fernbedienungseinbaugehäuse

19
AUTO-UMSCHALTBETRIEB ... AUTO-BETRIEBSMODUS
Das automatische Kühl- und Heizungsumschaltsystem gewährleistet eine leichte Steuerung und ganz-
jährige Klimatisierung.
Sobald die gewünschte Temperatur eingestellt ist, wird der Betrieb der Anlage entsprechend der Raum-
temperatur automatisch zwischen Kühlen und Heizen umgeschaltet. Darüber hinaus ermöglicht die
Ventilatorsteuerung der Außeneinheit, dass der Kühlbetrieb der Anlage bis zu einer Außentemperatur
von -10°C aufrecht erhalten werden kann.
Wenn die eingestellte Temperatur geändert werden soll:
• Die
O
O
TM
R
A
W
Taste drücken, um die Temperatur herunterzusetzen. Mit jedem Druck auf diese Taste wirdt die Temperatur um
etwa 1°C heruntergesetzt.
• Die
O
OT LOOC
Taste eindrücken um die Temperatur zu erhöhen. Mit jedem Druck auf diese Taste wird die Temperatur um etwa
1°C erhöht.
Zur Auswahl des AUTO-Modus:
1Die
F
FO
/NO
Taste eindrücken.
2Den (AUTO)-Modus durch Drücken der
E
D
OM
Taste wählen.
Mit jedem Druck auf diese Taste wird der Betriebsmodus in der Reihenfolge von
(AUTO) (KÜHLUNG) (LUFTTROCKNUNG) (HEIZUNG)
umgeschaltet.
Die eingestellte Temperatur wird auch auf der Fernbedienung angezeigt.
Den Betrieb stoppen:
Die
F
FO
/NO
Taste eindrücken.
Nachdem der Betriebsmodus einmal eingestellt wurde, startet der Betrieb ab
dem nächsten Mal ab dem vorher eingestellten Modus, wenn einfach die
F
FO
/NO
Taste eingedrückt wird.
Beschreibung der “AUTOMATISCHEN STARTWIEDERHOLUNGSFUNKTION”
• Diese Anlagen sind mit einer automatischen Startwiederholungsfunktion ausgestattet. Wenn der Netzstrom eingeschal-
tet ist, startet die Klimaanlage den Betrieb automatisch in der gleichen Betriebsart wie der, die mit der Fernbedienung
vor dem Stromausfall eingestellt wurde.
• Wenn die Anlage mit der Fernbedienung vor dem Abschalten des Netzstroms ausgeschaltet war, bleibt sie auch nach
Einschalten des Netzstroms ausgeschaltet.
• Wenn sich die Anlage vor dem Abschalten des Netzstroms im Notbetrieb befand, startet sie nach Wiederherstellung des
Netzstroms in der gleichen Betriebsart wie der, die mit der Fernbedienung vor dem Notbetrieb eingestellt war.
• Wenn die Anlage vor einem Netzausfall im Modus “ AUTO” betrieben wurde, wird der Betriebsmodus (KÜHLEN
(COOL), LUFTTROCKNUNG (DRY) oder HEIZEN (HEAT)) nicht im Speicher gesichert. Bei Einschalten der Stromver-
sorgung bestimmt die Anlage den zu verwendenden Betriebsmodus anhand der Raumtemperatur beim Neustart und
nimmt dann den Betrieb wieder auf.
Informationen über Multisystem-Klimaanlagen
Multiystem-Klimaanlagen können zwei oder mehr Inneneinheiten mit einer Außeneinheit verbinden. Je nach
Leistungsvermögen können mehr als zwei Anlagen gleichzeitig betrieben werden.
• Wenn Sie versuchen, zwei oder mehr Inneneinheiten mit einer Außeneinheit gleichzeitig zu betreiben - eine zum Kühlen
und die andere zum Heizen - wird die Betriebsart der Inneneinheit, die zuerst arbeitet, gewählt. Die anderen Innenein-
heiten, die später mit dem Betrieb beginnen, können nicht arbeiten und zeigen einen Betriebszustand an. (Beachten
Sie die unten stehende Tabelle für die Betriebsanzeigeleuchten.)
In diesem Falle bitte alle Inneneinheiten auf die gleiche Betriebsart einstellen.
• Wenn die Inneneinheit während der Enteisung der Außeneinheit ihren Betrieb beginnt, dauert es einige Minuten (max.
10 Minuten) bis die Warmluft ausgeblasen wird.
• Im Heizbetrieb liegt keine Fehlfunktion vor, wenn sich möglicherweise die Inneneinheit, obgleich sie nicht arbeitet,
erwärmt oder das Geräusch von strömendem Kältemittel hörbar wird. Die Ursache liegt darin, daß das Kältemittel
kontinuierlich in die Anlage ßießt, die nicht arbeitet.
Anzeigeeinzelheiten an der Inneneinheit
Die Betriebsanzeige an der rechten Seite der Inneneinheit zeigt den Betriebsstatus an.
Operation Indicator
Betriebsanzeigeleuchten
Anzeige Betriebsstatus Unterschied zwischen Solltem-
peratur und Raumtemperatur
Zeigt an, daß die Klimaanlage arbeitet, um die Solltemperatur zu er-
reichen. Warten Sie bitte einige Zeit, bis die Solltemperatur erreicht
ist.
Etwa 2°C oder mehr
Zeigt an, daß sich die Raumtemperatur der Solltemperatur nähert. Etwa 2°C oder weniger
Dies zeigt einen Betriebsbereitschaftszustand an.
Bitte lesen Sie weiter oben für Informationen zu Mehrfachsystem-
Klimageräten.
—
Erläuterung des “AUTO-UMSCHALTBETRIEBS”
(1) Anfangsmodus
1Wenn der AUTO-Betrieb nach Ausschalten der Anlage startet;
• Ist die Raumtemperatur höher als die eingestellte Temperatur, startet der Betrieb im Modus KÜHLEN.
• Ist die Raumtemperatur gleich oder niedriger als die eingestellte Temperatur, startet die Anlage im Modus HEI-
ZEN.
(2) Moduswechsel
1Der Kühlbetrieb (COOL) schaltet auf Heizbetrieb (HEAT) um, wenn die Raumtemperatur für die Dauer von 15
Minuten die eingestellte Temperatur um 2 Grad unterschreitet.
2Der Heizbetrieb (HEAT) schaltet auf Kühlbetrieb (COOL) um, wenn die Raumtemperatur für die Dauer von 15
Minuten die eingestellte Temperatur um 2 Grad überschreitet.
HINWEIS:
Wenn zwei oder mehr Inneneinheiten als Multisystem arbeiten, kann die Inneneinheit in bestimmten Fällen im
Betrieb (AUTO) nicht den Betriebsmodus (COOL HEAT) (KÜHLUNG HEIZUNG)) wechseln und geht in den
Bereitschaftsmodus. Detaillierte Information zu Multisystem-Klimaanlagen Þnden Sie rechts.
Leuchtend
Blinkend
Nicht leuchtend

20
1
2
3
4
TAEH
L
O
O
C
YR
D
Zum Einstellen der Betriebsarten KÜHLUNG, LUFTTROCK-
NUNG, HEIZUNG:
1Die
F
FO
/NO
Taste eindrücken.
2Den Betriebsmodus wählen, indem die
E
D
OM
Taste gedrückt wird.
Mit jedem Druck auf diese Taste wird der Betriebsmodus in der Reihenfolge von
(AUTO) →(KÜHLUNG) →(LUFTTROCKNUNG) →(HEIZUNG)
umgeschaltet
Den Betrieb stoppen:
Die
F
FO
/NO
Taste eindrücken.
Nachdem der Betriebsmodus einmal eingestellt wurde, startet der Betrieb ab
dem nächsten Mal ab dem vorher eingestellten Modus, wenn einfach die
F
FO
/NO
Taste eingedrückt wird.
MANUELLER BETRIEB (KÜHLUNG, LUFTTROCKNUNG, HEIZUNG)
EINSTELLEN DER VENTILATORDREHZAHL UND DER
LUFTABBLASRICHTUNG
Wenn die eingestellte Temperatur geändert werden soll:
• Die
O
O
TM
R
A
W
Taste drücken, um die Temperatur herunterzusetzen. Mit jedem Druck auf diese Taste wirdt die Temperatur um
etwa 1°C heruntergesetzt.
• Die
O
OT LOOC
Taste eindrücken um die Temperatur zu erhöhen. Mit jedem Druck auf diese Taste wird die Temperatur um etwa
1°C erhöht.
Im Modus KÜHLUNG
• Bei geringer Außentemperatur schaltet sich der Lüfter des Außengeräts häuÞg ein und aus oder verringert die
Geschwindigkeit, um eine ausreichende Kühlleistung zu gewährleisten.
In der Betriebsart “LUFTTROCKNUNG”
• Temperaturregelung ist nicht möglich.
• In diesem Betriebsmodus wird die Raumtemperatur etwas heruntergesetzt.
Die Einzelheiten der Anzeige auf der Inneneinheit sind auf Seite 19 erläutert.
Wenn das Klimagerät nicht wirksam kühlt oder heizt...
Wenn die Lüftergeschwindigkeit auf Low (langsam) oder AUTO (automatisch) gestellt ist, kann das Klimagerät in einigen Fällen
nicht ausreichend kühlen oder heizen. Ändern Sie in diesem Fall die Lüftergeschwindigkeit auf Med. (mittel) oder schneller.
Ändern Sie die Lüfter-
geschwindigkeit.
Lüftergeschwindigkeit:
Low (langsam) oder AUTO (automatisch) Lüftergeschwindigkeit:
Med. (mittel) oder Upper (hoch)
Die Ventilatordrehzahl und die Luftabblasrichtung können wie gewünscht eingestellt werden.
Um die VENTILATORDREHZAHL zu ändern, die
N
A
F
Taste ein-
drücken.
Mit jedem Druck auf diese Taste wird die Ventilatordrehzahl der folgenden
Reihenfolge nach geändert: (niedrig) (mittel) (hoch)
(sehr schnell) (automatisch)
• Mit der Kontaktstellung (sehr schnell) läßt sich der Raum stärker
kühlen/heizen.
• Wenn die Betriebsgeräusche der Klimaanlage Ihren Schlaf beeinträchtigen,
die Ventilatordrehzahl (niedrig) einstellen.
Um die Luftstromrichtung vertikal zu ändern die ENAV Taste ein-
drücken.
Mit jedem Druck auf diese Taste wird der Winkel der horizontalen Klappe der
folgenden Reihenfolge nach geändert: (1) (2) (3) (4)
(schwenk) (automatisch)
SCHWENK-Betrieb
SCHWENK-Betrieb benutzen, damit der Luftstrom alle Ecken des Raums
erreicht.
Empfohlener Bereich der horizontalen Klappe für eine
wirksamere Klimaanlage.
Normalerweise die (automatisch)-Position verwenden.
Mit Position (1) in den Betriebsarten KÜHLUNG
oder LUFTTROCKNUNG und mit den Positionen (2)
oder (4) in der Betriebsart HEIZUNG können Sie
Einstellungen nach eigenen Wünschen vornehmen.
Other manuals for MSZ-GB50VA Series
4
Table of contents
Languages:
Other Mitsubishi Electric Split Type Air Conditioner manuals

Mitsubishi Electric
Mitsubishi Electric PUH-P8MYA Operating manual

Mitsubishi Electric
Mitsubishi Electric MSZ-FD25VA User manual

Mitsubishi Electric
Mitsubishi Electric PEFY-P-VMHS-E User manual

Mitsubishi Electric
Mitsubishi Electric PUZ-ZM100VKA User manual

Mitsubishi Electric
Mitsubishi Electric MSZ-FH25VE - E1 User manual