'17 • SRK-T-203
-
32
-
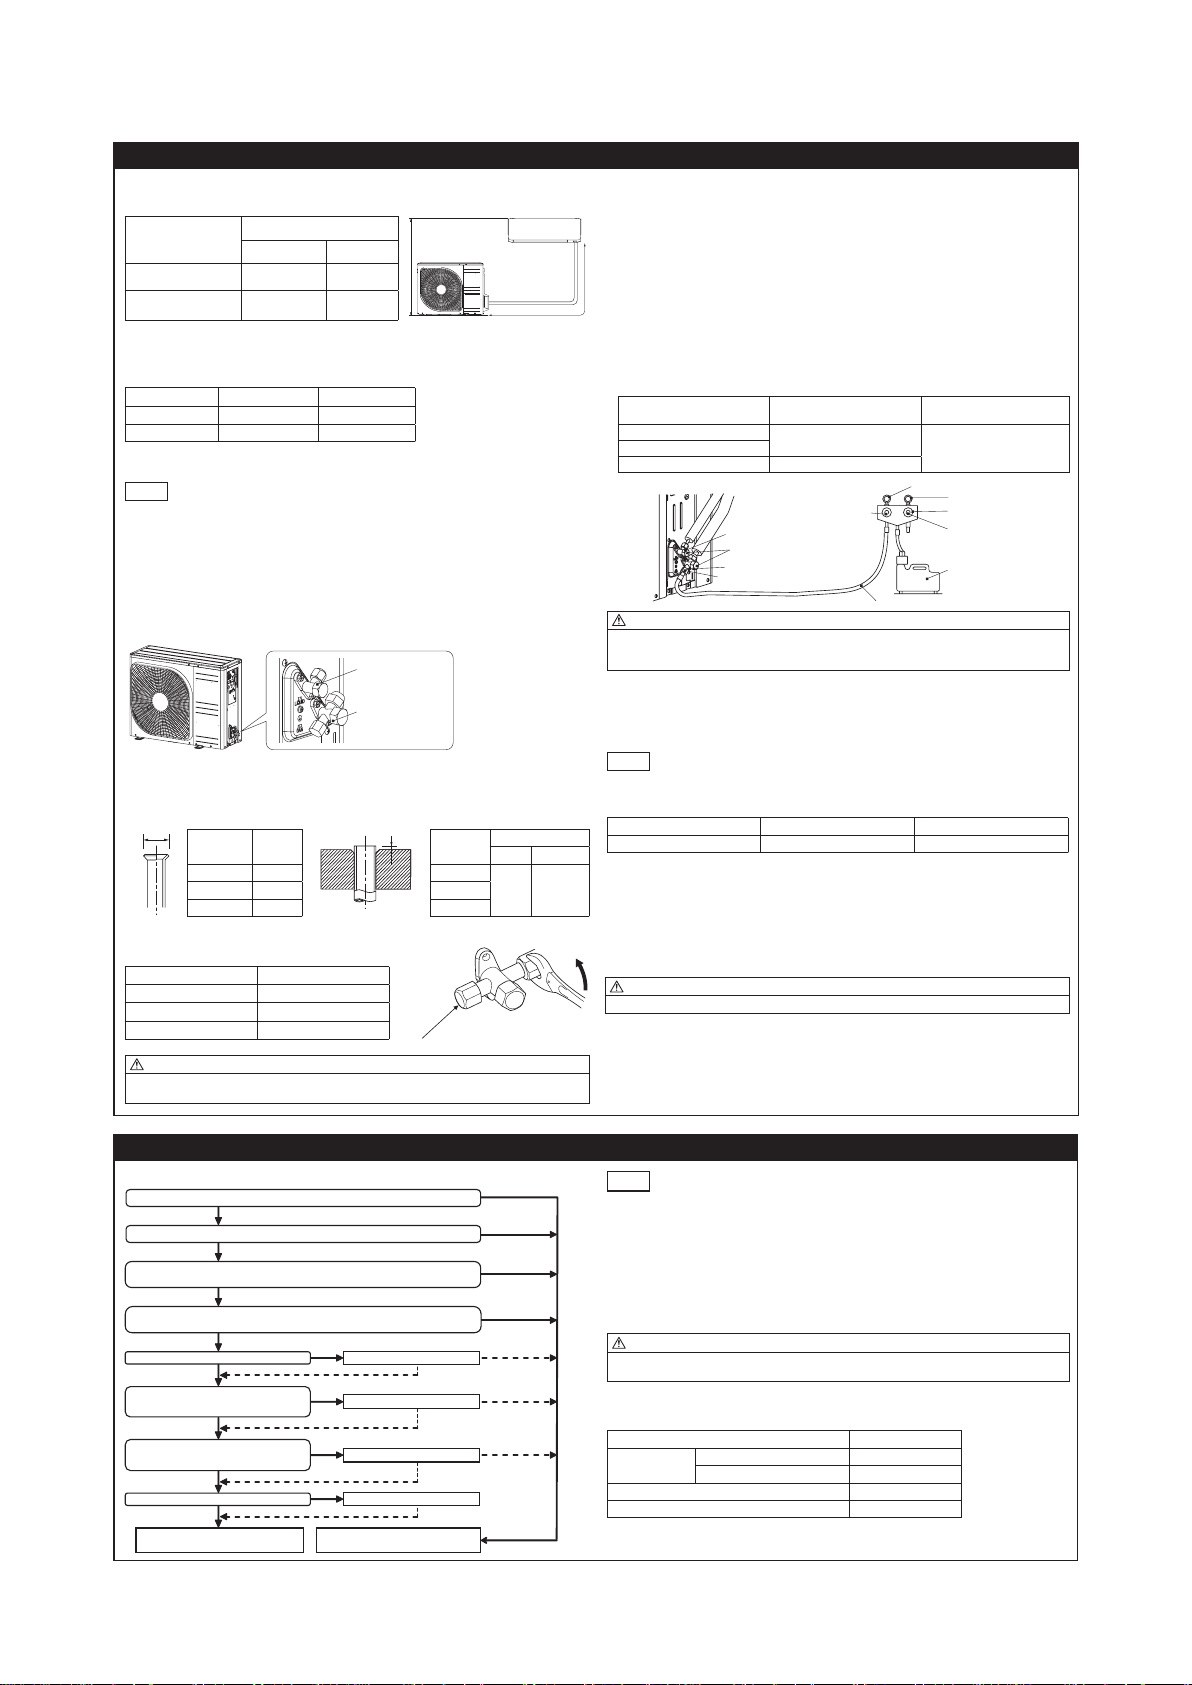
4. CONNECTING PIPING WORK
1. Restrictions on unit installation
Abide by the following restrictions on unit installation.
Improper installation can cause compressor failure or performance degradation.
Dimensional restrictions
H
L
ModelSRC20/25/35
ModelSRC40/50/60
Connectingpipelength(L) 25morless 30m or less
Elevation difference between
indoor and outdoor units(H)* 15m or less 20morless
* Outdoor unit installation position can be higher as well as lower than the indoor unit installation position.
2.Preparationofconnectingpipe
2.1.Selectingconnectingpipe
Select connecting pipe according to the following table.
Model SRC20/25/35
Model SRC40/50/60
Gas pipe ø9.52 ø12.7
Liquid pipe ø6.35 ø6.35
•Pipe wall thickness must be greater than or equal to 0.8 mm.
•Pipe material must be O-type (Phosphorus deoxidized seamless copper pipe ICS 23.040.15, ICS
77.150.30).
NOTE
If it is required to reuse the existing connecting pipe system, refer to 5. UTILIZATION OF EXISTING
PIPE.
2.2.Cuttingconnectingpipe
(1) Cut the connecting pipe to the required length with pipe cutter.
(2) Hold the pipe downward and remove the burrs. Make sure that no foreign material enters the pipe.
(3) Cover the connecting pipe ends with the tape.
3. Piping work
Check that both liquid and gas service valves are fully closed.
Carry out the piping work with service valves fully closed.
Liquid service valve
Gas service valve
3.1. Flaring pipe
(1) Takeoutarenutsfromtheservicevalvesofoutdoorunitandengagethemontoconnectingpipes.
(2) Flarethepipesaccordingtotableandgureshownbelow.
Flare dimensions for R410A are different from those for conventional refrigerant.
AlthoughitisrecommendedtousethearingtoolsdesignedspecicallyforR410A,conventionalaring
toolscanalsobeusedbyadjustingthemeasurementofprotrusionBwithaareadjustmentgauge.
ACopperpipe
outer diameter A 0
–0.4
B
Copperpipe
outer diameter
Rigid (clutch) type
R410A Conventional
ø6.35 9.1 ø6.35
0-0.5 1.0-1.5ø9.52 13.2 ø9.52
ø12.7 16.6 ø12.7
3.2.Connectingpipes
(1) Connect pipes on both liquid and gas sides.
(2)Tightennutstospeciedtorqueshowninthetablebelow.
Operation valve size (mm) Tightening torque (N·m)
ø6.35 (1/4") 14-18
ø9.52 (3/8") 34-42
ø12.7 (1/2") 49-61 Do not hold the valve cap area with a spanner
CAUTION
•Donotapplyrefrigeratingmachineoiltothearedsurface.Itcancauserefrigerantleakage.
•Donotapplyexcesstorquetothearednuts.Thearednutsmaycrackresultinginrefrigerantleakage.
4. Evacuation
(1) Connect vacuum pump to gauge manifold. Connect charge hose of gauge manifold to service port
of outdoor unit.
(2) Run the vacuum pump for at least one hour after the vacuum gauge shows -0.1MPa (–76cm Hg).
(3)Conrmthatthevacuumgaugeindicatordoesnotriseevenifthesystemisleftfor15minutesormore.
Vacuum gauge indicator will rise if the system has moisture left inside or has a leakage point.
Check the system for the leakage point. If leakage point is found, repair it and return to (1) again.
(4) Close the Handle Lo and stop the vacuum pump.
Keep this state for a few minutes to make sure that the compound pressure gauge pointer does not
swing back.
(5) Remove valve caps from liquid service valve and gas service valve.
(6) Turn the liquid service valve's rod 90 degree counterclockwise with a hexagonal wrench key to open
valve.
Close it after 5 seconds, and check for gas leakage.
Usingsoapywater,checkforgasleakagefromindoorunit'sareandoutdoorunit'sareandvalverods.
Wipe off all the water after completing the check.
(7) Disconnect charging hose from gas service valve's service port and fully open liquid and gas opera-
tion valves. (Do not attempt to turn valve rod beyond its stop.)
(8)Tightenservicevalvecapsandserviceportcaptothespeciedtorqueshowninthetablebelow.
Service valve size (mm) Service valve cap tightening
torque (N·m) Service port cap tightening
torque (N·m)
ø6.35 (1/4") 20-30 10-12ø9.52 (3/8")
ø12.7 (1/2") 25-35
Charge hose
Handle Lo
Valve cap
Liquid service valve
Gas service valve
Service port
Pressure gauge
Gauge manifold
Handle Hi
Vacuum pump
CAUTION
• To prevent the entering of different oil into the refrigeration system, do not use tools designed for any
other refrigerant type (R22, R407C, etc.).
•
Topreventvacuumpumpoilfromenteringintotherefrigerantsystem,useacounterowpreventionadapter.
5. Additional refrigerant charge
Additional refrigerant charge is required only when connecting pipe length exceeds 15 m.
5.1 Calculating additional refrigerant charge
Additional refrigerant charge can be calculated using the formula given below.
Additional refrigerant charge (g) = { Connecting pipe length (m) – Factory charged length 15 (m) } x 20 (g/m)
NOTE
• If additional refrigerant charge calculation result is negative, there is no need to remove the refrigerant.
• If refrigerant recharge is required for the unit with connecting pipe length 15m or shorter, charge the
factory charged volume as shown in the table below.
Model SRC 20/25/35 Model SRC40/50/60
Factory charged volume(kg) 1.45 1.50
5.2Chargingrefrigerant
(1) Charge the R410A refrigerant in liquid phase from service port with both liquid and gas service
valves shut. Since R410A refrigerant must be charged in the liquid phase, make sure that refriger-
ant is discharged from the cylinder in the liquid phase all the time.
(2)Whenitisdifculttochargea requiredrefrigerantvolume,fullyopenbothliquidandgasservice
valves and charge refrigerant, while running the unit in the cooling mode. When refrigerant is
charged with the unit being run, complete the charge operation within 30 minutes.
(3) Write the additional refrigerant charge calculated from the connecting pipe length on the label at-
tached on the service cover.
CAUTION
Runningtheunitwithaninsufcientquantityofrefrigerantforalongtimecancauseunitmalfunction.
5.UTILIZATIONOFEXISTINGPIPE
(1)Checkwhetheranexistingpipesystemisreusableornotbyusingthefollowingowchart.
Repair is impossible.
Air tightness is
impossible.
Repair is impossible.
Repair
Air tightness is OK.
Repair
Repair
NO
NO
NO
NO
NO
NO
NO
Are the outdoor and indoor units connected to the existing pipe system ?
Does the existing unit use any of the following refrigerant oils ?
Suniso,MS,BarellFreeze,HAB,Freol,etheroil,esteroil.
Dotheexistingpipespecications(pipelength,pipesizeandelevationdifferencebetweenindoorandoutdoorunit)conformtotherestric-
tionoftheunit.?(Goto4.Connectingpipingworkandcheck1.Restrictionsonunitinstallationand2.Preparationofconnectingpipe.)
Is the existing pipe system free of gas leaks?
(Checkwhetherrefrigerantchargewasrequired
frequently for the system before.)
Istheexistingpipesystemfreeofcorrosion,awsanddents?
Are heat insulation materials of the existing pipe system
free of peel-off or deterioration?
(Heatinsulationis necessaryforboth gas and liquidpipes.)
Is the existing piping system free of any loose pipe support ?
The existing pipe system is reusable. The existing pipe system is not reusable.
Install the new pipe system.
Repair the damaged parts.
Checkthepipesystemforairtightness.
Repair the damaged parts.
Repair the loose pipe support.
NO
Is it possible to run the unit ?
YES
YES
YES
YES
YES
YES
YES
YES
NOTE
• Consult with our distributor in the area, if you need to recover refrigerant and charge it again.
(2) Clean the existing pipe system according to the procedure given below.
(a)Carry out forced cooling operation of existing unit for 30 minutes.
For ‘Forced cooling operation’ refer to the indoor unit installation manual.
(b)Stop the indoor fan and carry out forced cooling operation for 3 minutes (Liquid return).
(c) Close the liquid service valve of the outdoor unit and carry out pump down operation (Refer to 6.
PUMP DOWN).
(d)Blow with nitrogen gas. If discolored refrigeration oil or any foreign matter is discharged by the
blow, wash the pipe system or install a new pipe system.
(3) Removethearenutsfromtheexistingpipesystem.Gobackto4.ConnectingPipingworkand
proceed to step 2.2 Cutting connecting pipe.
CAUTION
Donotusetheoldarenuts(ofexistingunit).Makesurethatthearenutssuppliedwiththe(new)
outdoor unit are used.
*Iftheexistingpipingisspeciedasliquidpipeø9.52orgaspipeø12.7,refertothefollowing.(SRC40,50
and 60 only)
<Table of pipe size restrictions>
Additional charge volume per meter of pipe 0.06kg/m
Pipe size Liquid pipe ø9.52
Gas pipe ø12.7
Maximum one-way pipe length 10
Length covered without additional charge 5
Additional charge volume (kg) = {Main pipe length (m) - Length covered without additional
charge shown in the table (m)} X Additional charge volume per meter of pipe shown in the table (kg/m)