Mitutoyo ID-H0560 User manual

User’s Manual
No. 99MAH016B1
SERIES No. 543
ID-H0530/0560
Digimatic Indicator
User’s Manual
Read this User’s Manual thoroughly
before operating the instrument. After reading,
retain it close at hand for future reference.

FOREWORD
In order to use this Digimatic Indicator properly, read this manual thoroughly before
operating the instrument. After reading this manual, store it in a safe place for future
reference.
Mitutoyo assumes no liability to any party for any loss or damage, direct or indirect,
caused by use of this instrument not conforming to this manual.
Information in this document is subject to change without notice.
2002 Mitutoyo Corporation. All rights reserved.
PRECAITIONS
Precautions against the Power Supply
Wrong handling that neglects the following precautions could result in serious injury or
death.
• This instrument is externally powered from the AC power supply via the AC adapter. Be
sure to use the Mitutoyo specified AC adapter (standard accessory: No.09EAA119).
• If this instrument is used near the machines that require a high voltage, high frequency,
WARNING or large current, do not share the power line of the AC adapter with those machines.
• Use the AC power supply that absolutely conforms to the voltage and frequency
indicated on the AC adapter. If the AC adapter is used under the condition exceeding
the permissible voltage range, it could cause an explosion or ignition.
• If this instrument is not used for an extended period of time, make sure that the AC
adapter is unplugged from the power supply to prevent fire, etc.
Precaution in Discarding This Instrument
Wrong handling that neglects the following precautions could result in serious injury or
death.
• This instrument uses liquid crystal. If discarding this instrument, observe the ordinance
and regulation by each local government.
• The liquid crystal includes an irritating substance. Should any liquid content be
WARNING accidentally applied to your eyes or skin, wash them with clean flowing water. If you
swallow the liquid content, immediately rinse your mouth, and after drinking a large
amount of water, vomit it, and then consult a doctor.
Precaution for Use
The following acts or circumstances will cause a failure or a malfunction in this instrument.
Care should be exercised.
IMPORTANT • Do not apply a sudden impact such as a drop or excessive force to this instrument.
• Do not disassemble or retrofit the instrument.
• Do not operate keys with a sharp tip (such as the tip of a screwdriver or ball point pen).
• Avoid using and storing this instrument at sites where it is subject to direct sunlight and
excessively hot or cold environments.
• The use of this instrument at a site with tenuous air or high pressure could cause a
failure due to deterioration in material.
No. 99MAH016B i

• Avoid storing the instrument at sites surrounded with high humidity and dust, and
avoid using it at sites where it is subject to direct splashes of water and oil.
• If a high-voltage device such as an electric pen is used, electronic parts may be
damaged. Also, using the instrument at a site where large electric noises are
generating could cause a malfunction.
• Use this instrument at a site with minimum vibration while securely fixing it on the
comparator stand.
• Do not use this instrument in such a way that a perpendicular load or a twisting force is
applied to the spindle.
• For cleaning use a dry, soft cloth or a cotton swab as it is or by damping it with a
diluted neutral detergent. The use of organic solvent (such as thinner and benzene)
will result in a failure.
• The dirt in the spindle and cylinder will cause a malfunction.
• Wipe off dirt on the spindle with a cloth damped with alcohol, and then lightly wipe the
spindle with a cloth damped with a small amount of low-viscosity oil.
• Clean the inside of the cylinder periodically. After removing the cylinder by rotating it,
brush off the dust and dirt on and around the piston and in the cylinder using a brush or
a blower brush.
• Take sufficient damage-preventive measures (safety measures) for an accidental
failure of this instrument.
The following precautions are important to obtain correct measurement results. Care
should be taken.
IMPORTANT • Perform sufficient thermal stabilization of this instrument and an object to be measured
before starting measurement. Use this instrument at a site which is subject to as little
thermal fluctuation as possible.
• To perform stabilized measurement, allows approximately 20 minutes after turning on
the power. The base line could be drifted approximately 0.5mm.
• Do not use this instrument with either stroke end specified as the reference point.
• Note that, if this instrument is used in other than the specified conditions, the functions
and performance will not be guaranteed.
WARRANTY
This Digimatic indicator has been manufactured under Mitutoyo’s rigorous quality control
system. In the event that this instrument should fail within one year from the original date
of purchase through normal use, we will repair or replace it at our option, free of charge,
upon its prepaid return to Mitutoyo. Contact your dealer or the nearest Mitutoyo Service
Center.
However, the following failure or damage may be subject to a repair charge even within
the warranty period:
1 Unit failure or damage arising from improper handling, or unauthorized retrofit or
repair by the user.
2 Unit failure or damage as the result of moving, dropping, or transporting after
purchase.
3 Unit failure or damage due to fire, salt, gas, abnormal voltage, or natural catastrophe.
This Warranty is valid only in the country of original purchase.
NOTES ON OVERSEAS TRANSFER
Please contact Mitutoyo before transferring it abroad.
No. 99MAH016B
ii

Contents
FOREWORD .......................................................................................................................................................i
PRECAITIONS....................................................................................................................................................i
WARRANTY........................................................................................................................................................i
NOTES ON OVERSEAS TRANSFER................................................................................................................i
1 NAME OF RACH PART......................................................................................................................... 1-1
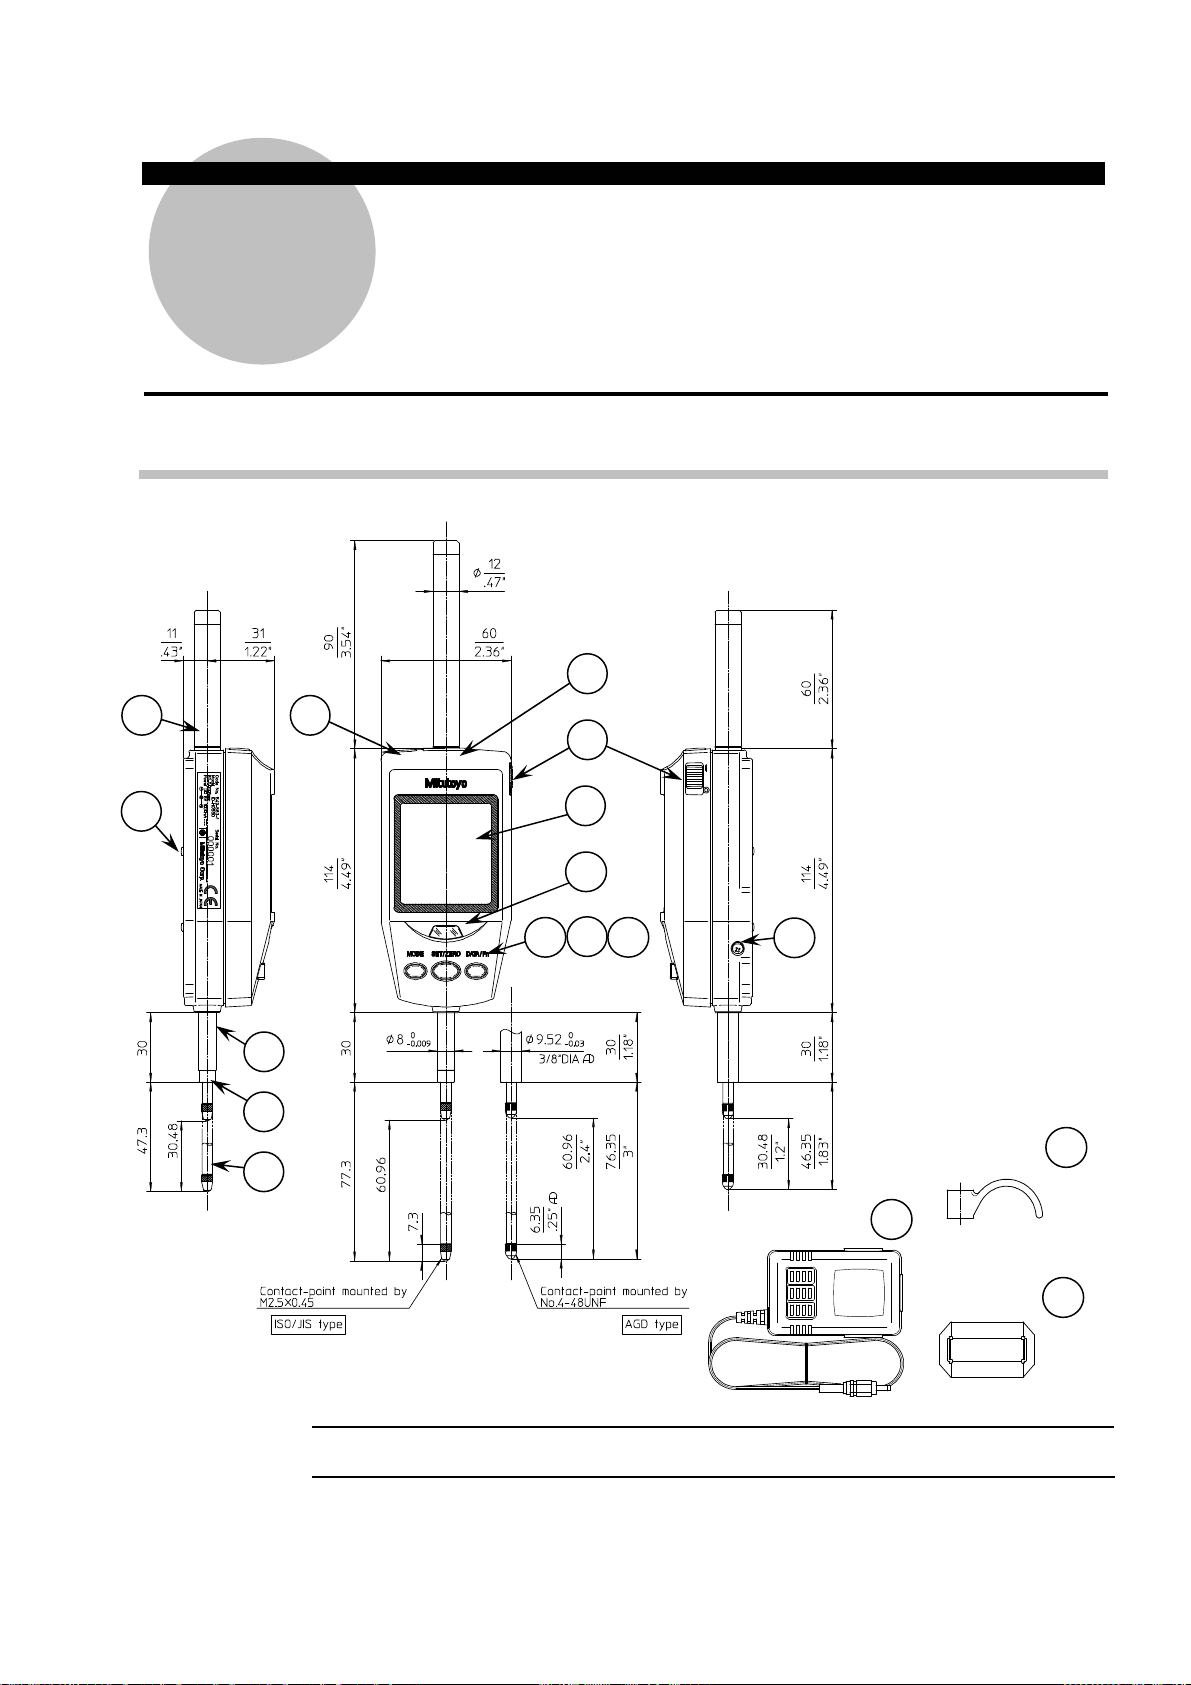
1.1 Part Names of the Main Unit......................................................................................................... 1-1
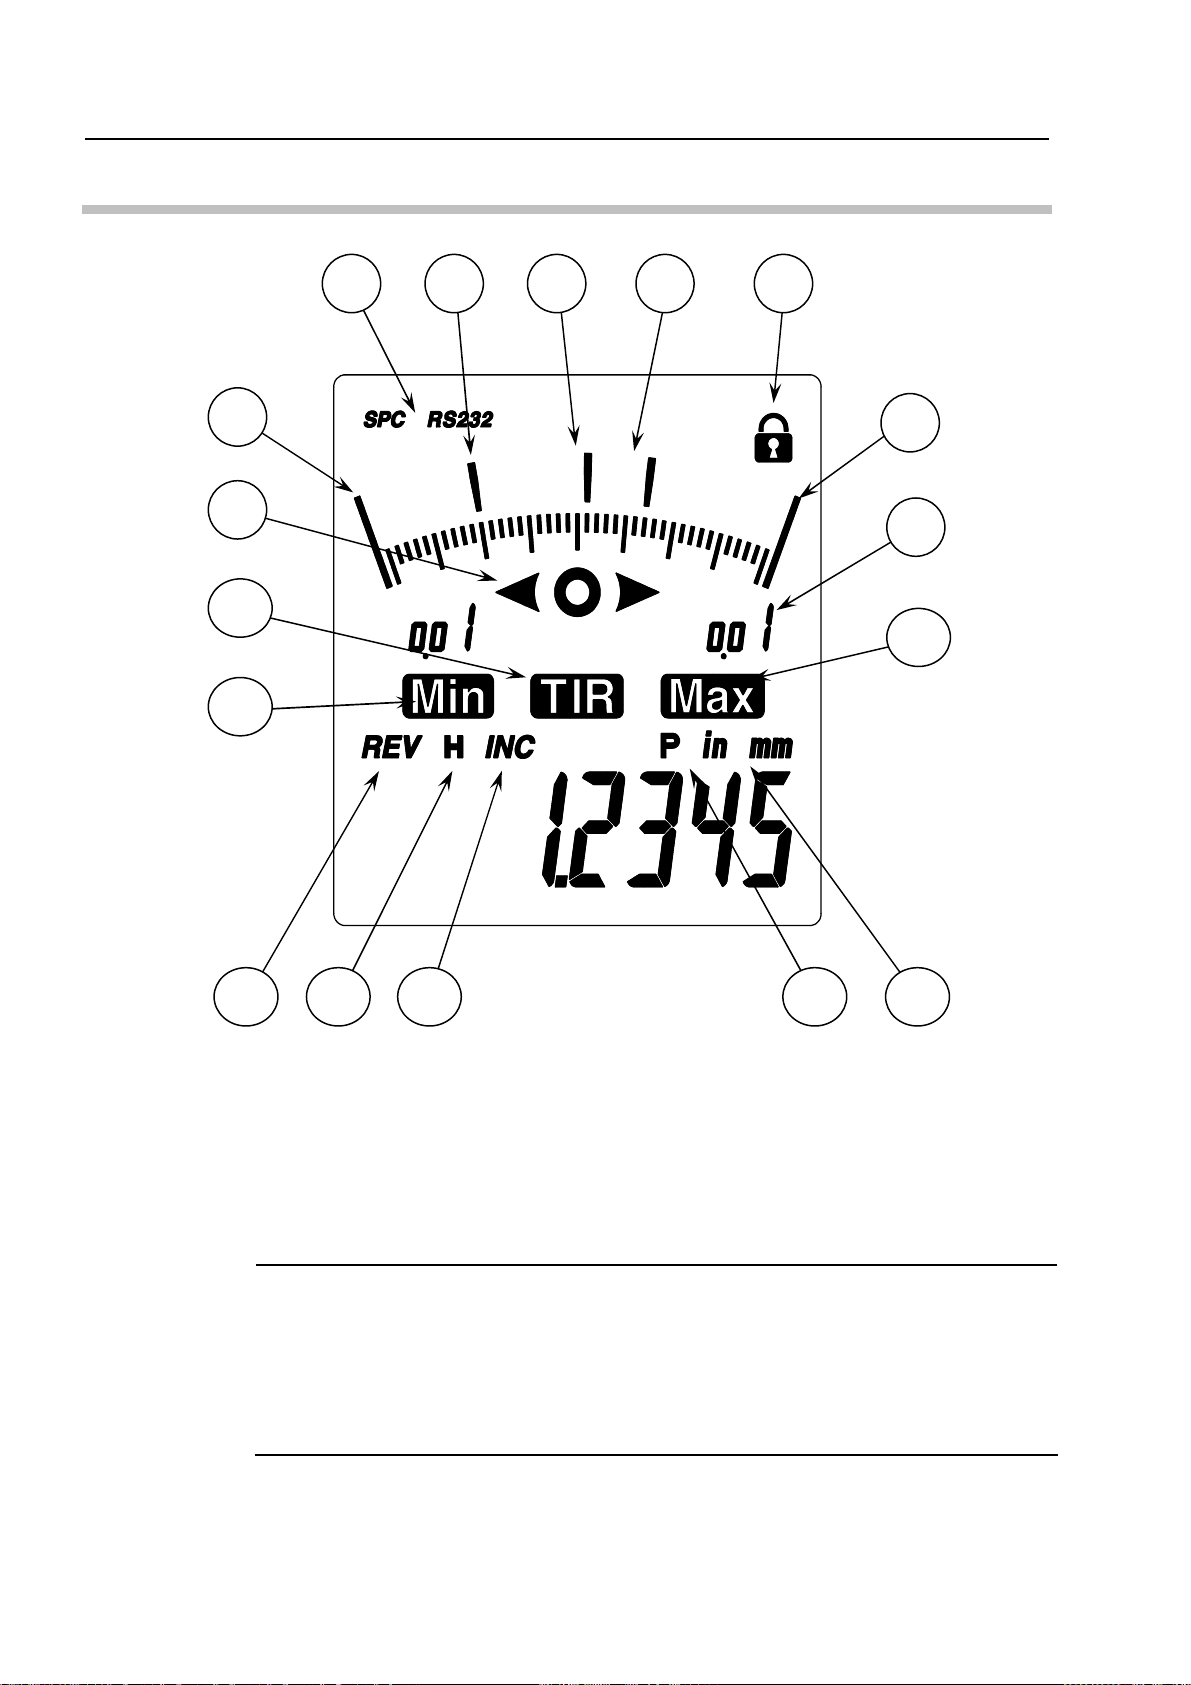
1.2 Details of the LCD Unit ................................................................................................................. 1-2
2 INSTALLATION...................................................................................................................................... 2-1
2.1 Attaching the Clamp Filter............................................................................................................ 2-1
2.2 Mounting on a Stand or a Jig....................................................................................................... 2-1
2.2 Attaching the Lifting Lever........................................................................................................... 2-1
2.3 Attaching the Release................................................................................................................... 2-2
2.4 Mounting the Lug or Special Back .............................................................................................. 2-2
2.5 Replacing the Contact Point ........................................................................................................ 2-2
3 OPERATING PROCEDURE.................................................................................................................. 3-1
3.1 Starting/Stopping This Instrument .............................................................................................. 3-1
3.1.1 Connecting to the power supply.......................................................................................... 3-1
3.1.2 Start / Stop.............................................................................................................................. 3-1
3.2 Parameter Setup Mode ................................................................................................................. 3-1
3.2.1 Switching the unit system between inch and mm during display of “unit” (only in inch spec)....3-2
3.2.2 Switching the digital resolution during display of “res.”.................................................. 3-2
3.2.3 Switching the analog range (analog resolution) during display of “range”.................... 3-3
3.2.4 Switching the count direction during display of “dir”....................................................... 3-3
3.2.5 Switching the I/O format between SPC(digimatic) and RS232 during display of “output” .......... 3-3
3.2.5.1 RS-232 setup....................................................................................................................3-3
3.2.6 Setting ID No. for RS232 communication and remote control during display of “id”.... 3-4
3.2.7 Switching the length measuring system during display of “start”.................................. 3-4
3.2.8 Returning all parameters to factory defaults during display of “reset”........................... 3-4
3.3 Measurement Mode....................................................................................................................... 3-5
3.3.1 Setting the length measuring system and reference point............................................... 3-5
3.3.1.1 INC system (Zero set) ...................................................................................................... 3-5
3.3.1.2 Preset system (setting the preset value).......................................................................... 3-5
3.3.2 Switching a measurement type in the measurement mode.............................................. 3-6
3.3.2.1 Tolerance judgment (setting/checking the upper and lower limit values)......................... 3-6
3.3.2.2 Run-out peak hold during display of “TIR” ....................................................................... 3-7
3.3.2.3 Maximum value peak hold during display of “Max”.......................................................... 3-7
3.3.2.4 Minimum value peak hold during display of “Min”............................................................ 3-8
3.3.3 Data output / Data hold.......................................................................................................... 3-9
No. 99MAH016B iii

3.3.4 Function lock..........................................................................................................................3-9
3.3.5 Centering the pointer.............................................................................................................3-9
3.4 Operation with the Remote Control (Option)..............................................................................3-9
4 DATA INUPUT/OUTPUT........................................................................................................................4-1
4.1 SPC (Digimatic) Input/Output.......................................................................................................4-1
4.1.1 Connecting procedure...........................................................................................................4-1
4.1.2 I/O connector..........................................................................................................................4-1
4.1.3 Output data format (DATA1)..................................................................................................4-2
4.1.4 Timing chart............................................................................................................................4-2
4.1.5 Using the Digimatic Presetter...............................................................................................4-2
4.2 RS-232 Input/Output......................................................................................................................4-4
4.2.1 Connecting procedure...........................................................................................................4-4
4.2.2 I/O connector..........................................................................................................................4-4
4.2.3 Communication specification...............................................................................................4-4
4.2.4 Communication command (I/O format) ...............................................................................4-5
4.2.5 Communication sample ........................................................................................................4-7
5 ERROR MESSAGE AND ACTION........................................................................................................5-1
6 SPECIFICATION ....................................................................................................................................6-1
6.1 Specifications of the main unit ....................................................................................................6-1
6.2 Standard accessories....................................................................................................................6-1
6.3 Optional accessories ....................................................................................................................6-2
No. 99MAH016B
iv

1 1 NAME OF RACH PART
This chapter describes the name of each part and the LCD display
contents.
1.1 Part Names of the Main Unit
7
1 6 8
9
2
10
11 12 13 14
3
4
5
(1) Cylinder
(2) Lug mounting screw
(3) Stem
(4) Spindle
(5) Contact point
mm Type : Parts No.901312
inch Type : Parts No.21BZB005
(6) DC jack
(7) I/O connector
(8) Power switch
(9) LCD unit
(10) Remote control reception
(11) MODE key
(12) SET/ZERO key
(13) DATA/Fn. key
(14) Release attaching hole
(15) AC adapter
(16) Spindle lifting lever
(17) Clamp filter
16
15
17
NOTE •Be sure to attach the clamp filter (ferrite core) to the AC adapter. For detailed
information about attachment, refer to section “2.1 Attaching the Clamp Filter”.
1-1
No. 99MAH016B

No. 99MAH016B
1-2
1.2 Details of the LCD Unit
7
17 1516
11
12
1314
9
10
2
3
456
8
1
(1) Function lock (2) Output format display (3) Upper over-range
(4) Upper pointer (5) Pointer (6) Lower pointer
(7) Lower over-range (8) Analog range (9) Tolerance judgment
(10) Maximum value hold measurement (11) Runout hold measurement (12) Minimum value hold measurement
(13) Display value unit (14) Preset value setup mode (15) Comparison measurement
(16) Data hold mode (17) Reverse direction measurement
NOTE •
•
•
When tolerance judgment measurement is performed, the upper pointer (4) and lower
pointer (6) blink at slow intervals to indicate the upper limit value and lower limit value,
respectively.
In the total runout, maximum value, or minimum value hold measurement mode, the
upper pointer (4) and lower pointer (6) blink to indicate the maximum value and
minimum value, respectively.
If the pointer (5) coincides with the upper pointer (4) and lower pointer (6), these
pointers blink at quick intervals.

No. 99MAH016B
2-1
2 INSTALLATION
This chapter explains how to mount this Digimatic indicator on a
stand or a jig and how to attach or replace optional accessories.
2.1 Attaching the Clamp Filter
Use this instrument by wrapping the AC adapter cord around the clamp filter (ferrite core)
as shown in the figure below.
2.2 Mounting on a Stand or a Jig
Use this instrument with its stem being clamped on the comparator stand (option) or an
appropriate jig.
IMPORTANT
ossible, avoid fixing the stem by directly clamping it with a clamp screw, etc. If the em stem
clamped with a tightening torque of 300N•cm or more, the indicator could cause a
lfunction.
NOTE
•Clamp the stem so that the spindle is oriented perpendicularly with respect to the
reference plane and a measuring surface. If the axis line (spindle) is not perpendicular
to the reference plane (measuring surface), an error is added to a measured value.
For example, assuming a tilt angle of the axis line from the reference plane as ψ, error δ
per measuring length 30mm will be the following according to the tilt angle: ψ= 1°: δ=
0.0045mm, ψ= 2°: δ= 0.0185mm, and ψ= 3°: δ= 0.0410mm.
•To mount this indicator on a jig, it is recommended that the stem be clamped with a
slotted holder that has a coupling portion of approximately φ8G7 (AGD: φ9.52) +
0.02/+0.005mm.
2.3 Attaching the Lifting Lever
While holding the spindle from the counter side (B) so as not to bend it, engage the
spindle with the groove on the lifting lever (No.137693/standard accessory).
2
㻃

No. 99MAH016B
2-2
Attaching the Release
Remove the screw (M2.6) in the release attaching hole with a #0 Phillips screwdriver,
and then screw in the release (No.540774/option) by hand.
IMPORTANT
•Do not pull or hit the release strongly. Some screw thread at its end may break.
•Inserting any other than the release or applying excessive force to the release mount
could result in failure.
NOTE
•The amount of lifting the spindle when using the release is approximately 30mm from
the bottom dead center.
2.5 Mounting the Lug or Special Back
This Digimatic indicator can be equipped with the back with lug (No.101040: JIS, ISO type
or No.101306: AGD type, both options) for Mitutoyo standard dial indicators or either of
various special backs.
Remove the four screws on the rear and mount the back
with lug with these screws.
NOTE
•For information about the assortment of accessories such as special backs, special
contact points, and extension rods, refer to the Mitutoyo general catalog, measuring
tool general catalog, or dial indicator catalogs.
2.6 Replacing the Contact Point
Various special contact points and extension rods of Mitutoyo dial indicator options are
available.
Hold the spindle with pliers while placing a waste cloth between them so that the
spindle will not rotate, and then detach/attach the contact point by pinching and
rotating it with other pliers.
IMPORTANT
•Unless the spindle is held unturned in the above procedure, a failure could be caused
in the Digimatic indicator. Causing damage to the spindle could result in a malfunction.
•Upon replacement of the contact point the external dimensions, measuring force,
measuring orientation restriction, etc., of the indicator may be changed.
•When the contact point other than the standard contact point is used, the error may be
added due to the shape of the contact point. (e.g. Perpendicularity of the contact point
and parallelism with the reference surface for the flat contact point, runout of the roller
contact point, etc.)
[2.4]
[2.5]
[2.6]
Back with lug
Screw
䟺4pieces 䟻

3 OPERATING PROCEDURE
This chapter explains the operating procedure of the Digimatic
indicator.
3
3.1 Starting/Stopping This Instrument
3.1.1
•
Connecting to the power supply
1 Remove the DC jack cover located at the upper on the Digimatic indicator ID-H, and
then push in the DC plug of the AC adapter (standard accessory) all the way until it
stops.
2 Plug the AC plug at the other end of the AC adapter firmly into an AC outlet or
extended outlet strip.
IMPORTANT To supply or shut off the power to this instrument, be sure to turn it on or off with the
[ON/OFF] switch on the side of the main body. If the power to the instrument is shut off
during operation, damage to its internal parts could result.
3.1.2 Start / Stop
1 Slide the [ON/OFF] switch on the side of the main body upward or downward to start
(restart) or stop (terminate) measurement with this instrument.
2 To start measurement, slide the [ON/OFF] switch upward.
3 To stop measurement, slide the [ON/OFF] switch downward.
3.2 Parameter Setup Mode
Parameters such as “Digital resolution” and “Direction” can be changed in the
Parameter Setup mode.
To put this instrument in the Parameter Setup mode, observe the following procedure.
1 Press and hold the [MODE] key for a long time (2 seconds or more) in the
Measurement mode. Then, the mode is switched to the Parameter Setup mode, the
“res.” (“unit” for inch spec) symbol is blinking on the LCD.
2 Press and release the [MODE] key quickly (for less than 2 seconds) to change setup
items.
3 When the item to be set is displayed, press the [SET/ZERO] key quickly, then change
the setting.
4 When the setting of a desired setup item has been changed, press and hold the
[MODE] key for a long time to return to the Measurement mode.
NOTE •The setting contents remain in memory even when the power is turned off.
No. 99MAH016B 3-1

Parameter Setup List
Reference Display Notation in
the manual Setup content Default
(Factory defaults)
3.2.1 ”unit” (Only for inch spec)
Switching the unit system
between inch and mm
“in”
(Only for inch
spec)
3.2.2 “res.” Switching the digital
resolution mm spec: 0.0005
Inch spec: 0.00002
3.2.3 “range” Switching the analog range mm spec: 0.01
Inch spec: 0.0004
3.2.4 “dir” Switching the count
direction
“ ”
(No display: +
direction)
3.2.5 “output” Switching the I/O format
between SPC and RS232 SPC
(Digimatic)
3.2.6 “id” Setting ID No. for RS232
communication remote
control 00
3.2.7 “start” Switching the length
measuring system between
INC and preset systems. INC
3.2.8 “reset” Returning parameters to
defaults.
3.2.1
3.2.2
Switching the unit system between inch and mm during display of “unit”
(only in inch spec)
1 Put the instrument in the Parameter Setup mode, and then quickly press and release
the [MODE] key repeatedly until “unit” on the LCD starts blinking.
2 Quickly pressing the [SET/ZERO] key changes “unit” from blinking to lighting-up and
blinks the currently-set unit system.
3 Press the [MODE] key quickly to switch to a desired unit (in or mm).
4 Quickly press the [SET/ZERO] key to apply the setting and switch the setup item to
the next “res.”.
Switching the digital resolution during display of “res.”
1 Put the instrument in the Parameter Setup mode, and then quickly press and release
the [MODE] key repeatedly until “res.” on the LCD starts blinking.
2 Press the [SET/ZERO] key quickly to blink the currently-set digital resolution.
3 Press the [MODE] key quickly to switch the setting to a desired resolution.
Unit system Selectable resolution
mm 0.0005mm 0.001mm
inch (only for inch spec)
.00002” .00005” .0001”
4 Quickly press the [SET/ZERO] key to apply the setting and switch the setup item to
the next “range”.
IMPORTANT •Upon switchover of the current unit system or digital resolution, this instrument
automatically makes conversions of the preset values and tolerance limit values. After
changing such a parameter, be sure to check the converted values.
No. 99MAH016B
3-2

3. OPERATING PROCEDURE
3.2.3 Switching the analog range (analog resolution) during display of
“range”
1 Put the instrument in the Parameter Setup mode, and then quickly press and release
the [MODE] key repeatedly until “range” on the LCD starts blinking.
2 Quickly pressing the [SET/ZERO] key changes “range” from blinking to lighting-up
and blinks the currently-set analog range.
3 Press the [MODE] key quickly to switch the setting to a desired analog range.
Digital
resolution Selectable analog range
0.0005mm ±0.01 ±0.02 ±0.05 ±0.1 ±0.2 ±40 ±80
0.001mm ±0.02 ±0.04 ±0.1 ±0.2 ±0.4 ±40 ±80
.00002” ±.0004 ±.0008 ±.002 ±.004 ±.008 ±2 ±4
.00005” ±.001 ±.002 ±.004 ±.01 ±.02 ±2 ±4
.0001” ±.002 ±.004 ±.01 ±.02 ±.04 ±2 ±4
RS-232
command * A01 A02 A05 A10 A20 AFS AFL
*: For information about RS232 commands, refer to section 4.2.4.
4 Quickly press the [SET/ZERO] key to apply the setting and switch the setup item to
the next “dir”.
3.2.4
•
Switching the count direction during display of “dir”
1 Put the instrument in the Parameter Setup mode, and then quickly press and release
the [MODE] key repeatedly until “dir” on the LCD starts blinking.
2 Quickly pressing the [SET/ZERO] key changes “dir” from blinking to lighting-up. Only
“dir” is displayed if the currently-set direction is “+” count, and “REV” blinks at the left
of “dir” if the direction is “-"count.
3 Press the [MODE] key quickly to switch the setting to a desired direction (between +
and -).
4 Quickly press the [SET/ZERO] key to apply the setting and switch the setup item to
the next “output”.
NOTE Upon change of the count direction, the sign (+/-) of a display value is also changed.
Before calling a preset value, perform setup of the count direction.
3.2.5
3.2.5.1
Switching the I/O format between SPC(digimatic) and RS232 during
display of “output”
1 Put the instrument in the Parameter Setup mode, and then quickly press and release
the [MODE] key repeatedly until “output” on the LCD starts blinking.
2 Quickly pressing the [SET/ZERO] key changes “output” from blinking to lighting-up
and blinks the currently-set I/O format.
3 Press the [MODE] key quickly to switch the setting to a desired I/O format (between
SPC and RS232).
4 Quickly press the [SET/ZERO] key to apply the setting and switch the setup item to
the next “id” (section 3.2.6) if SPC is specified. If RA232 is specified as the I/O format,
the procedure is continuously switched to the RS232 setup (section 3.2.5.1).
RS-232 setup
1 When the procedure is switched to the RS232 setup, “bps” starts blinking.
2 Press the [SET/ZERO] key quickly to blink the currently-set baud rate.
3 Press the [MODE] key quickly to switch the setting to a desired baud rate (4800 or
9600).
4 Quickly press the [SET/ZERO] key to apply the communication setting and switch the
setup item to the next “p-bit.”.
5 Referring to the following table, set the parity bit and data bit according to the
No. 99MAH016B 3-3

procedure in steps 2 to 4.
Setup item Display Setup content
Baud rate
(Bit rate) 4800bps 9600bps
Parity bit 0 (none) 1 (odd) 2 (even)
Data bit 7 bits 8 bits
6When the data bit setting has been applied, the setup item is switched to the next “id”.
NOTE •Initial setting (factory defaults) for RS-232 is as follows:
Bit rate: 9600bps Parity bit: even Data bit: 7bit
3.2.6
•
•
•
Setting ID No. for RS232 communication and remote control during
display of “id”
1 Put the instrument in the Parameter Setup mode, and then quickly press and release
the [MODE] key repeatedly until “id” on the LCD starts blinking.
2 Quickly pressing the [SET/ZERO] key changes “id” from blinking to lighting-up and
blinks the currently-set ten’s place of ID No.
3 Press the [MODE] key quickly to switch the ten’s place to a desired number (0 to 9).
4 Press the [SET/ZERO] key quickly to apply the specified number and blink the current
unit’s place of ID No.
5Press the [MODE] key quickly to switch the unit’s place to a desired number (0 to 9).
4 Quickly press the [SET/ZERO] key to apply the setting and switch the setup item to
the next “start”.
NOTE When the ID No. of the instrument has been set, only the signals from the remote control
and RS-232 communication with the same ID No. are received. If ID No. on the remote
control and RS232 communication sides is set to “00”, however, the instrument receives
any signals irrespective of its ID No.
The remote control (option) ID No. can be set to one of “00” to “07” or “09” to “15”.
The RS232 communication ID No. can be set to one of “00” to “09”.
3.2.7 Switching the length measuring system during display of “start”
1 Put the instrument in the Parameter Setup mode, and then quickly press and release
the [MODE] key repeatedly until “start” on the LCD starts blinking.
2 Quickly pressing the [SET/ZERO] key changes “start” from blinking to lighting-up and
blinks the currently-set length measuring system.
3 Press the [MODE] key quickly to switch the setting to a desired length measuring
system.
Display Setup content
Baud rate
(Bit rate) Always starts up under the INC system.
“ “(no display) Starts up under the length measuring system at the most
recent shutdown.
4 Quickly press the [SET/ZERO] key to apply the setting and switch the setup item to
the next “reset
Returning all parameters to factory defaults during display of “reset”3.2.8 1 Put the instrument in the Parameter Setup mode, and then quickly press and release
the [MODE] key repeatedly until “reset” on the LCD starts blinking.
2 When pressing the [SET/ZERO] key quickly, “no” on the LCD starts blinking.
3 To return the parameters to defaults, press the [MODE] key quickly to switch to “yes”
under blinking.
No. 99MAH016B
3-4

3. OPERATING PROCEDURE
4 Quickly press the [SET/ZERO] key to restore the defaults and switch the setup item to
the next “res.” (“unit” in inch spec).
IMPORTANT •
•
When resetting the parameters, the preset values and the upper and lower tolerance
limit values are also cleared. Set these values again.
Do not reset during RS-232 communication. Since the “I/O format” and “ID No.” are
changed, RS-232 communication will not be conducted any more.
3.3 Measurement Mode
3.3.1
•
•
Setting the length measuring system and reference point
This instrument has two length measuring systems, INC (Comparison) system and Preset
system.
Press and hold the [SET/ZERO] key for a long time in the normal measurement mode or
the tolerance judgment mode to switch the length measuring system between INC and
Preset systems.
NOTE The “INC” symbol lights up under the INC system and goes off under the Preset system.
To set the reference point, make sure that this instrument is clamped securely with the
spindle pushed in slightly.
3.3.1.1
3.3.1.2
(1)
(2)
(3)
(4)
•
•
•
•
•
INC system (Zero set)
In the INC system, the instrument measures a distance from the zero-set position.
When the [SET/ZERO] key is pressed quickly in the normal measurement mode or
the tolerance judgment mode, the instrument is zero-set at the current position.
Preset system (setting the preset value)
In the Preset system, the instrument measures a distance from the reference point
that has been preset with an arbitrary value (Calling the preset value).
1 When the [SET/ZERO] key is pressed shortly in the normal measurement mode or
the tolerance judgment mode, the most recent preset value is displayed, blinking the
“P” symbol.
2 Press the [SET/ZERO] key quickly to set the current spindle position to the preset
value, putting the instrument in the measurable state.
To change a preset value, press and hold the [SET/ZERO] key for a long time to blink
the “+” or “-” symbol, entering the state where a preset value can be set. Enter a sign
or a numeral observing the following procedure in steps (1) to (4).
Quickly press the [MODE] key repeatedly until a desired sign (+ or -) or numeral is
displayed.
Quickly press the [SET/ZERO] key to apply the sign or numeral and switch the
setup item to the next digit.
Repeat the procedure in steps (1) and (2) to enter a numeral in all digits. When
the least significant digit has been decided, the “P” symbol blinks up.
Press the [SET/ZERO] key quickly to set the current spindle position to the preset
value, putting the instrument in the measurable state.
NOTE The setting contents remain in memory even when the power is turned off.
Press and hold the [MODE] key for a long time in the process of presetting to restore the
state before presetting.
Press the [SET/ZERO] key while holding down the [DATA/Fn] key to reverse the order of
digits.
Press the [MODE] key while holding down the [DATA/Fn] key to reverse the order of a
numeric value.
Preset value can be called only for the first time after switching to the preset system. It is
impossible to call the preset value for the second time and afterward.
No. 99MAH016B 3-5

3.3.2 Switching a measurement type in the measurement mode
This instrument is provided with measurement mode described in the table below in
addition to normal measurement mode.
Press the [MODE] key quickly to switch the measurement mode to a desired
measurement type.
Reference Measurement mode Display Setup content
--- Normal Performs normal measurement.
3.3.2.1 Tolerance judgment
“<○>” Performs tolerance judgment
measurement.
Tolerance judgment is
performed for each hold value
in the runout, maximum value,
and minimum value hold
measurements.
3.3.2.2 Runout peak hold
“TIR” Performs peak hold
measurement of the runout
(total indicator reading).
3.3.2.3 Maximum value peak
hold
“Max”
Performs peak hold
measurement of the maximum
value.
3.3.2.4 Minimum value peak
hold
“Min”
Performs peak hold
measurement of the minimum
value.
3.3.2.1 Tolerance judgment (setting/checking the upper and lower limit values)
Tolerance judgment is performed for the current value in the normal measurement
mode, whereas it is performed for each peak hold value in each peak hold mode.
It is possible to set the upper and lower limit values separately for individual INC
system and Preset system.
It is not possible to set the upper and lower limit values separately for each
measurement mode.
The tolerance judgment is displayed with “< c>” and the backlight (red for NG and
green for OK).
1Quickly press the [MODE] key repeatedly until “< c>” on the LCD starts blinking.
2 When pressing the [SET/ZERO] key quickly, symbol “off” or “on” starts blinking.
3 Press the [MODE] key quickly to switch the blinking symbol to “on”.
4 Press the [SET/ZERO] key quickly. Then, the most recently-set upper limit value is
displayed and the “>” symbol starts blinking.
5 Quickly press the [SET/ZERO] key again to apply the upper limit value and switch the
setup item to the lower limit value.
To change the upper limit value, press and hold the [SET/ZERO] key for a long time to
blink the “+” or “-” symbol, entering the state where the upper limit value can be set.
No. 99MAH016B
3-6

3. OPERATING PROCEDURE
The same as the procedure in section 3.3.1.2(Setting the preset value), enter a
numeric value, then apply it with the [SET/ZERO] key to set the upper limit value.
6 When the upper limit value has been decided, the most recently-set lower limit value
is displayed and the “<” symbol starts blinking.
7 Quickly press the [SET/ZERO] key again to apply the lower limit value, thereby
entering the state where tolerance judgment can be performed.
To change the lower limit value, press and hold the [SET/ZERO] key for a long time to
blink the “+” or “-” symbol, entering the state where the lower limit value can be set.
The same as the procedure in section 3.3.1.2(Setting the preset value), enter a
numeric value, then apply it with the [SET/ZERO] key to set the lower limit value.
8 To cancel the tolerance judgment, switch the blinking symbol to “off” when “off” or “on”
is blinking, and then quickly press the [SET/ZERO] key.
NOTE •
•
If tolerance limit values have been erroneously set so as to be an upper limit value < a
lower limit value, “Error90” will be displayed. Press the [SET/ZERO] key shortly to clear
the error, and then set tolerance limit values so as to be an upper limit value > a lower
limit value.
Press and hold the [MODE] key for a long time in the process of tolerance setting to
restore the state before setting.
3.3.2.2
•
•
•
Run-out peak hold during display of “TIR”
Hold the runout of fluctuating measurement values according to the following
procedure.
When the tolerance judgment condition has been set, the instrument displays the
tolerance judgment result for the measured runout.
1 Quickly press the [MODE] key repeatedly until “TIR” is displayed.
2 Press the [SET/ZERO] key shortly to blink the “TIR” symbol. Then, the runout being
held is canceled and a new run-out hold measurement starts.
3 When the spindle is displaced, the “TIR” symbol changes from blinking to lighting-up
and a runout is held.
NOTE In the tolerance judgment measurement in the run-out hold mode, tolerancing is
performed by comparing the width between the upper and lower limit values that have
been set (upper limit value – lower limit value) and each TIR measurement value.
Start a run-out, maximum value, or minimum value hold measurement with the contact
point placed on a work-piece to be measured. Note that this instrument detects even a
displacement due to vibration or impact with a maximum response speed of 1m/sec.
When switching to “TIR”, “Max”, and “Min” sequentially by pressing the [MODE] key
quickly under the state where the run-out, maximum value, and minimum value have
been held, each peak value can be confirmed.
3.3.2.3
•
Maximum value peak hold during display of “Max”
Hold the maximum value of fluctuating measurement values according to the following
procedure.
When the tolerance judgment condition has been set, the instrument displays the
tolerance judgment result for the measured maximum value.
1 Quickly press the [MODE] key repeatedly until “Max” is displayed.
2 Press the [SET/ZERO] key shortly to blink the “Max” symbol. Then, the maximum
value being held is canceled and a new maximum value hold measurement starts.
3 When the spindle is displaced, the “Max” symbol changes from blinking to lighting-up
and the maximum value is held.
NOTE Press and hold the [SET/ZERO] key for a long time during measurement in the Preset
system. Then, the “INC” symbol lights up and the preset position is canceled. It is
possible, thereby, to perform measurement on the basis of the maximum value.(peak
zero set)
No. 99MAH016B 3-7

3.3.2.4
•
Minimum value peak hold during display of “Min”
Hold the minimum value of fluctuating measurement values according to the following
procedure.
When the tolerance judgment condition has been set, the instrument displays the
tolerance judgment result for the measured minimum value.
1 Quickly press the [MODE] key repeatedly until “Min” is displayed.
2 Press the [SET/ZERO] key shortly to blink the “Min” symbol. Then, the minimum value
being held is canceled and a new minimum value hold measurement starts.
3 When the spindle is displaced, the “Min” symbol changes from blinking to lighting-up
and the minimum value is held.
NOTE Press and hold the [SET/ZERO] key for a long time during measurement in the Preset
system. Then, the “INC” symbol lights up and the preset position is canceled. It is
possible, thereby, to perform measurement on the basis of the minimum value.(peak
zero set)
TIP •The difference of display and tolerance judgment in each measurement mode is shown
below.
Difference of display in TIR, Max., Min. mode
0
→a →b →c →d
Normal 0.00 5.00 -5.00 10.00 0.00
TIR 0.00 5.00 10.00 15.00
Max. 0.00 5.00 10.00
Min. 0.00 -5.00
Difference of tolerance judgment in each mode(Upper limit 8.00, Lower limit -3.00)
0 a b c d
Normal
TIR
Max.
Min.
c10.00
a 5.00
d
0.00
0 Lower limit
-3.000
-5.00
b
Upper limit 8.000
No. 99MAH016B
3-8

3. OPERATING PROCEDURE
3.3.3
•
•
Data output / Data hold
Output data to an external device or hold data according to the following procedure.
1 Press the [DATA/Fn] key quickly. Data is outputted to an external device if it is
connected with the connecting cable.
2 Data is held unless an external device is connected.
TIP For detailed information about data input/output, refer to chapter 4.
Data hold is available only when the SPC (digimatic) is set.
3.3.4
•
Function lock
To prevent wrong key operation, disable key entries except for peak hold cancel, data
output, data hold, and hold cancel according to the following procedure.
1 Press and hold the [DATA/Fn] key for a long time in each measurement mode. Then,
the “Lock” symbol lights up, putting the instrument in the function lock state.
2 To cancel the function lock state, press and hold the [DATA/Fn] key again for a long
time. The “Lock” symbol goes off, releasing the instrument from the function lock
state.
NOTE Function lock is canceled automatically when turning off the power of the instrument.
3.3.5
•
•
•
•
Centering the pointer
If the pointer is located outside the analog display range, move the pointer display
position to the center of the scale. This centering is the same operation in which the
bezel of a dial indicator is shifted around an arbitrary range of the dial scale.
Press the [SET/ZERO] key shortly while holding down the [DATA/Fn] key in each
measurement mode to move the pointer to the center of the scale.
NOTE In the normal measurement mode, locate the pointer so that the current measurement
position comes to the center of the scale.
In the runout hold mode, bring the center position of runout to the center of the scale.
In the maximum value peak hold mode, bring the center position of the maximum value
to the center of the scale.
In the minimum value peak hold mode, bring the center position of the minimum value to
the center of the scale.
3.4 Operation with the Remote Control (Option)
This instrument can be operated using the remote control (option).
Name of each
remote control
switch Function
SET INC system (when normal measurement): Zero-setting
Preset system (when normal measurement): Preset recalling
Each peak hold mode: Canceling peak hold (starting measurement)
DATA External device connected: Data output
External device unconnected: Data hold
MODE Switching a measurement type in the measurement mode
NOTE •
•
•
The remote control can identify and operate up to 14 Digimatic indicators in combination
by allocating ID No. to each indicator. For information about ID No. setup method of this
instrument, refer to section 3.2.6.
Data hold is available only when the SPC (digimatic) is set.
In the function lock state, switching zero-setting / presetting / measurement mode is
disabled.
No. 99MAH016B 3-9

No. 99MAH016B
3-10
MEMO

4DATA INUPUT/OUTPUT
This chapter explains the data input/output methods of the Digimatic
indicator.
4
This instrument provides two data communication methods of SPC (Digimatic)
input/output and RS-232 input/output. Select one of these methods to use the data
communication function.
IMPORTANT •
•
Use only the output cable of Mitutoyo specific accessories. The use of an improper
cable or deteriorated cable may disable data output.
Prior to data output carefully read the user’s manual of the data processing unit to use
it correctly.
4.1 SPC (Digimatic) Input/Output
Connect this instrument with a data processing unit such as Digimatic Mini Processor
DP-1VR using the M-SPC cable (optional accessory) to perform measurement transfer
and data processing including tabulation and record. It is also possible to input the preset
value by using Digimatic Presetter (option).
4.1.1 Connecting procedure
1 Switch the input/output format to SPC in the Parameter Setup mode. (Refer to section
3.2.)
2 Remove the cap on the I/O connector, and then plug the cable into the connector
firmly. (Pack the removed cap in a small bag and store it in a safe place so as not lose
it.)
TIP •For the method of switching the input/output format, refer to the section “3.2 Parameter
Setup Mode”.
4.1.2 I/O connector
Pin# Signal I/O
1 GND -
2(*1) DATA1 O
3(*1) CK O
4 (*1) RD O
5(*2) REQ I
6(*3) ENTRY I
7(*3) DATA2 I
8 VDD(5V) O
9 (N.C) -
10 GND -
*2
*3
*1
NPN open-collector or
Nch open-drain circuit
(2SC2855, etc.)
External device side
1000pF
1kΩ
22kΩ
ID-H side
For the Vcc=5 system
R1,R2=22kΩ±10%
C=330pF±20%
Tr
5V
R2
C
Vcc
R1
74HC14, etc.
*3: ENTRY and DATA2 are terminals dedicated to the Digimatic Presetter.
IMPORTANT •Since the power voltage differs between the ID-H and external device sides, absolutely
No. 99MAH016B 4-1
This manual suits for next models
1
Table of contents