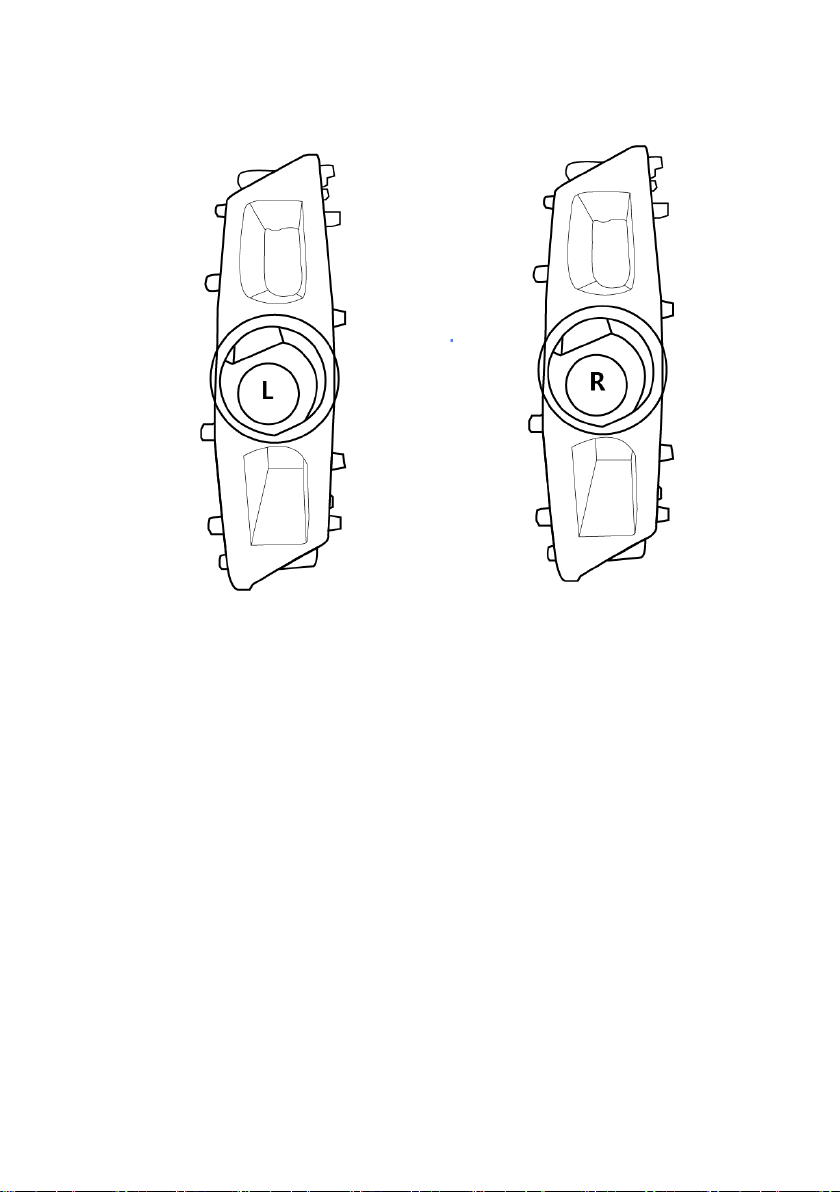
MJM RT-20 User manual

RT-20
USER’S MANUAL

Thanks for purchasing an MJM WHEELS™ RT-20 fat tire retro electric bike. MJM
WHEELS™ is based in CANADA, producing high-quality and unique style electric
bike with high-profile components.
Open the carton box and take out your RT-20 carefully. The package has following
items:
RT-20
CHARGER
PEDALS
FRONT
WHEEL
AXLE
F/R
REFLECTOR
Remove all zip ties and packing material, being careful when it comes to the edge
of the frame, tire and rim.
Follow steps to assembly your RT-20 ebike

Install Handle Bar
Loosen the bolts to put handle bar in between.
Use the reserved 4 bolts to install handle bar as picture shown.
Adjust handle bar angle and then tighten the 4 bolts to 20N.M.

Install Head Light
Use reserved bolts and bushing to install head light. Adjust height and angle, then
fasten all the bolts.
Connect the light power cable.

Install Front Wheel
Make sure the brake disc is placed in the center of caliper gap and front wheel can rotate
freely without any noise.
When the brake disc is not in the gap, DO NOT pull brake lever.

Install Pedals
Use the pedal marked with an “L” on the left side and the right pedal marked with an “R”
on the right side (side with drivetrain gears). The right-side pedal has a right-hand thread
(removes counterclockwise, installs clockwise); the left side pedal has a left-hand thread
(removes clockwise, installs counterclockwise). Be careful to not cross thread the pedals.

Insert, Remove or Adjust Saddle Height


Charge Battery before Your First Ride
*On the charger adapter, the red light stands for charging, while green light stands for
charging finished.
Make sure to charge your battery to full capacity before first ride.

Power ON/OFF your battery
Beside the charging port, you will find a separate switch to power ON/OFF your battery.
Make sure you switch on before your ride, and switch off after ride.
It helps protect the battery from draining itself.

Some Battery Tips
⚫Lithium battery capacity is reduced every time they have been used.
⚫MJM WHEELS™ genuine battery provides 600~800 charging cycles.
⚫Stay away from extreme environment. The suggested temperature operating limits
for the battery is -10C to 45C. Do not store need excessive heat.
⚫Do not allow the battery to be submerged in water or to be shorted out.
⚫The battery indicator bar on LCD display is only an approximate indicator of the
remaining charge.
⚫Frequent accelerating and braking will drain the battery charge more quickly than
using it to maintain a consistent speed ride.
⚫A battery will drain about 5% for every 8 hours of being left in stand-by mode.
⚫If you are not going to use the battery for an extended period of time, take out the
battery and store it in a cool, dry place.
⚫Do not use battery when it has less than 10% capacity left.
⚫Our bike is resistant to splashing, but not water-proof. Please do ride the bike
through water deeper than 17.5 cm. The controller box will short out.
⚫If you have been charging your battery for more than 12 hours and it is not yet fully
charged, take it off the charger and contact MJM WHEELS™.
⚫The charger may get warm to the touch, so make sure you charge they are in an
open area and do not lay anything on the charger unit while charging
⚫·Be friendly to the environment! Be sure to recycle your old batteries at a local
battery recycling center. Do not throw them in the garbage

Battery Storage
How to store your battery for a extended time?
Charge the battery every 3 months to avoid capacity loss. Batteries slowly self-discharge when
left unused for a long time. If a battery is allowed to reach a critically low voltage, their lifespan
and capacity will be permanently reduced.
Always disconnect your charger from the wall outlet and battery before storing the battery.
Avoid storing your battery in extreme temperatures, whether hot or cold.
Batteries are best kept in a cool, dry place. Do not allow batteries to accumulate condensation,
as this could cause shorting and corrosion.

Uninstall & Install Tank Cover
The RT-20 battery is placed inside the “tank”.
To replace the tank cover, or battery, you need to remove the tank cover by removing 2
bolts on each side. Use 5mm Allen Key.
To remove battery, use the same 5mm Allen Key to remove 4 bolts on the battery. You will
need to uninstall the tank cover on both sides to replace the battery.

Head Light Control
On the handle bar, there is a separate switch for head light. Push the button
⚫Downside: Low Beam
⚫Upside: High Beam
Don’t forget to switch off the light and battery when you finish riding. This operation helps
extend the battery life.

LCD Brief Manual
⚫To switch on the eBike system, press power button on handle bar. Repeat to shut off
the system.
⚫After switching on the eBike system, you can press Set button to switch between
ECO, STANDARD, and POWER modes
⚫Press + or – to adjust PAS speed level. There are 5 PAS levels by default.
⚫Hold the Set button for 2 seconds to enter setting interface, where you have the
options to customize.
⚫For more advanced settings, visit www.mjmwheels.com/pages/setup

Error Code
Definition
Solution
1
Current error or MOS damaged
Replace controller
2
Throttle Abnormality
Disconnect throttle
wire (located in
controller box, or in
front of handle bar if
the bike has water
proof quick release
connector) to see
whether the ERROR
code disappears. If it
does, replace throttle.
3
Motor Abnormality
Re-connect motor
wire (located
underneath chain stay
at right side). If still
does not work,
replace a new motor.
4
Motor Hall Abnormality
Contact with seller,
return full rear wheel
Troubleshooting
If there are errors about the electronic control system, the error code will appear
automatically.

to replace a motor
rotor.
5
Brake Abnormality
Disconnect 2 brake
lever wires (located in
front of handle bar to
see whether the
ERROR code
disappears. If yes,
replace the brake
lever and reconnect
brake lever wire to
controller.
6
Under voltage
Fully charge the
battery
7
Motor stalling
Do not block motor
from rotating freely
8
communication controller
receiving error
Disconnect all wires
(brake lever, display,
throttle, and motor)
then reconnect. Check
all connectors are in
good connection.
9
communication display receiving
error

As a final check, please go through this checklist to make sure
your bike is properly assembled and safe to ride:
■Handlebars
Ensure handlebars are straight and secure and all relevant bolts are tight.
Test that they are securely attached to the forks by gripping the front wheel
between your legs and attempting to turn the handlebars.
■Wheels
Ensure the front and rear mudguard stays are tight.
Check that the quick release mechanism is tightly gripping the front wheel.
■Seat and post
Ensure that the seat is straight and secure.
■Pedals and chain
Ensure the pedals are fully wound in, and tight. .
■Chain
Ensure that the chain is properly set up the gears

■Brakes
Test front and rear brakes whilst rolling the bike forwards –both wheels should
stop completely.
Test that there more than a fingers width between the grip and the brake lever
when fully depressed.
■Rack
Ensure that the rack is secure and that all visible bolts are tight.
■Kickstand
Rock the bike gently from side-to-side to ensure that the kickstand does not wobble. Tighten
the bolt on the frame directly above the kickstand if necessary.
■Tires
Pump the tires to the point that they are firm and cannot be deformed with
your thumb. This is equivalent to roughly 60ppi of pressure for the Sport and
Classic models and 50ppi for the Urban.
■Electrics
Test the pedal assist function by rotating the pedals with the rear wheel raised.
Fully charge the battery before use.

Before riding:
Adjust the height of the handlebars and saddle to suit the rider, whose toes should be able to
just touch the ground.
■Check that all lights and displays are working.
■Check regularly to ensure that the electrical connectors between the bike
and battery are clean.
■Check the brakes: this can be done by putting the front brake on and
pushing forwards. Do the same with the back brakes. The bike should not
move and the brake levers should not touch the handlebars. The brakes
should work without having to press down too hard on the handles.
■If your bike has a quick release on the front wheel then check that this is
properly tight in its position within the front forks. Quick release
mechanisms can more easily work loose than conventional axles and so
should be checked often for tightness.
■Wear an approved safety helmet when riding your e-bike:
■After mounting the bicycle, turn on the main switch, the power display
light will come on, indicating power is connected
■Release the kickstand, mount the bike, placing one foot ready to pedal,
check that it is safe to proceed, and then set off. You will feel the
motor as you begin to pedal.
Table of contents
Other MJM Bicycle manuals
Popular Bicycle manuals by other brands

LPR
LPR LPR12 JNR MX-V2 owner's manual

PROPAIN
PROPAIN BAM BAM Assembly instructions & user manual

HP Velotechnik
HP Velotechnik Street Machine Gte 2008 Operating manual and service instructions

HASE Bikes
HASE Bikes TRETS REH user manual

Hercules
Hercules Montfoort Cruise F7 operating instructions

Milly Mally
Milly Mally hero Operational manual