Mockingbird Let's Dig In! Guide

Let’s Dig In!
Mockingbird High Chair
Instruction Manual and User Guide
Scan the QR code for a step-by-step video tutorial
on setting up and using your Mockingbird High Chair

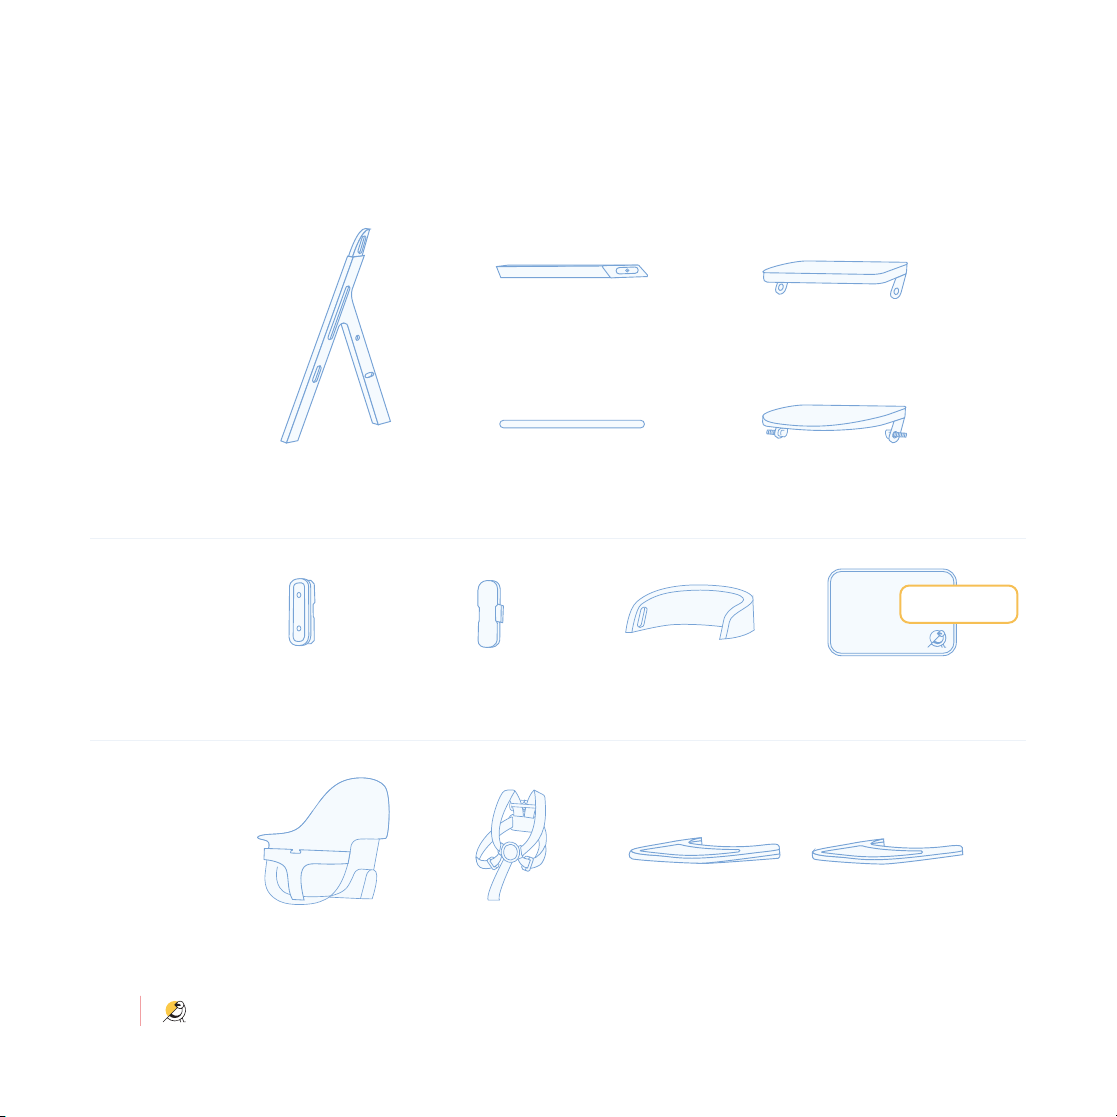
• Always use restraints, and adjust to fit snugly.
• Tray is not designed to hold child in chair.
• Stay near and watch child during use.
• Adult assembly required. Package contains small
parts, some of which may have sharp edges.
• Do not use the High Chair unless all
components are correctly fitted and adjusted. Pay
special attention to the Baby Seat, Belly Bar and
Adjustable Toddler Footrest – make sure these are
properly fastened before you put your child into the
chair.
• Do not use the Harness if it shows any signs of
deterioration or excessive wear and tear, such as
peeling, flaking or cracks in the plastic or silicone. If
any such deterioration or excessive wear and tear is
observed, please contact the Mockingbird Customer
Experience Team at hellomockingbird.com/contact to
order a replacement.
• Always place the High Chair on a level, stable
surface.
• Do not place the High Chair near an open fire or
other sources of strong heat due to the risk of fire.
• Do not use the High Chair if any part is broken, torn
or missing.
• Maximum child weight in child chair 150lbs.
• Do not use the High Chair until child can sit
unassisted.
• Maximum child weight in Baby Seat 35lbs.
• Do not use the High Chair without the plastic harness
clip installed securely on the silicone harness hub.
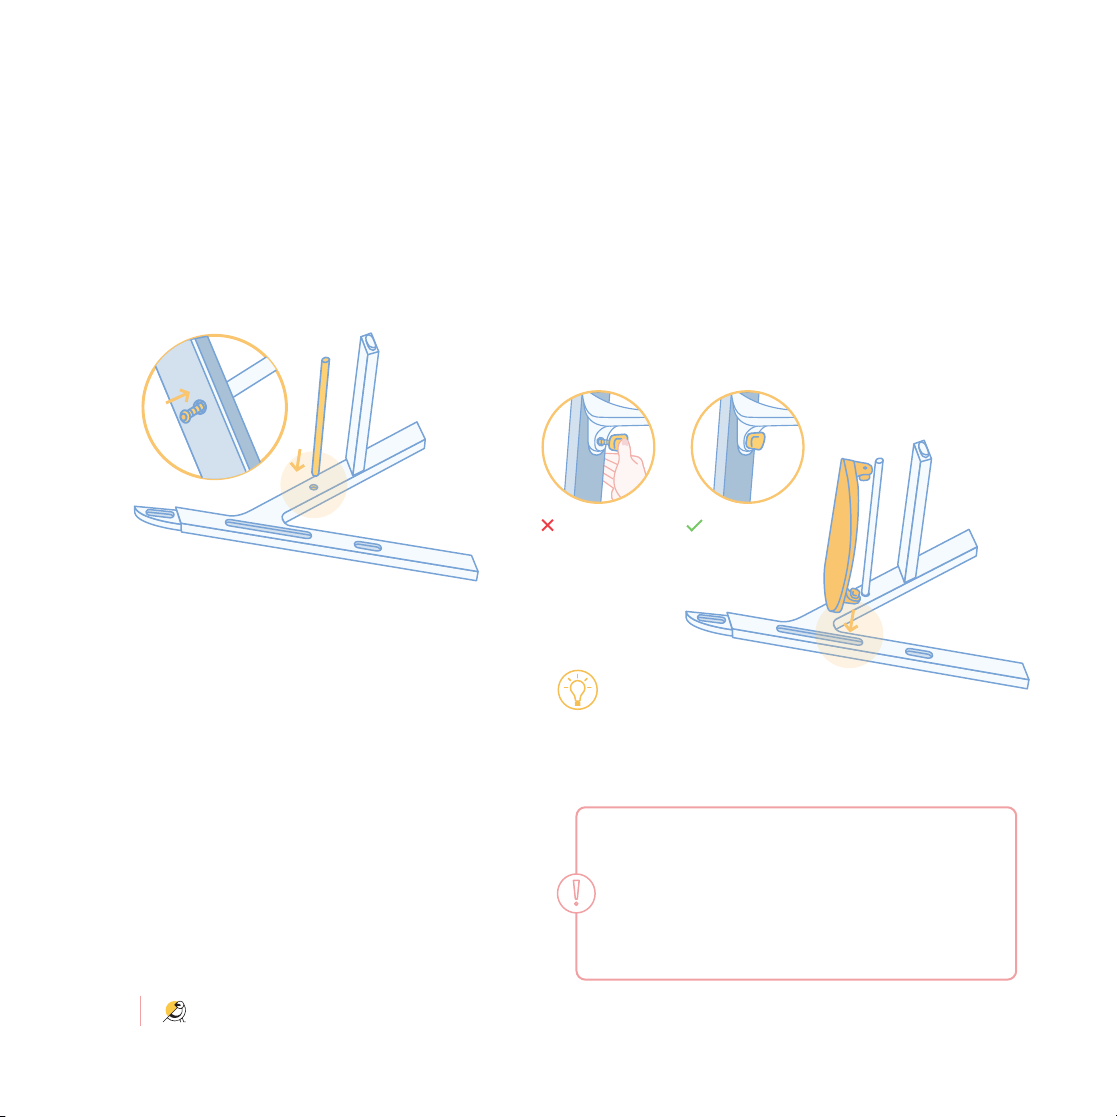
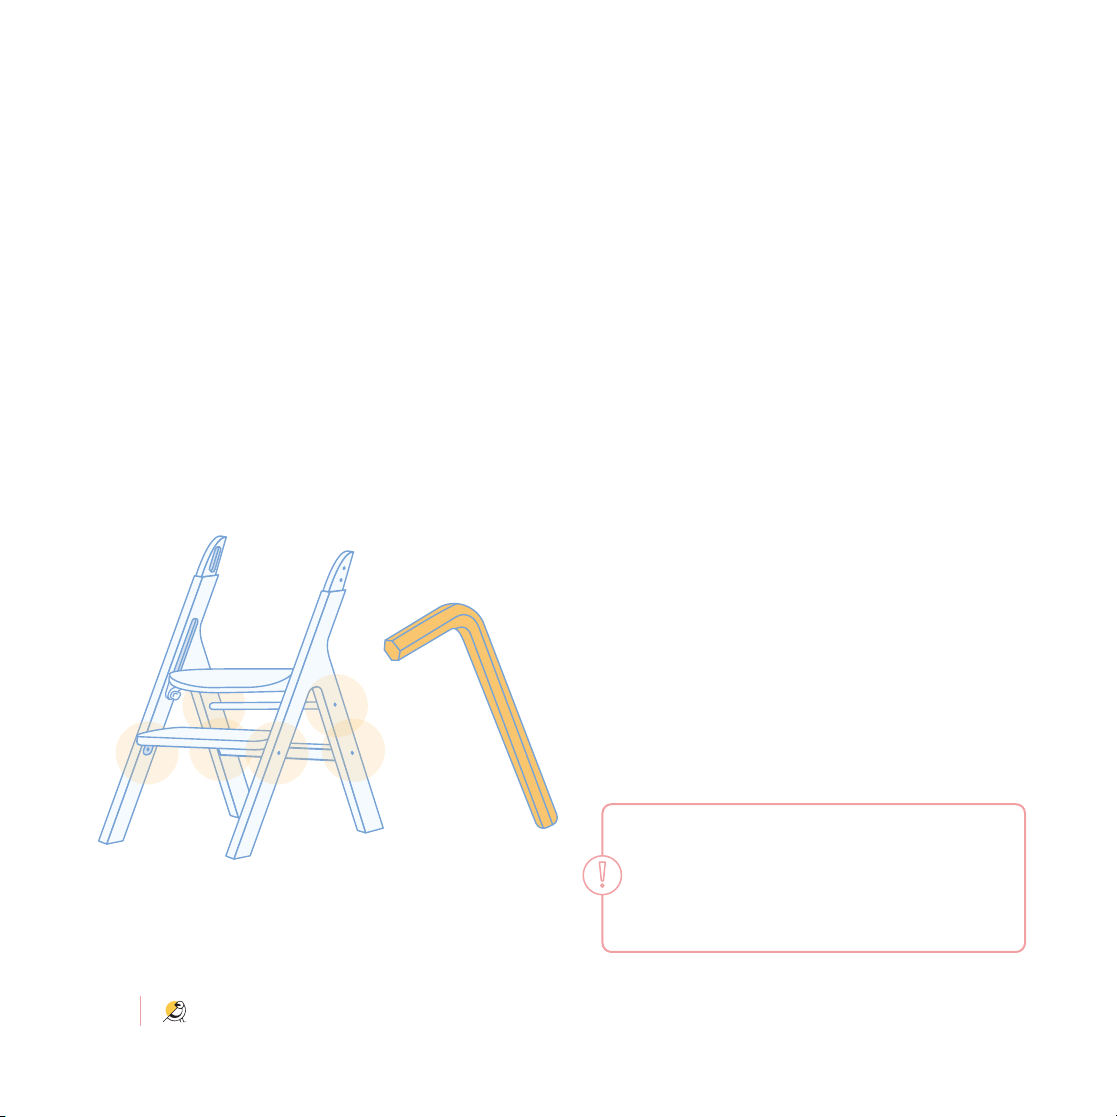
• Retighten all bolts 2-3 weeks after assembly of the High
Chair. After that you should check and retighten the
bolts if necessary on a regular basis, e.g. every second
month. Keep the Hex Key for future use, but out of the
child’s reach.
• Do not use the High Chair as a step stool.
• Do not use with a booster seat.
• NEVER use with accessories or replacement parts not
approved by Mockingbird for use with this product.
• For indoor use only.
• Do not place more than 10lbs. on the Tray. Do not rest
or lean on the Tray.
• Do not allow unsupervised children to play with or
climb on the High Chair.
• Do not allow children to stand in the High Chair or on
the Child Chair seating surface.
• Do not drag the High Chair across the floor. Dragging
the chair may scratch flooring. Lift and place the High
Chair when relocation is needed.
• The Adjustable Baby Footrest MUST be secured in the
highest adjustment position to use as a Child Chair seat.
WARNING
Failure to follow all warnings and instructions could result in SERIOUS INJURY or DEATH. Read these instructions
carefully before assembling and using this product. Store this user guide in a convenient place so it can be
consulted often.
When using this product as a High Chair with the Baby Seat installed:
FALL HAZARD: Children have suffered severe head injuries including skull fractures when falling from high
chairs. Falls can happen suddenly if child is not restrained properly.
General Warnings

@hello_mockingbird
1
Instruction Manual
3 What’s Included
5 Assemble the Frame
9 Assemble the Child Chair
11 Attach the Baby Seat
12 Attach the Adjustable Tray
14 Loading and unloading your child in the
High Chair
16 Adjusting the High Chair
18 Using the Tray Liner
19 A seat at the table
20 Converting to the Child Chair
21 When things get messy
Table of Contents
User Guide
Loading: Utilizing the Strap Hooks and adjusting the Harness
Unloading: Using the Quick Release Buckle
Removing the Harness
Adjusting the Baby Footrest
Adjusting the Tray
Attaching and removing the Tray Liner
High Chair Mode
Child Chair Mode
Removing the Baby Seat
Adjusting the Baby Footrest
Cleaning and Maintenance

5@hello_mockingbird
Instruction Manual
Let’s get started setting up your High Chair!
Watch our instructional
video for a step-by-step
tutorial here.

@hello_mockingbird
3
Hardware & Tools:
Hex Key
Frame Bolts (6)
Capsule Bolts (4)
Mockingbird High Chair
All the tools you’ll need are right here!
Frame Bolts (6)
Capsule Bolts (4)
Hex Key
We’d love to help you get everything set
up properly. Scan this QR code for our
easy step-by-step video guide.
To keep things simple, you’ll find all the hardware and tools needed to assemble your
High Chair in this package!

@hello_mockingbird
4
High Chair Components:
Child Step
Adjustable Baby Footrest
e Frame:
Child Chair:
Baby Seat
& Tray:
Frame Leg (2)
Baby Seat
with Belly Bar
5-Point Harness
(attached to the
Baby Seat)
Metal Crossbar
Capsule CapCapsule Child Backrest Placemat
Wooden Crossbar
Adjustable Tray Tray Liner
(attached to the Tray)
Bonus Gift!

@hello_mockingbird
5
Assemble
the Frame
Lay one Frame Leg flat on the floor with the inside face
up and all indents visible. Insert the Wooden Crossbar
into the matching indent on the bottom of the Frame
Leg. Insert a Frame Bolt from the outside of the Frame
Leg and fully tighten until completely snug.
Install the Wooden Crossbar
1
Ends of the Wooden Crossbar
To avoid scratching the Frame Legs during assembling lay down a
blanket before beginning assembly.
Pro Tip

@hello_mockingbird
6
Lay one Frame Leg back on its side and insert the Metal
Crossbar into the matching indent in the Frame Leg
above the Wooden Crossbar. Insert a Frame Bolt on
the outside of the leg and fully tighten until completely
snug.
Lay one Frame Leg back on its side and insert the
Adjustable Baby Footrest into the bottom of the white
track. Align the thumb screw at the bottom setting
and push the thumb screw into the track and tighten
until completely snug so there is no gap between the
Adjustable Baby Footrest and thumb screw.
Install the Metal Crossbar Install the Adjustable Baby Footrest
Important!
The thumb screws contain a spring and will pop out when not
fully engaged. Always check thumb screws are fully tightened
on both sides, on the same setting, before use. Tighten until
completely snug on both sides and there is no gap between
the Adjustable Baby Footrest and thumb screw.
The Footrest has four adjustable positions to fit your little
one just right. See page 16 for more tips about adjusting the
Footrest.
Pro Tip
Footrest umb Screw
Not Tightened Fully Tightened

@hello_mockingbird
7
Take the other Frame Leg and gently align the
Crossbars, Baby Footrest and Child Step into their
corresponding indents on the Frame Leg. Sandwich the
Frame Legs together. Install and tighten all remaining
Frame Bolts and thumb screws. For easier access, flip
the Frame over to tighten the Baby Footrest thumb
screws and Child Step Frame Bolts specifically.
Attach the second Frame Leg
Align the Child Step with the matching indent on the
bottom of the Frame Leg below the Baby Footrest.
Insert a Frame Bolt on the inside of the leg and and fully
tighten until completely snug.
Install the Child Step

@hello_mockingbird
8
Using the Hex Key, retighten all six Frame Bolts until
completely snug. There should be no gaps between
each part and the Frame Legs.
Tighten the Frame Bolts
Important!
Keep the Hex Key and retighten all Frame Bolts 2-3 weeks
after assembly of your High Chair. After that, you should
check on and retighten the bolts every other month or if
there is any wobble in the Frame.

@hello_mockingbird
9
Align the openings on the bottom of the Child Backrest
with the tops of the assembled Frame Legs. Slide the
Child Backrest onto the Frame Legs.
Insert the Capsule into the hole on each side of the
Child Backrest. While holding the Backrest up, insert
the two Capsule Bolts on each side of the Child
Backrest. Use the Hex Key to tighten all four bolts
completely.
Slide the Child Backrest onto the Frame Install the Capsules
Assemble the
Child Chair
2

@hello_mockingbird
10
Insert each Capsule Cap into the Capsule on both sides
of the Backrest. You will hear them click into place
once securely clipped in.
Insert the Capsule Caps
If you want to disassemble your High Chair in the future,
the Capsule Caps can be easily removed by using a flat head
screwdriver to pop them out.
Pro Tip

@hello_mockingbird
11
Align the Baby Seat over the Capsules and slide into
place onto the Backrest. Push down and on the base
of the Baby Seat and listen for a click on both sides.
Confirm the Baby Seat is fully clipped in and locked by
pulling up on each side of the Baby Seat.
Align the Baby Seat onto the Capsule
Attach the
Baby Seat
3
To learn more about converting the High
Chair to a Child Chair see page 20.
Pro Tip

@hello_mockingbird
12
Grasp the sides of the Adjustable Tray. Align the
openings on the sides with the armrests and the track
on the bottom with the Belly Bar. Slide onto the Baby
Seat and listen for the click on both sides. To adjust
positions or remove the Tray press the buttons located
on the bottom side of the Adjustable Tray and slide
the Tray in or out to each position. Utilize the markers
on the armrests to adjust the Tray to your desired
position. Always after adjusting positions, pull the tray
forward to confirm it is fully clicked in.
Grasp the sides of the Adjustable Tray, press the
buttons located on the bottom side of the tray and pull
outward to remove.
Slide on the Adjustable Tray Removing the Tray
Attach the
Adjustable Tray
4
The Tray has three adjustable positions to fit your little
one just right. See page 17 for more tips about adjusting
the Tray.
Pro Tip

16 @hello_mockingbird
User Guide
Great job! Look at you, mastering this set up.
Read on to learn how everything works!

@hello_mockingbird
14
Unbuckle the harness and align your child’s legs with
the leg openings of the Baby Seat. Gently lower your
child into the High Chair, ensuring they are comfortably
seated and their back is supported.
Secure your child in the 5-point safety harness,
adjusting the straps by pulling on the adjustment
points at the waist. The straps should rest comfortably
on the front of the child’s shoulders, and should not be
slipping off. The removable Strap Holder can be used
to help reduce strap slippage off the child’s shoulders.
The straps should be snug, but not too tight. Your child
should be able to move their arms comfortably. Fasten
the strap clips into the Quick Release Buckle (you
should hear an audible click). Give the straps a gentle
tug to confirm they’re securely fastened.
Loading Securing Your Child
Loading and unloading your
child in the High Chair
For an easy loading experience, first move the harness
straps out of the way by hooking them on the Strap
Hooks located on the back of the Baby Seat.
Pro Tip

@hello_mockingbird
15
To remove the Harness for cleaning, locate the silicone
tab attached to the Harness on the back of the Baby
Seat. Slide off the plastic clip attached to the silicone
tab and set aside for later. Pull the tab towards you and
squeeze the bottom portion on tab, flattening the tab.
Push the flattened tab through the hole in the seat to
remove the Harness.
To reattach the Harness, push the silicone tab back
through the Baby Seat and reattach the plastic clip by
sliding it on the hub post all the way over between the
silicone tab and Baby Seat. Rethread the crotch strap
and buckle back though the seat. Pull on the Harness
to make sure it is secure before use.
To remove the crotch strap and buckle pull the strap
though the hole in the base of the Baby Seat.
Press the button on the Quick Release Buckle
to quickly and easily release the straps. Undo the
Harness and gently lift your child out of the seat.
Removing the HarnessUnloading

@hello_mockingbird
16
The Baby Footrest has 4 positions so you can adjust
the seat height to fit your child just right. Unscrew the
thumb screws on both sides of the Footrest, until you
feel them pop out. Slide the Footrest up and down the
track, using the markers in the track as a guide. Once at
your ideal height, push the thumb screws back in and
tighten until completely snug on both sides and there
is no gap between the Adjustable Baby Footrest and
thumb screw.
When specifically adjusting the Baby Footrest in the
highest position you feel it lock into place once it is in
position. Once locked, push the thumb screws back
in and tighten until completely snug as well. After
adjusting, press down on the Footrest to make sure it is
secure before using.
Adjusting the Baby Footrest
Adjusting the High Chair
Adjust the Footrest height and Tray depth to ensure a comfortable fit for your child, and look for the following:
- Child can sit upright in the High Chair, and Baby Seat should provide proper support to prevent slouching, reclining or leaning to the sides
- Feet resting flat on the Footrest, with knees at a 90 degree angle
- Child can comfortably reach the Tray
Pro Tip

@hello_mockingbird
17
The Tray has 3 positions to adjust the seat depth for
your child. Press the buttons located on the bottom
side of the Tray and slide onto the Baby Seat. Utilize
the markers on the armrests to adjust the Tray to your
desired position. You will hear an audible click when
both sides are in a position. To re-adjust the Tray,
grasp the sides and press the buttons on the bottom
of the tray on both sides. Push in or pull out the Tray
to reach your desired position. Pull the Tray forward to
confirm it is fully clicked in. Use the number markings
on the armrests to confirm both sides are in the same
position.
Adjusting the Tray

@hello_mockingbird
18
The Tray Liner comes attached to the Tray. For easy
and quick one-hand removal, locate the tabs on either
side of the Tray Liner and pull outward on the tab to
unclip the Liner from the Tray. Repeat on the other side
and lift the Tray Liner up and off the Tray. To reattach,
press the Tray Liner onto the Tray until you hear it click
into place on both sides.
Attaching and Removing the Tray Liner
Using the Tray Liner
The Tray Liner provides added convenience as another tray option and makes for easier mealtime clean ups. After use, simply remove
the Tray Liner and wipe it down to use for the next meal. You can also put in the dishwasher and use the the Tray itself for your little
one’s next meal!
Pro Tip
Table of contents
Popular High Chair manuals by other brands

Coto baby
Coto baby stars q user manual

Hauck
Hauck SIT'N RELAX 3 IN 1 Instructions for use

Melissa & Doug
Melissa & Doug Wooden Doll High Chair 9382 Assembly instructions

Graco
Graco 3J01ZFA - Cozy Dinette Highchair owner's manual

Hauck
Hauck Sit'n Relax Instructions for use

Redsbaby
Redsbaby HILO instruction manual