Joovy Foodoo User manual

Instruction Manual
Manuel d’Instructions
Manual de Instrucciones
取扱説明書
Bassinet & High Chair
222X
© Joovy 2022 • 220228
OPEN & ASSEMBLE

2
Bassinet & High Chair

Table of Contents
English
Congurations .................................................................................................................................. 2
Safety and Warnings ........................................................................................................................ 3
Parts List .......................................................................................................................................... 7
Assembly and Usage........................................................................................................................ 8
Care and Maintenance ................................................................................................................... 13
Team 432........................................................................................................................................ 14
Francais
Congurations ................................................................................................................................ 16
Sécurité et Mise en Gardes............................................................................................................ 17
Liste des Pièces ............................................................................................................................. 22
Montage et Utilisation .................................................................................................................... 23
Entretien et Maintenance................................................................................................................ 29
Équipe 432 ..................................................................................................................................... 30
Español
Conguraciones ............................................................................................................................. 32
Seguridad y Advertencias .............................................................................................................. 33
Lista de Partes................................................................................................................................ 38
Ensamblaje y Uso........................................................................................................................... 39
Cuidado y Mantenimiento .............................................................................................................. 45
Equipo 432 ..................................................................................................................................... 46
日本語
構成 ................................................................................................................................................ 47
安全と警告 ...................................................................................................................................... 48
部 品リスト ....................................................................................................................................... 52
組み立てと使用方法 ........................................................................................................................ 53
保存取り扱い................................................................................................................................... 58
チーム432 ....................................................................................................................................... 59

2
Congurations
This product can be used in the following modes:
1 2 3
Bassinet Bassinet on stand High Chair
From birth up to 5 months or
max weight of 20 lbs. (9 kg).
From birth up to 5 months or
max weight of 20 lbs. (9 kg).
From birth up to 3 years or
max weight of 50 lbs. (22.7 kg).
45 6
Infant Booster Toddler Booster Youth chair
From when baby can sit
upright unassisted (about 6
months) up to max weight of
50 lbs. (22.7 kg).
From when baby can sit
upright unassisted (about 6
months) up to max weight of
60lbs. (27.3 kg).
From 3 years up to max
weight of 60 lbs. (27.3 kg).

3
Bassinet Modes (No. 1 & No. 2)
Failure to follow these warnings and the instructions could result in
serious injury or death.
• FALL HAZARD: To help prevent falls, do not use this product when the
infant begins to push up on hands and knees (about 5 months of age) or
has reached over 20 lbs. (9 kg), whichever comes rst.
•SUFFOCATION
HAZARD: Infants
have suocated:
• In gaps between extra padding
and side of the bassinet.
• On soft bedding.
Use ONLY the pad provided by
Joovy.
NEVER add a pillow, comforter,
or another mattress for padding.
• To reduce the risk of SIDS, pediatricians recommend healthy infants
be placed on their backs to sleep, unless otherwise advised by your
physician.
• FALL HAZARD—Always check that the bassinet is securely locked on
the stand by pulling upwards on the bassinet.
Safety and Warnings
IWARNING
IMPORTANT! KEEP FOR FUTURE
REFERENCE
Please read these instructions carefully before use and keep them
for future reference.

4
• If a sheet is used with the pad, use only the one provided by Joovy
which is specically designed to t the dimension of this bassinet mattress.
• Suocation Hazard: Bassinet can roll over on soft surfaces and suocate
child. NEVER place bassinet on beds, sofas or other soft surfaces.
• Fall Hazard: Child’s activity can move bassinet. NEVER place bassinet
on counter tops, tables or any other elevated surface.
• NEVER use this bassinet as a means to transport an infant in a motor vehicle.
• Do not use this bassinet if you cannot exactly follow the accompanying
instructions.
• Do not place any cord, strap or similar item in or near this bassinet that
could become wrapped around a child's neck.
• Do not place this bassinet near a window or patio door where a child
could reach the cord of a blind or curtain and be strangled.
• Check this bassinet regularly before using it and do not use it if any
parts are loose or missing or if there are any signs of damage. Do not
substitute parts. Contact the manufacturer if replacement parts or
additional instructions are needed.
• Children can suocate on soft bedding. Do not place pillows,
comforters or soft mattresses in this bassinet.
• Use only the mattress supplied by the manufacturer with this bassinet.
Do not add an additional mattress to this bassinet.
• Strings can cause strangulation! DO NOT place items with a string
around a child’s neck, such as hood strings or pacier cord. DO NOT
suspend strings over bassinet or attach strings to toys.
• The bassinet must be fully assembled per Joovy’s instructions before
using. Do not modify the bassinet or add any attachments not
specically recommended by Joovy.
• When used on the stand, ensure that the product is secure before a
child is placed in the bassinet.
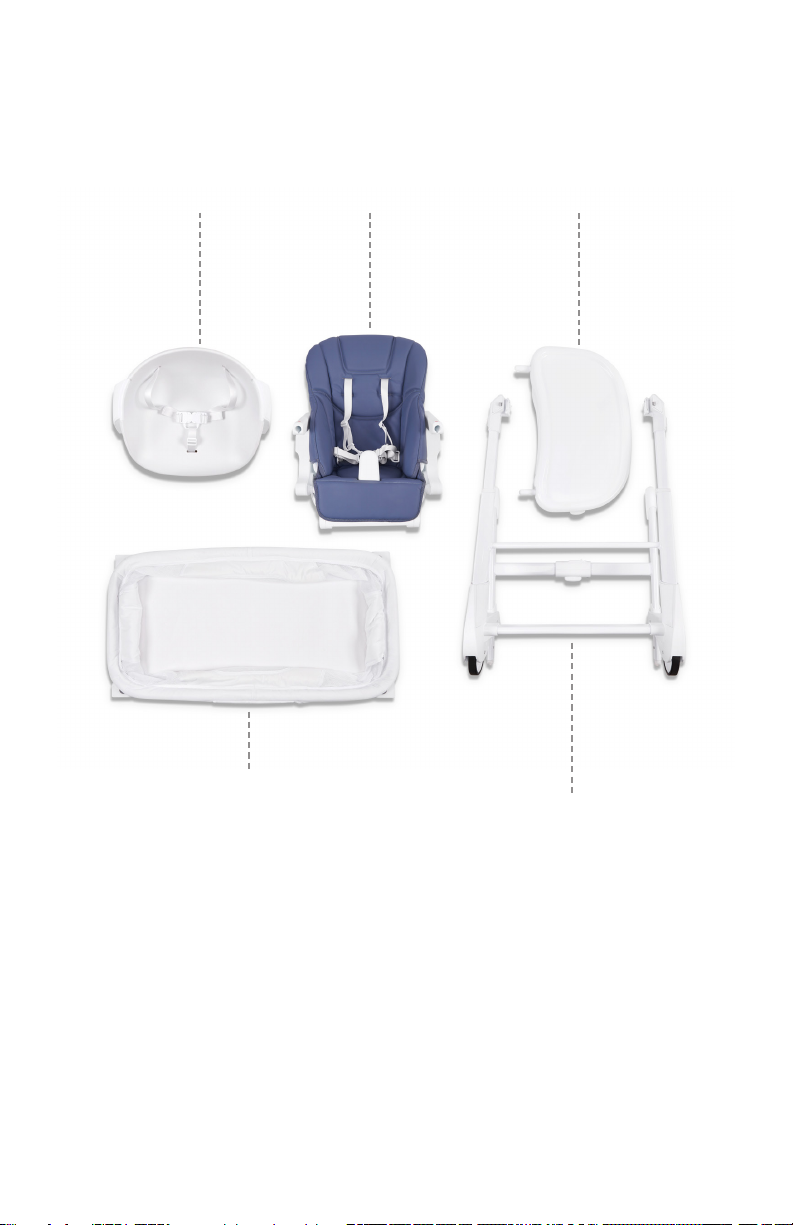
High Chair Mode (No. 3)
FALL HAZARD: Children have suered severe head injuries including skull
fractures when falling from high chairs. Falls can happen suddenly if child
is not restrained properly.
• Always use restraints, and adjust to t snugly.
• Tray is not designed to hold the child in the chair.
• Stay near and watch child during use.
• Always use high chair on a at, smooth surface.
• Never use near stairs.
• Never allow child to use footrest to climb in or out of the high chair.
• The child should be secured in the high chair at all times by the restraint
system, either in the reclining or upright position. The tray is not
designed to hold the child in the chair.

5
• It is recommended that the high chair be used in the upright position
only by children capable of sitting upright unassisted.
• It is recommended that the tray not be used on the high chair when it is
occupied by a child who cannot sit upright unassisted.
• NEVER use in any location where hanging cords can be reached by child.
• ALWAYS keep child in view while in high chair.
• The maximum weight for the high chair is 50 lbs. (22.7 kg). Excessive
weight may result in a hazardous unstable condition.
• The maximum age for the high chair is 3 years.
• The total weight that can be placed in the seat back pockets should be
less than 2.2 lbs. (1 kg).
• Do not use the high chair unless all components are correctly tted and
adjusted.
• Check your high chair for any parts that may be broken, torn or missing
before use and on a regular basis. Discontinue use of the high chair
should it malfunction or become damaged.
• Discard all packaging materials properly. Do not allow children to play
with them.
Infant and Toddler Booster Seat Modes
(No. 4 & No. 5)
IWARNING
Children have suered head injuries, including skull fractures, after
falling with or from booster seats.
• Check that infant or toddler booster seat is securely attached to adult
chair before each use.
• Always use restraints until child is able to get in and out of booster
seat without help. Adjust to t snugly.
• Never allow child to push away from table.
• Never lift and carry child in booster seat.
• Stay near and watch your child during use.
• ALWAYS use infant booster in the upright position on an adult chair.
• Never use infant booster seat on the oor as a oor seat.
• Place infant or toddler booster seat ONLY on an adult chair that has
a backrest.
• Ensure that the booster seat ts at onto the adult chair seat.
•ALWAYS attach BOTH sets of straps to the adult chair. Ensure
straps are tightly secured.
• If booster seat does not t at onto the adult chair seat or cannot
be securely attached to the adult chair, DO NOT use seat with that
chair.

6
• Use this product only for children capable of sitting upright unassisted.
• Prevent serious injury or death. Do not use in motor vehicles.
• Until child is able to get in and out of the booster seat without help
(about 2 ½ years old), the child should be secured in the booster seat at
all times by the restraining system. The tray is not designed to hold the
child in the chair.
• The maximum weight for the Infant booster seat is 50 lbs. (22.7 kg).
Excessive weight may result in a hazardous unstable condition.
• The maximum weight for the Toddler booster seat is 60 lbs. (27.3 kg).
Excessive weight may result in a hazardous unstable condition.
IWARNING
• Use this plastic seat as a booster ONLY on an adult chair.
• NEVER use plastic seat on the oor as a oor seat.
Youth Chair Mode (No. 6)
IWARNING
• Use as a youth chair ONLY for a child that is at least 36 months old and
can sit up unassisted.
• The maximum recommended weight for a child using the youth chair is
60 lbs. (27.3 kg).
• Remove the child restraint system and the chair attachment system from
this plastic seat before mounting it to the stand.
• Always place the youth chair on a at stable surface.
• Do not use if any parts are damaged or missing.
Please do not return this product to the store.
If you experience any diculty with the assembly or use of this product, or if you have a question
regarding these instructions, please contact Team 432 (page 14).
Please note: Styles and colors may vary.

7
Parts List
Bassinet with
mattress included Stand
Tray with tray insert
Plastic Seat High Chair seat/
Booster seat

8
Unpacking the Product
• Remove everything from the box – Stand, High Chair/Booster seat, Plastic seat, Tray with tray
insert, Bassinet with included mattress and documents (not shown).
• Discard all packaging materials properly including plastic coverings.
• DO NOT allow children to play with any packaging materials.
IWARNING
Adult assembly is required for this product. No tools required.
Bassinet Assembly Mode (No. 1)
• Keep children away from bassinet while assembling.
• Face the bassinet bottom toward you on its side. (1)
• Pull open the two clamps on the bassinet bottom. (2)
• Unfold the two supporting legs from both sides of the bassinet. (3)
• Extend the bassinet mattress to allow the supporting legs to be located inside the locking clamps. (4)
• With one hand push the mattress bottom from inside and close both clamps until they snap in place. (5)
• Push down on both sides of the bassinet to ensure the clamps are secure.
The bassinet can now be use in standalone Mode No.1.
Attaching Bassinet to Stand Mode (No. 2)
• Open the stand by rotating the rear legs toward the oor until they lock into place. (6)
• Make sure BOTH adjustable legs are locked in the lowest position. (7)
• The bassinet can be attached to the stand ONLY in one direction.
• Identify the arrows on the sides of the bassinet. (8)
• Align the bassinet so that the arrows are pointing toward the front of the stand. (9)
• Align the slots on each side of the bassinet with the male brackets on the adjustable legs of the
stand. (10)
• Push the bassinet down until it locks into place. (11)
• Ensure that the release buttons on BOTH sides of the adjustable legs are in the OUT position. (12)
• Pull up on the bassinet to ensure it is secure.
Detaching the Bassinet
• To detach the bassinet from the stand, press the release buttons on BOTH sides of the stand. (13)
• Grasp the bassinet handles and pull it up o the adjustable legs. (14)
• To fold the bassinet for storage or travel, open both locking clamps on the bassinet bottom, fold
the legs and collapse the bassinet.
Attaching High Chair Seat to Stand Mode (No. 3)
• Open the stand by rotating the rear legs toward the oor until they lock into place. (6)
• Make sure BOTH adjustable legs are locked in the lowest position. (7)
• Unfold the footrest by rotating it toward the front of the seat until it locks into place. (15)
• The high chair seat can be attached to the stand ONLY in one direction– facing forward. (16)
• Align the slots on each side of the high chair seat with the male brackets on the adjustable legs of
the stand. (17)
• Push the high chair seat down until it locks into place. (18)
• Ensure that the release buttons on BOTH sides of the adjustable legs are in the OUT position. (19)
Assembly and Usage
IMPORTANT NOTE: Please refer to the end of this manual for all photos
that are referenced in parentheses in the instructions below.

9
• Pull up on the high chair seat to ensure it is secure.
Detaching the High Chair Seat
• To detach the high chair seat from the stand, press the release buttons on BOTH sides of the stand. (20)
• Grasp the high chair seat and pull it up o the adjustable legs. (21)
• For storage or travel, press in the release buttons on both sides of the footrest and rotate it to its
closed position. (22)
Installing/Removing and Operating the Tray
• To install the tray, press and hold down the release lever on the underside of the tray, then pull the
locking mechanism toward the front of the tray. (23)
• Insert the two posts into the slots on the side arms of the high chair. (24)
• Push the tray all the way back toward the seatback. (25)
• Release the locking mechanism and pull on the tray to ensure it is locked in place.
• The tray can be adjusted into two positions. Press and hold down the release lever, pull the locking
mechanism toward the front of the tray, then slide the tray to adjust it to the desired position. (26)
• Ensure that BOTH sides of the tray are located in the same position.
• Gently pull on the tray to ensure it is secure.
• To remove the tray, press and hold down the release lever, pull the locking mechanism toward the
front of the tray, then pull the tray away from the high chair.
• Use caution when installing or repositioning the tray while a child is in the high chair.
IWARNING
It is recommended that the tray not be used on the high chair when
it is occupied by a child who cannot sit upright unassisted.
Using the Tray Insert
The tray insert is removable and dishwasher safe.
• To remove the insert, pull outward and upward on the hook attachments on both sides of the tray
insert. (27)
• To reattach the insert, t the insert into the tray until the hook attachments on both sides snap into place.
Adjusting the High Chair Seat Height
The high chair is adjustable to ve dierent heights.
• To adjust the high chair to a lower position, simultaneously press the gray buttons on both sides of
the adjustable legs of the stand and push downward until they lock into the desired position. (28)
• To adjust the high chair to a higher position, simply pull up on both adjustable legs of the stand
until they lock into the desired position. (29)
• Ensure that BOTH adjustable legs are at the same height position and secure.
Securing the Child in the Seat
There are 2 height adjustment positions for the shoulder straps. Adjust the height of these straps to
the closest height above your child’s shoulders.
• To detach the shoulder straps, turn the plastic ends sideways and push them through the slots in
the seatback. (30)
• Remove the seat fabric from the top of the seatback to expose the shoulder straps. (31)
• Turn the plastic ends of the straps sideways and push them through the slots in the fabric. (32)
• Move BOTH shoulder straps to the desired height and insert the plastic ends of each strap through
the slots in the fabric. (33)
• Insert the plastic ends of each strap through the slots in the seatback and turn the plastic ends so
that they are secured in place. (34)

10
• Replace the seat fabric over the top of the seatback. (35)
• Ensure both straps are at the same height.
• To unlatch the restraint system buckle, press the center button and remove the male ends of each
buckle. (36)
• Carefully place the child in the seat with the shoulder straps over their shoulders and chest. Then
place the crotch strap between the child’s legs.
• Push the shoulder/waist latch posts into the crotch buckle until they snap into place. (37)
• Tighten the waist belt to be snug around the child’s waist.
• The shoulder, waist, and crotch straps may be adjusted using the sliding plastic rings on these straps.
IWARNING
The child should be secured in the high chair at all times by the
restraint system, either in the reclining or upright position.
FALL HAZARD: Children have suered severe head injuries
including skull fractures when falling from high chairs. Falls can
happen suddenly if child is not restrained properly. Always use
restraints, and adjust to t snugly. Tray is not designed to hold the
child in the chair. Stay near and watch child during use.
Seat Recline Positioning
There are four recline positions for the seat.
• To adjust the recline angle of the seat, squeeze the release mechanism on the back of the seat. (38)
• Tilt the seat to the desired position and let go of the release mechanism. (39)
• Ensure that the seat is secure in its locked position before placing your child in the seat.
IWARNING
It is recommended that the high chair be used in the upright
position only by children capable of sitting upright unassisted.
Using the Footrest
The footrest can be adjusted to a more upright position if desired for a small child.
• To adjust it, press the release buttons in on both sides of the footrest and rotate it upwards to a
horizontal position until it locks into place. (40)
• Grasp the lower footrest panel and pull it out so that it is vertical. (41)
• To use the footrest in the lower position, press the release buttons in on both sides and rotate the
footrest downward until it locks into place.
Folding the High Chair
• Keep children away from high chair while folding.
• Simultaneously press the gray buttons on both sides of the adjustable legs of the stand and move
the legs to their lowest position. (42)
• While grasping the high chair with one hand, use the other hand to slide the secondary lock on the
lower leg frame to the side and then squeeze the folding button on this leg frame. (43)
• Continue to squeeze the folding button and rotate the rear legs toward the high chair until they
lock into place. (44)
• Release the folding button and then gently pull on the legs to ensure they are secure.
Note that the high chair can be folded with the seat installed.

11
Infant Booster - Using High Chair Seat on Adult Chair Mode (No. 4)
IMPORTANT NOTE: Refer to the diagram below. Use the high chair seat as an infant booster
ONLY on an adult chair that has the following MINUMUM dimensions:
Chair seat minimum width: 16” (40.6 cm)
Chair seat minimum depth: 17” (43.2 cm)
Chair backrest minimum height: 8” (20.3 cm)
Adult chair MINIMUM dimensions for use of high chair seat as a booster.
• Detach the high chair seat from the stand following “Detaching the High Chair Seat” instructions above.
• Turn the seat upside down and locate the rear frame support. (45)
• Press the buttons on BOTH sides of the rear frame support and rotate the support toward the
back of the seat. (46)
• Open the storage bag on the bottom of the seat and remove the two straps. (47)
• Unbuckle both straps. Allow the straps to hang down freely on the side of the seat with one
matching pair of straps oriented toward the front of the seat and the other pair toward the rear. (48)
• Rotate the lower footrest panel to its closed position.
• Press in the buttons on both sides of the footrest and rotate it to its closed position. (49)
• Place the seat on an adult chair, being careful not to tangle the straps. (50)
• Wrap the straps that are closest to the front of the seat around the bottom of the adult seat and
attach the buckle ends together. Tighten by pulling on the loose strap. (51)
• Wrap the straps that are closest to the back of the seat around the back of the adult seat and
attach the buckle ends together. Tighten by pulling on the loose strap. (52)
• Ensure the seat is securely attached by moving it from side to side and front to back.
The tray can be used on the infant booster seat by following the instructions above for “Installing/
Removing and Operating the Tray” and also “Using the Tray Insert.”
IWARNING
ALWAYS use this booster in the upright position on an adult chair.
NEVER use booster seat on the oor as a oor seat.
Toddler Booster - Using Plastic Seat on Adult Chair Mode (No. 5)
IMPORTANT NOTE: Refer to the diagram below. Use the plastic seat as a toddler booster
ONLY on an adult chair that has the following MINUMUM dimensions:
8’’(20.3cm)
16’’(40.6cm)
17’’(43.2cm)

12
Chair seat minimum width: 15” (38.1 cm)
Chair seat minimum depth: 14” (35.6 cm)
Chair backrest minimum height: 8” (20.3 cm)
Adult chair MINIMUM dimensions for use of plastic seat as a booster.
• Turn the plastic seat upside down, open the storage bag on the bottom of the seat and remove the
two straps. (53)
• Unbuckle both straps. Allow the straps to hang down freely on the side of the seat with one
matching pair of straps oriented toward the front of the seat and the other pair toward the rear. (54)
• Place the seat on an adult chair, being careful not to tangle the straps. (55)
• Wrap the straps that are closest to the front of the seat around the bottom of the adult seat and
attach the buckle ends together. Tighten by pulling on the loose strap. (56)
• Wrap the straps that are closest to the back of the seat around the back of the adult seat and
attach the buckle ends together. Tighten by pulling on the loose strap. (57)
• Ensure the seat is securely attached by moving it from side to side and front to back.
Youth Chair - Using Plastic Seat on Stand Mode (No. 6)
• To use the plastic seat as a youth chair, rst remove the waist and crotch straps.
• Turn the plastic end of each strap sideways and push it through the slot in the seat. (58)
• Store these straps in the pouch underneath the seat for future use. (59)
• The plastic seat can be attached to the stand ONLY in one direction– facing forward. (60)
• Align the slots on each side of the plastic seat with the male brackets on the adjustable legs of the
stand. (61)
• Push the plastic seat down until it locks into place. (62)
• Ensure that the release buttons on BOTH sides of the adjustable legs are in the OUT position. (63)
• Pull up on the plastic seat to ensure it is secure.
Reinstalling the Restraint System at a Later Time
• To reinstall the waist and crotch straps at a later time, orient the straps on the seat as shown. (64)
• Push the plastic end of each strap sideways through the slot in the seat and turn it sideways to
lock it in place. (65)
• Pull on each strap to ensure it is secure.
IWARNING
Use this plastic seat as a booster ONLY on an adult chair.
NEVER use plastic seat on the oor as a oor seat.
8’’(20.3cm)
15’’(38.1cm)
14’’(35.6cm)

13
Care & Maintenance
Maintenance
All of the locking mechanisms, snaps, rivets, and other hardware and plastic parts on the high chair
should be inspected periodically to ensure that they are secured properly and not damaged or
malfunctioning. The restraint system, as well as all other fabric items and their stitching should also
be inspected periodically to ensure that they are secured properly and not loose, torn or otherwise
damaged. All moving parts should also be checked periodically to ensure they are operating properly.
Any missing, broken, or worn components should be replaced immediately, and the high chair
should not be used until they are replaced. Only original manufacturer’s components should be
used. If needed, please contact Joovy (USA) or Elfe Juvenile Products (Canada) at our toll-free
phone number.
Cleaning
The fabric material on the seat and bassinet can be cleaned using mild household soap or detergent
and warm water on a sponge or clean cloth. Always allow the fabric to completely air dry before
using or storing this seat.
Alternatively, the seat and bassinet fabric can be machine washed cold and air dried. DO NOT dry in
a dryer.
Removing and Reinstalling the High Chair Seat Fabric
• To remove the seat fabric, rst detach the tray and put it aside.
• Unsnap the snaps on BOTH sides of the seat. (66)
• Unhook the seat fabric from the seatback on BOTH sides. (67)
• Pull the top of fabric o the seat back. (68)
• Turn the plastic ends of BOTH shoulder strap sideways and push them through the slots in the
seatback. (69)
• Do the same for the plastic ends of BOTH waist straps. (70)
• Reach underneath the high chair and do the same for the plastic end of the crotch strap. You may
want to gently tip over the high chair to do this. (71)
• Remove the fabric from the high chair.
• Now you can remove all the straps from the seat fabric by turning each plastic end sideways and
pushing it through the fabric.
REMOVE ALL STRAPS AND BUCKLES BEFORE WASHING THE FABRIC.
• After washing and air drying the fabric seat, reinstall it by following the above directions in the
reverse order. Ensure that all plastic ends of the straps are secure by pushing them through their
slots and turning them sideways to lock them into position.
Removing and Reinstalling the Bassinet Seat Fabric
• To remove the bassinet fabric, rst detach the bassinet from the stand.
• Unzip the fabric on BOTH ends of the bassinet and pull the fabric o of the top rail. (72)
• Pull the fabric cover up and release the Velcro from the hinges on both sides. (73)
• Face the bassinet bottom toward you on its side. (74)
• Pull open the two clamps on the bassinet bottom to release the legs. (75)
• Remove the board from the frame and put the frame aside. (76)
• Detach the three snaps on both sides of the board. (77)
• Carefully peel the fabric o the board on each end. (78)
The fabric can now be washed
• After washing and air drying the fabric, reinstall it by following the above directions in the reverse order.

14
Team 432
Please do not return this product to the store.
If you experience any of diculty with the assembly or use of this product, or if you have a question
regarding these instructions, please contact Team 432:
United States
Joovy
(877) 456-5049, 8:30 am – 5:00 pm Central Time
joovy.com LiveChat, 8:30 am – 9:00 pm Central Time
customerservice@joovy.com
Canada
Elfe Juvenile Products
(800) 667-8184, 8:30 am – 5:00 pm Eastern Time
@joovy

15

16
Congurations
Ce produit peut être utilisé dans les modes suivants :
1 2 3
Couchette Couchette sur support Chaise haute
De la naissance jusqu’à 5 mois
ou poids max. de 9 kg (20 lb).
De la naissance jusqu’à 5 mois
ou poids max. de 9 kg (20 lb).
De la naissance jusqu’à 3 ans
ou poids max. de 22,7 kg (50 lb).
45 6
Siège d’appoint pour
bambin
Siège d’appoint pour
bébé
Siège d’appoint pour
jeune
Depuis le moment qu’un bébé
peut s’asseoir debout sans
aide (environ 6 mois), jusqu’à
un poids max. de 22,7 kg (50 lb).
Depuis le moment qu’un bébé
peut s’asseoir debout sans
aide (environ 6 mois), jusqu’à
un poids max. de 27,3 kg (60 lb).
De l’âge de 3 ans jusqu’à un
poids maximum de
27,3 kg (60 lb).

17
Sécurité et Mise en Gardes
Modes de la Couchette (No1 et 2)
Omettre de suivre ces avertissements et les directives peut entraîner
des blessures graves ou la mort.
• DANGER DE CHUTE : Pour aider à empêcher les chutes, n’utilisez
pas ce produit lorsque le bambin commence à pousser sur ses mains
et pieds (environ 5 mois d’âge), ou qu’il ait atteint 9 kg (20 lb), le cas
échéant.
•DANGER
D’ÉTOUFFEMENT:
Des bambins se
sont étoués :
• Dans les espaces entre le matelassage
supplémentaire et le côté de la
couchette.
• Sur une literie molle.
Utilisez seulement le rembourrage
fourni par Joovy.
N’ajoutez JAMAIS d’oreillers, de
IMISE EN GARDE
IMPORTANT! CONSERVEZ POUR
RÉFÉRENCE FUTURE
Veuillez lire ces instructions soigneusement avant utilisation.
Conservez-les pour référence future.

18
couettes ou un autre matelas sur le
matelassage.
• Pour réduire les risques de SMSN, les pédiatres recommandent aux
bambins en santé d’être placés sur leurs dos pour dormir, à moins
qu’autrement conseillé par votre médecin.
• RISQUE DE CHUTE—Toujours s’assurer que le moïse est bien xé
sur la poussette; tirer le moïse vers le haut pour vérier la solidité de
l’installation.
• Si un drap est utilisé avec le rembourrage, utilisez seulement celui fourni
par Joovy qui est spéciquement conçu pour convenir aux dimensions
du matelas de la couchette.
• Danger d’étouement : La couchette peut se retourner sur des surfaces
molles et étouer l’enfant. NE placez JAMAIS la couchette sur des lits,
des sofas ou d'autres surfaces molles.
• Danger de chute : Les activités de l’enfant peuvent déplacer la
couchette. NE placez JAMAIS la couchette sur des dessus de comptoir,
des tables ou toute autre surface élevée.
• N’utilisez JAMAIS cette couchette comme moyen de transport d’un
bambin dans un véhicule motorisé.
• N’utilisez pas cette couchette si vous ne pouvez pas suivre exactement
les directives l’accompagnant.
• Ne placez aucune corde, courroie ou article similaire dans ou près de la
couchette, qui pourrait s'enrouler autour du cou de l’enfant.
• Ne placez pas cette couchette près d'une fenêtre ou d'une porte de
patio, où un enfant pourrait atteindre le cordon d'un store ou d'un rideau
et s'étrangler.
• Vériez régulièrement la couchette avant de l'utiliser. Ne l'utilisez pas
si des pièces sont lâches ou manquantes, ou si elle présent des signes
de dommages. Ne substituez pas les pièces. Communiquez avec le
fabricant si des pièces de rechange ou des instructions supplémentaires
sont requises.
• Les enfants peuvent s'étouer sur de la literie molle. Ne placez pas
d'oreillers, de couettes ou de matelas légers dans cette couchette.
• Utilisez uniquement le matelas fourni par le fabricant avec ce berceau.
N'ajoutez pas de matelas supplémentaire à ce berceau.
• Les ressorts peuvent provoquer un étranglement! NE placez PAS des
articles avec une celle autour du cou de l'enfant, comme des cordons
Table of contents
Languages:
Other Joovy High Chair manuals