Modena Sofisticato Series Owner's manual

English 2
TABLE OF CONTENT
Part 1: Important Safety Information 3
General Cautions 3
Prohibitions 3
Warnings 4
Notices 4
Part 2: Product Introduction 5
Product Components 5
Control Panel and Display 6
Part 3: How to Use 7
Panel and Display Instruction 7
Air Quality Indicator 8
Part 4: Maintenance 9
Part 5: Troubleshooting 10
Part 6: Specification 11
Appendix: Wiring Diagram 12
This manual book explains everything you need to know about your new
product. Please contact our Customer Care should you need further
assistance through www.modena.com.

English 3
General Cautions
1. Please check whether the device is fine and the components are
complete after unboxing the package.
2. Please be sure to remove the plastic package of the filter before
first time using the device.
3. Children and incapacitated person should use the device
accompanied by their superintendent.
4. Please unplug the device immediately if accident occurs, and do not
use the machine under defect condition.
5. In order to avoid danger, if the supply cord is damaged, it can only
be change by manufacturer or the qualified maintenance person.
6. Please do not use other components that are not permitted by
manufacturer, otherwise warranty will be terminated if the device is
breakdown in that case.
Prohibitions
1. Do not put your hand and foreign matter into the air inlet and air
outlet.
2. Do not unplug the power with wet hands.
3. Do not use the device at the place where full of hydogen, natural
gas, dimethylmethane, and other flammable gas.
4. Do not use the device if power cord or plug is damaged, or power
socket slacked off.
5. Do not jam the air inlet and air outlet
6. Do not use the device when using the aerosol bomb or there are oil
residue, incense smoke, alight flame, and chemical odor in the room.
And also do not use the device in deep wet place such as shower
room.
7. Do not operate the device without filter inside.
8. Do not wash or re-use the composite filter.
PART 1: IMPORTANT SAFETY INFORMATION

English 4
Warnings
1. Only 220V voltage socket can be used.
2. Hold still the plug when unplug it, and do not pull the power cord,
otherwise it will cause electric shock or sparks.
3. Unplug the device when not in use or need cleaning.
4. Clean the dust on the plug regularly.
5. Do not use strong causticity detergent when cleaning the device
because it can damage its surface.
6. Use only soft cloth to clean the surface of the device, oherwise it
will be damaged, scratched, or even fractured.
7. Do not put the device close to the heat source or even put onto it.
8. Ethyl alcohol or organic solvent are forbidden to be used to wipe the
device, otherwise it will damage the device or cause electric shock
and fire sparks.
Notices
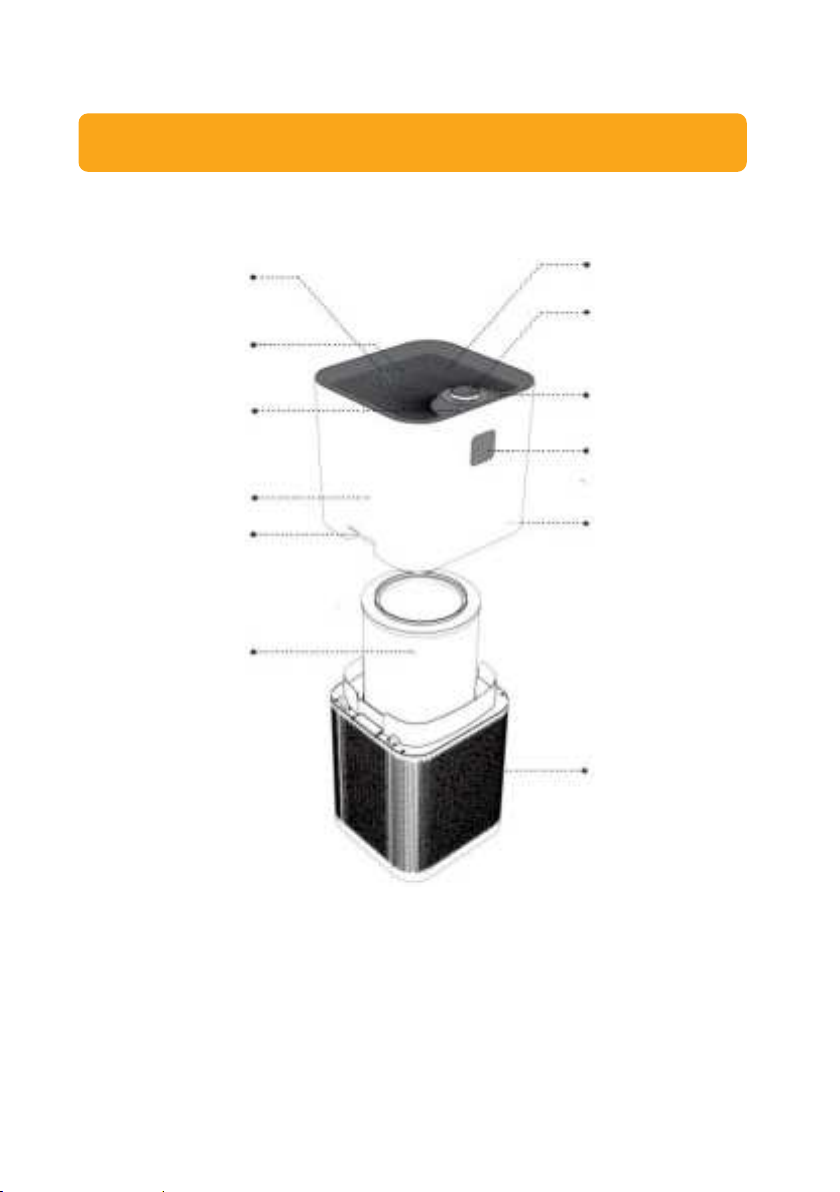
1. User can directly push the device or hands hold on both sides of
the buckle to move it. If user hold the air outlet, it is possible to
make the air outlet or the host device fall off, which can cause
injury.
2. This device is not intended to be used by persons with special
needs for their physical, sensory or mental capabilities, or lack of
experience and knowledge (including children), unless they have
been given the supervision or instructions concerning the use of the
appliance by a person who responsible for their safety. Children
should be supervised to ensure that they are not playing with this
water heater.
3. If the device causing signal interference on the radio or television,
please follow one or more below instructions:
•Re-adjust or rotate the receiving antenna.
•Take the device far away from radio or television receiving
antenna.
•Connect the air purifier power and signal power on different
socket.
•Please contact MODENA Service Center or qualified technician if
assistance is needed.

English 5
Product Components
PART 2: PRODUCT INTRODUCTION
Air Quality
Indicator Light
Control Panel
Power Button
Panel Display
Right Buckle
Air Intake
Negative Ion
Generator
Air Outlet
Network
Light Sensor
Upper Body
Left Buckle
Filter

English 6
Control Panel and Display
Power Switch
Fan Speed Display
Sleep Mode
Time Set Display
Filter Reset
Function Display
Timer Setting &
Child Lock
PM 2.5 Status
Anion Function
Temperature Display
WIFI Connect
Humidity Display
Auto Mode
Filter Lifetime

English 7
Panel and Display Instructions
Plug the device to enter standby condition, press
power button to enter working condition; when the
device is in working condition, press power button to
enter standby condition
Rotate the knob to until sleep mode indicator light on
and other indicator lamp off, then the fan will work at
low speed. Rotate the knob again to leave the sleep
mode.
If the filter button flashing in red and only one block
left on the filter lifetime display, it means that the
filter can be used only for next 48 hours and user
need to change the filter. To reset the filter, long
press the filter button until the red light stop flashing
and the block will be full again after it.
These button has two functions. Quick tap this
button to set the timer. 1 tap for 1 hour, 2 taps for 2
hours, and so on. Time can be set until 7 hours. To
activate the child lock function, long press on the
button for about 3 seconds. This button indicator will
turn on, and other buttons are not functional. Long
press the this button again for 3 seconds to unlock
it, indicator light will be off and all the buttons is
back to functional again.
Activate the anion function. Tap the button once to
activate and tap once again to deactivate it. Anions
electrically neutralize and remove bacteria, dust,
pollen, mold, and contaminated particulates which
are freely float and make foul air.
PART 3: HOW TO USE

English 8
Long press WIFI button for 5 seconds to turn WIFI
mode. WIFI button will flash rapidly and ready for
network connect. WIFI button will stop flashing and
the light will keep on if it successfully connect to the
network. Long press the WIFI button again to reset
the WIFI function.
Rotate the knob until intelligent mode indicator light
on to enter intelligent mode. The fan speed will
adjust automatically based on real time PM2.5 value.
Rotate the knob again to leave the intelligent mode.
Rotate the knob to set the fan speed, clockwise for
low to high and vice versa. The fan speed indicator
will change along with the block indicator.
The corresonding light will turn on based on different
time setting.
1h for 1 hour, 2h for 2hours, 1h 2h for 3hours, 4h for
4 hours, 1h 4h for 5 hours, 2h 4h for 6 hours, dan 1h
2h 4h for 7 hours.
The corresonding light will turn on based on the
activated function.
Display real-time PM2.5 value
Display real-time room temperature
Display real-time room relative humidity.
Each block represents 500 hours using time. It will
reduce gradually along with the filter lifetime
remaining.
Air Quality Indicator
Air Quality Status
Excellent
Good
Poor
Indicator Light Color
Green
Blue
Red
Air Quality Value
1 –75 μg/m3
75 –150 μg/m3
> 150 μg/m3
Wind Speed
Low
Medium
High

English 9
Warning: The device must be unplugged before maintenance and
cleaning
Device Cleaning
1. Wipe stains with soft cloth.
2. For stubborn stains, dip some neutral liquid into the soft cloth then
clean.
Note: No hard object to scratch the device surface during maintenance
and cleaning. When tear down the device, please refer to the
instruction manual and do as the requirement to avoid damaging the
components.
Filter Cleaning and Replacement
1. Built-in program will remind to replace the filter. Due to different air
quality around, filter lifetime will also be different. Filter replacement
also can be judged from the device noise and smell.
2. If there is dust cover on the composite filter, a vacuum cleaner can
be used to clean the dust on its surface to extend filter lifetime.
Notes:
•Filter lifetime can shorten if being used for certain condition, such as
in a room where many people smoke. Please replace the filter when
purify effect is not good anymore.
•Please dispose the used filter as non-combustible garbage.
Filter Replacement Method
1. Power off the device and unplug the power plug. (Pic. 1)
2. Pull the upper body. Put hands on both sides of the buckle and
press down the buckle to separate the upper and lower body, then
pull up the upper body. (Pic 2,3,4).
3. Take out the old filter from the lower body. Remove the plastic
packaging from the new filter, then reload it to the device. (Pic 5).
4. Install the upper body back to its original position, ensure that the
buckle is installed in right place. (Pic 6).
PART 4: MAINTENANCE

English 10
Problem
Possible Cause
Recommended Actions
The device cannot
be turned on
1. The device does not plug
well.
2. Upper body is not
installed properly.
1. Check the power plug and
re-plug it properly.
2. Install the upper body
properly.
The air flow is weak
1. Filter package has not
been removed.
2. Foreign materials jam the
air inlet or outlet.
3. The filter is dirty.
1. Remove the plastic package
of the filter.
2. Clean foreign material at the
air inlet or outlet.
3. Clean or replace the filter.
Dust removal effect
is not obvious and
air quality does not
get better
1. No filter in the device.
2. Door or window of the
room open frequently.
3. The device is put in
narrow place or close to
barrier around.
4. The filter is dirty.
1. Install filter into the device.
2. Reduce the door or window
opening frequency.
3. Move device to wider place
without any barrier.
4. Clean or replace the filter.
Odor comes from
the air outlet
1. Many people smoke or do
something causing odor
in the room.
2. The filter is dirty.
1. Change the indoor air.
2. Clean or replace the filter.
PART 5: TROUBLESHOOTING

English 11
Model
AP 6034 SKY
Product Type
Room Air Purifier
Color
White
Control Panel
Knob + Touch Control
Filter Composition
Pre-Filter, Activated Carbon, Anti-Bacteria
Cloth, HEPA13
WIFI Function
Yes
Negative Anion Function
Yes
Fan Speed
Low / Mid / High
Display
Yes, Temperature + Humidity + Filter
Lifetime
Timer Setting
Yes, 1-7 hours
Air Quality Indicator
Yes, Green-Blue-Red
Sleep Mode
Yes
Auto Mode
Yes
Light Sensor
Yes
Filter Replacement Indicator
Yes
Child Lock
Yes
Rated Voltage
220 V/ 60 Hz
Power
48 W
Clean Air Delivery Rate
550 m3/h
Coverage Area
50 - 60 m2
Dimension
380 x 380 x 760 mm
Specifications of this appliance may change without notice to improve the quality of the
product. Pictures in this manual are schematic and may not match your product exactly.
Values stated on the machine labels or in the documentation accompanying it are
obtained in laboratory in accordance with the relevant standards. Depending on
operational and environmental conditions of the appliance, values may vary.
PART 6: SPECIFICATIONS

English 12
APPENDIX: WIRING DIAGRAM
WIFI Module
Control Panel
Light
Sensor
Display Panel
Power Board
Power Source
Bouncing Pin
With Male End

03/21
This manual suits for next models
1
Table of contents
Other Modena Air Cleaner manuals