Modena Vicino Series Owner's manual

User
Manual Book
Built-in Dispenser
Vicino Series
BP 3435

Thank you for your trust in choosing MODENA products for your household needs. With your satisfaction as our
priority, we constantly aim to deliver stylishly designed products equipped with state-of-the-art technology to
assist you in your daily activities.
This is your guidebook containing everything you need to know about our product. Please reach out to us if you
need further assistance or other information via our Customer Care or our official website www.modena.com.

CONTENTS PAGE
•Introduction 2
• Part 1: Safety Warnings 4
• Part 2: Name of Parts 4
• Part 3: Installation 4
• Part 4: How to Use 8
• Part 5: Maintenance 9
• Part 6: Problem & Solution 9
• Part 7: Precaution 10
•Part 8: Specification 10

• Part 8: Specification 14
•Read all instructions before using the water dispenser.
•Never clean parts with flammable fluids.
•Do not store or use any other flammable vapors and liquids in the vicinity of this or any other water dispenser.
•During operation keep it beyond the children to avoid scald..
•Never turn on the heating switch when there is no water.
•Adopt the ground wire to avoid any electric shock.
•This appliance is not intended for use by persons (including children) with reduced physicalsensory or mental
capabilities or lack of experience and knowledge unless they have been given supervision or instruction concerning
use of the appliance by a person
•responsible for their safety.
•Children should be supervised to ensure that they do not play with the appliance.
•If the supply cord is damaged,it must be replaced by the manufacturer
1) Control panel
5)
Watertray
2) Cold water tap
7)
Water Purifier inlet
3) Hot water tap
8)
Bottled water inlet
4) Watertray cover
8)
Pump –Selenoid switch
Part 1 : Safety Warnings
Part 2 : Name of Parts

5
3.A. Installation Notes
1.
Before installation, the user should decide the water source to use the right inlet according to the source.
2.
Dispenser should be installed in a flat, easily accessible, and secure place (not tilted).
3.
Do not install the dispenser and power outlet in a damp or wet area.
4.
Make sure the power outlet is grounded properly.
5.
It is recommended to add a power switch in front of the dispenser, to cut off the electric current easily.
6.
This appliance is compatible to connect with bottled water (gallon) and water purified tap water.
7.
Make sure that the PE hose is not bent to avoid blocking the water flow.
8.
If dispenser is installed on a cabinet, make sure that the space in the cabinet has enough room for heat
dissipation to avoid machine disfunction. Install the appliance according to this instruction:
3.B. Installation method
3.B.1.
Set the cabinet position, the space should fit the dispenser according to the specified size requirements.
Product size table :
Model
W (mm)
D (mm)
H (mm)
Remark
BP 3435
564
550
453
The buckle 5mm, Under the buckle 3mm
Part 3: Installation

6
3.B.2.
Connecting the PE hose to the water dispenser
.
1.
Prepare the PE hose, cut it flat at both ends. Separate the fastener from the blue quick connector.
2.
Insert the PE hose into the fastener ring up until the very end part. To see if it’s secured, pull it using the
same strength. If the hose does not move, then it is set and will not fall off.
3.
Insert the fastener into the space between the connector and hook ring to secure the connection.

7
4.
Dispenser is equipped with PE hose that requires a hole to insert the hose through the back side of the
cabinet.
5.
If the dispensed is installed on a cabinet, it has to be secured.
Dispenser equipments must be set on the back of the cabinet, detach the water tray and mark the position with the
bolt on the bottom of the Dispenser, as shown in the picture:
6.
The bottled water and dispenser connections.
a.
Connect PE hose to the pipe for gallon, the connection method is same as install hose method (no. 2)
b.
Insert the pipe to the gallon and then plug the cover to mouth ofgallon.
c.
Insert the gallon and close the lower cabinet door.
3.B.3.
If the water source is from water purifier, pull out PE hose from the pipe for gallon, then connect the PE hose
to the clean water outlet of water purifier.

8
CONTROL PANEL
Remark:
1
Water capacity button
5
Cold water tap button
2
Hot water setting button
6
Light button
3
Hot water tap button
7
Cooling system button
4
Display screen
Getting Started
1)
Setting the amount of water
Touch button once for to set the water capacity of 150ml, twice for 250ml, and thrice to set continuous water flow.
2)
Hot water temperature setting
Touch button once to set the hot water temperature, there are 3 options: 55°C, 85°C and 100°C. If you need room
temperature water, set the temperature to _°C.
3)
To dispense hot water
Touch
button once to dispense hot water, the hot water will flow out according to the amount chosen in step 1.
If
the amount is set as continuous flow, water will stop flowing once the finger is lifted from button.
4)
To dispense cold water
Touch
button once to dispense cold water, the cold water will flow out according to the amount chosen in step 1.
If the amount is set as continuous flow, water will stop flowing once the finger is lifted from button.
5)
Switching the light on
Touch button once to switch on the light, and then touch once again to switch off the light.
6)
Switching the compressor/Cooling system on
Touch button once to switch on the compressor/Cooling system, and then touch once again to switch off the
compressor/Cooling system.
7)
Child lock activation
Hold the
button 3 seconds activate and deactivate the Child Lock
Part 4: How to Use

9
Note:
To keep the optimum function of the machine for an extended time, pay attention to the maintenance. Power plug should
be removed from the power socket before starting the maintenance process.
•Do not pull the cable to remove plug from power socket. Pull the plug instead.
•This dispenser has been disinfected before the shipping.
•Clean the hose, water tank, and heating element at least once a year by an expert. This procedure will keep the machine
in its best condition and prolong the life. Do not dissassemble the machine by yourself to avoid damage on the machine.
•Use soft and slightly wet cloth to clean the dispenser surface, and use soft and dry cloth to dry the surface. Do not let
water get into the machine.
•Make sure the power cord is unplugged from the power source when discarding excess water, during maintenance
process, or when the appliance is not used for a long time. Meanwhile, when the hot water to be cold/not hot, open the
drain valve until there is no water in the unit. Meanwhile, if the hot water tap release cold water, let the valve open until
there is no water left inside the dispenser.
•If the display screen shows “ ” empty water icon, that means that the water has run out. Change the water gallon
with the new one immediately.
•In order to ensure the long term normal use of water dispenser, please check the function regularly. When abnormality
occurs; please notify the Modena Service Center.
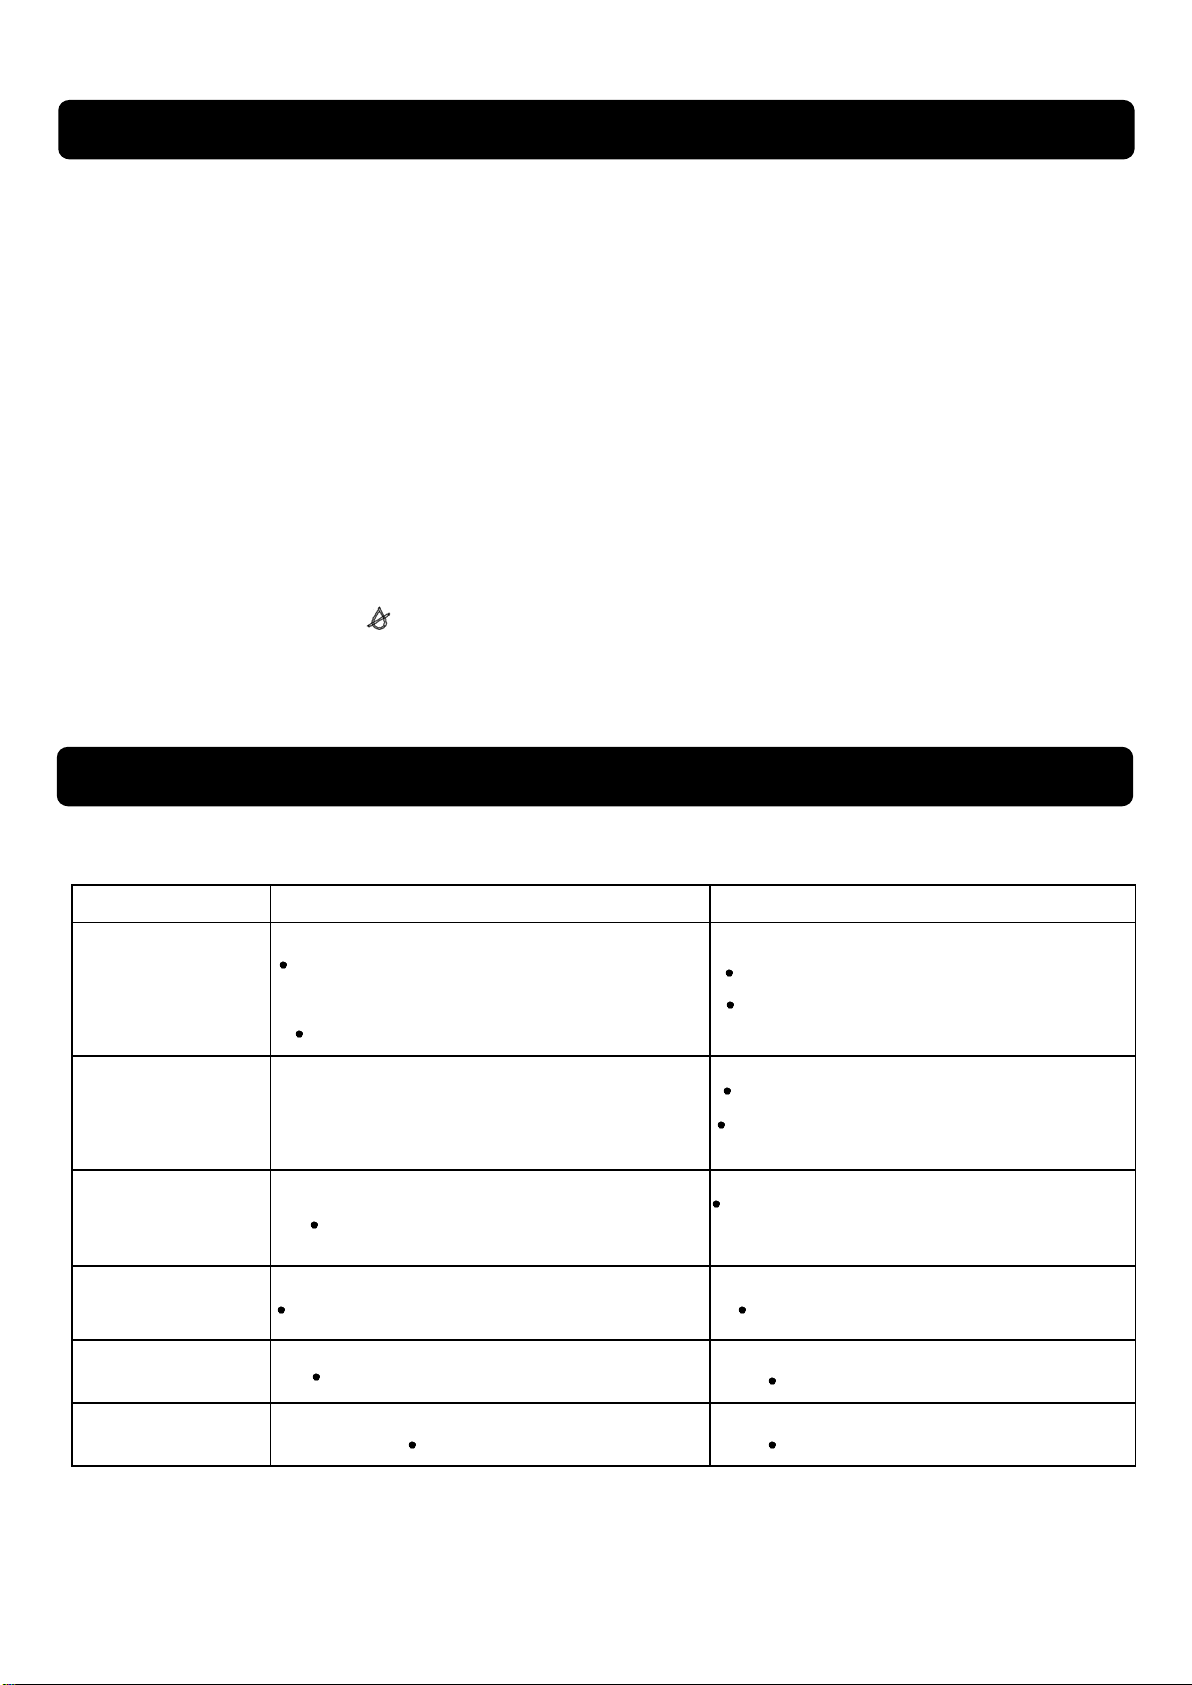
If abormalities happen when in use, please stop using the appliance and unplug the power cord, and check the
following table to make sure of the appliance’s condition. If necessary, please contact Modena Call Center.
Problem
Cause
Solution
Water is not hot or
not cold
Excessive dispensation of hot water or cold
water ina short period of time.
Unit is not yet connected to electricity.
Wait until the water becomes cold or hot.
Connect the cord to the outlet and press
the heater and coolerswitches.
Water is not being
dispensed out of the
tap
•
Water gallon is empty. The pipe is stuck or
block something.
Replace the water gallon with a new one.
Turn off the switch cooling to 4 hours, then
turn the switch back.
Leak on the water
gallon support
Water gallon is leaking/ damaged
Replace water gallon with a new one, make
sure the power cord is
unplugged.
Loud noise during
operation
Improper installation or placement of unit
Install unit on even and stable surface
Error code -
Err1
Hot temperature sensor is broken
Contact Modena service center
Error code –
Err2
Internal leakage
Contact Modena service center
Part 5: Maintenance
Part 6: Problem & Solution

10
•If the appliance is not going to be used for a long period of time, unplug it and drain all water in its interior
•Wash and disinfect the system every 3-6 months with a suitable cleaner and according to its instructions
for use
•Do not pull out the cable to unplug. Do not turn on and o- the appliance by connecting it and disconnecting
it from the source of electricity
•If you are not using the appliance for a long period of time or during the night, you can turn it o- to save
energy
The equipment must be installed keeping easy access to the electrical plug.
Specifications of this appliance may change without notice to improve the quality of the product. Pictures in this manual are
schematic and may not match your product exactly. Values stated on the machine labels or in the documentation
accompanying it are obtained in laboratory in accordance with the relevant standards. Depending on operational and
environmental conditions of the appliance, values may vary.
MODEL
BP 3435
Type
Built-in water dispenser
Water output
Hot, Normal & Cold
Color
Black & Stainless
Hot water output (liter/hour)
26
Cold water output(liter/ hour)
2
Hot water tank capacity (liter)
without water tank (instant)
Cold water tank capacity (liter)
1.1
Hot temperature (Celsius)
55,85,100
Cold temperature (Celsius)
≤14
Free-CFC compressor
Yes
Water tank material
Stainless Steel
Heating power (watt)
2100
Compressor power (watt)
120
Voltage / Frequency
220 V ~ / 50 Hz
Product dimension
595x560x455
Cut-out dimension
560x550x450
Part 7: Precaution
Part 8: Specification

12/20
Other manuals for Vicino Series
5
This manual suits for next models
1
Table of contents
Other Modena Dispenser manuals
Popular Dispenser manuals by other brands

Nordson EFD
Nordson EFD UltimusPlus I quick start guide

ICO
ICO ICO001 instruction manual

Star Manufacturing
Star Manufacturing HPD1 Installation and operating instructions

The Splash Lab
The Splash Lab TSL.R.010 Series Installation & maintenance

Metcal
Metcal DX-250 user guide

TECHCON SYSTEMS
TECHCON SYSTEMS TS250 user guide