manuals.online logo
Brands
  1. Home
  2. •
  3. Brands
  4. •
  5. modway
  6. •
  7. Indoor Furnishing
  8. •
  9. modway Estate MOD-5483 User manual

modway Estate MOD-5483 User manual

Customer Service 908-368-1025︱www.modwayfurniture.com Page 1 of 3
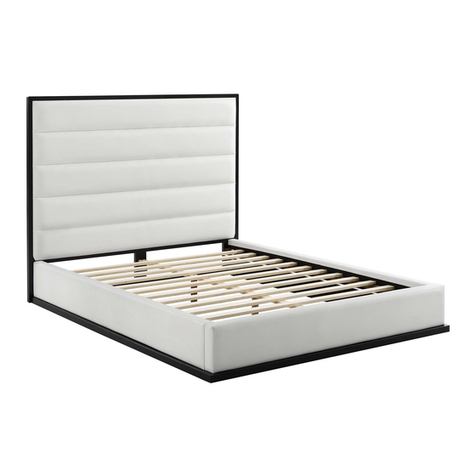
MOD-5483 KING BED
Thank you for purchasing the MODWAY KING BED!
Before you start, here is some helpful advice:
1.We suggest you spend a short time reading through this leaflet and then follow the simple step by step
instructions.
2.Owing to the size and weight of the bed, we recommend that it is assembled by two adults, on a carpeted or
padded area, in the room that it is intended for. Approx assembly time: 45 minutes.
3.Please do not use any tools other than those provided or recommended in these instructions.
4.Please do not throw away any of the packaging or the instruction until you have checked all the components and
hardware and the furniture is fully assembled. Please ensure that the packaging is disposed of in a safe
environmentally friendly way.
5.Assemble all components loosely until advised to tighten. Depending on use, it may be necessary to tighten the
components from time to time, so please save the tools that has been provided.
6.Please keep all fitting out of reach of children.
Hardware:
Component:
A Short Bolt M6x20mm x28
E Flat Washer x4
F Rubber Insert x16
G Allen Wrench x1
1 Headboard x1 2 Footboard x1
3 Side Rail x2 4 Double Slat x4
5 Single Slat x8 6 Low Post x2
1
6
2
3
3
4 6
4 4
4
5
5
5
7
8
8
8 8
7 Center Rail x2 8 Support Leg x8
B Medium Bolt M6x35mm x8
C Long Bolt M6x50mm x8
H Open Wrench x1
D Nut M6 x16
8
8
8 8
7
Customer Service 908-368-1025︱www.modwayfurniture.com Page 2 of 3
MOD-5483 KING BED
Ax4 Ex4 Gx1
Ax16 Fx16 Gx1
STEP 1:
Insert Low Post (6) into Headboard (1) as shown.
Attach by using Flat Washer (E) and Bolt (A) from the holes on the back of Low Post (6) and Headboard (1).
Use Allen Wrench (G) to tighten Bolts (A) clockwise until secure.
Hardware & Tool required
STEP 2:
Take out all Double Slats (4), Single Slats(5) and Side Rails(3) and place them as shown.
Insert one end of Rubber Insert (F),intoSingle Slats (5) ponding holes on one piece of
Side Rail (3) as shown.
Attach Double Slats (4) to the same Side Rail (3) by using Short Bolts (A).Do not fully tighten Short Bolts (A) with
Allen Wrench (G) yet.
Repeat above for the other Side Rail (3).
Use Allen Wrench (G) to tighten all Short Bolts (A) clockwise until secure.
Hardware & Tool required
Backwith holes
1
6
6
A1
E
AE
G
6
3
3
45444
55555
55
3
3
F
5
3
4
A
AG
1
then insert them into the corres
Take off the protective plastic caps from the bottom of Headboard (1)
Customer Service 908-368-1025︱www.modwayfurniture.com Page 3 of 3
MOD-5483 KING BED
A
G
STEP 4:
Hardware & Tool required
STEP 3:
Insert Bolts (A) into the bottom holes on the assembled Headboard (1&6) & Footboard (2) by hand.
Leaving 0.3~0.4inch space of the thread of Bolts (A) as shown for inserting the notch of assembled Side Rails (3&4&5).
Insert the notch of assembled Side Rails(3&4&5) into the space left on the Bolts (A).
Screw Bolts (A) into the top holes on the assembled Headboard (1&6) & Footboard (2) as shown.
Tighten Bolts (A) with Allen Wrench (D) after all assembled.
Bx8 Cx8 Dx16
Gx1
Hx1
Place Center Rail (7) and 4 pieces of Support Leg (8) under assembled Double Slat (4) and Single Slat (5) as shown.
Insert 4 pieces of Long Bolt (C) into the holes right on Center Rail(7) to connect it with Support Legs (8) as shown.
Insert 4 pieces of Medium Bolt (B) into 4 other holes left on Center Rail(7) to connect it with Support Legs (8) as shown.
Secure the above 8 pieces of Bolts (B&C) with Nuts (D) from the bottom of Support Legs (8) at same time.
Repeat the same steps for the remaining 4 pieces of Support leg (8) and 1 piece of Center Rail (7).
Use Allen Wrench (G) and Open Wrench (H) to tighten all Bolts (B&C) and Nuts (D) until secure.
H
G
C
B
7
8
D
D
4
4
4
4
4
7 8
AX8 Gx1 Hardware & Tool required
6 3
6
A
3
6
A
6
6
2
1
Top Hole
Bottom Hole
Notch
3
3
3
3
5
5
5
7 8
Assembly is completed. Your bed is ready to be enjoyed now!
0.3~0.4inch

This manual suits for next models

1

Other modway Indoor Furnishing manuals
modway EEI-5010 User manual

modway

modway EEI-5010 User manual

modway EEI-2709 User manual

modway

modway EEI-2709 User manual

modway EEI-3936 User manual

modway

modway EEI-3936 User manual

modway Scenic EEI-5879 User manual

modway

modway Scenic EEI-5879 User manual

modway EEI-5083-NAT User manual

modway

modway EEI-5083-NAT User manual

modway EEI-3020 User manual

modway

modway EEI-3020 User manual

modway EEI-2285 User manual

modway

modway EEI-2285 User manual

modway Vigor EEI-4213 User manual

modway

modway Vigor EEI-4213 User manual

modway EEI-4341 User manual

modway

modway EEI-4341 User manual

modway MOD-6343 User manual

modway

modway MOD-6343 User manual

modway EEI-5490 User manual

modway

modway EEI-5490 User manual

modway EEI-3739 User manual

modway

modway EEI-3739 User manual

modway MOD-7079 User manual

modway

modway MOD-7079 User manual

modway MOD-5175 User manual

modway

modway MOD-5175 User manual

modway EEI-2920 User manual

modway

modway EEI-2920 User manual

modway EEI-3460 User manual

modway

modway EEI-3460 User manual

modway EEI-3428-NAT-WHI User manual

modway

modway EEI-3428-NAT-WHI User manual

modway MOD-6329 User manual

modway

modway MOD-6329 User manual

modway MOD-5347 User manual

modway

modway MOD-5347 User manual

modway MOD-6275 User manual

modway

modway MOD-6275 User manual

modway Idyll EEI-3443 User manual

modway

modway Idyll EEI-3443 User manual
modway MOD-5423 User manual

modway

modway MOD-5423 User manual

modway EEI-1804 User manual

modway

modway EEI-1804 User manual

modway EEI-6347 User manual

modway

modway EEI-6347 User manual

Popular Indoor Furnishing manuals by other brands

fantastic furniture WEBSTER Sofa 3 Seater Mocha manual

fantastic furniture

fantastic furniture WEBSTER Sofa 3 Seater Mocha manual

Hooker Furniture 5291-75410 Assembly instruction

Hooker Furniture

Hooker Furniture 5291-75410 Assembly instruction

MID MID-7326CM user manual

MID

MID MID-7326CM user manual

Great Little Trading Loxley L5013 manual

Great Little Trading

Great Little Trading Loxley L5013 manual

Endura Ultimate Slide Bolt Astragal instructions

Endura

Endura Ultimate Slide Bolt Astragal instructions

Linon 6220SF-01-KD Assembly instructions

Linon

Linon 6220SF-01-KD Assembly instructions

Songmics VASAGLE LBS74/074 manual

Songmics

Songmics VASAGLE LBS74/074 manual

Home Decorators Collection Caville MR Assembly instructions

Home Decorators Collection

Home Decorators Collection Caville MR Assembly instructions

Amart Furniture MARGOT 71578 Assembly instruction

Amart Furniture

Amart Furniture MARGOT 71578 Assembly instruction

Walker Edison D44MIR Assembly instructions

Walker Edison

Walker Edison D44MIR Assembly instructions

aidapt VG890W Fixing and maintenance instructions

aidapt

aidapt VG890W Fixing and maintenance instructions

DHP 2389979 Assembly instructions

DHP

DHP 2389979 Assembly instructions

Living & Co Laguna Mixed Trestle Dining Set instruction manual

Living & Co

Living & Co Laguna Mixed Trestle Dining Set instruction manual

Costway 300515F Assembly instructions

Costway

Costway 300515F Assembly instructions

Walker Edison AF30ABGD Assembly instructions

Walker Edison

Walker Edison AF30ABGD Assembly instructions

Mosaic Beringer 164256 Assembly instructions & user manual

Mosaic

Mosaic Beringer 164256 Assembly instructions & user manual

SANKI S-CON MINI GOOD LUCK Operating and service manual

SANKI

SANKI S-CON MINI GOOD LUCK Operating and service manual

Sony SU-P42T2 stand instructions

Sony

Sony SU-P42T2 stand instructions

manuals.online logo
manuals.online logoBrands
  • About & Mission
  • Contact us
  • Privacy Policy
  • Terms and Conditions

Copyright 2025 Manuals.Online. All Rights Reserved.