Moe's SL0211-TY-US-R User manual

Smart Lock
Enjoy Our Smart Life

1. BUTTONSMain Button/Indicator lightSpeakerAA Battery x 4Lock/Unlock: Press the Main Button to Lock/Unlock.Reset: Take out batteires and put them back into the Smart Lock again. Within 10 seconds from the moment you see a BLUE indicator light, long-press the main button until you hear a long beep and the RED indicator light is on.Red light on for 3 seconds: Jammed/ResetBlue light on for 3 seconds: Locked, unlocked or power on.Wi-Fi Gateway x 12. IN THE BOXBattery AA x 4Lock Adapter x 4Baseplate A1 x 1Baseplate A2 x 1Smart Lock x 1Adhesive Strip x 1Tamperproof Screw x 2Power Cord x 1Screwdriver x 1Grommet x 4A2 Coverplate x1A1
B1

3. INSTALLATION - SMART LOCK(1) Fix the deadbolt in placeUse the adhesive strip in the box to fix the exterior (outdoor) part of the deadbolt, in order to prevent it from falling when the thumbturn is removed.(2) Remove the thumbturnUnscrew both screws and remove the thumbturn from the deadbolt. Keep the original screws from the Smart Lock for the next step. If there is an additional plate, remove it as well.

(3) Select the correct baseplate(4) Place the baseplate over the deadbolt While holding the baseplate, insert the two screws into the screw holes from the front of the baseplate. Match both screws to the screw holes on the deadbolt. Please make sure that the baseplate's back side is against the door.Note: If the original screws from the door lock are too small, causing the screws to pass directly through the holes on the Base Plate, you need to use one grommet for each screw. Adjust the grommet so that the screws fits the holes. Note that the grommet shouldn't touch the outer rim of the hole in the middle. Select one of the baseplate A1 or A2 that fits your deadbolt. Make sure that when the baseplate is placed over the deadbolt, the two screws can go through the two holes on the sides of the baseplate and match the screw holes on the deadbolt. If not, please try the other baseplate.Remove the backing of the double-sided tape, and make sure that the "UP" sign is upright.A2A1
A1
A1

B1
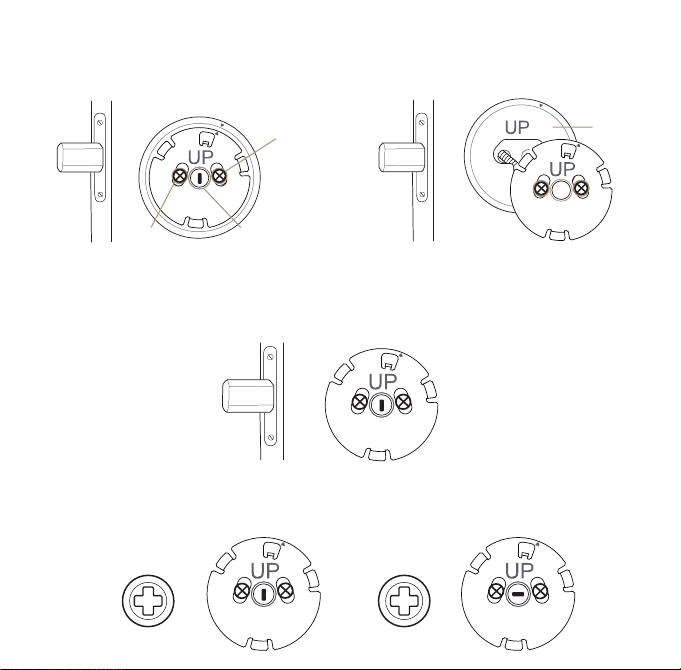
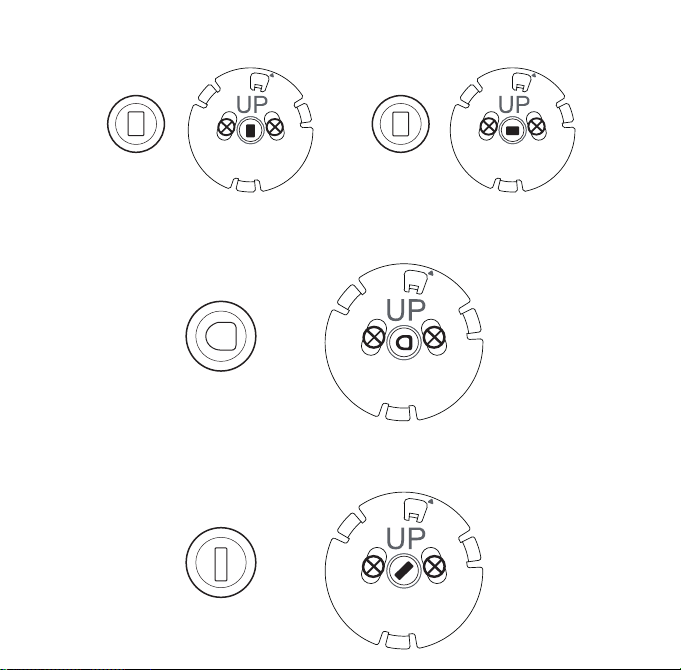
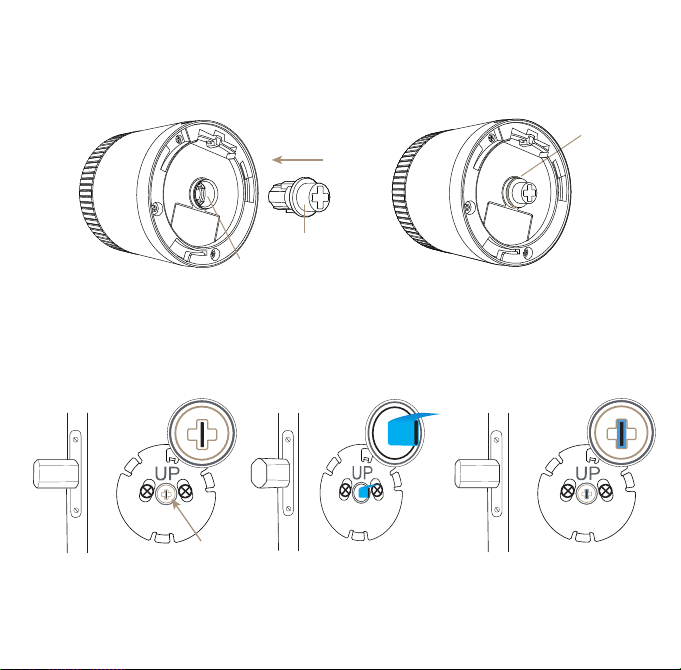
(5) Mount the baseplateAdjust the baseplate so that the tailpiece goes through its center hole. Tighten the screws to fix the baseplate on the door. Please do not over-tighten the screws as it may damage the door and the smart lock might not work well.(6) Select the correct adapterA. If the deadbolt has a thin tailpiece that is upright or level while the door is locked, please use the "+" shaped adapter.A1
A1 A1
A1
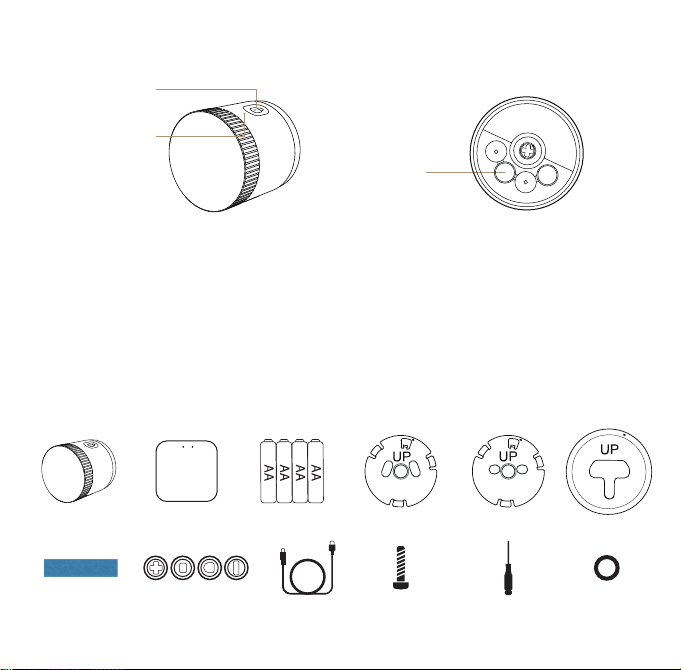
A1 CoverplateGrommet Grommet Outer rim of the holeB1
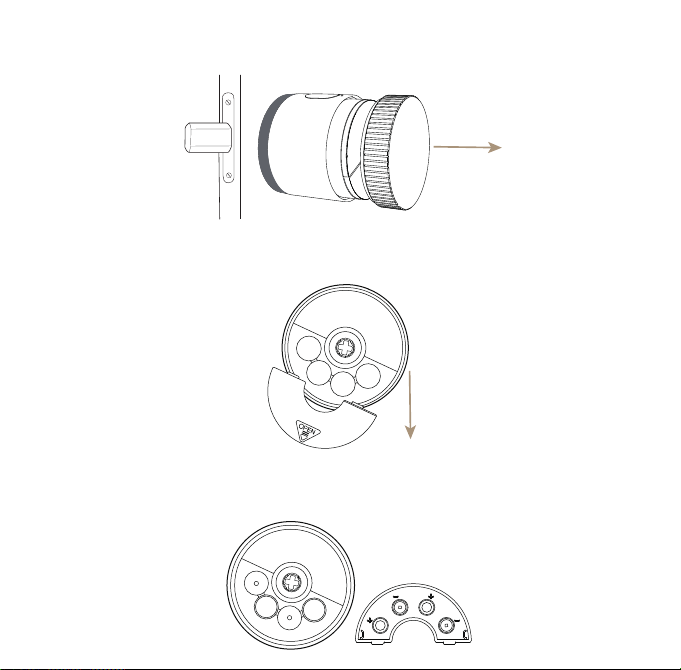
Determine if the Coverplate is requiredFor oversized deadbolt holes, if the mounting plate of your smart lock does not completely cover the holes left by the removed thumbturn, you may need to install the Coverplate in the box before the Baseplate A1 or A2, remember to remove the backing of the double-sided tape on the Coverplate.

B. If the deadbolt has a thick, rectangular tailpiece that is upright or level while the door is locked, please use the shorter and thicker rectangular adapter.C. If the deadbolt has an arch-shaped tailpiece, please use the arch-shaped adapter.D. If the deadbolt has a thin tailpiece that is angled while the door is locked, please use the angled rectangular adapter.A1 A1
A1
A1

Select the correct adapter based on your deadbolt's tailpiece. If the adapter fits the tailpiece but does not fit in Smart Lock's motor, flip the adapter and try again. Place the adapter in the motor and make sure there is NO GAP between the adapter and the hole for the adapter.Note: If the tailpiece is smaller than the adapter, you may use the adhesive strip to wrap and thicken the tailpiece so that it fits tightly into the adapter.
A1
A1 A1
No Gap Hole for the adapter Adapter

(7) Install the Smart Lock(8) Secure the Smart LockAlign the Main Button on the Smart Lock with the small triangle mark on the baseplate, and align the adapter with the deadbolt's tailpiece. If the adapter is not aligned with the tailpiece, turn the front cover of the Smart Lock to align them. Mount the Smart Lock over the baseplate, and turn the Smart Lock's body slightly counterclockwise to fix the Smart Lock on the baseplate. You may need to turn with a bit force. Make sure no gap between the smart lock and the door.Slide up the silica cover at the bottom of the Smart Lock, and find the screw holes underneath. Use the provided screw to secure the Smart Lock onto the baseplate. Use the screw hole on the Smart Lock that is closer the deadbolt's strike, either side works. Finally, slide down the silica cover back to the bottom of the Smart Lock.Note: Please do NOT put screws into both screw holes.No GapTriangle MarkMain Button(1)(2)(3)A1 Turn the body to fix it

(10) Remove the battery compartment coverSlide the battery compartment cover in the direction indicated on the cover to remove it.(11) Install the batteriesInstall 4 AA batteries. Make sure that the positive/negative ends match those marked on the battery compartment cover. Note: Please avoid using rechargeable batteries.(9) Remove the front coverPull the front cover out of the Smart Lock.

(12) Replace the battery compartment coverSlide the battery compartment cover back, and make sure that it is secured.(13) Replace the front coverPush the front cover into the Smart Lock. Make sure that the pole on the front cover matches the hole on the Smart Lock.

4.PREPARATION FOR USE(1) Follow the installation instruction to install Smart Lock on your door.(2) Download the App from Google Play or App Store.Please scan the QR code or download Smart Life on App store.(3) Log in to the App or create a new account.Mobile number/e-mail address
Region
Obtain verification code
Enter the Register/Login interface; tap “Register” to create an account by entering your phone number to get verifification code and “Set password”. Choose “Log in”if you already have a Smart Life account.

5.STEPS FOR CONNECTING THE APP TO THE DEVICEMethod One:Scan the QR code to configure the network guide.Method Two:(1) Turn on Bluetooth on the mobile.①②③④Scan the QR code Please connect the device according to the configuration process.

(3) Open Smart Life/Tuya App and Click“+”,then the prompt page will automatically show on the screen.Click “Add”.(2) Reset: Take out batteries and resert them into the Smart Lock and seeing a BLUE indicator light, long-press the Main Button within 10 seconds, until you hear a long beep and the RED indicator ligt is on.

Note: 1. To recalibrate the Smart Lock, please go to Smart Lock setting -> "Guide the operation" to start calibration.2. Reset: Take out batteries and resert them into the Smart Lock and seeing a BLUE indicator light, long-press the Main Button within 10 seconds, until you hear a long beep and the RED indicator ligt is on.3. Make sure that your phone's Bluetooth is enabled and is connected to the internet.4. The Bluetooth gateway is used to connect the smart lock into Smart Life APP for smart phone controls based on internet as remote unlock,notifications,voice control and ect.please see step 6(Installation-gateway) for details.TROUBLESHOOT FOR CALIBRATION FAILUREIf you had any issues to calibrating the Smart Lock, please refer to the following instructions to solve the issues.1. If the App shows ‘Calibration failed, code 0x01’, please recalibrate the lock and make sure that the rotation between the Smart Lock's locked and unlocked positions is between 60-900°.2. If the App shows ‘Calibration failed, code 0x05 or code 0x06 or code 0x07’, Please reset the Smart Lock and try again.(4) Add the device successfully, you can edit the name of the device to enter the device page by click “Next”

(1) Placing the GatewayTo optimize the connection performance, the Gateway is recommended to be placed within 5 meters (16 feet) from the Smart Lock. The required distance from your wireless router to the Gateway depends on many variables, it's recommended to place the Gateway at the location where your smart phone shows a full set of Wi-Fi “bars” to make sure the Gateway is able to have stable connection to the Wi-Fi.Blue: bluetooth statusFlashing means to be connected and allowed to connect to the networkkeep “on” for a long time, which means device is activatedkeep “off” for a long time, which means device is not activatedSwitch/Reset keyPower jack
BlueBluetooth status indicator (3) Make sure your phone is connected to 2.4GWi-Fi and the Bluetooth is enabled.(2) Reset method: Press and hold the button for 5 seconds and see the blue indicator flashing several times,which means the reset is successful.6. INSTALLATION - GATEWAY

Note: Gateway power input: DC 5V 1A, power over the Micro USB port. (4) Open Smart Life/Tuya App and Click“+”,then the prompt page will automatically show on the screen.Click “Add”.Enter Wi-Fi Password and click “Next”,waiting for the connection completed.The connection will take about 30-120 seconds,depending on your network condition.(5) Once the device has been added successfully,you will be able to find the device on“My Home” page.Go to the Bluetooth Gateway homepage, tap "Add device by list", select the Smart Lock, add the Smart Lock to the Gateway.

7. OPERATION OF SMART LOCKSelect “Smart Scenes” Locking and unlocking(1)Auto unlockThe smart lock supports unlock automatically when your Bluetooth is in range. How to enable Bluetooth auto unlock?Make sure that App has been always allowed to access location and enable Bluetooth.

(2)Auto lockYou can set the Smart lock to lock automatically based on a time delay.How to set an auto unlock time delay?Settings of the smart lock >> enable “automatic lock switch” >> “auto lock delay time set”Enable Bluetooth Auto-unlockAuto-unlock Settings123①:Geo-fence radius setting. It is necessary to set a range from 200 to 500 meters (650 to 1600 feet).②:Unlocking sensitivity, with a smaller value set, a stronger signal for the BLE is required. Set it “is not enabled” is suggested.③: How long time the mobile phone to scan the BLE lock, it is suggested to set it as “Permanent”, to make sure a high successful unlock rate.In order to have auto-unlocking working, it’s necessary to make sure:1. The App is ALWAYS allowed to get location;2. Backgroud App Refresh is turned on for the APP;3. The Bluetooth of the phone is turned on;4. The internet of the phone is turned on and stable;5. The Geo-fence is set up and the range should be from 200 to 500 meters (650 to 1600 feet).

(3)App lock and unlockIf your mobile Bluetooth is enabled and you are within range (approx. 3-5 meters/10-16 feet), your App will connect to the Smart Lock. If you bind the Smart Lock to the Gateway, the App will connect to the Smart Lock when you are outside of the range. When connected, you can unlock and lock the Smart Lock by long pressing the Unlock Button on the main page of the App. If you don’t operate the App within 2 minutes, the App will disconnect the lock automatically. You can press the Unlock Button on the main page of the App to get it connected again.(4)Family member access sharing Click “Member” >> Click “+” to add the account of your family member(5)Temporary access sharingClick “temporary code”Set up temporary access limited by dates and times or one-time temporary access for visitors. Once you have temporary access ready, you can send it to visitors.Note: It’s only ok to grant temporary access to someone who register their phone number or email address in this App.

(6)AccessoriesWe will have more accessories could be bound with the Smart Lock in the future, such as keypad to unlock the door, etc.(7)OthersEmergency operationIf you fail to control the lock by long pressing the main button in the App, or you can't turn the lock by rotating the front cover, click Emergency Operation to turn it left or right for 3 seconds, to restore the state of the Smart Lock. DON'T CLICK THIS when the Smart Lock works fine.Hold back latchThis feature is only available for locks with more than 1 latch and need to rotate more than 1 circle, such as EU cylinder lock.
Table of contents