Mohu Sky 60 User manual

ANTENNA
TUNER MODE
SCANNING FOR CHANNELS
CHANNEL SEARCH
ALTERNATIVE MOUNTING OPTION
C
D
D
A
OR
D
D
A
B
A
E
G
C
G
MOHU
SKYANTENNA
POWER
INJECTOR
HOUSING
30FT.
COAXIAL
CABLE E
I
G
F
H
H
G
TELEVISION
(not included)
E
ANT
TELEVISION
(not included)
POWER
INJECTOR
HOUSING I
K
J
Attach the mounting bracket (Part
A) to wood framework in your
attic or on your roof/eaves by
using the 4 self-threading screws
(Part B) included in the box. You
can also use the 4 bolts, nuts and
washers (Part D, optional) after
drilling holes.
Add the mounting tube (Part C) to the
mounting bracket by placing the short
end of the tube into the mounting
bracket. Loosely secure the mounting
tube with the two long bolts, washers and
nuts (Parts D) included in the box, then
adjust the mounting tube so that the top
of the tube is vertical. Once the mounting
tube is vertical, secure it by tightening
the two nuts (Part D). It is important that
the tube is approximately vertical.
Attach the 30 ft. coaxial cable
(Part E) to the coax connector on
the Sky using the end of the cable
with the rubber boot. Finger-
tighten the coax connector (do not
use tools). Slide the rubber boot
over the bottom connector for
weatherproofing.
Attach mounting clamp (Part F)
to the Sky (Part G) with the 4 bolts
and nuts (Parts H). Loosely attach
the nuts on the other side.
Slide the clamp/antenna over the
vertical end of the mounting tube.
Tighten the 4 bolts (Parts H) on
the mounting clamp to secure the
antenna to the mounting tube.
Run the free end of the 30 ft
coaxial cable (Part E) from the
antenna to your TV set. Be sure to
not kink or yank on the cable or it
can be permanently damaged.
Additional length of low-loss
coaxial cable can be added if
needed. Avoid adding excess cable
length in order to minimize losses.
Plug the free end of the coaxial cable
from the antenna to the connector on
the power injector (Part I). Plug the
short coaxial cable from the power
injector into the ANT/IN connector on
the back of your TV (See Figure 8).
The amplifier built into Sky must be
powered in order to function. Plug the
small end of the included USB cable
(Part J) into the amplifier and the large
end of the USB cable into an open USB
port on the back of your TV. If your TV
does not have a USB port, use the
included wall adapter (Part K) to power
the amplifier via any standard 120V
wall outlet (See Figure 8).
Using In your TV’s setup menu, set the
tuner mode to “Antenna” or “Air”. Consult
your TV manual for detailed instructions.
After selecting “Antenna” or “Air” in your TV’s
setup menu, set TV to “scan” for channels.
This can sometimes be listed as auto-
program, auto-scan, channel search or
channel scan. Consult your TV manual for
detailed instructions. The TV will typically
take several minutes to search for all
available stations. Once the scan is complete,
you will want to exit your TV menu to begin
watching free high-definition TV!
If you intend to mount the Sky in an attic, an alternative mounting option would be to hang the Sky from the wooden
framework using 2 nails or screws (see illustration below). The Sky must ALWAYS be installed in a horizontal manner.
You will ONLY want to use medium length nails or screws (less than 2.5 inches in length). You must also make sure NOT
to mount the Sky near any large metallic objects, such as pipe clamps or electrical conduits. If you decide to use this
alternative mounting option, please be sure to clamp the Sky together near the connector with the mounting clamp (Part
F) using the mounting clamp hardware (Parts H). Even though the mounting tube and clamp are not used, the screws
and nuts are needed.
INSTRUCTIONS
1
3 4
5 6
7 8
910
2
WHAT’S IN THE BOXIMPORTANT!
F
C
E
B
X4 X4 X6
DH
I
K
J
G
A
Note: The Sky antenna will require power in order to
function. You must use either a USB port or AC wall
adapter (included) to power the antenna.
SAFETY WARNING: If you intend to mount the
SkyHDTV antenna on a rooftop, make sure to mount it
away from any power lines or utility poles. Be sure to
follow all instructions and safety procedures when
installing your antenna. BEFORE installing, refer to
safety warning included in the box!
If you have any difficulties with the installation of your antenna, please contact Mohu.
OUTDOOR INSTALLATION WARNING
IMPORTANT SAFETY PRECAUTIONS: BE SURE TO THOROUGHLY READ THROUGH ALL
SAFETY PRECAUTIONS BEFORE INSTALLING THE SKY ANTENNA. FAILURE TO DO SO
COULD PUT LIVES AT RISK, SO IT IS VERY IMPORTANT THAT YOU READ EACH STEP
CAREFULLY! BE SURE TO FOLLOW ALL INSTRUCTIONS AND SAFETY PROCEDURES
WHEN INSTALLING YOUR ANTENNA.
IMPORTANT: BEFORE INSTALLING THE SKY ANTENNA, PLEASE BE SURE TO FAMILIARIZE
YOURSELF WITH THE SITE TO AVOID ANY POSSIBLE HAZARDS, AS LISTED BELOW:
[1] KEEP THE SKY ANTENNA AWAY FROM POWER LINES; FAILURE TO DO SO CAN
RESULT IN ELECTRIC SHOCK OR DEATH
[2] IF YOU ARE UNSURE ABOUT A SAFE INSTALLATION, DO NOT ATTEMPT TO INSTALL
THE ANTENNA YOURSELF. PLEASE CONTACT A LOCAL OUTDOOR ANTENNA
INSTALLER FOR ASSISTANCE.
[3] FOLLOW ALL SAFETY PROCEDURES WHEN USING A LADDER TO AVOID FALLING.
[G] - The Mohu Sky Antenna
[E] - 30 ft high-performance coaxial cable
[J] - 3 ft USB Cable
[I] - USB power injector
[K] - Power Cube
[F] - Antenna Mount and Hardware
[C] - Mounting Tube and Hardware
OUTDOOR/ATTIC
MULTI-DIRECTIONAL
ANTENNA
SKYHDTV
TM
15-20 FT.
MINIMUM
DANGER
If you intend to mount the Sky antenna on a rooftop, make sure to mount it
AWAY from any power lines or utility poles. Please be sure to mount the Sky
antenna AT LEAST 15-20 ft AWAY from any power lines. Make sure that there
are NO possibilities for any personnel or equipment involved to come in contact
with power lines. If any part of the Sky antenna should come into contact with
power lines, DO NOT TOUCH IT! Call the power company IMMEDIATELY for help.
If a person comes into contact with a power line and cannot move, DO NOT
TOUCH THAT PERSON AS YOU RUN THE RISK OF ELECTROCUTION. Use a
NON-CONDUCTIVE object, such as a dry board, or stick to push them so they
are no longer in contact with electrical power.
Once the person is no longer in contact with electrical power, call 911
IMMEDIATELY and administer CPR if you are certified.
A.
B.
C.
ALWAYS make sure that there is another person present ON THE GROUND
when installing the antenna.
BE SURE to assemble as much of the antenna ON THE GROUND as possible.
DO NOT attempt to mount the antenna on a windy, rainy or snowy day.
If the antenna begins to fall, DO NOT attempt to stop it. Stand back and let it fall.
AVOID using a metal ladder at all costs.
MAKE SURE that all towers and masts are securely grounded.
A.
B.
C.
D.
E.
F.
V20130108

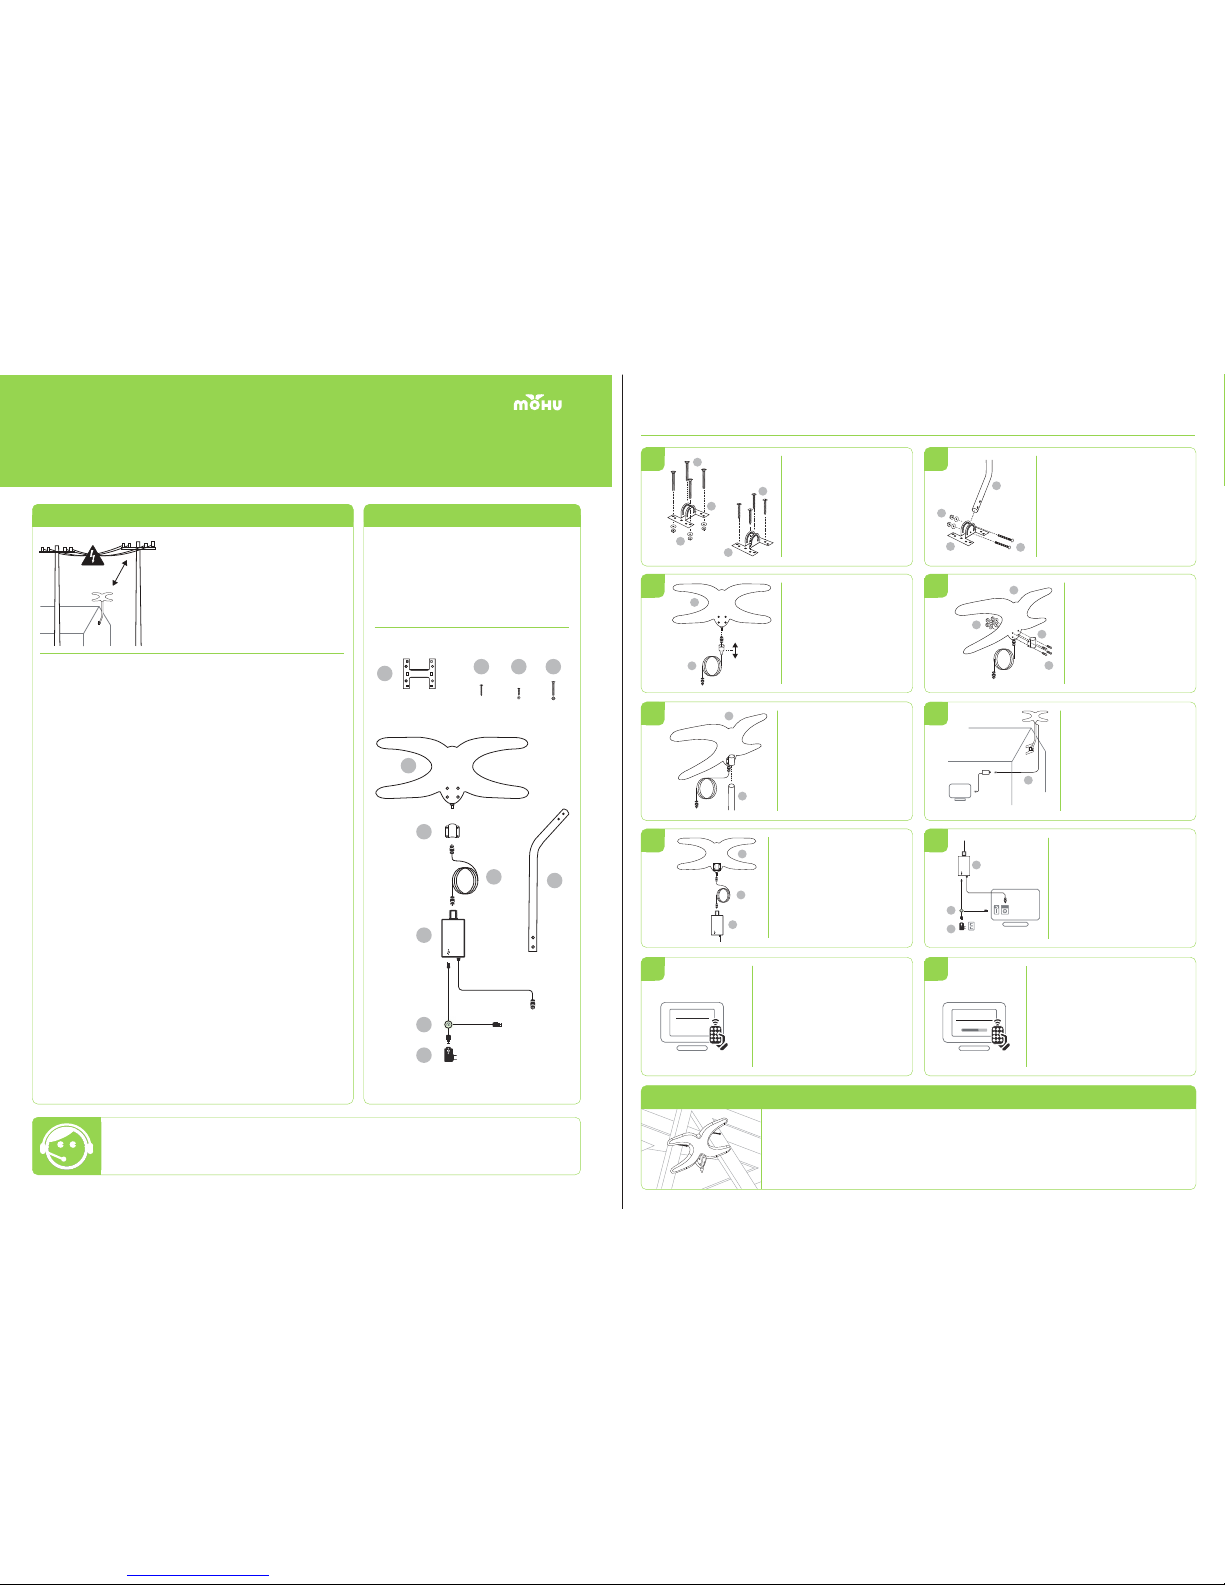
¿QUÉ VIENE INCLUIDO EN LA CAJA?IMPORTANT!
F
C
E
B
X4 X4 X6
DH
I
K
J
G
A
NOTA: El Sky requiere energía para funcionar. Debe
utilizar un puerto USB o adaptador de pared (incluido)
para enchufar la antena.
ADVERTENCIA DE SEGURIDAD: Si piensa montar
el Sky en su tejado, asegurase de montarlo lejos
de alguna líneas de fuerza electricas o astas
versátiles. Esté seguro de seguir todas las
instrucciones y los mecanismos de seguridad al
instalar su antena. ¡ANTES de instalar, refiérase a
la advertencia de seguridad, incluido en la caja!
Si tiene cualquier dificultad con la instalación de su antena, por favor contacte a Mohu a
ADVERTENCIA DE INSTALACIONES AL AIRE LIBRE
MEDIDAS DE SEGURIDAD IMPORTANTES: ASEGÚRESE DE LEER COMPLETAMENTE TODAS
LAS MEDIDAS DE SEGURIDAD ANTES DE INSTALAR EL SKY. DE NO HACERLO PODRÍA
PONER SU VIDA EN RIESGO, ASÍ QUE ES MUY IMPORTANTE QUE ¡LEA CADA PASO CON
CUIDADO! ASEGÚRESE DE SEGUIR TODAS LAS INSTRUCCIONES Y LOS MECANISMOS DE
SEGURIDAD AL INSTALAR SU ANTENA.
IMPORTANT: ANTES DE INSTALAR SU SKY, POR FAVOR ASEGÚRESE DE FAMILIARIZARSE
CON NUESTRO SITIO WEB PARA EVITAR CUALQUIER PELIGRO POSIBLE, COMO INDICADO:
[1] MANTENGA LEJOS EL SKY DE LA LINEA DE CORRIENTE; DE LO CONTRARIO PODRIA
RESULTAR EN UN CHOQUE ELÉCTRICO O MUERTE
[2] SI NO ESTA SEGURO ACERCA DE UNA INSTALACION SEGURO, NO INTENE
INSTALAR LA ANTENA. POR FAVOR, PONGASE EN CONTACTO CON UN INSTALADO
LOCAL DE ANTENAS EXTERIORES PARA OBTENER AYUDA.
[3] SIGA TODOS LOS PROCEDIMIENTOS DE SEGURIDAD CUANDO UTILICE UNA ESCAL-
ERA PARA EVITAR CAERSE.
[G] - La antena Mohu Sky
[E] - 10 metros de cable coaxial
[J] - 1 metro de cable USB
[I] - Inyector de corriente USB
[K] - Un adaptador de pared
[F] - Montadura de la antena y ferretería
[C] - Tubo de montar y ferretería
TM
15-20 PIES
MINIMO
PELIGRO
Si intenta montar su Sky en el tejado, asegúrese de montarlo LEJOS de líneas
de fuerza eléctrica o postes de servicios públicos. Asegúrese de montar el SKY
AL MENOS 15-20 pies de distancia de las líneas eléctricas aéreas. Asegúrese de
que NO haya posibilidades de personal o quipo que intervengan con las líneas
eléctricas. Si alguna parte del Sky entra en contacto con las líneas eléctricas,
¡NO LO TOQUE! Llame a la compañía eléctrica de IMEDIATO para pedir ayuda.
Si una persona entra en contacto con una línea eléctrica y no se puede mover,
NO TOQUE ESA PERSONA, PODRA CORRER EL RIESGO DE ELECTOCUCION.
Utilice un objeto NO-CONDUCTOR, como un tablero seco, o un palo para
empujar a la persona y no están en contacto con la energía eléctrica.
En cuanto la persona deje de estar en contacto con la energía eléctrica, llame al
911 INMEDIATAMENTE y administre RCP si esta certificados.
A.
B.
C.
SIEMPRE asegúrese de que haya otra persona presente en el suelo cuando este
instalando la antena.
ASEGURESE de armar lo más que pueda de la antena en el suelo.
NO intente montar la antena en un día ventoso, lluvioso o con nieve.
EVITE usar una escalera de metal, ¡a toda costa!
ASEGURESE de que todas las torres y mástiles estén firmemente conectados
a la tierra.
A.
B.
C.
D.
F.
SKYHDTV
OUTDOOR/ATTIC
MULTI-DIRECTIONAL
ANTENNA
ANTENA
ESCANEANDO POR CANALES
ESCANEAR
ALTERNATIVA PARA MONTAR
C
D
D
A
OR
D
D
A
B
A
E
G
C
G
E
I
G
F
H
H
G
E
ANT
I
K
J
Conecte la repisa de montar
(Parte A) a el armazón de
madera en su ático o en su
techo/alero utilizando los 4
tornillos (Parte B) incluidos en la
caja. También puede utilizar los 4
cerrojos, las tuercas y las
arandelas (Parte D, opcional)
después de taladrar los hoyos.
Agregue el tubo de montar (Parte C) a la
repisa de montar colocando la parte corta del
tubo en la repisa de montar. Asegure sin
apretar el tubo de montar con los dos
cerrojos largos, las arandelas y las tuercas
(Parte D) incluido en la caja, entonces ajuste
el tubo de montar para que la cima del tubo
este vertical. En cuanto el tubo de montar
este vertical, lo asegura apretando las dos
tuercas (Parte D). Es importante que el tubo
este razonablemente vertical.
Conecte los 10 metros de cable
coaxial (Parte E) al conector
coaxial en el Sky, utilizando el fin
del cable con el protector de
goma. Apriete con los dedos el
conector coaxial (no utilice
herramientas). Deslice el
protector de goma sobre el
conector inferior para
impermeabilizarlo.
Conecte la abrazadera de montar
(Parte F) al Sky (Parte G) con los
4 cerrojos y tuercas (Parte H).
Conecte sin apretar las tuercas
en el otro lado.
Deslice la abrazadera/antena
sobre el fin vertical del tubo de
montar. Apriete los 4 cerrojos
(Parte H) en la abrazadera de
montar para asegurar la antena
al tubo de montar.
Corra el fin libre de los 10 metros de
cable coaxial (Parte E) de la antena a
su televisor. Esté seguro de no
enroscar ni jalar el cable o podrá ser
dañado permanentemente. Cable
coaxial bajo-pérdida puede ser
agregado si es necesitado. Evite
agregar exceso longitud de cable
para minimizar perdidas.
Conecte el fin libre del cable coaxial
de la antena al conector en el
inyector de corriente (Parte I).
Conecte el cable coaxial corte del
inyector de corriente en el conector
del ANT/IN en la espalda de su
televisor (Vea Figura 8).
El amplificador construido en el Sky de ser
enchufado para funcionar. Conecte el
pequeño fin del cable USB incluido (Parte
J) en el amplificador y el fin grande del
cable USB en un puerto USB abierto en la
espalda de su televisor. Si su televisor no
tiene un puerto USB, utilice el adaptador
de pared incluido para enchufar el
amplificador a través de cualquier
tomacorriente estándar de pared de 120V
(Vea Figura 8).
En el menú del arreglo de su televisor,
ponga el modo de afinador a la “antena” o
el “aire”. Consulte su manual de su
televisor para instrucciones mas detalladas.
Después de seleccionar “antena” o “aire” en su
televisor, en el menú del arreglo de su televisor,
ponga su televisor a “escanear” por canales. Esto
puede estar listado como auto-programa,
auto-escáner, búsqueda de canal, o escáner de
canal. Consulte su manual de su televisor para
instrucciones mas detalladas. Típicamente, el
televisor tomara varios minutos para buscar todas
las estaciones disponibles. En cuanto termine de
escanear, salga del menú del televisor para
empezar a ver, ¡televisión gratis de alta definición!
Si piensa montar el Sky en un ático, una alternativa para montar seria de colgar el Sky del armazón de madera
utilizando 2 clavos o los tornillos (vea ilustración abajo). El Sky SIEMPRE debe ser instalado en una manera horizontal.
Usted SOLO querrá utilizar clavos medios de longitud o tornillos (menos de 2.5 pulgadas de largo). Debe de asegurarse
de NO montar el Sky cerca de ningún objeto metálico grande, como abrazaderas de tubo ni conductos eléctricos. Si
decide utilizar esta alternativa para montar su Sky antena, por favor este seguro de sujetar el Sky junto o cerca del
conector con la abrazadera de montar (Parte F) utilizando la ferretería de la abrazadera de montar (Parte H). Aunque el
tubo y la abrazadera de montar no sean utilizados, los tornillos y las tuercas son necesitados.
INSTRUCTIONS
1
3 4
5 6
7 8
910
2
10METROS
DECABLE
COAXIAL
MODO DE AFINADOR

AMPLIFIER
ALERT!
When
installing
your
Mohu®Antenna
Amplifier,
be
sure
to
install
it
exactly
as
the
diagram
displays.
Back
of
TV
Coaxial
Cable
MOHU®
ANTENNA
0 0
(to
antenna)
-----
Amplifier
(to
coaxial
cable)-
Coaxial
Cable
USB
Cable
(to
TV's
ANT
/IN
port)
-e
e--
(to
TV's
USB
Port
or
to
power
adaptor)
( J
POWER
OPTIONS:
J
a.
TV's
USB
Port
USB
Cable
to
TV's
USB
Port
-0-
[
~~
J
b.
Wall
Outlet
USB
Cable
to
Power
Adaptor
to
Wall
Outlet
Table of contents
Languages:
Other Mohu Antenna manuals
Popular Antenna manuals by other brands

ZyXEL Communications
ZyXEL Communications ZYAIR EXT-108 Dimensions

Ground Control
Ground Control Toughsat Flyaway quick start guide

Winegard
Winegard MT-4000 installation manual

Siemens
Siemens ANT793-6DG Compact operating instructions

COBHAM
COBHAM EXPLORER 5075GX quick guide

Glomex
Glomex 10946 User and installation manual

Antenna Experts
Antenna Experts AC9-150 installation manual

Taoglas
Taoglas TGX.04 Series installation instructions

ETS-Lindgren
ETS-Lindgren BiConiLog 3140 manual

KVH Industries
KVH Industries TracPhone V3 Installation checklist

Maco Antennas
Maco Antennas FLAT 8 Assembly instructions

Goobay
Goobay DVB-T DIA 220 PS Mini black Assembly instructions