MOIXA Smart Battery User manual

DC READY®, MOIXA®are registered trademarks, logos, illustrations are property of
Moixa Energy Holdings Ltd. Registered in England and Wales. © Moixa Technology Ltd 2016.
www.moixa.com
Moixa Technology Ltd,
One Fellmongers Path,
London SE1 3LY
| 1
Moixa Smart Battery
Technical File part 03E:
Maintenance Manual

DC READY®, MOIXA®are registered trademarks, logos, illustrations are property of
Moixa Energy Holdings Ltd. Registered in England and Wales. © Moixa Technology Ltd 2016.
www.moixa.com
Moixa Technology Ltd,
One Fellmongers Path,
London SE1 3LY
2 |

DC READY®, MOIXA®are registered trademarks, logos, illustrations are property of
Moixa Energy Holdings Ltd. Registered in England and Wales. © Moixa Technology Ltd 2016.
www.moixa.com
Moixa Technology Ltd,
One Fellmongers Path,
London SE1 3LY
| 3
0207 734 1511
www.moixa.com
System Maintenance procedures for the
Moixa®Smart Battery.
For technical support relating to your Smart Battery,
please contact Moixa:
introduction

DC READY®, MOIXA®are registered trademarks, logos, illustrations are property of
Moixa Energy Holdings Ltd. Registered in England and Wales. © Moixa Technology Ltd 2016.
www.moixa.com
Moixa Technology Ltd,
One Fellmongers Path,
London SE1 3LY
4 |
Issue
Draft
Draft V2
Released
Date
30/09/2016
04/10/16
12/10/16
Comment
Draft
Draft V2
V.1.0
Signed O by
CW
CW
CW
Authors Date
Chris Wright , CTO, Moixa Technology 12/10/2016
Dan Mason
Albert Miralles
Notes on the Maintenance / Operations Manual
1. Maintenance manual for guidance and subject to revision and version updates
2. Commercial condential and copyright Moixa Technology Ltd
3. This document is not for publication or online use without Moixa approval
4. You must have attended the approved installer program to carry out maintenance
on the Moixa Smart Battery unit
technical file

DC READY®, MOIXA®are registered trademarks, logos, illustrations are property of
Moixa Energy Holdings Ltd. Registered in England and Wales. © Moixa Technology Ltd 2016.
www.moixa.com
Moixa Technology Ltd,
One Fellmongers Path,
London SE1 3LY
| 5
Contents
03E.01 Tools required
03E.02 Fitting a 3G dongle or changing a WiFi Dongle
03E.03 Upgrade unit from Wi to TP link connection
03E.04 Swap SD card in Moixa Smart Battery
03E.05 Replace battery modules on Moixa Smart Battery unit
03E.06 Recharge battery modules on Moixa Smart Battery unit
03E.07 Swap Moixa Smart Battery unit for a replacement
03E.08 Check non-invasive meter locations
03E.09 Connecting a unit WiFi
03E.10 Updating Sub-Pic
03E.11 Installing the Moixa Install App
P.06
P.07
P.12
P.18
P.21
P.24
P.27
P.31
P.38
P.41
P.47
contents

DC READY®, MOIXA®are registered trademarks, logos, illustrations are property of
Moixa Energy Holdings Ltd. Registered in England and Wales. © Moixa Technology Ltd 2016.
www.moixa.com
Moixa Technology Ltd,
One Fellmongers Path,
London SE1 3LY
6 |
03E.01 Tools required
List of tools required for basic maintenance:
Tool Description Extra Information
1. Hex sey set To screws the battery and remove the covering
Screws: Hex head M4 8mm, socket counter-
sunk
2. Box end wrench Wi and 3G dongle pig tail: 8mm head
Inverter tray to moixa unit: 9/32 Inches
(7.14mm) Fixing unit: 10mm
3. Common screw drivers: • slot • phillips
4. AC clamp meter
5. Battery kit:
• Extension cable • Charger • Charger meter
6. Connectivity Kit:
• SD card: with last software • WIFI kit: anten-
na+ dongle • 3G kit: antenna + dongle
• Ethernet cable: cat5 • TP-Link Pair with 2x
ethernet cables
This can be acquired at Moixa Technology.
tools required

DC READY®, MOIXA®are registered trademarks, logos, illustrations are property of
Moixa Energy Holdings Ltd. Registered in England and Wales. © Moixa Technology Ltd 2016.
www.moixa.com
Moixa Technology Ltd,
One Fellmongers Path,
London SE1 3LY
| 7
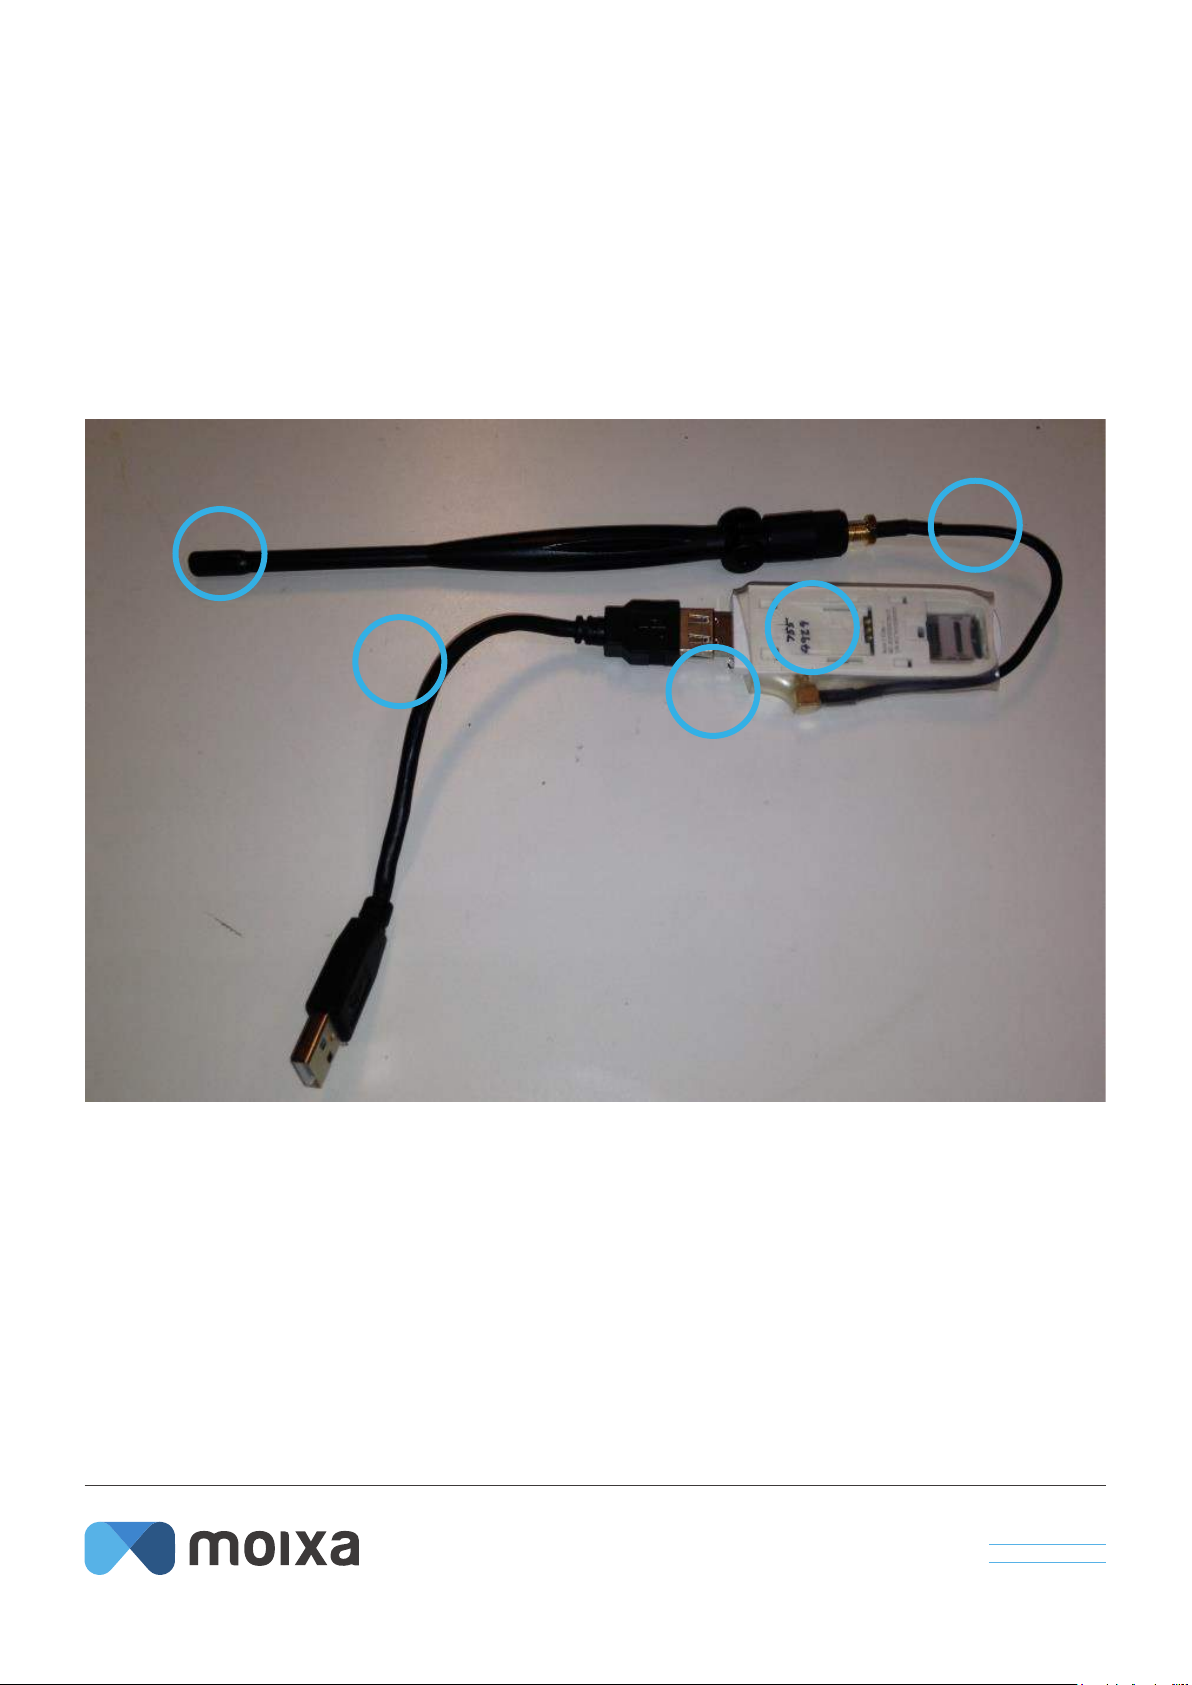
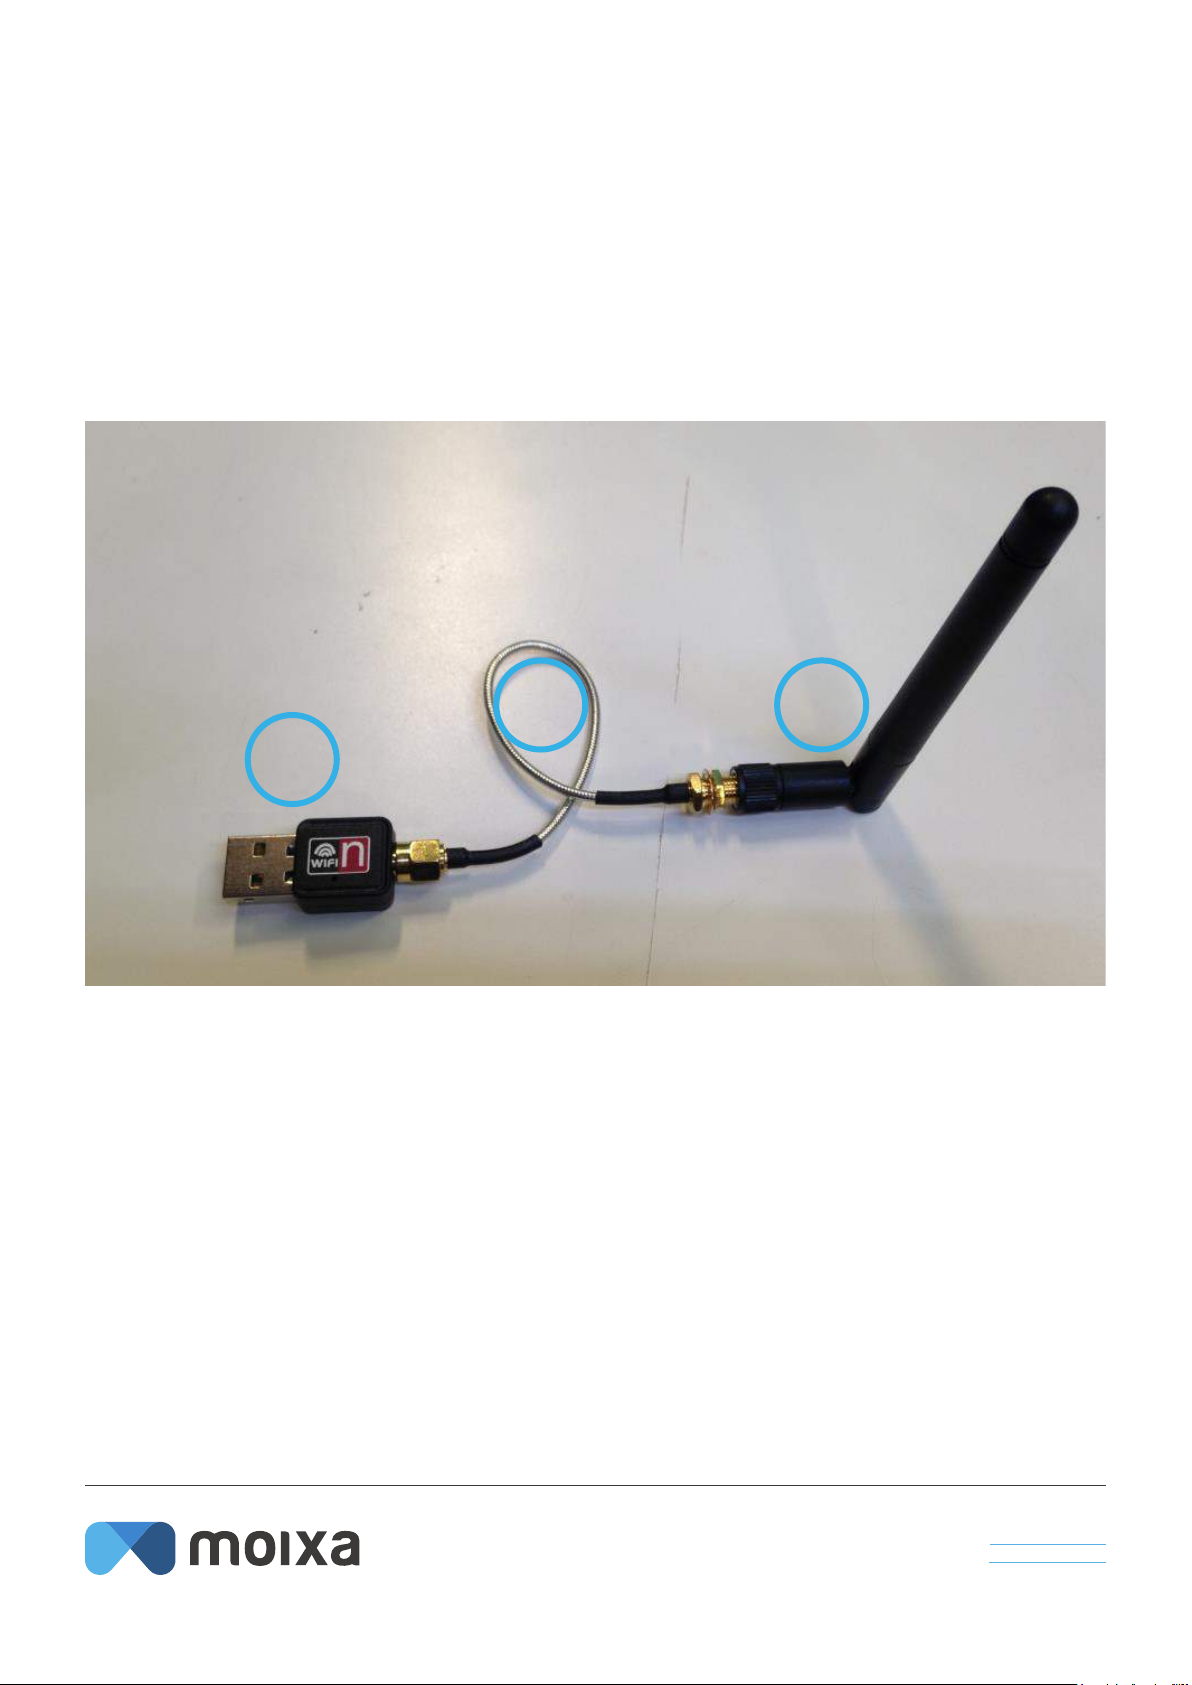
03E.02 Fitting a 3G dongle or replacing a WiFi Dongle
Description:
There is an issue with either a 3G or WiFi connection from a Moixa Smart Battery,
and the connection dongle needs to be replaced
This will involve:
a) Launch the Moixa maintenance App to record details of the job
b) Shutdown and Isolate the Moixa Unit.
c) Remove the 2 battery modules and the base cover - 7 allen keys screws, swap-
ping the SD card in the Pi module.
d) Replace the communications Dongle plugged into the USB socket of the Pi.
Replace the cover and the battery modules. Turn on the Unit. For WiFi you will
need to then set the Wi password on the Moixa Smart Battery by logging in – as
described in Section 03E.09
e) Check that the unit is online and reliably sending data, to do this you will need
to Ring Moixa technical team, report that work is complete and request that they
login to the unit to check that it is working correctly.
f) Press submit on the Moixa app to send details of the job to the Moixa team.
Timing:
Approx 40mins will be required for this work.
fitting/replacing 3g/wifi dongle

DC READY®, MOIXA®are registered trademarks, logos, illustrations are property of
Moixa Energy Holdings Ltd. Registered in England and Wales. © Moixa Technology Ltd 2016.
www.moixa.com
Moixa Technology Ltd,
One Fellmongers Path,
London SE1 3LY
8 |
3G dongle kit denition:
1. 3G antenna
2. Pig tail
3. 3G dongle
4. SIM card
5. Male to female USB adapter
12
3
4
5
fitting/replacing 3g/wifi dongle

DC READY®, MOIXA®are registered trademarks, logos, illustrations are property of
Moixa Energy Holdings Ltd. Registered in England and Wales. © Moixa Technology Ltd 2016.
www.moixa.com
Moixa Technology Ltd,
One Fellmongers Path,
London SE1 3LY
| 9
WIFI dongle denition:
1. WIFI Antenna
2. Dongle
3. Pig tail
2
31
fitting/replacing 3g/wifi dongle

DC READY®, MOIXA®are registered trademarks, logos, illustrations are property of
Moixa Energy Holdings Ltd. Registered in England and Wales. © Moixa Technology Ltd 2016.
www.moixa.com
Moixa Technology Ltd,
One Fellmongers Path,
London SE1 3LY
10 |
A. Unscrew the bolts and remove the cover
B. Identify the dongle
WIFI and 3G dongle is USB connected to the right side of the “PI” board
fitting/replacing 3g/wifi dongle
Pi

DC READY®, MOIXA®are registered trademarks, logos, illustrations are property of
Moixa Energy Holdings Ltd. Registered in England and Wales. © Moixa Technology Ltd 2016.
www.moixa.com
Moixa Technology Ltd,
One Fellmongers Path,
London SE1 3LY
| 11
C. Place 3G Dongle
Place it on the bottom of the unit
D. Connect the USB adapter to the socket
Connect the USB adapter and the 3G antenna
fitting/replacing 3g/wifi dongle

DC READY®, MOIXA®are registered trademarks, logos, illustrations are property of
Moixa Energy Holdings Ltd. Registered in England and Wales. © Moixa Technology Ltd 2016.
www.moixa.com
Moixa Technology Ltd,
One Fellmongers Path,
London SE1 3LY
12 |
03E.03 Upgrade unit from WiFi to TP link connection
Description:
We need to update an existing Moixa Smart Battery unit from using a WiFi con-
nection to using a ethernet over power line connection to provide a more reliable
data connection.
This will involve:
a) Launch the Moixa maintenance App to record details of the job
b) Shutdown and Isolate the Moixa Unit. Insert a socket in line in the existing cir-
cuit between the consumer unit and the Moixa Smart Battery unit (if there is not
a socket that can be used immediately next to the Moixa unit). This should mean
only splitting the existing wire and tting a back-box & socket
c) Plug in the TP link unit into the new socket and run the ethernet cable into the
Moixa unit. Remove the 2 battery modules and the base cover - 8 allen keys
screws, plugging the ethernet cable into the Pi module, swapping the SD card in
the Pi module, and replacing the cover and the battery units, switch on the Moixa
unit.
d) Pairing the TP link units. Plug in the other TP link unit between the broadband
router power supply and the mains socket, plugging the ethernet cable into the
back of the router, and checking that the lights are ashing on both of the TP link
units.
e) Check that the unit is online and reliably sending data. Ring Moixa technical
team, report that work is complete and request that they login to the unit to
check that it is working correctly.
f) Press submit on the Moixa app to send details of the job to the Moixa team.
Timing:
Approx 1.5 hours will be required for this work.
upgrade unit from wifi to tp link

DC READY®, MOIXA®are registered trademarks, logos, illustrations are property of
Moixa Energy Holdings Ltd. Registered in England and Wales. © Moixa Technology Ltd 2016.
www.moixa.com
Moixa Technology Ltd,
One Fellmongers Path,
London SE1 3LY
| 13
Required Tools: (normal electrical tools +)
• TP Link Adapter (x2)
• Ethernet Cable (x2)
• Multi-tool (Hexagonal screwdriver and athead screwdriver)
Instructions:
1. Launch Moixa App
2. Isolate Moixa unit from the mains. Shutdown the Moixa unit: Hold mode until
it beeps and then wait for the second set of beeps to turn o unit.
1. 2.
2.
upgrade unit from wifi to tp link

DC READY®, MOIXA®are registered trademarks, logos, illustrations are property of
Moixa Energy Holdings Ltd. Registered in England and Wales. © Moixa Technology Ltd 2016.
www.moixa.com
Moixa Technology Ltd,
One Fellmongers Path,
London SE1 3LY
14 |
3.If no mains socket is available imediately next to the Moixa Smart Battery, then
add one on a new or existing circuit, this can be a spur.
4. Plug in the TP link unit into the new socket and run the ethernet cable into the
Moixa unit - you will need to remove the cover to do this as below.
5. Remove Battery units
6. Remove cover from the Moixa Unit – 8 Allen key screws
3. 4.
6.5.
5.
upgrade unit from wifi to tp link

DC READY®, MOIXA®are registered trademarks, logos, illustrations are property of
Moixa Energy Holdings Ltd. Registered in England and Wales. © Moixa Technology Ltd 2016.
www.moixa.com
Moixa Technology Ltd,
One Fellmongers Path,
London SE1 3LY
| 15
7. Locate the Ethernet port on the raspberry Pi. Remove the WiFi Dongle from
the USB socket in the Pi. Tape it securely to the inside of the Moixa unit - incase
WiFi is needed in the unit in future, or put in plastic bag and tape to the inside of
the unit.
8. Plug the ethernet cable into the Pi module, run the cable out of the Moixa unit
to the TP link module, either through the recess to the side of the Pi, or up to the
top of the Moixa unit.
9. Secure Ethernet cable with cable ties.
10. Swap the SD cards in the Pi module
11. Replacing the cover and the battery units, switch on the Moixa unit.
7. / 8. 9. 10.
upgrade unit from wifi to tp link

DC READY®, MOIXA®are registered trademarks, logos, illustrations are property of
Moixa Energy Holdings Ltd. Registered in England and Wales. © Moixa Technology Ltd 2016.
www.moixa.com
Moixa Technology Ltd,
One Fellmongers Path,
London SE1 3LY
16 |
12. Pairing the TP link units. Plug in the other TP link unit between the broad-
band router power supply and the mains socket, plugging the ethernet cable into
the back of the router, and checking that the lights are ashing on both of the
TP link units. If needed press the pair button on both TP link units within a few
seconds - the units should be paired before shipping to you.
13. Check that the unit is online and reliably sending data. Ring Moixa technical
team, report that work is complete and request that they login to the unit to
check that it is working correctly.
14. Press submit on the Moixa app to send details of the job to the Moixa team.
Example TP link diagram on following page.
upgrade unit from wifi to tp link

DC READY®, MOIXA®are registered trademarks, logos, illustrations are property of
Moixa Energy Holdings Ltd. Registered in England and Wales. © Moixa Technology Ltd 2016.
www.moixa.com
Moixa Technology Ltd,
One Fellmongers Path,
London SE1 3LY
| 17
upgrade unit from wifi to tp link

DC READY®, MOIXA®are registered trademarks, logos, illustrations are property of
Moixa Energy Holdings Ltd. Registered in England and Wales. © Moixa Technology Ltd 2016.
www.moixa.com
Moixa Technology Ltd,
One Fellmongers Path,
London SE1 3LY
18 |
03E.04 Swap SD card in Moixa Smart Battery
Description:
We need to update the rmware on the Moixa Smart Battery system, and as it is
oine we need to do this with a manual SD card swap.
This will involve:
a) Launch the Moixa maintenance App to record details of the job
b) Isolate the Moixa Smart Battery with the switch, remove the 2 battery modules
and the base cover - 8 allen keys screws, swap the SD card in the Pi module, and
replacing the cover and the battery units, switch on the Moixa unit.
c) Check that the unit is online and reliably sending data. Ring Moixa technical
team, report that work is complete and request that they login to the unit to
check that it is working correctly.
d) Press submit on the Moixa app to send details of the job to the Moixa team.
Timing:
Approx 1.5 hours will be required for this work.
swap sd card

DC READY®, MOIXA®are registered trademarks, logos, illustrations are property of
Moixa Energy Holdings Ltd. Registered in England and Wales. © Moixa Technology Ltd 2016.
www.moixa.com
Moixa Technology Ltd,
One Fellmongers Path,
London SE1 3LY
| 19
Required Tools:
• Multi-tool (Hexagonal screwdriver and athead screwdriver)
Instructions
1. Launch Moixa App
2. Isolate Moixa unit from the mains. Shutdown the Moixa unit: Hold mode until
it beeps and then wait for the second set of beeps to turn o unit.
1. 2.
2.
swap sd card

DC READY®, MOIXA®are registered trademarks, logos, illustrations are property of
Moixa Energy Holdings Ltd. Registered in England and Wales. © Moixa Technology Ltd 2016.
www.moixa.com
Moixa Technology Ltd,
One Fellmongers Path,
London SE1 3LY
20 |
4. Remove Battery units
5. Remove cover from the Moixa Unit – 8 Allen key screws
6. Swap the SD cards in the Pi module
7. Replacing the cover and the battery units, switch on the Moixa unit.
8. Check that the unit is online and reliably sending data. Ring Moixa technical
team, report that work is complete and request that they login to the unit to
check that it is working correctly.
9. Press submit on the Moixa app to send details of the job to the Moixa team.
3.
6.
4. 5.
swap sd card
Other manuals for Smart Battery
5
Table of contents
Other MOIXA Inverter manuals