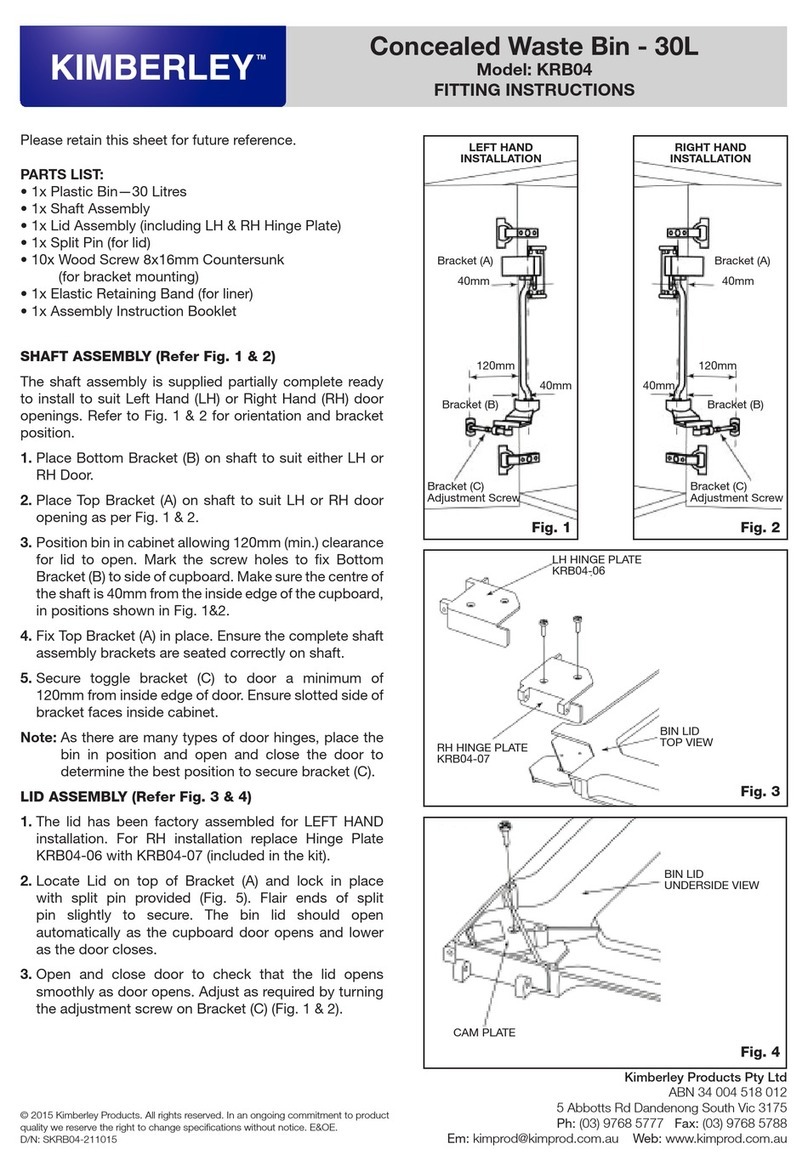
MOLOK MolokClassic 5 User manual

9/2016 © Molok Oy
1. Dig the installation pit according to the measurements
in the image 2. The pit should be 600 mm wider than the
diameter of the container. Level the bottom carefully with
spirit level and compact the ground if needed. (Image 3.1.)
Diameter of the installation pit:
MolokClassic®-container 5 m³ 2150 mm
MolokClassic®-container 3m³ and 1,3 m³ 1750 mm
2. Preparing 800 l and 300 l containers:
Fasten the anchor steel into the bottom insert according to
a separate instruction manual provided.
Preparing 5 m³; 3 m³ and 1,3 m³ containers:
Fix the plastic bottom anchors into the container with two
bolts each (bolts are tightened max. 25 Nm). (Image 3.2.)
3. Lift the container to the installation pit by using lifting
loops. The use of lifting beam is recommended (Image 3.3).
4. Align the lid opening by using the sign in the
front panel.
5. Use a spirit level to ensure the container is straight and level.
Depending on the installation site, use the spirit level either;
A. on top of the aluminium ring (lid and lifting
bag removed) OR
B. from the sides of the container
6. Fill the pit as described in the image 2.
With a light compactor, compact the filling soil
carefully with every 200 mm layer. We recommend
to use max. 100 kg round compactor. (Image 3.5)
7. Make sure that the finishing layer slopes slightly
downward from the container.
page 1/2
Ballast
Crushed gravel 0/16 mm or
excavation soil if the soil
type is not freezing (e.g.
clay, silt). Stones with
diameter more than 100
mm have to be removed
from the ballast.
Filter cloth may be used
between the ballast and the
16-32 mm crushed stone.
Gravel 16 - 32
min. 500 mm layer
Crushed gravel 0/16
min. 50 mm layer
Finishing layer
100 mm
Image 2.1. Installation pit

9/2016 © Molok Oy
1. Dig the installation pit according to the measurements
in the image 2. The pit should be 600 mm wider than the
diameter of the container. Level the bottom carefully with
spirit level and compact the ground if needed. (Image 3.1.)
Diameter of the installation pit:
MolokClassic®-container 5 m³ 2150 mm
MolokClassic®-container 3m³ and 1,3 m³ 1750 mm
2. Preparing 800 l and 300 l containers:
Fasten the anchor steel into the bottom insert according to
a separate instruction manual provided.
Preparing 5 m³; 3 m³ and 1,3 m³ containers:
Fix the plastic bottom anchors into the container with two
bolts each (bolts are tightened max. 25 Nm). (Image 3.2.)
3. Lift the container to the installation pit by using lifting
loops. The use of lifting beam is recommended (Image 3.3).
4. Align the lid opening by using the sign in the
front panel.
5. Use a spirit level to ensure the container is straight and level.
Depending on the installation site, use the spirit level either;
A. on top of the aluminium ring (lid and lifting
bag removed) OR
B. from the sides of the container
6. Fill the pit as described in the image 2.
With a light compactor, compact the filling soil
carefully with every 200 mm layer. We recommend
to use max. 100 kg round compactor. (Image 3.5)
7. Make sure that the finishing layer slopes slightly
downward from the container.
Image 3.1.
50 mm of 0-16 mm crushed
gravel can be used for levelling.
Image 3.2.
Fix the plastic bottom anchors
into the container using two
bolts.
Image 3.3.
Lift the container to the instal-
lation pit by using lifting loops.
Make sure that the container is
straight and level.
Image 3.4.
Fill the installation pit using
gravel 16-32 mm, ballast
material and suitable finishing
material.
Image 3.5.
Ballast material is then placed
on top of the crushed stone
(anchoring).
Use a spirit level to ensure the
container is straight and level.
Image 3.6.
Remove the plastic covers.
Picture 3.7
Remove the lifting loops.
Picture 3.8
Open and straighten the
lifting bag before placing it in
the container.
page 2/2
Additional pictures for instructions given on pages 2 and 4.
This manual suits for next models
2
Popular Storage Bin manuals by other brands

Safco
Safco 9922 Assembly instructions

Hoshizaki
Hoshizaki B-300SC parts list

HAUL MASTER
HAUL MASTER 61602 Owner's manual & safety instructions

Glasdon
Glasdon NEXUS 13G Assembly instructions

SEI
SEI Water Hyacinth CK012600TX Assembly instructions

Mullex
Mullex EURO-BOXX 55/60-R Assembly instructions and template