INSTALLATION
INSTRUCTIONS
CAUTION:
Usesupplywiressuitablefor194°F(90°C).
Hightemperature,riskofre,keepelectricalcords,drapery,furnishings,
and other combustibles at least 36 in. (915 mm) from the front of the heater
andawayfromthesides.Toreducetheriskofre,donotstoreoruse
gasolineorotherammablevaporsandliquidsinthevicinityoftheheater.
For bathroom use, the heater must be installed so that switches and other
controls cannot be touched by anyone in the bath or shower. Comply with
applicable electrical code for minimums clearances from water access and
the use of ground fault circuit interrupter (GFCI).
IMPORTANT:
Do not obstruct the front of the heater for at least 48 in. (1200 mm).
Deep a clearance of 1 in. (25 mm) to any walls.
RECESS WALL MOUNTING;
1- Make a hole within the wall at least 2 3/4 in. (70 mm) of depth.
Recommended installation height is 12 in. (305 mm) or 4 in. (102 mm)
minimum below heater. (Fig. 1).
The hole must be 18 5/8 in. (473 mm) by 13 3/8 in.(340 mm);
use the template printed on the cardbox of the heater.
CAUTION:HOLEMUSTBECUTPRECISELY.
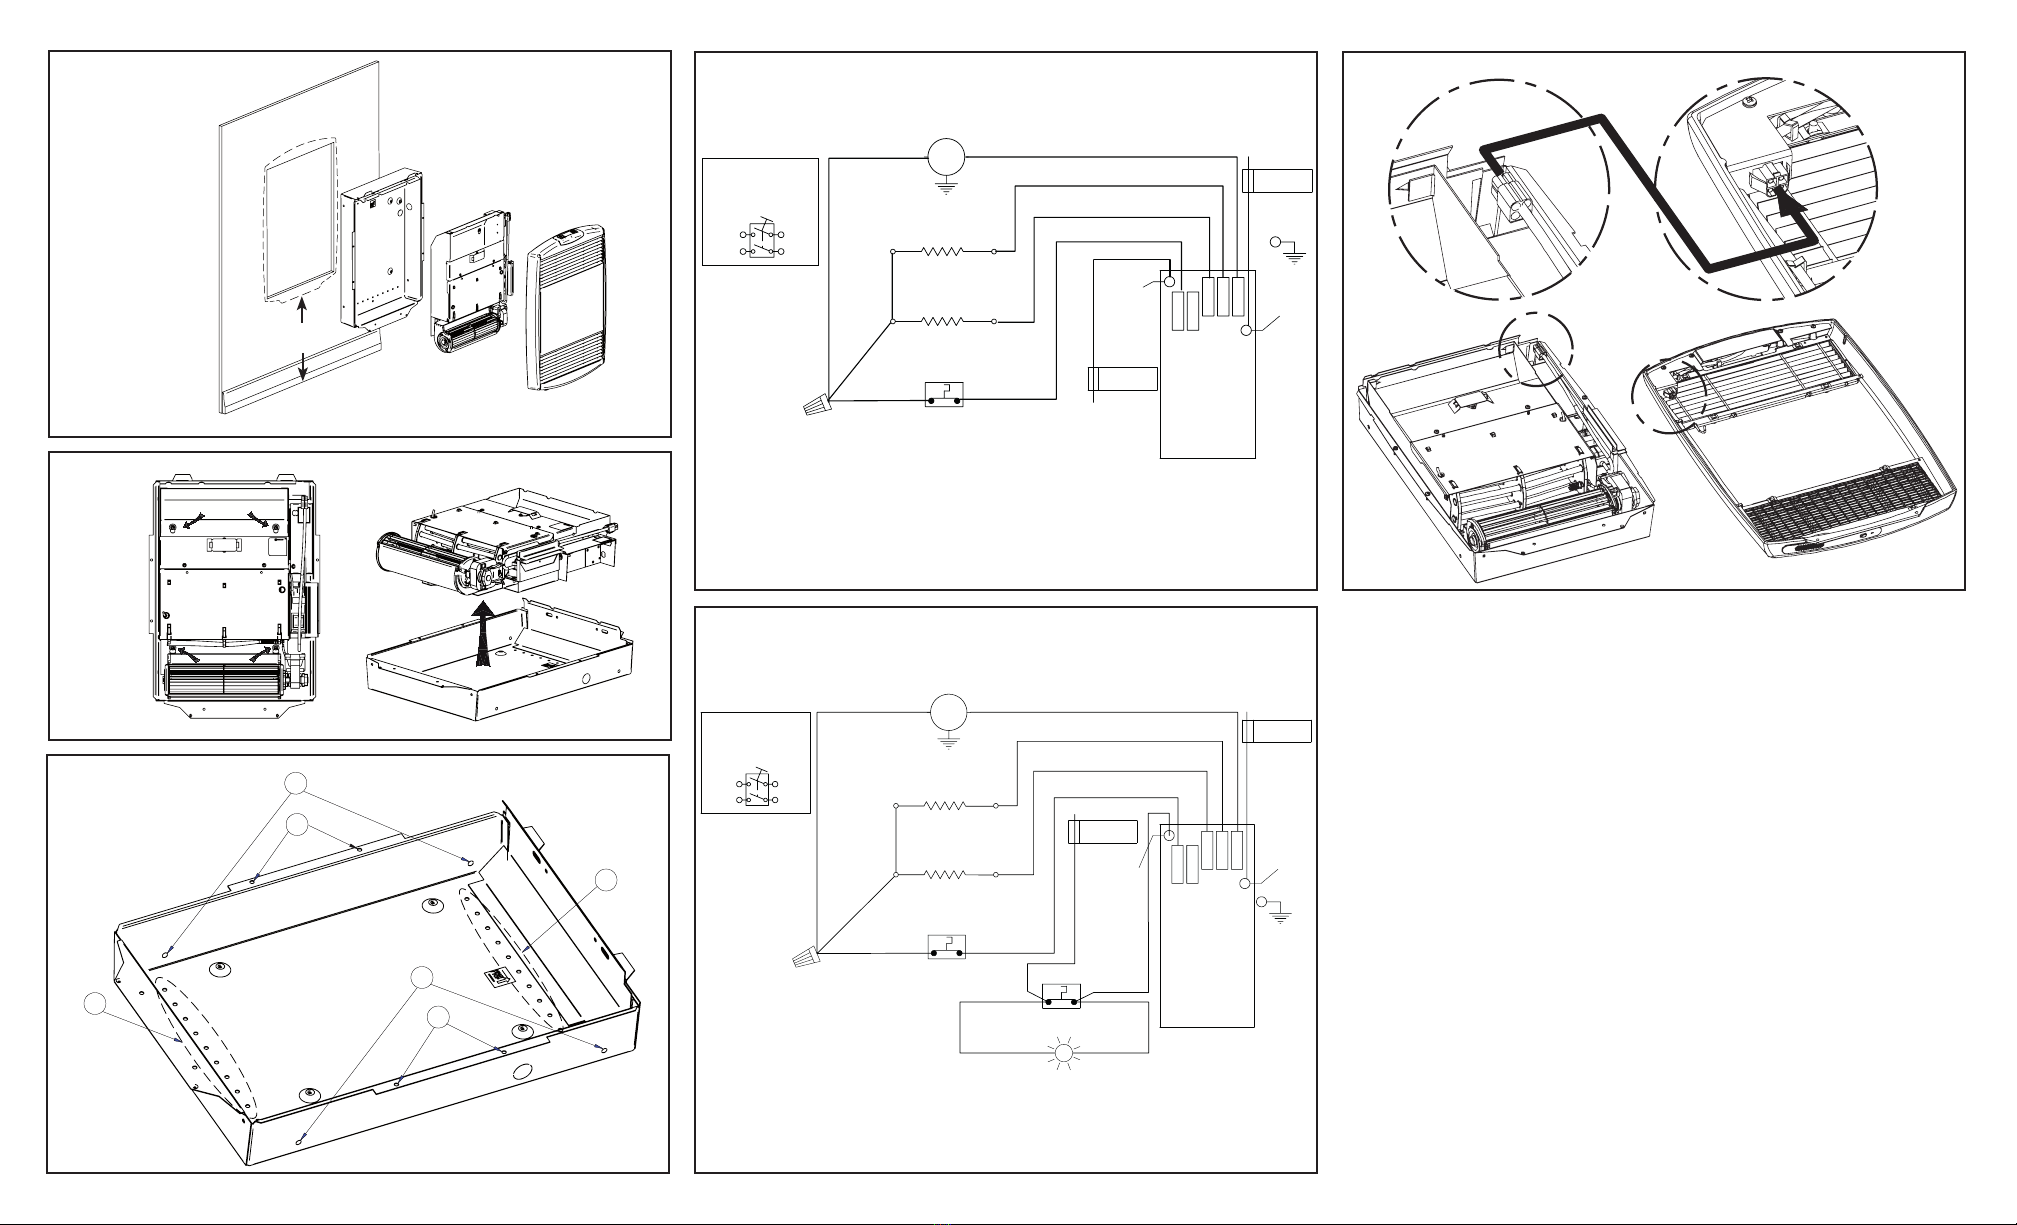
2- Remove front cover by unscrewing both screws at the bottom.
3- Remove the junction box cover by unscrewing the screw. Note the
plastic connector secured inside the junction box will be connected
outside the box once the heater is fully installed. This connector links
the enclosure with the display located on the front cover.
4- Removetheinsidemoduletowhichthefanisxedbylooseningthe
four (4) RED screws (Fig. 2).
5- Usetheappropriateknock-outhole(KOE7/8in.[22.2mm])withinthe
junction box and run the power cable inside the enclosure.
6- Fix the heater using the provided screws and mounting holes or
knock-outssuitableforyourinstallation(A,BorC) (Fig. 3).
7- Put inside module back and tighten the four (4) RED screws.
8- Wire the heater according to national and local codes and as per wiring
of this instruction (Fig. 4a, 4b).
9- Replace junction box cover and remove the front cover from its
protective bag.
10-Fix the plastic connector on the outlet located in the top of the front
cover (Fig. 5).
11- Put front cover back making sure the cable linking the cover with the
heater does not get stuck.
12-Test the heater to insure control works properly.
SURFACE WALL MOUNTING:
1- The heater can be surface mounted. Recommended installation height
below the heater is 12 in. (305 mm), 4 in. (102 mm) minimum. Use the
template printed on the cardbox of the heater to locate positioning
of the supply wire.
2- Follow steps #2 to #11 of RECESSED WALL MOUNTING.
Read carefully these instructions before installation, operation of the heater.
Failure to adhere to the instructions could result in re, electric shock,
serious personal injury, and death or property damage. Review frequently
for continuing safe operation and advise future users, if necessary.
IMPORTANT
INSTRUCTIONS
1- Read all instructions before installing or using this heater.
2- This heater is hot when in use. To avoid burns, do not let bare skin
touchhotsurfaces.Keepcombustiblematerials,likefurniture,pillows,
bedding, papers, clothes, and curtains at least 36 in. (915 mm) from
the front of the heater and away from the sides.
3- Extreme caution is necessary when any heater is used by or near
children or invalids and whenever the heater is left operating and
unattended.
4- Do not operate any heater after it malfunctions. Disconnect power at
service panel and have heater inspected by a reputable electrician
before reusing.
5- Do not use outdoors.
6- To disconnect heater, turn controls to off, and turn off power to heater
circuit at main disconnect panel.
7- Do not insert or allow foreign objects to enter any ventilation or
exhaustopeningasthismaycauseanelectricshockorre,or
damage the heater.
8- Topreventapossiblere,donotblockairintakesorexhaustinany
way whatsoever.
9- This heater has hot and arcing or sparking parts inside. Do not use
itinareaswheregasoline,paint,orammableliquidsareusedor
stored.
10- Use this heater only as described in this manual. Any other use not
recommendedbythemanufacturermaycausere,electricshock,or
injury.
11- AMERICANVERSIONONLY:Thisheaterincludesa visual alarm
to warn parts of the heater are getting excessively hot. If the alarms
illuminates, turn immediately the heater off and inspect for any objects
on or adjacent to the heater that may have blocked the airflow or
otherwise caused high temperatures to have occurred. DO NOT
OPERATE THE HEATER WITH THE ALARM ILLUMINATING.
12- The thermostat should not be considered an infallible device
in cases where maintaining a temperature is considered critical.
Examples: Hazardous material storage, computer server room, etc.
In these particular cases, it is imperative to add a monitoring system
to avoid the consequences of a thermostat failure.
SAVE THESE
INSTRUCTIONS
INS138-200702-03
MAINTENANCE
INSTRUCTIONS
- Cleaning should be done while the heater is disconnected
from the main service panel.
- Once a year or if needed, use a vacuum cleaner to remove
the dust accumulation through openings of the front grilles.
- Anyotherservicingshouldbeperformedbyaqualied
technician.
WARNING
When using electrical appliances, basic precautions should always be
takentoreducetheriskofre,electricalshockandinjury,includingthe
following.
Pat. No. Des. D571,906 S
WARRANTY
Please refer to the product sheet at www.momentoconfort.com.
PROBLEMS TIPS
Heater stops working in timer
mode (boost mode).
Make sure front of heater has at least
1219 mm (48 in.) of clearance and is
free of any objects.
Displayed temperature
differs from ambient
temperature.
Wait for a while that temperature
stabilizes. This thermostat uses
proportional integral adaptive
technology; temperature will remain
precise except when important cold
or hot air flows occur. Fan operation
as well as room recognition have to
be considered and may influenced
precision of temperature readings.
Interior of heater glows red. Make sure voltage applied is appropriate
(240V) and that interior of heater is free
of dust blocking heating wires.
Grilles are getting darker. Clean grilles using water and mild soap.
TROUBLESHOOTING
Reset red button
1 866 930-7878
www.momentoconfort.com
INSTRUCTIONS “MOR” Series
OPERATING
INSTRUCTIONS
Once the unit is powered up the blue display indicates the ambient tempe-
ratureindegreeCelsius(°C)orFahrenheit(°F).Tochangetheunitsfrom
°Cto°Forviceversa,pressthetwobuttonswitharrowsignsontheright
side of display simultaneously for two (2) seconds.
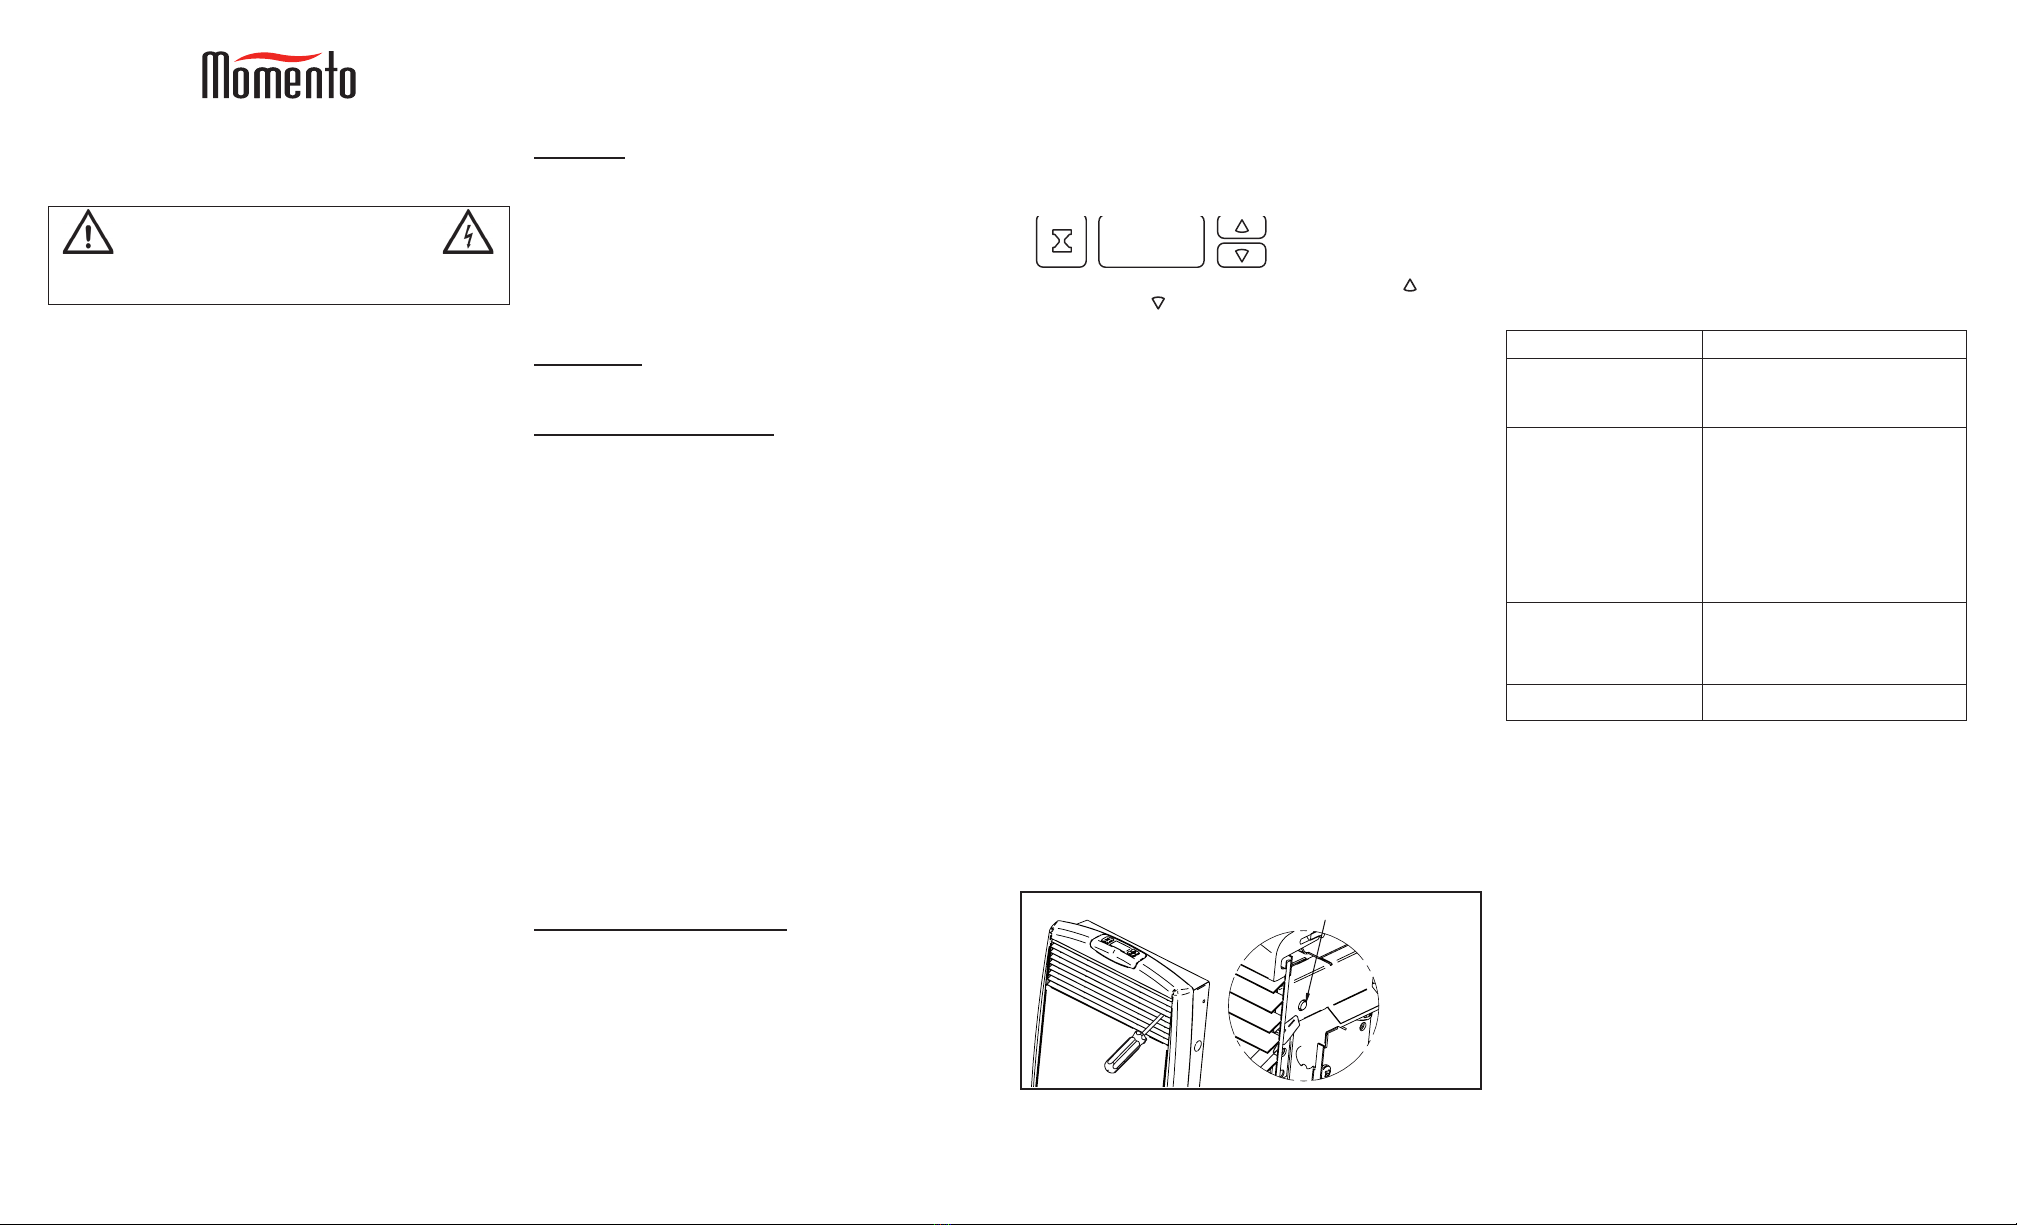
For the set point temperature, use the top arrow button ( ) and the
down arrow button ( )toadjustthesettingbetween10to35°C(50to
95°F).Whenheaterison,fourgradatedlinesindicatethepowerlevelon
the left side of the display.
For timer mode (boost heating), use the hour-glass button located on
the left side of display. Press once to activate this mode and to see the
remaining time flashing (“min” is now displayed in the bottom right corner).
Display will stop flashing after five (5) seconds. While the remaining time
flashes, press again the button on the left to set the minutes to 5, 10, 15,
20, 25 or 30. If display does not flash any more, press again the button on
the left to turn off the timer. Whenever needed in the timer mode, use the
arrows located on the right side to increase or decrease remaining time.
When in the timer mode ambient temperature is not displayed.
To turn on and off the night light use the button located underneath. The
night light is a low-consuming device due to its technology.
2-Stage of heating
The 1st stage of heating (1000W) is a natural convection type, it is normal
that you feel heat coming out of the grille even if the fan is not running. The
fan will start only with the 2nd stage of heating or in timer mode.
When starting up the heater for the first time, some smoke will come out of
the louvers; this is totally normal and will stop after a few minutes of use.
Also, under normal use the heater may become hot.
Hi-Limit with Manual Reset (AMERICANVERSIONONLY)
This heater includes a manual reset limiting control to turn off power when
parts of the heater are getting excessively hot. When it operates, a visual
alarm is illuminating. In that situation, immediately disconnect all power at
the main service panel and inspect for any objects on or adjacent to the
heater. Wait until the heater comes back at room temperature. Insert a flat
screw driver through the upper grille, on it’s right side and press the manual
reset red button. If the problem persists, contact a qualified technician.