Monoprice SB-600 User manual

SB-600 Dolby Atmos® 5.1.2 Soundbar
with Wireless Subwoofer and Wireless Surround Speakers
P/N 42034
User's Manual

2
CONTENTS
SAFETY WARNINGS AND GUIDELINES............................................................................................................4
INTRODUCTION....................................................................................................................................................................6
FEATURES.................................................................................................................................................................................6
CUSTOMER SERVICE........................................................................................................................................................7
PACKAGE CONTENTS.....................................................................................................................................................7
PRODUCT OVERVIEW.....................................................................................................................................................8
Soundbar Overall........................................................................................................................................................8
Soundbar Top Panel.................................................................................................................................................8
Soundbar Rear Panel...............................................................................................................................................9
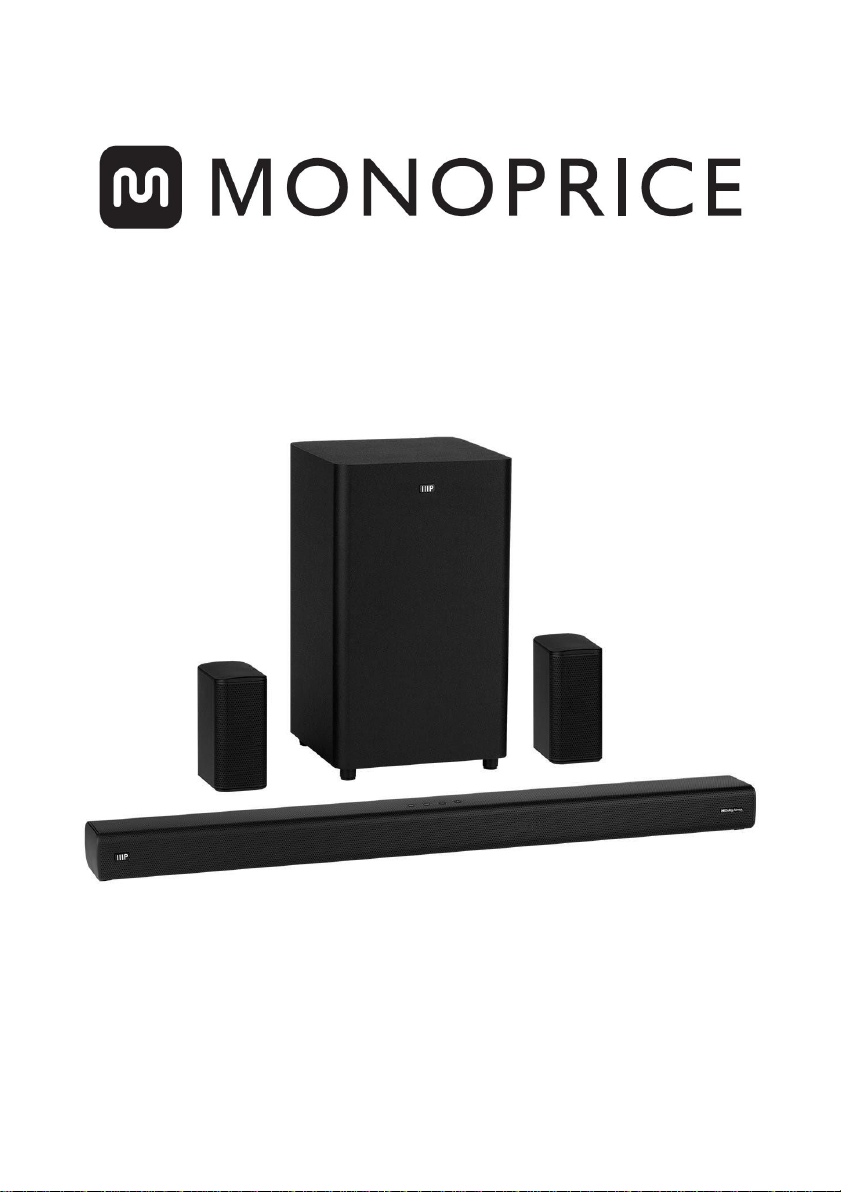
Wireless Subwoofer...............................................................................................................................................10
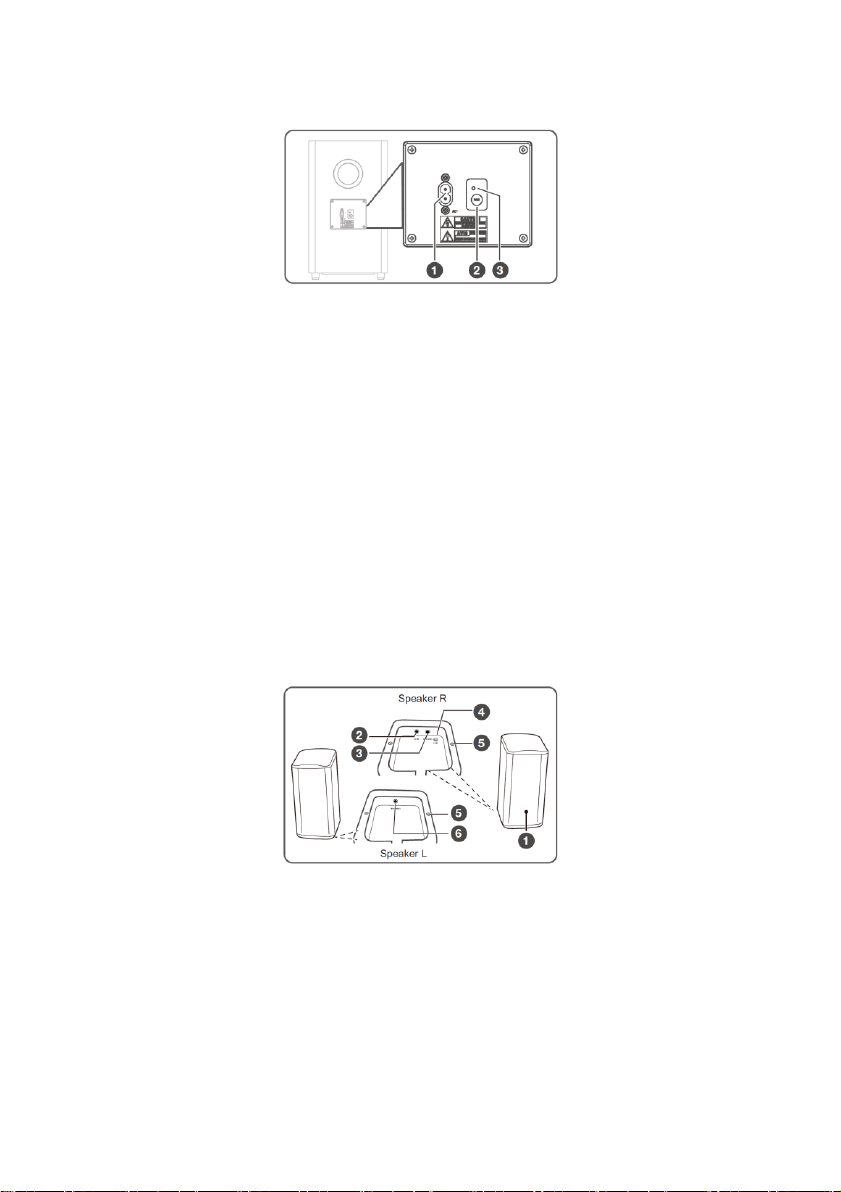
Wireless Surround Speakers...........................................................................................................................10
Remote Control...........................................................................................................................................................11
INSTALLATION....................................................................................................................................................................12
Safety Warning...........................................................................................................................................................12
Positioning .....................................................................................................................................................................13
Table/Shelf Placement.........................................................................................................................................13
Soundbar Wall Mounting..................................................................................................................................14
Surround Speaker Wall Mounting .............................................................................................................15
Remote Control..........................................................................................................................................................17
SOUNDBAR ENHANCED FEATURES..................................................................................................................17
Dolby Atmos.................................................................................................................................................................17
eARC/ARC.......................................................................................................................................................................18
CONNECTIONS...................................................................................................................................................................19

3
HDMI OUT.......................................................................................................................................................................19
HDMI IN 1/HDMI IN 2............................................................................................................................................20
OPTICAL...........................................................................................................................................................................20
COAXIAL ..........................................................................................................................................................................21
AUX......................................................................................................................................................................................22
Surround Speakers.................................................................................................................................................22
PAIRING THE SUBWOOFER AND SURROUNDS......................................................................................23
Automatic Pairing...................................................................................................................................................23
Manual Pairing...........................................................................................................................................................25
POWER SAVING...............................................................................................................................................................26
AV SYNC.................................................................................................................................................................................26
BLUETOOTH OPERATION..........................................................................................................................................27
USB OPERATION..............................................................................................................................................................28
TROUBLESHOOTING.....................................................................................................................................................29
TECHNICAL SUPPORT...................................................................................................................................................31
SPECIFICATIONS ...............................................................................................................................................................31
REGULATORY COMPLIANCE.................................................................................................................................34
Notice for FCC............................................................................................................................................................34
Radio Notice for FCC............................................................................................................................................35
RF Exposure Statement for FCC .................................................................................................................35
Notice for Industry Canada.............................................................................................................................35
Radio Notice for Industry Canada.............................................................................................................36
RF Exposure Statement for Industry Canada..................................................................................36

4
SAFETY WARNINGS AND GUIDELINES
Please read this entire manual before using this device, paying extra attention to
these safety warnings and guidelines. Please keep this manual in a safe place for
future reference.
•This device is intended for indoor use only.
•Do not expose this device to water or moisture of any kind. Do not place
drinks or other containers with moisture on or near the device. If
moisture does get in or on the device, immediately remove it from its
power source and allow it to fully dry before reapplying power.
•Do not touch the device, the power cord, or any other connected cables
with wet hands.
•If operating this speaker in a humid environment, ensure that no
condensation occurs. Condensation could cause damage to the speaker
cone and could cause a short in the amplifier, which in turn could cause
fire or severe electric shock.
•Do not install this device on an unstable surface where it could fall and
cause either personal injury or damage to the device and/or other
equipment.
•Do not expose this device to excessive vibration, extreme force, shock,
or fluctuations in temperature or humidity.
•Avoid prolonged exposure to excessive volume levels, which could
cause hearing damage. Reduce the volume to minimum before using this
speaker system, then increase the volume to a comfortable listening
level.
•Do not expose this device to excessively high temperatures. Do not
place it in, on, or near a heat source, such as a fireplace, stove, radiator,
etc. Do not leave it in direct sunlight.

5
•Do not place or install this device in an area where it can be exposed to
excessive amounts of dust, humidity, oil, smoke, or combustible vapors.
•Prior to operation, check the unit and power cord for physical damage.
Do not use if physical damage has occurred.
•Before plugging the unit into a power outlet, ensure that the outlet
provides the same type and level of power required by the device.
•Unplug this device from the power source when not in use.
•Take care to prevent damage to the power cord. Do not allow it to
become crimped, pinched, walked on, or become tangled with other
cords. Ensure that the power cord does not present a tripping hazard.
•Never unplug the unit by pulling on the power cord. Always grasp the
connector head or adapter body.
•Ensure that power is turned off and disconnected before making any
electrical connections.
•Remove the batteries from the controller if it will go unused for a
lengthy period of time.
•Do not mix new and old batteries or batteries of different types.
•Do not mix alkaline, standard, or rechargeable batteries with this
product.
•Clean using a soft, dry cloth only. Do not use chemical cleaners, solvents,
or detergents. For stubborn deposits, moisten the cloth with warm
water.
•This device has no user serviceable parts. Do not attempt to open,
service, or modify this device.

6
INTRODUCTION
The Monoprice™ SB-600 Dolby Atmos® 5.1.2 Soundbar delivers a true and
powerful Dolby Atmos home theater experience, with built-in Atmos height
speakers on the soundbar, wireless surround speakers, and a wireless 8"
subwoofer. Two HDMI® inputs, an HDMI eARC output, coaxial and optical digital
audio inputs, and a 3.5mm analog audio input allow you to connect your various
audio and video devices, while the Bluetooth® 4.2 radio and USB input allow you
to stream audio from your smartphone or PC. Enjoy total control from the
comfort of your easy chair using the included IR remote control. The wireless
connectivity ensures a quick and easy setup and a clutter free appearance. The
Monoprice SB-600 Dolby Atmos 5.1.2 Soundbar delivers stellar looks and a
complete home theater experience.
FEATURES
•Dolby Atmos® 5.1.2 soundbar
•Wireless surround speakers
•Wireless 8" subwoofer
•Two HDMI® inputs and an HDMI ARC output
•Bluetooth® 4.2 and USB streaming
•Coaxial and optical digital inputs
•3.5mm analog audio input
•Four DSP sound modes
•Includes an IR remote control
•Includes a Premium High Speed HDMI® Cable and mounting hardware
•Automatic standby mode after 15 minutes of inactivity

7
CUSTOMER SERVICE
The Monoprice Customer Service department is dedicated to ensuring that your
ordering, purchasing, and delivery experience is second to none. If you have any
problem with your order, please give us an opportunity to make it right. You can
contact a Monoprice Customer Service representative through the Live Chat link
on our website www.monoprice.com or via email at support@monoprice.com.
Check the website for support times and links.
PACKAGE CONTENTS
Please take an inventory of the package contents to ensure you have all the
items listed below. If anything is missing or damaged, please contact Monoprice
Customer Service for a replacement.
1x SB-600 Soundbar
1x Wireless Subwoofer
2x Wireless Surround Speakers
1x Remote Control
2x AAA Batteries
1x AC Power Adapter
2x AC Power Cord
1x Premium High Speed HDMI®
Cable
1x 3.5mm Audio Cable
1x 2.5mm Surround Speakers
Interconnect Cable
2x Soundbar Wall Mount
Brackets
4x Soundbar Wall Mount
Screws
4x Soundbar Wall Mount
Anchors
2x Soundbar Mounting Screws
2x Surround Speaker Wall
Mount Brackets
2x Surround Speaker Wall
Mount Screws
2x Surround Speaker Wall
Mount Anchors
4x Surround Speaker Mounting
Screws
1x User's Manual

PRODUCT OVERVIEW
Soundbar Overall
1. DISPLAY: The DISPLAY shows information about the status of the
system, including the selected input. When audio playback begins, the
display shows DOLBY ATMOS, DOLBY DIGITAL, PCM, or NONSUPPORT
FORMAT, depending on the audio format.
2. IR RECEIVER: The IR RECEIVER accepts signals from the included IR
remote control. The remote control has a maximum operating range of
up to 19.6 feet (6 meters) with angles up to ±30°.
3. WALL MOUNT MOUNTING POINTS: The soundbar mounting screws are
installed to these two locations.
Soundbar Top Panel
4. : Press the button to turn the system on or to put it into standby
mode.
5. : Press the button to cycle through the inputs. The cycle order is
AUX, BT, OPT/COA, HDMI® 1/2, HDMI eARC, USB.

9
6. ━/╋: Press the ━button to decrease the volume level and the ╋
button to increase the volume level.
Soundbar Rear Panel
7. AC INPUT: AC power socket for connecting one of the included AC
power cords.
8. COAXIAL: Digital coaxial audio input for connecting the coaxial output
on your TV. Note that you can use either the OPTICAL or COAXIAL input,
but not both.
9. OPTICAL: Digital optical audio input for connecting the optical output on
your TV. Note that you can use either the OPTICAL or COAXIAL input,
but not both.
10. USB: USB port for connecting a USB flash drive with mp3 files for audio
playback. You can use flash drives up to 32GB capacity, formatted with
the FAT16 or FAT32 file system.
11. AUX: 3.5mm stereo audio input for connecting an external audio device,
such as a smartphone or mp3 player or for connecting the analog audio
outputs on your TV.
12. HDMI OUT: HDMI® port for connecting a TV. The port supports the
eARC/ARC HDMI feature, which allows the soundbar to play audio that
originates on the connected TV.
13. HDMI IN: Two HDMI ports for connecting HDMI source devices, such as a
DVD player, Blu-ray Disc™ player, or gaming console. Note that only one
HDMI input is usable at a time.

10
Wireless Subwoofer
1. AC INPUT: AC power socket for connecting one of the included AC
power cords.
2. PAIR BUTTON: Press the PAIR BUTTON to activate the pairing function
between the subwoofer and the soundbar.
3. PAIR INDICATOR: The PAIR INDICATOR illuminates steadily when the
subwoofer is paired with the soundbar. It will flash rapidly while pairing
is in progress. It will blink slowly when the subwoofer is not paired with
the soundbar and pairing is not in progress.
Wireless Surround Speakers
1. PAIR INDICATOR: The PAIR INDICATOR illuminates steadily when the
surround speakers are paired with the soundbar. It will flash rapidly while
pairing is in progress. It will blink slowly when the surround speakers are
not paired with the soundbar and pairing is not in progress.
2. DC IN: DC barrel connector for connecting the included AC power
adapter.

11
3. SPEAKER (R): 2.5mm jack for connecting the 2.5mm surround speakers
interconnect cable to connect to the left surround speaker.
4. PAIR BUTTON: Press the PAIR button to activate the pairing function
between the surround speakers and the surround speaker.
5. WALL MOUNT MOUNTING POINTS: The included surrounds wall mount
brackets attach to the surround speakers at these two points.
6. SPEAKER (L): 2.5mm jack for connecting the 2.5mm surround speakers
interconnect cable to connect to the right surround speaker.
Remote Control
1. : Press the button to turn the
system on or to put it into standby
mode.
2. : These rocker buttons (AUX / BT,
USB / OPT/COA, and HDMI 1/2 /
HDMI® eARC) are for selecting one
of the input sources.
3. / : Press the button to
skip back to the previous track when
using the Bluetooth® (BT) or USB
input. Press the button to skip
forward to the next track when using the Bluetooth (BT) or USB input.
4. : Momentarily press the button to pause or resume playback
when using the Bluetooth (BT) or USB input. Press and hold the
button for about 1 second to enter Bluetooth® pairing mode or to
disconnect an existing paired Bluetooth device.
5. BASS: Press the ╋button to increase the bass response or press ━the
button decrease the bass response.

12
6. TREBLE: Press the ╋button to increase the treble response or press ━
the button decrease the treble response.
7. ╋/━/ : Press the ╋button to increase the volume level of the
system or press the ━button to decrease the volume level of the
system. Press the icon in the center of the button to toggle audio
mute on or off. If audio is muted, increasing or decreasing the volume
level toggles mute off.
8. EQ: Press the EQ button to cycle through the four audio equalization
effects. The cycle order is Voice, Sport, Movie, and Music.
9. SURR VOL: Press the ╋button to increase the relative volume level of
the surround speakers or press the ━button to decrease the relative
volume level of the surround speakers. The surround speakers will follow
the overall soundbar system volume, but this control allows you to fine
tune the volume level of the surrounds in relation to the overall volume.
10. AV SYNC: Press the ╋button to increase the audio delay or press the
━button to decrease the audio delay. Refer to the
AV SYNC
section for
more details.
11. VERTICAL SURROUND: Press the VERTICAL SURROUND button to turn
the surround speakers on or off.
INSTALLATION
Safety Warning
Mounting the soundbar and/or surround speakers to the wall should be
performed by qualified personnel only. Incorrect installation can result in severe
personal injury or property damage. Care must be taken to avoid damage to any
electrical wiring or plumbing inside the walls. It is the installer's responsibility to
ensure that the wall can safely support the weight of the soundbar/surround
speakers and wall mount brackets. Use a stud finder as necessary to find the

13
studs on a wood stud drywall wall. Additional tools (not included) are required to
install this speaker system.
Positioning
•The soundbar should be placed or mounted below the TV.
•The subwoofer should be placed on the ground at least 3 feet from the
soundbar and about 4" (10cm) from the nearest wall.
•The surround speakers should be placed or mounted to the left and right
of the listening position and at or slightly above your ear height. If
directly to the sides is not possible, place or mount them slight behind
the listening position.
Refer to the diagram below.
Table/Shelf Placement
Rather than mounting the soundbar and/or surround speakers to the wall, they
can be simply placed on a table or shelf.
•Place the soundbar below the TV and in front of the TV stand. The feet
on the soundbar will protect your surface from scratches.
•Place the surround speakers on a table or shelf. Ensure that the
connecting cables are routed through the notch in the base, so that the
speaker sits evenly on the surface.

14
Soundbar Wall Mounting
Perform the following steps to mount the soundbar to the wall. Use common
sense at all times.
1. Using a pencil, a carpenter's
level, and a tape measure,
mark two positions on the
wall exactly 950mm apart.
Use the level to ensure that
these marks are at the same
height on the wall. These
marks will be at the center
of each wall mount bracket.
2. For each mark, place one of
the wall mount brackets
against the wall, with the mark in the center of the notch. Use the level
to ensure the bracket is level, then mark each hole in the bracket, which
is where the two screws will be used to secure the bracket to the wall.
3. Use a ø5.5 ~ 6.0 mm drill bit to drill a hole at each of the four marked
screw hole locations.
4. If using wall anchors, insert an anchor into each hole. If they do not
insert fully by hand, lightly tap each anchor with a small hammer to drive
them completely into the wall.
5. Position each bracket over the holes, then use a #2 Phillips screwdriver
and the wall mount bracket screws to secure each bracket to the wall.
Take care not to overtighten the screws. Ensure that the opening of the
notch is at the top of the bracket.

15
6. Remove the two screws at
the wall mount mounting
locations on the rear of the
subwoofer. Store them in a
safe place in case you need
to use them in the future.
7. Install the soundbar
mounting screws into the
screw holes at the wall
mount mounting locations.
8. Position the soundbar so the soundbar mounting screws are positioned
over the notches in the brackets, then slide it down into place.
Surround Speaker Wall Mounting
Perform the following steps to mount the surround speakers to the wall. Use
common sense at all times.
1. Determine where the surrounds will be located. Use a pencil to mark a
location on the wall(s). Use a tape measure to ensure that each location
is at the same height on the wall(s).
2. Use a ø5.5 ~ 6.0 mm drill bit to drill a hole at each of the marked
locations.
3. If using wall anchors, insert an anchor into each hole. If they do not
insert fully by hand, lightly tap each anchor with a small hammer to drive
them completely into the wall.
4. Using a #2 Phillips screwdriver, screw the surround speaker wall mount
screws into the wall, but do not screw them all the way in. Leave about
3mm of screw body showing, as shown in the image below.
5. Plug one end of the 2.5mm surround speakers interconnect cable into
the Speaker (L) jack on the left surround speaker.

16
6. Use two of the surround speaker mounting screws to attach one of the
surround speaker wall mount brackets to the left surround, as shown in
the image below.
7. Plug the other end of the 2.5mm surround speakers interconnect cable
into the Speaker (R) jack on the right surround speaker. Note that if the
surround speakers are further apart than the included 4 meter cable can
reach, you can use an extension cable or substitute a longer cable.
8. Plug the included AC power adapter into the DC IN jack on the right
surround speaker. Do not plug it into an AC power outlet yet.
9. Use two of the surround speaker mounting screws to attach one of the
surround speaker wall mount brackets to the right surround, as shown in
the image below.
10. Use the keyholes on the wall mount brackets to hang each surround
speaker from the surround speaker wall mount screws in the wall(s).

17
Remote Control
Perform the following steps to prepare the remote control for use.
1. Press and slide back the battery compartment cover on the remote
control.
2. Insert two AAA batteries (included). Take care to match the polarity of
the batteries with the markings inside the battery compartment.
3. Slide the battery compartment cover back into place.
Notes:
•Remove the batteries from the controller if it will go unused for a
lengthy period of time.
•You can use either rechargeable or non-rechargeable batteries.
•Do not mix new and old batteries or batteries of different types.
•Do not mix alkaline, standard, or rechargeable batteries with this
product.
SOUNDBAR ENHANCED FEATURES
Dolby Atmos
One of the primary features of this soundbar is support for Dolby Atmos®. Dolby
Atmos is an audio encoding method that delivers an immersive listening
experience. It does this by using height speakers to create sound in three
dimensional space. However, rather than requiring speakers physically mounted

18
in the ceiling or high on the walls, it uses upward firing drivers that bounce
sound off the ceiling to create the three dimensional audio experience. Please
visit https://www.dolby.com/technologies/dolby-atmos for more details.
The following elements are required for Dolby Atmos® support:
•Full Atmos support is only available when using one of the HDMI® inputs.
•You must use an HDMI cable that complies with the HDMI version 2.0
specification, such as the included Premium High Speed HDMI Cable.
•The HDMI source devices should have No Encoding selected for the
audio bitstream.
•If using the eARC/ARC audio input, the TV must support Dolby Atmos.
eARC/ARC
This soundbar supports the HDMI® Audio Return Channel (ARC) and Enhanced
Audio Return Channel (eARC) features, which allow it to receive and playback
audio that originates on the connected TV. This is useful for when you watch
broadcast TV or when using an app on a smart TV. When properly configured,
you can use your TV's remote control to adjust the volume level and mute status
of the soundbar.
The following elements are required to use the eARC/ARC feature:
•Your TV must support both the HDMI CEC (Consumer Electronics
Control) and eARC or ARC features.
•You must enable CEC and ARC on your TV.
•The HDMI cable between the TV and the soundbar must comply with
the HDMI version 1.4 specification or later.
•Your TV's digital sound output S/PDIF mode must be set to PCM.
•To use eARC/ARC, select the HDMI eARC input on the soundbar.

19
CONNECTIONS
HDMI OUT
Use the included Premium High Speed HDMI® Cable to connect your TV to the
soundbar. Plug one end of the cable into an HDMI input on your TV, then plug
the other end into the HDMI OUT TV eARC/ARC port on the soundbar.
Notes:
•Some 4K HDR TVs require the HDMI input or picture settings to be set
for HDR content reception. Please refer to your TV's user's manual for
setup details.
•To use the eARC/ARC feature, you must connect to the HDMI input on
your TV that supports ARC. Please refer to your TV's user's manual.
•If you want to use Dolby Atmos® with the eARC/ARC feature, your TV
must support Dolby Atmos and you must use a Premium High Speed
HDMI Cable, such as the one included with the soundbar.

20
HDMI IN 1/HDMI IN 2
Use Premium High Speed HDMI® Cables, such as the one included in the package,
to connect your video source devices to the soundbar. Plug one end of the cable
into the HDMI IN 1 or HDMI IN 2 port on the soundbar, then plug the other end
into the HDMI output on your video source device.
Notes:
•Only one of the two HDMI inputs can be used at a time.
•If you will not be using Dolby Atmos® encoded content from either
video source device, you can connect using a High Speed HDMI® Cable
instead of a Premium High Speed HDMI Cable.
OPTICAL
Use a digital optical S/PDIF cable (not included) to connect your TV or other
audio source device to the soundbar. First, remove the protective plug from the
OPTICAL connector on the soundbar. Put it in a safe place for later use. Plug one
end of an optical cable into the OPTICAL connector on the soundbar, then plug
the other end into the optical output on your TV or other audio source device.
Notes:
•You can use either the OPTICAL input or the COAXIAL input, but not
both at the same time.
Other manuals for SB-600
1
This manual suits for next models
1
Table of contents
Other Monoprice Speakers System manuals
Popular Speakers System manuals by other brands

Peavey
Peavey SP 5XL Specifications

KYE Systems Corp.
KYE Systems Corp. Genius SW-S2.1 200 Service guide

Philips
Philips MX900/22 Instructions for use

Harman Kardon
Harman Kardon HKTS-10 owner's manual

Bosch
Bosch PRAESENSA PRA-CSLW Quick installation manual

TerraTec
TerraTec HomeArena MX 2.1 quick start guide