Monoprice 14567 User manual

MONOPRICE
Select 8-inch 200-watt Subwoofer
PID 14567/30734/30735
User's Manual

2
TABLE OF CONTENTS
SAFETY WARNINGS AND GUIDELINES.......................................................................................................................................3
INTRODUCTION................................................................................................................................................................................................5
CUSTOMER SUPPORT.................................................................................................................................................................................5
PACKAGE CONTENTS.................................................................................................................................................................................6
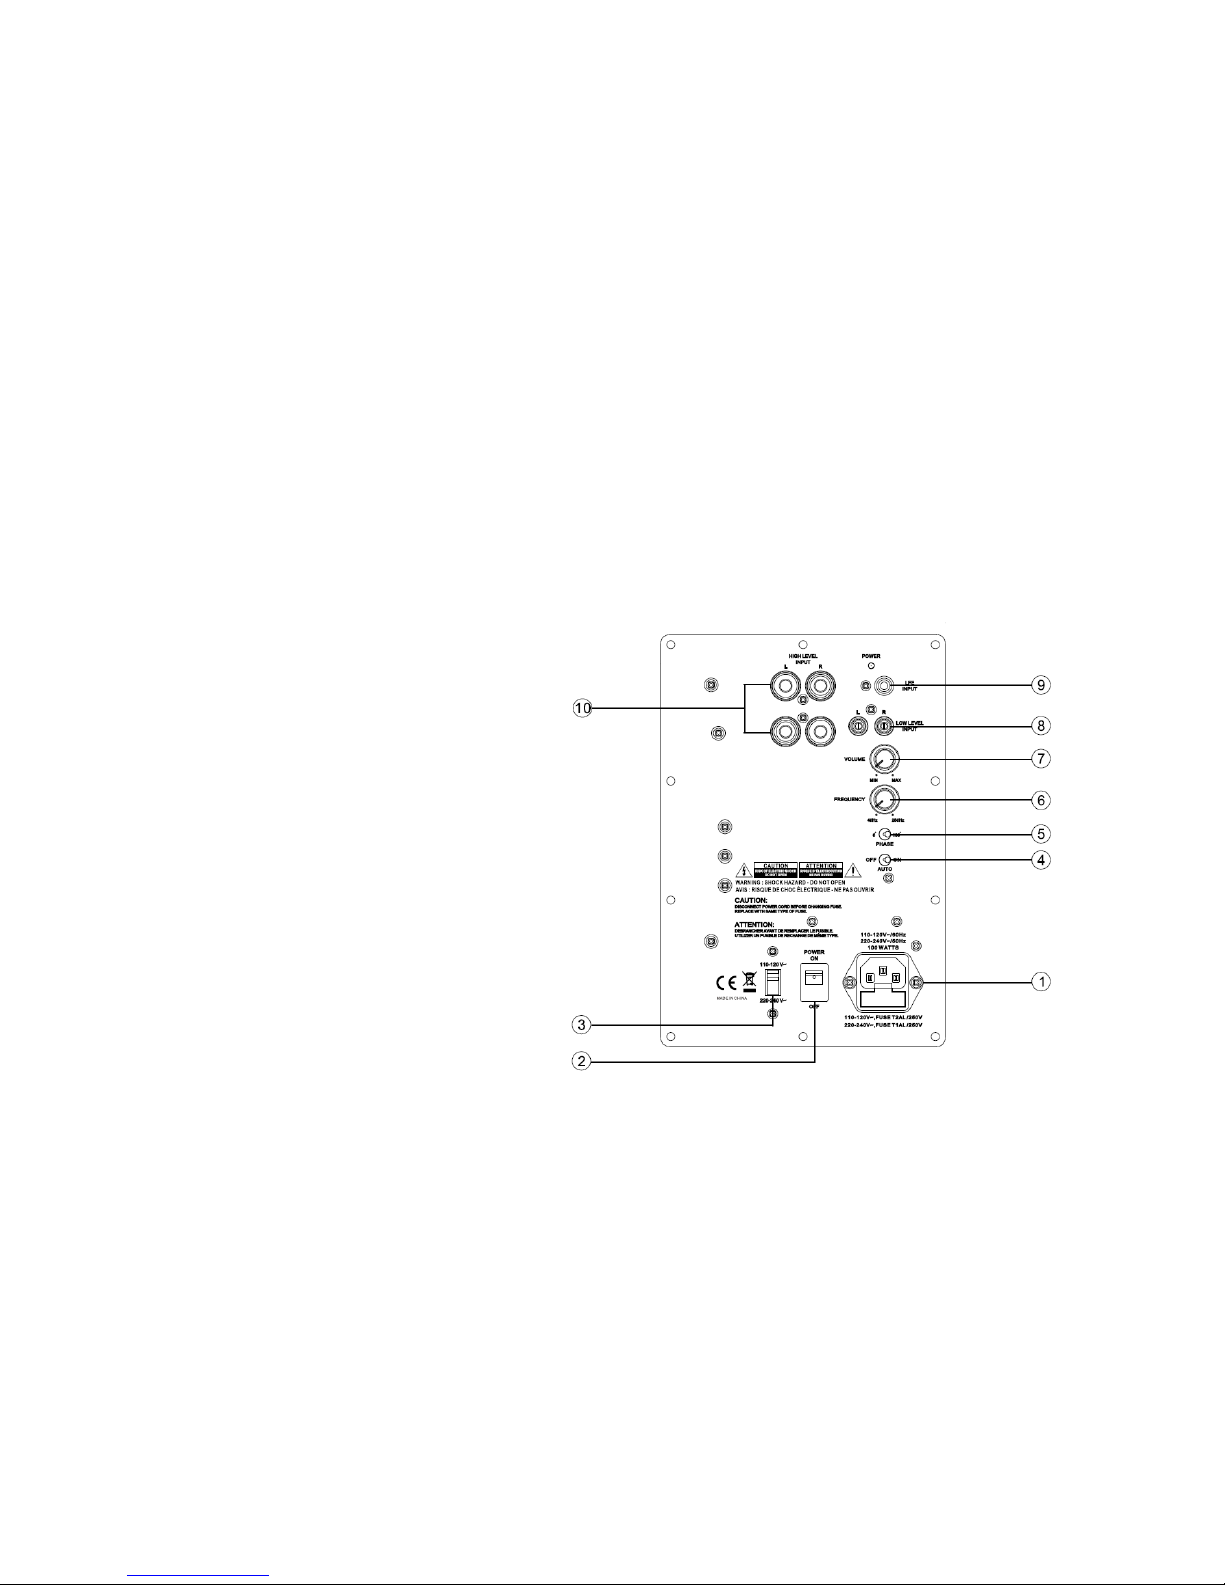
SUBWOOFER OVERVIEW........................................................................................................................................................................6
SPEAKER BREAK-IN ...................................................................................................................................................................................... 7
SUBWOOFER PLACEMENT.....................................................................................................................................................................8
SPEAKER CONNECTIONS.........................................................................................................................................................................8
Preparation....................................................................................................................................................................................................8
Connecting to a Dedicated Subwoofer Output..........................................................................................................9
Connecting to a Stereo Preamplifier Output .................................................................................................................9
Connecting to a Stereo Speaker Output..........................................................................................................................10
SETUP.......................................................................................................................................................................................................................11
Subwoofer Settings.............................................................................................................................................................................. 11
INPUT VOLTAGE AND FUSE REPLACEMENT........................................................................................................................12
TROUBLESHOOTING .................................................................................................................................................................................. 13
TECHNICAL SUPPORT............................................................................................................................................................................... 13
SPECIFICATIONS............................................................................................................................................................................................14
REGULATORY COMPLIANCE..............................................................................................................................................................15
Notice for FCC ..........................................................................................................................................................................................15
Notice for Industry Canada...........................................................................................................................................................16
EU Declaraton of Conformity......................................................................................................................................................16
WEEE Information ................................................................................................................................................................................. 17
Safety Notice.............................................................................................................................................................................................18

3
SAFETY WARNINGS AND GUIDELINES
For best results, and to avoid personal injury or damage to your valuable equipment,
carefully read and follow these safety warnings.
Do not expose this speaker to moisture of any kind. Do not place items containing
liquids, such as vases or drinking glasses, on or near this speaker. If moisture does
get in or on the device, immediately unplug it from the power outlet and allow it to
fully dry before reapplying power.
If operating this speaker in a humid environment, ensure that no condensation
occurs. Condensation could cause damage to the speaker cone and could cause a
short in the subwoofer's amplifier, which in turn could cause fire or severe electric
shock.
To avoid damage or discoloration of the speaker cabinet, do not place or install this
speaker where they will be exposed to direct sunlight.
Do not place or install this speaker near a heat source, such as a fireplace, stove, or
space heater.
Ensure that there is at least 8" (20cm) of free space in the back of the subwoofer to
allow for heat dissipation from the amplifier.
Do not pick up or carry the subwoofer by the ports on the front. Do not stick any
objects inside the ports.
When picking up the subwoofer take care not to touch the speaker cone on the
front of the unit.
Power off and unplug all Audio/Video components when making wired
connections. Only apply power after all connections have been made.
Double-check all connections prior to applying power to ensure that speaker
polarity is properly made and that there are no stray wire strands, which could short
the connections, either on the back of the speakers or the AV receiver/amplifier.
This device uses a grounded power cord and requires a ground connection for safe
operation. Ensure that the power source has a proper ground connection. Do not
modify the plug or use a "cheater" plug to bypass the ground connection. If the

4
power cord will not fit in your AC outlet, please contact an electrician to have the
obsolete plug replaced.
Do not allow the power cord to be walked on or pinched. Do not run the power
cord under a rug, as doing so could cause a fire.
Ensure that your AC power outlet provides voltage within the range specified on
the rear panel of the subwoofer.
When removing cords or cables, do not pull on the cable. Always grasp the
connector/plug head when removing cords or cables.
If the fuse needs replacing, replace it with the same type, as specified in the
SPECIFICATIONS
and in the
INPUT POWER
sections.
This unit ships set for nominal 110~120 VAC operation. If changing the input voltage
level, you must also change the fuse to the type specified in the
SPECIFICATIONS
and in the
INPUT POWER
sections for the voltage level being used.
Always remove power and unplug the subwoofer before attempting to replace the
fuse.
Do not bypass the purpose of the fuse by shorting the contacts or by any other
means.
Install the subwoofer in a place where the power plug can be readily accessible so
that you can quickly unplug the unit in the event that a safety incident occurs.
Do not use full volume until after the speaker has been fully broken-in.
If you hear distortion reduce the volume until the distortion is no longer audible.
Distortion can sound like a buzzing, scratching, or hammering sound. Distortion can
damage or destroy delicate speaker coils.
To avoid annoying feedback, ensure that any turntable is isolated from the
vibrations produced by the speakers and subwoofer.
Extreme bass frequencies and volume can distort the image on a nearby television.
If this occurs, move the subwoofer further away from the TV.
Do not use cleaning fluids, solvents, or other chemicals to clean the speaker cabinet.
Do not use paper towels or other abrasive materials or cleaners. Use only a soft, dry

5
cloth. For best results, use a microfiber cleaning cloth. For particularly stubborn
deposits, moisten the cloth with warm water.
Do not use excessive volume when listening to this speaker. If you experience pain,
discomfort, or dizziness, reduce volume immediately. Prolonged exposure to
excessive volume can cause permanent hearing damage.
Do not disassemble or attempt to service this subwoofer.
INTRODUCTION
Congratulations on your purchase of this Home Theater Subwoofer from Monoprice! When
setup and used properly, this speaker will give you years of superior sound reproduction.
For best results, please read this entire manual prior to installation and use. To avoid
personal injury or damage to your valuable equipment you should pay extra attention to
the safety warnings and guidelines. Keep this manual in a safe place for future reference.
CUSTOMER SUPPORT
The Monoprice Customer Service department is dedicated to ensuring that your ordering,
purchasing, and delivery experience is second to none. If you have any problem with your
order, please give us an opportunity to make it right. You can contact a Monoprice
Customer Service representative through the Live Chat link on our website
www.monoprice.com during normal business hours (Mon-Fri: 5am-7pm PT, Sat-Sun: 9am-

6
PACKAGE CONTENTS
After receiving the product, please inventory the contents to ensure you have all the
proper parts, as listed below. If anything is missing or damaged, please contact Monoprice
Customer Service for a replacement.
1x Subwoofer
1x AC power cord (IEC 60320 C13 to NEMA 5-15)
1x User's manual
SUBWOOFER OVERVIEW
1. AC IN/FUSE: Plug the included
AC power cord into this
socket. The fuse holder has the
main fuse and a spare inside.
Check the
SPECIFICATIONS
table for the proper fuse
ratings.
2. POWER: Depress the side with
the white dot to turn power
ON.
3. VOLTAGE: Use this switch to
set the mains voltage for
110~120 or 220~240 VAC
operation. The switch is protected by a plastic cover to prevent accidental changes.
4. AUTO: Turns the Auto Power feature on/off. When enabled, the subwoofer will
automatically go into standby mode after about 22 minutes with no audio signal
detected. If in standby, it will automatically power on when an audio signal is
detected.

7
5. PHASE: Sets the subwoofer to be in-phase or 180° out-of-phase with the signal
being sent to the satellite and center channel speakers. See the
SETUP
section
below for details on how to use this control.
6. FREQUENCY: Use this knob to set the variable crossover frequency from 40 ~ 250
Hz. See the
SETUP
section below for details on how to use this control.
7. VOLUME: Use this knob to set the overall volume level of the subwoofer in relation
to the satellite and center channel speakers. See the
SETUP
section below for
details on how to use this control.
8. LOW LEVEL INPUT: Stereo line level RCA inputs for connecting to the normal line
level, stereo preamplifier outputs on an amplifier.
9. LFE INPUT: Mono line level RCA input for connecting to a dedicated subwoofer
output on an amplifier. This is the preferred method of connecting the subwoofer.
10. HIGH LEVEL INPUT: Stereo speaker level 5-way binding posts for connecting to the
speaker level outputs on an amplifier. This is the least favored method of
connecting the subwoofer.
SPEAKER BREAK-IN
In the same way that a new car requires a break-in period before it can be safely operated
at high engine RPMs, speakers require a break-in period before they can be safely operated
at maximum volume levels. Proper break-in ensures that the moving parts of the speaker
(the cone and cone suspension) are allowed to flex and soften, losing the initial stiffness
and allowing the speaker to move through its full intended range. After the break-in
period, the subwoofer will produce richer and fatter sounding lows without any hint of
distortion.
The best way to break-in speakers is simply to play normal music or watch movies at
moderate volume levels. The amount of time required for speaker break-in varies based on
the operating environment, but is typically in the area of 50~80 hours. It will take a bit
longer in a cold or dry environment and a little less time in a warm or humid environment.
Note that the break-in period does not have to be continuous.

8
SUBWOOFER PLACEMENT
Do not place the subwoofer in a corner as it will result in a "boomy", unnatural
sounding bass.
Do not place the subwoofer directly against a wall or cabinet. There should be some
room around the subwoofer for the sound to develop and reflect itself around the
room.
Although bass is omnidirectional, a location in the front center is generally ideal.
Tip: One good way to determine the best initial location for the subwoofer is to first place
it at your ideal listening location. While playing music with solid bass content, walk around
the room until the bass sounds best, then move the subwoofer to that location and fine
tune from there.
SPEAKER CONNECTIONS
Warning! To prevent possible personal injury and/or damage to your equipment,
turn off and unplug all equipment before making connections!
Preparation
Before attempting to make any connections it is best to look at the situation, get all the
necessary materials together, and then make all the connections at once.
First, look at the back of your amplifier or receiver to determine what options it offers for
making connections. Amplifiers and receivers typically employ either 5-way binding posts,
spring-loaded terminals, or push terminals for the speaker connections. For subwoofers,
many amplifiers and receivers offer one or two line level RCA connectors.
A 5-way binding post can accept bare speaker wire, spade plugs, pin plugs, and banana
plugs, while spring loaded and push terminals can accept either bare speaker wire or pin
plugs. Refer to the documentation that came with your amplifier or receiver to determine
the maximum size/gauge speaker wire the speaker terminals can accept.

9
The subwoofer offers three types of connections. The ideal connection is made using a
single coaxial RCA cable from the amplifier's dedicated subwoofer output to the LFE input
on the subwoofer. The next best connection type is from an amplifier's stereo preamplifier
outputs to the two line level RCA jacks. The last connection choice is from the amplifier's
stereo speaker level outputs to the stereo High Level Input on the subwoofer. The 5-way
binding posts can accept bare speaker wire (up to 10 AWG), spade plugs, banana plugs, or
pin plugs.
There are several different ways to connect the subwoofer. The method you choose is
primarily determined by the presence of a dedicated subwoofer output on your
amplifier/receiver. The connection methods are presented in order of preference.
Connecting to a Dedicated Subwoofer Output
A dedicated subwoofer output is usually one or two RCA jacks marked "Subwoofer", "Sub
Pre Out", or something similar on the back of the amplifier/receiver. Refer to the
manufacturer's documentation for reference. Subwoofer outputs are monophonic, so if
you have two subwoofer outputs they are intended to drive two separate subwoofers.
To make this connection you will need a cable with a single RCA plug on each end.
1. Insert the RCA plug at the one end of the cable into the LFE Input jack on the back
of the subwoofer.
2. Insert the RCA plug at the other end of the cable into the subwoofer output jack on
the back of the amplifier/receiver.
Connecting to a Stereo Preamplifier Output
If your amplifier/receiver lacks a dedicated line level subwoofer output, the next best
option for connecting the subwoofer is to use line level preamplifier outputs. These
outputs should not be confused with line level outputs intended to connect components,
such as tape decks or DVD recorders, to the amp. Preamplifier outputs will usually be
marked as "Pre-amp Out" or something similar. Refer to your amp's owner's manual to
determine which, if any, outputs are the pre-amp outputs.

10
To make this connection you will need a stereo RCA patch cable of the appropriate length.
1. Insert the black/negative side of one end of the cable into the black/negative Low
Level Input RCA jack on the back of the subwoofer.
2. Insert the red/positive side of one end of the cable into the red/positive Low Level
Input RCA jack on the back of the subwoofer.
3. Insert the black/negative side of the other end of the cable into the black/negative
pre-amplifier RCA jack on the back of the amplifier/receiver.
4. Insert the red/positive side of the other end of the cable into the red/positive pre-
amplifier RCA jack on the back of the amplifier/receiver.
Connecting to a Stereo Speaker Output
If your amplifier/receiver lacks both a dedicated subwoofer output and pre-amp outputs,
you can still make a connection using speaker level inputs on the subwoofer. To make this
connection will need two equal lengths of two-conductor speaker wire.
1. Connect the black/negative side of one speaker wire to the left channel
black/negative High Level Input 5-way binding post on the back of the subwoofer.
2. Connect the red/positive side of the wire to the left channel red/positive High Level
Input 5-way binding post on the back of the subwoofer.
3. Connect the black/negative side of the other end of the speaker wire to the
black/negative left channel output for the Front/Main speakers on the back of the
amp. This can be connected in parallel to the actual front main speakers.
4. Connect the red/positive side of that end of the wire to the red/positive left
channel output for the Front/Main speakers on the back of the amp.
5. Repeat steps 1-4 for the right channel connection.
6. Visually inspect the connections at each end to verify correct polarity and the
absence of any stray wire strands.
Note that the 5-way binding posts have protective plugs inserted into the end. If
you are using banana plugs, remove these plugs and put them in a safe place for
future use. Otherwise, you can leave them in place.

11
SETUP
Once all connections have been made and inspected, plug in and power on all equipment,
including the subwoofer.
Subwoofer Settings
Auto Power: The amplifier features a power saving mode, which will automatically put
the amplifier into standby mode after about 22 minutes of inactivity, then will
automatically power on when an audio signal is detected. Use the POWER and AUTO
switches to determine the mode of operation, as outlined below:
Mode
POWER Switch
AUTO Switch
LED
ALWAYS OFF
OFF
N/A
Off
STANDBY
ON
ON
Red
AUTO ON
ON
ON
Green
ALWAYS ON
ON
OFF
Green
Note: If you will be away, or if the subwoofer will go unused for a lengthy period, set
the power switch to the OFF position.
Frequency: The Frequency knob allows you to adjust the frequency of the low pass
filter, which acts as a crossover network between the subwoofer and satellite/center
channel speakers. This setting determines how well the bass from the subwoofer
blends with the mids and highs from the satellite and center channel speakers.
Refer to the owner's manual for your satellite/center channel speakers to find the low
end of the frequency response. A good starting point therefore is to set the Frequency
knob to a position that represents that level, then adjust it slightly up or down
according to how it sounds.

12
Volume: The overall volume of the subwoofer will increase or decrease with the
volume of the other speakers. The volume control on the subwoofer is therefore used
to match the audio output level of the satellite and center channel speakers so that
they blend into one smooth, continuous sound. In general, unless your musical material
is particularly bass heavy or light, once you have set the volume on the subwoofer you
shouldn't need to adjust it again.
Phase: Depending on the location of your subwoofer, the sound that reaches your ideal
listening location could be out of phase with the sound from the rest of the system. If
the bass sounds out of timing, muddy, or attenuated, try flipping the phase switch to
the other position. The default, which will provide the best bass sound most of the
time, is with the phase set to 0°.
As the subwoofer breaks in you may find you need to make minor adjustments to the
frequency and volume settings to ensure the proper blend with the speakers.
INPUT VOLTAGE AND FUSE REPLACEMENT
By default the subwoofer ships with the Voltage switch set to the 110~120 V~ position and
an F2AL125V fuse installed. Perform the following steps if you intend to operate this
subwoofer in a 220V environment.
1. Flip the Power switch to the OFF position.
2. Unplug the AC power cord from the power source, then unplug it from the C14
panel connector on the rear of the subwoofer.
3. Insert the end of a flat head screwdriver into the groove at the top of the fuse
holder, inside the C14 panel connector. Pull back or twist the screwdriver to unseat
and remove the fuse holder.
4. Remove the main and spare fuses from the fuse clip and store them in a safe place,
such as taped to this manual.

13
5. Insert an F1AL250V fuse (not included) into the fuse clip. Optionally, insert another
F1AL250V fuse into the spare fuse tunnel.
6. Reinsert the fuse holder and push it in completely to seat it in place.
7. Using a Phillips screwdriver, remove the two screws holding the plastic cover over
the Voltage switch, then remove the cover.
8. Using a flat head screwdriver, slide the Voltage switch to the 220~240 V~ position.
9. Replace the plastic cover over the Voltage switch and secure it to the rear panel
using the two screws removed in step 7 above.
You will need to supply a power cord appropriate for the standard employed in your
locale. Monoprice stocks and sells AC power cords with a C13 connector for use in various
international markets, including the UK, EU, and Australia.
TROUBLESHOOTING
Q: There is no sound from the subwoofer.
A: Ensure that the subwoofer is plugged into an AC outlet and that it is turned on.
Double check the speaker wire or line level connection to the subwoofer. Try turning
up the subwoofer's volume control. Try flipping the phase switch to the other position.
TECHNICAL SUPPORT
Monoprice is pleased to provide free, live, online technical support to assist you with any
questions you may have about installation, setup, troubleshooting, or product
recommendations. If you ever need assistance with your new product, please come online
to talk to one of our friendly and knowledgeable Tech Support Associates. Technical
support is available through the online chat button on our website (www.monoprice.com)
during regular business hours, 7 days a week. You can also get assistance through email by
sending a message to tech@monoprice.com

14
SPECIFICATIONS
Woofer Type
8" paper cone with rubber surround
Amplifier Power (RMS)
100 watts into 4 ohms @ 1% THD+N
Amplifier Power (Peak)
200 watts into 4 ohms @ 1% THD+N
Nominal Impedance
4 ohms
Frequency Response
40 Hz ~ 1.3 kHz
THD+N (@ 100 watts/4 ohms/100Hz)
0.5%
Signal to Noise Ratio
> 96dB
Line Input Sensitivity
205mV
Adjustable Low Pass Crossover
46 ~ 250 Hz
Low Pass Filter
270 Hz @ 30 dB/oct
High Pass Filter
28 Hz @ 22 dB/oct
Bass Boost
12dB @ 45 Hz
Auto On Sensitivity
3mV
Auto Off Time
22 minutes
Power Consumption (Standby)
0.2 watts
Power Consumption (No Input Signal)
12 watts
Power Consumption (Maximum)
158 watts
Dimensions
15.0" x 10.6" x 12.8" (380 x 270 x 325 mm)
Weight
18.5 lbs. (8.4 kg)

15
REGULATORY COMPLIANCE
Notice for FCC
This device complies with Part 15 of the FCC rules. Operation is subject to the following
two conditions: (1) this device may not cause harmful interference, and (2) this device must
accept any interference received, including interference that may cause undesired
operation.
Modifying the equipment without Monoprice’s authorization may result in the equipment
no longer complying with FCC requirements for Class B digital devices. In that event, your
right to use the equipment may be limited by FCC regulations, and you may be required to
correct any interference to radio or television communications at your own expense.
This equipment has been tested and found to comply with the limits for a Class B digital
device, pursuant to Part 15 of the FCC Rules. These limits are designed to provide
reasonable protection against harmful interference in a residential installation. This
equipment generates, uses and can radiate radio frequency energy and, if not installed and
used in accordance with the instructions, may cause harmful interference to radio
communications. However, there is no guarantee that interference will not occur in a
particular installation. If this equipment does cause harmful interference to radio or
television reception, which can be determined by turning the equipment off and on, the
user is encouraged to try to correct the interference by one or more of the following
measures:
Reorient or relocate the receiving antenna.
Increase the separation between the equipment and receiver.
Connect the equipment into an outlet on a circuit different from that to which the
receiver is connected.
Consult the dealer or an experienced radio/TV technician for help.

16
Notice for Industry Canada
This Class B digital apparatus complies with Canadian ICES-003.
EU Declaration of Conformity
Monoprice, Inc. declares the product described within this user guide or manual is in
compliance with below applicable directives. The full text of the EU Declaration of
Conformity is available at the following internet address:
https://www.monoprice.com/product?c_id=109&cp_id=10906&cs_id=1090602&p_id=1456
7&seq=1&format=2
or the CE DoC , which can be found within this user manual.
EMC Directive 2004/108/EC
Low Voltage Directive 2014/35/EU
RoHS2 Directive 2011/65/EU
WEEE Directive 2012/19/EC
Packaging & Packaging Waste Directive 94/62/EC
REACH Directive 1907/2006/EC
To prevent possible hearing damage, do not listen at high volume levels for long period

17
WEEE Information
User information for consumer products covered by EU Directive 2012/19/EU on Waste
Electric and Electronic Equipment (WEEE).
This document contains important information for users with regards to the proper
disposal and recycling of Monoprice products. Consumers are required to comply with this
notice for all electronic products bearing the following symbol:
For Consumers in the European Union: This EU Directive requires that the product bearing
this symbol and or its packaging must not be disposed of with unsorted municipal waste.
The symbol indicates that this product should be disposed of separately from regular
household waste streams. It is your responsibility to dispose of this and other electrical and
electronics products via designated collection facilities appointed by the government or
local authorities. Correct disposal and recycling will help prevent potential negative
consequences to the environment and human health. For more detailed information about
the disposal of your unwanted product, please contacts your local authorities, waste
disposal service, or the shop where you purchased the product.

18
Safety Notice
WARNING: Do not use this product near water, for example, in a wet basement or near
swimming pool or in an area where accidental contact with water or liquid might occurs.
WARNING: Avoid using this product during an electrical storm. There may be a remote risk
of electric shock from the surge caused by lightning.
WARNING: The external power adapter or AC power cord is the equipment's disconnection
device. The power outlet must be located nearby the equipment and its access must be
easy.
This manual suits for next models
2
Table of contents
Other Monoprice Subwoofer manuals

Monoprice
Monoprice 605999 User manual

Monoprice
Monoprice Premium 5.1-Ch.Home Theater System with... User manual

Monoprice
Monoprice 30486 User manual

Monoprice
Monoprice 10801 User manual

Monoprice
Monoprice SW-12 User manual

Monoprice
Monoprice CSW-8 User manual

Monoprice
Monoprice SW-15 User manual

Monoprice
Monoprice 9723 User manual

Monoprice
Monoprice SW-10 User manual

Monoprice
Monoprice 24456 User manual