MONRIDE Belmont User manual

© 2022 MONRIDE E-BIKES
OWNER’S
OWNER’SOWNER’S
OWNER’S
MANUAL
MANUALMANUAL
MANUAL
V.1042022

© 2022 MONRIDE E-BIKES
Table
TableTable
Table
of
ofof
of
Contents
ContentsContents
Contents
1. MONRIDE OWNER’S MANUAL
......................................................................................3
1.1 MONRIDE BIKE SETUP .......................................................................................4
2. MONRIDE EBIKE OVERVIEW
............................................................................................5
3. LEGAL .................................................................................................................6
4. LOCAL REGULATIONS
...................................................................................................6
5. INTENDED USE
..........................................................................................................6
6. BEFORE THE 1ST AND EVERY RIDE .........................................................................
.0 DISPLAY ........................................................................................................... 11
.1 Display for Monkland and Somerled ................................................................... 11
.2 Display for Belmont and Claremont .................................................................... 13
8. RIDING TIPS
........................................................................................................... 1
9. SERVICE & MAINTENANCE
....................................................................................... 18
10. WARRANTY
........................................................................................................... 19

MONRIDE
E
-
BIKE
|
3
1.
1. 1.
1. MONRIDE
MONRIDEMONRIDE
MONRIDE
OWNER’S MANUAL
OWNER’S MANUALOWNER’S MANUAL
OWNER’S MANUAL
Dear Customer,
Thank you for choosing MONRIDE eBike!
The line of MONRIDE eBikes give ri ers a new way of thinking, living, travelling an provi e a unique lifestyle feeling. It’s all about pure ri ing
enjoyment an the fun of being active. Enjoy the moment in the here an now as you have become part of this electrifie movement. Don’t
stop!
MONRIDE eBikes are the rive for anyone who wants an elegant look, a relaxe urban cycling experience an quiet cruising. The rive unit
fits perfectly into the bicycle frame, features harmonious elivery of acceleration an supports the eBiker with spee s up to 32 km/h.
Pure ri ing enjoyment an absolute comfort.
Included Items:

MONRIDE
E
-
BIKE
|
4
1
11
1.
..
.1
11
1
MONRIDE
MONRIDEMONRIDE
MONRIDE
IKE SETUP
IKE SETUPIKE SETUP
IKE SETUP
1. Remove eBike from box an remove all packaging materials
2. Install the han lebar by rotating the stem counter clockwise. The brake cable must be on the left an make sure no cables are
wrappe aroun the hea tube.
Use a 5mm Allen wrench to loosen the han lebar a justment bolt an a just it an tighten it.
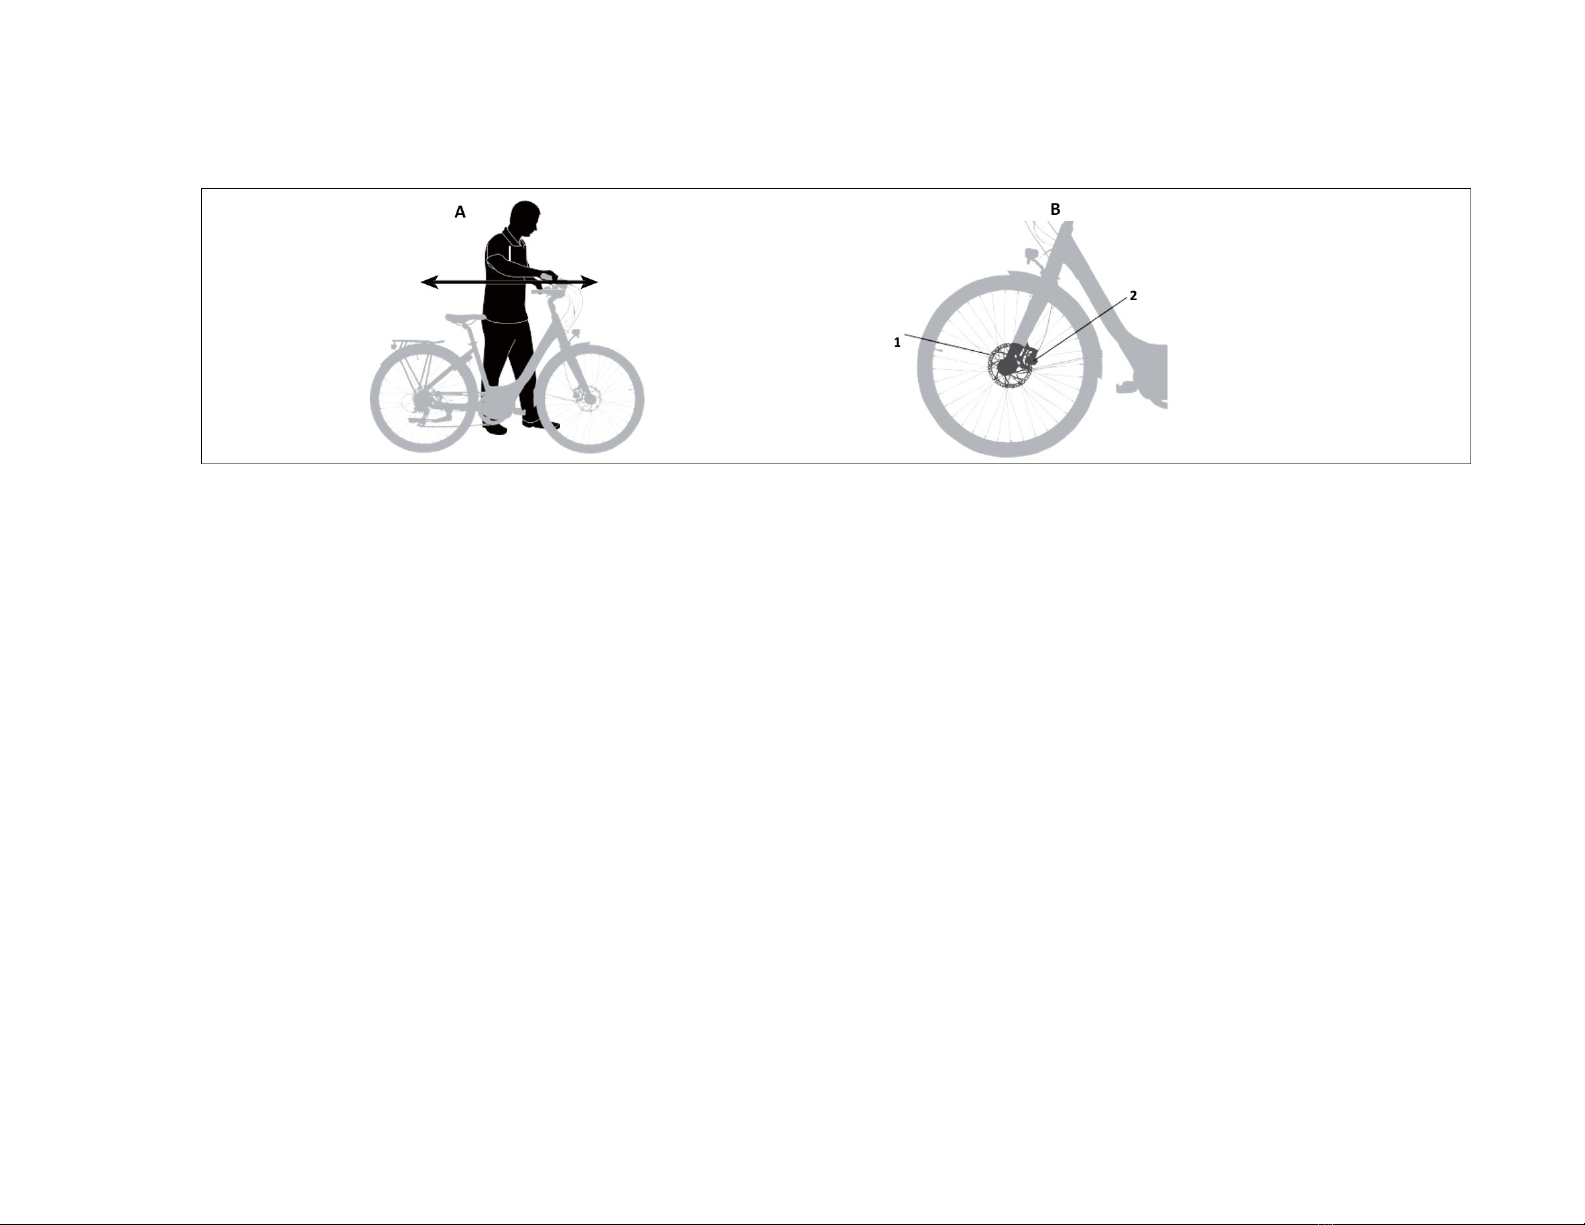
Place the han le bar on the stem an use a 4mm Allen wrench to tighten the 4 bolts. 3. To install the front wheel, remove the quick
release an skewer an pass the skewer through the hub from the brake rotor si e of the wheel. Reinstall the springs an shoul point
in towar s the wheel hub. Lift the front of the eBike an lower the fork onto the wheel an tighten the quick release.
3. Open the Kickstan an stan the eBike up
4. Install front fen er an hea light. Sli e the fen er through the fork an pass a washer onto the bolt an the bolt through the
hea light onto the fen er mounting point an tighten the bolt with a 5mm Allen key. Plug in the hea light connector. Unbolt the
fen er mounts on each si e an wrap the counts onto the fork an tighten the clamp bolts. Ensure the fen er is evenly installe .
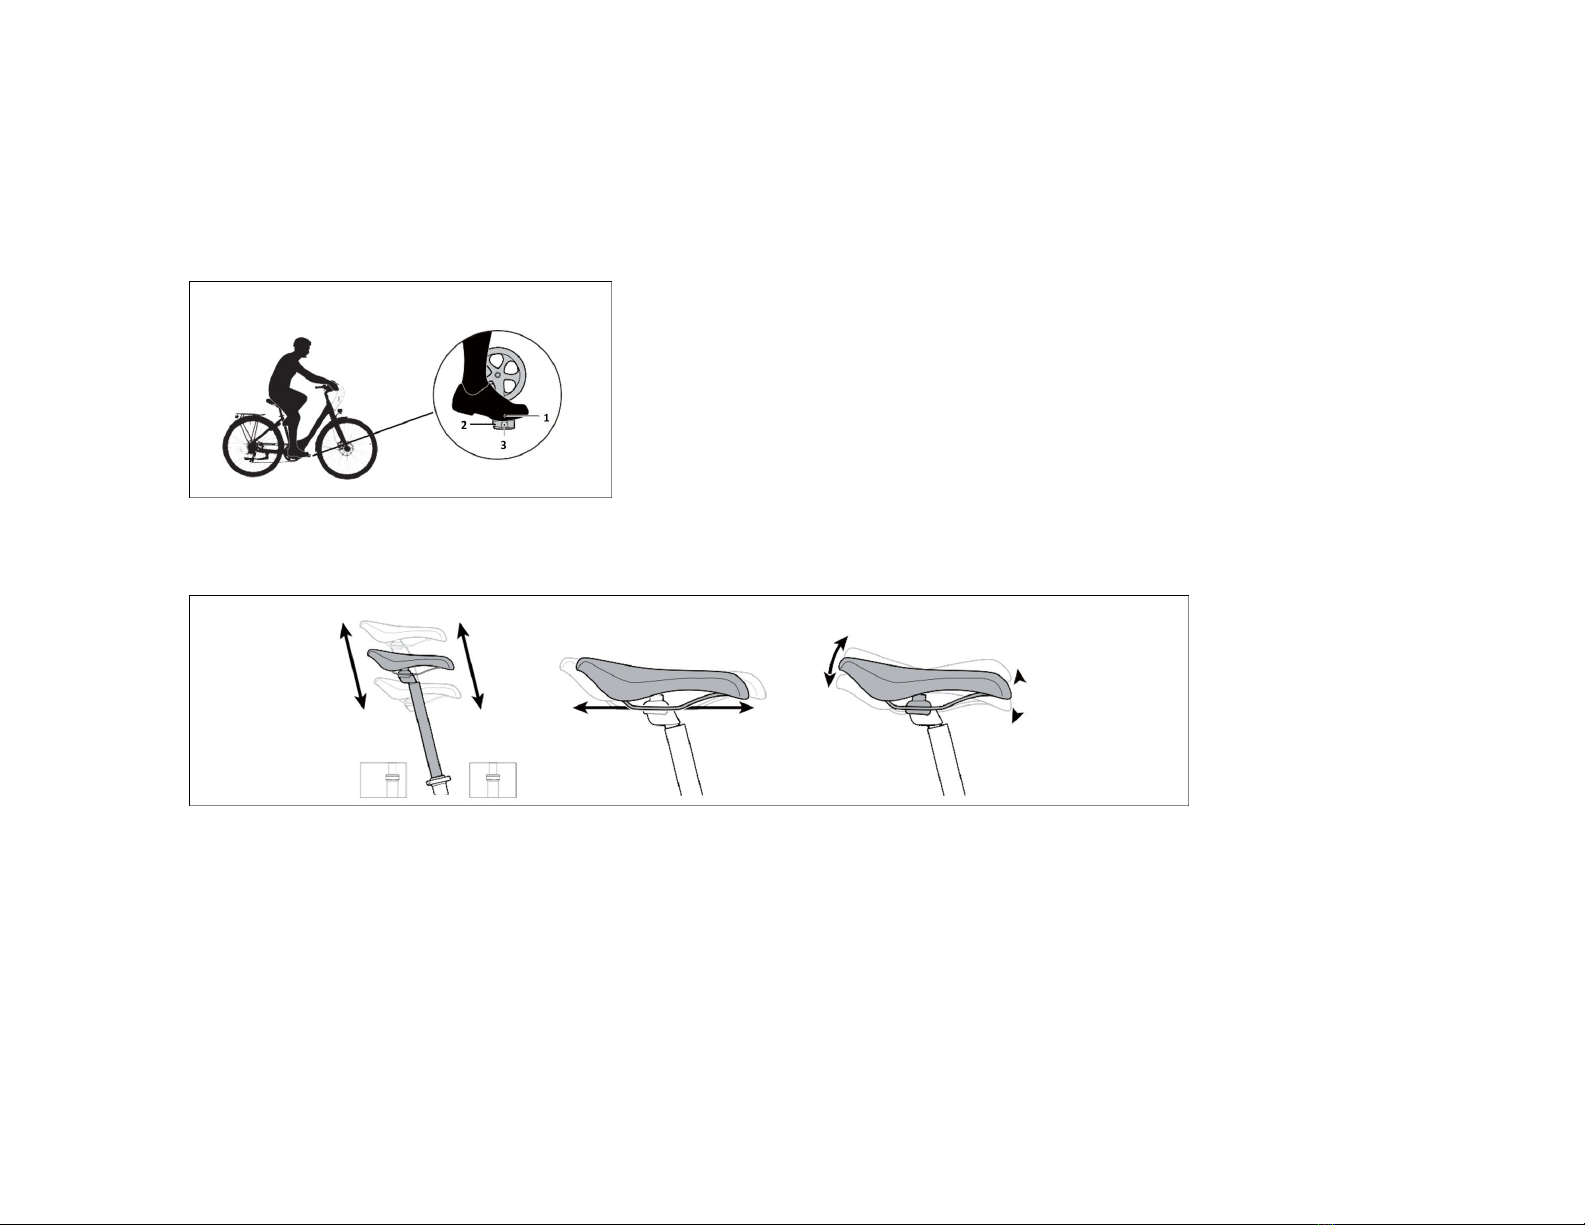
6. Remove the seat post, a some grease to the post an reinsert the post to your esire position an tighten the clamp.
7. Install each pe al on the right or left si e as per the pe al R or L sticker. Use a pe al wrench to tighten each pe al.
8. Inspect the tires an inflate as in icate on the tire si ewall.
Please rea the manual carefully to un erstan ing the workings an performance of your MONRIDE eBike.
Preparations
PreparationsPreparations
Preparations
before
beforebefore
before
riding:
riding:riding:
riding:
Please charge your battery BEFORE the very first use.
Remove the battery key BEFORE the very first use.
Remove the lock key (Somerle an Monklan only) BEFORE the very first use.
Please wear a helmet.
Max
MaxMax
Max
load:
load:load:
load:
Each e-Bike is esigne for people 5 feet or taller. The maximum loa of the eBike is 120kg (Ri er + luggage). The company shall
not un ertake any responsibility if the loa is more than 120kg.
Checks:
Checks:Checks:
Checks:
Please check the brakes, tires, tire pressure, han lebar an rims for safe ri ing.

MONRIDE
E
-
BIKE
|
5
2
22
2.
. .
. MONRIDE
MONRIDEMONRIDE
MONRIDE
E IKE OVERVIEW
E IKE OVERVIEWE IKE OVERVIEW
E IKE OVERVIEW
Your new MONRIDE eBike is a Pe al assist electric bike equippe with an electric motor that provi es assistance when the bike is being
pe ale . It also has a throttle control to rive the wheels when not pe aling. The assist is activate by a pe al action sensor esigne to
etect when the pe al is being turne . In North America the limit is 32 km/h (20 mph). Assistance is cut off above those esignate spee s.
The controller allows you to select the egree of power assist provi e by the motor from economy to sport mo e, enabling you to tailor
the performance of the bike to fit your specific style an roa topographies.

MONRIDE
E
-
BIKE
|
6
3.
3. 3.
3. LEGAL
LEGALLEGAL
LEGAL
Provincial &
Provincial & Provincial &
Provincial & Transport Canada Regulations:
Transport Canada Regulations:Transport Canada Regulations:
Transport Canada Regulations:
•Wearing a helmet is require at all times
•Minimum age: 14 in QC, NB, NL, PEI, with a permit.
ON 16 an over no permit require .
18 an over no permit require
•Maximum spee : 32 km/h
•Please refer to Transport Cana a website for more up to ate information
•
All MONRIDE eBike specifications are subject to change without notice
4.
4. 4.
4. LOCAL REGULATIONS
LOCAL REGULATIONSLOCAL REGULATIONS
LOCAL REGULATIONS
Pe elec stan s for pe al electrical cycles. They are also known as EPACs which stan s for Electrically Power Assiste Cycles. Pe elecs are
bicycles with a motor that provi es assistance when a ri er starts to pe al. The A-weighte emission soun pressure level at the river’s ears
is less than 70 B(A). When a ri er stops pe aling, the assistance stops. In general, electric bikes are viewe by law as more similar to a
conventional bicycle than a motorize scooter or motorcycle. In most cases, an electric bike can be ri en in bike lanes, on bike paths, an
can be locke to bike racks like a regular bicycle. Ri ers are not require to have a river’s license to operate an electric bike an are not
require to obtain any special licensing or registration for their pe elecs. Please refer to you provincial an local roa way safety co e.
5.
5. 5.
5. INTENDED USE
INTENDED USEINTENDED USE
INTENDED USE
MONRIDE eBikes are built for Urban Riders.
They are esigne for one person ri ing at a time. They are not inten e for use off roa , racing or stunts. The warranty will be
voi if the eBike is not use in accor ance with this inten e usage.

MONRIDE
E
-
BIKE
|
7
6.
6. 6.
6. EFORE THE 1
EFORE THE 1EFORE THE 1
EFORE THE 1
ST
STST
ST
AND EVERY RIDE
AND EVERY RIDEAND EVERY RIDE
AND EVERY RIDE
*Remove the battery key BEFORE the very first use.
**Remove the lo k key (Somerled and Monkland only) BEFORE the very first use.
Spen some time familiarizing yourself on how to operate an use your new eBike before hitting the roa
.
Ele tri al system
Make sure you are familiar with the function of all the controller buttons an meaning of the isplays.
Check battery charge level. Check the lock for the battery to ensure it is secure in the ock
Wheels
Check the tire pressure an make sure it is within the minimum an maximum values in icate on the si ewalls of the tires.
Spin both Wheels to make sure they rotate smoothly, are true (not wobbling) an o not rub against the Brakes. If the wheel(s) wobbles si e
to si e or rubs against the Brake Pa s, take the bike to a qualifie bike shop to have the wheel(s) true or replace .
Wheels that o not run true may in icate problems with the Spokes or Tires.
Headset
Stan with the Front Wheel presse firmly between your legs an try to twist the Han lebar. If
movement occurs, realign your Han lebar an tighten the Hea set an han post base or service it at
your ealer. Lift the Front Wheel off the groun an swing it from si e to si e. Does it feel smooth? If you
feel any bin ing or roughness in the steering, you may have an overly tight Hea set. Have your ealer
check it.

MONRIDE
E
-
BIKE
|
8
rakes
rakesrakes
rakes
Test your Brakes by stan ing next to your bike, pull both Brakes, an rock the Bike back an forth. (A) The Bike shoul not roll, an the Brake
Pa s shoul remain firmly in place. Does your bike feel soli ? If you feel a clunk with each forwar or backwar movement of the bike, you
probably have a loose Hea set. Have your ealer check it. Note that for certain Disc Brakes you may feel a bit of play when attempting to
rock the bike back an forth. These are cause by the built-in clearances between the Brake Pa s an the Brake Caliper to allow for thermal
expansion an is consi ere normal. In these cases, it’s not a loose Hea set.
Gears
GearsGears
Gears
Test ri e your new eBike in a safe area away from traffic to familiarize yourself with the function of the Gear Shifters an how to upshift an
ownshift. Check that in exing (shifting from gear to gear) is crisp an that you are able to shift into the lowest an highest gears with ease.

MONRIDE
E
-
BIKE
|
9
ike Fit
ike Fitike Fit
ike Fit
The best ri ing position is the one that you are most comfortable in, but a ba ly a juste bicycle may lea to back or joint pain an re uce
your control. Check that your Sa le an Han lebar are at the correct height an that you can reach Brake an Gear Levers comfortably.
For most people, the ball of the foot (1) shoul be place on the Pe al (2) irectly above the Pe al Spin le (3).
Saddle
The sa le height is an important component of the overall ri ing position. While seate , you shoul have a slight ben in your knee when
the Pe al is pushe own all the way. The leg shoul not be fully exten e so make sure the Sa le is not too high. If the seat is too low,
repetitive strain on the knee may lea to pain. The Sa le can be move up an own, forwar an back an angle up an own.
Battery
Your MONRIDE eBike equippe with a lithium-ion battery. Mo ern lithium-ion batteries have more than 500 full ischarge cycles before
the capacity ecreases. The battery oes not have a memory effect so you may charge the battery at any time an o not have to wait until
the battery is completely eplete before charging again. If you’re going to stop using the bike for more than a month, charge the battery to
about 80% full before storage. Never fully rain the battery an leave it uncharge for a prolonge perio of time as this may amage the

MONRIDE
E
-
BIKE
|
10
battery permanently. Only use the original charger connecte to a surge protector from the battery manufacturer. Do not use another
charger, even if the plug fits.
Charging
Your eBike comes with battery that plugs into any 110 AC socket. Turn off the power to the monitor, stop using the bike an plug in the
charger.
When your MONRIDE battery has reache the en of its service life, it shoul be treate as hazar ous waste material an shoul not be
ispose of in normal househol trash.
Tampering with the motor system

MONRIDE
E
-
BIKE
|
11
7.0
7.0 7.0
7.0 DISPLAY
DISPLAYDISPLAY
DISPLAY
7.1
7.1 7.1
7.1 Display
DisplayDisplay
Display
for Monkland and Somerled
for Monkland and Somerledfor Monkland and Somerled
for Monkland and Somerled
The MONRIDE isplay gives you all the information you nee to enjoy the ri e.
Fun tions:
Spee Display, Motor Power Ratio Display, Battery Level Display, Error In ication, Total Mileage, Single Mileage, Single Running Time Light Signal,
Control an Settings Power Switch, 6km/h Inching Control, Wheel Diameter Setting, Top Spee Setting, Time Setting for Auto-Hibernation,
Backlight Brightness Setting.

MONRIDE
E
-
BIKE
|
12
Keys:
Key operations involve short press, long press, an long press of combination keys.
Short press is use for short/frequent operations:
1. Short press the Plus or Minus Button to change assist power/spee uring ri ing.
2. Short press the “M” button to switch the rea ings in the multi-function isplay section.
Long press on a single key is use to switch mo e/on/off status.
Long press on combination keys to set parameters. (Note short press on combination keys is isable ).
Instru tions
On/Off:
Long press Mode (M) to start display. Long press M again to switch off.
Changing the Assist Power: Short press the Plus or Minus to a just the power
Swit h Speed Display: Long press Plus to switch spee .
Enable / Disable Walking Assist an set the real-time cruise, an turn on/off the lights: When the eBike is parke , long press Minus to enter
6km/h cruise mo e. When the vehicle is traveling, long press Minus to enter real-time cruise mo e. Long press Minus or engage the Throttle to
exit the cruise mo e. Long press Plus to turn on/off backlight.
Turn on/off the LCD Display: When the isplay panel is operating, long press
M
an it will be turne off, otherwise, it will stays on.
Swit h Display Readings: Short press M to switch rea ings in the multi-function section.
Set Parameters: Long press Plus an Minus together to enter the setting interface. In this interface, short press Plus or Minus to change the value
to the parameter, which will blink after mo ification. Short press
M
to switch to the next parameter an the previously set value will be save .
Press Plus an Minus together to exit the setting an save the parameters. The system will automatically exit an save the mo ifie parameters
after 10 secon s.
Distan e: Press
M
to see TRIP an TOTAL. Long press
M
an Minus together to clear Trip istance.
Note: The pro uct you purchase may be slightly ifferent from the escriptions in this user manual, but will not affect normal usage.

MONRIDE
E
-
BIKE
|
13
7.2
7.2 7.2
7.2 Display
DisplayDisplay
Display
for elmon
for elmonfor elmon
for elmont
tt
t
and Claremont
and Claremontand Claremont
and Claremont
The MONRIDE isplay gives you all the information you nee to enjoy the ri e.
Fun tions:
Power On/Off
Press an hol Power button for 1 secon to turn on/off the isplay. The Display will
automatically shut own when not in operation a fter a few minues

MONRIDE
E
-
BIKE
|
14
Assist Level
Short press UP/DOWN button to change the assist level. Top assist level is 9 for
neutral. Level quantities can be a juste accor ing to the customer requirements.
Speed & Mileage Mode
Short press POWER button can change the spee mo e& the mileage mo e,
Spee ->AVG Spee ->MAX Spee ->Trip->ODO-> Time->Power.
Headlight/Rear Light On/Off
Press an hol UP button for 1 secon can turn on/off the hea light/rear light.
Walk Mode
Press an hol DOWN button for 1 secon to get into walk mo e. Release the button to get out of walk mo e.
Data Cleanup
Double press POWER button (press interval less than 0.3 secon ) can get into parameter
setting state, the parameter blinks. Short press UP/DOWN buttons to change the
parameter value, short press POWER button can switch to the next parameter. Double
press POWER button (press interval less than 0.3 secon ) can quit from the parameter
setting state. The meter will automatically quit the parameter setting state when there is no
operation for 10 secon s.
The or er of parameters is as follows:

MONRIDE
E
-
BIKE
|
15
Kilometers / Miles
The location of spee isplays symbol S7, press UP/DOWN button rotate isplay the symbol km/h / MPH (Km / Mile)
Ba klight Brightness :
The location of spee isplays symbol bL1, press UP/DOWN button isplay symbol 1~5 to change the brightness of the backlight
Auto Off
The location of spee isplays symbol OFF, press UP/DOWN button to change the value from1 to 9, the number represent elay time (minutes)
before isplay shut own automatically, efault value is 5 minutes.
Wheel Diameter
The location of spee isplays symbol W , press UP/DOWN button rotate isplay the symbol 16/18/20/22/24/26/700C/28/29, value represents
the iameter of the wheel (inch). Inputing the wrong value for wheel iameter will cause wrong spee an mileage.
Voltage Setup
The location of spee isplays symbol bU0, press UP/DOWN button rotate isplay the symbol 24V/36V/UbE, UbE means user- efine voltage
setting, this parameter can be set through computer. This is preset an no nee to set it unless you are an a vance user.
Password/Speed Limit Setup
The location of spee s isplays symbol PS , require to input passwor s, press UP/DOWN buttons to change the passwor value (0~9),
short press POWER button to switch the passwor item, passwor is 4 igits, the efault passwor is "1919". Press POWER button when passwor
a justment is complete . Display will return to the Voltage set item if the passwor is incorrect. Correct passwor will enter the Spee limit set
item.

MONRIDE
E
-
BIKE
|
16
Speed Limit Setup
The location of spee isplays symbol SPL, the location of mileage isplays spee limit value, the efault value is 25km/h. Press UP/DOWN
buttons to mo ify the value, the value can be set from 10 to 45km/h. Press POWER button to confirm when you finish the a justment. Note the
maximum spee is restricte by the motor an controller.
Throttle Fun tion Setting
The location of spee isplays symbol H 6, press UP/DOWN can change the parameter from 0 - 1, it change the throttle’s action, 1 mean walking
mo e(6km/h), 0 means max spee .
Throttle Speed Level Setting
This parameter is active when H 6 was set to ‘0’, Displays show symbol H P on spee position, press UP/DOWN can change the
parameter from 0 – 1, ‘0’ means reach max spee , ‘1’ means spee limit was restricte accor ing to assist level.
Assist Level Setting
The location of spee isplays symbol PAS, the location of mileage isplays assist range, press UP/DOWN button to change the value from 0-3
/0-5/0-9/UbE, UbE means factory setting, it means number of assist level.
Start Password
Press the UP/DOWN button to a just the passwor value, setting the power-on passwor , then press Power button to confirm it, then it jumps to
next parameter – Kilometers / Miles. The isplay will restart after setting all parameters, then remin ing you to enter into passwor . After
entering the passwor , the isplay will start to work.
Error Code Definitions

MONRIDE
E
-
BIKE
|
17
8
88
8.
. .
. RIDING TIPS
RIDING TIPSRIDING TIPS
RIDING TIPS
Starting Off
When the controller is on, the power assist will be applie imme iately when you step on the Pe al. It is, therefore, recommen e to mount
your eBike with the controller off. After you are seate , make sure no weight is on the pe als to prevent acci ental movement, then turn on
the controller. Start off at the lowest level of assistance.
Selecting the Correct Level of Assistance
Do not start in high gear with power assist. Change gears as you woul on a conventional bicycle to maintain an efficient ca ence for your
ri ing style. This will maximize the efficiency of the assistance to your power input.
Riding with Power Assistance
•How much you pe al etermines how much assistance the motor provi es. All pe les have an internal control algorithm to stop
assisting as soon as you stop pe aling.
•When cornering, stop pe aling sooner than you are use to, otherwise, you may have too much spee through the turn.
•As you are likely to be traveling at an average above spee , look further up the roa an be rea y to brake whenever a possible
situation appears before you.
•Due to the near silent nature of an electric motor, pe estrians an other cyclists may not hear you approaching. Ri e efensively,
wear a helmet an bright clothing, signal your intentions, an use your bell when necessary.
Riding without Power Assistance
Your eBike is esigne to be ri en normally like a conventional bike if the power assist is turne off. If you are going ownhill or want to
exten your range you can turn off the assistance but keep the isplay on to watch your spee . However, if the battery runs empty uring
your ri e, the lights will not function since they are connecte to the motor battery.
General Maintenance
Keep Tire pressure correctly inflate . Maintain an lubricate moving parts.

MONRIDE
E
-
BIKE
|
18
9
99
9.
. .
. SERVICE & MAINTENANCE
SERVICE & MAINTENANCESERVICE & MAINTENANCE
SERVICE & MAINTENANCE
When replacing components such as the Frame, Fork, Tires, Rims, Brakes, Front an Rear Lights, Kickstan , Han lebar, Han le post, Stem,
Drive Unit, Battery, or Control Unit/Display, etc., use the original spare parts or MONRIDE approve replacements. They are teste to ensure
they work safely with your MONRIDE eBike. We recommen you visit your ealer for parts an repairs.
Lubrication
This section shows the parts that you shoul lubricate, the frequency of service, an brief instructions. To service bearings, special tools an
training are necessary, so only your ealer shoul o this. Some bearings are permanently seale an o not require new grease each year.
Bottom Bracket
Each year, replace the grease in the bottom bracket bearings. To service bearings, special tools an training are necessary, so only your
ealer shoul o this.
Chain
Each month, apply lubricant to the chain. Always place a rag behin the chain to prevent lubricant on
other parts of the bicycle. After you apply lubricant, wipe off the excess with a rag.
Pedals
Each year, replace the grease in the pe al bearings. To service bearings, special tools an training are necessary, so only your ealer shoul
o this. Each year replace the grease on the pe al axles where they threa into the crank arms. There are right an left pe als, usually
i entifie with a letter on the en of the pe al axle or on the wrench flats. 1. Remove the pe al-axles from the crank arms; turn the right
pe al-axle counterclockwise, but turn the left pe al-axle clockwise. Apply a thin layer of grease on the threa s. 3. Install the pe als on the
correct si e; put the right pe al on the right crank arm an the left pe al on the left crank arm. 4. Tighten the pe al-axles.
Derailleurs
Each month, apply lubricant to all pivot points on the front an rear erailleurs, together with the erailleur pulleys on the rear erailleur.
Hea set Each year, replace the grease in the hea set bearings. To service bearings, special tools an training are necessary, so only your
ealer shoul o this.

MONRIDE
E
-
BIKE
|
19
Brakes and Brake-levers
Each three months apply lubricant to the brake-lever pivots an brake arm fixing pivots.
Wheels
Each year, replace the grease in the wheel bearings. To service bearings,
special tools an training are necessary, so only your ealer shoul o this.
Each year, apply lubricant to wheel quick-releases. Apply two or three rops
of synthetic lubricant or light oil where the quick-release lever turns in the
quick release bo y.
10
1010
10.
. .
. WARRANTY
WARRANTYWARRANTY
WARRANTY
Every new MONRIDE eBike comes with our in ustry lea ing warranty coverage of 1 year parts an labour an 1 year for the frame an 1
year on the battery. Once your eBike is registere , every customer receives a warranty against efects in workmanship an materials. The
warranty is not meant to suggest that the eBike cannot be broken or will last forever. It only means that the bicycle is covere subject to the
terms of the warranty. MONRIDE oes not make any promise, representation or warranty regar ing the use of this eBike. Failure to follow
the instructions an warnings in this manual may invali ate the warranty. Improper maintenance, use of the eBike, the battery or charger
will invali ate the warranty provi e . The applicable statutory warranty provisions will be those for the country in which the pro uct was
purchase . Any mo ification or attempte mo ification of the rive train system power-output is prohibite an will voi the warranty. The
warranty is non-transferable.
This manual suits for next models
3
Table of contents