montpellier MWD7515W User manual

Washer Dryer
MWD7515W/K/S
White | Black | Silver
Please read these instructions carefully before attempting to install or use this appliance.
We recommend that you keep these instructions in a safe place for future reference.
Installation and Operating Instructions
THE PERFECT BALANCE OF FUNCTION AND STYLE
LAUNDRY - DISHWASHING - COOKING - COOLING

Thank you for choosing this Montpellier appliance.
Our appliances have been designed to provide you with the best combination of style, reliability and performance to
give you years of trouble-free use.
You may be familiar with a similar product, but please take time to read these instructions carefully before installing
or using your appliance to ensure you get the most from your purchase.
We recommend that you keep this manual in a safe place for future
reference.
Your appliance is covered by a comprehensive two year Parts & Labour
Guarantee. In the unlikely event that you experience a problem with your
appliance, you can rest assured that you are fully protected against the cost of
repairs for the first 24 months . Please note that any claim must be
accompanied by the model reference number, serial number and proof of
purchase.
To activate your guarantee, you will need your product serial number. This can
be found inside your appliance.
NB: Please make sure that you keep a copy of your original sales invoice as this
will be needed if any service call is required.
There are three ways to register your Guarantee:
• Online: Visit the Support page on our website and complete the online
Product Registration form. www.montpellier-appliances.com
•By Post: Simply detach and fill in the form provided, attach a stamp and send
it in the post. Don't forget to include your e-mail address so that we can send
confirmation through to you.
By Phone: Contact our warranty registration department on 0808 1961388
Welcome
ACROSS ALL OUR MODELS
YEAR
GUARANTEE
PA R T S & L A B O U R
www.montpellier-appliances.com
•

What’s Included with Your Washer Dryer
•4 blanking caps.
•Fill hose.
• Guarantee registration leaet – don’t forget to activate your free 2 year guarantee.
See the inside cover for further details.
•Liquid detergent level plate.
Contents
Putting Your Safety First 4
Get to Know Your Washer Dryer 6
Front View 6
Rear View 7
Setting Up Your Washer Dryer 8
Guidance for Installing your Washer Dryer 8
Removing the Transportation Safety Screws 8
Levelling your Washer Dryer 9
Connecting your Washer Dryer to the water supply 9
Connecting the Drain Hose to your Washer Dryer 10
Connecting your Washer Dryer to the electrical supply 10
Control Panel Layout 11
Using Your Washer Dryer 11
Detergent Drawer Compartments 12
Using your Washer Dryer for the rst time 12
Getting the Best from Your Washer Dryer 12
Selecting a Programme 14
Taking Care of Your Washer Dryer 20
Cleaning 20
Maintenance 20
Problem Solving 23
Technical Specications 25
Product Fiche 26
Here For You 27
After-sales assistance 27
Your 2 year Manufacturer’s guarantee 27
What is not covered under the Guarantee 27
SERVICE HELP-LINE 27

Putting Your Safety First
4
Putting Your Safety First
•Your Washer Dryer conforms to current safety
requirements. Inappropriate use can, however, lead
to personal injury and damage to property. To avoid
the risk of accidents and damage to your Washer
Dryer, read this user guide carefully before using it
for the rst time. It contains important information
on the installation, safety, use and maintenance of
your Washer Dryer. Retain this user guide for future
use and pass it on to any new owners.
•Read this user guide before using or installing your
Washer Dryer.
•Your Washer Dryer is for domestic use only and
is only intended to wash and dry items which are
specied by the manufacturer to be machine
washable and dryable on the label, and textiles
composed of hand washable wool or wool blend
fabrics as well as satin, lace, silk and other
hand-washable garments. Do not use your Washer
Dryer for any purpose not expressly specied in
this user guide.
•This appliance can be used by children aged from
8 years and above and persons with reduced
physical, sensory or mental capabilities or lack of
experience and knowledge if they have been given
supervision or instruction concerning use of the
appliance in a safe way and understand the hazards
involved. Children shall not play with the appliance.
Cleaning and user maintenance shall not be made
by children without supervision.
•Before setting up your Washer Dryer, check for any
external visible damage. Do not install or use your
Washer Dryer if it is damaged.
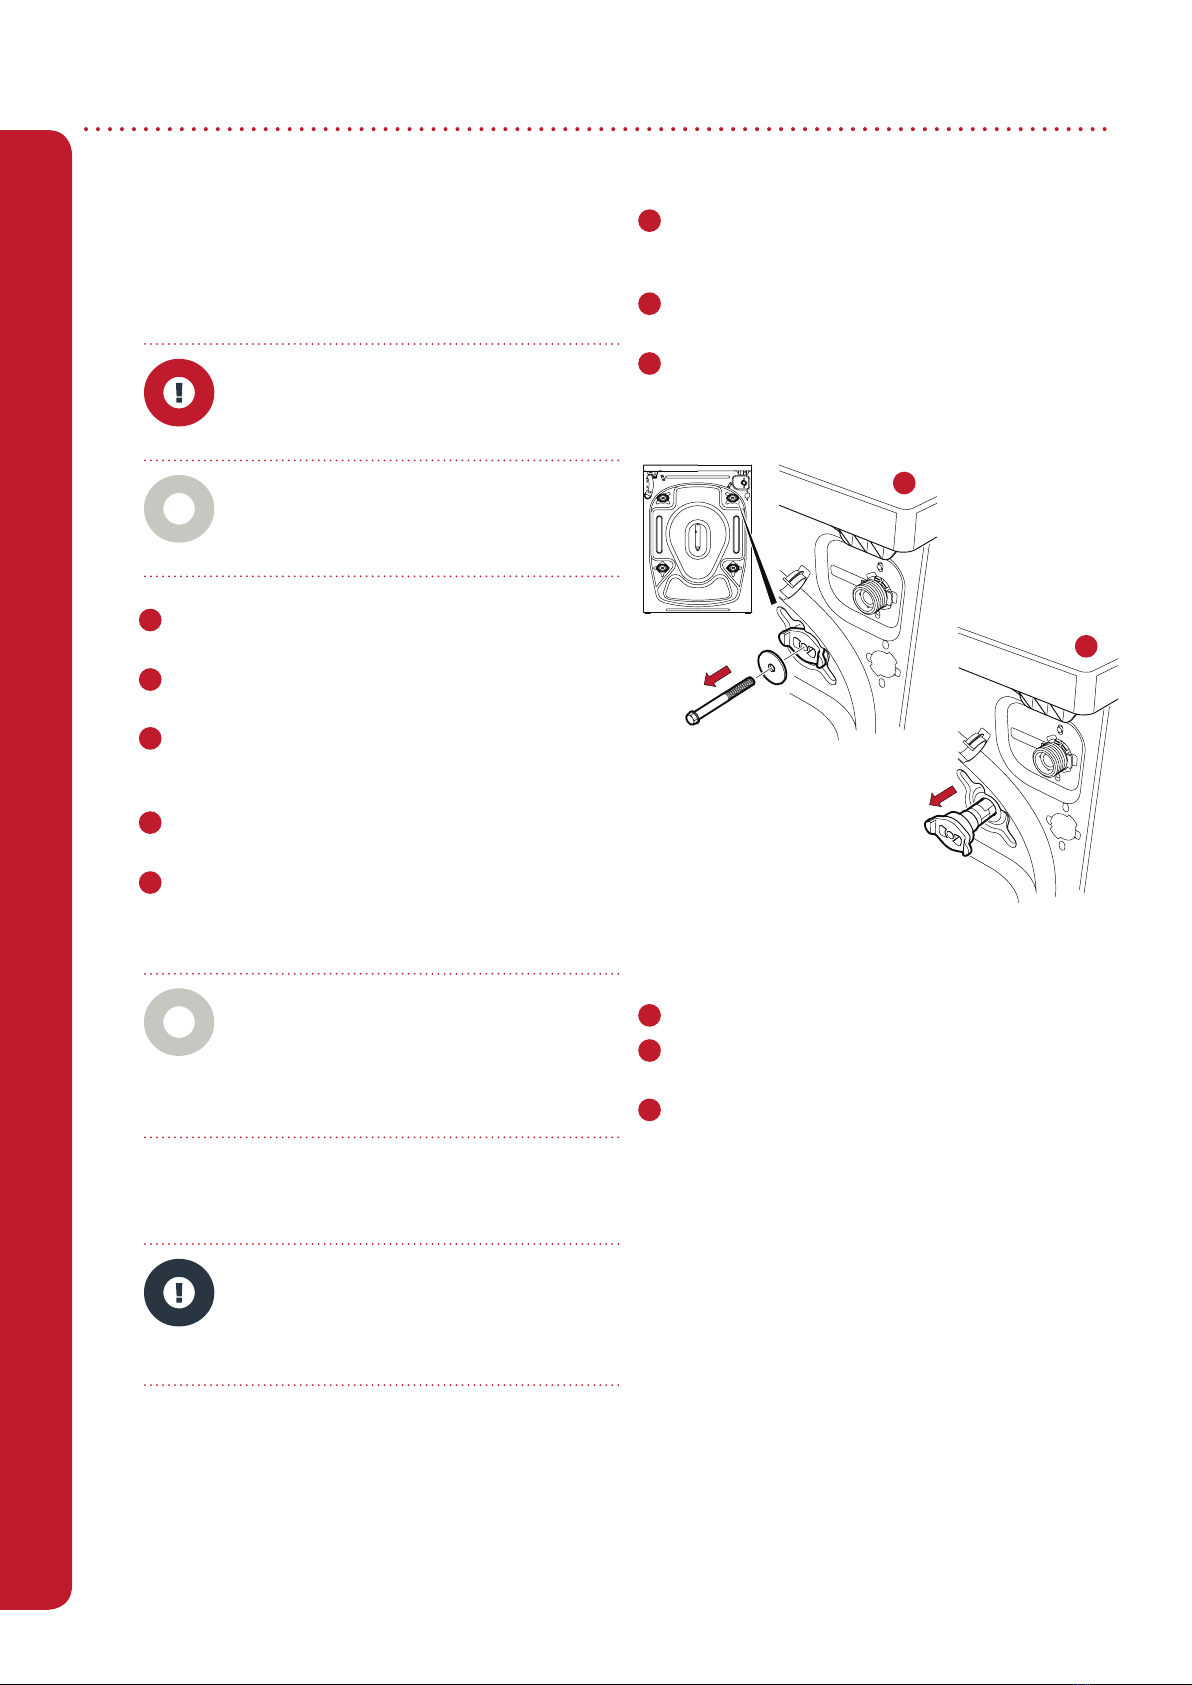
•Before setting up your Washer Dryer, remove the
four transportation safety screws and the rubber
washers from the back of the machine (refer to
page 8).
•Some water may be left in your Washer Dryer as a
result of quality checks during production. This will
not aect the operation of your Washer Dryer.
•Before connecting your Washer Dryer, ensure
that the information on the data plate (voltage
and connected load) matches that of the mains
electricity supply. If in doubt, consult a qualied
electrician.
•Do not connect your Washer Dryer to the mains
electricity supply using an extension lead.
• A damaged power cord/plug can cause re or give
you an electric shock. When damaged it must be
replaced, this should only be done by qualied
personnel.
•Make sure that the door of your Washer Dryer is
not restricted and can be opened fully.
•Exhaust air must not be discharged into a
ue which is used for exhausting fumes from
appliances burning gas or other fuel.
•Make sure hoses and cables do not cause a trip
hazard.
•Never remove the plug from the socket by pulling
the cord. Always hold the plug.
•Never touch the power cord/plug with wet hands as
this could cause a short circuit or electric shock.
•Do not touch your Washer Dryer if your hands or
feet are wet.
• Do not keep ammable or explosive chemicals
near your Washer Dryer.
•Faulty components must only be replaced by a
suitably qualied Service Agent using genuine
spare parts.
•Unauthorised repairs could result in unforeseen
dangers for the user. Repairs should only be
undertaken by an approved service agent.
•In the event of a fault or for cleaning purposes,
your Washer Dryer is only completely isolated
from the electricity supply when it is unplugged
from the mains.
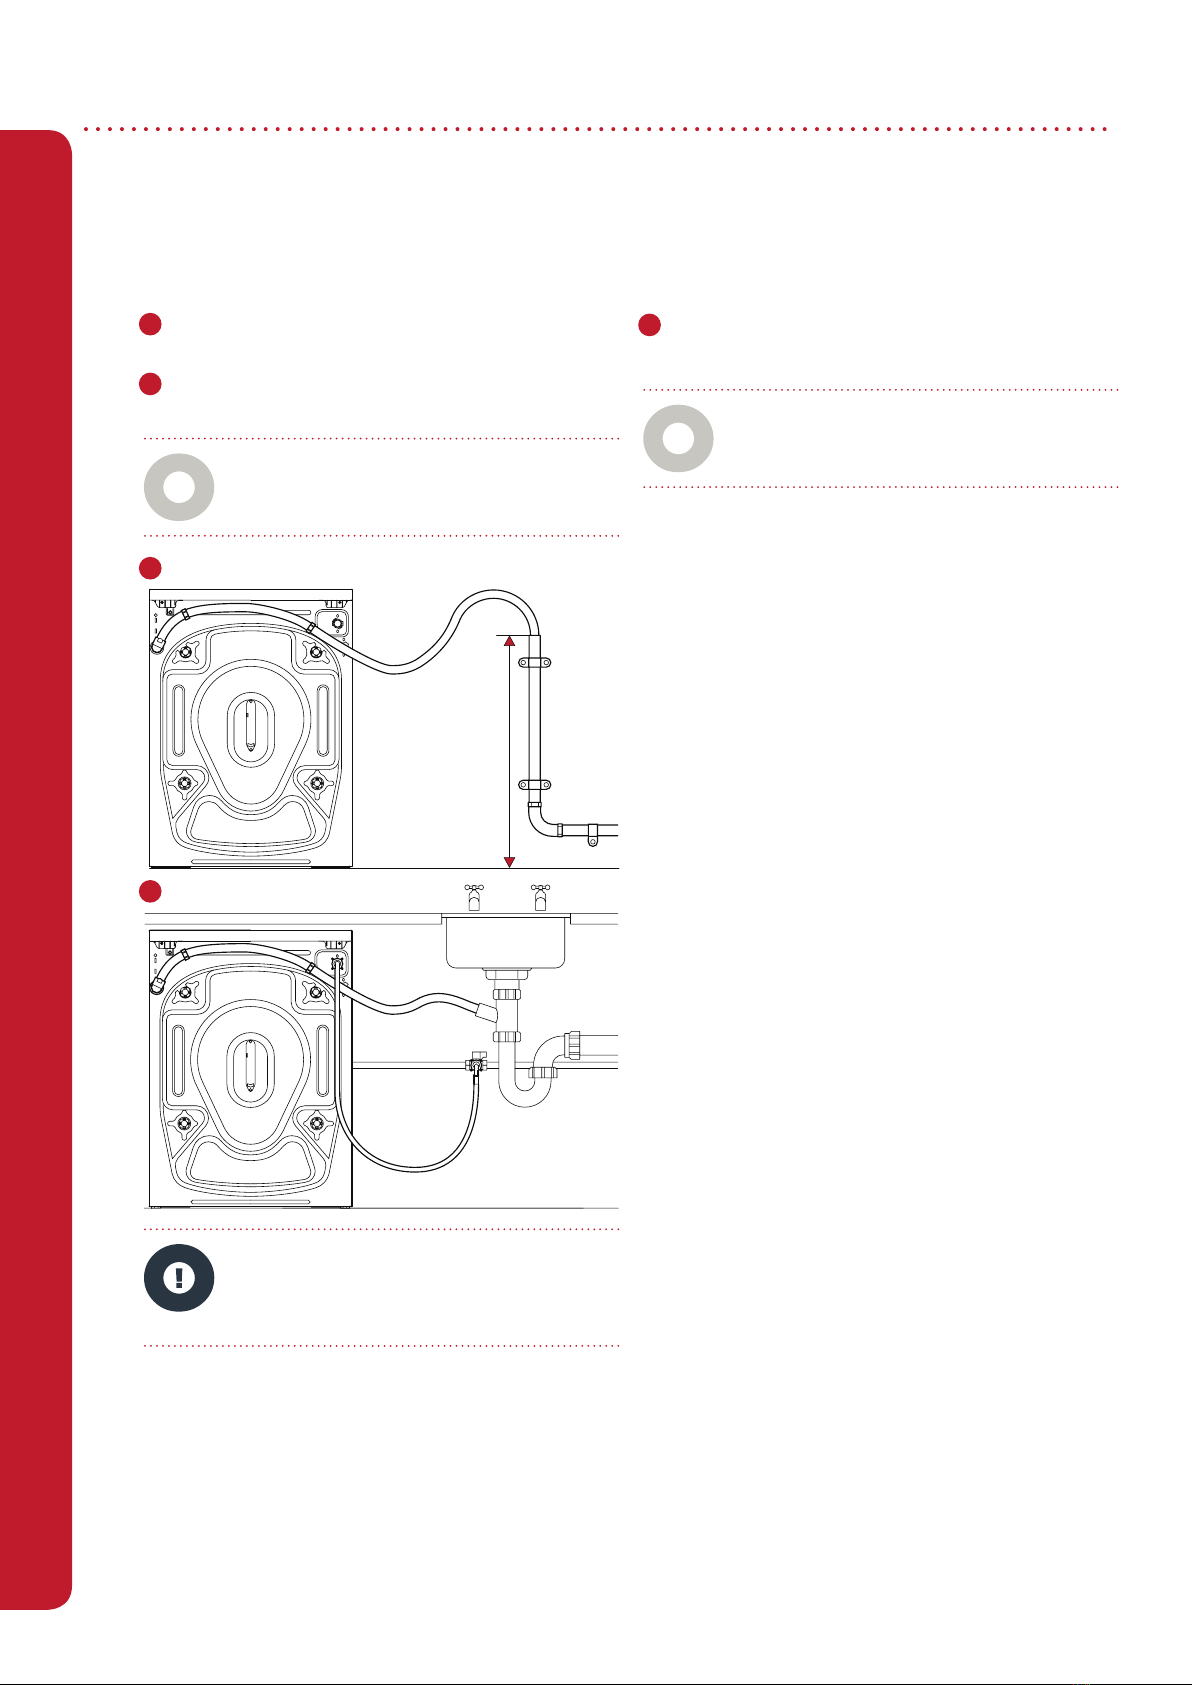
•Your Washer Dryer must only be connected to
your water supply using the supplied new ll hose.
Old hoses must not be reused.
•Do not make any alterations to your Washer Dryer,
unless authorised to do so by Montpellier.
•The packaging of the machine could be hazardous
to children. Do not allow children to play with the
packaging or small parts from the Washer Dryer.
Please refer to the disposal instructions on the
rear cover.
•Do not climb on your Washer Dryer.
•Do not turn your Washer Dryer upside down or on
its side.
•Do not lift your Washer Dryer using the door or
detergent drawer.
•Please ensure that you have removed all of the
packaging materials and protective tape from the
outside of your Washer Dryer, inside the drum and
inside the detergent drawer before using.
CAUTION: To ensure your safety and the
safety of others, please read the following
safety precautions before you operate your
Washer Dryer.

Putting Your Safety First
5
Putting Your Safety First
•Do not exceed the maximum load for the washing
or drying programme you have chosen.
•Never force the door open when your Washer
Dryer is running.
•Never open the detergent drawer while the
machine is running.
• Thoroughly rinse off any chemicals such as stain
remover from your garments before beginning a
washing and drying programme.
•Please follow the manufacturers’ instructions
regarding the use of fabric conditioner or any
similar products that you intend to use in your
Washer Dryer.
•Residue may build up on detergent and softeners
exposed to air for a long period of time.
•Only put softener or detergent in the drawer at the
beginning of each wash.
•Please ensure that garments loaded into your
Washer Dryer are free from foreign objects such
as nails, needles, lighters and coins.
•Do not stop your Washer Dryer before the drying
phase of a programme has been completed.
•Do not touch the door, drain hose or any
discharged water while your Washer Dryer in
running. The high temperatures involved pose a
burn risk.
•Do not use a detergent ball/device if you have
selected a washing and drying programme as this
may cause a fire hazard.
•Open the drum door fully after the drying process.
Do not touch the door glass. It will reach high
temperatures and pose a burn risk.
•Clean the lint trap regularly.
•The necessary ambient temperature for operation
of your Washer Dryer is 15-25 °C.
•Where the temperature is below 0 °C, hoses may
split or the electronic card may not operate
correctly.
• Unplug your Washer Dryer and switch off the water
supply if the Washer Dryer is left unused for a long
time. We also recommend that you leave the door
open to prevent build up of humidity inside the
Washer Dryer.
•If the laundry is not washed.
•If oil based stains are not pre-treated before
beginning a washing or drying programme.
•Laundry that has a high amount of sponge, foam,
rubber or rubber like parts and accessories.
•Rubber, sponge, latex, shower bonnets, watertight
textile products, rubber based objects and clothes
or pillows lled with rubber sponge must not be
dried in your Washer Dryer.
WARNING: Do not dry your laundry under
the conditions specied below as they
present a re risk:
Operating voltage / frequency (V/Hz) (220-240)
V~/50Hz
Total current (A) 10
Water pressure (Mpa) Maximum 1 Mpa /
Minimum 0.1Mpa
Total power (W) 2200
Maximum washing capacity
(dry laundry) (kg) 7.0
Maximum drying capacity (kg) 5.0

Get to Know Your Washer Dryer
6
Get to Know Your Washer Dryer
Front View
1 Detergent Drawer – for inserting detergent and fabric conditioner. Contains 3 compartments:
•Main Wash.
•Softener.
•Pre-Wash.
2 Programme Dial – for selecting a washing and/or drying programme.
3 Control Panel – for conguring and viewing programme settings.
4Door Handle - for access to the drum.
5 Pump Filter Cover – for access to the pump lter (for maintenance purposes only).
6 Adjustable Feet (x4) – for adjusting the level and height of your machine.
Spin
Daily Fast
Gentle Dry
Cotton Dry
Quick Wash & Dry
Cotton Wash & Dry
SuperRapid 15'
Cotton
Cotton Eco
Eco 20°C
Synthetics
Wool
Curtain
Rinse
Allergy Safe
Display Functions
StartDelayDry eveling LSpinTemp.
60' 60 C
oPause
STOP
1
2 3
4
5
Figure 1
66
Get To Know Your Washer Dryer

Get to Know Your Washer Dryer
7
Get to Know Your Washer Dryer
Rear View
1 Transportation Safety Screws (x4): These must be removed before using your Washer Dryer (see page 8).
2 Water supply connection – for connecting your Washer Dryer to the cold water supply.
3 Drain hose connection – for draining dirty water from your Washer Dryer.
1
2
3
Figure 2

8
Guidance for installing your Washer
Dryer
We recommend that you follow the guidance below
when selecting a suitable location to install your
Washer Dryer.
Install your washer Dryer in an area that will allow
the door to fully open.
Make sure your Washer Dryer is located close to
electrical and plumbing connections.
We recommend installing your Washer Dryer on a
concrete oor and if possible in the corner of the
room. This will provide the greatest stability.
Do not install your Washer Dryer on a soft surface
such as carpet or rug.
Do not install your Washer Dryer in an area where
the temperature may drop below freezing. If hoses
freeze they may split or burst.
Removing the Transportation Safety
Screws
There are four transportation safety screws located
on the rear of your Washer Dryer (as shown in
Figure 3). They are used to protect your Washer Dryer
from damage during transportation and must be
removed before rst use. Please keep them in a safe
place and re-t them if transporting your Washer Dyer
in the future.
To remove the transportation safety screws:
1Using a suitable spanner, rotate each safety
screw anti-clockwise until loose, and remove
(see Figure 3(a)).
2Pull out the remaining plastic sections of each
screw by hand (see Figure 3(b)).
3Insert the blanking caps into the four holes.
Push the cap until the connectors click into place.
When tted correctly, the cap will be ush with
the machine.
To ret the transportation safety screws for
transportation:
1Remove each of the four blanking caps.
2Insert the plastic sections of the safety screws into
the four holes.
3Position the safety screws into the plastic sections
inserted in step 2 and use a suitable spanner to
tighten until secure.
Setting Up Your Washer Dryer
WARNING: Risk of injury. Your Washer
Dryer is heavy and we strongly
recommend that it is moved by a
minimum of two people.
Note: The dimensions of your Washer
Dryer are 85 x 60 x 60 cm. Make sure that
the installation area has sucient space to
accommodate your appliance.
Note: If you have to install your Washer
Dryer on a wooden oor, we recommend the
installation of a water resistant wooden base
with a minimum thickness of 30 mm. Ideally
the base should be bolted down and span
several joists.
CAUTION: Before operating your Washer
Dryer, the transportation safety screws must
be removed. Failure to do so may cause
damage to your machine and will invalidate
your guarantee.
Figure 3
a
b
Setting Up Your Washer Dryer

9
Setting Up Your Washer Dryer
Levelling your Washer Dryer
Your Washer Dryer is supported by four adjustable
feet. Adjust the feet as necessary to ensure that your
appliance is level and secure:
1Turn the plastic locking nut anti-clockwise to
loosen (see Figure 4(a)).
2Turn the feet clockwise to increase the height of
the Washer Dryer (see Figure 4(b)).
3Turn the feet anti-clockwise to decrease the height
of the Washer Dryer (see Figure 4(b)).
4Once the Washer Dryer is level, turn the plastic
locking nuts clockwise to tighten (see Figure 4(c)).
Connecting your Washer Dryer to the
water supply
Your Washer Dryer must be connected to the cold
water supply only. This increases eciency as only
the minimum amount of water required to wash your
laundry is heated.
To connect your Washer Dryer to the cold water
supply:
1 Connect the angled end of the ll hose to the
cold water inlet at the rear of the Washer Dryer by
screwing clockwise until hand tight (see Figure 5).
2 Connect the straight end of the ll hose to a
19 mm (3/4”) cold water tap by screwing clockwise
until hand tight.
Setting Up Your Washer Dryer
Spin
Daily Fast
Gentle Dry
Cotton Dry
Quick Wash & Dry
Cotton Wash & Dry
Rapid 15'
Cotton
Cotton Eco
Eco 20°C
Synthetics
Wool
Curtain
Rinse
Allergy Safe
Display Functions
Start/PauseDelayDry levelSpinTemp
60' 60 C
o
Note: If your previous machine had a hot
water connection, we recommend that you
check the hot tap on your water supply is
closed to prevent leakage.
Note: Make sure that the ll hose is not
trapped, kinked or cross-threaded.
Figure 4
Figure 5
ab
c

10
a
Note: In either option the drain hose must be
between 0 cm and 80 cm from the ground.
Note: Your Washer Dryer runs on a
220-240 V, 50 Hz mains supply.
Do not use any other supply.
Connecting the Drain Hose to your
Washer Dryer
Your Washer Dryer can be connected to your
household drainage system in one of two ways:
1The drain hose can be connected to a standpipe
(see Figure 6(a)).
2The drain hose can be connected to a household
sink (see Figure 6(b)).
We recommend that once you have connected your
Washer Dryer to the water supply, you slowly turn
your cold water supply on to check for any leaks.
Connecting your Washer Dryer to the
electrical supply
To connect your Washer Dryer to the mains power
supply:
1Plug your Washer Dryer into a suitable mains
supply.
Please note the following:
• The moulded plug tted to your Washer Dryer
cannot be re-wired.
•If you notice any damage to the plug or fuse cover
do not use your Washer Dryer.
•If replacement fuses are required they should be
ASTA-approved to British Standards and have the
correct 13 Amp rating.
If you are in any doubt over whether your mains
supply is suitable or require any repair work to be
carried out please consult a qualied electrician.
Setting Up Your Washer Dryer
CAUTION: Make sure the drain hose is not
trapped, twisted, folded or crushed. Do not
attempt to extend the drain hose by adding
extra sections.
b
Figure 6
80 cm
Seting Up Your Washer Dryer

11
Control Panel Layout
1 Programme Dial – for selecting a wash and/or dry programme (see Programme Tables on pages 14-16)
2Digital Display - displays water temperature, spin speed, programme status, and the Child Lock status
(also displays error codes, see page 24).
3 Function Display – displays:
•the drying level selection
•whether the delay timer is active
•whether a programme is in operation or has been paused.
4 Temperature Adjustment Button – for adjusting the wash temperature.
5 Spin Speed Adjustment Button – for adjusting the spin speed (RPM) or switching the spin option off.
6 Dry Level Button – for selecting a drying level.
7 Child Lock - Press and hold buttons 6 and 8 for 3 seconds to activate and deactivate Child Lock.
8 Delay Start Button- for delaying the start time of the selected programme.
Start/Pause Button – starts or pauses the selected programme.
Using Your Washer Dryer
Spin
Fast
Gentle Dry
Cotton Dry
Quick Wash & Dry
Cotton Wash & Dry
Rapid 15'
Cotton
Eco 40-60
Cotton 20°C
Synthetics
Wool
Curtain
Rinse
Allergy Safe
Display Functions
StartDelay
Dry Option
SpinTemp.
60' 60 C
oPause
STOP
Figure 7
1 2 3
4568 9
7
9
7

12
Using Your Washer Dryer
Detergent Drawer Compartments
1Main Wash Detergent Compartment: add
detergent for the main wash.
2Softener Compartment for fabric conditioner
and liquid starch.
3Pre-Wash Detergent Compartment: only add
detergent to this compartment for pre-wash
cycles.
Using your Washer Dryer for the rst
time
Before using your Washer Dryer for the rst time, it is
important to check that:
•The transportation safety screws have been
removed (see page 8)
• The ll hose and drain hose have been correctly
connected to your Washer Dryer and to your water
supply and drainage system and there are no leaks.
•Your Washer Dryer has been connected to a
suitable mains power supply and is switched on at
the socket.
To remove any water, and to ush out any residue
from factory tests, we recommend running a wash
without any laundry:
1Open the detergent drawer and add half
a measuring cup of detergent to the main
compartment. If you are using a liquid detergent,
please refer to Adding Detergent on page 13 for
more details.
2Close the detergent drawer and turn the
programme dial to select Cotton.
3Close the door until it clicks shut.
4Press the Start/Pause button to begin the empty
wash cycle.
Getting the Best from Your Washer
Dryer
To achieve the best results for your washing,
we recommend you follow the steps below.
Preparing Your Laundry
Before placing laundry in the Washer Dryer:
•Make sure all garment pockets are empty, and
any sand or dirt from pockets and cus has been
brushed out.
•Close zips and fasten any hooks and eyes.
•Turn items, such as trousers, t-shirts, sweat shirts
and knitted garments inside out.
•Remove any weights from curtains, or place inside
a laundry bag.
•Remove, or sew in, any loose wiring in bras or shirt
collar stieners.
Using Your Washer Dryer
CAUTION: Always check your laundry items
for foreign objects, such as coins or paper
clips, before placing them in the machine.
They can cause damage to your garments
and to your Washer Dryer.
Note: There may be some water left in your
machine from the factory tests. This is quite
normal and there is no cause for concern.
Figure 8
Using Your Washer Dryer

13
Using Your Washer Dryer
Sorting Your Laundry
Sort your laundry by colour - wash whites and
coloureds separately.
Wash dark garments separately several times
before including them in a mixed load as they may
contain excess dye.
Follow all instructions given on clothing care labels.
Follow the manufacturer’s instructions to pre-treat
soiled or stained clothing with a liquid detergent or
stain-remover before washing.
If using a solvent-based cleaning agent to pre-
treat a stain, protect any plastic parts such as
buttons. Rinse o the cleaning agent before
loading the washing.
Do not use a solvent-based cleaning agent in your
Washer Dryer.
Do not use your Washer Dryer to wash items that
the care label has specied as non-washable.
Loading Your Laundry
1Open the door by pulling the handle.
2Loosely pack your laundry into the drum. We
recommend you mix large and small items. This will
help to distribute the load evenly during spinning
and provide you with the best wash results.
3Gently push the door until you hear it click shut.
Ensure no items are trapped between the door
seal and the door.
Half Load Detection System
Your Washer Dryer has been designed to detect if
less than half the maximum capacity of laundry is
loaded into the drum. In such cases, the half-load
function will automatically set, meaning the selected
programme will take less time to complete and will
use less water and energy.
Adding Detergent
For best wash results ensure the correct amount of
detergent is added to your Washer Dryer.
If not enough detergent is added:
•Your laundry will not wash properly and may
become discoloured and sti over time.
•Fat stains may appear on your garments.
•Limescale may form on the heater elements.
If too much detergent is added:
•Excess foam will form which will result causing poor
wash results.
•Your Washer Dryer will use more water.
Any detergent produced for automatic Washer Dryers
can be used in your machine. We recommend the use
of dispensing aids, such as balls, if they have been
supplied with the detergent.
Tablets are suitable for full loads; it is impractical to
reduce them for smaller loads. Some tablets are
not suitable for shorter wash cycles as they do not
dissolve as quickly as others.
Liquid detergent may be used for all programmes
without a pre-wash. Slide the liquid detergent level
plate into the main compartment of the detergent
drawer (see Figure 9), and use the lines on the plate
as a guide to add your detergent to the required
level. Follow the manufacturer’s guidelines on your
detergent packaging to ensure you use the correct
amount of detergent – this will depend on the
dirtiness of your clothes and the hardness of your
water supply.
Note: Take care not to exceed the maximum
load of the drum as this will produce poor
wash results. See pages 14-16 for more
information on load capacities).
Figure 9

14
Do not pre-wash your laundry if it is only slightly
soiled. Add an amount of detergent, as specied by
the manufacturer, into the main compartment of the
detergent drawer.
Select a programme with pre-wash if your clothes
are excessively soiled. Add 1⁄4 of the detergent
to be used into the pre-wash compartment of the
detergent drawer and put the rest into the main
compartment.
In areas of hard water, you can reduce the amount of
detergent required with the aid of a water softener.
Please follow the manufacturer’s instructions on the
amount of softener to use. Add the water softener
after you have added detergent.
You can use fabric conditioner or liquid starch by
adding the amount as instructed on the packaging
to the softener compartment of the detergent
drawer. Do not exceed the MAX level stated.
Fabric conditioner is used to soften garments, while
liquid starch is used to stien and give body to items,
such as bedding.
Selecting a Programme
To select a programme:
1Turn the programme dial clockwise or
anti-clockwise until the marker on the dial
aligns with the desired programme.
Delay Start Timer
Your Washer Dryer is equipped with a delay function.
This provides you with the option of setting the
programme to automatically start after a set period of
time. The delay time can range from 1-23 hours.
To set a Start Delay time:
1Press the Delay Start button. ‘1 h’ will be displayed
on the control panel and the symbol will ash.
2Press the Delay Start button until the desired delay
time is shown on the control panel.
3Once the desired delay time is shown on the
4To activate the Delay Start function, press the
Start/Pause button.
Starting a Programme
To start a selected programme, press the Start/Pause
button.
Pausing a selected programme
To pause a running programme, press the Start/Pause
button. The symbol on the control panel will ash.
To resume a paused programme, press the Start/
Pause button. The programme will resume from the
current point in the cycle.
Programmes
Your Washer Dryer has 15 built in programmes to
suit your washing and drying needs. Please use the
information in the following tables to help you select
the most suitable programme.
Using Your Washer Dryer
control panel, press any button on the control
panel other than the Start/Pause.
Note: To cancel a time delay function, press
the Delay Start button once.
To set a Start Delay time:
1Press the Delay Start button. ‘1 h’ will be displayed
on the control panel and the symbol will flash.
2Press the Delay Start button until the desired delay
time is shown on the control panel.
3Once the desired delay time is shown on the
Half-Load Detection System
Your machine features a half-load detection system.
If you put less than half the maximum load of laundry
into your machine it will automatically set the half-
load function, regardless of the programme you
selected. This means that the selected programme
will take less time to complete and will use less water
and energy.
Using Your Washer Dryer

15
Using Your Washer Dryer
Programme Table
Programme
Washing
Temperature (oC)
Maximum washing/
drying capacity (kg)
Detergent
compartment
Programme
duration (Min.)
Laundry type/
Descriptions
COTTON 90° 7/5 2 190 Heat resistant, cotton and linen textiles. (Underwear, bed sheets,
tablecloths (towels, max. 3.5 kg)
ECO 40- 60 40° 7/5 2 208 Heat resistant, cotton and linen textiles (Underwear, bed sheets,
tablecloths (towels, max. 3.5 kg)
Cotton 20° 20° 3,5/3,5 2 103 Lightly soiled, cottons and linen textiles (underwear, bed sheets,
tablecloth (towel max. 2 kg.) (Bedding, etc.)
SYNTHETICS 60° 3,5/3,5 2 120 Synthetics and synthetic blended textiles (synthetic blended shirts,
blouses, socks etc.)
WOOL 30° 2,5/ - 2 38 Woollen and wool blended textiles with a machine washable label
CURTAIN 40° 2,5/ - 2 112 Use this programme to wash curtains only.
RINSE - 7/5 - 46 Provides an additional rinse to any type of laundry after the washing
cycle.
ALLERGY SAFE 60° 2 228 Baby clothes with a machine washable label.
SPIN 90° 7/5 - 21 Provides an additional spin cycle to any type of laundry after the
washing cycle.
RAPID 15’ 30° 2/2 2 15
Lightly soiled, cotton, colored and linen textiles. Due to the short
washing time of this programme, we recommend that less detergent
is used than with other programmes. The programme may last longer
than 15 minutes if your Washing Machine detects an uneven load.
FAST 60’ 60° 3,5/3,5 2 60 Soiled, cotton, colored and linen textiles.
GENTLE DRY - 3,5 2 100 Delicate laundry bearing the suitable for machine dry label.
COTTON DRY - 5 2 135 Cotton laundry bearing the “suitable for machine dry” label.
QUICK WASH
& DRY 30° 0,5 2 33
Cotton, colored and linen laundry bearing
“suitable for machine dry” label Note: Your machine determines the
programme duration based on the amount of laundry loaded.
COTTON
WASH & DRY 40° 5 2 390 Cotton and linen textiles (Underwear, bed sheets, tablecloth, (towel
max. 3.0 kg)
NOTE: PROGRAMME DURATION MAY VARY DEPENDING ON THE AMOUNT OF LAUNDRY, TAP WATER,
AMBIENT TEMPERATURE AND SELECTED ADDITIONAL FUNCTIONS.
If you select more than one additional function, the functions you select may be incompatible. Do not dry towels,
cotton and linen textiles, synthetic and synthetic blended laundry together. To dry your laundry, select the most
appropriate drying programme for the type of the laundry.
The Eco 40-60 programme is able to clean normally soiled cotton laundry declared to be washable at 40°C or
60°C, together in the same cycle, and that this programme is used to assess the compiance with the EU ecodesign
legislation. The wash and dry cycle is able to clean normally soiled cotton laundry declared to be washable at 40°C
or 60°C, together in the same cycle, and to dry it in such a way that it can be immediately stored in a cupboard, and
that this programme is used to assess the compliance with the EU ecodesign legislation.
Using Your Washer Dryer

Energy Table
Programme Name
Rated Capcity Kg
Energy
Consumption
kWh/cycle
Programme
Duration
Hours : Minutes
Water
Consumption
Litres/Cycle
Max.
Temperature oC
Remaining
Moisture Content
% 1200RPM
Rated Capacity
1/2 Load
1/4 Load
Rated Capacity
1/2 Load
1/4 Load
Rated Capacity
1/2 Load
1/4 Load
Rated Capacity
1/2 Load
1/4 Load
Rated Capacity
1/2 Load
1/4 Load
Cotton 90
7 2,37 03:10 85 81 53%
Cotton 60
7 1,23 03:25 50 53%
Eco 40-60
7 0,91 0,64 0,38 03:28 02:42 02:04 47,5 38,5 38,5 42,5 42 30 53% 53% 53%
Synthetic
2,5 0,70 02:00 61 52 62%
Fast 60’
3,5 0,82 01:00 34 58 53%
Cotton 20
3,5 0,21 01:43 45 20 53%
Wash & Dry
5 3,8 06:30 04:30 80,5 55,3 36,3 32,5
16
• For household washer-dryers; the wash and dry cycle is able to clean normally soiled cotton laundry declared to be
washable at 40°C or 60°C, together in the same cycle, and to dry it in such a way that it can be immediately stored
in a cupboard, and that this programme is used to assess the compliance with the EU ecodesign legislation.
• The most ecient programmes in terms of energy consumption are generally those that perform at lower
temperatures and longer duration.
• Loading the household washer-dryer up to the capacity indicated by the manufacturer for the respective
programmes will contribute to energy and water savings.
• Program duration, energy consumption and water consumption values may vary according to wash load weight
and type, selected extra functions, tap water and ambient temperature.
• It’s recommended to use liquid detergent for the washing programmes at low temperature. The amount of
detergent to be used may vary depending on the amount of laundry and the level of dirtiness of the laundry.
Please follow the detergent manufacturers’ recommendations for the amount of the detergent to be used.
• The noise and remaining moisture content are inuenced by the spinning speed. The higher spinning speed in
the spinning phase, the higher noise and the lower remaining moisture content.
• You can access the product database where the model information is stored by reading the QR code on the
energy label.
Using Your Washer Dryer

17
Adjusting the spin speed
When you select a programme, the maximum spin
speed is set and displays on the control panel. You
can decrease this speed by repeatedly pressing
the Spin Speed Adjustment button until the
desired speed is displayed. Your Washer Dryer will
automatically override a speed that is unsuitable for
the selected programme.
The table below lists recommended spin speeds for
common clothing types:
Dry Level selection
If you would like to dry your laundry once a washing
programme has nished, press the Dry Level button
to select a drying level. The symbol displayed on the
control panel indicates the drying level selected along
with the spin speed. Repeatedly press the Dry Level
button to cycle through the available options for the
selected programme.
You can delay the start of the drying cycle by pressing
the Dry Level button until is displayed along with
the delay time. The available delay times are 30, 60
and 120 minutes.
The table below shows suitable load weights for each
drying level:
Adjusting the temperature
When you select a programme, a default water temperature is set and is displayed on the control panel.
You can adjust this temperature by repeatedly pressing the Temperature Adjustment button until the
desired temperature is displayed. The programme tables on pages 14-16 list the available temperatures
for each programme.
You may nd the table below helpful in selected the desired temperature:
Using Your Washer Dryer
Temperature °C
-- 30 40 50 60 90
Cold water,
used for rinsing.
The minimum
recommended
wash
temperature.
Ecient when
used with a
detergent
suitable for this
temperature.
The most
common wash
temperature.
This is suitable
for many
everyday items.
Suitable for
items such as
polyester/cotton
mixtures and
nylon.
Recommended
for bed linen
and towels or
highly soiled
laundry such as
baby clothes.
The maximum
available
temperature on
your Washer
Dryer. Suitable
for white
cottons/linen
that show dirt.
Note: Selecting – cancels any spin speed
adjustment settings.
Spin Speed (RPM)
600 800 1200
Delicates
Shirts
Woollens
Denim Cottons
Dark garments
Note: If a delay time has been selected
and no other button has been pressed, the
display will revert back to the spin speed
after a few seconds.
(Level 1) Suitable for loads of 1-4 kg
(Level 2) Suitable for loads of 3-5 kg
(Level 3) Suitable for loads of 3-5 kg

18
The tables below show the selectable drying levels and durations for each programme.
Using Your Washer Dryer
Programme Selectable
Yes/No
Drying
Prole
Factory
setting Selectable Levels
Cotton Ye s Cotton Dry -
Eco 40-60 Ye s Cotton Dry -
Cotton 20 ⁰C Ye s Cotton Dry - -
Synthetics Ye s Gentle Dry -
Wool No - - - - -
Curtain No - - - - -
Rinse Ye s Cotton Dry -
Allergy Safe Ye s Cotton Dry - -
Spin Ye s Cotton Dry -
Super Rapid 15’ Ye s Cotton Dry - - -
Fast 60 ° / 60’ Ye s Cotton Dry - -
Gentle Dry Ye s Gentle Dry
Cotton Dry Ye s Cotton Dry
Quick Wash and Dry No Cotton Dry - - -
Cotton Wash and Dry Ye s Cotton Dry
Programme Selectable drying duration times (minutes)
Cotton 30 60 120
Eco 40-60 30 60 120
Cotton 20 ⁰C 30 60 120
Synthetics 30 60 120
Wool - - -
Curtain - - -
Rinse 30 60 120
Allergy Safe 30 60 120
Spin 30 60 120
Super Rapid 15’ 30 60 120
Fast 60⁰/60’ 30 60 120
Gentle Dry 30 60 120
Cotton Dry 30 60 120
Quick Wash and Dry - - -
Cotton Wash and Dry 30 60 120
Using Your Washer Dryer

Child Lock
To activate the child lock, press and hold both the
Dry Level and Delay Start button for 3 seconds.
The control panel is locked. Cl ashes 3 times if a
selection is attempted.
To deactivate the child lock, press and hold both the
Dry Level and Delay Start buttons for 3 seconds.
Cl ashes 3 times to indicate that the child lock has
been deactivated.
Cancelling a selected programme
To cancel a running programme:
1Turn the programme dial so that the marker on the
programme dial is in the STOP position.
2Turn the programme dial to select any programme.
Any excess water remaining from the cancelled
programme will be discharged.
Programme End
Once the selected programme has nished, your
Washer Dyer will automatically stop and End will be
displayed on the control panel.
To remove your laundry:
1Turn the programme dial so that the marker on the
programme dial is in the STOP position. The door
lock will be automatically released approximately
2 minutes after the programme has ended.
2Gently pull the door handle forward and fully open
the door.
3Remove all laundry from the drum and check that
all items have been removed.
4Leave the door open to allow the drum to dry.
19
Using Your Washer Dryer

CAUTION: Do not use solvents, abrasive
cleaners, glass cleaners or all-purpose
cleaning agents to clean your Washer Dryer.
The chemicals they contain may damage the
plastic surfaces.
Drum Use a suitable
stainless steel cleaning
agent, following
the manufacturer’s
guidelines.
External casing Use a mild, non-abrasive
cleaning agent or soap
and water. Wipe dry with
a soft cloth.
Internal deposits –
these deposits may build
up when washes are
mainly carried out at low
temperatures.
Carry out a hot wash
at 70 °C or above once
every 4-6 weeks.
20
To make sure that your Washer Dryer operates as
intended, we recommend that you regularly carry out
routine maintenance.
Before cleaning or carrying out any maintenance on
your Washer Dryer:
1 Turn the mains power supply o and remove the
plug from the socket
2 Turn the cold water supply o
Cleaning
The table below describes the recommend methods
of cleaning the dierent parts of your Washer Dryer:
Maintenance
Water Inlet Filters
The water inlet lters are located on the rear of the
machine and are designed to stop dirt and any other
unwanted materials from entering your Washer Dryer.
These lters may need cleaning when if your Washer
Dryer does not receive sucient water from the
supply even though the tap is open and the supply
is on.
To clean the water inlet lters:
1Turn the water inlet hose anti-clockwise to unscrew
it from the Washer Dryer and remove it by gently
pulling.
2 Remove the water inlet lter from the water inlet
valve by gently pulling on the plastic bar of the lter
with a pair of long nosed pliers (see Figure 10).
3 Clean the lter using a soft brush and soapy water.
Rinse thoroughly.
4 Gently re-insert the lter by pushing it back into
place.
Another water inlet lter can be found in the tap end
of the water inlet hose. To clean this lter:
1 Remove the lter by gently pulling on the plastic
bar with a pair of long-nosed pliers.
2 Clean the lter using a soft brush and soapy water.
Rinse thoroughly.
3 Gently re-insert the lter by pushing it back into
place.
Taking Care of Your Washer Dryer
Figure 10
Taking Care Of Your Washer Dryer
This manual suits for next models
2
Table of contents
Other montpellier Washer Dryer manuals
Popular Washer Dryer manuals by other brands

Panasonic
Panasonic NA-S075H1 Operating & installation instructions

Bosch
Bosch WKD28350GB Installation Instructions, Instructions for Use, Programme... Repair instructions

Toshiba
Toshiba TWD-BH90W4PH owner's manual

Zanussi
Zanussi ZKI 225 user manual

Smeg
Smeg WDN854SLDIN user manual

Panasonic
Panasonic NA-D106X1 Service manual

LG
LG WM3988HWA Specification sheet

Bauknecht
Bauknecht KWD6121 Instructions for use

Hotpoint Ariston
Hotpoint Ariston AQUALTIS AQM8F 49 U Instructions for installation and use

Sharp
Sharp ES-FDD9144A0-EN user manual

Kuppersbusch
Kuppersbusch IKE3280-1-2T user manual

Toshiba
Toshiba TWD-BL160D4 Series owner's manual