Instruction Manual
SAFETY PRECAUTIONS LED PRODUCT
Dear customer,
We are delighted that you have chosen a Moree product.
GB
Specifications LED Product
Dimensions: approx. 84 cm,
H 45, 55, 75, 105 cm
Material/ colour: ABS, gloss finished, white trans-
lucent, UV resistant,
Aluminium brushed, anodized
Weight: approx. 25.5 - 28 kg
Illuminant: Multicolour LEDs, max 13W
Battery: 12V, 12Ah
Operating time approx. 20h
Protection class: III
Protection grade: IP 20, for indoor use
Certification: CE
Charger: 220/240V~ 50/60Hz, Vout 12V, 3A
• Before using the product, please read the safety precautions
fully. Keep the manual for the entire life of the product.
• IMPORTANT: THE PRODUCT MAY ONLY BE CHARGED IN DRY
ROOMS. THERE MUST BE NO MOISTURE ON THE CHARGING
POINT OR ON THE CHARGER.
• The product may only be used when positioned horizontally,
with the top facing upwards on firm, non-flammable ground
and should not be covered.
• The product may only be charged with the supplied
charger.
• Make sure your voltage corresponds to the voltage printed
on the product.
• Stop operating the product immediately if it emits smoke, a
strange smell, or otherwise behaves abnormally.
• The product may only be used after correct installation. Dis-
connect the product from the mains supply before opening.
• Do not allow dirt or metal objects (such as keys) to contact
the charging point.
• Avoid dropping or subjecting the product to severe impact.
• Max. load is 5 kg.
• Do not pull on any cables !
• Do not alter the product in any way. Faulty or unqualified
repair work may cause injury to the user.
• If the appliance (including cord and charger) shows any
defect, stop using it and only replace damaged components
with specific ones that are available from the manufacturer or
a representative.
• Moree product appliances meet European safety stand-
ards.
• CAUTION! WHEN DISASSEMBLING DO NOT LOOK DIRECT-
LY INTO THE OPERATING LIGHT SOURCE - RISK OF IRREVERS-
IBLE EYE DAMAGE!
Remote Control
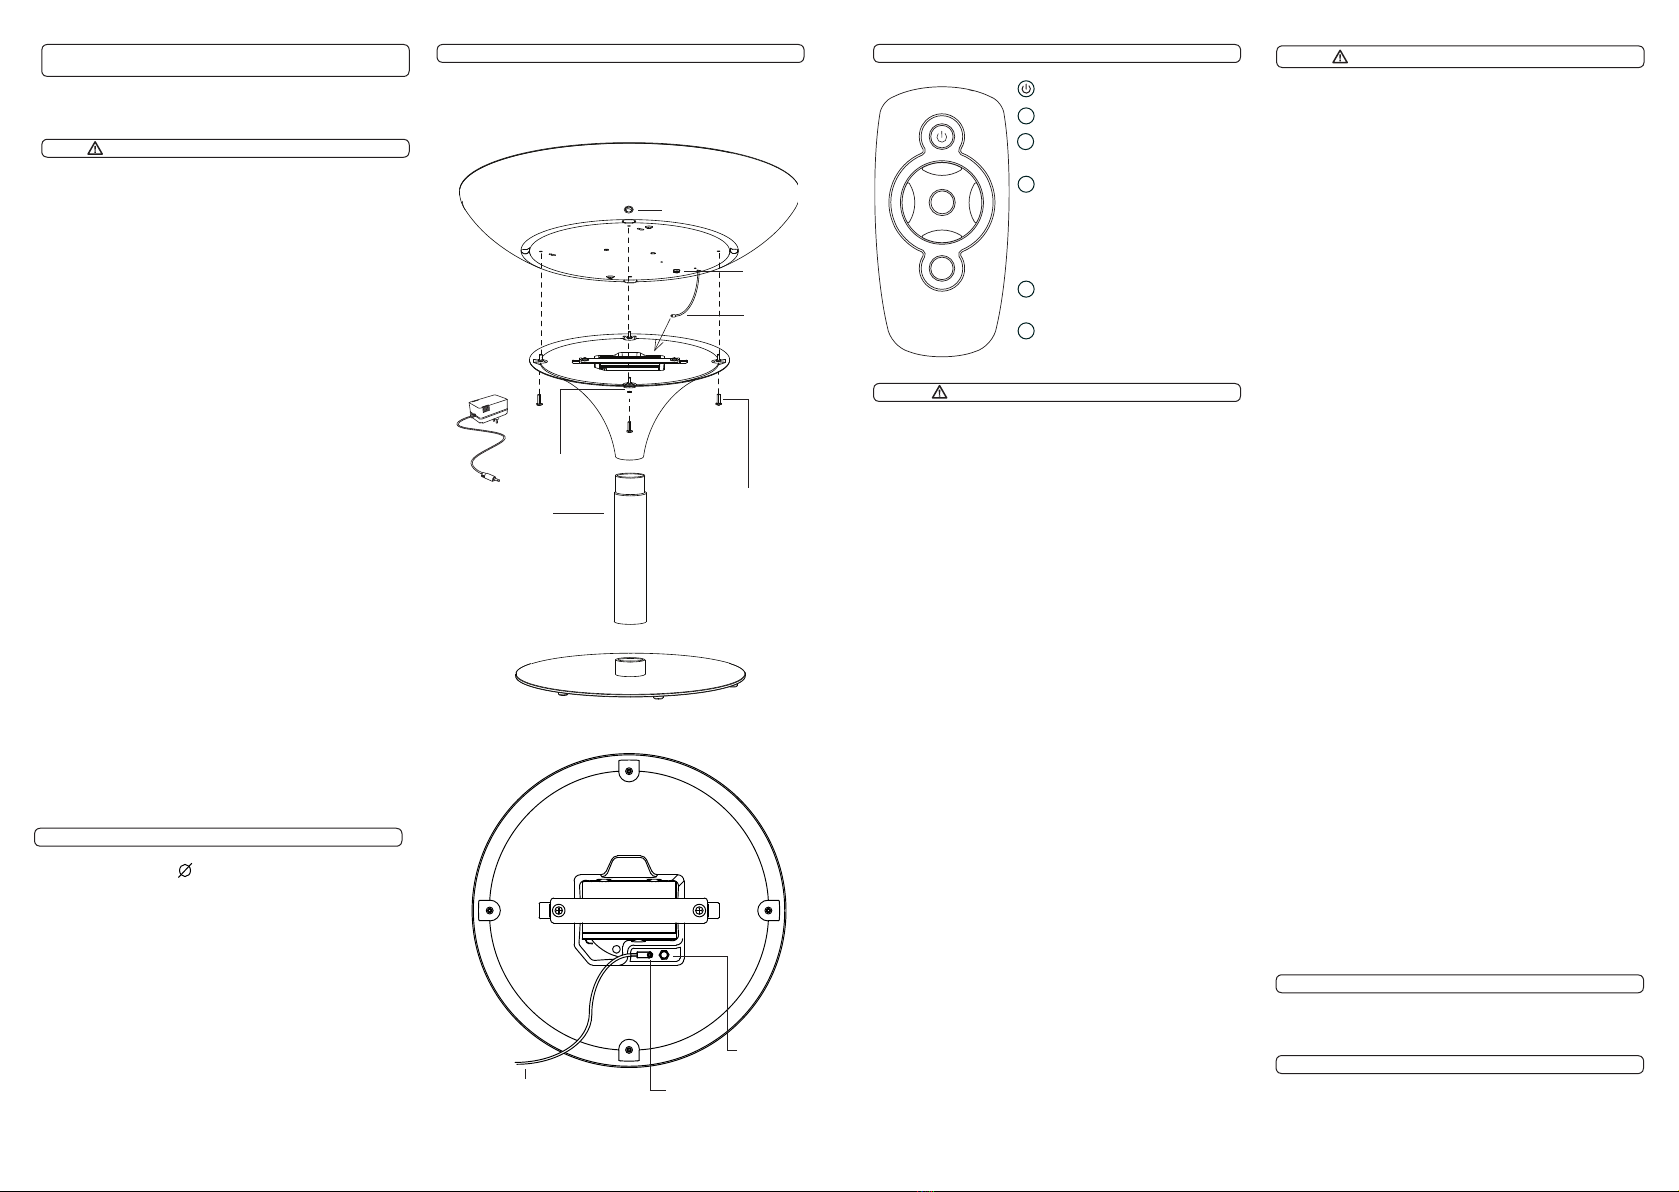
Contruction Diagram
ON/Off/ Reset-button
90 second RGB colour change
programme
3 minute RGB colour change
programme
White light
Pulse programme (single press)
Flash programme (double press)
1
2
3
4
5
Colour selection button; can be
used at any time to choose the
colour being displayed. To activate
the previous programme or choose
other programmes please push the
off/ reset button.
1
2 3 4
5
REMOVE PROTECTIVE PLASTIC FILM!
Due to the production process the surfaces of the tabletop
could be slightly convex.
SAFETY PRECAUTIONS - BATTERY
• THE PRODUCT MAY ONLY BE CHARGED WITH THE SUPPLIED
CHARGER.
• THE BATTERY MUST ONLY BE CHANGED BY QUALIFIED PER-
SONNEL USING THE SAME BATTERY TYPE !
• DO NOT ATTEMPT TO DISASSEMBLE, ALTER OR APPLY HEAT
TO THE BATTERY !
• In case of leakage, do not allow liquid to come into contact with
skin. If liquid is spilt on clothes or skin immediately wash off
with water. Should problems occur, contact a doctor.
Charging the battery
• To charge the battery, rst plug the charger into the charging
point and then connect the charging plug to the power supply.
• Before use charge the battery fully.
• The product will automatically shut off when the battery is
empty. It will turn on again when the battery is recharged - this
may take up to 3 hours.
In order to maintain a longer battery life, please comply with
the following instructions when using this product:
• If the product is not used for a long period of time please turn
it off (via the switch on the product), because the standby mode
will slowly empty the battery.
• When the product is stored under 25°C it can be left for up to
2 months. If left for longer than this period, make sure to charge
it fully again.
• Please replace the battery after the correct time interval shown-
below, and do not continue to use the battery after its recom-
mended replacement time.
Temprature of battery Replacement time
Below 25oC (77oF) 6 Years
30oC (86oF) 4 Years
40oC (104oF) 2 Years
• If the battery is quickly depleted even after charging, it has
reached the end of its life span. Purchase a new battery.
SAFETY PRECAUTIONS - CHARGER
• ATTENTION! THE UNIT IS SUPPLIED WITH HAZARDOUS MAINS
VOLTAGE (230 V~). LEAVE SERVICING TO SKILLED PERSONNEL
ONLY.
• UNQUALIFIED HANDLING MAY CAUSE AN ELECTRIC SHOCK
HAZARD. FURTHERMORE, ANY GUARANTEE CLAIM WILL EX-
PIRE IF THE UNIT HAS BEEN OPENED.
• Use only recommended power sources.
• Only use the unit for recharging 12 V lead batteries.
• The unit is suitable for indoor use only. Protect it against any
water contact, high air humidity and heat (admissible ambient
temperature range 0 – 40 °C).
• Do not place any objects lled with liquid on the unit, e.g a
glass.
• Do not allow dirt or metal objects (such as keys) to contact the
charger terminals or plug. This could result in fire, electrical
shock or other damage.
• The heat generated within the unit must be cooled. Therefore,
never cover the housing.
• Unplug the battery charger from the power outlet after re-
charging is complete, or when you are not using it.
Do not operate the unit or immediately disconnect it from the
mains socket:
1. if there is visible damage to the unit or the mains cable,
2. if a defect might have occurred after the unit was dropped or
suffered a similar accident,
3. if malfunctions occur.
• In any case the unit must be repaired by skilled personel.
• A damaged mains cable must be replaced by the manufactur-
er or authorized, skilled personnel only.
• Never pull the mains cable to disconnect the mains plug from
the socket, always pull the plug.
• For cleaning only use a dry, soft cloth; never use chemicals or
water.
• No guarantee claims for the unit and no liability for any result-
ing personal damage or material damage will be accepted if the
unit is used for other purposes than originally intended, if it is
not correctly connected, operated, or not repaired in an expert
way.
Operation
1) Connect the mains plug of the charger to a mains socket. The
LED is illuminated to indicate operation. The charging process
has ended when the LED is lit green.
2) The charging time depends on the capacity and the charging
status of the battery.
Glass Table Top (04-01-01)
A glass table top is available as an accessory.
Top View Stand
Connection cable
Connect the cable from
the top section here.
Fuse 2
Fuse 1
ON/ OFF
Charging point
3) Screw the table
top on the stand to
secure the assembly
1) Assemble
the stand
Wipe the product with a soft, damp cloth only. Do not use abra-
sives, alcohol or solvent based cleaners.
Maintenance
2) Connect
the cable


