Morgan MPC-136 User manual

U ER MANUAL
ressure
Cooker MPC-136
E-mail: electrical.appliance@dksh.com
www.morgan.my
Market Expansion
Services by
www.dksh.com.my
facebook.com/morganappliances

SAFETY INSTRUCTIONS
C O N T E N T S
3
5
5
6
7
14
14
Safety Instructions
Parts Identification
Specifications
Features
Operating Instruction
Cleaning & aintenance
Trouble Shooting
32
Before using the electrical appliance, the following basic precautions should always
be followed in order to prevent accidents or injuries to the user, other people, and
damage to property.
1. This appliance is intended for indoor home use only.
2. Never use any accessories or parts from other manufactures. Your warranty will
become invalid if such accessories or parts have been used.
3. Check that your home power supply corresponds with this appliance’s intended
voltage.
4. Place this appliance on a stable, heat resistant surface. ake sure not to place near
or on a heat source such as gas or electric burner or oven.
5. Short power cords are attached to this item to prevent entanglement and tripping
hazards. Extension cords with corresponding voltage, electrical rating and grounding
wires can be used. Care should be taken so that any exposed cord is not hanging
down from a counter or table where it can be pulled on or tripped over by any child or
adult.
6. Before using this appliance inspect the plug and cord line for cuts and/or abrasion
marks if they are found. Do not use this appliance and contact our authorized
customer service representative.
7. Insert the plug by grasping it firmly and guiding it into your home’s grounded electric
outlet. Disconnect by grasping the plug and removing it from your home’s grounded
electric outlet. Never wrap the cord tightly around the appliance during use or storage
as this can cause the wire to fray and break.
8. During initial use, you may notice some smoke and or a slight odor. This is normal and
should quickly dissipate. It should not reoccur after the appliance has been used a few
more times.
9. This appliance should be used only by persons who are capable of understanding the
user manual or are supervised by those who have adequate understanding of the
appliances’ features, their use and the operating instructions. Children must be
supervised and should not be left alone with appliances during their operation.
10. During use appliances should not be left unattended.
11. Care should be taken not to move appliances that are in use.
12. Do not move appliances that are full of food or liquid whether hot or cold.
13. Never operate this appliance without food and liquid in the removable cooking bowl.
Thank you for choosing a quality Pressure Cooker from Morgan. Please read this
Instruction Manual carefully before using it, and please keep the user manual for
future reference. We believe our easy-to-use pressure cooker will make your life
comfortable and more pleasurable.
THI APPLIANCE I FOR HOU EHOLD U E ONLY.

54
SAFETY INSTRUCTIONS
14. Do not exceed the ‘ AX’ fill level. When cooking foods that expand (such as dried
vegetables, beans, grains, rice, etc.) Do not fill past the ‘ AX’ rice fill level.
15. Appliances can emit heat or steam when in use therefore care should be taken not to
block inlets or outlets.
16. Always check the pressure release valve and safety locking pin for clogging or
obstruction and clean if necessary.
17. Appliance exteriors are designed to be cool to the touch. Portions do get HOT during
use. Burns can result from touching heating elements, air vents and removable
baskets or containers and - if any part is designed to be handled, do so with care.
18. Do not use this appliance near an open flame or flammable materials.
19. Examine the silicone seal gasket to make sure it is without tear or damages. Only use
the gasket designed for this particular appliance. Should you notice that the silicone
sealing gasket has any damage please contact customer service.
20. Before using this appliance please read the caution sticker attached to the lid of the
pressure cooker. Review how to lock and unlock the lid as well as always checking the
setting of the float pressure release valve to make sure it is in the right position
(Airtight or Exhaust) for the function you have selected.
21. It is necessary to lock the lid of this appliance for safe cooking. Once the lid is locked
and the cooking process has begun do not attempt to open the lid. Do not force the lid
open once locked. Should you need to open the pot cancel the function with the cancel
button. If this is a function that requires the steam to be released follow the instruction
to turn the knob to exhaust and release the steam. The pot will go to the keep warm
setting and can then safely be opened.
22. Never place your hands, arms or face over the pressure release valve once this
appliance has started to function.
23. Do not use the appliance for frying. Oil can be used within the saute mode (this is a
quick, light fry mode) and as an ingredient in a frying cooking process.
24. Do not warm for more than ten hours.
25. Do not leave uncooked ingredients in this pot for more than a short period of time. Raw
meat, poultry, fish, fruits or vegetables can spoil.
26. Unplug unit when you have finished cooking.
27. Before cleaning, make sure that the pot is turned off, unplugged, cooled to room
temperature and all pressure has been released.
28. Do not clean the appliance until the unit is cool.
29. Do not immerse complete appliance in water or a dishwasher for cleaning.
30. Clean with a non-abrasive cleaner, soft pad or cloth.
31. Store unit in a cool, dry location.
32. In case of any electric emergency such as a fire call 911.
ARTS IDENTIFICATION
S ECIFICATION
1
23
4
5
6
7
8
10
11
12
9
RATED VOLTAGE / FREQUENCY 220-240V 50/60Hz
RATED WATTAGE 1000W
CAPACITY 6L
1. Lid Handle
2. Pressure Exhaust
Valve
3. Floater
4. Spoon
5. easuring Cup
6. Rubber Gasket
7. Power Cord
8. Inner Pot
9. Control Panel
10. Lid Sensor
11. Handle
12. Condensation Cup

6
FEATURES
The organ pressure cooker can also function as a slow cooker. It can enable you to cook
a fast, fresh homemade meal on the pressure setting or a programmed slow cooked meal
that you have ready when you arrive home. Additionally, you can select cooking presets that
meet your personal cooking preferences including: saute, steam, chili/beans and beef/
poultry. We know you will enjoy your cooking experience. This is a multi-function appliance
so please take the time to look over the features of this device with its many settings. There
are safety and operating instructions that are unique to this appliance so pay careful
attention to these instructions this will insure that you maximize the benefits of this purchase
and that it functions safely and efficiently.
CONTROL ANEL
When the pressure cooker has been set up and plugged into an electrical outlet the
user interface will appear as pictured. An alert will sound notifying the user that it is
powered on. Four blue zeros will light up on the display. All the user functions can be
accessed by selecting them as pictured below.
O ERATING INSTRUCTIONS
1. DELAY TIMER
This feature allows the user to set a timed cooking experience. You can set the timer within
the time frame one half-hour to twenty-four hours. The timer is set in thirty minute increases
or decreases.
2. HIGH RESSURE
This setting can only be started while cooking within the pressure cooker mode. The high
pressure setting is used for quick cooking. In the high pressure setting the amount of
pressure in the pot is raised to its maximum intensity.
3. LOW RESSURE
This setting can only be started while cooking with the pressure cooker mode. The low
pressure setting is used for with the pots pressure set for lower intensity.
4. RICE
This setting adjust the time and cooking features of the pressure cooker to optimize pressure
cooking rice. Rice will be cooked allowing the grains to be both separated and tender. A
measuring cup is provided for measuring the rice. This setting is suitable for all types of rice
such as long grain rice, jasmine, basmati and brown rice. Weigh dry rice accurately and
wash well with cold water until water runs clear. Drain well and place into the removable
cooking bowl. Add corresponding water amount. Water to rice ratio is based on the table
provided. Keep in mind that different grains of rice require different time adjustments. Rice
will foam and double in size after cooking. When you put in the dry rice use the interior bowl
markings and do not fill the bowl beyond the 1/2 marking for your rice and water
combination.
Grain (1 Cup) Water Required
Basmati 1 1/2cups (350mL)
Brown 1 1/2cups (350mL)
White 1 1/4cups (330mL)
Wild 3 cups (700mL)
5. SOU /STEW
This setting is suitable to cook a variety of soups from light broths to hearty. It can also be
used to cook a variety of vegetable, meat or poultry stews.
6. SLOW COOK
This setting has adjusted for long cook times at low temperatures. It is ideal for breaking
down tough cuts of meat or vegetables that would be accomplished with long and slow
cooking times. It is used paired with the timer and/or delay start mode. The user determine
the cooking time based on what is being prepared. A reference guide is included in the user
guide. The delay timer can be used to allow the cook to set the slow cooking function to
automatically for a period from a half hour to twenty- four hours.
Menu Function Default Cooking Adjustable Cooking Cooking Pressure Adjustable Cooking
Time (minutes) Time (minutes) (KPa) Temperature
Rice 12 1 – 30 50 – 70 110 – 114 ºC
Soup/Stew 16 1 – 50 50 – 70 110 – 114 ºC
Beans/Chili 20 1 – 50 50 – 70 110 – 114 ºC
Beef/Poultry 25 1 – 99 50 – 70 110 – 114 ºC
High Pressure 1 1 – 99 50 – 70 110 – 114 ºC
Low Pressure 1 1 – 99 30 – 40 106 – 108ºC
Steam 1 1 – 99 No Pressure 100ºC
Saute 10 1 – 50 No Pressure 165 – 180ºC
Slow Cooker 60 1 – 9 (hours) No Pressure 90 – 95ºC
(.5 increments)
7

8 9
O ERATING INSTRUCTION
7. SAUTE
This setting is designed for softening and caramelizing garlic, onions and smaller pieces of
food prior to pressure or slow cooking. It can also be used to pre-heat the pot so that other
functions will begin more rapidly.
8. STEAM
This setting is ideal for steaming vegetables, fish fillets, dumplings and reheating.
9. INCREASE (+)
This setting allows the user to increase the time for the functions of this appliance. Slow
increases are completed by tapping the button gently. Faster increases are completed by
holding down the button.
10. DECREASE (–)
This setting allows the user to decrease the time for the functions of this appliance. Slow
decreases are completed by tapping the button gently. Faster decreases are completed by
holding down the button.
11. START/CANCEL
This setting starts or cancels each appliance function. When a function is started the initial
display will show a moving LED image to show that the pot has started the warming function
this may take several minutes. The cancel function will stop a process. If you then decide to
start again you will have to restart all of the functions you require.
12. LED DIS LAY
This display allows the user to see if the appliance is turned on, whether a function is in
progress or whether the function has completed. When the unit is first plugged in an alert
will sound and the display will show four blue zeros.
13. KEE WARM
This setting is engaged when one of the menu functions such as pressure cooking, slow
cooking or steaming comes to an end. It can also be turned on its own to keep food warm
for up to six hours.
14. LOW RESSURE
This setting can only be started while cooking within the pressure cooker mode. When set
to low pressure the cooking time is increased because the level of pressure in the pot is
raised to its minimum intensity.
15. CHILI/BEANS
This setting is used for chili recipes that often will have beans as a key ingredient. The
setting assumes that you are cooking dried beans. To shorten the cook time, soak beans in
cold water overnight. Discard soaking water and cook with fresh cold water for half the pre-
set cooking time. ake sure to use a water ratio of 1 part beans to 3 parts water. Beans swell
and double in size after cooking. For best results, do not overfill the cooking bowl. The total
volume of uncooked beans and water should not exceed the marking inside the removable
cooking bowl.
16. BEEF/ OULTRY
This setting is used for cooking meat and poultry.
17. RESSURE VALVE
This valve has two settings exhaust and airtight. Airtight: Set when the pressure cooker is
in use.Exhaust: Set when the pressure cooking is complete to allow steam to escape. Also
set when the pot is set to steam to allow steam to escape. Care must be taken not to put
your hand, arm or face near the valve when steam is escaping. Use a utensil (a long
handled item such as a spatula, tong etc.) to turn the valve distancing the user from the
escaping steam. You can also use a dry or wet towel to cover the vent as the steam is
escaping.
CLEAN THE APPLIANCE PARTS BEFORE USE
Remove the silicone gasket and the interior pot. Wash with water and a non-abrasive
sponge and cleaner. Dry the items. Reinstall the gasket and pot. ake sure the gasket is in
tightly installed in the interior of the lid (both behind and under the metal ring within the lid).
Look at the features diagram to guide you. Reattach the lid if it has been removed.
REMOVING THE LID
A. Removing the Lid
Open the lid by inserting your hand under the molded
plastic handle and turning it to the left it will not move any
further. The lid can be removed.

10 11
O ERATING INSTRUCTION 6. Close the lid by turning the lid to the right clockwise. You will hear a clicking noise.
(icons will be lined up)
7. Insert the clear plastic condensation collection cup by holding it against the cooker
under the lid hinge and sliding to lock it into the gap space provided that is the size of
the top of this cup.
8. If you are using the pressure cooking setting make sure the pressure valve is in the
airtight position. Pressure cooking produces steam which is let out of the cooking unit
by allowing the unit to naturally cool down. This takes a long time. To cool down the
pot more quickly and to open the lid faster carefully turn the pressure valve to
exhaust. Follow the safety instructions to ensure that you do not burn yourself with
escaping steam.
9. Once you have selected the cooking feature the lid will need to be locked. Once you
have started the cooking cycle you will not be able to open the lid. Should you need to
open the lid you must cancel the cooking setting and wait for the keep warm button to
light up.
10. You can safely open the pot lid.
HOW TO RE ARE FOOD IN THE INNER OT
1. Add the food and liquid of your choice to the inner pot. ake sure not to go higher
than the 2/3 marking line on the pot. If you are cooking rice or beans (food that will
expand more than is typical of other foods) do not go over the1⁄2line. This includes
both the rice/ beans and water.
2. ake sure to put the inner pot into the electric cooker unit.
3. Close the lid.
4. Turn the lid counterclockwise until you hear a clicking noise and see the triangle and
gumdrop are lined up in the close position.
DELAY TIMER SETTING
1. Prepare the food in the inner pot and insert it in the cooking unit.
2. Close and lock the lid.
3. Set the delay start for a time within the default settings. The display screen will be
shown as (dl) with a time value. The display will show a delay time which will blink
until you select your cooking setting.
4. Select a cooking setting, then press start. The display will show your cook time in a
blinking set of digits.
5. The cooking time will blink until you press start. The display will show your delay
cooking time in solid not blinking digits.
OPERATING INSTRUCTIONS
1. When plugging in the unit an alert will beep letting you know that the unit is plugged in.
2. The display will show four blue zeros.
3. Open the lid by turning the unit to the left-counter-clockwise. You will hear a clicking
noise. (icons will be lined up)
4. ake sure the silicone gasket is fully installed in the lid and lies flat behind the wire ring.
5. Insert the inner pot into the electric cooker base with your desired food to be cooked.
Pay careful attention to the maximum fill line for different types of food.
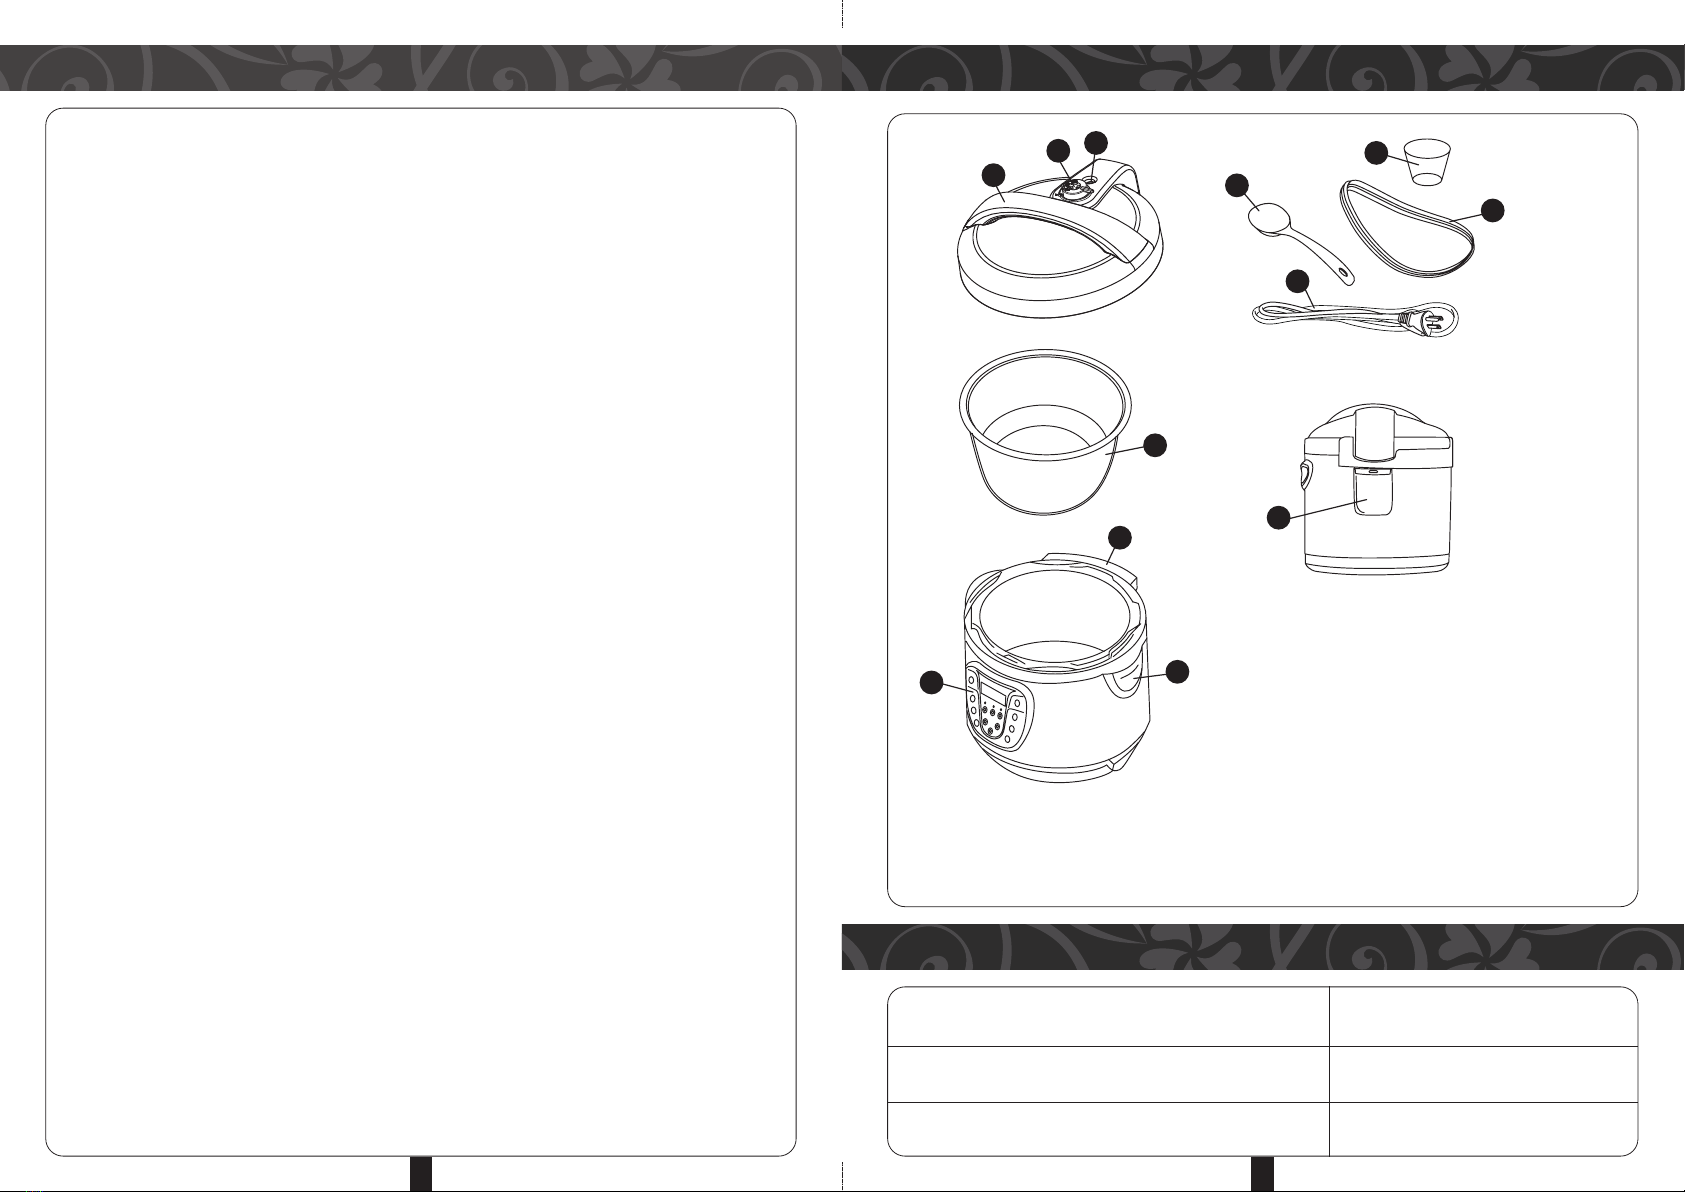
INSTALLING CONDENSATION CUP
B. The clear condensation cup is installed in the back of the lid in the opening that
corresponds with the size of the cup. This cup collects steam as it condenses
along the rim of the pot.
O EN/CLOSE OSITION OF THE LID
C. You will know the lid is in the open position when the icons on the left side of the
lid line up next to the word open.
To lock the lid- insert your hand under the molded plastic handle and turning it to the
right. On the top right side of the lid you will see the icons line up next to the word
close (diagram of the triangle and gum drop). For the lid to be in the open position the
open triangle and the lid need to line up. For the lid to be in the closed position the
close triangle and the lid icon have to line up. Knob counter clockwise and lifting lid up
and off the appliance. Open the lid by turning the lid knob handle counter clockwise
and lifting lid up and off the appliance.
LID SAFETY LOCK SYSTEM
This unit has a built-in safety feature that prevents all functions (except SLOW COOK,
SAUTE, or STEA ) from activating if the lid is not properly locked/secured into place.
Once a function is selected and the user presses START to begin cooking, if the lid is
NOT properly locked into place, the unit will go back into "stand-by" mode and the LED
display will return to 0000 and begin to blink. This is to prevent the unit from pressure
cooking without the lid being properly secured. The SLOW COOK, SAUTE, or STEA
functions will still work as these functions use the Glass Lid or no Lid at all.
UNLOCK UNLOCKLOCK LOCK
OPENED LID CLO ED LID
DELAY SCREEN PRESSURE COOK SCREEN

12 13
O ERATING INSTRUCTION SLOW COOK SETTING
This setting is a slow cooking option for food preparation.
1. Select this feature
2. The slow cook preset setting should be considered a low, slow, temperature cook
setting. When using this setting make a time adjustment should be made to account
for the temperature of this setting.
3. A circulating preheat display will start
4. When preheated you can choose a time value for how long you would like to cook
your food you can set the pot to cook for a period from 1-9 hours in increments of half
hours 1, 1.5, 2.0 etc.
5. After the preheat the display will indicate the time value.
6. When the cooking cycle is completed an alert will sound and the keep warm will
setting will light up.
SAUTE SETTING
This setting is used to quickly saute ingredients for your cooking experience.
1. The pot can be left open.
2. The saute setting can also be used as a way to preheat the pot.
3. Select this feature
4. The saute setting can be used for a cooking time from 1-50 minutes. The default value
is 10 minutes.
5. The preheat display of a moving blue rectangle will remain until the pot is preheated.
This can take approximately ten minutes if the pot is cool.
STEAM SETTING
This setting is used for steaming vegetables and fish.
1. The steam setting is a non-pressure setting.
2. It can be set in 1 minute increments from 1-99 minutes.
3. Select steam enter the amount of time for which you will be steaming by pressing the
+ or – keys
4. The pressure cooker will preheat . The display will indicate the preheat screen cycling
blue display. This may take up to ten minutes.
5. The number will be displayed and begin to cook counting down to the end. Steam
may exit from the pressure valve. Opening on the top of the pot.
6. The pot will sound an alert when complete.
7. The keep warm setting will go on.
RESSURE COOK
1. When using the pressure cooker setting you must make sure the pressure valve is set
to airtight. This will cause the cooker to build up the necessary pressure to cook more
quickly. When the cooking function has ended you can decide to allow the pot to
naturally depressurize (this can take a long period of time) or release the pressure by
turning the valve to exhaust. Caution must be take not be near the releasing steam.
2. HIGH PRE URE: You can select to pressure cook at a high pressure setting. The
high pressure setting will allow the pot to cook your food within a quicker time under a
high pressure cooking condition. Use of this setting is determined by what the food
ingredients you have decided to cook.
3. LOW PRE URE: You can select to pressure cook at a low pressure setting. The low
pressure setting will allow the pot to cook your food within a less rapid cooking time
than under a high pressure cooking condition. Use of this setting is determined by
what the food ingredients you have decided to cook and how rapidly you want to cook
them.
STE S FOR USING THE RESSURE COOK SETTINGS
1. Plug in the pressure cooker
2. Put the pressure valve on airtight
3. Lock the Lid
4. Press any of the pressure cooking setting: High, Low, Rice, Soup/Stew, Chili/Beans, or
Beef/Poultry
5. The display will show a circulating start up screen indicating the pot is preheating. It
may take in ten minutes or more for this to complete.
6. The display will now show the letters PC and a time value.
7. The display will count down until the cooking time is complete.
8. An alert will sound and the keep warm setting will blink.
9. You can either choose to wait for the natural cool down of the pot or use the quicker
method of turning the steam valve to exhaust.
10. The keep warm indicator light will change to a non-blinking continuous light.
11. You can now open the lid safely. Please be aware the contents of the pot are hot and
steam will escape from the open pot.
KEE WARM SETTING
This setting is turned on following any of the cooking functions (High/Low Pressure, Rice,
Soup/Stew, Chili/Beans and Beef/Poultry) upon completion and will stay on for up to six
hours. If you select keep warm as an initial setting the pot will keep your food warm for up
to six hours.

14 15
TROUBLESHOOTINGCLEANING & MAINTENANCE
PART HOW TO CLEAN
Pressure Valve Grab the pressure valve and pull it up. Wash it in warm water with a
mild detergent. Allow the valve to dry put it back in place.
nplug the cord from the back. Wash the display and outside pot
Main nit with a soft damp sponge. Allow to dry completely before using the
cooker.
Pot, Measuring Cup, Rinse with warm water and mild detergent. se a non-abrasive mild
Spoon and Holder, Condensation Cup detergent and sponge or cloth.
Silicone Gasket Wash with warm soapy water. Inspect after each use for any tears
or other damage.
Pressure Valve ( nderside of the lid) This should be clean and free of food residue. It can be removed if
necessary.
TROUBLESHOOTING
INDICATOR CODE PROBLEMS/CAUSES
E1 Open circuit of the sensor
E2 Short circuit of the sensor
E3 Overheating
E4 ignal switch malfunction
DISPLAY SHOWS THE FOLLOWING ERROR CODES
Record the code displays and contact Customer ervice for how to resolve the
problem. In most cases, you will need to return the appliance.
PROBLEM PO IBLE REA ON OLUTION
Display shows endless Preheat is still not completed Wait approximately 10 minutes.
cycling of blue rectangle
Gasket is not aligned in wire rim in Remove gasket and re-insert correctly
the lid
Lid will not lock Lid is not in aligned on the pot rod Remove lid and reposition
Lid is not in the lock position Turn the lid until the close symbols line up
Cooking cycle has not ended Wait until the keep warm indicator light is on
Lid will not open Lid is not aligned on the pot Carefully move the lid until it can be removed
correctly and reinstalled
Water is running down Condensation collector cup is not Put in the cup in the channel on the back of
from the unit installed the pot
Rice is too soft, mushy Too much water was used Measure rice and water accurately
Rice is too dry Too little water was used Measure rice and water accurately
Table of contents
Other Morgan Electric Pressure Cooker manuals