Morgan MBO-7701M User manual

E-mail: electrical.appliance@dksh.com
www.morgan.my
Market Expansion
Services by
www.dksh.com.my
facebook.com/morganappliances
USER MANUAL
Built-in
Oven MBO-7701M
MBO-7701M(IM)0160117.qxp_Layo t 1 1/18/17 12:20 PM Page 1

2 3
N TE: This User Instruction Manual contains important information, including safety &
installation points, which will enable you to get the most out of your appliance. Please keep it
in a safe place so that it is easily available for future reference; for you or any person not familiar
with the operation of the appliance.
CAUTION!
Do not use the oven until you have read this instruction manual. The oven is intended for
household use only.
GENERAL INFORMATION
• This appliance is designed for domestic household use and can be built into a standard
kitchen cabinet or housing unit.
• IMP RTANT: The adjacent furniture or housing and all materials used in the installation must
be able to withstand a minimum temperature of 85°C above the ambient temperature of the
room it is located in, whilst in use.
• Certain types of vinyl or laminate kitchen furniture are particularly prone to heat damage or
discoloration at temperatures below the guidelines given above.
• Any damage caused by the appliance being installed in contravention of this temperature
limit, or by placing adjacent cabinet materials closer than 4mm to the appliance, will be the
liability of the owner.
• For use in leisure accommodation vehicles, please refer to the appropriate information given
in the installation instructions for this appliance.
• The use of this appliance for any other purpose or in any other environment without the
express agreement of our company will invalidate any warranty or liability claim.
• Your new appliance is guaranteed against electrical or mechanical defects, subject to certain
exclusions that are noted in our company’s Conditions of Warranty. The foregoing does not
affect your statutory rights.
• Repairs may only be carried out by Service Engineers or their authorized service agent.
WARNING AND AFETY IN TRUCTION
• This appliance complies with all current European safety legislation. We emphasize that this
compliance does not remove the fact that the appliance surfaces will become hot during use
and retain heat after operation.
• This appliance is not intended for use by persons (including children) with reduced physical,
sensory or mental capabilities, or lack of experience and knowledge, unless they have been
given supervision or instruction concerning use of the appliance by a person responsible for
their safety.
• During use the appliance becomes hot. Care should be taken to avoid touching heating
element inside the oven.
• Means for disconnection must be incorporated in the fixed wiring in accordance with the
wiring rules.
• If the power cord is damaged, it must be replaced by the manufacturer, its service agent or
similarly qualified persons in order to avoid a hazard.
WARNING!
• The appliance and its accessible parts become hot during use.
• Care should be taken to avoid touching heating elements.
• Children less than 8 years’ of age should be kept away unless continuously supervised.
IMPORTANT AFETY INFORMATION
C O N T E N T
3-5
5
6
6
7-8
9-10
11-12
13-14
14-15
IMPORTANT SAFETY INFORMATION
PARTS IDENTIFICATION
CONTROL PANEL
SPECIFICATIONS
USING YOUR OVEN
CLEANING AND MAINTENANCE
INSTALLATION
TROUBLESHOOTING
MAIN COOKING FUNCTIONS GUIDELINE
MBO-7701M(IM)0160117.qxp_Layo t 1 1/18/17 12:20 PM Page 2

4 5
IMPORTANT AFETY INFORMATION IMPORTANT AFETY INFORMATION
IN TALLATION
• This appliance must be correctly installed by a suitably qualified person, strictly in accordance
with the manufacturer’s instructions.
• We decline any responsibility for injury or damage, to person or property, as a result of
improper use or installation of this appliance.
• Heat, steam and moisture will be created during use of the appliance. Take care to avoid
injury and ensure that the room is adequately ventilated. If the appliance is going to be used
for prolonged periods of time, then additional ventilation may be required.
• Please consult with your qualified installer if you are in any doubt about the amount of
ventilation that you will require.
1. Control panel
2. Side shelf
3. Oven shelf
4. Oven door
5. Door handle
ACCE ORIE
6. Side shelf left
7. Side shelf right
8. Oven shelf
9. Baking tray
1
2
3
4
5
6
7
9
8
PART IDENTIFICATION
• This appliance can be used by children aged from 8 years and above and persons with
reduced physical, sensory or mental capabilities or lack of experience and knowledge
provided they have been given supervision or instruction concerning use of the appliance in
a safe way and understand the hazards involved. Children shall not play with the appliance.
Cleaning and user maintenance shall not be made by children without supervision.
• If the power cord is damaged, it must be replaced by the manufacturer, its service agent or
similarly qualified persons in order to avoid a hazard.
• During use the appliance becomes hot. Care should be taken to avoid touching heating
elements inside the oven. A steam cleaner is not to be used for cleaning the oven.
• WARNING: Ensure that the appliance is switched off before replacing the lamp to avoid the
possibility of electric shock.
• WARNING: Accessible parts may become hot during use. Young children should be kept
away.
• Do not use harsh abrasive cleaners or sharp metal scrapers to clean the oven door glass since
they can scratch the surface, which may cause the glass to shatter.
CHILD AFETY
• We strongly recommend that babies and young children are prevented from being near to
the appliance and not allowed to touch the appliance at any time.
• If it is necessary for younger family members to be in the kitchen, please ensure that they are
kept under close supervision at all times.
GENERAL AFETY
• This appliance is not intended for use by persons (including children) with reduced physical
sensory or mental capabilities, or lack of experience and knowledge, unless they have been
given supervision or instruction concerning use of the appliance by a person responsible for
their safety.
• Do not place heavy objects on the oven door or lean on the oven door when it is open, as
this can damage the oven door hinges.
• Do not leave heated oil or fat unattended, as this is a fire risk.
• Do not place pans or baking trays directly on the base of the oven cavity, or line it with
aluminum foil.
• Do not allow electrical fittings or cables to come into contact with areas on the appliance
that get hot.
• Do not use the appliance to heat the room it is located in or to dry clothing.
• Do not install the appliance next to curtains or soft furnishings.
• Do not attempt to lift or move cooking appliances by using the oven door or handle, as this
• may cause damage to the appliance or result in injury to the person lifting the appliance.
CLEANING
• Cleaning of the oven should be carried out on a regular basis.
• Care should be taken whilst using this appliance and when following the cleaning procedure.
• IMP RTANT: The appliance must be disconnected from the power supply before following
the cleaning procedure.
MBO-7701M(IM)0160117.qxp_Layo t 1 1/18/17 12:20 PM Page 3

6 7
CONTROL PANEL
PECIFICATION
U ING YOUR OVEN
ELECTING AN OVEN FUNCTION
The oven function selector knob should be used to select the
particular mode of cooking that you require. The appliance will
utilise different elements within the oven cavity, depending on the
oven function that you select. When a function is selected, the
power indicator light will come on.
THI APPLIANCE HA 7 GRILL FUNCTION
FOR YOU TO ELECT
THERMO TAT CONTROL KNOB
The oven thermostat control knob sets the required
temperature of the oven. It is possible to regulate the
temperature within a range of 50 - 250°C. Turn the control
knob clockwise.
DEFROST MODE: The fan runs without heat to reduce the defrosting time of
frozen foods. The time required to defrost the food will depend on the room
temperature, the quantity and type of food. Always check food packaging for the
defrosting instructions.
CONVENTIONAL OVEN (top and lower elements):This method of cooking
provides traditional cooking, with heat from the top and lower elements. This
function is suitable for roasting and baking on a single shelf only.
FAN OVEN: This method of cooking uses the circular element whilst the heat is
distributed by the fan. This results in a faster and more economical cooking process.
The fan oven allows food to be cooked simultaneously on different shelves,
preventing the transmission of smells and tastes from one dish onto another.
HALF GRILL: This method of cooking utilises the inner part only of the top
element, which directs heat downwards onto the food. This function is suitable for
grilling small portions of bacon, toast and meat etc.
FULL GRILL: This method of cooking utilises the inner and outer parts of the top
element, which directs heat downwards onto the food. This function is suitable for
grilling medium or large portions of sausages, bacon, steaks, fish etc.
FAN AND GRILL: This method of cooking utilises the top element in conjunction
with the fan, which helps to provide a quick circulation of heat. This function is
suitable where quick browning is required and “sealing” the juices in, such as steaks,
hamburgers, some vegetables etc.
FAN AND LOWER ELEMENT: This method of cooking utilises the bottom
element in conjunction with the fan, which helps to circulate the heat. This function
is suitable for sterilizing and preserving jars.
12345
1. Oven function selector knob
2. Power indicator light
3. Oven timer knob
4. Oven operating light
5. Thermostat control knob
Model MB -7701M
Dimensions (mm) 595H x 595W x 577D
Rated Voltage / Frequency 220-240V~ 50Hz
Rated Wattage 3300W
ven Capacity 71 Litres
MBO-7701M(IM)0160117.qxp_Layo t 1 1/18/17 12:20 PM Page 4

9
CLEANING AND MAINTENANCE
8
U ING YOUR OVEN
• The oven should be cleaned after every use. When cleaning the oven, the light should be
switched on to enable you to see the surfaces better.
• The oven chamber should only be washed with warm water and a small amount of washing-
up liquid.
• After cleaning the oven chamber wipe it dry.
• ever clean the oven surfaces by steam cleaning.
• The oven cavity should only be cleaned with warm soapy water, using either a sponge or soft
cloth. o abrasive cleaners should be used.
• Any stains that may appear on the bottom of the oven will have originated from food
splashes or spilt food, these splashes occur during the cooking process. These could possibly
be a result of the food being cooked at an excessively high temperature or being placed in
cookware that is too small.
• Only select a cooking temperature and function that is appropriate for the food that you are
cooking. Always ensure that the food is placed in an adequately-sized dish and that you use
the drip tray where appropriate.
• The exterior of the oven should only be cleaned with warm soapy water, using either a
sponge or soft cloth. Do not use abrasive cleaners.
• If you use any form of oven cleaner on your appliance, then you must check with the
manufacturer of the cleaner that it is suitable for use on your appliance.
CAUTION!
Do not use cleaning products containing abrasive materials for the cleaning and maintenance
of the glass front panel.
OVEN LIGHT BULB REPLACEMENT
In order to avoid the possibility of an electric shock, always ensure that the appliance is
switched off before replacing the bulb.
• Remove all oven shelves, the drip tray and the side rack that is on
the same side as the oven light.
• Using a screwdriver, remove the lamp cover (1).
• Unscrew the bulb (2) clockwise and remove it from its holder
• Replace the bulb with a 25W/300°C, screw type pigmy
• Do not install any other types of non-recommended bulb
• Place the lamp cover back into position. There is a curve on one
side of the cover; this should be on the right hand side as the
cover goes back into place.
• Screw the bulb in, making sure it its properly inserted into the
ceramic socket.
• Secure the lamp cover.
1
2
OVEN OPERATING LIGHT
This light will illuminate, indicating that the oven’s heating
elements are in operation. The light will turn off when the
temperature set on the thermostat control knob has been
reached. It will cycle on and off throughout the cooking
time.
You should not place food inside the cavity, until the correct
cooking temperature has been reached.
COOKING GUIDELINE
• Please refer to the information given on food packaging for guidance on cooking
temperatures and times. Once familiar with the performance of your appliance,
temperatures and times can be varied to suit personal preference.
• If you are using the fan oven function, then you should follow the information given on the
food packaging for this particular mode of cooking.
• Ensure that frozen foods are thoroughly thawed before cooking, unless the instructions on
the food packaging advise that you can “cook from frozen”.
• Pre-heat the oven and do not place food inside until the oven operating light has gone off.
You can choose not to pre-heat when using the fan oven mode; however, you should extend
the cooking time given on the food packaging by approximately ten minutes.
• Before cooking, check that any accessories that are not required are removed from the oven.
• Place cooking trays in the centre of the oven and leave gaps between the trays to allow air
to circulate.
• Try to open the door as little as possible to view the dishes.
• The oven light will remain on during cooking.
WARNING
• Keep the oven door closed when using any of the grill functions.
• Do not use aluminum foil to cover the grill pan or heat items wrapped in aluminum foil
under the grill. The high reflectivity of the foil could potentially damage the grill element.
• You should also never line the base of your oven with aluminum foil.
• During cooking, never place pans or cookware directly onto the bottom of your oven. They
should always be placed on the shelves provided
• The grill heating element and other internal components of the oven becomes extremely hot
during operation. Exercise caution to avoid touching them when handling food which you
are grilling.
• IMP RTANT: Exercise caution when opening the oven door to avoid contact with hot parts
of the oven and steam.
• The drip tray handle should only be used to reposition the drip tray and OT for removing
it from the oven cavity. When removing the drip tray, you should ALWAYS use an oven glove.
• The drip tray handle should not be left in position when the appliance is switched on.
• A steam cleaner is not to be used.
• WARNING: Accessible parts may become hot during use. Young children should be kept away
during use.
• Do not use harsh abrasive cleaners or metal scrapers to clean the oven door glass as this can
scratch the surface and cause the oven glass to shatter.
MBO-7701M(IM)0160117.qxp_Layo t 1 1/18/17 12:20 PM Page 5

1110
CLEANING AND MAINTENANCE IN TALLATION
LIV E L
EA RTH
NE U T RAL N
BR O W N
YE L L OW / GREEN
BLUE
PO W E R CORD
MA I N S
POW E R
SUP P LY
ELECTRICAL CONNECTION
WARNING: THIS APPLIANCE MUST BE EARTHED.
• This appliance should be wired into a 16 A double pole switched fused spur outlet, having
3mm contact separation and placed in an easily accessible position adjacent to the appliance.
The spur outlet must still be accessible even when your oven is located in its housing to
enable the appliance to be disconnected from the mains supply.
• To connect the oven power cord, loosen and remove the cover on the terminal block, in order
to gain access to the contacts inside. Make the connection, securing the cord in place with
the cable clamp provided and then immediately close the terminal block cover again.
• If you have to change the oven power cord, the earthing (yellow/green) conductor must
always be 10 mm longer than the line conductors.
• Care must be taken to ensure that the temperature of the mains supply cable does not
exceed 50°C.
• If the mains supply cable is damaged, then it must be replaced by an appropriate
replacement which can be obtained from Spares Department.
IN TALLING THE OVEN INTO THE KITCHEN CABINET
• The kitchen area should be dry and aired and equipped with efficient ventilation. When
installing the oven, easy access to all control elements should be ensured.
600
600
min70
5
560
560
200
85-90
22
572
595
535
555
595
22
PO ITIONING THE APPLIANCE
• Ensure that the aperture for fitting the oven corresponds to the size given in the above
diagram.
• The oven must be fitted into an oven housing with the ventilation cut-outs shown in the
“Ventilation requirements” section on the next page.
• Ensure that the rear panel of the furniture housing unit has been removed.
• Ensure that the oven has been securely fixed into the housing unit. The fixing of the oven
into the housing is made by using four screws. These should be screwed through the oven
cabinet and into the housing unit.
DOOR REMOVAL
• The hinges (A) have two movable bolts on them (B). If you raise
both of the movable bolts (B), then the hinges (A) are released
from the oven housing. (figure 1)
• Grip the sides of the door at the centre and then incline it slightly
towards the oven cavity and then pull the door gently away from
the oven cavity.
IMP RTANT: You should make sure that the door is supported at all
times and that you place the door on some padded material whilst
cleaning it.
• The oven door and door glass should only be cleaned using a
damp cloth and a small amount of detergent. The cloth MUST
OT have come into contact with any form of cleaning product
or chemical previously.
• To refit the door, slide the hinges back into their slots and open the door fully.
IMP RTANT: The movable bolts (B) must be closed back into their
original positions before closing the door.
Removing the internal glass panel
• Press the bracket latch on two side that is in the corner at the top
of the door. ext, remove the glass from the second blocking
mechanism. After cleaning, insert and block the glass panel, and
push the the blocking mechanism (figure 2).
REGULAR IN PECTION
Besides keeping the cooker clean, you should:
• Carry out periodic inspections of the control elements and cooking units of the cooker. After
the warranty has expired you should have a technical inspection of the cooker carried out at
a service centre at least once every two years.
• Fix any operational faults.
• Carry out periodical maintenance of the cooking units of the cooker.
CAUTION!
All repairs and regulatory activities should be carried out by the appropriate service centre or
by a suitably authorized technician.
LIDING RACK KIT A EMBLY
To assemble the side racks:
1. Remove the two frames, lifting them
away from the spacers (figure 3).
2. Secure the two frames with the guide
rails using the guide rails using the
holes provided on the oven walls. The
holes for the left frame are situated at
the top, while the holes for the right
frame are at the bottom (figure 4).
A
B
(figure 1)
1
2
(figure 2)
(figure 3) (figure 4)
MBO-7701M(IM)0160117.qxp_Layo t 1 1/18/17 12:20 PM Page 6

1312
IN TALLATION TROUBLE HOOTING
The oven isn’t working.
There appears to be no power to the
oven and grill.
The grill function works but the main
oven does not.
My food is not cooking properly
My food is not cooking evenly
The oven light is not working
I am getting condensation in my oven
IMP RTANT: If your appliance appears not to be operating correctly, please contact the dealer.
• Check that the oven is in manual operation mode.
• Check that you have selected a cooking function
and a cooking temperature.
• Check that the appliance has been connected to the
power supply correctly.
• Check that the power fuses are in working order.
• Check that the operating instructions for setting
the time of day and putting the appliance into
manual operation mode have been followed.
• Check that you have selected the correct cooking
function.
• The grill and top oven element is not working, or
cuts out for long periods of time during use.
• Allow the oven to cool for approximately 2 hours.
Once cool, check whether the appliance is again
working properly.
• Ensure that you are selecting the correct
temperature and the correct cooking function for
the food that you are cooking. It may be appropriate
to adjust your cooking temperature by plus or minus
10°C, to achieve the best cooking results.
• Check that the oven has been installed correctly and
is level.
• Check that the correct temperatures and shelf
positions are being used.
• Refer to page 14 and follow the “oven light bulb
replacement” section.
• Steam and condensation is a natural by-product of
cooking any food with high water content, such as
frozen food, chicken etc.
• You may get condensation in the oven cavity and
forming between the oven door glasses. This is not
necessarily a sign that the oven is not working
correctly.
• Do not leave food in the oven to cool after it has
been cooked and the oven has been switched off.
• Use a covered container, where practical, when
cooking to reduce the amount of condensation that
forms.
VENTILATION REQUIREMENT
Plinth
Storage space
Remove rear from
this section
Rear panel
Rear panel
51.5
Minimum ventilation
cut-out 200cm2
Minimum ventilation
Requirements for
rear of unit top, base
and support shelves
Storage space
85 + 90
A
A
A
A
(Figure shows the entilation and
cut-out requirements for the
installation of the appliance into
a tall housing unit).
Ensure that the oven has been securely
fixed into the housing unit. The fixing
of the oven into the housing is made
by using four screws. These should be
screwed through the oven cabinet and
into the housing unit.
MBO-7701M(IM)0160117.qxp_Layo t 1 1/18/17 12:20 PM Page 7

1514
TROUBLE HOOTING
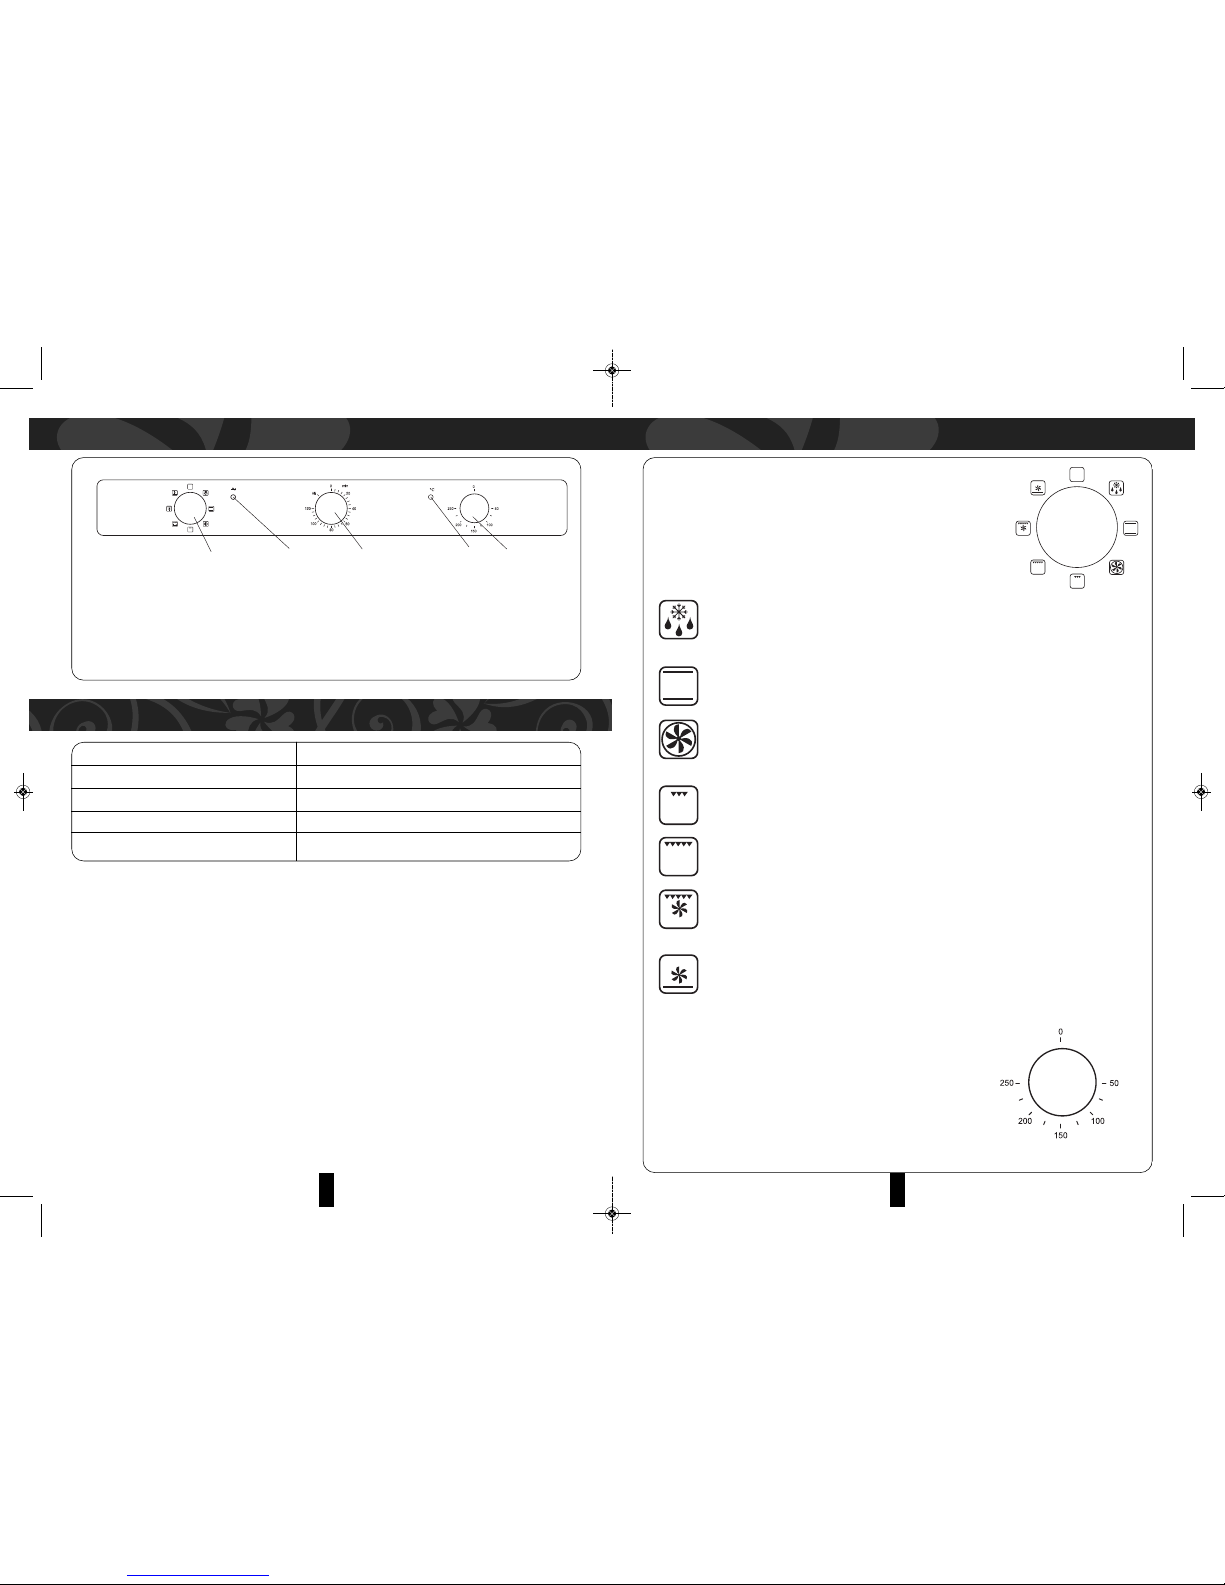
MAIN COOKING FUNCTION GUIDELINE
Food Weight Preheat time Tray position Temperature setting Finish time
Beef 0.8 kg 10 min 3rd Tier 200ºC 20-25 min
Chicken 1.2 kg 10 min 3rd Tier 200ºC 40-45 min
Banger 0.6 kg 10 min 3rd Tier 200ºC 15-20 min
Hamburger
0.6 kg 10 min 3rd Tier 200ºC 15-20 min
Corn 1.2 kg 10 min 3rd Tier 200ºC 20-25 min
Vegetable
0.5 kg 10 min 4th Tier 200ºC 15-20 min
TOP HEATING ELEMENT + FAN
Food Weight Preheat time Tray position Temperature setting Finish time
Beef 0.8 kg 10 min 3rd Tier 250ºC 20-25 min
Chicken 1.2 kg 10 min 3rd Tier 250ºC 40-45 min
Banger 0.6 kg 10 min 4th Tier 250ºC 15-20 min
Hamburger
0.6 kg 10 min 4th Tier 250ºC 15-20 min
Corn 1.2 kg 10 min 3rd Tier 250ºC 20-25 min
Vegetable
0.5 kg 10 min 4th Tier 250ºC 15-20 min
TOP HEATING ELEMENT
Food Weight Preheat time Tray position Temperature setting Finish time
Bread 0.5 kg 10 min 1st Tier 200ºC 10-15 min
Pizza 0.7 kg 10 min 2nd Tier 200ºC 40-45 min
Baking
1.5 kg 10 min 1st Tier 180ºC 35-40 min
Power Cake
Biscuit 0.7 kg 10 min 2nd Tier 180ºC 20-25 min
Fruit Salad
1.2 kg 10 min 3rd Tier 250ºC 20-25 min
Pie
BOTTOM HEATING ELEMENT + FAN
* The abo e cooking suggestions ser e as a guideline only
Food Weight Preheat time Tray position Temperature setting Finish time
Beef 1.0 kg 10 min 2nd Tier 200ºC 40-50 min
Chicken 1.2 kg 10 min 2nd Tier 200ºC 50-60 min
Duck 1.5 kg 10 min 2nd Tier 200ºC 50-60 min
Steak 0.8 kg 10 min 2nd Tier 180ºC 20-30 min
Bread 0.5 kg 10 min 2nd Tier 200ºC 35-45 min
REAR HEATING ELEMENT + FAN
Food Weight Preheat time Tray position Temperature setting Finish time
Beef 1.0 kg 10 min 2nd Tier 220ºC 40-50 min
Chicken 1.2 kg 10 min 2nd Tier 220ºC 50-60 min
Chicken 1.5 kg 10 min 2nd Tier 220ºC 50-60 min
Steak 0.8 kg 10 min 2nd Tier 220ºC 20-30 min
Bread 0.5 kg 10 min 2nd Tier 220ºC 35-45 min
TOP HEATING ELEMENT + BOTTOM HEATING ELEMENT
DO NOT ATTEMPT TO REPAIR THE APPLIANCE YOUR ELF.
• Please note that if an engineer is asked to attend whilst the product is under warranty and
finds that the problem is not the result of an appliance fault, then you may be liable for the
cost of the call out charge.
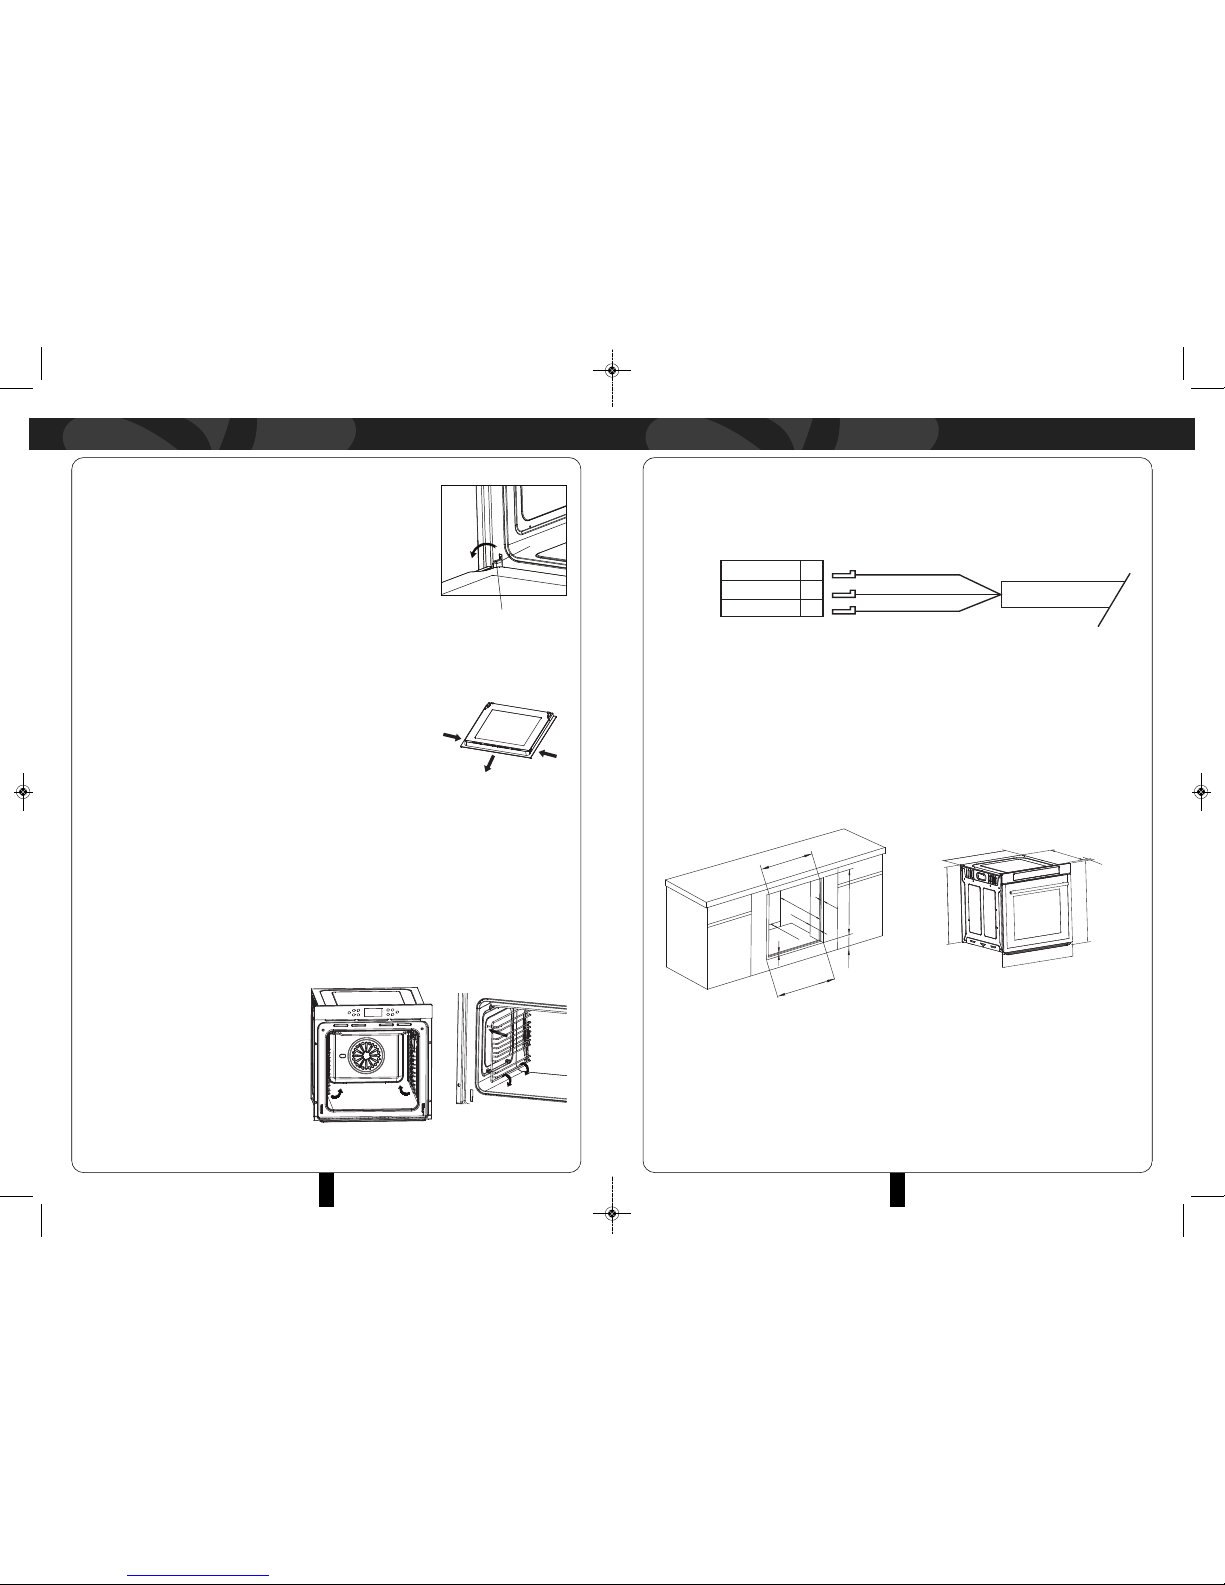
• The appliance must be accessible for the engineer to perform any necessary repair. If your
appliance is installed in such a way that an engineer is concerned that damage will be caused
to the appliance or your kitchen, then he will not complete a repair.
• This includes situations where appliances have been tiled in, sealed in with sealant, have
wooden obstructions placed in front of the appliance, like plinths. Or any installation other
than the one specified by our company has been completed.
MBO-7701M(IM)0160117.qxp_Layo t 1 1/18/17 12:20 PM Page 8
Table of contents
Other Morgan Oven manuals

Morgan
Morgan MEO-1002RC User manual

Morgan
Morgan MEO-HC70RC User manual

Morgan
Morgan MEO-602RC User manual

Morgan
Morgan MEO-GLAMO 45RC User manual

Morgan
Morgan MEO-GLAMO 23B User manual

Morgan
Morgan MEO-Imperium25 User manual

Morgan
Morgan MEO-GLAMO 120RC User manual

Morgan
Morgan MEO-HC22B User manual

Morgan
Morgan MEO-HC26C User manual

Morgan
Morgan MEO-HC23B User manual
Popular Oven manuals by other brands

Frigidaire
Frigidaire FEB386WEC Specifications

Bosch
Bosch VBC011BR0M User manual and installation instructions

Bosch
Bosch HBN411 2K Series instruction manual

Belling
Belling BI 60 FP Users guide & installation handbook

Electro Depot
Electro Depot MO 46MF KX 225C Instructions for use

Piron
Piron G915RXSD instruction manual