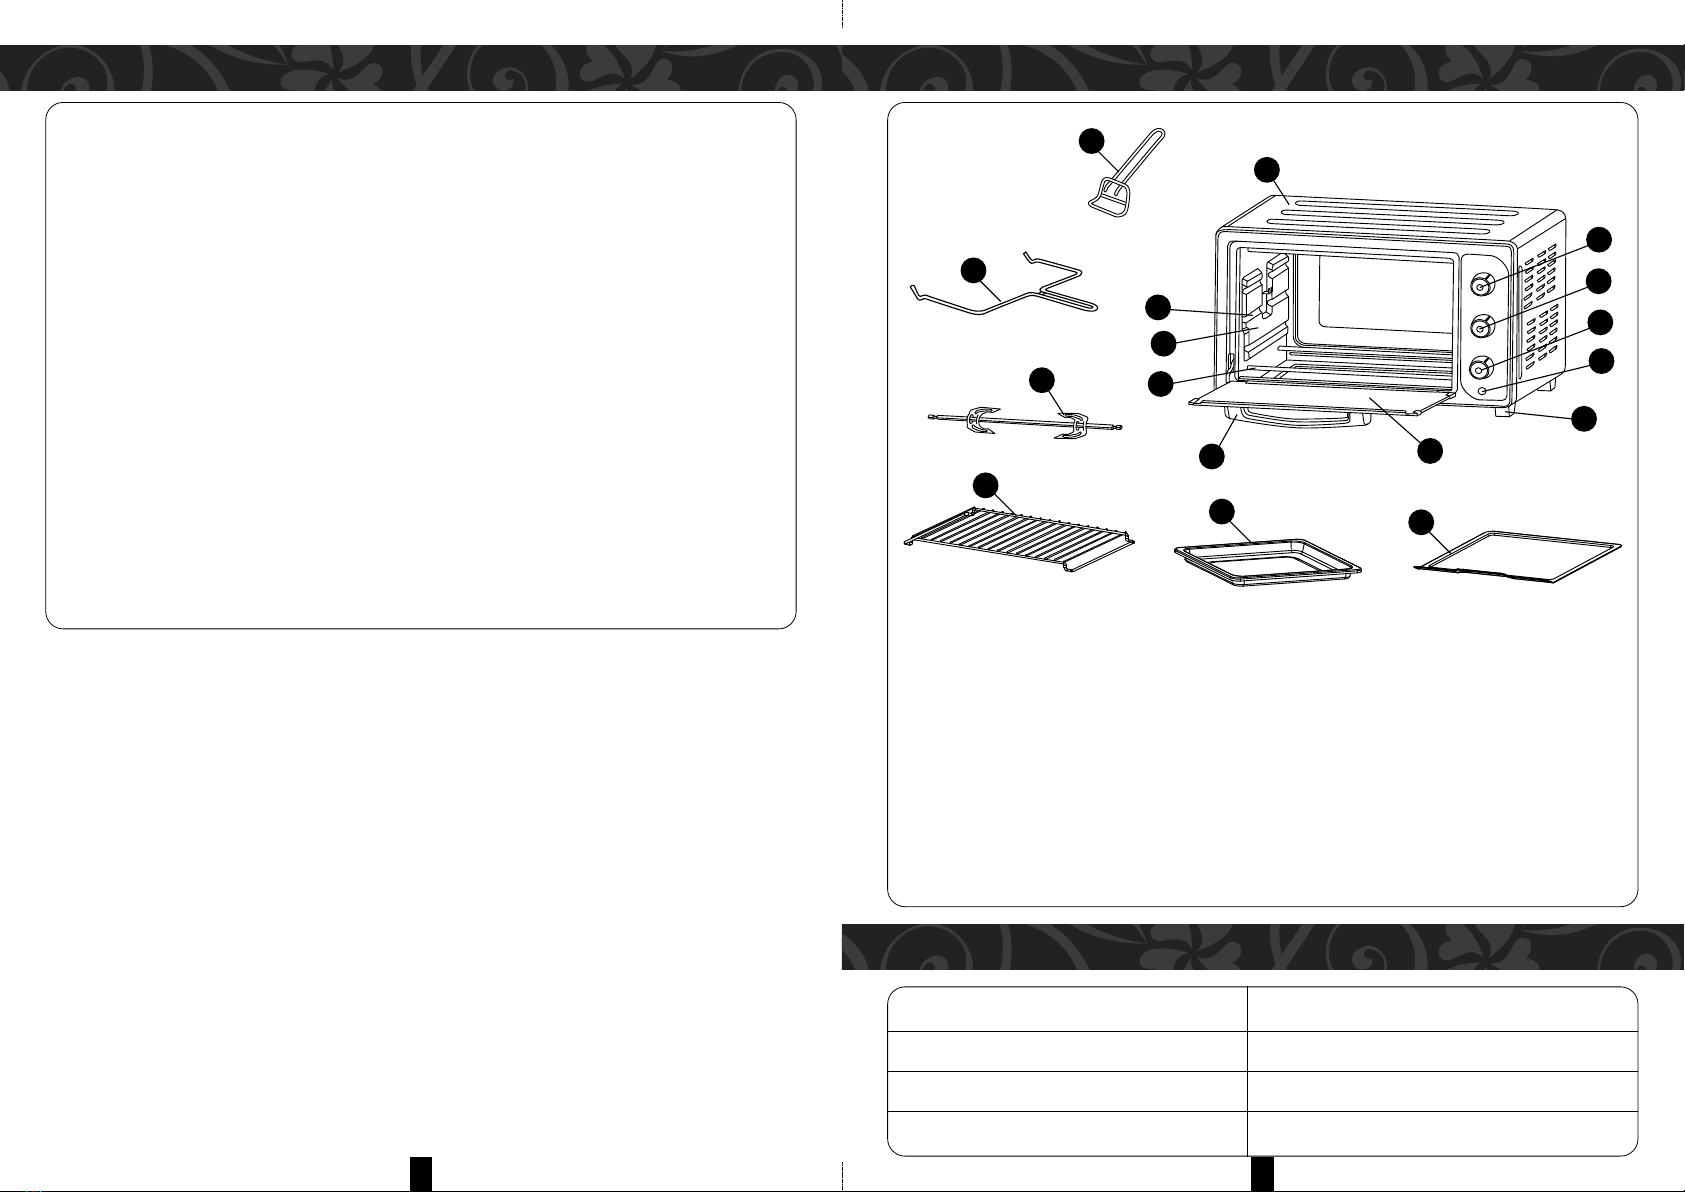
Morgan MEO-GLAMO 45RC User manual

E-mail: electrical.appliance@dksh.com
www.morgan.my
Market Expansion
Services by
www.dksh.com.my
facebook.com/morganappliances
USER MANUAL
Electric
Oven
ME -GLAM 45RC

3
17. Do not place cardboard, plastic, paper and similar items in the oven.
18. Do not store any materials, other than manufacturer’s recommended accessories in this oven
when not in use.
19. To disconnect, turn any control to “ FF” and detach the power plug from the power supply.
Always hold on the power plug and never pull the power cord.
20. Always wear oven gloves when removing or putting in accessories or ovenware.
21. This appliance is for H USEH LD USE NLY. Do not use outdoors.
22. Do not use appliance for other than its intended use.
23. WARNING: Accessible parts and surfaces are hot during operation.
24. The glass door cannot support items in the oven in a fully open position.
25. Do not control the appliance with an external timer or separate remote-control system.
26. CAUTION: HOT SURFACE! The temperature of accessible surface may be high when the
appliance is operation. Do not touch hot surfaces. Use handle or knobs.
27. This appliance is not intended for use by persons (including children) with reduced physical,
sensory or mental capabilities or lack of experience and knowledge, unless they have been given
supervision or instruction concerning use of the appliance by a person responsible for their
safety.
28. Children should be supervised to ensure that they do not play with the appliance.
29. If the supply cord is damaged, it must be replaced by the manufacturer, its authorized service
center or similarly qualified persons in order to avoid a hazard.
30. It is recommended to place the rear surface of the appliance against a wall.
IMPORTANT SAFEGUARDS
Plea e note: initial tart-up operation may re ult in minimal odor and moke. Thi i normal and
harmle . It i due to burning of the protective ub tance applied to the heating element in the
factory.
When u ing electric appliance , ba ic afety precaution hould alway be followed including
the following:
1. Read all instructions carefully and retain them for future reference.
2. Before connecting to the power supply, ensure that the voltage of the appliance corresponds to
the voltage indicated on the power supply rating label at the bottom of the appliance.
3. Do not touch hot surfaces. Use handle or knobs.
4. Close supervision is necessary when any appliance is used by or near children.
5. To protect against electric shock, do not immerse power cord, power plug, or any parts of the
oven in water or other liquids.
6. Do not allow power cord to hang over edge of table or counter or touch hot surfaces.
7. Do not operate appliance with a damaged power cord or power plug or after the appliance
malfunctions or has been damaged in any manner. In such a situation, it is recommended to
return the appliance to your nearest Authorized Service Center for examination, repair, or
adjustment.
8. The use of accessory attachments not recommended by the appliance manufacturer may cause
hazard or injury.
9. Do not place on or near a hot gas or electric burner, in a heated oven, or in a microwave oven.
10. When operating the oven, allow at least 12cm of ventilation space on all sides of the oven to
allow for optimal air circulation.
11. Unplug from the power supply when not in use, or before cleaning. Allow the appliance to cool
down before assembling or disassembling parts, or before cleaning.
12. Do not cover any part of the oven with metal foil to prevent overheating the oven.
13. Extreme caution should be exercised when removing a tray, disposing hot grease or other hot
liquids.
14. Do not clean the oven with metal scouring pads. Metal chippings may contact electrical parts and
pose a risk of electric shock.
15. A fire may occur if the oven is covered by or placed near flammable material, including curtains,
draperies, walls, and the like during operation. Do not store any item on the oven during
operation.
16. Exercise extreme caution when using containers constructed of anything other than metal or
glass.
Thank you for purcha ing a quality MORGAN appliance. We tru t that you will have a plea ant
experience with your new product. To guarantee afety and be t efficiency, plea e read thi
manual carefully and keep a copy for future reference.
2

5
PARTS IDENTIFICATION
SPECIFICATIONS
13 12
14
15
6
10
9
8
7
11
2
1
3
4
5
16
17
Model ME -GLAM 45RC
Rated Voltage / Frequency 220-240V~ 50/60Hz
Rated Wattage 1800W
Capacity 45L
4
1. Door handle
2. Glass door
3. Heating element
4. Inner cavity
5. Rack support
6. Housing
7. Temperature control knob
8. Heating/Function control knob
9. Timer control knob
10. Indicator light
11. ven foot
12. Crumb tray
13. Bake tray x 2pcs
14. Wire rack
15. Rotisserie axis, fork & screw
16. Rotisserie handle
17. Tray handle
SAVE THESE INSTRUCTIONS
Before using your oven for the first time, be sure to:
1. Read all instructions included in this manual and save them for future reference.
2. Ensure oven is not connected to the power supply and Timer Knob is in the “0” position.
3. Remove all racks and pans. Wash the racks and pans in hot sudsy water or in a dishwasher.
4. Thoroughly dry all accessories and reassemble them in the oven. Insert power cord into the
power supply and you are ready to use your new oven.
Important tips on first use:
1. Ensure that the voltage of the appliance corresponds to the voltage indicated on the power supply
rating label at the bottom of the appliance
2. Do not allow power cord to hang over edge of table or counter to prevent children from tripping
over.
3. WARNING: Do not operate the appliance if the power cord is damaged. Return it to the
manufacturer, authorized service center or a similarly qualified person for repairs to avoid a
hazard.
4. This unit has a short power cord to reduce the risk of tripping over a long cord.
5. An extension power cord may be used if its power rating matches or exceeds the appliance’s
power rating.

7
6
OPERATING INSTRUCTIONS CARE & CLEANING
ALWAYS UNPLUG VEN AND ALL W T C L BEF RE CLEANING
MAINTENANCE:
• This appliance has been designed to operate for prolonged periods with minimum maintenance.
Continuous satisfactory operation depends upon proper care and regular cleaning.
• WARNING: Always disconnect appliance from the power supply before performing any
maintenance or cleaning tasks.
CLEANING:
• To protect against the risk of electrical shock, do not immerse the unit, power cord or power plug
in water or other liquids.
• Use a damp cloth to wipe over the exterior surface of the appliance.
• The oven features a Quick-Clean internal coating which can be cleaned using a damp cloth
moistened with mild detergent to wipe.
• Wash all accessories in hot sudsy water or in a dishwasher.
• Wipe the door with a clean damp cloth, and dry with a paper or cloth towel. Clean exterior with
damp cloth.
D N T USE ABRASIVE CLEANERS N ANY PART F THIS APPLIANCE. ALWAYS
UNPLUG THE VEN FR M THE P WER SUPPLY AND ALL W T C L BEF RE
CLEANING.
DRY ALL PARTS AND SURFACES TH R UGHLY BEF RE PERATING!
Heating/Function & Temperature Knob
• Select cooking mode using the Heating/Function Knob.
• Use the temperature knob to select the desired cooking temperature.
Place the food on grill rack or Food tray and close the oven door
• Do not place food on paper or plastic container when cooking in the oven.
• Use the Food tray for smaller food items that is likely to drip while cooking.
• Place food evenly on the grill rack.
Insert the power plug into the power supply.
• Select the desired cooking function and temperature.
• When cooking is finished, turn the Timer knob to “0” position.
• Detach power plug from the power supply after cooking.
Note: The weight of the food placed on the Food Tray/Grill Rack should not exceed
3.5kg (as a reference) to ensure & maintain even cooking. It is also important to place
food on the Food Tray/Grill Rack evenly for best cooking results.
TEMPERATURE CONTROL
• Choose the desired temperature from 100°C to 250°C for cooking.
FUNCTION CONTROL
• This oven is equipped with different positions for a variety of cooking needs:
( ) perates lower heating
( ) perates both upper & lower heating with convection.
( ) perates upper heating with convection.
( ) perates both upper & lower heating
( ) perates upper heating with rotisserie.
( ) perates both upper & lower heating with convection & rotisserie.
TIMER CONTROL
• 60mins timer. You can set the time by turning the control clockwise. This function activates a
notification sound at the end of the programmed time.
Other Morgan Oven manuals

Morgan
Morgan MEO-HC22B User manual

Morgan
Morgan MEO-1002RC User manual

Morgan
Morgan MBO-7701M User manual

Morgan
Morgan MEO-602RC User manual

Morgan
Morgan MEO-LUX100L User manual

Morgan
Morgan MEO-Imperium25 User manual

Morgan
Morgan MBO-7700D User manual

Morgan
Morgan MEO-HC26C User manual

Morgan
Morgan MEO-HC23B User manual

Morgan
Morgan MEO-GLAMO 120RC User manual
Popular Oven manuals by other brands

Sunbeam
Sunbeam Bake & Grill BT5300P Instruction booklet

Hotpoint
Hotpoint FK 1037 EN .20 X /HA operating instructions

Fisher & Paykel
Fisher & Paykel OB90S9MEPX3 manual

NEW POL
NEW POL NWH600X Operating and installation instructions

ZANKER
ZANKER ZKB 7527 user manual

Siemens
Siemens HB23AB 21W Series instruction manual