Morgan MEO-GLAMO 30RC User manual

E-mail: electrical.appliance@dksh.com
www.morgan.my
Market Expansion
Services by
www.dksh.com.my
facebook.com/morganappliances
USER MANUAL
Electric
Oven
MEO-GLAMO 30RC

3
18. WAR I G: To prevent accidental burns, always use/grip the handles and knobs when operating
this appliance. Always wear protective, insulated oven mitts when placing or removing items from
a hot oven.
19. This oven’s safety tempered glass door is stronger than ordinary glass and more break-resistant.
Tempered glass can break, but not into sharp edge pieces. Avoid scratching door surface or
nicking edges. If the door glass has a scratch or nick, contact our customer service center before
using the oven.
20. This appliance is for indoor and household use only. Do not use outdoors.
21. Do not use appliance for other than its intended use.
22. The temperature of the door and other accessible surfaces may be higher during operation.
23. Do not rest cooking utensils or baking dishes on glass door.
24. This appliance is not intended for use by persons (including children) with reduced physical,
sensory or mental capabilities or lack of experience and knowledge, unless they have been given
supervision or instruction concerning use of the appliance by a person responsible for their
safety.
25. Children should be supervised to ensure that they do not play with the appliance.
26. Food weight placed on the Food Tray/Grill Rack should not exceed 3.0kg. Space out food evenly
on the Food Tray/Grill Rack and not on one side only for best cooking results.
27. For appliance with type Y attachment: if the power cord is damaged, it must be replaced by the
manufacturer, its services agent or similarly qualified persons in order to avoid a hazard.
28. Rear surface of appliances should be placed against a wall.
29. It is recommended to clean this appliance regularly as grease build-up may pose a fire hazard.
CAUTIO : APPLIA CE SURFACES ARE HOT AFTER USE. ALWAYS wear protective, insulated
oven gloves when touching hot oven or hot dishes and food, or when inserting or removing rack,
pans or baking dishes.
IMPORTANT SAFEGUARDS
W en using an electrical appliance, basic safety precautions s ould always be followed,
including t e following:
1. All safety and operating instructions should be read before operation and user manual should be
retained for future reference.
2. Do not touch hot surfaces.
3. Close supervision is necessary when appliance is used by or near children.
4. To protect against the risk of electric shock, do not immerse any part of the appliance in water or
other liquids.
5. Do not allow power cord to hang over edge of table, counter or touch hot surfaces. Do not
operate appliance with damaged cord or plug or after the appliance malfunctions, or has been
damaged in any manner, return appliance to the nearest Authorized Service Center for
examination, repair, or adjustment.
6. WAR I G: The use of accessory attachments not recommended by the appliance manufacturer
may cause hazard or injury.
7. When operating the oven, keep at least four inches of space on all sides of the oven to allow for
adequate air circulation.
8. Always detach power plug from the power supply when appliance is not in use, or before
cleaning. Allow it to cool before assembling or disassembling parts, or before cleaning.
9. To disconnect, turn the control knob to STOP, then unplug the power plug. Always grasp the
power plug firmly, but never yank on the power cord.
10. Do not cover CRUMB TRAY or any part of the oven with metal foil. This may cause the oven to
overheat.
11. Do not clean the appliance with metal scouring pads as pieces can break off the pad and contact
with electrical parts, creating a risk of electric shock.
12. Do not insert oversized foods or metal utensils into an electric oven as they may create a fire or
risk of electric shock.
13. Do not cover the oven or allow it to touch flammable materials including curtains, draperies,
walls, and the like, during operation to avoid a fire hazard.
14. Do not place any item on the oven during operation.
15. Extreme caution should be exercised when using containers constructed if anything other than
metal or glass.
16. Do not place any of the following materials in the oven: cardboard, plastic, paper, or anything
similar.
17. Do not store any materials, other than manufacturer’s recommended accessories in this oven
when not in use.
T ank you for purc asing a quality MORGAN appliance. We trust t at you will ave a pleasant
experience wit your new product. To guarantee safety and best efficiency, please read t is
manual carefully and keep a copy for future reference.
2
SAVE THESE INSTRUCTIONS
BEFORE FIRST USE
Before using your convection electric oven for t e first time, be sure to:
1. Remove all accessories, including racks and pans and shipping materials packed inside the oven.
2. Wash the racks and pans in hot sudsy water or in dishwasher.
3. Thoroughly dry all accessories and reassemble in oven. Insert power plug into a power supply
and your oven is ready for operation.
4. After reassembly, operate the oven at MAX temperature for approximately 15 minutes to eliminate
any packing oil that may remain after shipping.
5
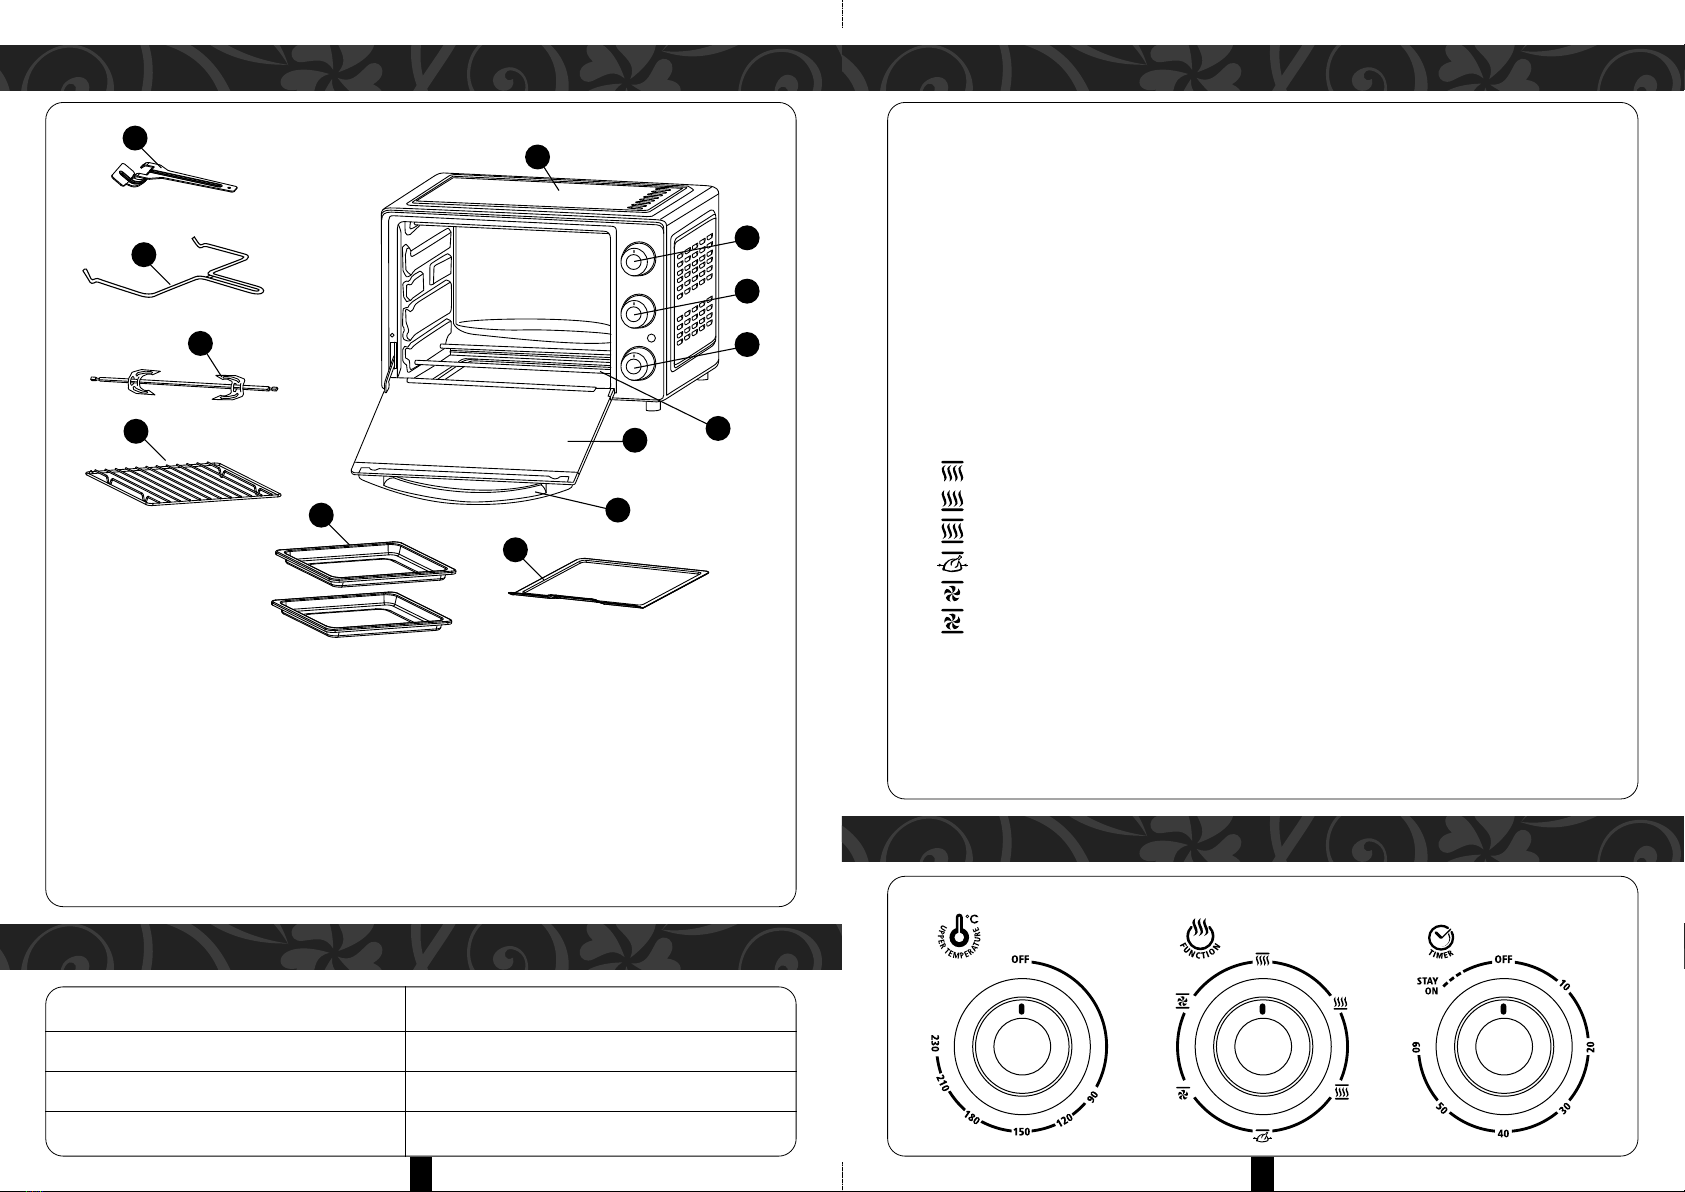
FUNCTIONS & FEATURES
12
13
11
10
1
2
3
4
6
7
5
9
8
OPERATING INSTRUCTIONS
Model MEO-GLAMO 30RC
Rated Voltage / Frequen y 220-240V~ 50/60Hz
Rated Wattage 1500W
Capa ity 30L
4
1. Housing
2. Temperature Control Knob
3. Function Switch Knob
4. Timer Control Knob
5. Heating Element
6. Glass Door
7. Door Handle
8. Tray Handle
9. Rotisserie Handle
10. Rotisserie Forks With
Screws/rotisserie Spit
11. Wire Rack
12. Baking Tray
13. Crumb Tray
PARTS IDENTIFICATION
SPECIFICATIONS
CONTROL PANEL
Please familiarize yourself wit t e following oven functions and accessories prior to first use:
= WIRE RACK: For toasting, baking, and general cooking in casserole dishes and standard pans.
= BAKING TRAY: For use in broiling and roasting meat, poultry, fish, and various other foods.
= ROTISSERIE SPIT: Use to roast a variety of meats and poultry.
= TRAY HANDLE: Allow you to pick up Food Tray and Grill Rack.
= CRUMB TRAY: For holding the crumb during the operation.
= ROTISSERIE HANDLE: Allow you to pick up rotisserie spit.
= TEMPERATURE CONTROL KNOB: Select desired temperature from low (90°C) to high (230°C).
= TIMER CONTROL KNOB: turn control to the left (counter-clockwise) and the oven will STAY O
until it is shut off manually. To activate timer, turn to right (clockwise) for other use. A bell will
sound at the program end time.
= FUNCTION SWITCH KNOB: there are six modes
( ) upper heating elements
( ) lower heating elements
( ) upper and lower heating elements
( ) upper heating elements+rotisserie
( ) upper heating elements + convection,
( ) upper and lower heating elements +convection
= INDICATOR COVER: it is illuminated whenever oven is turned on.
NOTE:
= Food weight placed on the Food Tray/Grill Rack should not exceed 3.0kg.
= Space out food evenly on the Food Tray/Grill Rack and not on one side only for best cooking
results.

7
6
OPERATING INSTRUCTIONS
FUNCTION ( ) or ( )
= Ideal for baking sliced meats, chicken legs & wings, potato flakes, poultry meat, chops, fish and
so on with even heating.
Operation
1. Preheat oven as directed in recipe.
2. Set thermostat knob to 230°C.
3. Turn function knob to ( ) or ( ).
4. Inspect for doneness 5~10 minutes before expected completion time.
5. Turn timer knob to OFF when complete.
FUNCTION ( )
= Ideal for cooking bread, pizza, and poultry in general.
Operation
1. Place grill rack to the middle support guide.
2. Turn function knob to ( ).
3. Place food to be cooked on food tray and onto grill rack.
4. Turn timer knob to O , set desired time and inspect progress with meat thermometer to ensure
desired doneness.
5. To inspect or remove food, use tray/rack handle to help slide food in and out.
6. Turn timer knob to OFF when complete.
NOTE: All cooking times are based on meats at refrigerated temperature. Frozen meats may take a
considerably longer time to cook. Therefore, the use of a meat thermometer is highly recommended.
FUNCTION ( ) or ( )
= Ideal for bake cake in general.
Operation
1. Place grill rack to the middle support guide.
2. Place food to be cooked on food tray and onto grill rack.
3. Turn function knob to ( ) or ( ).
4. Turn timer knob to O , set desired time and inspect progress with meat thermometer to ensure
desired doneness.
5. To inspect or remove food, use tray/rack handle to help slide food in and out.
6. Turn timer knob to OFF when complete.
FUNCTION ( )
= Ideal for cooking whole chicken and poultry in general.
Rotisserie Split Use
= Insert pointed end of spit through fork, ensuring points of fork face same direction as pointed end
of spit.
= Slide towards square of spit and secure with thumbscrew.
= Run spit directly through center of food.
= Insert second fork into other end of roast or poultry.
= Ensure food is centered on spit. Insert pointed end of spit into drive socket on right-hand side of
oven wall.
= Ensure the square end of spit rests on spit support, located on left-hand side of oven wall.
Operation
1. Place food tray onto lowest support guide.
2. Preheat oven as directed in recipe.
3. Set thermostat knob to 230°C.
4. Turn function knob to ( ).
5. Inspect for doneness 5~10 minutes before expected completion time.
6. Turn timer knob to OFF when complete.
NOTE:
= Food weight placed on the Food Tray/Grill Rack should not exceed 3.0kg.
= Space out food evenly on the Food Tray/Grill Rack and not on one side only for best cooking
results.
CARE & MAINTENANCE
This appliance requires little maintenance. It contains no user serviceable parts. Do not attempt to
repair it yourself. Contact a qualified technician if the product requires servicing.
CLEANING INSTRUCTIONS
ALWAYS UNPLUG OVEN AND ALLOW TO COOL BEFORE CLEANING
= To protect against the risk of electrical shock, do not immerse the unit, cord or plug in water or
other liquid.
= Your oven features a Quick-Clean coating. If desired, wipe walls with damp cloth and moistened
with mild detergent.
= DO OT use steel wool scouring pads or abrasive cleaners or scrape walls with metal utensils, as
this may damage the quick-clean coating.
= Wash all accessories in hot sudsy water or in a dishwasher.
= Wipe glass door clean with a damp cloth and wipe dry with a paper or cloth towel. Clean exterior
with damp cloth.
IMPORTANT: DRY ALL PARTS AND SURFACES THOROUGHLY PRIOR TO OPERATION.
TO STORE
Detach power plug from the power supply, allow it to cool before cleaning & storing. Store the
appliance in its box in a clean, dry place. ever store appliance while it is hot or still plugged in. ever
wrap cord tightly around the appliance. Do not put any stress on the cord where it enters the unit, as it
could cause the cord to fray and break.
Other Morgan Oven manuals

Morgan
Morgan MBO-7700D User manual

Morgan
Morgan MEO-GLAMO 120RC User manual

Morgan
Morgan MEO-LUX100L User manual

Morgan
Morgan MEO-Imperium25 User manual

Morgan
Morgan MEO-HC23B User manual

Morgan
Morgan MEO-GLAMO 23B User manual

Morgan
Morgan MBO-7701M User manual

Morgan
Morgan MEO-HC22B User manual

Morgan
Morgan MEO-HC26C User manual

Morgan
Morgan MBO-7680D User manual


Popular Oven manuals by other brands

Brandt
Brandt FC 222 user manual

aumate
aumate TOA20M04N-1E instruction manual

Maytag
Maytag CWE4100AC - 24" Single Electric Wall Oven Dimension Guide

Kernau
Kernau KBO 1076 S PT B instruction manual

Bosch
Bosch HB 37 N Series User manual and installation instructions

Electrolux
Electrolux EOD5420AA user manual


