Morgan MWM-11 Sapphire User manual

E-mail: electrical.appliance@dksh.com
www.morgan.my
Market Expansion
Services by
www.dksh.com.my
facebook.com/morganappliances
USER MANUAL
MWM-11 Sapphire
Automatic
Washing
Machine

3
PAR S IDEN IFICA ION
2
C O N E N S
3
4
6
6
8
9
10
11
12
14
16
17
18
19
PARTS IDENTIFICATION
SAFETY AND PRECAUTIONS
INSTALLATION & ADJUSTMENT
USING THE DRAIN HOSE
WATER INLET INSTALLATION
PREPARATION BEFORE OPERATION
LOADING LAUNDRY
DETERGENT GUIDE
CONTROL PANEL & FEATURES
OPERATING INSTRUCTIONS
CARE & CLEANING
TROUBLESHOOTING
OTHER FUNCTION
SPECIFICATIONS
Top Lid
Inner Lid
Lint Filter
Inner Tub
Fixed Foot
Drainpipe Gate
Stopper
B
Water Inlet Valve
Screw Cover
Water Absorption
Gasket
Power Cord
Control Panel
Pulsator
Body
Base
Adjustable
Foot
Drain Hose
Handle
Back Cover
I
ACCESSORIES
ABOUT THE SAFETY SYMBOLS
Base Cover
(1 pc)
D
+
+
+
+
Connect this end to
the machine
Connector for
water inlet hose
and tap
water inlet hose connector
Water Inlet Hose (1 pc)
T
Drain Hose
(1 pc)
Drain Hose Clip (1 pc)
T
Tapping Screw
ST4X14 (2 pcs)
W
Inner Lid (1 pc)
Pin (1 pc)
WARNING SYMBOL
Pay special attention to the warning
symbols. There may be serious
risks to personal body safety or
damage to the appliance if warnings
are not followed.
ROHIBITION SYMBOL
This symbol strictly prohibits
action(s) that may be dangerous to
your personal safety and/or may
damage the appliance.

5
SAFE Y PRECAU IONSSAFE Y PRECAU IONS
4
Earth
wire
Ventilation holes
at the bottom
Soft item
Insert power plug into an earthed rated
220-240V AC power supply.
Always unplug from power supply & turn off
water when not in use, or when cleaning or
moving the appliance. Do not touch power plug
with wet hands.
Do not bend or twist the power cord in any
manner. Do not operate appliance with damaged
power cord or power plug or after the appliance
malfunctions. Contact your Authorized Service
Centre for examination, repair, or adjustment.
Ensure the pin of the
power plug is clean &
wipe with cloth if
dirty.
• Do not install the appliance in the bathroom or
damp places.
• Do not splash water on it or place wet clothes
on the control panel.
Do not wash with water hotter than 50ºC. If placed on carpeted floor, adjust the fixing feet
to allow air to flow freely.
Do not wash raincoat, motorcycle cover, feather
dress or waterproof apparels as these may
cause the appliance to vibrate abnormally
during operation.
• Do not share the same power socket or use
an extension socket.
• Do not use a damaged or loose power socket.
• Do not insert hands into the machine during
operation, even during slow speeds.
• Never allow children to play on or near the
machine during operation.
It is dangerous to alter the specifications or
modify this appliance in any manner.
Do not overload the appliance or place any hot
items such as hot kettle on the washing machine.
Do not wash garments which have been in
contact with volatile petroleum products.
• Do not leave children unattended near the
washing machine.
• Do not allow children to play with the washing
machine.
eep the appliance away from direct sunlight
and other heat sources which may damage it.
Always clean the lint filter to prevent lint from
obstructing the cascade outlet during washing.
Ensure proper installation after every clean.
Do not place hard objects such as coins, safety
pins, nails, screws, or which can damage the
machine.
• Ensure water tap is turned on and inlet hose
is properly installed before washing.
• It is recommended to use low suds & high
efficiency laundry detergent.
⊳⋯
⊳⋯
䞈㋴㤥
Close Open

7
6
INS ALLA ION & ADJUS MEN
USING HE DRAIN HOSE
Important: Ensure inner lid is installed prior to using the machine as it won’t
function without the inner lid in place.
INS ALLA ION S EPS
1. Remove the inner from the machine packing list.
2. Install the right hinge “d” into the round holder “c” (see Fig. 1). Then press left hinge “b” into the
holder “a” in accordance to the direction of the arrows.
3. After inserting left hinge “b” into holder “a”, insert bolt 4 into the left holder “a” (see Fig. 2).
4. Insert pin 4 into holder “a”. A click can be heard once it is securely in place. Hold handle 3, open &
close the inner lid a few times.
5. Once inner lid is correctly installed, the machine is ready for use.
Fig. 1
F
aacc
dd
bb
11
22
33
Fig. 2 Fig. 3
44
CHANGING HE DIREC ION OF HE DRAIN HOSE
1. Detach the drain hose and clip from the connector. Place the machine front side down on a soft mat
on the floor. Unmount the screws on the back cover using a screwdriver and detach the back cover.
Unmount the screw fixed to the drain hose
connector (on the right of washing machine) and
loosen the drain hose connector.
2. Detach the drain hose using reasonable force
and drain hose hoop (on the right of washing
machine). Loosen the inner drain hose.
3. Detach the drain hose gate stopper (left side of the machine fixed on
washing machine base with two clips).
4. Place the inner drain hose to another side. Do not distort the inner drain
hose. Fix inner drain hose with drain hose hoop and drain hose
connector. Stand the washing machine gently and secure the back
cover with screw and install the drain hose and clip into the drain
hose connector.
WA ER DRAINAGE
To ensure the drain hose drains smoothly:
1. The height of the drain hose should be less
than 10cm to ensure proper drainage.
2. Do not step on or distort the drain hose.
3. Cut the drain hose if it is too long. Cut the
front end of the drain hose slant to ensure
drainage is smooth.
4. Purchase a longer hose for longer drainage
with diameter not less than 30mm and
length not exceeding 1.5m.
5 Cut at Points A or B if the additional drain
hose is too long.
Drain hose connector Drain hose
Drain hose clip
Drain hose hoop
Drain hose gate stopper
D
<10cm
≤1.5m
≥ø30mm
<
AB
USING HE DRAIN HOSE
INS ALLING HE DRAIN HOSE
• Set the drain hose clip into the drain hose to 2-3cm (from the end of the drain hose without the pot
hook).
• Install the drain hose into the correct drain hose connector and fix the drain hose connector with the
clip.
• Attach drain hose clip on the machine cabinet.

WA ER INLE INS ALLA ION PREPARA ION BEFORE OPERA ION
Use the new hose supplied together with the machine. Do not reuse old hose.
1. Insert a new flat washer into each end of the inlet hoses. Firmly insert the washers into the coupling.
NOTE:
• Use the new hose sets supplied with the machine.
• Do not reuse old hoses.
• Use pliers to tighten the coupling.
• Do not overtighten as this may damage the valve.
2. Connect water inlet hoses to faucet.
3. Connect other ends to their respective cold & hot water inlet valves located at the rear of the
machine.
4. Fasten the nut. Gently swing it to ensure it is securely fastened.
INSPEC CONNEC ION BE WEEN WA ER INLE HOSE & AP
1. Gently swing the hose to ensure it is securely fastened.
2. After installation, turn on water to inspect for leaks.
3. Do not bend, twist or overstrain the hose.
4. Always inspect connection between water inlet hose and tap. Ensure c
onnection between water inlet hose and washer is secure and that
there is no leaking.
98
(Cotton)
(
(Cotton)
(
(Cotton)
(
(Cotton)
(
(Cotton)
(
(Cotton)
(
(Cotton)
(
(Cotton)
(
PREPARA ION BEFORE WASHING
1. Connect the inlet hose and turn on the tap.
2. This appliance must be properly earthed before connecting to the power supply. Do not link the earth
terminal gas or tap pipeline, and so forth.
3. Lay down the drain hose.
War i g: Water temperature should ot exceed 50°C!
4. Machine must be placed horizontally on even and stable surface to prevent excessive noise and
vibration.
I IS IMPOR AN O NO E HE FOLLOWING BEFORE LAUNDRYING:
• Ensure laundry is washable.
• IMPORTANT: Wash new coloured clothing separately when washing for the first time and do not wash
white clothing with coloured ones.
• Immerse non-absorbable laundry by hand.
• Treat stubborn stains such as fruit, wine, grass, rust etc. with specially formulated pre-wash detergent
before laundrying.
• Overturn the nap fabric and long floss laundry before putting them into the machine.
• Do not place chemical-soaked laundry directly into the machine.
• Place small items such as handkerchiefs, ribbons, socks etc. into laundry bag or pillow case.
Check whether
there are
special
requirements for
laundrying.
not long
bands, fasten
buttons and
zippers.
Do not
overload
machine. Load
laundry loosely
alternating
larger items
with smaller
ones.
Sort laundry
according to fabric
type. colourfastness,
and soil level. Place
thin fabric, woollens
and those prone to
wear and tear into
laundry bag.
Ensure all pockets
are empty of small
objects such as
coins, keys, screws
etc. as these may
damage the drain
pump.

LOADING LAUNDRY DE ERGEN GUIDE
1110
• The machine's washing and spinning capacity refer to the largest weight of standard laundry under
dry condition. Washing quantity shall be lower than the rated capacity.
• Different thickness, size and laundry type will influence the actual washing
capacity. It is ideal that laundry can be overturned normally during washing.
• Do not select high water level when laundry is less than 1.0kg to avoid water
splashing.
LAUNDRY REFERENCE GUIDE
(Cotton)
(
(Cotton)
(
Blanket (Cotton)
(approx. 900g)
Work clothes (above,under)
(approx.1200g) Jeans (approx. 800g)
Coat (Cotton)
(approx. 800g)
Jacket (Cotton)
(approx. 800g)
Single bed sheet (Cotton)
(approx. 600g)
Socks
(approx. 50g)
Underpants
(approx. 70g)
Undershirt (Cotton)
(approx.180g)
Shirt (Cotton)
(approx. 300g)
Pyjamas (Cotton)
(approx.200g)
USING POWDERED DE ERGEN
Dissolve powdered detergent directly in machine
• Select Low water level.
• Add powdered detergent, run for 30 seconds to dissolve it
completely & press the START/PAUSE button.
• Place laundry & select suitable water level program.
Quick dissolve
• Prepare warm water (30 C) in a container.
• Pour powdered detergent while stirring to fully dissolve it.
• Add sufficient detergent according to laundry load & desired water level.
• It is recommended to use liquid detergent for “QUIC WASH” program for better results.
• It is not recommended to use detergent with excessive foam.
• Poor quality or expired detergent powder may get caked.
• Please clean the detergent box frequently.
USING BLEACH
• Fill water to the selected level, dilute the bleach in the container.
• Slowly pour into the washing tub.
• Do not use bleach for coloured or fragile clothing to avoid damage.
• Do not pour bleach to directly onto laundry.
• Always dissolve powdered bleach before use.
CLOSE OP LID
Ensure top lid is closed as machine will not function when it is opened.

PROCESS BU ON
• Press PROCESS button to select either cycles from “wash-rinse-spin”, “soak-wash-rinse-spin”,
“wash”, “wash-rinse”, “rinse-spin”, “spin”.The default cycle is “wash-rinse-spin” after pressing START.
PROGRAM BU ON
• Normal: For general wash
• Heavy: For jeans & heavy clothes
• Quick Wash: For speedier general wash
• Soft: For delicate clothes
• Standard: Standard wash
• Child: Delicate was for children’s clothes
• Dry Clean: Removes odour & bacteria
• Hot Dry: Separate drying for wet clothes
HO DRY BU ON
• Press “hot dry time” button to heat dry according to the following cycles: 30 points, 60 points, 120
points & 180 points.
DISPLAY SCREEN
• Under delay & before wash, display shows DELAY time in HOURS.
• During wash, display will show process time in MINUTES.
• In the event of a malfunction, display will show trouble code.
• On START with fuzzy logic activated, display will show “- -“.
MODE & INDICA OR LIGH S
ON: indicate selected mode
FLASHING: indicate the program is in operation. Under DELAY function before operation the digital
timer shows delay time, unit is HOUR.
POWER BU ON
• Press POWER button to turn on power. Press again to turn power off.
• The machine will power off automatically if START/PAUSE button is not pressed 10 minutes after
powering on.
S AR /PAUSE BU ON
• Press START/PAUSE button to begin operation.
• Press START/PAUSE during operation to pause the machine. Press START/PAUSE to resume
operation after pause.
WA ER LEVEL BU ON
• Digital timer will display “- -“ if fuzzy logic is activated but water level is not selected. Select NORMAL
or HEAVY to activate fuzzy logic, STANDARD to deactivate with water level at “6”. QUIC WASH will
deactivate fuzzy logic & water level will be “2”.
• After pressing START/PAUSE, press “Water Level” to select desired water level without fuzzy logic.
Select water level according to laundry load: 1-2 for low, 3-5 for middle, and 6-8 for high water level.
• During wash (including rinse), press water level button to add water. Release button to stop.
• During wash (including rinse), press START/PAUSE & press water level button to select higher water
level. Press START/PAUSE again to resume operation & water will automatically fill to the preset
level.
DELAY BU ON
• After pressing START, press DELAY button to select preset time from 2 – 24 hours.
• Press POWER button to cancel preset timer & enter default state.
CON ROL PANEL & FEA URES CON ROL PANEL & FEA URES
1312

1. Press POWER button to power on machine.
– Machine will be in standby mode.
– The machine will enter FUZZY mode if there is no water inside the tub.
– Press START/PAUSE button, Select PROGRAM and then HEAVY. The machine will enter FUZZY
mode and sense the laundry load automatically to set the water level.
– The machine will not be in FUZZY mode if there is water inside the inner tub.
2. Press PROGRAM to select desired program.
3. PRESS PROCESS to begin process selection.
Note: ressing ROCESS button continuously will repeat the process cycle again.
4. Select desired water level according to laundry load.
5. Press HOT DRY TIME button to select heat drying time.
6. At the beginning of START, press DELAY button if required to select delay time, which will be
displayed on the screen indicating time to complete the wash process.
7. To cancel DELAY, press POWER button for machine to enter STANDBY mode.
8. To select "Air Dry" at the beginning of operation, press PROGRAM button to select AIR DRY. The
machine will be in standby mode when air dry function is completed.
9. Close the top lid, press START/PAUSE to begin operation.
10.The buzzer will sound & power will automatically cut-off after operation is completed.
11. It is recommended to select STANDARD program for normal wash at full load to conserve water.
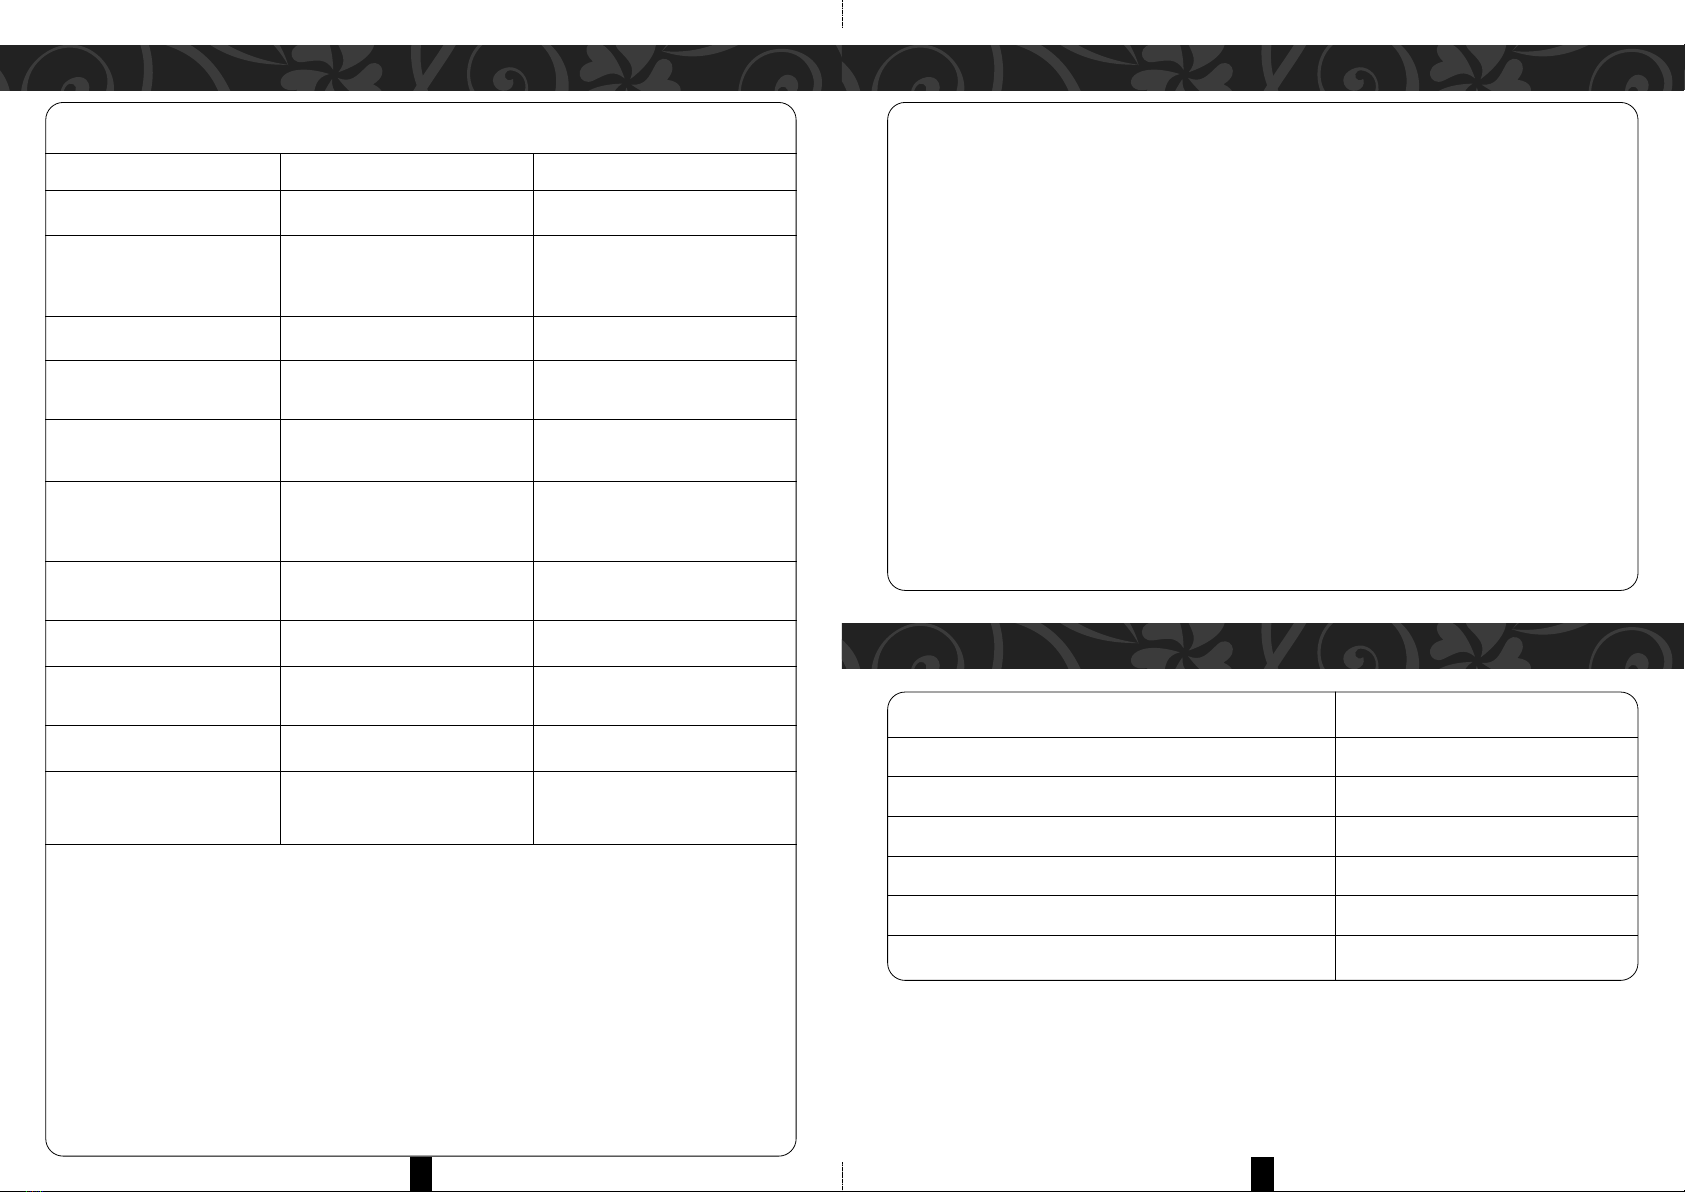
Pressing PROCESS PROGRAM APPLICATION LIGHTING INDICATOR
Button No. of Times
0 Wash, Rinse & Spin Standard Program Wash, Rinse & Spin lights
are lit
1 Soak, Wash Rinse & For soiled laundry Soak, Wash, Rinse & Spin
Spin lights are lit
2 Wash Adding detergent Wash light is lit
repeatedly
3 Wash, Rinse No spinning to avoid Wash & Rinse lights are lit
creasing
4 Rinse & Spin Hand Wash, Rinse & Rinse & Spin lights are lit
Spin
5 Spin Hand Wash & Spin Spin light is lit
OPERA ING INS RUC IONS OPERA ING INS RUC IONS
1514
• Do not heat dry laundry stained by food, oil, animal oil, machinery oil, solvent, petrol,
benzene, thinner, alcohol and etc., as these may ignite and pose a fire hazard.
• Do not place flammable materials into the inner tub.
• Do not place machine near flammable sources of oil, petrol, benzene, thinner,
alcohol & so forth as these may pose a fire hazard.
• Do not heat dry cushions as the materials inside them may leak, cause chemical
reaction or may be flammable.
• Do not wash, rinse, spin & heat dry waterproof materials as they may damage the
machine.
• Please refer to page 16 for heat dryable clothing list.
• Spin clothes well before heat drying.
• Lay laundry loosely piece by piece into the inner tub before heat drying.
• Upon completion of heat drying, clean air vents from any obstructions such as dirt, dust, paper to
ensure drying efficiency.
• Water condensation may occur during heat drying. It is recommended to open the inner tub lid and
allow tub to ventilate upon completion.
• Do not insert clothing into the inner tub when heat drying is in progress.
• Ensure inner tub lid is closed when heat drying.
• CAUTION: Exercise caution when removing clothing after heat drying. Do not touch the walls of the
inner tub as it is still hot!
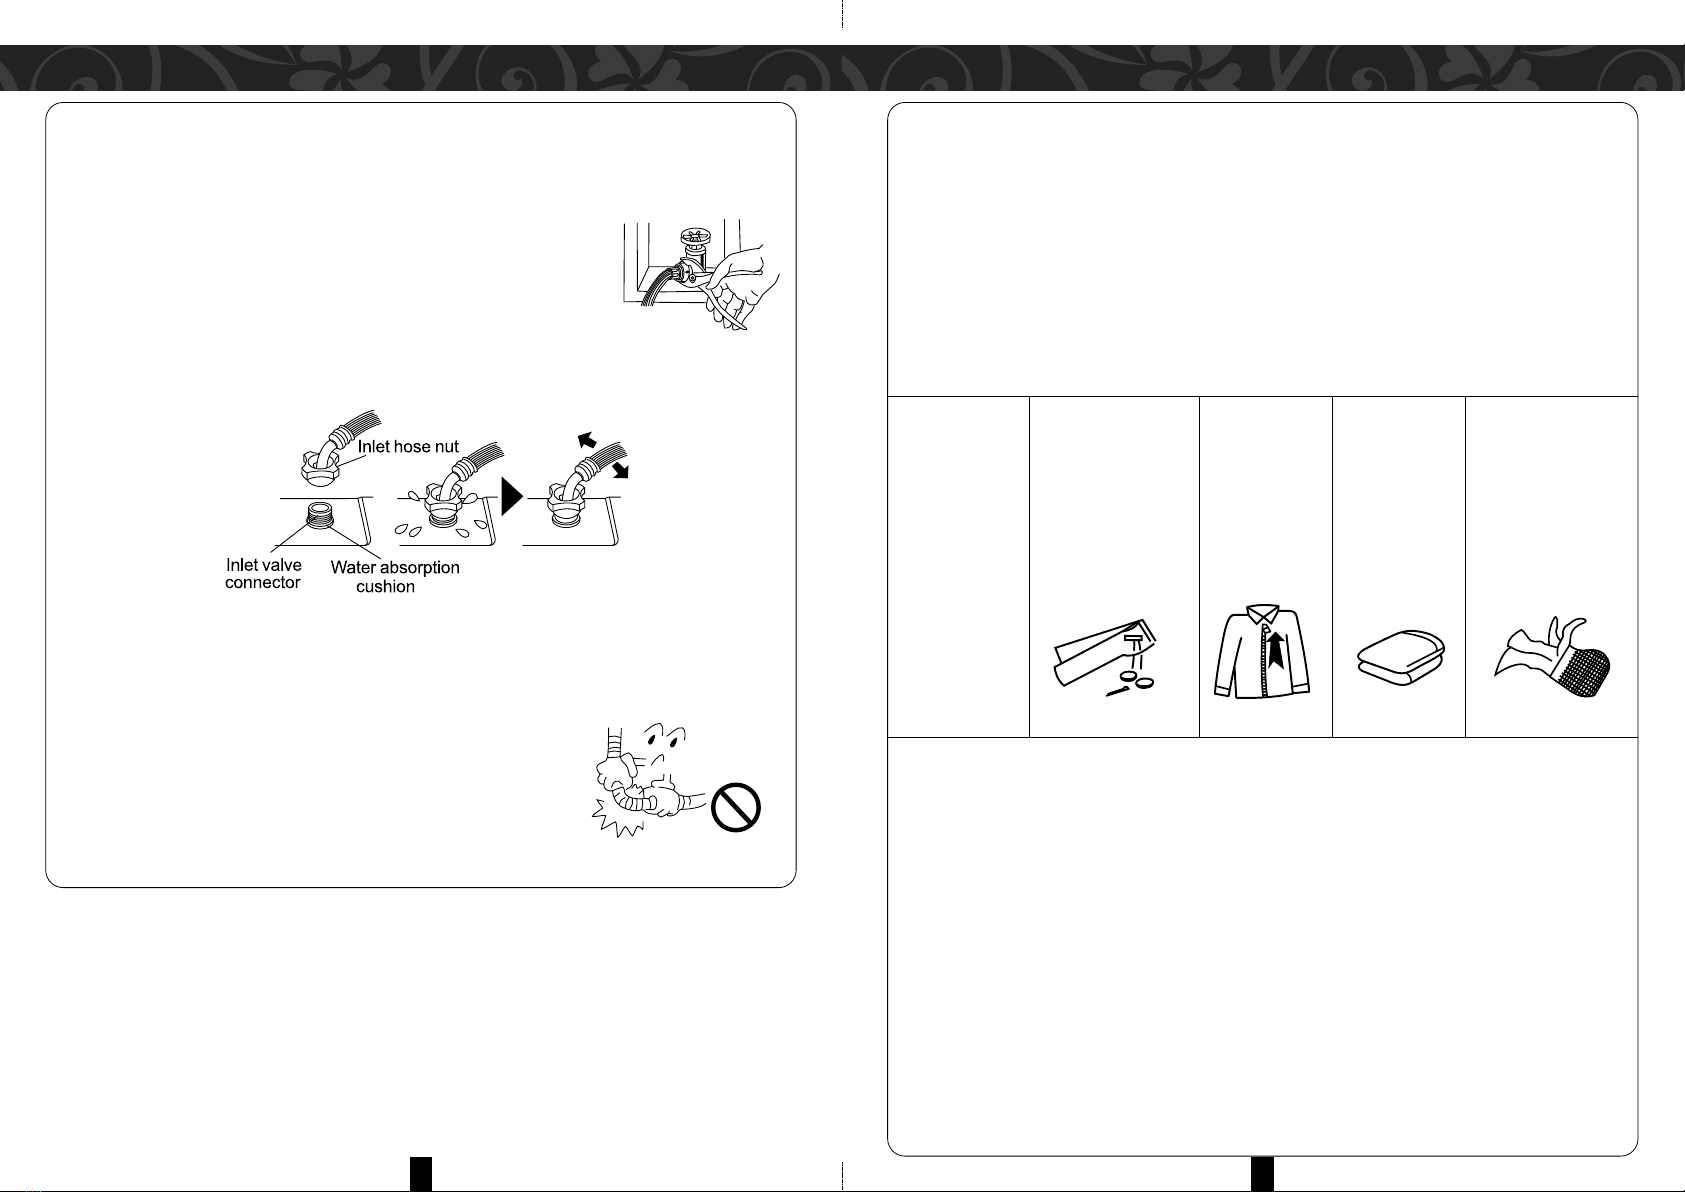
HEA DRY CAPACI Y & DRYING IME
Capacity & Drying Time Fabric Type (according to material, thickness & weight)
± 1.0KG
(±120 minutes)
owel x 2 pcs
(100% cotton/±70g)
± 2.0KG
(±240 minutes)
± 3.0KG
(±300 minutes)
HEA DRYING FUNC ION & NO ES
WARNING 1
WARNING 2
Underwear x 2 pcs
(100% cotton/±50g)
Undergarment x 2 pcs
(100% cotton/±130g)
Suit/Shirt x 1 pc
(Blend/±20g)
Stockings x 4 pairs
(100% cotton/±50g)
Bath owel x 2 pcs
(100% cotton/±300g)
Work Suit x 1 set
(Blend/±800g)
Bath owel x 2 pcs
(100% cotton/±300g)

CARE & CLEANING ROUBLESHOO ING
1716
• Use this troubleshooting guide for a list of possible solutions if the machine does not perform as
expected or malfunctions.
• If a solution cannot be found or the problem persists, please contact your authorized service center.
• Do not, under any circumstance, dismantle or attempt to repair the machine yourself.
ROBLEM OSSIBLE CAUSES SOLUTION
No display on control panel • Power Plug is not inserted correctly. • Reinsert power plug correctly.
• No power supply. • Inspect the power socket or change to
another power socket.
• Power switch is not turned on. • Press power switch.
• Check power supply
Water inlet hose leaking • Inlet hose connector (connecting with the • Reinstall the inlet hose again.
tap) is not secure.
• Inlet hose and washing machine connector • ighten the connector of the machine.
is loose.
Machine does not drain • Drain hose is not placed down on floor • Lay down the drain hose to floor level.
level.
• Drain hose is bent/twisted or obstructed. • Straighten or clean the drain hose.
No water supply • ap is not turned on. • Restart when water supply is resumed.
• Water inlet hose is obstructed. • urn on the tap.
• Follow instructions “cleaning the water
inlet filter”.
Spin function stops and water • Excessive or insufficient laundry load.
supply resumes during spin • he machine will adjust itself
program • Machine is not placed on stable surface. automatically.
Spin function not working even • op lid is open when drain function begins • Close the top lid.
when spin button is selected or when is completed.
Intermittent spin during spin • Balance laundry load for best spin results. • his is normal.
function
Water flows from drain hose • Water remnant in the tub during factory • his is normal.
during first use quality check and test
IMPORTANT: De ach power plug from power supply immedia ely if problem persis s af er
following he above roubleshoo ing and con ac your au horized service agen . I is dangerous
o a emp o repair he machine yourself.
AF ER EVERY WASH
• The machine stops automatically, and the buzzer will sound to remind you to remove the laundry or
begin another wash.
• Always unplug machine from the power supply after every wash and turn off the water tap to prevent
leaks.
EX ERIOR CARE & CLEANING
• Clean the machine exterior using a soft, damp cloth.
• Do not use abrasive cleansers or chemicals to avoid damaging plastic parts
and surface.
CLEANING INLE GA E
The inlet gate filter may be obstructed by dust. To clean:
• Turn off water tap and turn on the power switch.
• Start machine for 5 seconds & allow water in the inlet hose flow into the tub.
• Turn off power.
• Detach inlet hose, remove and clean the inlet gate valve and the inlet gate filter.
• Reassemble the inlet gate & filter.
CLEAN LIN FIL ER
It is recommended to clean the lint filter after
every wash. To clean:
• Detach the lint filter (see Illustration 1).
• Open the lint filter and wash it (see Illustration 2).
• Close the lint filter and reassemble.
MAIN ENANCE IPS
It is advisable to turn off the water tap after every wash & detach the inlet hose, if
necessary. After every wash:
• Drain any remaining water in the tub immediately.
• Unplug power cord from the power supply.
• Store power cord and drain hose.
• Wipe the water on machine exterior & surface with soft cloth.
• eep top lid open for a while to help prevent mould and stagnant smells from forming inside the
appliance.
The baffleplate
(
Press it and pull out the lint filterB
The baffleplate
(the black rubber block)
Illustration 1 Illustration 2
Close
Open
Close
Open

O HER FUNC ION
1918
O HER FUNC ION
SPECIFICA IONS
1. WHEN ALARM GOES OFF
FAULT CODE DIS LAY OSSIBLE CAUSES SOLUTION
E0 op lid opened when Delay is started. Close top lid & clear fault code.
E1 Water does not drain within 5 minutes. Ensure drain hose is laid down. Open
top lid, follow troubleshooting guide,
close top lid & clear fault code.
E2 op lid opened during spin function. Close top lid & clear fault code
E3 Imbalanced spin. Open top lid, loosen laundry to balance
weight. Close top lid & clear fault code.
E4 Water level does not reach preset level Open top lid, follow troubleshooting
even after 50 minutes. guide, close top lid & clear fault code.
E5 op lid still open after deactivating Close top lid & clear fault code.
(Child lock light flashes child lock.
synchronously)
E6 Water level exceeds overflow level. Drain water until water level reaches the
maximum water level mark.
E7 Abnormal input & output memory. Close top lid & clear fault code.
EA Heat drying when inner tub is filled with Heat dry after spin.
water.
EB Heat drying exceeds rated weight Open top lid & remove some clothing.
F1 Water sensor malfunction Power off, detach power plug from
power supply & contact authorized
service agent.
2. IMBALANCE ADJUS MEN
• During spinning, violent vibrations may happen if laundry is not placed equally in the tub. This machine
has an automatic imbalance adjustment function. Once vibration exceeds beyond a specified level,
the adjustment system will start automatically to adjust the imbalance.
3. POWER SUPPLY IS CU OFF AU OMA ICALLY
• If START/PAUSE button is not pressed within 10 minutes after pressing the POWER button, power
supply will cut off automatically.
• Power supply will cut off automatically after washing is completed.
Model MWM-11 Sapphire
Rated Voltage / Frequency 220-240V~ 50Hz
Washing ower 410W
Spinning ower 330W
Capacity 11.0kg
Weight Approx. 36.5kg
Dimension (mm) 584W x 621D x 978H
4. CHILD LOCK FUNC ION
All buttons including OWER will be locked.
• If top lid is open during operation, machine will stop and sound an alarm.
• If top lid is closed within 5 seconds, the machine operation will resume & fault code will be cleared.
• If top lid is not closed within 5 seconds, DRAIN process will begin if there is water in the inner tub &
closing the top lid will not deactivate this process.
• During draining, an alarm will sound once every 10 seconds.
• When water in inner tub is 5cm higher, an alarm will sound once every 10 minutes.
• When draining completes, the machine will be in waiting mode.
• If top lid is closed, the machine will resume operation as in previous setting.
Once child lock is activated & top lid is opened for over 5 seconds during WASH or
RINSE (with water inside inner tub) – DRAIN function will activate & alarm will
sound. If child lock function is deactivated during DRAIN, water will be added
automatically to reach preset level and resume operation.
Table of contents
Other Morgan Washer manuals

Morgan
Morgan MWM-1310SA User manual

Morgan
Morgan MWM-B1270SA User manual

Morgan
Morgan MWM-7 Zircon User manual

Morgan
Morgan MWM-Vagor 13 FA User manual

Morgan
Morgan MWM-1312SA User manual

Morgan
Morgan MWM-13 Aquamarine User manual

Morgan
Morgan MWM-680FA User manual

Morgan
Morgan MWM-1370SA User manual

Morgan
Morgan MWM-Vagor 11 User manual

Morgan
Morgan MWM-Rena 7FA User manual
Popular Washer manuals by other brands

LG
LG F1473ND owner's manual

LG
LG WM2677HSM owner's manual

Indesit
Indesit WIXE 127 Instructions for use

Hotpoint Ariston
Hotpoint Ariston WMG 721 Instructions for use

Tricity Bendix
Tricity Bendix AW 405 Operating and installation instructions

Siemens
Siemens WM16XME2FG User manual and installation instructions