Morgan MWM-13 Aquamarine User manual

E-mail: electrical.appliance@dksh.com
www.morgan.my
Market Expansion
Services by
www.dksh.com.my
facebook.com/morganappliances
USER MANUAL
MWM-13 Aquamarine
Automatic
Washing
Machine

3
PART IDENTIFICATION
2
C O N T E N T
3
4
6
7
8
10
11
12
13
15
16
17
18
19
PARTS IDENTIFICATION
SAFETY AND PRECAUTIONS
INSTALLATION & ADJUSTMENT
USING THE DRAIN HOSE
WATER INLET INSTALLATION
PREPARATION BEFORE OPERATION
LOADING LAUNDRY
DETERGENT GUIDE
CONTROL PANEL & FEATURES
OPERATING INSTRUCTIONS
CARE & CLEANING
TROUBLESHOOTING
OTHER FUNCTION
SPECIFICATIONS
Top Lid
Detergent Box
Lint Filter
Inner Tub
Fixed Foot Drainpipe Gate
Stopper
B
Back Plate
Water Absorption
Gasket
Water Inlet
Valve
Screw Cover
Power Cord
Back
Cover
Control
Panel
Pulsator
Body
Base
Adjustable
Foot
Drain Hose
Handle
ACCESS RIES
AB UT THE SAFETY SYMB LS
Base Cover (1 pc) D
+
+
+
+
Connect this end to
the machine
Connector for
water inlet hose
and tap
water inlet hose connector
Water Inlet Hose (1 pc)
T
Drain Hose (1 pc)
Drain Hose Clip (1 pc)
T
Tapping Screw
ST4X14 (2 pcs)
B
WARNING SYMB L
Pay special attention to the warning
symbols. There may be serious
risks to personal body safety or
damage to the appliance if warnings
are not followed.
PR HIBITI N SYMB L
This symbol strictly prohibits
action(s) that may be dangerous to
your personal safety and/or may
damage the appliance.

5
AFETY PRECAUTIONAFETY PRECAUTION
4
Earth
wire
Ventilation holes
at the bottom
Soft item
Insert power plug into an earthed rated
220-240V AC power supply.
Always unplug from power supply & turn off
water when not in use, or when cleaning or
moving the appliance. Do not touch power plug
with wet hands.
Do not bend or twist the power cord in any
manner. Do not operate appliance with damaged
power cord or power plug or after the appliance
malfunctions. Contact your Authorized Service
Centre for examination, repair, or adjustment.
Ensure the pin of the
power plug is clean &
wipe with cloth if
dirty.
• Do not install the appliance in the bathroom or
damp places.
• Do not splash water on it or place wet clothes
on the control panel.
Do not wash with water hotter than 50ºC. If placed on carpeted floor, adjust the fixing feet
to allow air to flow freely.
Do not wash raincoat, motorcycle cover, feather
dress or waterproof apparels as these may
cause the appliance to vibrate abnormally
during operation.
• Do not share the same power socket or use
an extension socket.
• Do not use a damaged or loose power socket.
• Do not insert hands into the machine during
operation, even during slow speeds.
• Never allow children to play on or near the
machine during operation.
It is dangerous to alter the specifications or
modify this appliance in any manner.
Do not overload the appliance or place any hot
items such as hot kettle on the washing machine.
Do not wash garments which have been in
contact with volatile petroleum products.
• Do not leave children unattended near the
washing machine.
• Do not allow children to play with the washing
machine.
eep the appliance away from direct sunlight
and other heat sources which may damage it.
Always clean the lint filter to prevent lint from
obstructing the cascade outlet during washing.
Ensure proper installation after every clean.
Do not place hard objects such as coins, safety
pins, nails, screws, or which can damage the
machine.
• Ensure water tap is turned on and inlet hose
is properly installed before washing.
• It is recommended to use low suds & high
efficiency laundry detergent.
⊳⋯
⊳⋯
䞈㋴㤥
Close Open

7
6
IN TALLATION & ADJU TMENT
WATER DRAINAGE
To ensure the drain hose drains smoothly:
1. The height of the drain hose should be less
than 10cm to ensure proper drainage.
2. Do not step on or distort the drain hose.
3. Cut the drain hose if it is too long. Cut the
front end of the drain hose slant to ensure
drainage is smooth.
4. Purchase a longer hose for longer drainage
with diameter not less than 30mm and
length not exceeding 1.5m.
5 Cut at Points A or B if the additional drain
hose is too long.
<10cm
≤1.5m
≥ø30mm
<
AB
U ING THE DRAIN HO E
It is important to install and adjust the machine according to the requirements of
the manual for your safety and correct operation
UNPACKING
• Unpack carton & detach bottom panel.
• Open the top lid of the machine and remove all accessories. Remove all wrappers, including the
polystyrene base.
• It is recommended to keep the packaging for reuse in case the machine is to be transported again.
IN TALLING THE BOTTOM COVER
• Lean the machine forward gently and insert the bottom cover (the side
with instructions) into the notch along arrowhead direction.
• Fix the bottom cover on the washing machine base with two tapping
screws in the provided accessories by using a cross screwdriver.
PO ITIONING
The distance between the washing machine and the wall should preferably exceed 50mm, and the
maximum allowed angle of the shank base of the machine is 1º. Slanting or uneven ground may cause
operation to stop. It is recommended to adjust with the
following methods:
Make it horizontal
Use a tied thread with plumb to ensure it is horizontal.
Adjust the adjustable feet
• Lift the adjustable foot gently, loosen the adjustable nut
and twist the adjustable foot.
• Fasten the nut after adjustment.
Notch
Bottom panel
The baffleplate
(
The baffleplate
(
Loosen Fasten
Adjustable
nut
Adjustable
foot
High Low
G
The baffleplate
(

WATER INLET IN TALLATION
Use the new hose supplied together with the machine. Do not reuse old hose.
98
Ensure front end is longer than 10mm & tap exit end face is flat and smooth to avoid leakage.
CONNECTING THE INLET HO E CONNECTOR WITH THE WATER TAP
1. Press the lower end of the lock lever and push down the slider. Remove inlet hose connector from
the inlet hose (see illustration 1).
2. Loosen the four bolts on the inlet hose connector to access the tap. Then set the inlet hose connector
to the tap (see illustration 2)
Note: If tap ca iper is unab e to fit into the in et hose end, unscrew the four bo ts and remove
the bushing.
Important: Tap exit end must be f at otherwise it wi eak (see illustration 3).
3. Fasten the four bolts in the inlet hose connector evenly (see illustration 4).
4. Turn the fastening nut (see illustration 5).
Note: Before turning the fastening nut, ensure threading is about 4mm above the upper
surface of the nut and ess than 2mm above the upper surface of the nut after securing
(see illustration 6).
(Illustration 1)
(Illustration 4) (Illustration 5) (Illustration 6)
(Illustration 2) (Illustration 3)
WATER INLET IN TALLATION
CONNECTING INLET HO E TO THE WA HING MACHINE
1. Do not remove the water absorption
cushion.
2. Inspect if water absorption cushion is
dropped or damaged before every
operation.
3. If it is, contact your authorized service
agent immediately.
4. Attach the inlet hose nut on the inlet valve connector.
5. Fasten the inlet hose nut and swing it gently to make secure the connection.
CONNECTING INLET HO E CONNECTOR WITH THE INLET HO E
1. Push down the slider & insert the inlet hose into the connector.
2. Hang the lock lever to the inlet hose connector and release the
slider until a click sound is heard.
CHECK CONNECTION BETWEEN INLET HO E
CONNECTOR & TAP
1. Swing the inlet hose gently to ensure it is fastened & secure.
2. After installation, turn on tap to inspect for leaks.
3. Do not bend/twist or distort the inlet hose.
4. Inspect proper connection between inlet hose
connector and the tap before every operation.
5. Ensure they are secure to prevent & not loose.
DI MANTLING INLET HO E
1. Turn off the tap.
2. Press the locking lever, push down slider & detach inlet hose.
3 Leave inlet hose connected to the tap if machine is used frequently to
prevent damaging the fixing screws.

PREPARATION BEFORE OPERATION LOADING LAUNDRY
1110
(Cotton)
(
(Cotton)
(
(Cotton)
(
(Cotton)
(
(Cotton)
(
(Cotton)
(
(Cotton)
(
(Cotton)
(
PREPARATION BEFORE WA HING
1. Connect the inlet hose and turn on the tap.
2. This appliance must be properly earthed before connecting to the power supply. Do not link the earth
terminal gas or tap pipeline, and so forth.
3. Lay down the drain hose.
Warning: Water temperature shou d not exceed 50°C!
4. Machine must be placed horizontally on even and stable surface to prevent excessive noise and
vibration.
IT I IMPORTANT TO NOTE THE FOLLOWING BEFORE LAUNDRYING:
• Ensure laundry is washable.
• IMPORTANT: Wash new coloured clothing separately when washing for the first time and do not wash
white clothing with coloured ones.
• Immerse non-absorbable laundry by hand.
• Treat stubborn stains such as fruit, wine, grass, rust etc. with specially formulated pre-wash detergent
before laundrying.
• Overturn the nap fabric and long floss laundry before putting them into the machine.
• Do not place chemical-soaked laundry directly into the machine.
• Place small items such as handkerchiefs, ribbons, socks etc. into laundry bag or pillow case.
Check whether
there are
special
requirements for
laundrying.
not long
bands, fasten
buttons and
zippers.
Do not
overload
machine. Load
laundry loosely
alternating
larger items
with smaller
ones.
Sort laundry
according to fabric
type. colourfastness,
and soil level. Place
thin fabric, woollens
and those prone to
wear and tear into
laundry bag.
Ensure all pockets
are empty of small
objects such as
coins, keys, screws
etc. as these may
damage the drain
pump.
• The machine's washing and spinning capacity refer to the largest weight of standard laundry under
dry condition. Washing quantity shall be lower than the rated capacity.
• Different thickness, size and laundry type will influence the actual washing
capacity. It is ideal that laundry can be overturned normally during washing.
• Do not select high water level when laundry is less than 1.0kg to avoid water
splashing.
LAUNDRY REFERENCE GUIDE
(Cotton)
(
(Cotton)
(
Blanket (Cotton)
(approx. 900g)
Work clothes (above,under)
(approx.1200g) Jeans (approx. 800g)
Coat (Cotton)
(approx. 800g)
Jacket (Cotton)
(approx. 800g)
Single bed sheet (Cotton)
(approx. 600g)
Socks
(approx. 50g)
Underpants
(approx. 70g)
Undershirt (Cotton)
(approx.180g)
Shirt (Cotton)
(approx. 300g)
Pyjamas (Cotton)
(approx.200g)

MODE & INDICATOR LIGHT
ON: indicate selected mode
FLASHING: indicate the program is in operation. Under DELAY function before operation the digital
timer shows delay time, unit is HOUR.
POWER BUTTON
• Press POWER button to turn on power. Press again to turn power off.
• The machine will power off automatically if START/PAUSE button is not pressed 10 minutes after
powering on.
TART/PAU E BUTTON
• Press START/PAUSE button to begin operation.
• Press START/PAUSE during operation to pause the machine. Press START/PAUSE to resume
operation after pause.
AIR DRY BUTTON
• On START, there will be no AIR DRY setting. Push this button to select desired AIR DRY time.
PROGRAM BUTTON
• Normal: For general wash
• Standard: Standard wash
• Jeans: For thick & larger items
• Heavy: For heavy laundry load
• Child: For sensitive & children wear
• Underwear: For delicate clothes
• Quick Wash: For quick & normal wash
• Wool: For gentle wash
• Tub Clean: For periodic inner tub & barrel wall cleaning & maintenance.
PROCE BUTTON
• Press PROCESS button to select either cycles from “wash-rinse-spin”, “soak-wash-rinse-spin”,
“wash”, “wash-rinse”, “rinse-spin”, “spin”.The default cycle is “wash-rinse-spin” after pressing START.
DETERGENT GUIDE CONTROL PANEL & FEATURE
1312
• Detach the detergent box from the machine.
• Pour concentrated synthetic detergent powder into the
detergent box (see illustration).
• It is recommended to use high efficiency, low foam
detergent powder.
U ING POWDERED DETERGENT
• It is recommended to add detergent powder under “FUZZY” program.
• Dissolve powdered detergent directly in machine
• Select Low water level.
• Add powdered detergent, run for 30 seconds to dissolve it completely & press the START/PAUSE
button.
• Place laundry & select suitable water level program.
Quick dissolve
• Prepare warm water (30 C) in a container.
• Pour powdered detergent while stirring to fully dissolve it.
• Add sufficient detergent according to laundry load & desired water level.
• It is recommended to use liquid detergent for “QUIC WASH” program for better results.
• It is not recommended to use detergent with excessive foam.
• Poor quality or expired detergent powder may get caked.
• Please clean the detergent box frequently.
U ING BLEACH
• Fill water to the selected level, dilute the bleach in the container.
• Slowly pour into the washing tub.
• Do not use bleach for coloured or fragile clothing to avoid damage.
• Do not pour bleach to directly onto laundry.
• Always dissolve powdered bleach before use.
CLO E TOP LID
Ensure top lid is closed as machine will not function when it is opened.
Detergent box
.

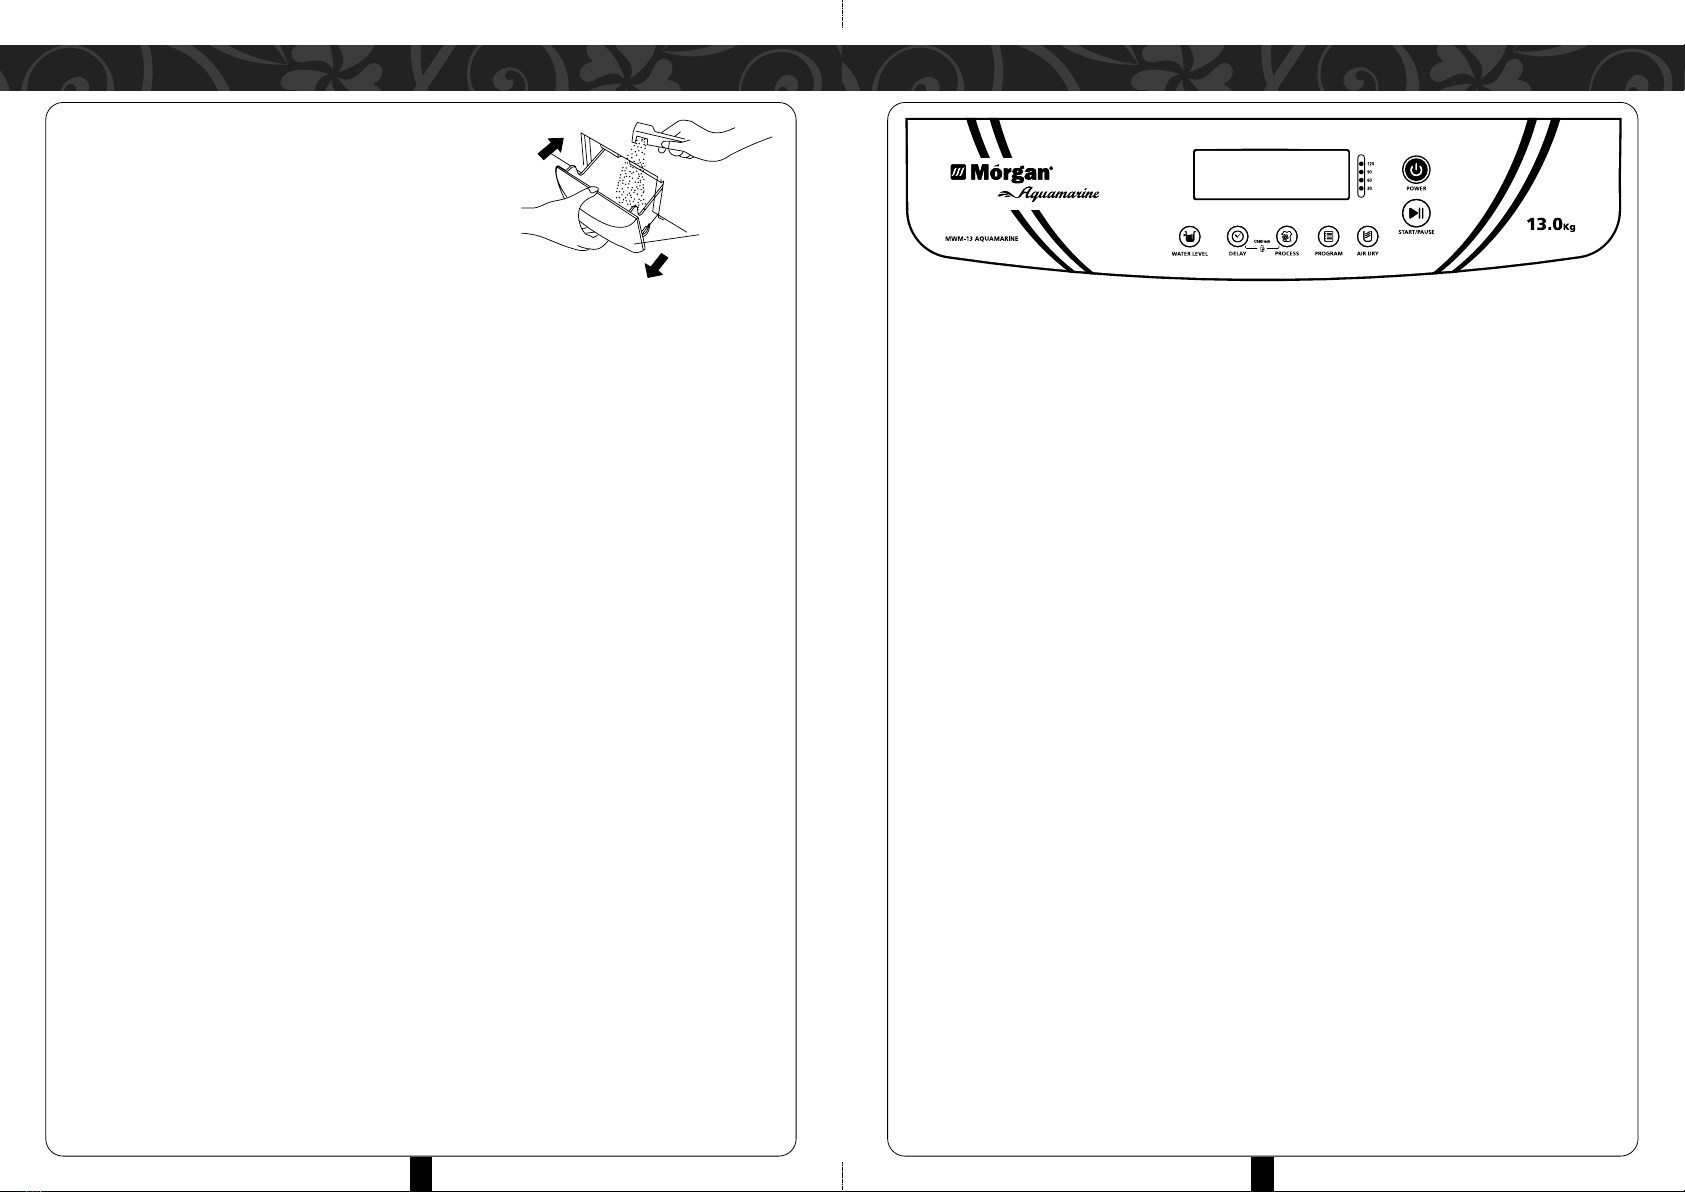
1. Press POWER button to power on machine.
– Machine will be in standby mode.
– The machine will enter FUZZY mode if there is no water inside the tub.
– Press START/PAUSE button, Select PROGRAM and then HEAVY. The machine will enter FUZZY
mode and sense the laundry load automatically to set the water level.
– The machine will not be in FUZZY mode if there is water inside the inner tub.
2. Press PROGRAM to select desired program.
3. PRESS PROCESS to begin process selection.
Note: Pressing PR CESS button continuously will repeat the process cycle again.
5. Select desired water level according to laundry load.
6. On START, press DELAY button if required to select delay time, which will be displayed on the screen
indicating time to complete the wash process. To cancel DELAY, press POWER button for machine
to enter STANDBY mode.
7. To select "Air Dry" at the beginning of operation, press PROGRAM button to select AIR DRY. The
machine will be in standby mode when air dry function is completed.
8. Close the top lid, press START/PAUSE to begin operation.
9. The buzzer will sound & power will automatically cut-off after operation is completed.
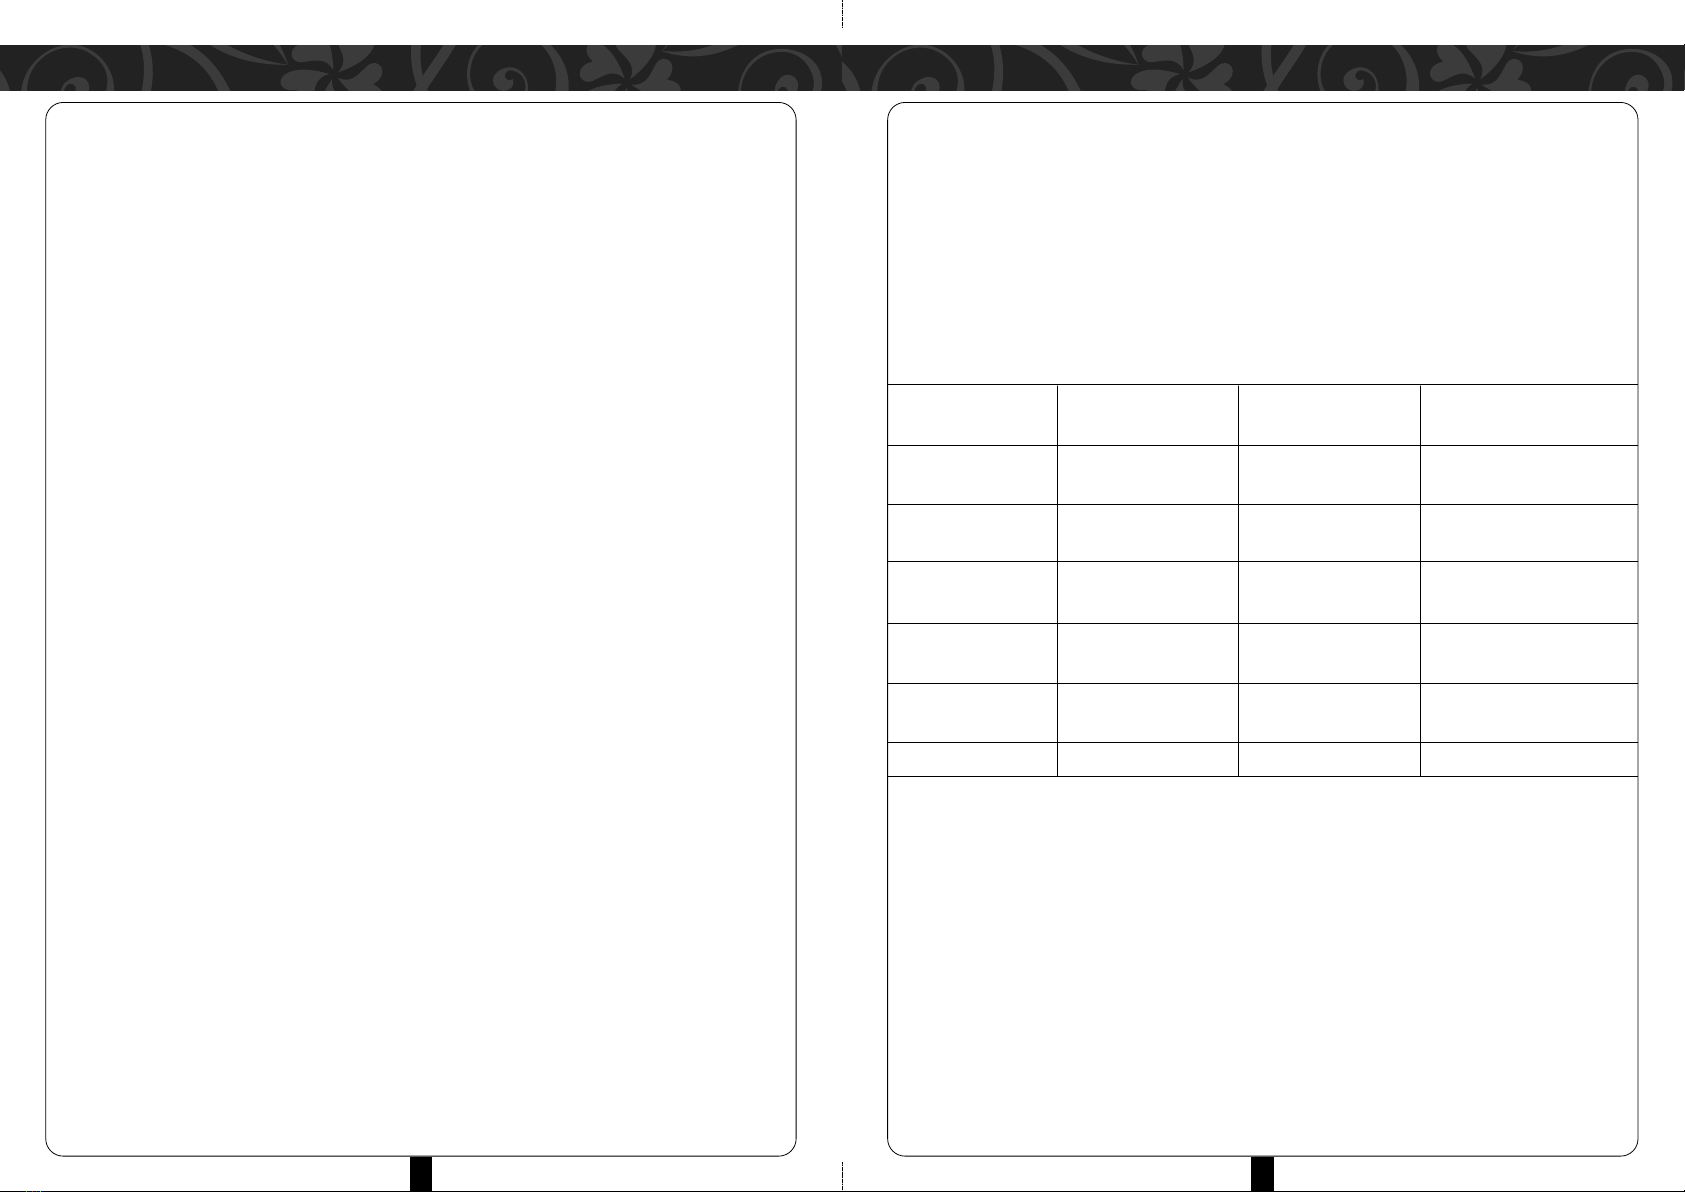
Pressing PROCESS PROGRAM APPLICATION LIGHTING INDICATOR
Button No. of Times
0 Wash, Rinse & Spin Standard Program Wash, Rinse & Spin lights
are lit
1 Soak, Wash Rinse & For soiled laundry Soak, Wash, Rinse & Spin
Spin lights are lit
2 Wash Adding detergent Wash light is lit
repeatedly
3 Wash, Rinse No spinning to avoid Wash & Rinse lights are lit
creasing
4 Rinse & Spin Hand Wash, Rinse & Rinse & Spin lights are lit
Spin
5 Spin Hand Wash & Spin Spin light is lit
CONTROL PANEL & FEATURE OPERATING IN TRUCTION
1514
DELAY BUTTON
• After pressing START, press DELAY button to select preset time from 2 – 24 hours.
• Press POWER button to cancel preset timer & enter default state.
WATER LEVEL BUTTON
• On START with FUZZY LOGIC and WATER LEVEL is not selected, the digital timer will display “- -“.
• Before pressing START/PAUSE, select desired program.
– FUZZY LOGIC will only activate if NORMAL or HEAVY wash is selected.
– FUZZY LOGIC will not activate if STANDARD wash is selected with water level at “6”.
– FUZZY LOGIC will also not activate if QUIC WASH is selected with water level at “2”.
• FUZZY LOGIC will not activate if WASH process is NOT selected
• On START without FUZZY LOGIC, select desired water level according to laundry load.
– Low water level = 1-2
– Mid water level = 3-6
– High water level = 7-10
• To add more water during wash function (including rinse):
– Press WATER LEVEL button to add water. Release WATER LEVEL button to stop.
– Pause operation & press WATER LEVEL button to select higher water level.
– Press Start/Pause button to add water automatically and continue operation.
– If selected water level is lower than existing water level, the same water level will automatically
apply for the next cycle.
• Water will be added automatically during SOA , WASH & RINSE cycles if it senses water level lower
than selected water level.
DI PLAY CREEN
• Under delay & before wash, display shows DELAY time in HOURS.
• During wash, display will show process time in MINUTES.
• In the event of a malfunction, display will show trouble code.
• On START with FUZZY LOGIC activated, display will show “- -“.

CARE & CLEANING TROUBLE HOOTING
1716
• Use this troubleshooting guide for a list of possible solutions if the machine does not perform as
expected or malfunctions.
• If a solution cannot be found or the problem persists, please contact your authorized service center.
• Do not, under any circumstance, dismantle or attempt to repair the machine yourself.
PR BLEM P SSIBLE CAUSES S LUTI N
No display on control panel • Power Plug is not inserted correctly. • Reinsert power plug correctly.
• No power supply. • Inspect the power socket or change to
another power socket.
• Power switch is not turned on. • Press power switch.
• Check power supply
Water inlet hose leaking • Inlet hose connector (connecting with the • Reinstall the inlet hose again.
tap) is not secure.
• Inlet hose and washing machine connector • Tighten the connector of the machine.
is loose.
Machine does not drain • Drain hose is not placed down on floor • Lay down the drain hose to floor level.
level.
• Drain hose is ent/twisted or o structed. • Straighten or clean the drain hose.
No water supply • Tap is not turned on. • Restart when water supply is resumed.
• Water inlet hose is o structed. • Turn on the tap.
• Follow instructions “cleaning the water
inlet filter”.
Spin function stops and water • Excessive or insufficient laundry load.
supply resumes during spin • The machine will adjust itself
program • Machine is not placed on sta le surface. automatically.
Spin function not working even • Top lid is open when drain function egins • Close the top lid.
when spin utton is selected or when is completed.
Intermittent spin during spin • Balance laundry load for est spin results. • This is normal.
function
Water flows from drain hose • Water remnant in the tu during factory • This is normal.
during first use quality check and test
IMPORTANT: Detach po er plug from po er supply immediately if problem persists after
follo ing the above troubleshooting and contact your authorized service agent. It is dangerous
to attempt to repair the machine yourself.
AFTER EVERY WA H
• The machine stops automatically, and the buzzer will sound to remind you to remove the laundry or
begin another wash.
• Always unplug machine from the power supply after every wash and turn off the water tap to prevent
leaks.
EXTERIOR CARE & CLEANING
• Clean the machine exterior using a soft, damp cloth.
• Do not use abrasive cleansers or chemicals to avoid damaging plastic parts
and surface.
CLEANING INLET GATE
The inlet gate filter may be obstructed by dust. To clean:
• Turn off water tap and turn on the power switch.
• Start machine for 5 seconds & allow water in the inlet hose flow into the tub.
• Turn off power.
• Detach inlet hose, remove and clean the inlet gate valve and the inlet gate filter.
• Reassemble the inlet gate & filter.
CLEAN LINT FILTER
It is recommended to clean the lint filter after
every wash. To clean:
• Detach the lint filter (see Illustration 1).
• Open the lint filter and wash it (see Illustration 2).
• Close the lint filter and reassemble.
MAINTENANCE TIP
It is advisable to turn off the water tap after every wash & detach the inlet hose, if
necessary. After every wash:
• Drain any remaining water in the tub immediately.
• Unplug power cord from the power supply.
• Store power cord and drain hose.
• Wipe the water on machine exterior & surface with soft cloth.
• eep top lid open for a while to help prevent mould and stagnant smells from forming inside the
appliance.
The baffleplate
(
Press it and pull out the lint filterB
The baffleplate
(the black rubber block)
Illustration 1 Illustration 2
Close
Open
Close
Open

OTHER FUNCTION
1918
OTHER FUNCTION
PECIFICATION
1. WHEN ALARM GOE OFF
FAULT C DE DISPLAY P SSIBLE CAUSES S LUTI N
E0 Top lid opened when Delay is started. Close top lid & clear fault code.
E1 Water does not drain within 5 minutes. Ensure drain hose is laid down. Open
top lid, follow trou leshooting guide,
close top lid & clear fault code.
E2 Top lid opened during spin function. Close top lid & clear fault code
E3 Im alanced spin. Open top lid, loosen laundry to alance
weight. Close top lid & clear fault code.
E4 Water level does not reach preset level Open top lid, follow trou leshooting
even after 50 minutes. guide, close top lid & clear fault code.
E5 Top lid still open after deactivating Close top lid & clear fault code.
(Child lock light flashes child lock.
synchronously)
E6 Water level exceeds overflow level. Drain water until water level reaches the
maximum water level mark.
E7 A normal input & output memory. Close top lid & clear fault code.
F1 Water sensor malfunction Power off, detach power plug from
power supply & contact authorized
service agent.
2. IMBALANCE ADJU TMENT
• During spinning, violent vibrations may happen if laundry is not placed equally in the tub. This machine
has an automatic imbalance adjustment function. Once vibration exceeds beyond a specified level,
the adjustment system will start automatically to adjust the imbalance.
3. POWER UPPLY I CUT OFF AUTOMATICALLY
• If START/PAUSE button is not pressed within 10 minutes after pressing the POWER button, power
supply will cut off automatically.
• Power supply will cut off automatically after washing is completed.
Model MWM-13 Aquamarine
Rated Voltage / Frequency 220-240V~ 50Hz
Washing Power 410W
Spinning Power 330W
Capacity 13.0kg
Weight Approx. 37.5kg
Dimension (mm) 598W x 613D x 983H
4. CHILD LOCK FUNCTION
All buttons including P WER will be locked.
• If top lid is open during operation, machine will stop and sound an alarm.
• If top lid is closed within 5 seconds, the machine operation will resume & fault code will be cleared.
• If top lid is not closed within 5 seconds, DRAIN process will begin if there is water in the inner tub &
closing the top lid will not deactivate this process.
• During draining, an alarm will sound once every 10 seconds.
• When water in inner tub is 5cm higher, an alarm will sound once every 10 minutes.
• When draining completes, the machine will be in waiting mode.
• If top lid is closed, the machine will resume operation as in previous setting.
nce child lock is activated & top lid is opened for over 5 seconds during WASH or
RINSE (with water inside inner tub) – DRAIN function will activate & alarm will
sound. If child lock function is deactivated during DRAIN, water will be added
automatically to reach preset level and resume operation.
Table of contents
Other Morgan Washer manuals

Morgan
Morgan MWM-1310SA User manual

Morgan
Morgan MWM-1312SA User manual

Morgan
Morgan MWM-7 Zircon User manual

Morgan
Morgan MWM-Vagor 11 User manual

Morgan
Morgan MWM-11 Sapphire User manual

Morgan
Morgan MWM-B1270SA User manual

Morgan
Morgan MWM-Rena 7FA User manual

Morgan
Morgan MWM-Vagor 13 FA User manual

Morgan
Morgan MWM-680FA User manual

Morgan
Morgan MWM-1370SA User manual