Morgan MWM-Vagor 13 FA User manual

E-mail: electrical.appliance@dksh.com
www.morgan.my
Market Expansion
Services by
www.dksh.com.my
facebook.com/morganappliances
USER MANUAL
MWM-Vagor 13 FA
Automatic
Washing
Machine
MWM-Vagor 13 FA(IM)141215_La out 1 12/18/15 10:39 AM Page 1

3
AFETY AND PRECAUTION
2
C O N T E N T
3
6
8
9
10
11
12
13
15
15
16
18
19
Safety And Precautions
Washer Installation
Preparation Before Washing
Parts Identification
Control Panel
Quick Start
Washing Instructions
Special Features
Fully Automatic Wash Program
Technical Specifications
Cleaning And Maintenance
Troubleshooting
Malfunction Display And Solutions
Observe the following items in order to prevent from injuring yourself, others and
the damage of property:
Warning General Warning symbol of potential hazards that may result in serious injury
or death
Caution General Caution symbol to alert user of potential injury to persons and/or
property.
Please observe the following contents accompanying the symbols
This symbol alerts potential hazards. All safety messages should be obeyed to avoid
possible harm.
This symbol denote prohibited actions. All safety messages should be obeyed to avoid
possible dangers.
This symbol denotes mandatory actions. All safety messages should be obeyed to avoid
possible hazards.
Never allow this appliance to be used by persons (including children) with psychological,
physical or sensory impairments or with insufficient knowledge, unless closely supervised
and instructed by someone responsible for their safety. Children should be supervised to
ensure they do not play with the appliance at all times.
WARNING
DO NOT dismantle/
assemble the machine.
DO NOT insert hands to
remove clothing when
tub is still spinning.
Always wait for it to
stop.
小小天天
DO NOT install machine
in damp and wet areas to
prevent electric shocks,
shor t circ u i t s a n d
damage.
小
小
天
天
DO NOT spray water
directly onto the machine
when cleaning.
No we areas No spraying
MWM-Vagor 13 FA(IM)141215_La out 1 12/18/15 10:39 AM Page 2

5
AFETY AND PRECAUTIONAFETY AND PRECAUTION
WARNING
4
小小天天
DO NOT allow children to climb onto the
machine or peer into the spin barrel to avoid
accidents.
Prohibi ed
Prohibi ed
Prohibi ed
Smoke and hea sources
prohibi ed
DO NOT wash clothes that have been in contact
with flammable liquids like kerosene, gasoline
and alcohol.
DO NOT damage power
cord/power plug in order to
avoid electric shock, short
circuit and risk of fire.
DO clean the power
plug regularly to remove
dust and dirt to prevent
malfunctions.
DO remove power plug from
the power supply if the
machine is not in use.
DO earth the power socket
to avoid electric shock,
short circuit and accidental
leakage.
DO insert the power
plug into the power
supply correctly and
securely.
DO NOT place flammable materials like burning
candle, lighted cigarettes, electric stove on the
washer. Keep away from
heat sources.
WARNING
CAUTION
小小天天
>50C
小小天天
DO use the correct
power supply with
correct rated voltage.
DO NOT touch the
power plug with wet
hands.
DO ensure water inlet is
connected with tap
turned on.
DO NOT exceed 50°C
when using warm water
for washing.
DO NOT replace or
modify the power cord.
Request for authorized
repair and service
DO NOT place young
children or heavy objects on
the washer top.
DO NOT yank on the
power cord. Pull on the
power plug.
Please do not wash down
jacket, raincoat, fishing coat
and similar clothes in the
washer.
Prohibi ed
Prohibi ed
Prohibi edProhibi ed
MWM-Vagor 13 FA(IM)141215_La out 1 12/18/15 10:39 AM Page 3

7
6
WA HER IN TALLATION
• Remove package and bottom board of the cabinet on the foam cover.
• Open the lid of the washer door and remove accessories.
• DO NOT wash the foam cushion as trial operation.
IN TALLATION OF DRAINAGE HO E
Completely sleeve the drain hose over the drainage outlet.
Fix and tighten it with a hoop. (As shown in he figure)
IN TALLATION OF WATER INLET PIPE
•Place the water inlet pipe(which has metallic filtering bag) screw on to the tap. Tightly screw
another end of water inlet hose on water inlet valve, (with rubber seal ring inside).
Note: When tightening the cl mping nut, evenly pply the
force nd do not twist the w ter inlet v lve to void
bre king of w ter inlet v lve joint.
ONLY FOR MODELS WI H DOUBLE SCREW
HREAD WA ER INLE PIPE
Placement Of Water Drainage Hose
DO NOT exceed 3m if the
water hose is to be extended
as it will affect the water
discharge.
The placed height of water
drain hose should not exceed
15cm.
Do not bend the water drain
hose and place it under the
washer.
Base foamed cushion
Under3m
Under 15cm
Water inlet hose
Clamping nut
IN TALLATION OF WATER INLET PIPE
12
4
Junk ring
C
5mm
A
B
5
Clamping nut Water inlet hose
3
FOR LOWER DRAINAGE SYS EM ONLY
WA HER IN TALLATION
Small ball
Push down the slide jacket to expose the
small balls and enable separation of
connector socket from speedy connector.
The connection socket consists of A and B two parts. Before
installation, A and B two parts must be unscrewed about 5mm, or
directly disconnected. If the bore of water tap is larger, remove the
plastic junk ring of part A.
Unscrew four screws of part A and sleeve part A horizontally over the
mouth at the end of water tap (the mouth at the end of water tap must
be flat and smooth. Flatten it by filing if it is not flat) and push it
upward with force making the rubber washer firmly press the plane
center of water tap mouth. Then tighten the screw sequentially. After
that, tightly screw on part B.
6
Connect
7
Separate
5
CONNEC : Push down the slide jacket of speedy connector
(4 small balls must be exposed ), insert it into the connection
socket and then push upward Release the connection of water
tap with speedy connector completely. If it is required to feed
water, simply open the water tap.
SEPARA E: Close the water tap, push down the slide jacket
of speedy connector and pull out the speedy connector.
Tightly screw another end of water inlet hose on water inlet
valve. (with rubber seal ring inside).
Note: When tightening the cl mping nut, evenly pply
the force nd do not twist the w ter inlet v lve to void
bre king of w ter inlet v lve joint.
ONLY FOR MODELS WITH SINGLE SCREW THREAD WATER INLET PIPE
If the power cord is d m ged, it must be repl ced by the m nuf cturer, its service
gent or simil rly qu lified persons in order to void h z rd. The instructions for
ppli nces connected to the w ter m ins by det ch ble hose-sets sh ll st te th t the
new hose-sets supplied with the ppli nce re to be used nd th t old hose-sets
should not be reused. The openings must not be obstructed by c rpet.This ppli nce
is for indoor use only.
MWM-Vagor 13 FA(IM)141215_La out 1 12/18/15 10:39 AM Page 4

PREPARATION BEFORE WA HING PART IDENTIFICATION
ADJU T THE ADJU TABLE FOOT TO EN URE
WA HE TABILITY
Adjustable foot (rotate clockwise to extend, anti-clockwise to
contract). Incline the washer slightly and loosen the adjustable
foot knob. Adjust the foot knob and ensure maximum contact
with the ground. Tighten and lock the foot knob. Ensure washer
is placed on flat, stable ground surface to prevent washer barrel
from excessive vibration and damaging the cabinet.
CONNECT WITH
TO POWER
UPPLY
Adjustable foot
(rotate clockwise to
extend, anti-clockwise to
contract).
IN TALL THE WATER INLET HO E.
PLACE CLOTHING INTO WA HER AND ADD ADEQUATE AMOUNT OF
DETERGENT.
NOTICE: Remove coins, keys and other objects and
zip up clothing to prevent them from damaging the
barrel.
For one inlet hose
TURN ON THE
WATER UPPLY
PUT DOWN THE DRAIN HOU E.
Note: W ter will overflow if the height of the
w ter hose is below 860mm.
Gravity drain
U
Power Cord
Frame
Handle
Adjustable foot knob
Top id
Control Panel
Cabinet
Ple se refer to tt ched re ding m teri ls.
Fixing ring (1) is used for the fixing in time of
the installation of the lower drain hose.
Only for lower drainage hose
Water inlet hose assembly
Only for model wi h single screw hread wa er
inle pipe
Water inlet hose assembly
Only for model wi h double screw hread wa er
inle pipe
Self-tapping screw
Only for models including base cover
Universal connector
98
MWM-Vagor 13 FA(IM)141215_La out 1 12/18/15 10:39 AM Page 5

CONTROL PANEL QUICK TART
WA H LEVEL
Press this button to preset selected water quantities. The indicator light will illuminate and move with
each press.
WA H
Press the button to select the washing duration.
RIN E
Press the button to select the rinsing duration.
PIN
Press the button to select the spinning duration.
DELAY
Press this button to preset delay time. For > 24 hours, every button press will extend delay time by an
hour. For > 24 hours, every button press will extend delay time by 6 hours up to 48 hours and will revert
back to default status after that.
PROGRAMME
Choose automatic presets from:
– Normal (light)
– Jeans (light)
– Silk (light)
– Quick (flash)
– Anti-Wrinkle (flash)
– Air Dry (flash)
CHILD LOCK
Press the "water level" and "Spin" at the same time to lock buttons on control panel. Press the "water
level"and "Spin" at the same time again to unlock.
TART/PAU E
After programme selection, press the button to start. Press the button to pause during operation. Press
again to resume operation until program completes.
* The manufac urer reserves he righ o amend/modify he illus ra ions wi hou no ice.
To pro ec he con rol panel, he in erval ime of power on and off should be no less han 30 seconds.
IN TALL THE WA HING
MACHINE
1
LOAD THE LAUNDRY
2
MEA URE, ADD
DETERGENT AND
WATER INTO THE
WA H TUB
3
CLO E THE
MACHINE DOOR
4
PUT DOWN THE
DRAINAGE PIPE
5
TURN ON WATER
UPPLY
6
PLUG THE POWER
UPPLY
7
ELECT THE
DE IRED PROGRAM
8
PRE THE
[ TART/PAU E] BUTTON
9
PROGRAMME ELECTION
1. Press the POWER button.
2. Select the proper water level and other attached functions.
3. Press the start/pause key.
When w shing completes
•When washing is completed, the buzzer wil sound continuously for 6 times and power will be
automatically cut off thereafter.
•Turn water supply off.
•Remove power plug from power supply.
1110
MWM-Vagor 13 FA(IM)141215_La out 1 12/18/15 10:39 AM Page 6

IN TRUCTION OF THE NORMAL PROGRAM
1. [Normal] wash program is the easiest, most convenient and most common washing program. When
the user press the power switch and then press [Start/Pause] button, the normal washing program
will start to work.
2. When the washer start to work, the digital tube show the remain time. The indicator light which stand
for remaining time is flickering.
TEP IN DETAIL
1. Press the power switch.
2. According to the washing amount choose the proper water level.
3. Press START/PAUSE button.
IN TRUCTION TO INGLE WA H PROGRAM
1. You may freely select any single wash program, or combine WASH, SPIN, and SPIN programs if
desired. Simply turn off any one (or two) of these 3 indicators if not needed and leave the selected
ones illuminated.
2. Single wash -- after switching on the power, turn off RINSE and SPIN two indicators by pressing
these two keys. The operation for single rinse and single spin is similar.
3. Single wash-spin – after switching on the power, turn off RINSE indicator by pressing that key. The
operation for single rinse-spin and single wash-rinse is similar.
U E THE CLEANING OLUTION FOR TWICE
1. Place first batch of laundry, add detergent and press “Function” button to set single “wash” program.
2. Remove the first batch of laundry after the buzzer sounds.
3. Place second batch of laundry and select “WASH, RINSE, and SPIN”.
4. Remove laundry after the buzzer sounds.
5. Place first batch of laundry and press “Function” button to run “RINSE” and “SPIN”.
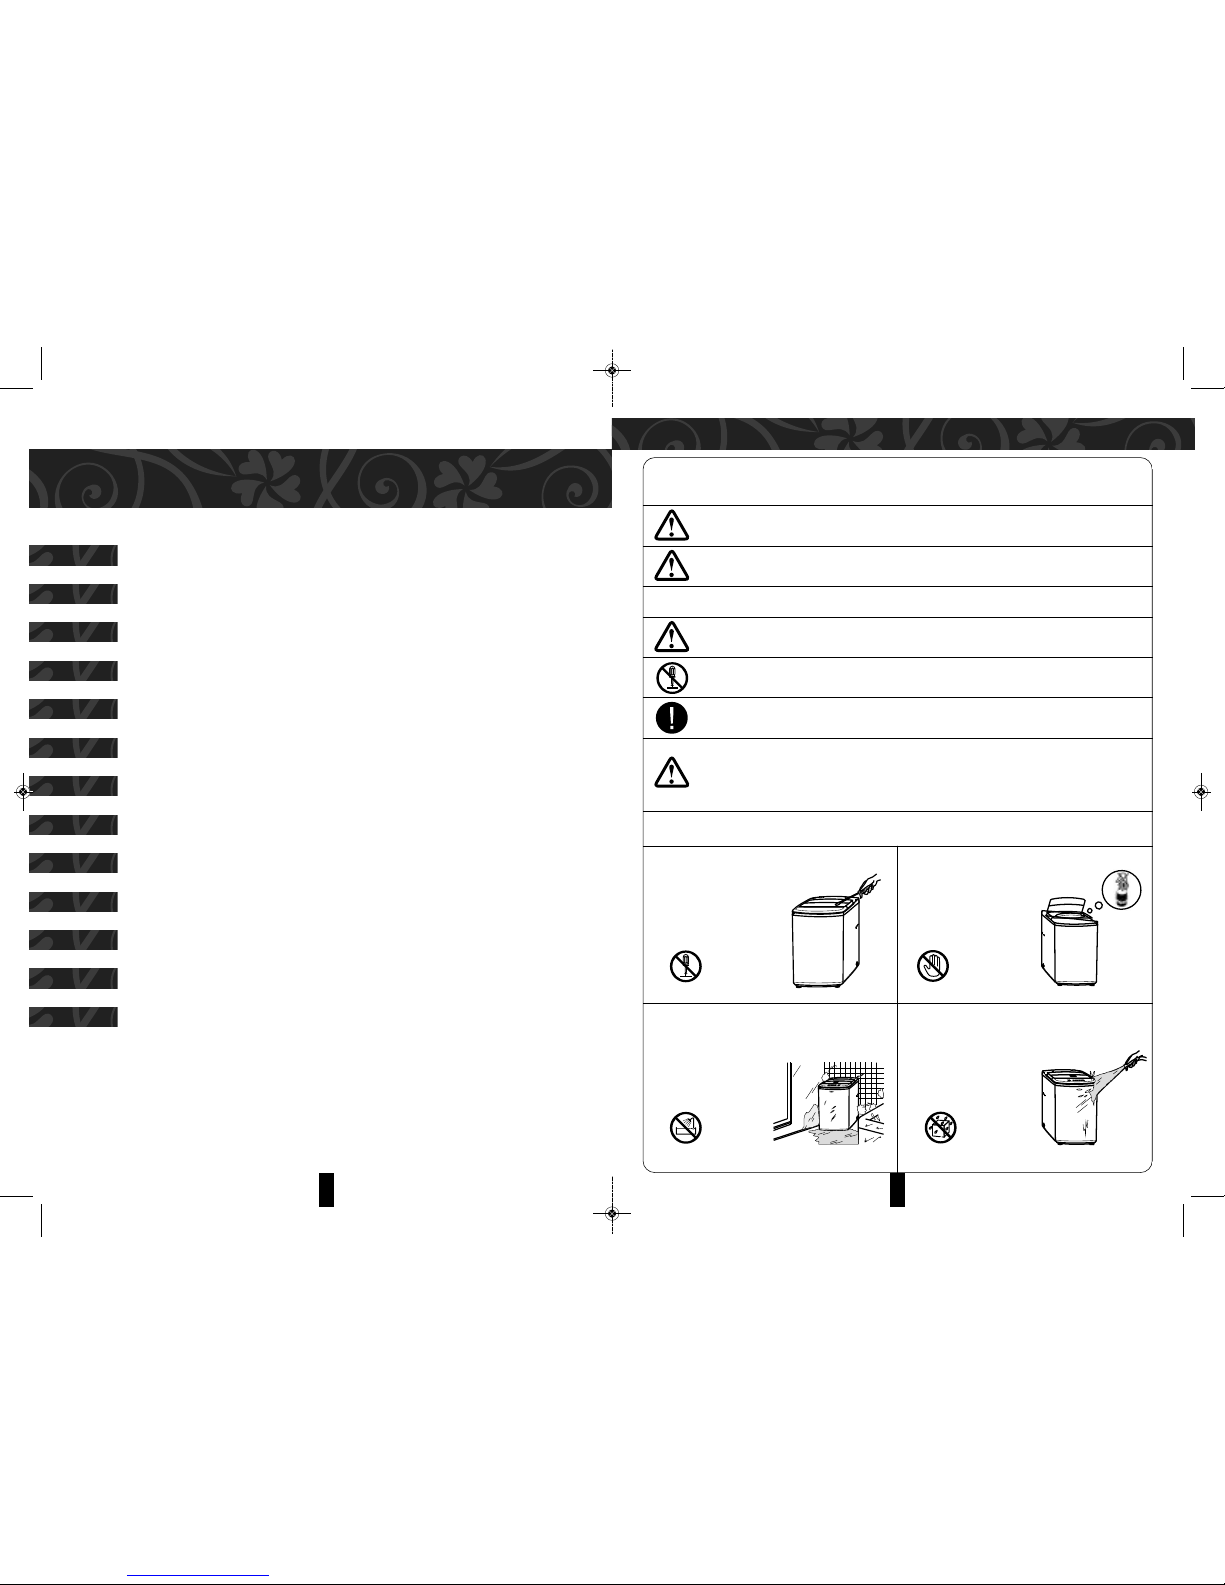
NOTICE
1. Close the lid of the door when machine is running, otherwise, it will automatically stop working
during spin process and send out abnormal warning.
2. The washer will not work when the filled water does not reach the set water level.
WA HING IN TRUCTION PECIAL FEATURE
DELAY TIME PROGRAM
Delay time means the preset beginning
time of washing.
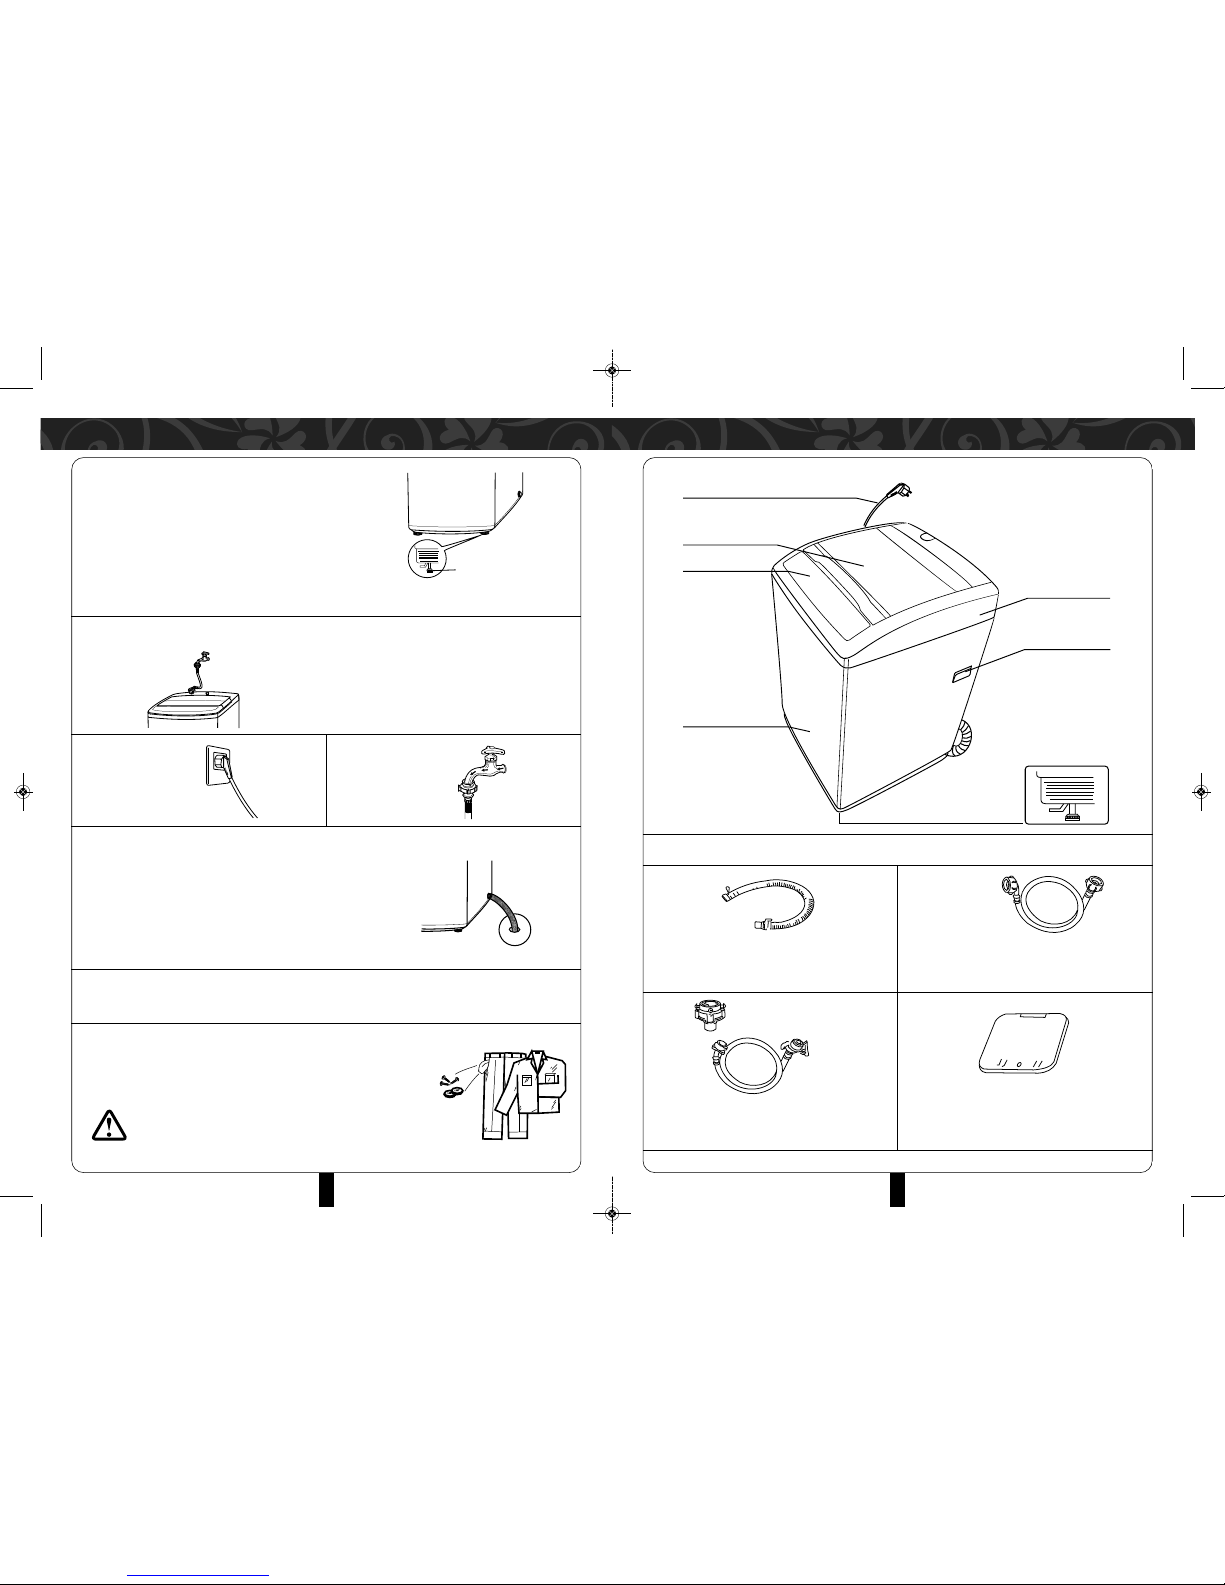
1. Switch on the power.
2. Open the tap and lay the drainage hose.
3. Put in the laundry and detergent.
4. Select the propre water level according to
the quantity of clothes.
5. Select the functions and programs.
6. Press “DE AY” button to select the
beginning time of washing.
7. close the lid and press “START/PAUSE”
button.
Confirmation of the delay and inspection
1. After the delay function is started, the corresponding delay light will flash, and other lights will be
turned off.
2. After commencing the delay button, press and hold the “Delay” button to select desired preset
program and function. Release “Delay” button to return to default delay status.
Cancel the delay time, or alternate the delay time
1. Press “ Power” button to cancel the delay time.
2. To change the delay time, cancel the delay time first, and then press “Delay” button to reset.
NORMAL
For normal washing procedure.
QUICK
Short washing time. Suitable for washing lightly stained clothes.
AIR DRY
As for not easily fading,deforming, and non-waterproof clothes, can use the function to dry clothes
without heating, and to reach the result of being dried in a room.
ANTI-WRINKLE
Short washing time with many rinses for a more thorough wash.
ILK
Delicate wash, especially for silk frabics.
JEAN
For heavily soiled or stained clothes.
Method of use delay button
Press the “DE AY” button each time, the
number o the digital indication adds by “1”; After
the number reaches “24”, press the “DE AY”
button each time, the number adds by “6”; After
the number reaches 48, the light of delay time is
turned off , and the delay program return to
original status.
Remaining Time
(Minutes)
Delay
Delay (hour)
1312
MWM-Vagor 13 FA(IM)141215_La out 1 12/18/15 10:39 AM Page 7

Model MWM-Vagor 13 FA
Rated Voltage / Frequency 240V~ 50Hz
Rated Wattage 600W
Capacity 13.0kg
Max. water presure permitted in the water inlet 0.6Mpa
Min. water presure permitted in the water inlet 0.1Mpa
FUNCTION OF AUTOMATIC POWER HUT OFF
1. If the machine is non-operational 10 minutes after powering on, it will power off automatically.
2. After end of operation, the buzzer will sound 6 times, and the power will off automatically.
FUNCTION AND ADJU TING FOR UNBALANCE
1. If the laundry is placed on uneven surfaces, it will most likely to cause vibrations during spinning.
The machine is capable of adjusting any imbalance and correcting them if the imbalance is
excessive.
2. If imbalances are not rectified, a warning alarm will sound.
FUZZY CONTROL FUNCTION
1. The “fuzzy” program automatically detects laundry loads. If there is water in the tub prior to
washing, the machine will deactivate “fuzzy” control. If water level is selected manually, the machine
will deactivate “fuzzy” contro function.
POWER FAILURE MEMORY FUNCTION
1. In the event of a power supply disruption, the machine will memorize the current operation state and
revert to that same state once power supply resumes.
* Applies only o washers wi h he wo abovemen ioned func ions
PECIAL FEATURE FULLY AUTOMATIC WA H PROGRAM
PROGRAM WASH IME RINSE IME SPIN IME O AL IME
NORMA Soak 8 min 2 times 5 min 62 min
Wash 12 min
QUICK 6 min 1 times 3 min 23 min
SI K Soak 10 min 2 times 5 min 60 min
Wash 12 min
JEANS Soak 13 min 2 times 1 min 45 min
Wash 6 min
ANTI-WRINK E 9 min 2 times 1 min 41 min
AIR DRY 60 min 60 min
NOTE: The tot l times include w ter filling nd dr ining times. W ter pressure nd w ter
dr in ge speeds c n ffect tot l oper tion times.
TECHNICAL PECIFICATION
1514
MWM-Vagor 13 FA(IM)141215_La out 1 12/18/15 10:39 AM Page 8

END OF PROGRAM
•The machine will sound at the end of any program to remind you to remove laundry or to resume
operation again.
•After the sound, the washing machine returns to its power-off state with no display and all lights off.
•Turn off water supply to prevent water leakage and remove power plug to avoid fire hazards.
CLEAN THE LINT FILTER IN THE DRAIN PUMP
(only for models with dr in ge filter)
MAINTENANCE
•Use a clean, soft cloth to wipe off water and dirt on the exterior of the
machine after every use. Do not use abrasive
•chemical cleansers as they can damage the plastic finishing.
CLEANING AND MAINTENANCE CLEANING AND MAINTENANCE
CLEANING THE WATER INLET
After prolonged use, the w ter inlet mesh b g m y be blocked with
smudge nd should be cle ned ccording to these steps:
•Switch on power and turn off water supply.
•Allow washer to work for 5 seconds so that water flows into the tub through
the water inlet hose. Turn off power.
•Remove the water inlet hose and clean the mesh bag and reassemble the
water inlet assembly.
CLEANING THE MAGIC FILTER
After using the w shing m chine for period, ple se cle n it ccording to the following steps:
1. Remove out the lint filter.
2. Open the filter and wash it clean in the water.
3. Restore it and fix it.
CLEANING THE NORMAL FILTER
After using the w shing m chine regul rly, cle n it ccording to the following steps:
1. Take off the lint filter.
2. Turn over the mesh bag and wash it clean in
the water.
3. Restore and fix it.
(only for magic fil er)
(only for normal fil er)
1. Drain water from the
pump container.
2. oosen the pump cover
anti-clockwise.
3. Remove out the lint filter.
4. Clean the filter. 5. Restore it and adjust the
convex place to align at
the pump hole.
6. Tighten the pump cover
clockwise.
1716
MWM-Vagor 13 FA(IM)141215_La out 1 12/18/15 10:39 AM Page 9

Should you experience m lfunctions or problems with your w sher, ple se cont ct your
m nuf cturer, ne rest uthorized service gent or simil rly qu lified person. DO NOT ttempt
to rep ir it yourself. The following re helpful troubleshooting guides:
LI T OF YMPTOM AND REA ON
SYMP OMS REASONS
•Power may be turned off / fuse blown out
•No water supply / low water pressure
NO WATER •Inlet hose not connected
F OWING IN •Inlet valve filter screen obstructed
•Inlet valve coil damaged
•“Start/Pause” button may have been pressed accidentally
•Power may be turned off / fuse blown out
•Power supply may be too low
NO WASHING •Water inside washer below the minimum level (washer will no work if below
minimum level)
•“Delay” washing mode may been selected
ABNORMA •Water drainage hose placed too high
DRAINING •Mouth of water hose submerged in water
•Drainage valve inner rubber ring is obstructed
•Door lid is closed
ABNORMA •Clothing piled at one side of barrel or excessive laundry load
SPIN •Washer placed on unstable surface
•oose motor belt
NO E: If l undry is piled up to one side during the spin process, it will result in imb l nce of the
spin b rrel. The computer insid the w sher will utom tic lly correct it by filling in more w ter.
The computer will ttempt to correct this problem in 3 times. If problem still persists, you will
h ve to m nu lly sort out the l undry inside the w sher.
TROUBLE HOOTING MALFUNCTION DI PLAY AND OLUTION
Should the w sher m lfunction, cont ct the ne rest service centre or the m nuf cturer’s s les
service dep rtment immedi tely.
DO NOT ttempt to rep ir it yourself. The following re the solutions for problem codes th t
usu lly ppe r on the displ y p nel during m lfunction:
PROBLEM POSSIBLE CAUSE PROBLEM CODE BUZZER SOUNDS ALARM SOUNDS
ALARM FOR
WATER INLET
Water is filled for 16 minutes
and yet does not reach the
preset level “E1” flares
IMBALANCE
ALARM
Chec imbalance for the thirt
time “E3” flares
OVERFLOW
ALARM
Water continues filling even
after water has reached the
preset level
“E5” flares
DRAIN ALARM Alarm for water drain time out “E4” flares
ALARM FOR
OPENING LID
Lid is opened after starting.
Delay timer, or lid is opened
during spinning, or when lid is
opened with child loc
activated.
“E2” flares
The buzzer goes on
for 10 seconds. If the
fault is not sloved,
buzzes again for 10
seconds in every 16
minutes.
Open the lid to deal
with faults, then
close the stop the
alarm.
Power off, repair
1918
MWM-Vagor 13 FA(IM)141215_La out 1 12/18/15 10:39 AM Page 10
Table of contents
Other Morgan Washer manuals

Morgan
Morgan MWM-B1270SA User manual

Morgan
Morgan MWM-13 Aquamarine User manual

Morgan
Morgan MWM-Rena 7FA User manual

Morgan
Morgan MWM-11 Sapphire User manual

Morgan
Morgan MWM-1310SA User manual

Morgan
Morgan MWM-1370SA User manual

Morgan
Morgan MWM-680FA User manual

Morgan
Morgan MWM-Vagor 11 User manual

Morgan
Morgan MWM-7 Zircon User manual

Morgan
Morgan MWM-1312SA User manual
Popular Washer manuals by other brands

LG
LG F1473ND owner's manual

LG
LG WM2677HSM owner's manual

Indesit
Indesit WIXE 127 Instructions for use

Hotpoint Ariston
Hotpoint Ariston WMG 721 Instructions for use

Tricity Bendix
Tricity Bendix AW 405 Operating and installation instructions

Siemens
Siemens WM16XME2FG User manual and installation instructions