Morgan MWM-680FA User manual

USER MANUAL
Automatic
Washing
Machines
M M-680FA
M M-780FA
M M-890FA
E-mail: electrical.appliance@dksh.com
www.morgan.my
Market Expansion
Services by
www.dksh.com
facebook.com/morganappliances
MWM-680FA(IM)130312_Layout 1 3/13/12 3:22 PM Page 1

2 3
C O N T E N T S
4
4
5
6-8
9-10
10
10
11
12
13
14
14-15
16
17
18
Warning
Care And Maintenance
Parts Identification
Installation Instruction
Control Panel: Functions & Processes
Guidlines Before Washing
Program Selection Guide
Normal Usage
How To Use The Blanket Program
How To Use Customizes Program
How To Use Preset Washing
Various Functions
Troubleshooting
Troubleshooting Guide
S ecifications
MWM-680FA(IM)130312_Layout 1 3/13/12 3:22 PM Page 2

5
PARTS IDENTIfICATION
4
1. Never put your hand(s) into the Wash/
Spin Tub while the washer is operating.
• Reaching your hands into the
washing machine during operation
may cause serious injuries.
• If the Wash/Spin Tub does not stop within 15 seconds
after the Washer id is opened, turn the washer off
immediately and call a service person.
2. Ensure the power plug and power cord
are properly connected to the washer.
• An improperly connected power plug
may pose a fire hazard.
• Never disconnect the washer by
yanking on the power cord. Hold the
power plug as you pull it out.
• Never disconnect/connect the power plug with wet
hands as it may cause electric shocks.
3. Be sure not to bring any type of
flame near the washer or put lit
cigarettes or volatile materials on
the top of the washer.
4. Never wash laundry stained with
benzene, kerosene, thinner or
gasoline.
• It may cause a risk of fire explosion.
5. Do not install the washer in the
bathroom or humid place.
• It may cause malfunction or an
electric shock.
6. Do not allow children to play on or
near the washer
• If a child accidentally falls in to the
Wash/Spin Tub, serious injury can
occur.
7. Be sure not to splash or pour water
on the Control Panel.
• It May cause a malfunction or
electric shock.
8. It is not recommended to allow your washer
to be repaired by an unqualified person.
Repair must only be carried out by a
qualified technician.
Washing Machine Body
Use soft cloth to wipe off excess water
or dirt on the surface of the washer.
• Do not spray directly onto the
washer body.
• Detergent and other chemicals are not to be used on
the surface
Water Inlet Valve
(Recommended to clean every 6 months)
• The water inlet mesh bag may be
blocked, please remove the water inlet
hose, take out the water inlet mesh bag
from the water inlet valve, clean the
mesh bag, then assemble the mesh bag
in the valve and attach the water inlet hose.
“Magic” Hose Joint Filter
(Recommended to clean every 6 months)
• Pull the water inlet hose out.
• Turn off the revolver according to the
figure shown.
• oad off the “Magic” Hose Joint Filter and
clean the crud with a toothbrush.
• Install the clean “Magic” Hose Joint Filter to revolver
and water inlet hose.
Lint Filter
(Recommended to clean every week)
• Take out the lint filter
• Wash the lint filter with water.
• Install the filter (Align the frame
claw to the groove below)
CA TION: Lint filter is fragile
WARNING
CARE AND MAINTENANCE
ACCESSORIES
Instruction Manual Drainage Hose Water Supply Hose
Magic Hose Joint Bottom Cover Screw
MWM-680FA(IM)130312_Layout 1 3/13/12 3:22 PM Page 3

7
INSTALLATION INSTR CTIONS
INSTALLING BOTTOM COVER
1. Unplug the power Cord of the washer.
2. Gently lay down the front side of the washer on a soft mat or cushion. (Be careful
not to dent the frame.)
3. Insert the attached Bottom Cover onto the hooks of the leg by pushing until reaches
into the front hooks.
4. Fasten the Bottom Cover with screw.
5. Gently set the washer upright.
6
INSTALLATION INSTR CTIONS
WHERE TO PLACE THE WASHER
1. Choose a dry location and away from exposure to direct sunlight.
2. Install the washer on a stable and level surface.
3. Adjust the adjustable eg of the washer if necessary, to level the washer as
shown in the figure.
4. Use the gradienter to ensure washer is evenly placed.
CAUTION:
• Do not block the ventilation opening at the bottom of the washer, by
placing the washer on a carpeted floor.
ATTACHING THE “MAGIC” HOSE JOINT TO A TAP
Type A: Is the most suitable
Type B: The length of the mouth of tap needs to be at least
16mm. If it is less than 16mm, the “Magic” Hose Joint
can’t be installed.
Type C: It may cause water leakage.
CAUTION:
• Do not use water which is warmer than 50ºC
• If your tap is not suitable, please consult the authorized service center.
HOW TO ATTACH “MAGIC” HOSE JOINT
1. oosen the four screws and slide the top of the “Magic” Hose Joint (section A in the figure) onto the tap. Then,
securely tighten the four screws provided with the
“Magic” Hose Joint by using a screwdriver to secure the
top of the joint to the tap.
2. Remove the CAUTION label from the “Magic” Hose Joint.
3. Turn the male coupler on the joint (section B in the figure)
clockwise to attach it securely to the top of the joint
(section A in the figure).
• The appliance is to be connected to the water main using
the new Water Supply Hose and “Magic” Hose Joint and old hose-sets should not be reused.
CAUTION:
If the outer diameter of the tap is larger than the caliber of the Joint Ring, loosen
the four screws and remove the Joint Ring from the “Magic” Hose Joint.
INSTALLING WATER SUPPL HOSE TO THE WASHER
• Turn the nut clockwise while holding the hose.
CONNECTING THE WATER SUPPL HOSE TO “MAGIC” HOSE JOINT
1. While pushing the sleeve on the female coupler (section D in the
figure) of the joint down with your finger, connect the female coupler
to the male coupler (section C in the figure).
2. Release the sleeve, then push the Water Supply Hose up into the
“Magic” Hose Joint until it clicks into place.
3. Pull the Water Supply Hose down to make sure that it is securely
attached.
HOW TO DETACH THE WATER SUPPL HOSE
Please read the following procedure in order to avoid spilling water when detaching the Water Supply Hose.
1. Turn off the tap.
2. Press the Power ON/OFF button to turn on the power, the NORMA button and
the START/PAUSE button.
3. Press the POWER ON/OFF button to turn the power off 15 seconds later.
4. While pushing the lock lever and the sleeve on the female (section D in the
figure) of the joint down with your fingers, detach the female coupler from the
male coupler (section C in the figure).
5. Turn the water inlet hose anti-clockwise on the water inlet valve, until it gets
detached.
INSTALLING THE DRAINAGE HOSE
Place the clip part of the Hose Band sideways to prevent it from touching
the frame which may cause a vibration noise.
MWM-680FA(IM)130312_Layout 1 3/13/12 3:22 PM Page 4

8 9
INSTALLATION INSTR CTIONS CONTROL PANEL: f NCTIONS & PROCESSES
CHANGING THE DRAINAGE HOSE DIRECTION
You can change the direction from right side to left side.
NOTE: Put gloves on to prevent injury of your hands when changing the Drainage Hose direction.
1. Unplug the Power Cord of the washer.
2. Detach the Back Cover by loosening screws at the back side of the
washer. Detach outer Drainage Hose and gently lay down the front side
of the washer on a soft mat or cushion.
• Be careful not to open the Washer id and dent the frame.
3. Detach the Cap from the left side of the frame.
4. oosen the Hose Band and pull inner Drainage Hose out of the Drainage
Valve. Pull the Hose Band out of the Inner Drainage Hose.
5. Remove right and left Tabs of Drainage Outlet one side after another pushing the Tabs both inside and outside and
pull the Drainage Hose out toward outside of frame.
6. Pull out this inner Drainage Hose from the left hole and attach it to the Drainage Outlet securely.
7. Connect the inner Drainage Hose to the Drainage Valve in place and fix the Hose Band.
• If you do not attach as instructed, it can damage the inner Drainage Hose and cause a water leakage through the
torn position.
8. Attach the Cap to the right hole.
9. Re-attach Back Cover and gently set the washer up.
EXTENSION OF THE DRAINAGE HOSE
When extending the external Drainage Hose, please follow the below figure for the length and height.
EXTENSION HEIGHT LENGTH
Not straight Max. 15cm Max. 1m
Straight Max 3m
B
C
A
D E F G H
LED DISPLA INDICATOR
Display various setting information as follows:
• By default, the display will show remaining washing time (e.g.) Remaining time is 20 minutes
• When FUNCTIONbutton is pressed, the digital display indicates time or times. (E.g.) Twice Water Saver Rinsed
• When WATER EVE is Pressed, the indicator shows water level. (E.g.) Water level is 24
• When malfunction occur, the indicator will indicate warning. (E.g.) Water does not flow
DETERGENT INDICATION
• These are the spoon indications of the DETERGENT volume.
• Refer to “DETERGENT AND OAD RECOMMENDATIONS” on page 10.
START/PAUSE BUTTON
• Press this button to start the washer operation.
• This button can also be used to pause the washer operation. To restart the washer operation, press the STAR/PAUSE
button again.
NOTE: 1. This is not a cancel button.
2. To cancel the End Buzzer, press and hold the START/PAUSE button for about 4 seconds until beeping ceases.
WATER LEVEL BUTTON
• You can choose the appropriate water level that matches the load size.
FUNCTION AND SET BUTTON
• The FUNCTION and SET button can beysed to select PRESET, SOAK, WASH time, RINSE time, and SPIN time. For
example, to set RINSE time: Press the FUNCTION button till RINSE light flashes. Then, press the SET button to select
the desired rinse times.
PROGRAM BUTTON
• To choose the PROGRAM, press the PROGRAM button. Press until light flashes at required program.
• You can set the CHI D OCK function. Refer to the CHI D OCK section at page 14.
A
B
C
D
E
F
MWM-680FA(IM)130312_Layout 1 3/13/12 3:22 PM Page 5

11
NORMAL SAGE
10
CONTROL PANEL: f NCTIONS & PROCESSES
PROGRAM SELECTION G IDE
G ILDLINES BEfORE WASHING
MAXI SOLVE BUTTON
• You can press the “MAXI SO VE” button to select or cancel the “MAXI SO VE” function
POWER ON/OFF BUTTON
• To turn power on, press POWER ON/OFF and the same again to turn power off. When washing is done, power will
automatically turn off in 5 seconds (except for water drainage setting).
NOTE: 1. If you want to change the wash pr0gram, press the POWER ON/OF again to switch off, then, press it again
to switch it on.
2. If you leave the washer on without starting the operation, the power will switch off in 10 minutes
automatically.
• Ensure nothing remains in the pockets (pin, coins etc. that can damage the clothes or the washer and result in
annoying noises).
• Turn the clothes inside out to get rid of scraps.
• Woolen items like women innerwear, articles with embroidery, nylon etc. should be place in a laundry net for extra
protection.
• Close the fastener and tie loose laces.
• Brush off the dirty parts like dust and sand.
• Put light clothes at the bottom. Please pause the operation and push them into the water when they float up.
• Please separate the washing of white clothes from coloured clothes, coats from innerwear.
OPERATION STATUS FOR THE PROGRAM
PROGRAM WASHING TIME (min) RINSING TYPE SPINNING TIME (min)
CUSTOM 10 Shower Rinse 1 time, 5
Water Saver Rinse 1 time
NORMA 5 – 12 Water Saver Rinse 2 times 5 –6
HEAVY DUTY 7 – 14 Water Overflow Rinse 2 times 7 –8
ECO-SPEEDY 5 Water Saver Rinse 1 time 3
B ANKET 12 Water Overflow Rinse 2 times 8
DE ICATE 6 Water Saver Rinse 2 times 2
• The total time may vary with water pressure.
• Shower rinse could be changed as Water Saver Rinse. Please see page 14 for the instructions on the SHOWER RINSE.
G
H
PREPARATION
1. Ensure drainage hose is connected.
2. Connect the water supply hose to the faucet and turn the faucet on.
• Ensure Magic Hose screws are securely tightened to prevent water leakage
3. Plug the Power Cord into a socket.
4. Put the clothes inside.
5. Press POWER ON/OFF button.
6. Press START/PAUSE button
• Sensor detects the clothes weight automatically. (For NORMA /CUSTOM /HEAVY DUTY)
Auto select the proper water power, water level, wash/spin time and rinse time. (It is not available for 2 lowest
water levels. Need to manually set it, if needed)
7. Use recommended amount of detergent as show in chart.
8. Close the washer lid.
• The washer will alarm and stop working before spinning if the washer lid is not closed.
• To use softener, pour the softener into the Softener Dispenser before washing.
• Too much detergent causes poor rinsing and too litter detergent results in weak washing.
MWM-680FA
WATER LEVEL I4 I8 22 26 30 34 38 45
Water Volume (Approx. ) 14 18 22 26 30 34 38 45
Detergent Indicators
Powdered detergent 10 – 15gm 15 – 22gm 20 – 26gm 26 – 32gm
MWM-780FA
WATER LEVEL I5 20 24 28 32 38 45 50
Water Volume (Approx. ) 15 20 24 28 32 38 45 50
Detergent Indicators
Powdered detergent 12 – 20gm 20 – 28gm 28 – 36gm 36 – 45gm
MWM-890FA
WATER LEVEL I6 24 30 36 42 47 54 60
Water Volume (Approx. ) 16 24 30 36 42 47 54 60
Detergent Indicators
Powdered detergent 12 – 25gm 25 – 35gm 35 – 50gm 50 – 70gm
MWM-680FA(IM)130312_Layout 1 3/13/12 3:22 PM Page 6

12 3 4
12 3 4
12 3 4
12 3 4
12 13
HOW TO SE THE BLANKET PROGRAM HOW TO SE THE C STOMIZED PROGRAM
For washing blanket and other bulky items.
• The water level will be changed to 8 automatically when BAKNKET PROGRAM is set. You can adjust it from level 5
to level 8 by hand accordingly to the size of the blanket or the bulky items.
PROCEDURE
1. Press POWER ON/OFF button and open the washer lid.
2. Press the PROGRAM button continuously and choose the B ANKET program (The B ANKET light will flash).
4. Fold up the blanket as the method shown in the figures below and put it into the washing tub.
5. Press the START/PAUSE button.
6. Close the washer lid.
• The washer will stop working automatically before spinning if the washer lid is not closed.
• The buzzer will alarm at the end of the operation and the power will be switched off automatically in 5 seconds.
• Proceed to shut water supply and clean the lint filter.
HOW TO FOLD UP THE BLANKET AND PUT IT INTO WASHING TUB.
END OF C CLE
Remove blanket and dry
NOTICE:
• Handwash the dirty sides before loading blanket into the washer.
• Use proper amount of detergent.
• Soiled blankets are better cleaned using warm water (approx. 30°C).
• If the blanket floats out during washing, press the START/PAUSE button to pause the washer. Then, push the blanket
down, and press the START/PAUSE button again to resume washing.
Fold in two by the long side Fold 4 times in the same
direction Roll up the blanket Put it into the tub with the edge
downwards.
12 3 4
You can set WASH, RINSE, SPIN and adjust operating time freely according to your washing preferences.
PROCEDURE
1. Press The POWER ON/OFF button.
2. Press the PROGRAM button to
select the program you want.
3. Press the FUNCTION button to select the process and time
4. Press FUNCTION button to choose cycle you prefer. The light moves from right when pressed.
5. Press SET button to choose SOAK, WASH. SPIN time and RINSE time.
• SOAK time indicating
• WASH time indicating
• RINSE time indicating
• SPIN time indicating
• PRESET time indicating
6. Press the WATER EVE button, choose proper water level.
• Add detergent.
7. Close the washer lid
8. Press the START/PAUSE button.
• At the end of the cycle, the buzzer will sound.
• The appliance will memorize the last customized selection mode.
PROGRAM CHOOSING GUIDE
PROGRAM WATER POWER S ITABLE CLOTHES
NORMA Standard Normal Clothes
CUSTOM Standard All kinds of clothes
HEAVY DUTY Strong Dirty clothes like working coat
ECO-SPEEDY Standard ess Dirty
B ANKET Blanket Blanket or bulky
DE ICATE Soft adies’ innerwear, articles with
embroidery
0 1 1. 2 2. 3 3. 4 4. times
SOAK WASH RINSE SPIN PRESET
0 5 10 35 40 min.
(This function is not available for DELICATE/BLANKET course)
(The number means times and “.” means Overflow Rinse)
(Except the DELICATE course)
(For DELICATE course)
(Except the DELICATE course)
0 1 2 19 20 min.
0 1 2 8 9 min.
0 1 2 3 min.
0 1 2 23 24 hours.
MWM-680FA(IM)130312_Layout 1 3/13/12 3:22 PM Page 7

14 15
HOW TO SE PRESET WASHING
VARIO S f NCTIONS
VARIO S f NCTIONS
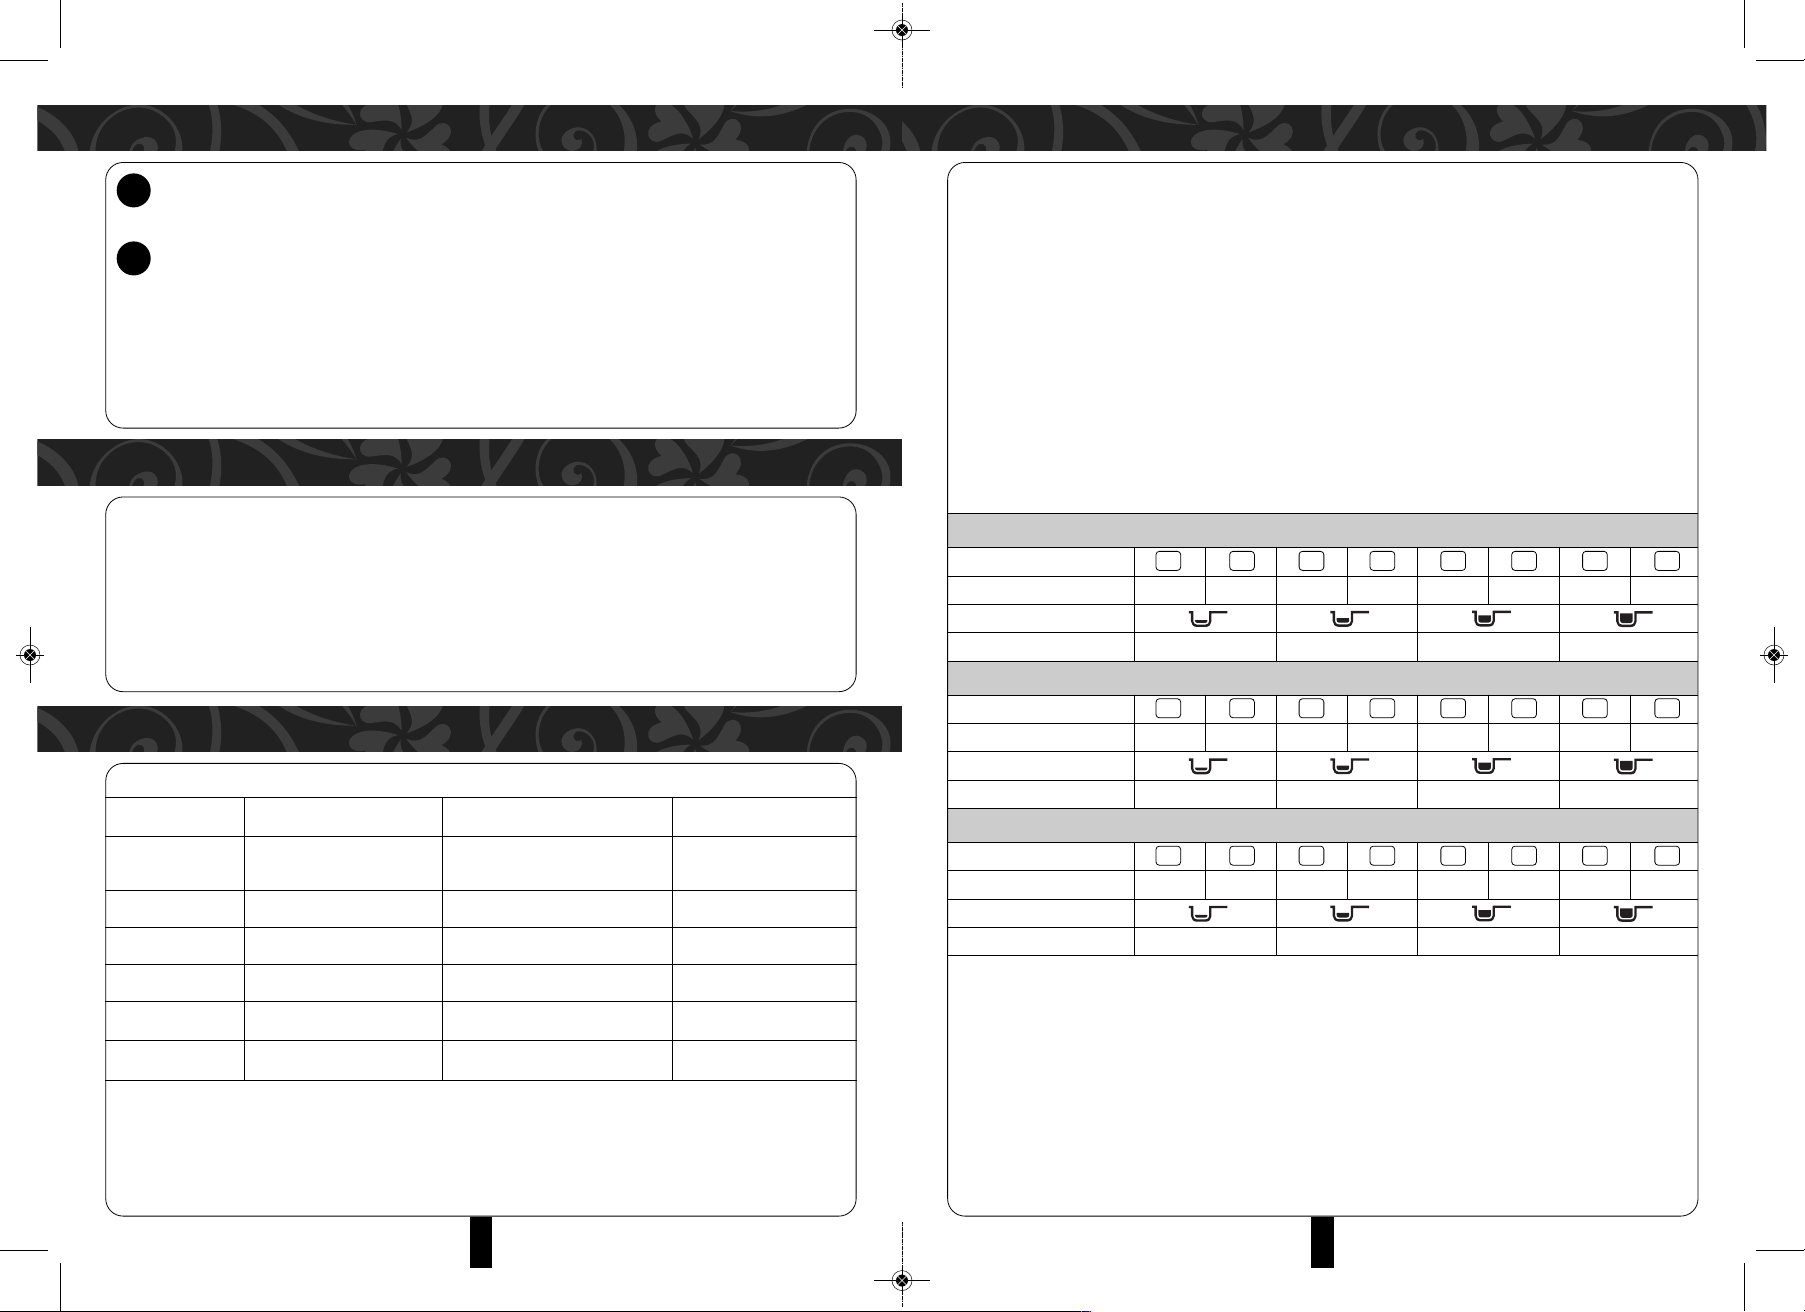
• The preset time means the washing end time.
• Before using Preset Washing, turn on the water supply and drainage hose to avoid water leakage.
PROCEDURE
1. Press POWER ON/OFF button.
2. Select PROGRAM or FUNCTION as required.
3. Press the PROCESS button until the PRESET light flashes. Press SET button to select the required preset time (washing
end time). PRESET indicate
4. Select water level if necessary.
• Add detergent.
5. Close the washer lid.
6. Press the SRART/PAUSE button.
• After the PRESET has started, the corresponding light will be turned on, and other lights will switch off
approximately one minute later.
• Preset function does not work with DE ICATE wash.
• To check the PRESET status, press the SET button, The procedure status will be displayed for 5 seconds.
• To cancel the PRESET, shut off the power.
• To change the PRESET time, press the PRESET button again after cancelling it.
6 7 8 24 0 1 5 (hours)
SHOWER RINSE
It occurs during the last spinning period of washing program. The water is showered onto the clothes to take off foam
and dirt.
WATER SAVER RINSE
It is common rinse. You set the water level for rinse. When the machine runs to rinse program, water flows into the inner
tub to the special level and stops. Then machine will rinse.
OVERFLOW RINSE
It will use more water than the set water level. When the machine runs to rinse program, water flows into the inner tub
to the special level, but do not stops. Water continues flows in and flow out from overflow gap to take off foam and dirt.
• For point 1, if you cancel the shower rinse, it will change to water saver rinse or overflow rinse. It depends on what
you set. For example, under CUSTOM, you cancel the shower rinse, and choose “2” for rinse. There will be 2 times of
water saver rinse; if you choose “2.” for rinse. There will be 2 times of overflow rinse.
How To Set
• Press POWER ON/OFF button to switch on the power, and press the SET button for 4 seconds. To restore it, repeat
above steps or pull out the plug.
MEMOR FUNCTION
When NORMA , CUSTOM or HEAVY program is selected, 15 seconds after starting, the appliance will memorize this
program and begin to operate under the same program setting when the washer is used next.
• This function is not available for DE ICATE/B ANKET program.
• PRESET and WATER EVE will not be remembered.
• The SOAK, WASH, RINSE and SPIN for CUSTOM program will be remembered.
WATER LEVEL SETTING
Choose the desired water level during the WASH/RINSE process.
Method:
1. Press FUNCTION button till WASH light flashes
2. Press the WATER EVE button to choose the desired water level, press SET button to set wash time.
3. Then press the FUNCTION button again till RINSE light flashes, press WATER EVE button again to choose the
appropriate water level.
4. Press SET button to set RINSE time and RINSE type.
5. Press the FUNCTION button till SPIN light flashes, press the SET button to set SPIN time.
6. Press START/PAUSE button to commence washing according to your settings.
TWO STEPS CLEANING FUNCTION
The washer will start washing when water reaches below 2 levels as set. By this, the washer starts working with more
density of detergent.
• This function will not be affected, if water level 1 or 2 is selected, and if DE ICATE or B ANKET program is selected.
• When SOAK is selected, this function will not be affected after soaking.
CHILD LOCK FUNCTION
This function avoids accidental opening of the washer by children, etc.
Method of Setting
Press the POWER ON/OFF button to switch on the power, and press the PROGRAM button for 4 seconds until the buzzer
sounds. To restore it, repeat the above steps or pull out the plug.
• The control panel lights will illuminate to indicate E5 if the washer lid is open during operation when CHI D OCK
function is selected.
CANCELLING THE END BUZZER
If you select this function, the buzzer will not sound at the end of the wash. This is suitable for washing clothes at night.
Method of Cancelling
Press the POWER ON/OFF button to switch on the power, and press the START/PAUSE button for 4 seconds until the
buzzer sounds. To restore it, repeat the above steps or pull out the plug.
HOW TO DRAIN RESIDUAL WATER
• This function will set the drainage valve to expel any residual water inside the washer for a minutes.
• Press the POWER ON/OFF button to switch on the power, and press the FUNCTION button for 4 seconds until the
buzzer sounds. To restore, repeat the above steps or pull out the plug
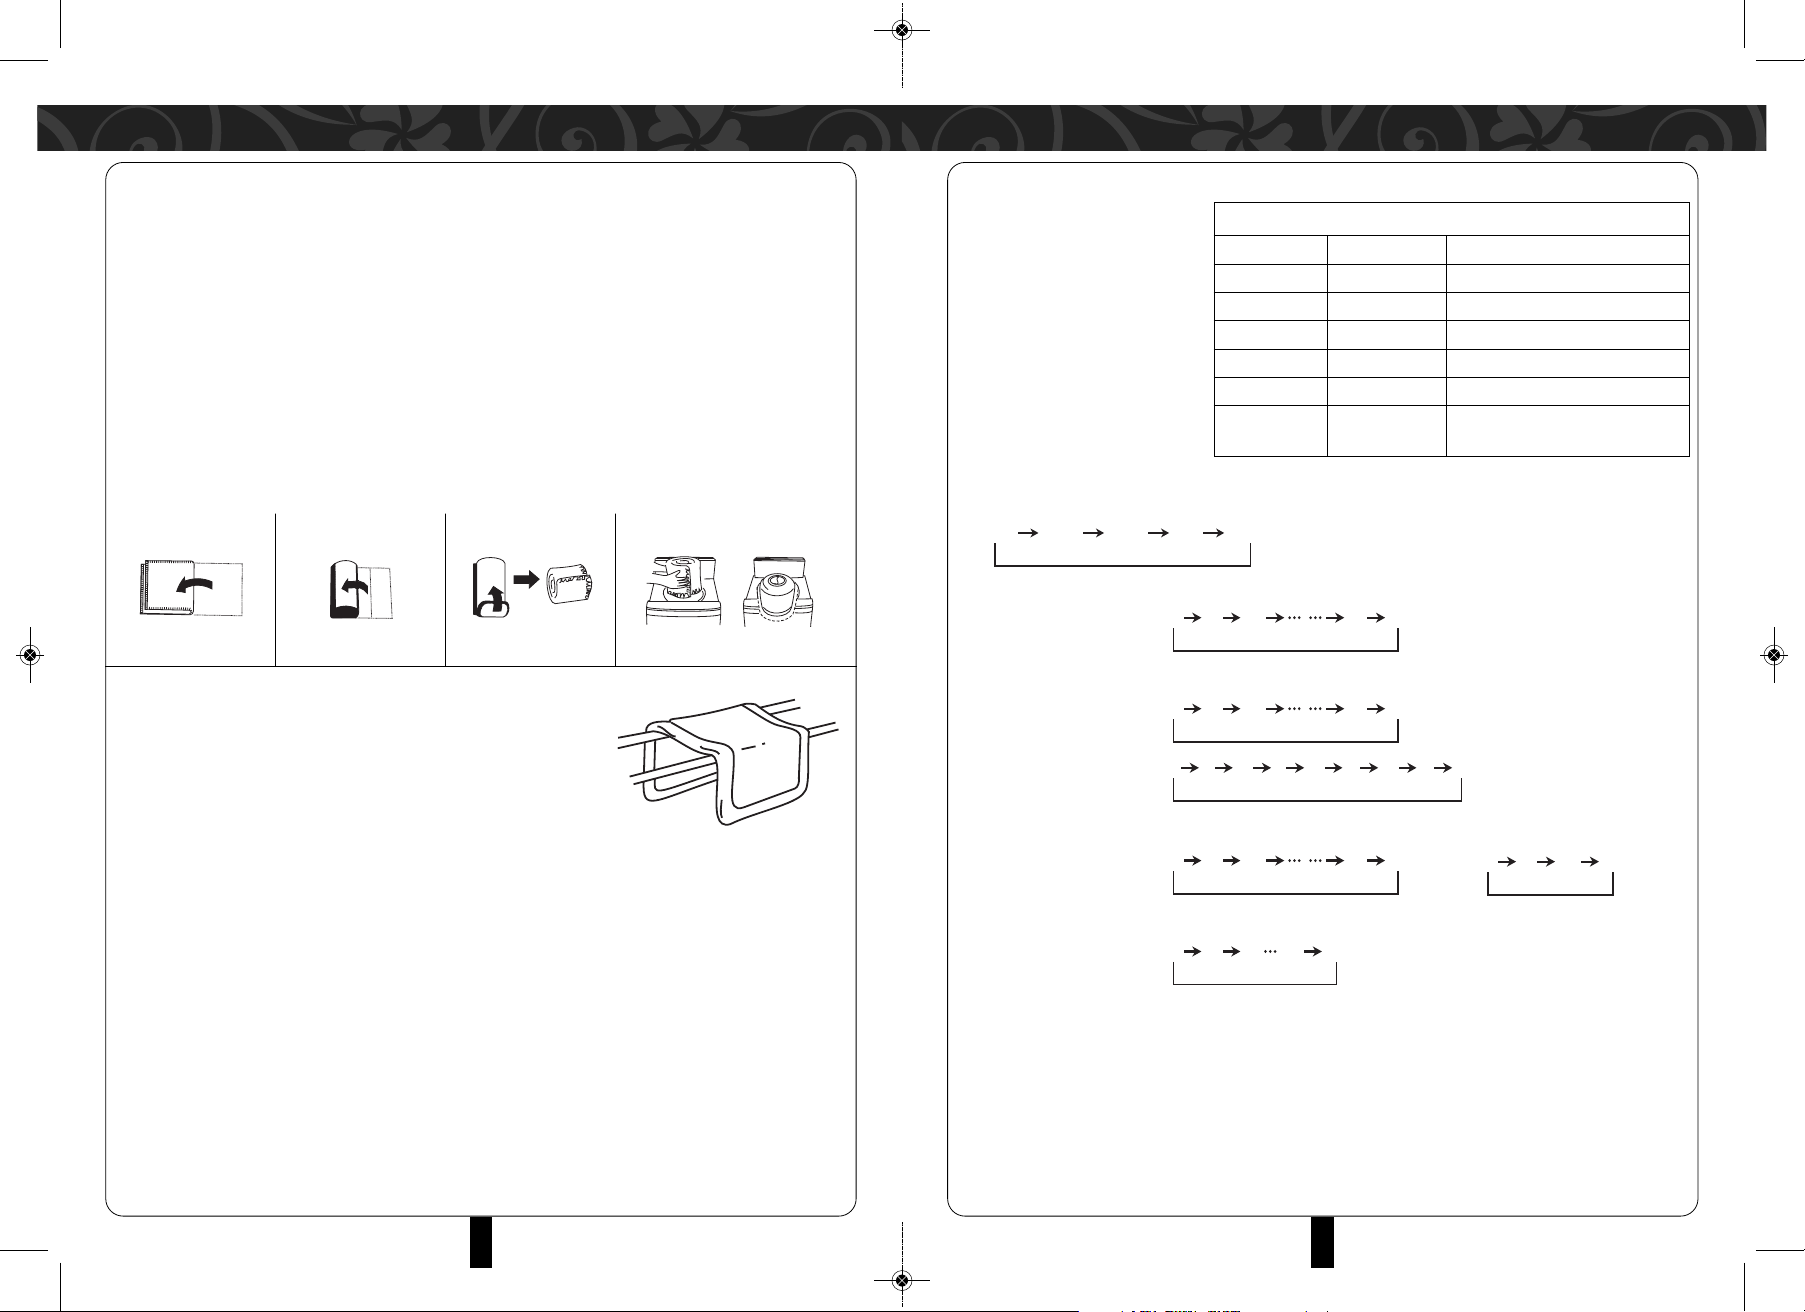
MAXI SOLVE
Maxo Solve Case has two parts, Detergent Case & Solution Case.
MAXI SOLVE process as follow:
1. Put wash powder into Detergent case.
2. Gentle water current will be injected into the Detergent Case. The detergent
will enter into Solution case evenly and slowly. This process will last around
30 seconds.
3. Strong water current will be poured into the Solution Case to dissolve the
detergent.
4. In this case, the detergent that enters into the tub has been dissolved in the solution case.
Detergent
Case
Solution
Case
MWM-680FA(IM)130312_Layout 1 3/13/12 3:22 PM Page 8

16 17
TRO BLESHOOTING TRO BLESHOOTING G IDE
1. During Washing or Rinsing, water continues to flow
Water is automatically added due to decreasing water levels.
2. Spin tub turns or stops intermittently at the beginning of the spin cycle
Intermittent spinning gives a better spin effect
3. No water drainage during Overflow Rinse
This is the result of lower water level set or lower water pressure
4. Water flows in and rinses during spin cycle
This automatic correction balances unequal distribution of clothes inside the tub.
5. Sound of water flowing after spin cycle
This is the sound of liquid being balanced inside the balance ring to help reduce vibration during spinning.
6. Control panel is still lit after powering off
The “Memory Function” is activated
7. Washer powers off and fails to operate
Reset the program once more
WARNING
If malfunction occurs during operation, check the following before calling the authorized service center.
TROUBLE INDICATION
When the following occur, the microcomputer will detect the abnormal condition and electronic buzzer sounds for
approximately 10 seconds and the indicators flash as shown below. At the same time, the washer stops operation.
NOTE: The trouble indicators can be released by pressing the STAR/PAUSE button once, if you want to release the
emergency stop, then press START/PAUSE button again to restart the operation.
NAT RE OF PROBLEM TRO BLE INDICATION WHERE TO CHECK
The washer does not work • Press the POWER ON/OFF button.
at all • Press the START/PAUSE button.
• Press the PRESET button.
• Check whether the fuse or circuit breaker has been
activated.
Water does not flow into the • Turn the water supply tap on.
Wash/Spin tub • Check whether the water supply has been cut off.
• Check whether the metal filter of the water Inlet is
clogged.
• Check whether water pressure is too low.
Water does not drain out • ay down the Drainage Hose from the hookhole.
• Check the Drainage Hose for any obstructions.
• Check whether the Drainage Hose id clogged.
• Check whether the Drainage Hose is too high off the
ground.
The washer does not spin • Check whether the laundry has shifted to one side
• Of the Wash/Spin Tub.
• Check whether the washer is on level surface.
• Close the washer lid
The buzzer keep beeping • Check whether the CHI D OCK is set.
Keeps beeping • Close the washer lid.
Other troubles • Press the POWER ON/OFF button to turn off the power,
call the authorized service center.
MWM-680FA(IM)130312_Layout 1 3/13/12 3:22 PM Page 9

This appliance must be earthed.
For washer plug top 3 pin (For BS standard Plug with 13 Amp Fuse)
IMPORTANT
The wires in this mains lead are coloured in accordance with following code:
Green/Yellow: Earth ight Blue: Neutral Brown: ive
As the colours of the wires in the mains lead of this appliance may not correspond with the coloured marking identifying
the terminals in your plug, precessd as follows:
• The wire which is coloured green and yellow must be connected to the terminal in the plug marked with the letter E
or by the earth symbol
• The wire which is coloured light blue must be connected to the terminal marked with the letter N or coloured white.
• The wire which is coloured brown must be connected to the terminal marked with the letter or coloured black.
THIS APPLIANCE IS INTENDED FOR HOUSEHOLD USE ONL .
STYLE AUTOMATIC ASHING MACHINE
MODEL NO.MM-680FAMM-780FAMM-890FA
RATED VOLTAGE220–240V~
RATED FREQUENCY 50–60Hz
RATED ASH CAPACTTY 6.0kg 7.3kg 8.5kg
RATED INPUT PO ER 300 330 400
18 19
SPECIfICATIONS
WARNING
MWM-680FA(IM)130312_Layout 1 3/13/12 3:22 PM Page 10
This manual suits for next models
2
Table of contents
Other Morgan Washer manuals

Morgan
Morgan MWM-11 Sapphire User manual

Morgan
Morgan MWM-7 Zircon User manual

Morgan
Morgan MWM-Vagor 13 FA User manual

Morgan
Morgan MWM-Rena 7FA User manual

Morgan
Morgan MWM-1312SA User manual

Morgan
Morgan MWM-13 Aquamarine User manual

Morgan
Morgan MWM-1370SA User manual

Morgan
Morgan MWM-1310SA User manual

Morgan
Morgan MWM-B1270SA User manual

Morgan
Morgan MWM-Vagor 11 User manual