Morgan MWM-Rena 7FA User manual

E-mail: electrical.appliance@dksh.com
www.morgan.my
Market Expansion
Services by
www.dksh.com.my
facebook.com/morganappliances
U ER MANUAL
MWM-Rena 7FA
Automatic
Washing
Machine
MWM-Rena7FA(IM)011118. xp_Layout 1 11/8/18 10:32 AM Page 1

3
SAFETY AND PRECA TIONS
2
C O N T E N T S
3
4
6
8
10
11
12
13
14
15
16
17
18
SAFETY AND PRECAUTIONS
SAFETY INFORMATION
INSTALLATION & ADJUSTMENT
WATER INLET INSTALLATION
WASH GUIDE
LOAD GUIDE
DETERGENT GUIDE
CONTROL PANEL & FEATURES
OPERATING INSTRUCTIONS
CARE & CLEANING
TROUBLESHOOTING
WARNING ALARM & TROUBLESHOOTING
SPECIFICATIONS
Top Lid
Top Frame
Lint Filter B
Control Panel
Inner Tub
Pulsator
Body
Base
Feed Valve
Power Cord
Drain Hose
Fixing Foot x 3 pcs
B
Back Cover
Adjustable Foot
Handle
Drain Hose Gate Stopper
Detergent Dispenser
Lint FilterA
ACCE ORIE
ABOUT THE AFETY YMBOL
Base Cover (1 pc) D
+
+
+
+
Connect this end to
the machine
Connector for
water inlet hose
and tap
water inlet hose connector
Water Inlet Hose (1 pc)
T
Drain Hose (1 pc)
Drain Hose Clip (1 pc)
T
Tapping Screw
ST4X14 (2 pcs)
B
WARNING YMBOL
This symbol indicates information
that, if ignored, could result possibly
in personal injury or physical
damage due to incorrect handling.
PROHIBITED ACTION YMBOL
This symbol indicates a prohibited
action which if ignored, could result
possibly in personal injury or
damage to the appliance due to
incorrect handling.
MWM-Rena7FA(IM)011118. xp_Layout 1 11/8/18 10:32 AM Page 2

5
SAFETY INFORMATIONSAFETY INFORMATION
4
Earth
wire
Ventilation holes
at the bottom
Soft item
Insert the power plug into the power supply with
a rated voltage of 220-240V AC.
Always unplug the appliance and turn off the
water when the power is cut, moving or cleaning
the washing machine, or it is not in use. Do not
insert or pull off the plug with wet hands.
Do not bend, modify, stretch or twist the power
cord. If power cord or power plug is damaged or
becomes loose, have them repaired or replaced
by our authorized service technicians to avoid
danger. The pins of the power plug must remain
clean. Please clean it
carefully with dry
cloth if it is dirty.
Do not install the washing machine in the
bathroom or damp areas. Do not wash the
machine with water & do not place wet clothes
on the control panel.
Do not use water hotter than 50ºC. If the machine is situated on a carpeted floor,
please adjust the feet to allow air to circulate
freely.
Do not wash raincoat, bicycle cover, feather
dress and waterproof materials as these will
cause the washing machine to vibrate
abnormally during the spinning process.
Do not share the same socket with other electric
appliances. Do not use damaged power plug or
loose power socket.
Do not insert hands into the machine when it is
operating. It is dangerous even if the speed is
slow. Do not allow children to play or climb on
the machine.
It is dangerous to alter the specifications or
attempt to modify this machine in any way.
Do not overload the appliance or put any hot
items (i.e., kettle with hot water) on the machine.
Garments which have been in contact with
volatile petroleum products should not be
machine washed.
This appliance is not intended for use by persons
(including children) with reduced physical, sensory or
mental capabilities, or lack of experience and
knowledge, unless they have been given supervision
or instruction concerning use of the appliance by a
person responsible for their safety. Children should be
supervised to ensure that they do not play with the
appliance.
eep the appliance away from direct sunlight
and heat sources like the heater.
eep the lint filter in good condition to prevent
lint from the blocking cascade outlet during
washing. Always install it to its proper position
and clean it frequently.
Any objects such as coins, safety pins, nails,
screws, stones or any other hard, sharp material
can cause extensive damage and must not be
placed into to the machine.
• Ensure tap is turned on before washing & the
water inlet hose is installed correctly.
• It is recommended to use low foam detergent.
⊳⋯
⊳⋯
䞈㋴㤥
Close Open
Dismantle Fit on
Lint filter A Lint filter B
MWM-Rena7FA(IM)011118. xp_Layout 1 11/8/18 10:32 AM Page 3

7
6
INSTALLATION & ADJ STMENT
It is important to install and adjust the machine according to the instructions in this
manual for your safety and proper operation.
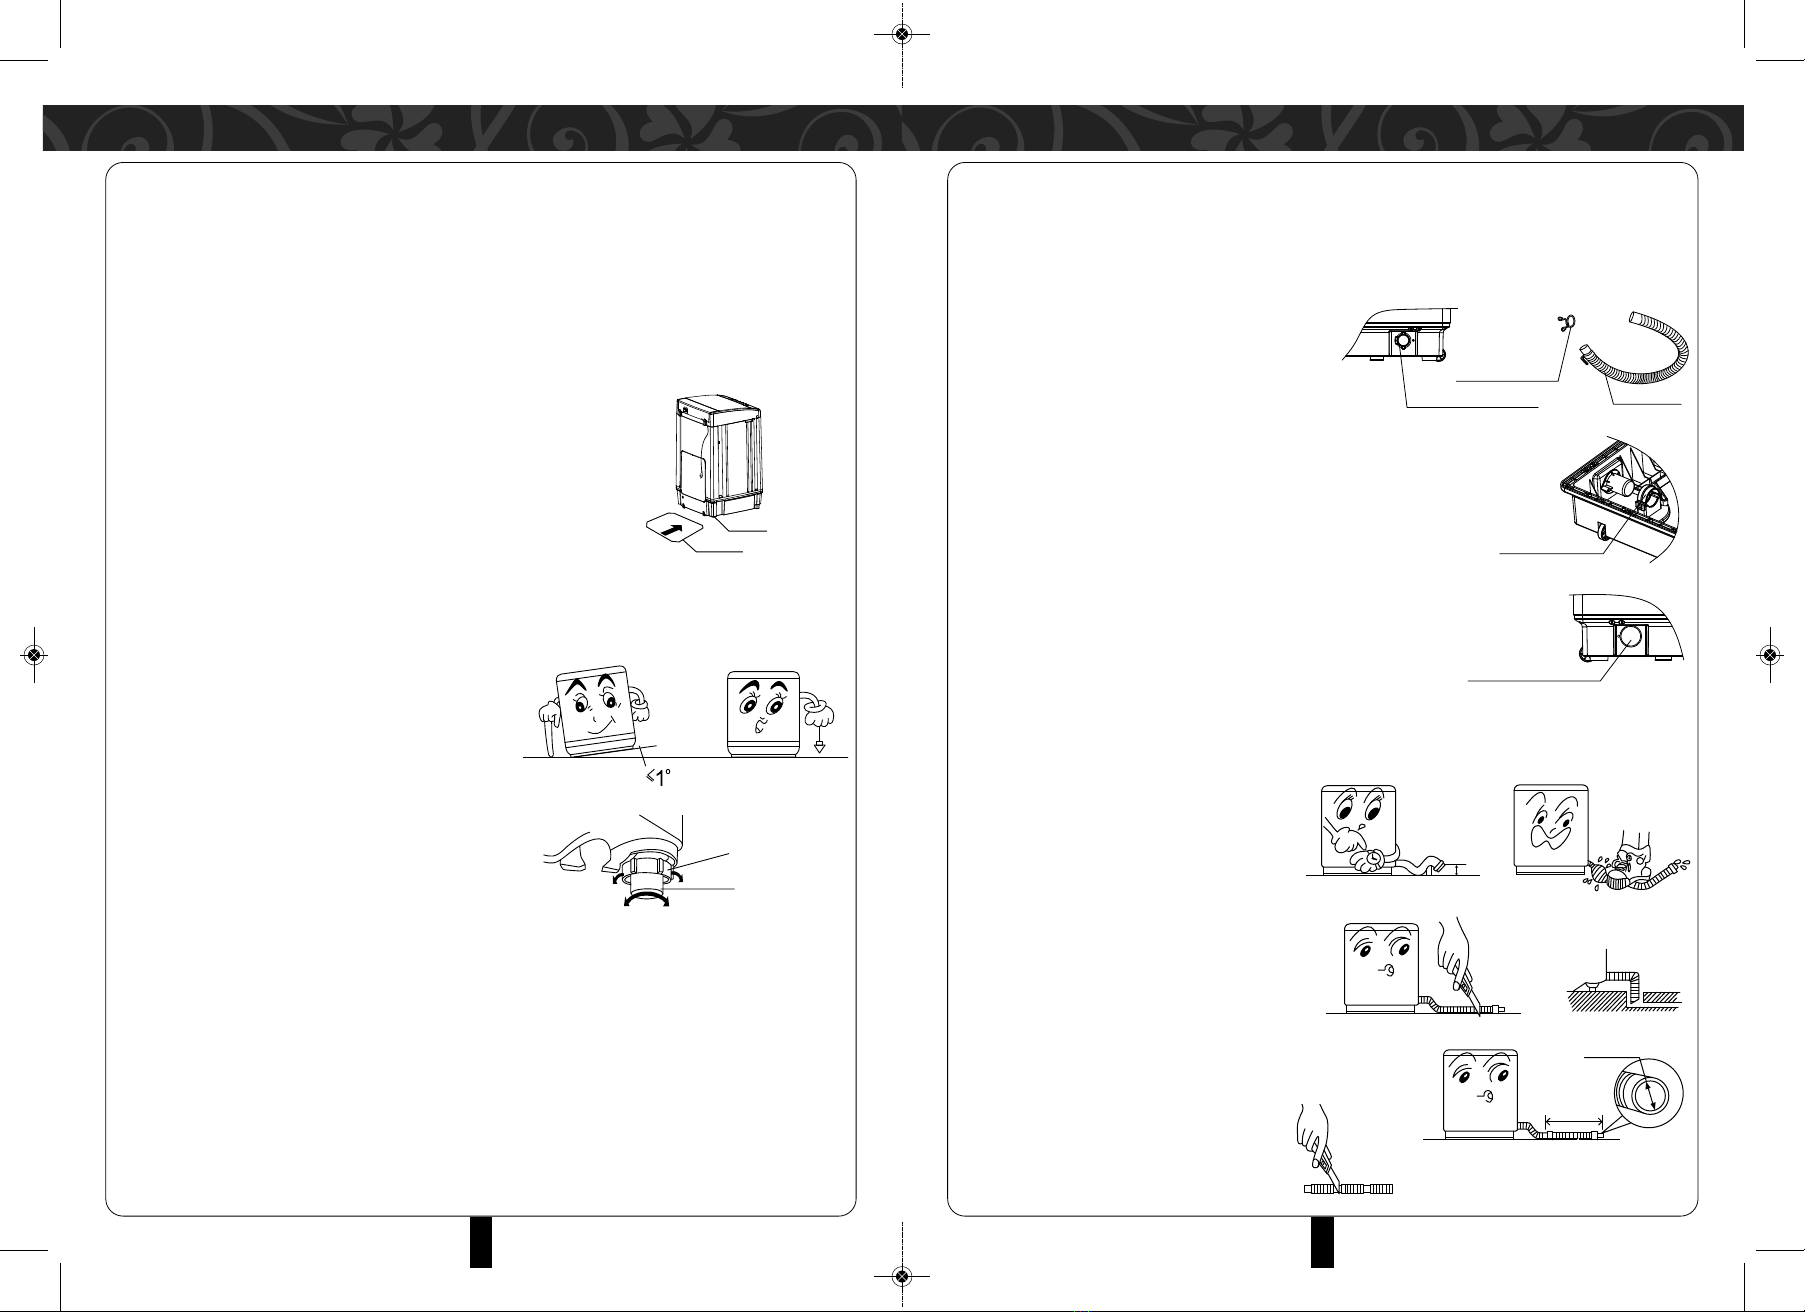
NPACKING
• Unpack the carton and take out the bottom panel.
• Open the top lid of the washing machine and remove all the accessories. Remove all wrappers,
including the polystyrene base.
• You are advised to keep all the packaging for reuse in case the machine is to be transported again.
INSTALLING THE BOTTOM COVER
• Lean the machine forward gently and insert the bottom cover (the side
with instructions) into the notch along arrowhead direction.
• Attach the bottom cover onto the washing machine base with two
tapping screws in the accessories by using cross screwdriver.
POSITIONING
The distance between the washing machine and the wall should be
more than 50mm, and the maximum allowed angle of the shank base of the machine is 1 . Slanting or
unstable ground may affect proper operation. To rectify this, adjust it with the following methods:
Make it horizontal
Use a tied thread with plumb to check if it is horizontal.
Adjust the adjustable feet
1. Lift up the adjustable foot gently, loosen the
adjustable nut and twist it.
2. Fasten the nut after adjustment.
INSTALLING THE DRAIN HOSE
• Set the drain hose clip into the drain hose 2-3cm from the drainpipe end and install the drain hose
into the drain hose connector.
Install the drain hose and drain hose connector with the clip onto the drain hose clip on the cabinet.
Notch
Bottom panel
The baffleplate
(
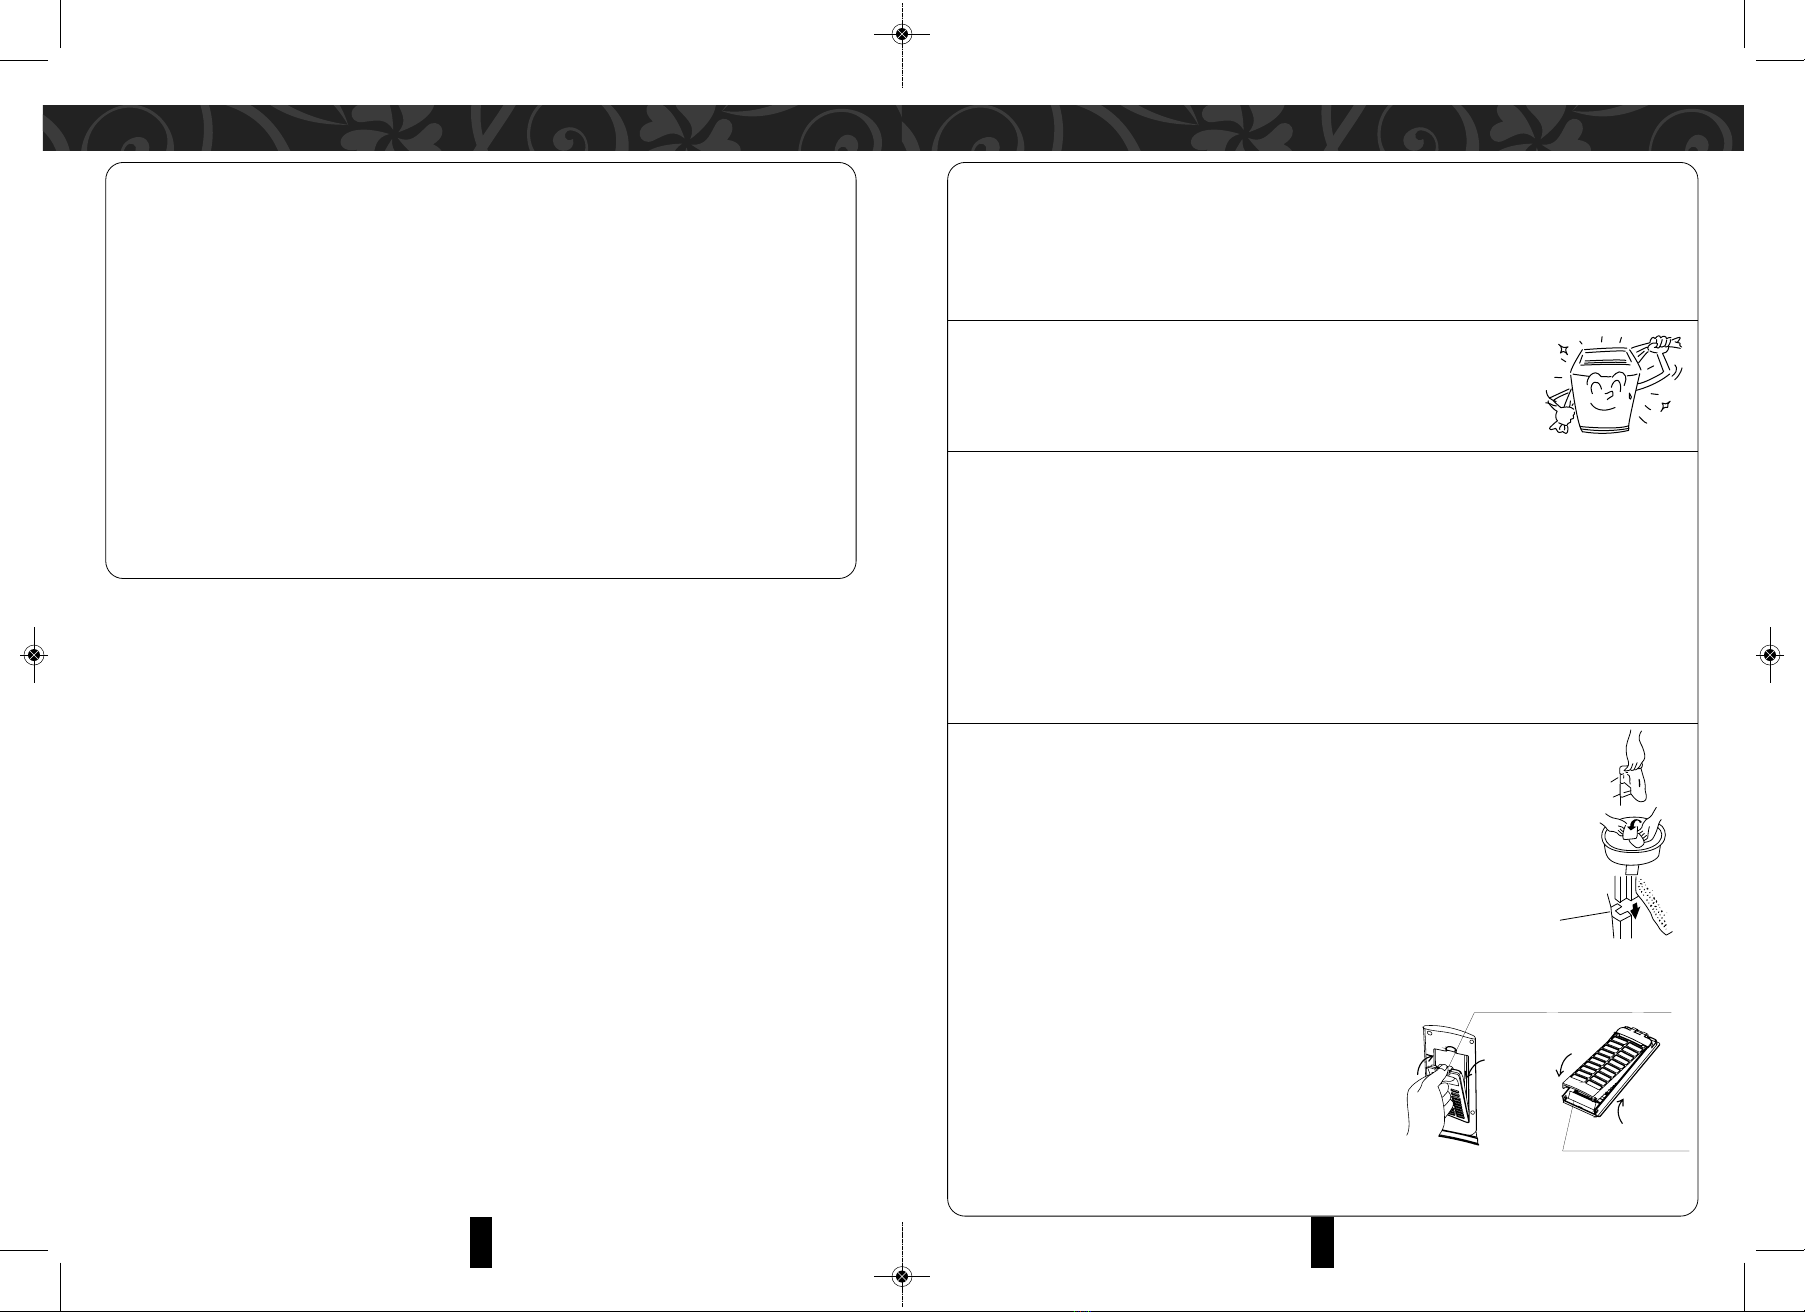
CHANGING THE DIRECTION OF THE DRAIN HOSE
1. Detach the drain hose and drain hose clip from the drain hose connector. Lay a soft mat on the
floor and place the washing machine front side down onto the mat.
2. Unmount the screws on the back cover using a screwdriver and detach the back cover.
3. Unmount one screw fixing the drain hose
connector (on right of the washing machine)
and loosen the drainpipe connector.
(Section sketch map for washing machine
right side)
4. Extrude the drainpipe with proper force and remove the drain hose
hoop (on right of the washing machine) & loosen the inner drain hose.
(Section sketch for inside washing machine)
5. With proper force, detach the drain hose gate stopper on left side
of the washing machine. The drain hose gate stopper is fixed on
the washing machine base with two clips.
(Section sketch map for washing machine left side)
6. Pull the inner drainpipe to another side, taking care not to
distort or damage the inner drain hose.
Attach the inner drain hose with the drain hose hoop using one
screw to secure the drain hose connector. Install the drain hose
gate stopper to another side, place the washing machine standing upright and reattach the cover
using the screws. Install the drain hose with drain hose clip into the drain hose connector.
WATER DRAINAGE
1. The height of the drain hose should be less
than 10cm, otherwise the drainage will not
be smooth and need a long time to drain,
the machine may stop during working.
2. Do not step on or press the drainpipe.
3. Cut the drainpipe if it is too long. Cut the front
end of the drainpipe slantingly to make
drainage smoothly.
4. Purchase a proper hose if you need additional drainpipe.
Its diameter should not less than 30 mm and length
should not exceed 1.5m.
5. If the additional drainpipe is too long,
cut some at A or B point.
Drainpipe connector Drainpipe
Drainpipe clip
Drainpipe hoop
Drainpipe gate stopper
D
<10cm
≤1.5m
≥ø30mm
<
AB
The baffleplate
(
Loosen Fasten
Adjustable
nut
Adjustable
foot
High Low
G
The baffleplate
(
INSTALLATION & ADJ STMENT
MWM-Rena7FA(IM)011118. xp_Layout 1 11/8/18 10:32 AM Page 4

WATER INLET INSTALLATION WATER INLET INSTALLATION
TAP SELECTION
The front end should be longer than 10mm. The tap exit end should be flat and smooth. If not, file it to
prevent leakage.
CONNECTING THE INLET HOSE CONNECTOR WITH THE WATER TAP
1. Press the lower end of the lock lever and push down the slider. Remove the inlet hose connector
from the inlet hose (see illustration 1).
2. Loosen the four bolts on the inlet hose connector until the tap can be accessed. Then set the inlet
hose connector into the tap (see illustration 2).
Note: if the tap calibre is larger and cannot fit into the inlet hose end, unscrew the four bolts
and detach the bushing.
Important: Tap exit end must be flat otherwise it will lea (see illustration 3).
CONNECT THE WATER INLET HOSE TO THE MACHINE
1. Do not remove the water absorption
cushion. Inspect the cushion for signs of
damage after using. Replace if required.
2. Insert the inlet hose nut onto the inlet
valve connector.
3. Tighten the inlet hose nut and gently
swing it to ensure it is secure.
CONNECT THE INLET HOSE CONNECTOR WITH THE WATER INLET HOSE
1. Push down the slider. Insert the inlet hose into the connector.
2. Hang the lock lever to the inlet hose connector and release the slider
until a click sound is heard.
INSPECT THE CONNECTION BETWEEN INLET HOSE
CONNECTOR AND THE TAP
1. Swing the inlet hose gently to ensure it is fastened.
2. After installation, turn on the tap and inspect for leaks.
3. Do not twist or bend the water inlet hose.
4. Before using, always inspect the connection between
the inlet hose connector and the tap, and the installation of the inlet hose. Ensure they are firmly
fitted and does not slip during operation.
DISMANTLING THE WATER INLET HOSE
1. Turn of the tap.
2. Press the locking lever, push the slider down and detach the water
inlet hose.
3. If the machine is used frequently, the water inlet hose connector can
be secured to the tap to prevent damaging the fastening screws.
3. Fasten the four bolts in the inlet hose connector evenly (see illustration 4).
4. Secure the fastening nut (see illustration 5).
Note: Before tightening the nut, the threading is approx. 4mm above the nut’s upper surface.
After tightening the nut, the threading is less than 2mm above the nut’s upper surface
(see illustration 6).
98
Recommended Tap Not recommended tap
(Illustration 1)
(Illustration 4) (Illustration 5) (Illustration 6)
(Illustration 2) (Illustration 3)
MWM-Rena7FA(IM)011118. xp_Layout 1 11/8/18 10:32 AM Page 5

WASH G IDE LOAD G IDE
PREPARATION BEFORE WASHING
1. Connect the water inlet hose and turn on the tap.
2. This machine must be reliably earthed. Insert the power plug.
Note: The earth terminal should not lin to gas pipeline, tap pipeline etc.
3. Lay down the drain hose.
Warning: the temperature of the water should less than 50 C!
PAY ATTENTION TO THE FOLLOWING BEFORE WA HING:
• The capacity of washing and spinning refer to the largest weight of the standard laundry under dry
conditions.
• It is recommended to wash a load lower than the rated capacity.
• Different thickness, size and type of the laundry will influence the actual
washing capacity.
• It is important that the laundries can be turned around easily during washing.
Do not select high water level when loads are less than 1.0kg to avoid water
splashing.
LA NDRY REFERENCE G IDE
1. To get the best wash results, sort your laundry before washing and ensure that laundry is washable.
2. It is essential to wash new coloured items separately when washing for the first time. White items
should not be washed together with coloured items.
3. Wash non-absorbable laundry by hand.
4. Read care labels as they will tell you how the fabric of each garments should be washed.
5. It is essential to wash new coloured items separately when washing for the first time. White items
should not be washed with coloured items.
6. Sort clothes according to the type of and amount of soil. For example, oily soils will require a higher
temperature to lift the stain, whereas mud and blood stains are better washed in cold as heat can
set the stain further into the fabric. Pre-treating stains will also improve upon wash results.
7. Do not put the chemical-stained laundry into the machine directly.
8. Baby articles (baby clothes, nappies and towels) should be washed separately. If washed together
with clothes, they may become infected.
9. Check pockets before each wash and remove loose items that may cause damage to both your
washer and your clothes. Close all zippers, hooks and eyes to prevent them from hooking on with
other garments.
10. It is advisable to place bras in a washing bag to prevent the steel wire from popping out into the
drum and damaging the machine. Very smallitem (handkerchiefs, ribbons, socks etc) should be
washed in a washing bag or a pillow case.
1110
Check for
special washing
requirements
not the long
band, fasten
the buttons and
secure the
zippers.
Do not
overload the
machine. Load
the laundry
loosely
alternating
large items with
smaller ones.
Sort the laundry
according to the type
of fabric, colour-
fastness and how
dirty it is. Place
thinner laundries,
woollens and such
prone to wear and
tear laundry into
washing bag.
Before washing,
empty all pockets
from small objects
which may have
been left inside
coins, keys, lighters
etc.) as these could
damage the drain
pump.
(Cotton)
(
(Cotton)
(
Blanket (Cotton)
(approx. 900g)
Work clothes (above,under)
(approx.1200g) Jeans (approx. 800g)
Coat (Cotton)
(approx. 800g)
Jacket (Cotton)
(approx. 800g)
Single bed sheet (Cotton)
(approx. 600g)
Socks
(approx. 50g)
Underpants
(approx. 70g)
Undershirt (Cotton)
(approx.180g)
Shirt (Cotton)
(approx. 300g)
Pyjamas (Cotton)
(approx.200g)
MWM-Rena7FA(IM)011118. xp_Layout 1 11/8/18 10:33 AM Page 6

• Detach the detergent dispenser box (see illustration).
• Pour concentrated synthetic washing powder into the box directly.
• It is recommended to low suds powder or liquid
SING DETERGENT
Dissolve in the machine directly (not suitable for delay program).
1. Select Low water level.
2. Add detergent and run for 30 seconds to dissolve it completely.
3. Place laundry into the tub, select suitable water level.
4. Prepare warm water of 30 C in a container.
5. Pour the powder while stirring to fully dissolve it.
6. Follow the instructions on the back of the detergent box for the correct amount to use.
7. Too much detergent does not mean better wash results as the rinse will not be as clean and efficient.
It may also cause excessive suds to flow into the dispenser compartment leading to unnecessary
environmental pollution and build-up inside the washer.
8. Too little detergent may also cause dirt and lint to settle back onto your clothes.
9. It is also recommended to clean the detergent dispenser frequently to prevent detergent build-up.
SING BLEACH
1. Fill water to the selected level, dilute the bleach in a container and pour slowly into the wash tub.
2. Do not use bleach coloured or delicate laundry.
3. Do not add bleach directly onto laundry.
4. Refer to the manual for the usage and quantity of the bleach. Dissolve powder bleach before use.
Notes: Refer to the manual for using concentrated washing powder. Avoid over-dispensing
detergent if laundry load is small.
MODE & INDICATOR LIGHTS
ON: indicate selected mode
FLASHING: indicate the program is running
• On startup, press 'Water Level' to select water level according to laundry load.
– 1-2 is low water level
– 3-5 is middle water level
– 6-8 is high water level
• When water level is set with '1,3,5 or 7', the light will always illuminate.
• When water level is set with '2,4, 6 or 8', the light will flash.
• To add water during washing/rinse, press 'Water Level' button to add water, release button to stop.
• Alternatively, you may pause operation and press the 'Water Level' button to select a higher water
level.
8 PROGRAM SELECTION:
'Normal', 'Standard', 'Heavy', 'Fast', 'Soa ', 'Wash', 'Spin', 'Airdry'.
• When setting program 'soak, wash, spin or air dry', the light will always illuminate.
• When set program 'normal, standard, heavy or fast', the light will flash.
Note: Program setting on startup will always revert to 'Normal'.
POWERS: the machine ON or OFF.
• Press START button to begin washing operation after setting water level, program and process.
• Press again to PAUSE washing.
DETERGENT G IDE CONTROL PANEL & FEAT RES
1312
Detergent box
.
MWM-Rena7FA(IM)011118. xp_Layout 1 11/8/18 10:33 AM Page 7

1. Press POWER button.
2. The machine will be in FUZZY mode if there is no water in the inner tub.
3. Now press "START/PAUSE" button (press "Program" and select "Heavy". The machine will be in
FUZZY mode). The machine will activate FUZZY sensor and to sense laundry weight and set water
level automatically.
4. If there is water in the inner tub, washing machine will not be in FUZZY mode.
5. Press "Program" button to select the desired wash program.
6. Select appropriate water level according to laundry load.
7. Upon startup, press PROGRAM button to select AIR-DRY function if required. When the AIR-DRY
function completes the washing machine will be in waiting state.
8. Close the top lid, press "START/PAUSE" and the machine will start operating.
9. When washing completes, the buzzer will sound and cuts off power automatically.
OPERATING INSTR CTIONS CARE & CLEANING
1514
AFTER EVERY WASH
• The machine stops automatically, and the buzzer will sound to remind you to remove the laundry or
begin another wash.
• Always unplug machine from the power supply after every wash and turn off the water tap to prevent
leaks.
EXTERIOR CARE & CLEANING
• Clean the machine exterior using a soft, damp cloth.
• Do not use abrasive cleansers or chemicals to avoid damaging plastic parts
and surface.
CLEANING THE WATER INLET FILTER
Frequent washing may cause the water inlet filter net to be obstructed by dirt and grime. It is
recommended to clean it periodically.
• Turn off the tap.
• Turn on power.
• Start the machine for 5 seconds to allow water from the inlet hose to flow to the tub.
• Turn off power.
• Detach the inlet hose, remove and clean the inlet valve and the inlet net, and install again.
CLEANING LINT FILTERS A & B
CLEANING LINT FILTER A
It is recommended to clean the lint filter periodically to prevent obstruction.
• Clean the lint filter A according to the following steps (see illustration):
• Detach lint filter A.
• Turn lint filter A net inside out and wash it.
• Reattach lint filter to its original position.
CLEANING LINT FILTER B:
• Detach lint filter B (see illustration 1)
• Open lint filter B cover and wash it
(see illustration 2).
• Reattach lint filter to its original position.
The baffleplate
(
Groove
P
The baffleplate
(
Press it and pull out the lint filterB
The baffleplate
(the black rubber block)
Illustration 1 Illustration 2
Close
Open
Close
Open
MWM-Rena7FA(IM)011118. xp_Layout 1 11/8/18 10:33 AM Page 8

TRO BLESHOOTING WARNING ALARM & TRO BLESHOOTING
1716
1. WARNING ALARM
• Use this troubleshooting guide for a list of possible solutions if the machine does not perform as
expected or malfunctions.
• If a solution cannot be found or the problem persists, please contact your authorized service center.
• Do not, under any circumstance, dismantle or attempt to repair the machine yourself.
PROBLEM PO IBLE CAU E OLUTION
No display on control panel • Power Plu is not inserted correctly. • Reinsert power plu correctly.
• No power supply. • Inspect the power socket or chan e to
another power socket.
• Power switch is not turned on. • Press power switch.
• Check power supply
Water inlet hose leakin • Inlet hose connector (connectin with the • Reinstall the inlet hose a ain.
tap) is not secure.
• Inlet hose and washin machine connector • Ti hten the connector of the machine.
is loose.
Machine does not drain • Drain hose is not placed down on floor • Lay down the drain hose to floor level.
level.
• Drain hose is bent/twisted or obstructed. • Strai hten or clean the drain hose.
No water supply • Tap is not turned on. • Restart when water supply is resumed.
• Water inlet hose is obstructed. • Turn on the tap.
• Follow instructions “cleanin the water
inlet filter”.
Spin function stops and water • Excessive or insufficient laundry load.
supply resumes durin spin • The machine will adjust itself
pro ram • Machine is not placed on stable surface. automatically.
Spin function not workin even • Top lid is open when drain function be ins • Close the top lid.
when spin button is selected or when is completed.
Intermittent spin durin spin • Balance laundry load for best spin results. • This is normal.
function
Water flows from drain hose • Water remnant in the tub durin factory • This is normal.
durin first use quality check and test
PROBLEM PO IBLE CAU E OLUTION
Indicator water level li ht, wash, spin After fillin water for 5 minutes, water Open the top lid, refer to troubleshootin
& other li hts not flashin . does not reach the ideal level. uide for solution, then close the top lid
to clear the alarm.
Top lid is opened durin the spin Close the top lid and clear the alarm.
process.
Water does not fill to the required level Open the top lid, refer to troubleshootin
even after 50 minutes. uide for solution, then close the top lid
to clear the alarm.
Indicator water level li ht, spin, Spin is not balanced. Open the top lid and clear the alarm.
air- dry & other li hts not flashin .
Indicator water level li ht, soak & Water exceeds the overflow level. Drain excess water until the water level
other li hts not flashin . reaches the ideal water level.
Water level indicator li ht & other Water level sensor malfunction. Turn off the power supply and contact
li hts not flashin . your authorized technicians.
2. IMBALANCE ADJ STMENT
• Strong vibrations may occur during spinning if laundry load is not placed equally inside the tub. This
machine has an imbalance adjustment function which will activate automatically once vibration
exceeds the allowed level to rectify the imbalance.
3. POWER S PPLY IS C T OFF A TOMATICALLY
• If the START/PAUSE button is not activated within 10 minutes after pressing POWER, power supply
will be cut off automatically.
• When washing completes, power supply will be cut off automatically.
4. MEMORY BACK P F NCTION
• If power supply is cut off while machine is operating, the last selected program can be memorized
and continued once power supply resumes.
MWM-Rena7FA(IM)011118. xp_Layout 1 11/8/18 10:33 AM Page 9

SPECIFICATIONS
1918
Model MWM-Rena 7FA
Rated Voltage / Frequency 220-240V~ 50Hz
Rated Wattage 370W
Capacity 6.0kg
Max. water presure permitted in the water inlet 0.85Mpa
Min. water presure permitted in the water inlet 0.03Mpa
Weight Approx. 29kg
Dimension (mm) 547W x 563D x 920H
MWM-Rena7FA(IM)011118. xp_Layout 1 11/8/18 10:33 AM Page 10
Table of contents
Other Morgan Washer manuals

Morgan
Morgan MWM-680FA User manual

Morgan
Morgan MWM-Vagor 11 User manual

Morgan
Morgan MWM-1370SA User manual

Morgan
Morgan MWM-1312SA User manual

Morgan
Morgan MWM-7 Zircon User manual

Morgan
Morgan MWM-B1270SA User manual

Morgan
Morgan MWM-13 Aquamarine User manual

Morgan
Morgan MWM-1310SA User manual

Morgan
Morgan MWM-11 Sapphire User manual

Morgan
Morgan MWM-Vagor 13 FA User manual