Morris MDE-1215 User manual

INSTRUCTION MANUAL
DEHUMIDIFIER MDE-1215
www.morris.gr
Please keep this manual carefully for further reference!
Thank you for selecting our super quality dehumidifier. Please be sure to read this
manual carefully before using it. Any questions, please contact the professional
service for help. Keep the manual for future reference.
The dehumidifier will remove excess moisture from the air, creating a comfortable
environment for your home and Office. Its compact design allows you to easily move it to
every room.

1
CONTENTS
CONTENTS…...............................................................................................1
CAUTIONS…................................................................................................2
PARAMETER…............................................................................................3
PARTS….......................................................................................................4
OPERATIONS…............................................................................................5
WATER DRAINAGE…..................................................................................8
MAINTENANCE…........................................................................................9
TROUBLE SHOOTING….............................................................................10

2
CAUTIONS
Please read the operating instructions carefully before using your dehumidifier
for the first time.
1. Install the unit on flat and hard floor to diminish vibration or noise.
2. Never immerse the unit in water or other liquids.
3. Never operate the unit if the cable or other connector is damaged, or something
abnormal may happen, please call customer service for help.
4. Disconnect the unit from power supply when it is not in use, or before relocating or
cleaning it.
5. Operate the unit only at the voltage specified.
6. The unit is for indoor use only. Don’t use it for other purpose.
7. Do not put heavy objects on the appliance.
8. Do not tip the unit to any side as spilt water could damage the appliance.
9. Never insert any other object into the unit body to avoid any hazard or unit failure.
10. Do not put the unit close to heat-generating devices or near flammable and
dangerous materials.
11. This appliance is not intended for use by persons (including children) with reduced
physical, sensory or lack of experience and knowledge, unless they have been given
supervision or instruction concerning use of the appliance by a person responsible for
their safety. Children should be supervised to ensure that they do not play with the
appliance.
12. If the supply cord is damaged, it must be replaced by the manufacturer or its service
agent or a similarly qualified person in order to avoid a hazard
13. The appliance must be positioned so that the plug is accessible
14. The appliance shall be installed in accordance with national wiring regulations
15. The ambient temperature range for the appliance is 5°-35°
Don’t try to repair, dismantle or remold such appliance, or it may make some
damage. Even the change of power cord should be done by special qualified
person.

3
PARAMETER
Model No. MDE-1215
Dehumidify Capacity 12L/day(30℃ RH80%)
Rated Voltage AC220-240V
Rated Frequency 50Hz
Input Power 235W(30℃ RH80%)
Rated Current 1.25A(30℃ RH80%)
Water Tank Capacity 2L
Sound Pressure Level ≤43dB(A)
Refrigerant Charge R134a/130g
Net Weight 10.5kg
Suction Side Pressure 0.5MPa
Discharge Side Pressure 1.5MPa

4
PARTS
A: Touch panel
F: Turbofan K: Compressor
B: Top air outlet
G: Motor L: Float
C: Side air inlet
H: Condenser M: Water Tank
D: Side panel
I: Evaporator N: Three layers of filter(Optional)
E: Purify component (Optional) J: Temperature and humidity sensor O: Back air inlet

5
OPERATIONS
POWER
When power is on, the panel shows blue. Press this button to turn on /off the unit. Do not
unplug the power cord directly to force the machine stop working directly.
Press the “POWER” key, machine run and enter CONT (Continuously dehumidification)mode
automatically. The “POWER” and “CONT” indicator lights show orange. The fan speed is high
by default, and the “SPEED” indicator light shows red.
Press the “POWER” key again, the machine is turn off, the fan delay shut down 10 seconds.
In the mode of “CONT”, we can set up the SPEED, TIMER, ION and other functions independent.

6
HUMSET
Press this key, the system exit the CONT mode, enter the smart mode.
Press this button to adjust humidity as following (The initial humidity is 60%), from
60%→65%→70%→75%→80%→40%→45%→50%→55%→60%. When the indoor
humidity is lower than the set humidity, the machine would stop automatically.
After set the humidity in 5 seconds, the machine show the current environment humidity.
Long press this button for 3 seconds to query the current environmental humidity.
When we set the humidity is “--%”, the system enter the CONT mode, 5 seconds later,
“HUMSET” indicator light put off, the “CONT” indicator light up.
TIMER
24 hours timer
Press this button to set timer on/off, if you would like to cancel timer setting, press this button
to 00 shown from display.
SPEED
Press this button to adjust the fan speed between HIGH, LOW fan speed.
Under the high speed, the indicator light shows red, the low speed, the indicator light shows
blue.
ION
Press this button to turn on and off the ion function.
Purifying function can separate open: when power is on, press this key, the motor starts, the
compressor does not start, separately used for air purification, still can set the timer and adjust
the fan speed at this time.

7
Double “88” display
1. When the machine is running, show the current humidity,
2. When we set the humidity, show the humidity of we set.
3. When we set the timer, show the time of we set.
4. When we long press “HUMSET”in 3 seconds, show current humidity.
When current humidity<20%, shows “LO”
When current humidity>95%, shows “HI”
Digital color:
1. When the humidity is appropriate, the digital is blue.
2. When the humidity is high, the digital is green.
3. When the humidity is too high and too low, the digital is red.
Water full indication
When water tank is full, indicator light shows red and the unit will buzz for 15 times and then
stop. You must empty the water tank and put it back to the correct position.

8
WATER DRAINAGE
Water Tank
The Water full indication will show red when water tank is full, warning will be given.
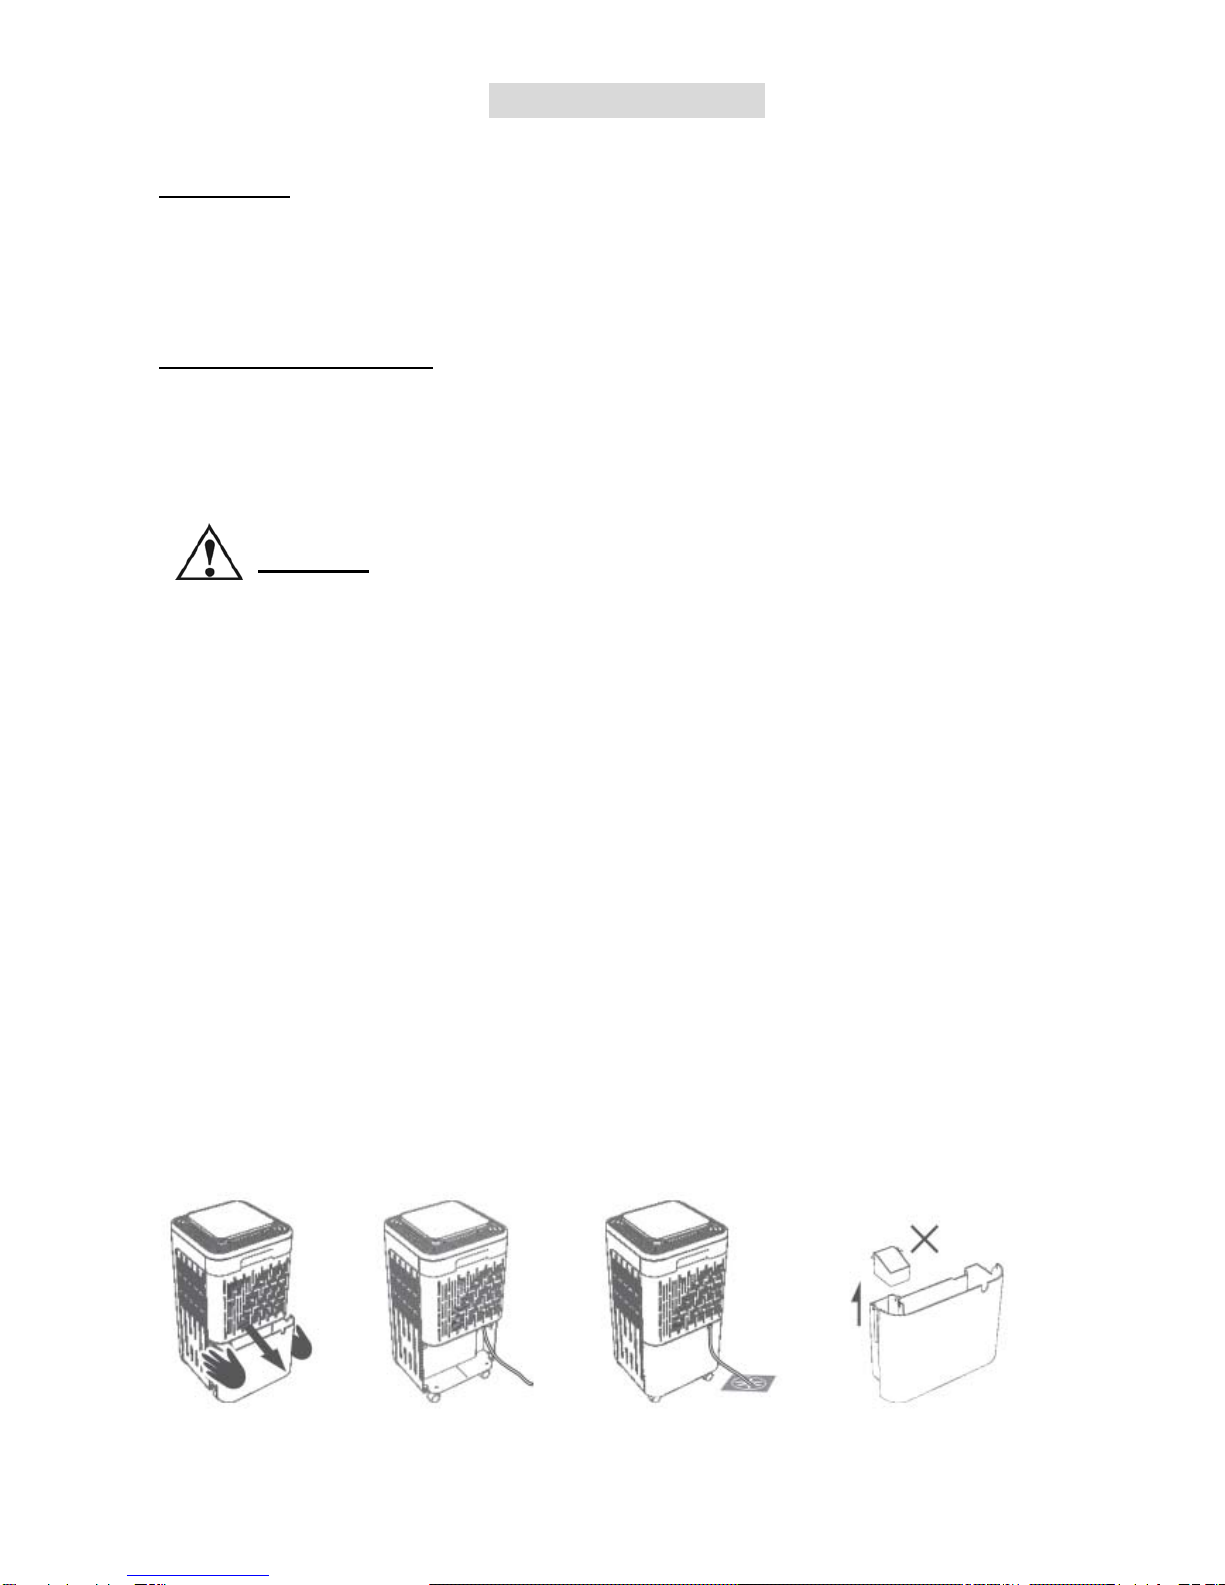
Take out the water tank(FIG 1), empty the water inside.
Put the water tank back into the dehumidifier
Continuous drainage
Take out the water tank first, and connect the pipe with the outfall closely (FIG 2), the other
side connection with floor drain on other container such as a bucket (FIG 3), at last put the
water tank into the dehumidifier.
Caution:
1. Never block the water outlet or the pipe, water will flow into the water tank if it
is blocked.
2. Never bend the drainage pipe and be always lower than the outlet.
3. Must close the cover when no need continuous drainage.
NOTICE:
1. When the machine is running, take out the water tank, the machine will stop.
2. Water tank is the default drainage .
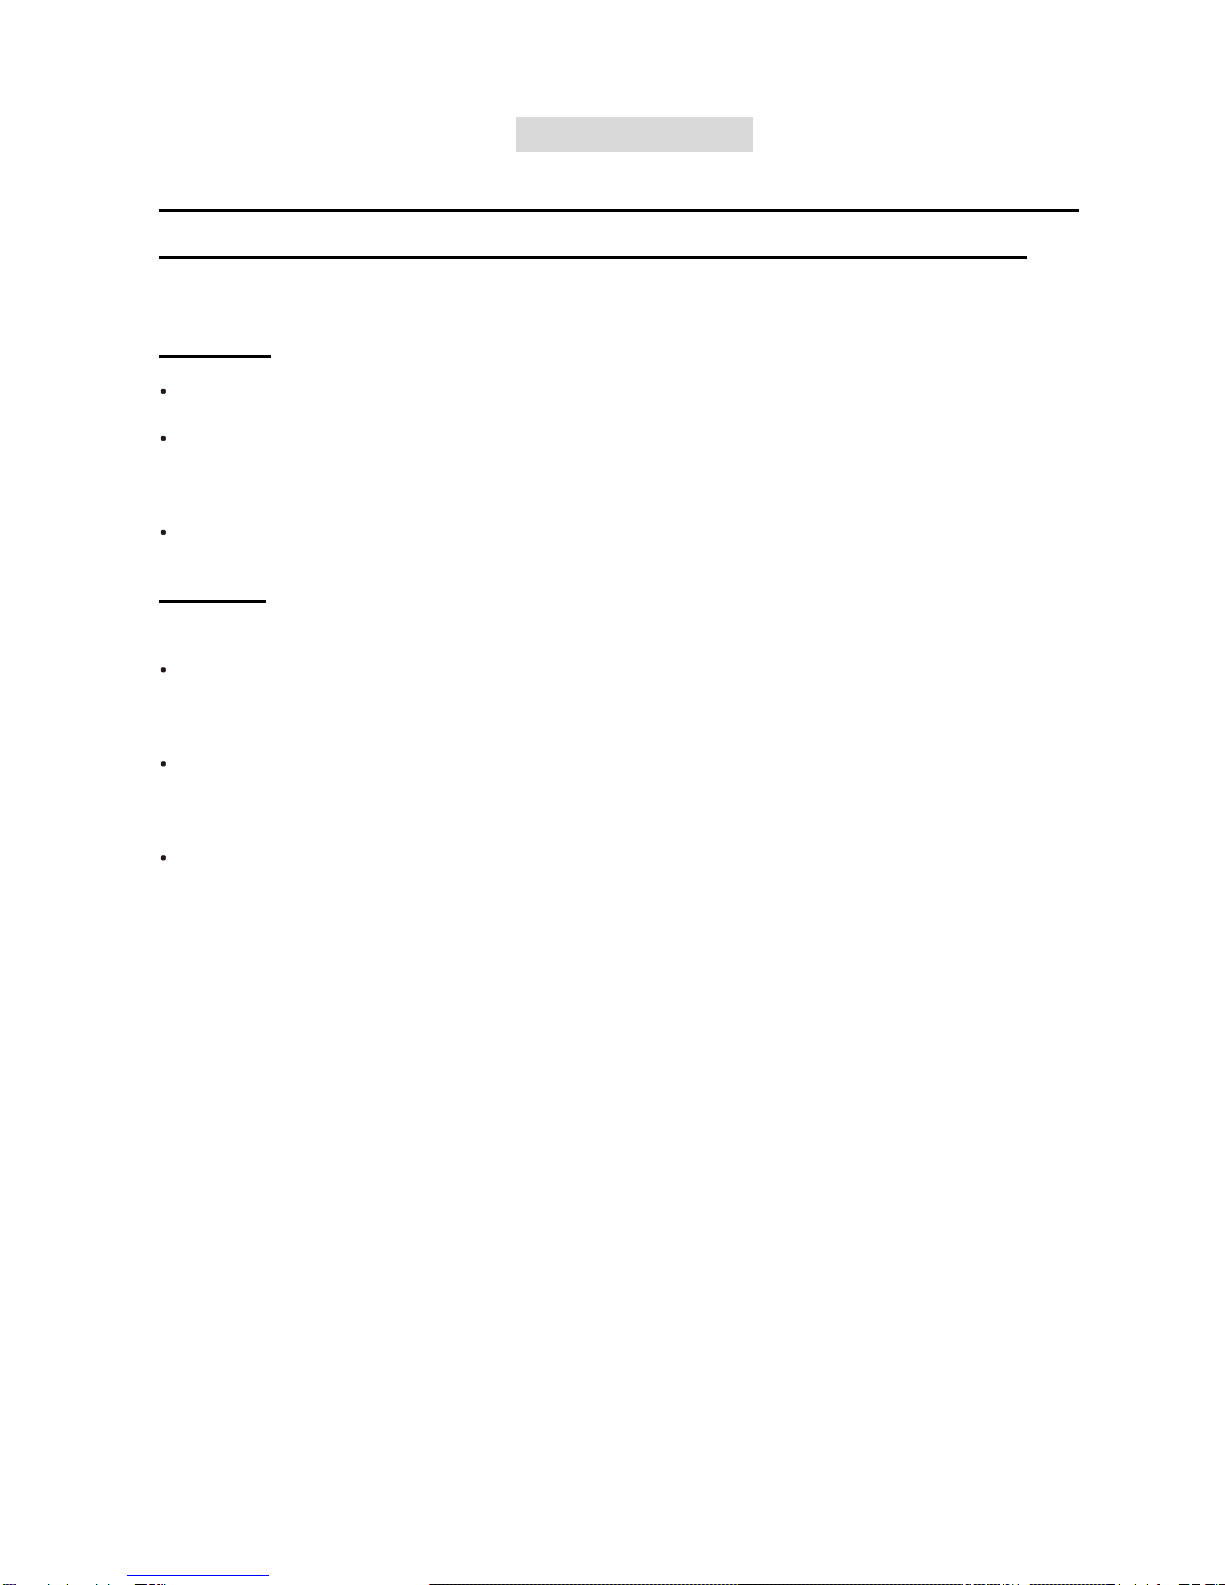
3. Don’t remove the float from the water tank(FIG 4), if you do this, the machine will show
“FULL”, and stop to work.
4. Drain the water collection tank completely when water tank is full and reset your setting
5. If the water tank is dirty, clean by cool water or warm water, cannot use cleaner, steel wool,
chemical rag duster, gas oil, benzene, thinner or other solvent to clean it, otherwise, it
would damage the water tank and lead to leakage
6. When put the water tank back to the unit, please use two hands to push the water tank into
the machine to the correct position. Or the water full indication will still show red and the
machine can not work.
FIG1 FIG2 FIG3 FIG4

9
MAINTENANCE
NOTE: TURN OFF THE UNIT AND UNPLUG IT BEFORE ANY
MAINTENANCE OR REPAIR TO AVOID ELECTRIC SHOCKS.
Cleaning
Unplug the unit before any cleaning.
Clean the housing with a soft moisture cloth. Do not use chemical solvent (such as benzene,
alcohol, gasoline).The surface may be damaged or even the whole case may be deformed.
Do not sprinkle water on the unit.
Air filter
The unit is equipped with washable air filter. Take out the washable filter. After the cleaning
operation, insert the filter back to its place.
Clean the washable filter every 2 weeks. If the filter is blocked with dust, the efficiency will
reduce.
Wash the air filter by immersing it gently into warm (about 40°) water with a neutral
detergent, rinse it and dry it thoroughly in a shaded place.
Dehumidifier storage
If the dehumidifier will not be used for an extended period of time:
1. Drain the water tank completely and make sure no more water stocked inside.
2. Unplug the unit and fold up the power supply cord.
3. Remove and clean the air filter, allow it to dry completely and reinstall it.
4. Store the dehumidifier in a cool, dry location, away from direct sunlight, extreme
temperature and excessive dust.

10
TROUBLE SHOOTING
BEFORE CALLING FOR SERVICE
Before contacting professional service, review this list. It may save your expense and time.
This list includes common occurrences that are not the result of a defect in workmanship or
materials.
Problem Possible Cause Solution
The unit doesn't operate
No power supply Connect to a functioning outlet and
switch on
Water Full Indication Flash
Drain water tank and reset your
setting, or replace the water tank to
right place
Room temperature under 5
degree, the error shows ”CL”;
above 38 degree, the error
shows “CH”
Self-Protection designed to protect the
unit. Can not work under such
temperature
Timer function is active. Deactivate Timer function.
The dehumidifying
function doesn't work
or the unit turn on / off
frequently
Is the air filter clogged? Clean the air filter as instructions
Is the door/window
opened? Close the door / window
Is the unit close any heat
emanation? Remove the unit to a cool place
Is the intake duct or discharge
duct obstructed?
Remove the obstruction from the
discharge duct or intake duct.
E1 Evaporator sensor problem Connection mouth pull out and connect
it again, or change the sensor.
E2 Humidity sensor problem Connection mouth pull out and connect
it again, or change the sensor.
Cautions: Switch off the unit and unplug it immediately if anything abnormal
happens. Then contact a qualified electrician.

11
www.amiridis-savvidis.gr
declare that the dehumidifier
EN 55014-1/A2:2011
EN 55014-2/A2:2008
EN 61000-3-2/A2:2009
EN 61000-3-3:2013
EN 60335-2-40/A13:2012
EN 60335-1:2012
EN 62233: 2008
Rohs Directive: 2011/65/EU
Table of contents
Other Morris Dehumidifier manuals

Morris
Morris MDD-10251W User manual

Morris
Morris MDE-2016 User manual

Morris
Morris Premier plus MDD-10251W User manual

Morris
Morris MDB-16150HIW User manual

Morris
Morris MDB-12150HIW User manual

Morris
Morris MDB-12160HIW User manual

Morris
Morris MOR-DHE-D068 User manual

Morris
Morris MDE-4019 User manual

Morris
Morris MDE24291 User manual

Morris
Morris MOR-12LDHE-WIFI User manual
Popular Dehumidifier manuals by other brands

Maxell
Maxell DMH1000 user manual

Meaco
Meaco 12L Low energy Dehumidifier User instruction manual

INVENTOR
INVENTOR DE-GDNM16 owner's manual

Rowenta
Rowenta VITALITY DH3110 Instructions for use

Olimpia splendid
Olimpia splendid SeccoPur S Instructions for installation, use and maintenance

Honeywell
Honeywell DH45W owner's manual