morxes GIRO User manual

Montážní návod koloběžek MORXES
Assembly manual for MORXES footbike
Montageanleitung für die Tretroller MORXES
MORXES GIRO
MORXES SPORT
Návod M2101

NÁVOD
(MONTAGEANLEITUNG/MANUAL)
CZ
DE
EN
Smontovaná část koloběžky,sada montážních klíčů,
zadní osa náboje a přední osa náboje, přední a zadní kolo
Smontovaná část koloběžky,sada montážních klíčů,
zadní osa náboje a přední osa náboje, přední a zadní kolo
Ein zusammengebauter Teil des Rollers, ein Werkzeugsatz,
ein Vorder- und ein Hinterrad mit Achsen, Montageanleitung.
PACKAGE CONTAINS:
INHALT DES PAKETS:
OBSAH BALENÍ:
Koloběžku vybalte z krabice a odstraňte veškerý obalový materiál.
Den Tretroller aus dem Karton herausnehmen, die Kabelbinder abschneiden und die
Polster Plastik lösen.
Unbox and unwrap the kick scooter from the box.
Odejměte krytku na šroubu a šroub 1 povolte. Vytáhněte šroub společně s víčkem
hlavového složení. Jednou rukou si přidržujte vidlici koloběžky tak, aby nedošlo k
vypadnutí. Nasaďte představec s řidítky na sloupek vidlice.
Entfernen Sie die Schraubkappe und lösen Sie die Schraube 1. Ziehen Sie die
Schraube zusammen mit der Steuersatzkappe heraus. Halten Sie die Tretrollergabel
mit einer Hand fest, damit sie nicht herausfällt. Setzen Sie den Vorbau mit dem
Lenker auf den Gabelschaft.
Remove the screw cap and loosen the screw 1. Pull out the screw together with the
headset cap. Hold the footbike fork with one hand so that it does not fall out. Place
the stem with the handlebars on the fork steerer.
Nasaďte zpět víčko hlavového složení a dotáhněte šroub (max. 5-6 Nm) tak, aby v
hlavovém složení nevznikala vůle. Na šroub nasaďte krytku.
Setzen Sie die Steuersatzkappe wieder auf und ziehen Sie die Schraube fest (max.
5-6 Nm). Setzen Sie die Kappe auf die Schraube.
Replace the headset cap and tighten the screw (max. 5-6 Nm). Put the cap on the
screw.
1

Rozpojte přední brzdu.
Die Vorderradbremse abklemmen.
Disconnect the front brake.
Přední osu kola vsuňte do náboje a kolo vložte do přední vidlice. Dávejte pozor, aby
kolo bylo symetricky umístěno mezi rameny vidlice. Dotáhněte šroub (max 8 Nm).
Stecken Sie die Vorderachse des Laufrades in die Nabe und stecken Sie das Laufrad
in die Vorderradgabel. Achten Sie darauf, dass das Laufrad symmetrisch zwischen
den Gabelarmen positioniert ist. Ziehen Sie die Schraube fest (max. 8 Nm).
Insert the front axle of the wheel into the hub and insert the wheel into the front fork.
Make sure that the wheel is symmetrically positioned between the fork arms.
Tighten the screw (max 8 Nm).
Spojte přední brzdu. Pro kontrolu roztočte kolo. Kolo se musí volně točit a brzdové
špalky nesmí třít o ráfek. Zmáčknutím brzdy se kolo musí zastavit. Při zmáčklé
brzdě by se kolo nemělo protočit, když jej zkusíte znovu roztočit rukou.
Schließen Sie die Vorderradbremse an. Drehen Sie das Rad, um zu überprüfen. Das
Rad muss sich frei drehen und die Bremsbeläge dürfen nicht an der Felge reiben.
Das Rad muss beim Drücken der Bremse anhalten. Wenn die Bremse gedrückt wird,
sollte sich das Rad nicht drehen, wenn Sie versuchen, es von Hand zu drehen.
Connect the front brake. Spin the front wheel. The wheel must turn freely and the
brake pads must not rub against the rim. The wheel must stop when pressing the
brake. With the brake is pressed, the wheel should not spin when you try to spin it by
hand.
Řídítka srovnejte s předním kolem tak, že osa symetrie řídítek je rovnoběžná s
předním kolem. Dotáhněte šrouby na představci (max. 8-9 Nm).
Den Lenker mittig zentrieren, damit die Radachse gerade laufen kann. Die
Schrauben anziehen, damit diese fest sind. Die Schrauben anziehen. (8 - 9 Nm.)
Straighten out the handlebars with front wheel that the axis of handlebars symmetry
is parallel with front wheel. Tighten up the screws (8 - 9 Nm.).
Rozpojte zadní brzdu.
Trennen Sie die Hinterradbremse.
Disconnect the rear brake.

Rozpojená zadní brzda.
Die Hinterradbremse abgeklemmt.
Disconnected rear brake.
Zadní osu kola vsuňte do náboje a kolo vložte do rámu. Dávejte pozor, aby kolo bylo
symetricky umístěno mezi zadními rameny rámu. Dotáhněte šroub (max 8-9 Nm).
Stecken Sie die Achse in die Vorderradnabe und das ganze Rad in die
Hinterradgabel. Stellen Sie sicher, dass das Rad symmetrisch montiert ist. Ziehen
Sie die Schraube fest (max. 8 Nm).
Insert the axle into the front wheel hub and insert the whole wheel into the rear fork.
Make sure the wheel is fitted symmetrically. Tighten up the bolt (max 8 Nm).
Spojte zadní brzdu. Pro kontrolu roztočte kolo. Kolo se musí volně točit a brzdové
špalky nesmí třít o ráfek. Zmáčknutím brzdy se kolo musí zastavit. Při zmáčklé
brzdě by se kolo nemělo protočit, když jej zkusíte znovu roztočit rukou.
Schließen Sie die Hinterradbremse an. Drehen Sie das Rad, um zu überprüfen. Das
Rad muss sich frei drehen und die Bremsbeläge dürfen nicht an der Felge reiben.
Das Rad muss beim Drücken der Bremse anhalten. Wenn die Bremse gedrückt wird,
sollte sich das Rad nicht drehen, wenn Sie versuchen, es von Hand zu drehen.
Connect the rear brake. Spin the front wheel. The wheel must turn freely and the
brake pads must not rub against the rim. The wheel must stop when pressing the
brake. With the brake is pressed, the wheel should not spin when you try to spin it by
hand.
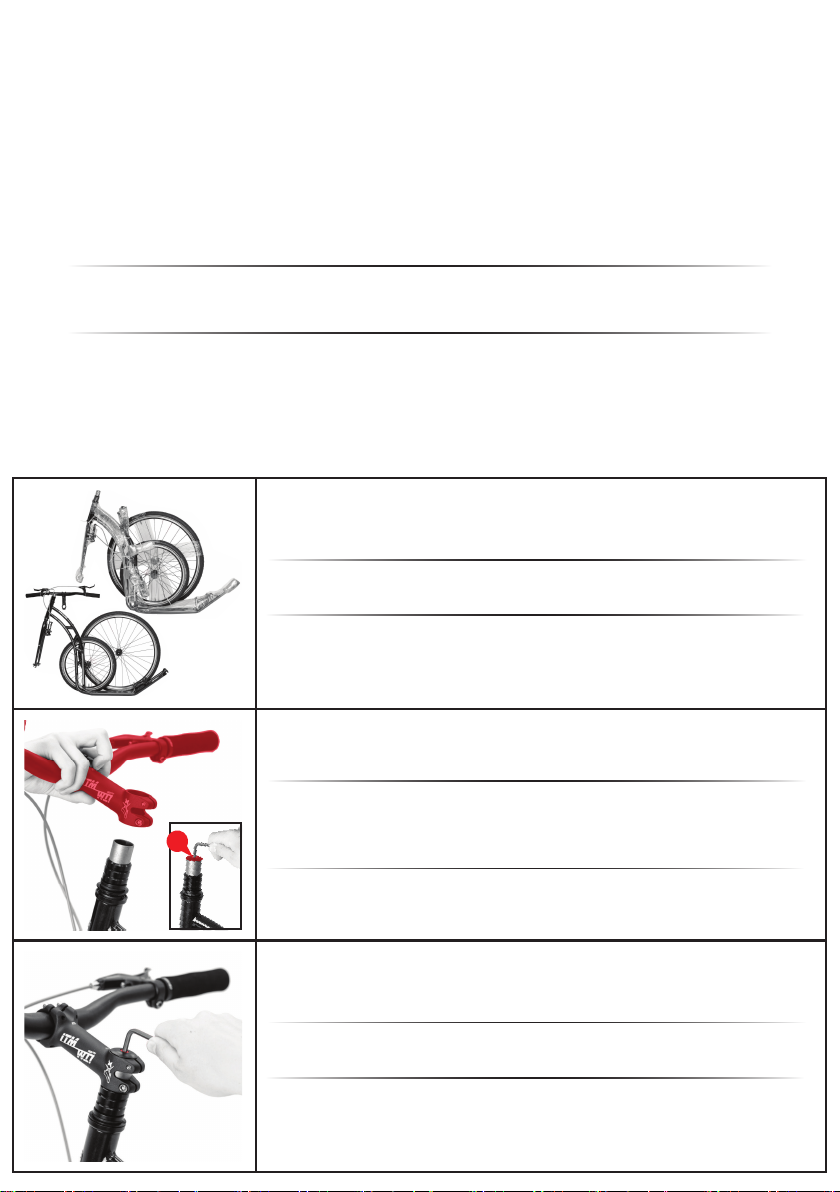
Povolte šrouby na představci, srovnejte řidítka do vhodné polohy a šrouby dotáhněte
(max 8-9 Nm). Pozn.: Šrouby dotahujte postupně do kříže proti sobě (všechny
stejným dotahovacím momentem).
Vorbauschrauben lösen, Lenker ausrichten und festziehen (max. 8-9 Nm).
Hinweis: Schrauben über Kreuz gegeneinander anziehen (alle mit gleichem
Drehmoment).
Loosen the stem bolts, align the handlebars and tighten them (max 8-9 Nm).
Note: Tighten the screws crosswise against each other (all with the same torque).
Nastavte brzdové páky do vhodné polohy tak, aby se nám snadno ovládaly a
dotáhněte šrouby na objímce (max. 5-6 Nm).
Stellen Sie die Bremshebel so ein, dass sie leicht zu bedienen sind und ziehen Sie die
Schrauben an der Hülse fest (max. 5-6 Nm).
Adjust the brake levers to a suitable position so that they are easy to use and tighten
the screws on the sleeve (max. 5-6 Nm).
This manual suits for next models
1
Table of contents