Moser Genio 1565 User manual

Type 1565
Originalbetriebsanleitung
Netz-/Akku-Haarschneidemaschine Typ 1565
de
Translation of the original operating manual
Cord/cordless hair clipper type 1565
en
Traduction du mode d’emploi d’origine
Tondeuse à cheveux batterie/secteur de type 1565
fr
Traduzione delle istruzioni per l‘uso originali
Tagliacapelli a rete/batteria tipo 1565
it
Traducción del manual de uso original – Máquina de corte de pelo con
alimentación de red/por batería modelo 1565
es
Tradução do manual de utilização original – Máquina para corte de
cabelo com bateria e ligação à rede eléctrica tipo 1565
pt
Vertaling van de originele gebruiksaanwijzing
Snoer/snoerloze tondeuse type 1565
nl
Översättning av originalbruksanvisning
Nät-/batteridriven hårklippningsmaskin typ 1565
sv
Oversettelse av den originale bruksanvisningen
Nett-/batteridrevet hårklippemaskin type 1565
no
Alkuperäiskäyttöohjeen käännös
Verkko-/akkukäyttöinen hiustenleikkuukone Tyyppi 1565
fi
Orijinal kullanma kılavuzunun çevirisi
Elektrikli/bataryalı saç kesme makinesi Tip 1565
tr
Tłumaczenie oryginalnej instrukcji obsługi – Maszynka do strzyżenia
włosów z zasilaniem sieciowym/akumulatorowym typu 1565
pl
Překlad originálního návodu k použití
Síťový/akumulátorový zastřihovač vlasů typ 1565
cs
Preklad originálneho návodu na obsluhu
Sieťový/akumulátorový strihač vlasov, typ 1565
sk
Az eredeti gépkönyv fordítása
1565 típusú hálózatról működő/akkumulátoros hajvágó gép
hu
Prevod originalnih navodil za uporabo
Aparat za striženje las na omrežni/akumulatorski pogon tip 1565
sl
Traducerea instrucţiunilor de folosire originale
Maşină de tuns părul alimentată de la reţea/acumulator model 1565
ro
Превод на оригиналното упътване – Машинка за подстригване –
работа на ток и с акумулатор тип 1565
bg
Перевод оригинального руководства по эксплуатации
Аккумуляторно-сетевая машинка для стрижки волос , тип 1565
ru
Переклад оригінальної інструкції – Машинка для стриження
волосся з живленням від мережі або акумулятора тип 1565
uk
Μετάφραση των πρωτότυπων οδηγιών λειτουργίας
Κουρευτική μηχανή ρεύματος/μπαταρίας τύπος 1565
el
! " #$ % د ' ()ا +,- . / ا م ا 12 3 4 #5 6 ز ' 89 : % ا ' ;< " =<$)> 6 ' ?@6 ر = %و ا ' C5"> 6 ءEFG" ا ز1565
!< 3 ($ 6تI6E%' 9, - . / ا م
E< 3 JE 6تE-<3 K%> 6,-./ ا مد ' ()ا +,- < $ 6 ل
! "#$%اءةد* +,ا -. / 0 1 2 ل 456 ,7 89و ا./ + 0 2ب72<=>?2 > + @ A $B,
ا * 5% و ع<9ا./DE ا ما * "G 2 زIول>% ة .
اJ/B%د* +,ا -. / 0 1 2 لKL ا7"M ء>NاO@ /Pو اQ/ RS4A4 56 ,T+ E<9
>62ن!VG ,ا * WXW ل إ*+A.
<9Q2 * =ZV8 + [ا * "G 2 زI\% اف^2*_=،ا Q %صJ 8bأن! 6Wند* +,
ا -. / 0 1 2 ل>%<d2
ً
>fا * "G 2 ز .
<9Q2 * =وTW دأيZ 0 2 رض>fZ 0 8 + 1 2توإرk2داتاI> 2نا Ol8 + = ،
! "#اZB2عا * / WT+ G 2تا Ol8 + = .
M"Nا ' " EJزو ا OرM6 د ات
P@ "
mn % o 2T[JNا * p0 d 2 ت ا*6G%42q+=>fاQ/ 12لا O Wتأو
ا * / 0 %ضrX 2 4 2 تmn + % ة .
P@ "
mn % ا - o R"2 ر>fاQ/ 12لا O Wتأوا * / 0 %ضrX 2 4 2 تmn + % ة .
!8Q = "
ZlL!%>NاQ/ 12لو $WعإX2 4 2 تTV E ! = أووTW دأ mn 2 ر
Xl + = .
!R?(S
Z@B+Ar>6 2 o + =Qp W ل أs% ا ر >2د!=.
Z@B+A>% <t4 10 8 W > 2تو op2 q uK2>= .
! /n8#اI>%K@ 2ا ZD2 ذإT% ا ء> 0w.
$[4/@R+LاrT%اءاتو <tا * /V 8 V, ا O d / %ح.
و 2T ا U R -V
أ ,$ 6 ء ا 1#X ا ء ا U CJY %)ا ' ",Z ا ' - J[( 84ر:Z(1
AkR % ة$yا * 50 %
BزرZ5z + , /إ ! d 2ف> {k%sW q 9O%ا$B =>V/ Wىا * 5l N
C> Em,ا * "G 2 ز* 8 % 4}42*/+2ر
Dر أسXz + % > D py *?B }\Wلا * 50 % ،3>[و6>[
Eر أس7B+%> D py *?B }\Wلا * 50 % ،9>[و1 2>[
F< %k2 ةZ @ +Ä
Hز !Å> D py *5R % ة ا * dy
IوQE ةا * /zL! =ا*6G%42q+=
J$ 2 4ÇوQE ةا * /zL! =
ا'?(6Y6تا '-KR(%
ا ' \5 6 ز ا U 8$ J ل
آ*+=ا * /5z + , :
>l% كذوZ+2ر>V/ 1 % 4n2 ر ! = :4n2 ر ! =K+Eر!Eا * @ + 6,و ا O0Eن >EةmE > =ا * Bn2 ر ! = :*z2!=100د$+d= اI402د)ا *nWلxا * 0 %ضxا-ر Z R 2ع(:149x 40 x 36>[ ا * W زن:140Ö% امZd%!B2
ً>V/ Wىا * ?" + P :6 6د !V+ B ,)A(J 8bا I $ pb J 8b
>V2 < =2 5.[ ا -K / M ا ز :>2,5م/ث²
و]/ ة ا ' -_Q=%ا'C5">6`(%
ا * n% ا ز :>G 2 !á6000
ا./ Gàكا * dEر ة :1 2 و اطJ 8bا I $ pb <W * / +=ا * /5z + , :100–240<W *Å/5 0–6 0K% Z M
KL اا * "G 2 ز! /W<%J 8bQ1 2 ! =J2ز * =و-!pE ر أيsWs2 ء -. 8 6 + = .Z /n2 4t
> W اXR 2 تKL اا * "G 2 ز>f>02 ! +%و Z 0 8 + 1 2تا-Zl2 دا Iو ر و 49اO/08d=4 2 * / W ا <t
ا * 6 G % و > z @ 2 \ + V92004/108/EGو ا ä-ت2006/42/EG.
ا,- < $ 6 لا ' \5 6 ز
ا ' - 8a ( "
اQ/ RS41W ادZ z 8 +Äا * "G 2 ز* @d,ا * "G 2 زأوا -Q / R 2 ظ4A456 ,
آ >N<9و $Å-Qt .
Z å7E>NJEمo dp2 ن أيk9 ء <9>l/W!2تا*/V8+[.
ا < ly72<=ا ITM ا ء * 8 / å7E>NJEموTW دأيأs% ا ر o 2T1 =JNا * @ d,.
ا 1E 6 ن
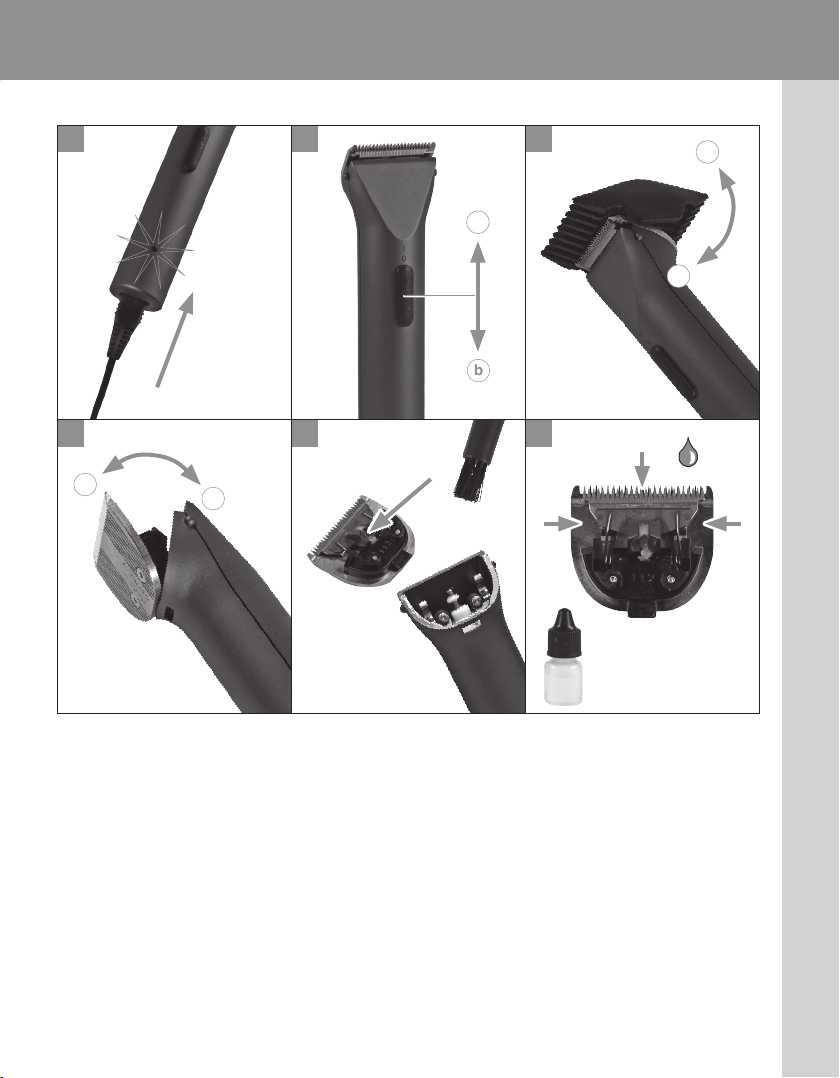
!R?(S!أ[" ا ر Y 6 #$ %IFc 3@( %P6Gd % .
ا Q %صJ 8bر 4}ا * "G 2 ز4 1pE ر Z+2ر>/%دد)A C( واo/BA
إ *b$+1=ا * "G Eا OL7Wر ةJ 8b* WQ=ا * GW! = .
M8 F ا ' ?@6 ر = %
! % TbZ Dp +y>Eة16.2 J =Zd%!B2
ً
* 5l N ا * "G 2 ز$B,
ا./ 0 1 2 * AIول>% ة .
1.أ دm,$ 2 4ÇوQE ةا * /zL! =ا*6G%42q+=)J(<9> Em,)D( ا * "G 2 ز
)ا *pW ر ة ا * / Ws+l+ =2( .
2.أ دm,وQE ةا * /zL! =ا*6G%42q+=<9>pE ر ا * 6G% 4 2 ءا * l 2 q n9 .
3.$[4ç!d2فا * "G 2 ز>Nmàلا * ?z }J 8bزرا * /5z + , /ا r ! d 2ف)ا * pW ر ة
ا * / Ws+l+ =3ⓑ(.
·màلJ1 8 + =ا * 5l N ،.Wف! ?9 ء > {k%>% ا $ B =>V/ Wى
ا * 5l N )C( .
·!V/ z %قkl N ا * Bn2 ر ! =>NTE ! E456 ,7
ُ
89ّ
QW ا *910
.2J2ت.
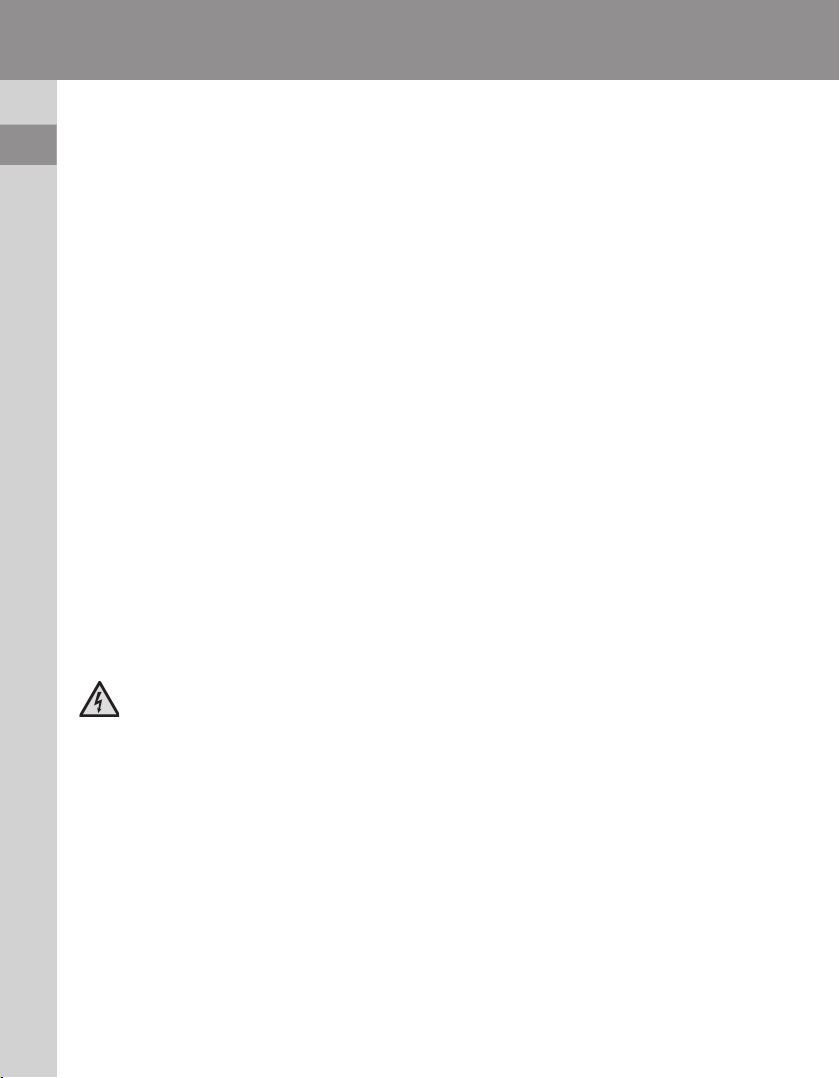
ا ' -;_ ( )> 6 ' ?@6 ر = %
1.kz ,ا * "G 2 ز>Nmàلا * ?z }J 8bزرا * /5z + , /ا r ! d 2ف^[$[4ç!d2<A
40Eا-o /G2 ء>Nا-./DEام)ا *pW ر ة ا * / Ws+l+ =3ⓐ/ⓑ(.
·40Ekl N ا * Bn2 ر ! =456 ,7 2 >,،!16@ëا./ 01 2 لا * "G 2 ز
4 Eون\2 $ =7G%42q+=OEةZ p, إ *b100د$+d= .Z /n8#KL ه
ا * V0 =>Nا *n2 $ =>24w5إ *b1 0دور اتkl N .
·ا o0Eاما*0@2!=ا *62<+=45R % ة ا * dy!{^%456 ,TE.8 B9
J 8b>Eةا./ 0 1 2 * G 2 .
ا ' -;_ ( )>6'C5">6ء
1.أ دm,$ 2 4ÇوQE ةا * /zL! =ا*6G%42q+=)J(<9> Em,)D( ا * "G 2 ز
)ا *pW ر ة ا * / Ws+l+ =2( .
2.أ دm,وQE ةا * /zL! =ا*6G%42q+=<9>pE ر ا * 6G% 4 2 ءا * l 2 q n9 .
3.kz ,ا * "G 2 ز>Nmàلا * ?z }J 8bزرا * /5z + , /ا r ! d 2ف^[$[4ç!d2<A
40Eا-o /G2 ء>Nا-./DEام)ا *pW ر ة ا * / Ws+l+ =3ⓐ/ⓑ(.
ا +,- . / ا م
ا ' 89 : % > 6,- < $ 6 لا ' " ؤ وسا U . gg % 'a? hEi- JىGJلا ' ;< "
!16@ëأ!?2
ً
ا./ 0 1 2 لTG 2 زا * là $ =>fا*%
ِ
ؤوسا O D pp = *?B }>V/ Wى
\Wلا * 50 % .! /W<%ا * "G 2 زJ 8bا * % ؤ وسا*/2*+=ا O D pp = *?B }>V/ Wى
\Wلا * 50 % :
·ر أسXz + % > D py *?B }\Wلا * 50 %=\Wلا * dy3>[و6>[
·ر أس7B+%> D py *?B }\Wلا * 50 %=\Wلا * dy9>[و1 2>[
·!16@ë$% اءة>V/ Wىا * dy)42O8 +1/%(J 8bا * % أسا O D py
*?B }\Wلا * 50 % .
·! 16Nا./DE ا مر أس>Nا * % ؤ وساO%<d=OV/W!9$y
>D / 8 Rw.-. / D E ا م>V/ Wىا * dyا*_2o9،! "#إزا *=ا * % أس
ا O D py *?B }\Wلا * 50 % ، ^[إدارZAو وs0 A >NTE ! E .
·Z 61N>+MةKL ها * % ؤ وس<9s1 2 o G 2 OV/ Wى$y> WQE ،
4 zïا * @%JNزاو!=وsf ا * "G 2 زJ 8bا * % أس.
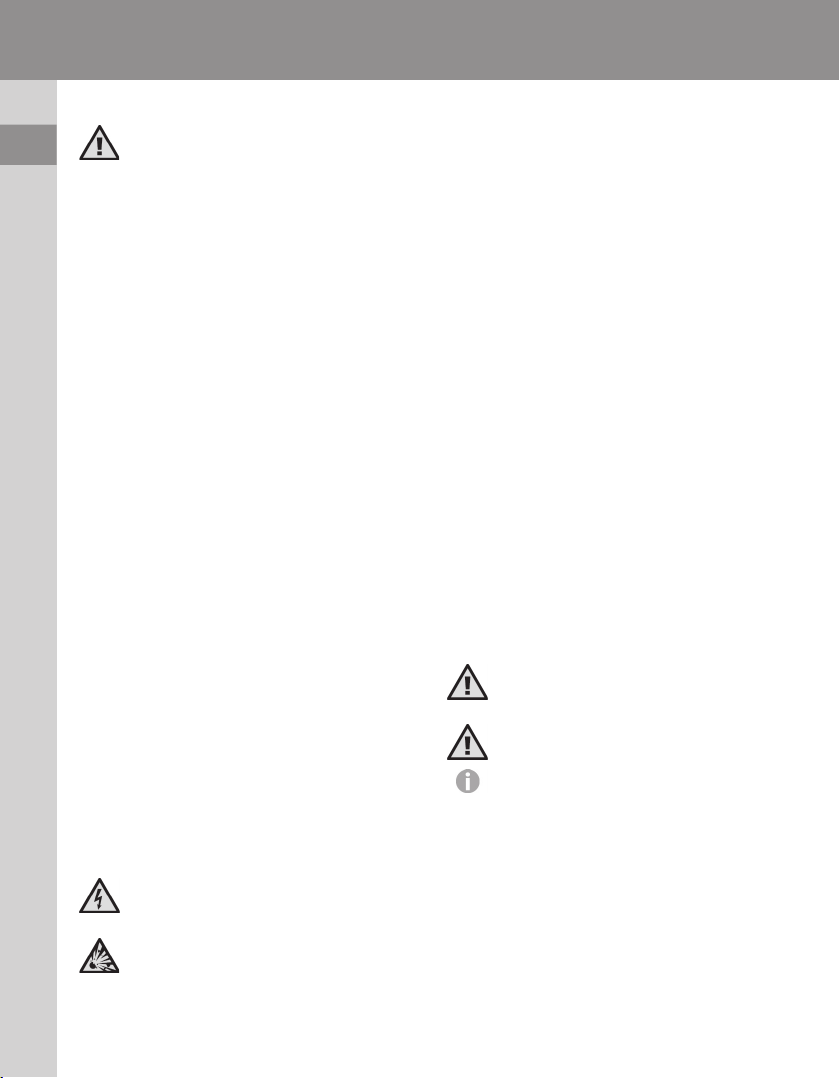
! " k (l/إزا'%ا ' " أسا U . gn 'a? hGJلا ' ;< "
1.sf ا * % أسا O D py *?B }\Wلا * 50 %J 8bQ2 < =ا * dyو اsz }
42Z"2هkR % ة ا * dyJ 8bÖn 2 ء ا * "G 2 زإ *bÖ2 !=ا*/_B+ÅJ 8bا * B % وز ات
ا Oàq 1 =)ا *pW ر ة ا * / Ws+l+ =4ⓐ(.
2.!16@ëإزا *=ا * % أسا O D py *?B }\Wلا * 50 %<+1240E>Nmàلد<0A
42Z"2هQ2 < =ا * dy)ا * pW ر ة ا * / Ws+l+ =4ⓑ(.
ا '<R 6 =%> 6 ' \5 6 ز
! Ro(Tو2( 6 Y % ا ' \5 6 ز
P@ " !2< K 6 تk5">6`(%Y 6 #$ %IF!i"با ' iJ ا ` ) .
$[4 ç\R 2 ءا * "G 2 زو <p8 A JNا */+2را*6G%42q9$B,ا *5% و ع
<9Z @+ R AوX+2o/A.
-Z z nÇا * "G 2 ز<9اO2ء.
ا Q %صJ 8bJEمZV% بأي.W ا q ,إ *bد ا m,ا * "G 2 ز .
-Zd[4 WX, ا * "G 2 ز42*/+2را*6G%42q9إ-40Eا * / å7E>N
TR 2 < A456 ,Z2م.
!R?(S!أ[" ا ر Y 6 #$ %IFEJ ا دk($6و=%:J=% .
ا./DE ا ماOWادا *6+12و!=ا *dW!=$E! { ديإ *bإ *l2قأs% ا ر
4 2 * "G 2 زو > 8ld 2 Z A .
-ZV/ 01,أي>W اد>L! B =أو>p @ R % ة !
-ZV/DE م.Wى>W ادا * / @ +Äوز ! WتkR % اتا * dyا * /9
! @ pu ا *p2 o f 4 2./ 0 1 2 * G 2 .
!16@ëا * lp W ل J 8b4D2m2تا * / @ +Äوز !Åا *5R % ا ت>N42q0ë
ا Ol89أوJN\% !tا - Zp2 ل 41%7M o 2*DE>=ا*M42qN.
40Eا -. / 0 1 2 ل ، $[4çزا *=ا * % أسا O D py *?B }>V/ Wى\Wلا * 50 %
)ا *pW ر ة ا * / Ws+l+ =4ⓑ(^[أدرkR % ة ا * dyolWا IJ 8b)ا *pW ر ة
ا * / Ws+l+ =5ⓐ(.ا./ 01,< %k2 ةا * / @ +Ärز ا * =4d2!2ا * 50 %>N
< /l2تا * zn2 ءا * D 2 ر T9* 8 "G 2 زو >NkR % ة ا * dy)ا *pW ر ة ا * / Ws+l+ =
ر$[6( .اsz } أ!?2
ً
J 8bJ/ 8 =ا * / @ +Ä.KLها * 01 8 + =ZV1 u4çزا *=4d2!2
ا * 50 % ا O / W اTE ة4w> 5}وkR % ة ا * dy46,.G W * = 4 W ا .n = < %k2 ة
ا * / @ +Äا O 8ld =)EASY CLEANING(.
ا Q %صJ 8bأن! B db> Em,ا * "G 2 ز* 8 % 4}42*/+2رo+R2
ً
4 2./ 1 % ا ر .
ا./ 01,$n0 =$ 1 2شo 2J1=و>B 8 8 =$8+à
ً
* / @ +Äا * "G 2 ز .
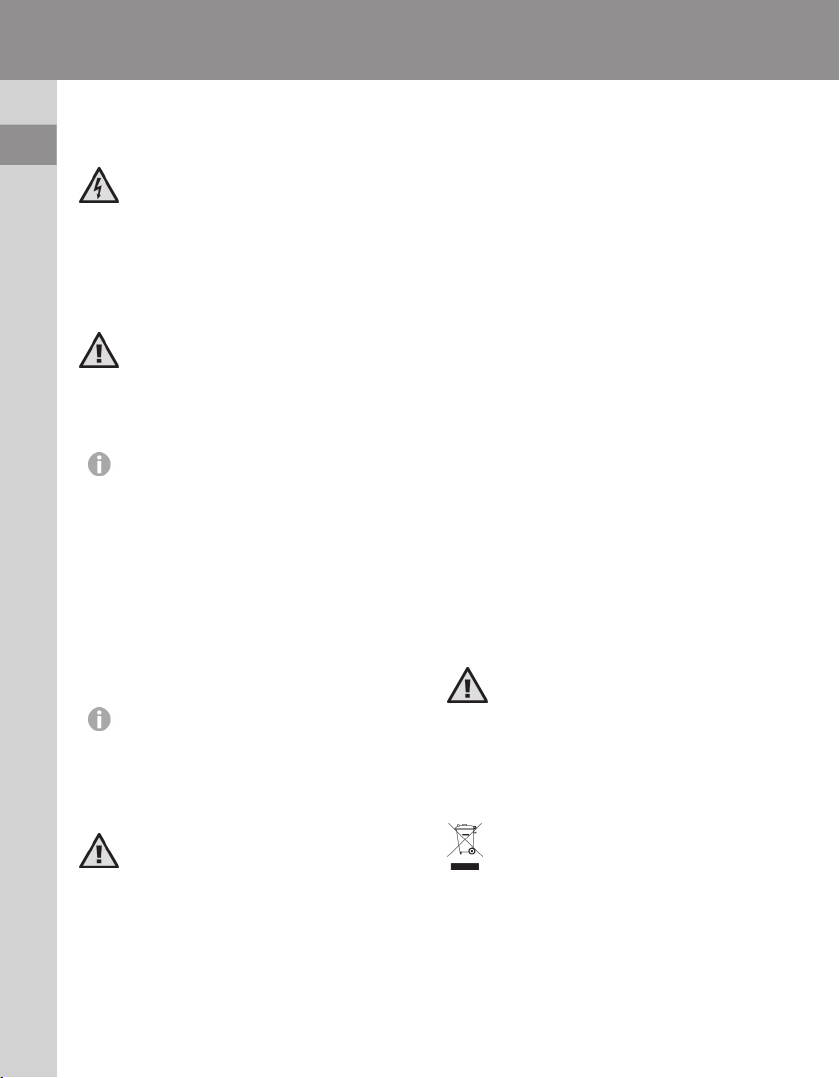
o ÄkR % ة$yا * 50 % 4 W ا .n = 4D2m=ا * / @ +Ä.
ا./DEز !ÅkR % اتا * dy* /M!+Åا *5R % ة)ا *pW ر ة ا * / Ws+l+ =ر$[7( .
$[4/M!+ÅkR % ة$yا * 50 % 456 ,> @ /[* ?1 2 نTW د ة $yJ2 * +=OEة\W ! 8 = .
$[4/z++%kR % ة ا * dyإذا-QÅأنأدا ءK2$EZ % ا Tf40E
>Eةا./ 01 2 ل\W ! 8 =رÖ[Z @+ RG 2وZM!+/G2456 ,> @ /[ .
ا,- ? / ا لMq " ة ا ' Kn
!R?(S!P@ " ا O2 6 > % و]/ وثأ[" ا ر E6د=%Y - (\%
ا +,- . / ا م ا '_("ا '9`s .
$[4 ç\R 2 ءا * "G 2 زو <p8 A JNا */+2را*6G%42q9$B,Zz++%
kR % ة$yا * 50 % .
1.أ\Ráا * "G 2 ز4 W ا .n = زرا * /5z + , /ا r ! d 2ف)ا *pW ر ة ا * / Ws+l+ =3ⓑ(
^[ا <p8 A JNا * /+2را*6G%42q9.
2.اsz }J 8bkR % ة$yا * 50 %<9ا-Z"2 ها O 0 2 7Ç* zn2 ءا * "G 2 ز
)ا *pW ر ة ا * / Ws+l+ =5ⓐ(.ا <p,kR % ة$yا * 50 %JNا * "G 2 ز .
3.rJ 2 د ةkR % ة ا * dy* Ws0 G 2 ا IX 8 9 ، $[4/_B+ÅاO5
ْ
B
َ
ëا * Dn 2 <94 R /l=
ا*/_B+Åا O / W اTE ة4 2 * zn2 ءا * D 2 ر T9و اsz }
J 8bا *5R % ة إ *bأن!V/ d %
وs0 G 2 4 2 * "G 2 ز)ا *pW ر ة ا * / Ws+l+ =5ⓑ(.
E< 6 '\% ا U;6 k )
Mq " ة ا ' Kn+! Kn>;C )#( / .
Mq " ة ا ' Kn!\" ا ' ;< " .
E/ةP/ E % ا ' ?@6 ر = %:g( " ة#/ا
ً
.
ا *VB#:kR % ة ا * dy> / VD = .
$[4/@+Äو Z M ! +Åا *5R % ة)ا *pW ر ة ا * / Ws+l+ =6/7(.
ا *VB#:kR % ة ا * dy>/ ô78 = .
$[4/z++%kR % ة ا * dy)ا *pW ر ة ا * / Ws+l+ =5( .
إ26 > % ا ' ?;" ة
ا *VB#:ا * ?z } ا O 1 2 رسJ 8bا * B5% ة7B+%TEا
ً
.
! "#Z DR +Äا * ?z } ا O 1 2 رسJ 8bا * B5% ة .
ا *VB#:زاو!=ا * dykE ! E ة ا-olEار.
ا Q %صJ 8bا./DE ا ما * "G 2 ز4 1V/ Wىأ7_%ZVn+l2
ً
.
E uM"Ei- Jىا ' ;8 F += a4 ء .
ا *VB#:> Em,ا * "G 2 ز* 8 % 4}42*/+2ر> / Vö .
o Ä> Em,ا * "G 2 ز* 8 % 4}42*/+2ر.
ا *VB#:m8,4 2 * /zL! =ا*6G%42q+=.
Z å7E>N.à > = ا * % 4}4wوQE ةا * /zL! =و >pE ر ا * 6G% 4 2 ءا * l 2 q n9 .
ا < ly7B,ا* /+2را*6G%42q9* 8 / å7E>N.à > / A .
ا < lyا * /zL! =ا*6G%42q+=.
ا ' - . 3nEFا ' \5 6 ز
!R?(S!إ EC 6 Y ( %]/ وثأ [" ا ر >(d(%c4]6 ' %I/م
ا ' - . 3nEFا ' \5 6 ز >;C ),3 ( Z .
ا Q %صJ 8bإ <% اغkl @ = ا * Bn2 ر ! =$B,ا * / D 8y>@G2!
ا * / D 8y>Nا * "G 2 ز4 56 ,> @ 2 .#!l2 <SJ 8bا*B+ú=و !lWل
دونZ 0 %ضا r oV2 نوا*B+ú=Iيأs% ا ر >l/ 1 8 = .
J@Eا * / D 8y>Nا ITG M ة ا*6G%42q+=Ö+%ا OV/ 0 1 8 = ، ا Q %صJ 8bاQ/ % ا م
ا O d /?+ 2 تا*d2oWo+=ا * "2 ري4G2ا * 01,.
E< 3 JE 6تP 62% > 6 ' - . 3nEFا 1#5 X ة ا'C5">6`(%و اO' C- "وY ( %c4
ا + !86 د ا 1و ر و >4:
! D?f ا * / D 8y>Nا ITG M ة ا*6G%42q+=د ا m,ا-Zl2 دا Iو ر و 49
O"1 W J =>Nا * d W ا owا Ol8 + =
ا * /9Z% Z6MJ 8bا * / WT+ Aا Iو ر 49
2002/96/ECا * D 2ص4 2 ITG M ة ا*6G%42q+=و اr* 6/%و o + =ا*0/+d=.
و ! l %KL اا * / WT+ Aر >9ا * "G 2 ز>fا*@R2!2تا * B 8E!=أواO@M* +=.
!16@ëا * / D 8y>"2o+2
ً
>Nا * "G 2 ز4 W اQE ة>No d 2طT1fا ITG M ة
ا*/240=* 8B 8E!=أو41%7M>N>% ا7MإJ2دةZEو!%ا*@R2!2ت.
ar
Operating Instructions
Cord/Cordless Hair Clipper

de
en
fr
it
es
pt
nl
sv
no
fi
tr
pl
cs
sk
hu
sl
ro
bg
ru
uk
el
ar
2
1
A
B
F
I
C
E
D
GH
J

de
en
fr
it
es
pt
nl
sv
no
fi
tr
pl
cs
sk
hu
sl
ro
bg
ru
uk
el
ar
3
432
65 7
a
b
a
b
ab

DEUTSCH
de
en
fr
it
es
pt
nl
sv
no
fi
tr
pl
cs
sk
hu
sl
ro
bg
ru
uk
el
ar
4
Allgemeine Sicherheitshinweise
Bestimmungsgemäßer Gebrauch
· Nutzen Sie Haarschneidemaschinen ausschließlich zum Schneiden
von menschlichem Haupthaar, Barthaar und Augenbrauen.
· Nutzen Sie Tierhaarschneidemaschinen ausschließlich zum Schneiden
von Tierhaaren und Tierfell.
Anforderungen an den Anwender
· Lesen Sie vor der ersten Inbetriebnahme die Betriebsanleitung voll-
ständig durch und machen Sie sich mit dem Gerät vertraut.
· Dieses Gerät ist nicht für den Gebrauch von Personen (einschließlich
Kindern) mit verringerten körperlichen, sensorischen oder geistigen
Fähigkeiten oder Mangel an Erfahrung und Wissen bestimmt, es sei
denn, sie werden beaufsichtigt oder erhielten eine Anweisung hin-
sichtlich des Gebrauches des Gerätes von einer Person, die für ihre
Sicherheit verantwortlich ist. Kinder sollten beaufsichtigt werden, um
sicherzustellen, dass sie nicht mit dem Gerät spielen.
· Das Gerät außerhalb der Reichweite von Tieren und vor Witterungs-
einflüssen geschützt ablegen.
Gefährdungen
Beachten Sie die folgenden Sicherheitshinweise!
Gefahr! Stromschlag durch Schäden am Gerät/Stecker-
schaltnetzteil.
fDas Gerät nicht benutzen, wenn es nicht ordnungsgemäß
funktioniert, wenn es beschädigt ist, oder wenn es ins Wasser
gefallen ist. Reparaturen ausschließlich von einem autorisier-
ten Service Center unter Verwendung von Original-Ersatzteilen
durchführen lassen, um Gefährdungen zu vermeiden.
fDas Gerät niemals mit einem beschädigten Stromkabel bzw.
Steckerschaltnetzteil verwenden. Ein beschädigtes Stromka-
bel bzw. Steckerschaltnetzteil, darf nur von einem autorisierten
Service Center oder einer ähnlich qualifizierten Person durch
ein Original-Ersatzteil ersetzt werden, um Gefährdungen zu
vermeiden.

DEUTSCH
de
en
fr
it
es
pt
nl
sv
no
fi
tr
pl
cs
sk
hu
sl
ro
bg
ru
uk
el
ar
5
fElektrogeräte dürfen nur durch elektrotechnisch ausgebildete
Fachkräfte repariert werden.
Gefahr! Stromschlag durch eintretende Flüssigkeit.
fEin ins Wasser gefallenes Elektrogerät auf keinen Fall berühren.
Sofort den Netzstecker ziehen.
fElektrogeräte niemals in der Badewanne oder unter der Dusche
benutzen.
fElektrogeräte stets so ablegen bzw. aufbewahren, dass sie
nicht ins Wasser (z.B. Waschbecken) fallen können. Den Kon-
takt von Elektrogeräten mit Wasser und anderen Flüssigkeiten
vermeiden.
fDas Gerät nur in trockenen Räumen benutzen und
aufbewahren.
fAls zusätzliche Sicherheitsmaßnahme wird der Einbau einer
geprüften Fehlerstrom-Schutzeinrichtung (RCD) mit einem
Bemessungsauslösestrom von nicht mehr als 30 mA in den
Badezimmerstromkreis empfohlen.
Explosionsgefahr!
fDas Gerät niemals in Umgebungen benutzen, in denen Aerosol-
(Spray-) Produkte verwendet werden, oder in denen Sauerstoff
freigesetzt wird.
fVersuchen Sie nicht, den Akku selbst auszuwechseln.
fDas Gerät nicht längere Zeit Temperaturen unter 0°C oder über
+40°C aussetzen. Direkte Sonneneinstrahlung vermeiden.
Warnung! Verletzungen durch unsachgemäße Handhabung.
fBenutzen Sie das Gerät, zum Schutz vor Verletzungen, niemals
mit beschädigtem Schneidsatz.
fSchalten Sie das Gerät immer vor dem Ablegen aus, da das
Gerät durch die Vibrationen herunterfallen kann.
Vorsicht! Schäden durch falsche Spannungsversorgung.
fBetreiben Sie das Gerät ausschließlich mit Wechselstrom mit
der auf dem Typenschild angegebenen Spannung.

DEUTSCH
de
en
fr
it
es
pt
nl
sv
no
fi
tr
pl
cs
sk
hu
sl
ro
bg
ru
uk
el
ar
6
Vorsicht! Schäden durch unsachgemäße Handhabung.
fVerwenden Sie ausschließlich das vom Hersteller empfohlene
Zubehör.
fVerwenden Sie zum Aufladen des Gerätes ausschließlich das
im Lieferumfang enthaltene Steckerschaltnetzteil. Ersetzen Sie
defekte Steckerschaltnetzteile nur durch Original-Ersatzteile, die
Sie über unsere Servicecenter beziehen können.
fNiemals Gegenstände in die Geräteöffnungen stecken oder fal-
len lassen.
fDas Gerät zum Tragen nicht am Stromkabel festhalten, und das
Kabel nicht als Griff verwenden.
fBeim Ausstecken des Gerätes niemals am Stromkabel oder am
Gerät selbst ziehen.
fDas Stromkabel nicht um das Gerät wickeln.
fDas Stromkabel und das Gerät von heißen Oberflächen
fernhalten.
fDas Gerät nicht mit verdrehtem oder abgeknicktem Kabel aufla-
den bzw. aufbewahren.
fKeine Einwegbatterien verwenden. Lassen Sie die Akkus aus-
schließlich im Service Center austauschen.
Allgemeine Benutzerhinweise
Informationen zum Gebrauch der Betriebsanleitung
fBevor Sie das Gerät zum ersten Mal in Betrieb nehmen,
muss die Betriebsanleitung vollständig gelesen und verstan-
den werden.
fBetrachten Sie die Betriebsanleitung als Teil des Produkts
und bewahren Sie sie gut und erreichbar auf.
fFügen Sie diese Betriebsanleitung bei Weitergabe des
Geräts an Dritte bei.
fBei Konflikten mit nationalen Sicherheitsbestimmungen oder
-anweisungen ist den nationalen Vorgaben Folge zu leisten.
Symbol- und Hinweiserklärung
GEFAHR
Gefahr durch Stromschlag mit möglicher schwerer
Körperverletzung oder Tod als Folge.
GEFAHR
Explosionsgefahr mit möglicher schwerer Körperver-
letzung oder Tod als Folge.
WARNUNG
Warnung vor einer möglichen Körperverletzung oder
einem gesundheitlichen Risiko.
VORSICHT
Hinweis auf die Gefahr von Sachschäden.
Hinweis mit nützlichen Informationen und Tipps.
Sie werden zu einer Handlung aufgefordert.
Führen Sie diese Handlungen in der beschriebenen
Reihenfolge durch.
f
1.

DEUTSCH
de
en
fr
it
es
pt
nl
sv
no
fi
tr
pl
cs
sk
hu
sl
ro
bg
ru
uk
el
ar
7
Produktbeschreibung
Bezeichnung der Teile (Abb. 1)
A Schneidsatz
B Ein-/Ausschalter
C Ladekontrolllampe
D Gerätebuchse
E Kammaufsatz klein, 3 mm und 6 mm Schnittlänge
F Kammaufsatz groß, 9 mm und 12 mm Schnittlänge
G Reinigungsbürste
H Öl für den Schneidsatz
I Steckerschaltnetzteil
J Geräteanschlussstecker
Technische Daten
Handgerät
Antrieb: DC-Motor
Akku: NIMH-Akku
Betriebsdauer Akku: bis zu 100 min
Abmessungen (LxBxH): 149 x 40 x 36 mm
Gewicht: ca. 140 g
Emissionsschalldruckpegel: max. 66 dB(A) @ 25 cm
Vibration: < 2,5 m/s
2
Steckerschaltnetzteil
Typ: Adapter 6000
Leistungsaufnahme: max. 12 W
Betriebsspannung: 100 – 240 V~ / 50 – 60 Hz
Das Gerät ist schutzisoliert und funkentstört. Es erfüllt die Anfor-
derungen der EU-Richtlinie Elektromagnetische Verträglichkeit
2004/108/EG und die Maschinenrichtlinie 2006/42/EG.
Betrieb
Vorbereitung
Bewahren Sie das Verpackungsmaterial für eine spä-
tere sichere Lagerung oder Transport auf.
fKontrollieren Sie die Vollständigkeit des Lieferumfangs.
fPrüfen Sie alle Teile auf eventuelle Transportschäden.
Sicherheit
Vorsicht! Schäden durch falsche
Spannungsversorgung.
fBetreiben Sie das Gerät ausschließlich mit Wech-
selstrom mit der auf dem Typenschild angegebe-
nen Spannung.
Akku laden
Vor der ersten Inbetriebnahme ist eine Ladezeit von
ca. 16 Stunden erforderlich!
1. Stecken Sie den Geräteanschlussstecker (J) des Stecker-
schaltnetzteiles in die Gerätebuchse (D) (Abb. 2).
2. Stecken Sie das Steckerschaltnetzteil in die Netzsteckdose.
3. Schalten Sie mit dem Ein-/Ausschalter das Gerät aus
(Abb. 3
ⓑ
).
· Während des Ladevorgangs leuchtet die Lade-
kontrolllampe (C).
· Die Ladezeit bis zum Erreichen der vollen Kapazi-
tät beträgt ca. 10 Stunden.
Akku Betrieb
1. Schalten Sie mit dem Ein-/Ausschalter das Gerät ein und
nach Gebrauch aus (Abb. 3
ⓐ
/
ⓑ
).
· Bei voll geladenem Akku kann das Gerät bis
zu 100 Minuten ohne Netzanschluss betrieben
werden. Diese Kapazität wird nach ca. 5 – 10
Ladezyklen erreicht.
· Bei unzureichender Pflege des Schneidsatzes
kann sich die Laufzeit erheblich reduzieren.
Netzbetrieb
1. Stecken Sie den Geräteanschlussstecker (J) des Stecker-
schaltnetzteiles in die Gerätebuchse (D) (Abb. 2).
2. Stecken Sie das Steckerschaltnetzteil in die Netzsteckdose.
3. Schalten Sie mit dem Ein-/Ausschalter das Gerät ein und
nach Gebrauch aus (Abb. 3
ⓐ
/
ⓑ
).
Bedienung
Schneiden mit Kammaufsätzen
Das Gerät kann auch mit Kammaufsätzen betrieben werden.
Folgende Kammaufsätze sind im Lieferumfang enthalten:
· Kammaufsatz klein = 3 mm und 6 mm Schnittlänge
· Kammaufsatz groß = 9 mm und 12 mm Schnittlänge
· Die Schnittlänge (in mm) ist am Kammaufsatz
abzulesen.
· Ein Kammaufsatz kann für zwei Schnittlängen
benutzt werden. Für die zweite Schnittlänge den
Kammaufsatz abnehmen, drehen und wieder
aufsetzen.
· Vorteil dieser Kammaufsätze ist, egal in welchem
Winkel man das Gerät an den Haaren ansetzt,
immer wird die gleiche Schnittlänge erreicht.
Kammaufsatz aufsetzen / abnehmen
1. Kammaufsatz an der Schneidkante des Schneidsatzes
ansetzen und bis zum Einrasten in die Noppen in Richtung
Gehäuse auf den Schneidsatz drücken (Abb. 4
ⓐ
).
2. Der Kammaufsatz lässt sich durch Drücken in Richtung
Schneidkante entfernen (Abb. 4
ⓑ
).

DEUTSCH
de
en
fr
it
es
pt
nl
sv
no
fi
tr
pl
cs
sk
hu
sl
ro
bg
ru
uk
el
ar
8
Instandhaltung
Reinigung und Pflege
Gefahr! Stromschlag durch eintretende
Flüssigkeit.
fSchalten Sie das Gerät aus und trennen Sie es
von der Stromversorgung, bevor Sie mit der Reini-
gung und Pflege beginnen.
fDas Gerät nicht in Wasser tauchen!
fLassen Sie keine Flüssigkeiten in das Gerätein-
nere gelangen.
fSchließen Sie das Gerät nur vollständig getrock-
net wieder an die Stromversorgung an.
Vorsicht! Schäden durch aggressive Chemikalien.
Aggressive Chemikalien können das Gerät und Zube-
hör schädigen.
fVerwenden Sie keine Lösungs- oder
Scheuermittel.
fVerwenden Sie ausschließlich das vom Hersteller
empfohlene Reinigungsmittel und Schneidsatzöl.
Hygiene-Spray sowie Schneidsatzöl können Sie über
Ihren Händler oder unser Service Center beziehen.
fNehmen Sie nach jedem Gebrauch den Kammaufsatz ab
(Abb. 4
ⓑ
) und klappen Sie den Schneidsatz vom Gehäuse
ab (Abb. 5
ⓐ
). Entfernen Sie mit der Reinigungsbürste die
Haarreste aus der Gehäuseöffnung und vom Schneidsatz
(Abb. 6). Drücken Sie zusätzlich den Reinigungshebel. So
können Sie einfach die Haarreste zwischen Scherkamm und
Schermesser mit der Reinigungsbürste entfernen (EASY
CLEANING).
fHalten Sie die Gerätebuchse (D) stets sauber.
fWischen Sie das Gerät nur mit einem weichen, eventuell
leicht feuchten Tuch ab.
fReinigen Sie den Schneidsatz mit dem Hygienespray.
fÖlen Sie den Schneidsatz mit dem Schneidsatzöl (Abb. 7).
fFür eine gute und lang anhaltende Schneidleis-
tung ist es wichtig den Schneidsatz häufig zu ölen.
fWenn nach längerer Gebrauchsdauer trotz regel-
mäßigem Reinigen und Ölen die Schneidleistung
nachlässt, sollte der Schneidsatz ausgewechselt
werden.
Austausch des Schneidsatzes
Warnung! Verletzungen und Sachschäden durch
unsachgemäße Handhabung.
fSchalten Sie das Gerät aus und trennen Sie es
von der Stromversorgung, bevor Sie den Schneid-
satz austauschen.
1. Schalten Sie mit dem Ein-/Ausschalter das Gerät aus
(Abb. 3
ⓑ
) und trennen Sie es von der Stromversorgung.
2. Drücken Sie den Schneidsatz in Pfeilrichtung vom Gehäuse
weg (Abb. 5
ⓐ
). Entfernen Sie den Schneidsatz.
3. Zum Wiedereinsetzen den Schneidsatz mit dem Haken in
die Aufnahme am Gehäuse ansetzen und bis zum Einrasten
zum Gehäuse drücken (Abb. 5
ⓑ
).
Problembehebung
Schneidsatz schneidet schlecht.
Schneidsatz rupft.
Akkulaufzeit ist zu kurz.
Ursache: Schneidsatz ist verschmutzt.
fReinigen und ölen Sie den Schneidsatz (Abb. 6/7).
Ursache: Schneidsatz ist verschlissen.
fTauschen Sie den Schneidsatz aus (Abb. 5).
Hautverletzung
Ursache: Zu starker Druck auf die Haut.
fSchwächerer Druck auf die Haut.
Ursache: Schneidwinkel zu steil angesetzt.
fGerät flacher ansetzen.
Ladekontrolllampe leuchtet nicht.
Ursache: Gerätebuchse ist verschmutzt.
fReinigen Sie die Gerätebuchse (D).
Ursache: Defekte Stromversorgung.
fÜberzeugen Sie sich von der einwandfreien Kontaktierung
zwischen Steckerschaltnetzteil und Steckdose. Überprüfen
Sie das Stromkabel auf eventuelle Beschädigungen.
fPrüfen Sie die Stromversorgung.
Entsorgung
Vorsicht! Umweltschäden bei falscher Entsorgung.
fAkkus vor der Entsorgung entladen!
fDie ordnungsgemäße Entsorgung dient dem
Umweltschutz und verhindert mögliche schädliche
Auswirkungen auf Mensch und Umwelt.
Beachten Sie im Falle der Entsorgung des Geräts die jeweiligen
gesetzlichen Vorschriften.
Information zur Entsorgung von elektrischen und elektroni-
schen Geräten in der europäischen Gemeinschaft:
Innerhalb der Europäischen Gemeinschaft wird für
elektrisch betriebene Geräte die Entsorgung durch
nationale Regelungen vorgegeben, die auf der EU-
Richtlinie 2002/96/EC über Elektronik-Altgeräte
(WEEE) basieren. Danach darf das Gerät nicht mehr
mit dem kommunalen oder Hausmüll entsorgt werden.
Das Gerät wird bei den kommunalen Sammelstellen
bzw. Wertstoffhöfen kostenlos entgegengenommen.

ENGLISH
de
en
fr
it
es
pt
nl
sv
no
fi
tr
pl
cs
sk
hu
sl
ro
bg
ru
uk
el
ar
9
General safety instructions
Intended use
· Only use hair clippers to cut human hair, beard hair and eyebrows.
· Only use animal clippers to cut animal hair and animal fur.
Requirements on the user
· Read the operation manual in full and familiarise yourself with it before
the first use.
· This appliance is not intended for use by persons (including children)
with reduced physical, sensory or mental capabilities, or lack of expe-
rience and knowledge, unless they have been given supervision or
instruction concerning use of the appliance by a person responsible for
their safety. Children should be supervised to ensure that they do not
play with the appliance.
· Keep the appliance out of reach of animals and protected against the
effects of the weather.
Hazards
Please adhere to the following safety instructions!
Danger! Electric shock due to damage to appliance/plug-in
transformer.
fDo not use the appliance if it is not working correctly, if it is dam-
aged or if it has fallen into water. Repairs may only be performed
at an authorised service centre using original spare parts, in
order to avoid hazards.
fNever use the appliance if the mains cable or plug-in trans-
former is damaged. A damaged mains cable or plug-in trans-
former may only be replaced with an original spare part, by an
authorised service centre or another similarly qualified person, in
order to avoid hazards.
fOnly specialists properly trained in the handling of electrotechni-
cal appliances may repair electrical equipment.
Danger! Electric shock due to penetration of liquid.
fNever touch electrical equipment that has fallen into water. Dis-
connect from the mains immediately.

ENGLISH
de
en
fr
it
es
pt
nl
sv
no
fi
tr
pl
cs
sk
hu
sl
ro
bg
ru
uk
el
ar
10
fNever use electrical equipment in the bath or under the shower.
fAlways position or store electrical equipment where it cannot fall
into water (e.g. washbasin). Prevent electrical equipment from
coming into contact with water and other liquids.
fOnly use and store the appliance in dry rooms.
fAs additional safety measure, it is recommended that a tested
residual current appliance (RCD) with a residual operating cur-
rent of not more than 30 mA be installed in the bathroom circuit.
Danger of explosion!
fNever use the appliance where aerosol (spray) products are
being used or where oxygen is released.
fDo not attempt to replace the battery.
fDo not expose the appliance to temperatures below 0°C and
above +40°C for any length of time. Avoid direct exposure to
sunlight.
Warning! Injuries due to incorrect handling.
fTo prevent injury, never use the appliance if the blade set is
damaged.
fAlways switch the appliance off before storage, as the appliance
can fall down due to the vibrations.
Handle with care! Damage due to incorrect power supply.
fOnly operate the appliance with an alternating current and with
the voltage stated on the nameplate.
Handle with care! Injuries due to incorrect handling.
fOnly use accessories recommended by the manufacturer.
fOnly use the plug-in transformer that is included in the scope of
supply for charging the appliance. Only replace defect plug-in
transformers with original spare parts which you can order via
our service centres.
fNever insert or allow objects to fall into the openings of the
appliance.
fDo not hold the appliance by the mains cable to carry it, and do
not use the cable as a handle.

ENGLISH
de
en
fr
it
es
pt
nl
sv
no
fi
tr
pl
cs
sk
hu
sl
ro
bg
ru
uk
el
ar
11
fWhen disconnecting the appliance from the mains, never pull on
the mains cable or on the appliance itself.
fDo not wind the mains cable around the appliance.
fKeep the mains cable and appliance away from hot surfaces.
fMake sure that the mains cable is not twisted or kinked when
charging or storing.
fDo not use disposable batteries. Batteries should only be
replaced at authorised service centres.
Product description
Description of parts (Fig. 1)
A Blade set
B On/off switch
C Charging indicator light
D Appliance socket
E Attachment comb small = cutting lengths 3 mm and 6 mm
F Attachment comb large = cutting lengths 9 mm and 12 mm
G Cleaning brush
H Oil for blade set
I Plug-in transformer
J Appliance plug
Technical data
Hand-held appliance
Drive unit: DC motor
Battery: NiMH battery
Operating time: up to 100 minutes
Dimensions (LxWxH): 149 x 40 x 36 mm
Weight: approx. 140 g
Emission sound pressure level: max. 66 dB(A) @ 25 cm
Vibration: < 2.5 m/s
2
Plug-in transformer
Type: adapter 6000
Power consumption: max. 12 W
Operating voltage: 100 – 240 V~ / 50 – 60 Hz
The appliance is safety insulated and radio screened. It meets
the requirements of EU Electromagnetic Compatibility Directive
2004/108/EC and Machinery Directive 2006/42/EC.
General user information
Information about using the operation manual
fBefore using the appliance for the first time, you must read
and understand the operation manual completely.
fConsider the operation manual as part of the product and
store it in a safe and accessible place.
fInclude this operation manual if passing the appliance on
to a third party.
fIn the case of conflicts with national safety specifications or
instructions, the national requirements must be followed.
Explanation of symbols and notes
DANGER
Danger of electric shock which may result in serious
physical injury or death
DANGER
Danger of explosion which may result in serious
physical injury or death.
WARNING
Warning of possible physical injury or a health risk.
CAUTION
Information about danger of material damage.
Note with useful information and tips.
Action to be taken by owner.
Carry out these actions in the sequence described.
f
1.

ENGLISH
de
en
fr
it
es
pt
nl
sv
no
fi
tr
pl
cs
sk
hu
sl
ro
bg
ru
uk
el
ar
12
Operation
Preparation
Keep the packaging material for later safe storage or
transport.
fCheck that the contents are complete.
fCheck all the parts for possible transport damage.
Safety
Handle with care! Damage due to incorrect power
supply.
fOnly operate the appliance with an alternating cur-
rent and with the voltage stated on the nameplate.
Charging the battery
Before the appliance is used for the first time, it
should be charged for approx.16 hours!
1. Connect the appliance plug (J) on the plug-in transformer to
the appliance socket (D) (Fig. 2).
2. Insert the plug-in transformer into the mains socket.
3. Switch off the appliance using the on/off switch (Fig. 3
ⓑ
).
· During charging, the charging indicator light (C)
is illuminated.
· It should take around 10 hours for the appliance
to charge to full capacity.
Battery operation
1. Switch on the appliance using the on/off switch and switch
off after use (Fig. 3
ⓐ
/
ⓑ
).
· When the battery is fully charged, the appliance
can be used for up to 100 minutes without mains
connection. This capacity is attained after approx.
5 - 10 charging cycles.
· In case of insufficient maintenance of the
blade set, the operating time can be reduced
considerably.
Mains operation
1. Connect the appliance plug (J) on the plug-in transformer to
the appliance socket (D) (Fig. 2).
2. Insert the plug-in transformer into the mains socket.
3. Switch on the appliance using the on/off switch and switch
off after use (Fig. 3
ⓐ
/
ⓑ
).
Operation
Cutting with the attachment combs
The appliance can also be operated with attachment combs.
The following attachment combs are included as standard:
· Attachment comb small = cutting lengths 3 mm and 6 mm
· Attachment comb large = cutting lengths 9 mm and 12 mm
· The cutting length (in mm) is shown on the attach-
ment comb.
· One attachment comb can be used for two differ-
ent cutting lengths. For the second cutting length,
all you need to do is remove the attachment
comb, rotate and replace.
· The advantage of these attachment combs is that
no matter the angle at which you approach the
hair, you always achieve the same cutting length.
Attaching/removing the attachment comb
1. Place the attachment comb onto the cutting edge of the
blade set and press it down onto the blade set into the
knobs in the direction of the housing until it clicks into posi-
tion (Fig. 4
ⓐ
).
2. The attachment comb can be removed by pushing it in
towards the cutting edge (Fig. 4
ⓑ
).
Maintenance
Cleaning and care
Danger! Electric shock due to penetration of
liquid.
fSwitch the appliance off and disconnect it from
the power supply, before you start with cleaning
and care.
fDo not immerse the appliance into water!
fDo not allow any liquid to get inside the appliance.
fOnly reconnect the appliance to the power supply
if it is completely dry.
Handle with care! Damages due to aggressive
chemicals.
Aggressive chemicals could damage the appliance
and accessories.
fNever use solvents or scouring agents.
fOnly use cleaning agents and blade set oil recom-
mended by the manufacturer.
Hygienic spray and blade set oil are available from
your dealer or our service centre.
fAfter every use, remove the attachment comb (Fig. 4
ⓑ
)
and lift the blade set out of the housing (Fig. 5
ⓐ
). Use the
cleaning brush to remove any cut hairs from the housing
opening and from the blade set (Fig. 6). The cleaning lever
can also be pressed. This allows the cut hairs that accumu-
late between the bottom blade and the top blade to be eas-
ily removed using the cleaning brush (EASY CLEANING).
fAlways keep the appliance socket (D) clean.
fOnly wipe the appliance with a soft cloth, possibly slightly
damp.
fClean the blade set using the hygienic spray.
fOil the blade set with the blade set oil (Fig. 7).

ENGLISH
de
en
fr
it
es
pt
nl
sv
no
fi
tr
pl
cs
sk
hu
sl
ro
bg
ru
uk
el
ar
13
fFor a good and long-lasting cutting performance, it
is important to oil the blade set frequently.
fIf the cutting performance deteriorates after long
use despite regular cleaning and oiling, the blade
set should be replaced.
Changing the blade set
Warning! Injuries and material damage due to
incorrect handling.
fSwitch the appliance off and disconnect it from the
power supply before changing the blade set.
1. Switch the appliance off using the on/off switch (Fig. 3
ⓑ
)
and disconnect it from the power supply.
2. Slide the blade set off the housing in the direction of the
arrow (Fig. 5
ⓐ
). Remove the blade set.
3. Replace the blade set by hooking it into the housing and
pressing it down until it clicks into position (Fig. 5
ⓑ
).
Problem elimination
Blade set is cutting badly.
Blade set is pulling hair out.
Battery life is too short.
Cause: blade set is dirty.
fClean and oil the blade set (Fig. 6/7).
Cause: blade set is worn out.
fReplace the blade set (Fig. 5).
Skin injury
Cause: too much pressure on the skin.
fLess pressure on the skin.
Cause: Cutting angle is too high.
fHold appliance more flatly to the skin.
Charging indicator light does not light up.
Cause: appliance socket is dirty.
fClean appliance socket (D).
Cause: defective power supply.
fMake sure that there is a faultless contact between the
plug-in transformer and the socket. Check the mains cable
for possible damage.
fCheck the power supply.
Disposal
Handle with care! Environmental damage in the
case of incorrect disposal.
fDischarge batteries prior to disposal!
fCorrect disposal will ensure environmental protec-
tion and prevent any potentially harmful impact on
people or the environment.
Adhere to the relevant legal requirements when disposing of
the appliance.
Information on the disposal of electrical and electronic
appliances in the European Community:
Within the European Community, national regulations
are specified for the disposal of electrical appliances,
based on EU Waste Electrical and Electronic Equip-
ment Directive 2002/96/EC (WEEE). In accordance
with this, the appliance can no longer be disposed of
with the local or domestic waste.
The appliance will be accepted free of charge by local
collection points or recycling centres.

FRANÇAIS
de
en
fr
it
es
pt
nl
sv
no
fi
tr
pl
cs
sk
hu
sl
ro
bg
ru
uk
el
ar
14
Consignes de sécurité générales
Utilisation conforme
· Utilisez les tondeuses à cheveux et poils exclusivement pour la coupe
de cheveux, de poils de barbe et de sourcils humains.
· Utilisez les tondeuses pour animaux exclusivement pour couper les
poils et les pelages d’animaux.
Exigences envers l’utilisateur
· Avant la première mise en service, lisez intégralement le mode d’em-
ploi et familiarisez-vous avec l’appareil.
· Cet appareil n’est pas prévu pour une utilisation par des personnes
(enfants compris) dont les capacités physiques, sensorielles ou
mentales sont amoindries ou manquant d’expériences et de connais-
sances, sauf si elles sont surveillées ou ont reçu des instructions sur
l’utilisation de l’appareil de la part d’une personne responsable de leur
sécurité. Les enfants doivent être gardés sous surveillance pour éviter
qu’ils ne jouent avec l’appareil.
· Ranger l’appareil hors de portée des animaux et protégé contre les
intempéries.
Risques
Tenez compte des consignes de sécurité suivantes !
Danger ! Électrisation due à des détériorations de l’appareil /
du bloc d’alimentation à fiches.
fN’utilisez pas l’appareil s’il ne fonctionne pas correctement, s’il
est endommagé ou s’il est tombé dans l’eau. Faites effectuer
les réparations exclusivement par un SAV autorisé et avec des
pièces détachées d’origine, afin de prévenir les risques.
fN’utilisez jamais l’appareil si le câble ou le bloc d’alimentation à
fiches sont endommagés. Afin de prévenir tous risques, le câble
électrique ou le bloc d’alimentation à fiches endommagé ne doit
être remplacé que par un centre de service agréé ou une per-
sonne qualifiée similaire, et uniquement par une pièce détachée
d’origine.
fLes appareils électriques ne doivent être réparés que par des
spécialistes ayant une formation en électrotechnique.

FRANÇAIS
de
en
fr
it
es
pt
nl
sv
no
fi
tr
pl
cs
sk
hu
sl
ro
bg
ru
uk
el
ar
15
Danger ! Électrisation liée à la pénétration de liquides.
fNe touchez en aucun cas un appareil électrique tombé dans
l’eau. Débranchez immédiatement la prise secteur.
fN’utilisez jamais un appareil électrique dans la baignoire ou
sous la douche.
fRangez ou stockez toujours les appareils électriques de sorte
à ce qu’ils ne puissent pas tomber dans l’eau (par ex. lavabo).
Évitez tout contact d’un appareil électrique avec de l’eau ou tout
autre liquide.
fUtilisez et rangez l’appareil uniquement dans des endroits secs.
fLa mise en place d’un dispositif de protection contrôlé à courant
différentiel résiduel (RCD) ayant un courant de déclenchement
n’excédant pas 30 mA est recommandée à titre de mesure de
sécurité supplémentaire dans le circuit électrique de la salle de
bain.
Risques d’explosion !
fN’utilisez jamais l’appareil dans un environnement dans lequel
des aérosols sont utilisés ou dans lequel de l’oxygène est libéré.
fN’essayez pas de changer la batterie vous-même.
fN’exposez pas l’appareil pendant une durée prolongée à des
températures inférieures à 0 °C ou supérieures à +40 °C. Évitez
l’exposition aux rayons directs du soleil.
Avertissement ! Blessures liées à une utilisation
non-conforme.
fPour votre sécurité, n’utilisez jamais l’appareil avec une tête de
coupe endommagée.
fÉteignez toujours l’appareil avant de le poser, puisque les vibra-
tions émises par l’appareil pourraient provoquer sa chute.
Attention ! Dommages liés à une tension d’alimentation
erronée.
fUtilisez l’appareil exclusivement sur du courant alternatif avec la
tension indiquée sur la plaque signalétique.

FRANÇAIS
de
en
fr
it
es
pt
nl
sv
no
fi
tr
pl
cs
sk
hu
sl
ro
bg
ru
uk
el
ar
16
Attention ! Dommages liés à une utilisation non-conforme.
fUtilisez exclusivement les accessoires recommandés par le
fabricant.
fPour charger l’appareil, utilisez exclusivement le bloc d’alimen-
tation à fiches fourni. Ne remplacez les blocs d’alimentation à
fiches défectueux que par des pièces détachées d’origine que
vous pourrez obtenir auprès de notre service après-vente.
fN’introduisez jamais et ne laissez jamais tomber des objets dans
les ouvertures de l’appareil.
fNe portez pas l’appareil à l’aide du câble, ne vous servez pas
du câble comme poignée.
fLorsque vous débranchez l’appareil, ne tirez jamais sur le câble
électrique ou l’appareil.
fN’enroulez jamais le câble électrique autour de l’appareil.
fTenez l’appareil et le câble électrique éloignés des surfaces
chaudes.
fNe chargez pas et ne stockez pas l’appareil avec un câble vrillé
ou pincé.
fN’utilisez pas de batteries non rechargeables. Faites remplacer
vos batteries uniquement par votre SAV.

FRANÇAIS
de
en
fr
it
es
pt
nl
sv
no
fi
tr
pl
cs
sk
hu
sl
ro
bg
ru
uk
el
ar
17
Conseils d’utilisation généraux
Informations concernant l’utilisation du mode d’emploi
fAvant la première mise en service de l’appareil, vous devez
avoir lu et compris intégralement le mode d’emploi.
fVous devez considérer le mode d’emploi comme partie
intégrante du produit et le conserver soigneusement et à un
endroit facilement accessible.
fJoignez ce mode d’emploi à l’appareil lorsque vous le
remettez à des tiers.
fEn cas de conflits avec les dispositions et consignes de
sécurité nationales, celles-ci sont prioritaires et doivent être
respectées.
Explication des symboles et consignes
DANGER
Danger par électrisation pouvant entraîner des bles-
sures graves ou la mort.
DANGER
Danger par explosion pouvant entraîner des blessures
graves ou la mort.
AVERTISSEMENT
Avertissement contre des blessures éventuelles ou un
risque pour la santé.
ATTENTION
Indication de risques de dommages matériels.
Indication avec des informations utiles et des astuces.
Vous êtes invité(e) à une action.
Exécutez ces actions dans l’ordre décrit.
f
1.
Description du produit
Désignation des éléments (Fig. 1)
A Tête de coupe
B Interrupteur marche/arrêt
C Témoin de charge
D Prise de l’appareil
E Contre-peigne, petit modèle, longueur de coupe 3 mm et
6 mm
F Contre-peigne, grand modèle, longueur de coupe 9 mm et
12 mm
G Brosse de nettoyage
H Huile pour la tête de coupe
I Bloc d’alimentation à fiches
J Prise
Caractéristiques techniques
Appareil portatif
Moteur : Moteur CC
Batterie : Batterie NIMH
Durée de fonctionnement
sur batterie : jusqu’à 100 min
Dimensions (Lxlxh) : 149 x 40 x 36 mm
Poids : env. 140 g
Niveau de pression acoustique
des émissions : max. 66 dB(A) @ 25 cm
Vibrations : < 2,5 m/s
2
Bloc d’alimentation à fiches
Modèle : Adaptateur 6000
Puissance absorbée : max. 12 W
Tension d’utilisation : 100 – 240 V~ / 50 – 60 Hz
L’appareil est équipé d’une double isolation et d’un antiparasi-
tage. Il satisfait les exigences de la directive UE Compatibilité
Électromagnétique 2004/108/CE et la directive relative aux
machines 2006/42/CE.

FRANÇAIS
de
en
fr
it
es
pt
nl
sv
no
fi
tr
pl
cs
sk
hu
sl
ro
bg
ru
uk
el
ar
18
Fonctionnement
Préparation :
Conservez les matériels d’emballage pour un range-
ment ou transport sûr ultérieur.
fContrôlez l’intégralité de la livraison.
fContrôlez toutes les pièces quant à des dommages de
transport.
Sécurité
Attention ! Dommages liés à une tension d’alimen-
tation erronée.
fUtilisez l’appareil exclusivement sur du courant
alternatif avec la tension indiquée sur la plaque
signalétique.
Charger la batterie
Avant la première utilisation, le temps de charge est
d’environ 16 heures !
1. Mettez la prise (J) du bloc d’alimentation à fiches dans la
prise de l’appareil (D) (Fig. 2).
2. Branchez le bloc d’alimentation à fiches de l’appareil dans
la prise secteur.
3. Éteignez l’appareil en utilisant l’interrupteur marche / arrêt
(Fig. 3
ⓑ
).
· Le témoin de charge (C) s’allume pendant la
charge.
· Le temps de charge est d’environ 10 heures pour
atteindre la capacité maximale.
Fonctionnement sur batterie
1. Mettez l’appareil en marche avec l’interrupteur marche/arrêt
et éteignez-le après utilisation (Fig. 3
ⓐ
/
ⓑ
).
· Lorsque la batterie est complètement chargée,
l’appareil peut être utilisé jusqu’à 100 minutes
sans devoir le brancher au secteur. Cette capacité
est atteinte après 5 - 10 cycles de charge environ.
· La durée d’utilisation peut considérablement
diminuer en cas d’entretien insuffisant de la tête
de coupe.
Fonctionnement sur secteur
1. Mettez la prise (J) du bloc d’alimentation à fiches dans la
prise de l’appareil (D) (Fig. 2).
2. Branchez le bloc d’alimentation à fiches de l’appareil dans
la prise secteur.
3. Mettez l’appareil en marche avec l’interrupteur marche/arrêt
et éteignez-le après utilisation (Fig. 3
ⓐ
/
ⓑ
).
Utilisation
Couper avec les contre-peignes
L’appareil peut également être utilisé avec des contre-peignes.
Les contre-peignes suivants sont fournis avec l’appareil :
· Contre-peigne, petit modèle = longueur de coupe 3 mm et
6 mm
· Contre-peigne, grand modèle = longueur de coupe 9 mm
et 12 mm
· La longueur de coupe (en mm) figure sur le
contre-peigne.
· Un contre-peigne ne peut être utilisé que pour
deux longueurs de coupe. Pour la deuxième
longueur de coupe, retirer le contre-peigne, le
retourner et le remettre.
· L’avantage de ces contre-peignes est que la
longueur de coupe reste constante quel que soit
l’angle avec lequel l’appareil est appliqué sur les
cheveux.
Mettre en place/enlever le contre-peigne
1. Placez le contre-peigne sur l’arête coupante de la tête de
coupe et appuyez dessus en direction du boîtier jusqu’à ce
qu’il s’emboîte dans les doigts (Fig. 4
ⓐ
).
2. Le contre-peigne peut être retiré facilement en appuyant
dessus en direction de l’arête coupante (Fig. 4
ⓑ
).
Entretien
Nettoyage et entretien
Danger ! Électrisation liée à la pénétration de
liquides.
fÉteignez l’appareil et débranchez-le de l’alimen-
tation électrique avant de procéder au nettoyage
et à l’entretien.
fNe plongez pas l’appareil dans l’eau.
fNe laissez pas de liquides pénétrer à l’intérieur
de l’appareil.
fNe rebranchez l’appareil à l’alimentation électrique
que lorsqu’il est parfaitement sec.
Attention ! Dommages liés à des produits
chimiques agressifs.
Les produits chimiques agressifs peuvent endomma-
ger l’appareil et les accessoires.
fN’utilisez pas de solvants et d’abrasifs.
fUtilisez exclusivement le détergent et l’huile pour
tête de coupe recommandés par le fabricant.
Vous pouvez vous procurer le spray hygiénique ainsi
que l’huile pour tête de coupe auprès de votre reven-
deur ou de notre SAV.

FRANÇAIS
de
en
fr
it
es
pt
nl
sv
no
fi
tr
pl
cs
sk
hu
sl
ro
bg
ru
uk
el
ar
19
fAprès chaque utilisation, retirez le contre-peigne (Fig. 4
ⓑ
)
et rabattez la tête de coupe en l’écartant du boîtier
(Fig. 5
ⓐ
). À l’aide de la brosse de nettoyage, retirez le
reste des cheveux dans l’ouverture du boîtier et dans la
tête de coupe (Fig. 6). Appuyez de plus sur le levier de net-
toyage. Les restes de cheveux entre le peigne de la tête de
coupe et la lame peuvent ainsi facilement être enlevés avec
la brosse de nettoyage (EASY CLEANING).
fVeillez à ce que la prise de l’appareil (D) soit toujours
propre.
fEssuyez l’appareil uniquement avec un chiffon doux, éven-
tuellement légèrement humide.
fNettoyez la tête de coupe avec le spray hygiénique.
fLubrifiez la tête de coupe avec l’huile pour tête de coupe
(Fig. 7).
fPour une capacité de coupe performante et
durable, il est important d’huiler souvent la tête
de coupe.
fSi après une longue durée d’utilisation et malgré
un nettoyage et une lubrification tous deux régu-
liers, la capacité de coupe diminue, il convient de
changer la tête de coupe.
Changement de tête de coupe
Avertissement ! Blessures et dommages matériels
liés à une utilisation non-conforme.
fÉteignez l’appareil et débranchez-le de l’alimen-
tation électrique avant de remplacer la tête de
coupe.
1. Éteignez l’appareil en utilisant l’interrupteur marche / arrêt
(Fig. 3
ⓑ
) et débranchez-le de l’alimentation électrique.
2. Appuyez sur la tête de coupe en partant du boîtier dans le
sens des flèches (Fig. 5
ⓐ
). Retirez la tête de coupe.
3. Pour remettre la tête de coupe en place, mettez le crochet
dans le logement du boîtier et poussez jusqu’à ce qu’elle
s’emboîte (Fig. 5
ⓑ
).
Élimination des problèmes
La tête de coupe ne coupe pas correctement.
La coupe de la tête de coupe n’est pas nette.
La durée de fonctionnement de la batterie est trop courte.
Cause : La tête de coupe est encrassée.
fNettoyez et huilez la tête de coupe (Fig. 6/7).
Cause : La tête de coupe est usée.
fRemplacez la tête de coupe (Fig. 5).
Blessures de la peau
Cause : Pression trop importante sur la peau.
fAppuyez moins fort sur la peau.
Cause : Angle de coupe trop raide.
fPlacez l’appareil plus en parallèle.
Le témoin de charge ne s’allume pas.
Cause : La prise de l’appareil est encrassée.
fNettoyez la prise de l’appareil (D).
Cause : Alimentation électrique défectueuse.
fVérifiez le bon contact entre le bloc d’alimentation à fiches
et la prise secteur. Vérifiez le câble électrique quant à
d’éventuelles détériorations.
fVérifiez l’alimentation électrique.
Élimination
Attention ! Dommages environnementaux en cas
de mise au rebut erronée.
fDéchargez les batteries avant de les jeter !
fLe traitement conforme des déchets protège
l’environnement et empêche les impacts possibles
sur l’homme et l’environnement.
Lors de la mise au rebut de l’appareil, respectez les réglemen-
tations légales en vigueur.
Informations concernant la mise au rebut d’appareils élec-
triques et électroniques dans la Communauté Européenne :
Au sein de la Communauté Européenne, des régle-
mentations nationales reposant sur la directive UE
2002/96/CE relative aux appareils électroniques
(WEEE) définissent la mise au rebut des appareils
électriques. Selon celle-ci, l’appareil ne doit plus être
jeté dans les ordures communales ou ménagères.
L’appareil peut être remis gratuitement aux centres de
collecte communaux ou aux entreprises de traitement
de déchets.

ITALIANO
20
de
en
fr
it
es
pt
nl
sv
no
fi
tr
pl
cs
sk
hu
sl
ro
bg
ru
uk
el
ar
Avvertenze generali sulla sicurezza
Uso conforme alle norme
· Utilizzare i tagliacapelli esclusivamente per tagliare i capelli, i peli della
barba e le sopracciglia.
· Utilizzare le tosatrici per animali unicamente per tagliare il pelo di
animali.
Requisiti dell’utente
· Prima della prima messa in funzione, leggere per intero le istruzioni
per l’uso e familiarizzarsi con l’apparecchio.
· Questo apparecchio non è destinato all’impiego da parte di persone
(ivi inclusi anche i bambini) con ridotte capacità fisiche, sensoriali
o psichiche o, ancora, che non abbiano esperienza o competenza
nell’uso del medesimo, a meno che non vengano sorvegliati o rice-
vano istruzioni sull’uso dell’apparecchio da una persona che è respon-
sabile della loro sicurezza. Sorvegliare i bambini onde accertare che
non utilizzino l’apparecchio come un giocattolo.
· Conservare l’apparecchio lontano dalla portata di animali e protetto
dagli agenti atmosferici.
Pericoli
Osservare le seguenti istruzioni di sicurezza!
Pericolo! Folgorazione causata da danni all’apparecchio/ali-
mentatore switching da rete.
fMai utilizzare l’apparecchio se non funziona correttamente, se è
danneggiato o se è caduto nell’acqua. Per evitare pericoli, fare
eseguire le riparazioni esclusivamente in un centro di assistenza
autorizzato utilizzando parti di ricambio originali.
fMai utilizzare l’apparecchio con un cavo elettrico o con un ali-
mentatore switching da rete danneggiati. Per evitare pericoli, un
cavo elettrico o un
alimentatore switching da rete
danneggiato
devono essere sostituiti con un ricambio originale solo da un
centro di assistenza autorizzato o da una persona con una qua-
lifica equivalente.
Table of contents
Languages:
Other Moser Hair Clipper manuals

Moser
Moser Type 1250 User manual

Moser
Moser 1591Q User manual

Moser
Moser 1234 Operational manual

Moser
Moser 1873 C User manual

Moser
Moser 1556 User manual

Moser
Moser 1871 User manual

Moser
Moser Motion Nano 1585 User manual

Moser
Moser 1233 User manual

Moser
Moser Type 1250 User manual

Moser
Moser ARCO User manual