Moser 1870 Li+ User manual

Type 1870 Li+
Originalbetriebsanleitung
Netz-/Akku-Haarschneidemaschine Typ 1870 Li+
de
Translation of the original operation manual
Cord/cordless hair clipper type 1870 Li+
en
Traduction du mode d’emploi d’origine
Tondeuse à cheveux secteur / batterie type 1870 Li+
fr
Traduzione delle istruzioni per l’uso originali
Tagliacapelli a rete/batteria tipo 1870 Li+
it
Traducción del manual de uso original
Máquina de corte de pelo con alimentación de red/por batería 1870 Li+
es
Tradução do manual de utilização original – Máquina para corte de
cabelo com bateria e ligação à rede eléctrica Tipo 1870 Li+
pt
Vertaling van de originele gebruiksaanwijzing
Snoer/snoerloze tondeuse type 1870 Li+
nl
Översättning av originalbruksanvisning
Nät-/batteridriven hårklippningsmaskin Typ 1870 Li+
sv
Oversettelse av den originale bruksanvisningen
Nett-/batteridrevet hårklippemaskin type 1870 Li+
no
Alkuperäiskäyttöohjeen käännös
Tyypin 1870 Li+ verkko-/akkukäyttöinen hiustenleikkuukone
fi
Orijinal kullanma kılavuzunun çevirisi
Elektrikli/bataryalı saç kesme makinesi Tip 1870 Li+
tr
Tłumaczenie oryginalnej instrukcji obsługi – Maszynka do strzyżenia
włosów z zasilaniem sieciowym/akumulatorowym typu 1870 Li+
pl
Překlad originálního návodu k použití
Zastřihovač vlasů s napájením ze sítě/akumulátoru typ 1870 Li+
cs
Preklad originálneho návodu na obsluhu
Sieťový/akumulátorový strihač vlasov typ 1870 Li+
sk
Az eredeti használati utasítás fordítása
Hálózatról / akkumulátorról működtethető 1870 Li+ típusú hajvágó gép
hu
Prevod originalnih navodil za uporabo
Aparat za striženje las na omrežni / akumulatorski pogon tip 1870 Li+
sl
Traducerea manualului de utilizare original – Maşină de tuns părul
model tip 1870 Li+ cu alimentare de la priză/acumulator
ro
Превод на оригиналното упътване – Машинка за подстригване –
работа на ток и с акумулатор тип 1870 Li+
bg
Перевод оригинального руководства по эксплуатации – Аккуму-
ляторно-сетевая машинка для стрижки волос, тип 1870 Li+
ru
Переклад оригінальної інструкції – Машинка для стриження волосся,
яка працює від електромережі та акумуляторів, тип 1870 Li+
uk
Μετάφραση των πρωτότυπων οδηγιών λειτουργίας
Κουρευτική μηχανή ρεύματος/μπαταρίας τύπος 1870 Li+
el
! " #$ % د ' ()ا+,-./اما 12 3 4–#5 6 ز ' 89 : % ا ' ;< " =<$)
> 6 ' ?@6 ر = %و ا ' C5" > 6 ء–E" ا ز1870Li+
!< 3 ($ 6تG6H%' 9, - . / ا م
H< 3 IH 6تH-<3 J%> 6,- <$ 6 لد ' ()ا+,-./ام
!"#ا%& '( ) لا + ,- ) ز/ول12 ة ،5 ,6!2ا ءةد+ 9#ا:%&;<ام>?@ #
A BCوD-E1F) 1 9 G H .
5 ,6اI&" )رد+ 9#ا:%&;<امA,K ء:5 &,K أ1MاNG &Oو ا :P & Q ) ظ>H > ?@ #S9 <DC1@)ن5U- #ا + VWV ل إ+9H.
DCP) + YZUB 9 Eا + ,- ) ز+ ,- )ت\)+]Y،5 2 S^ZUB 9 Eد+ 9#ا:%&;<ام
1_ا + ,- ) ز .
DCP) + YوSV دZF) ر > ) ت1_اN') 5 92وا+&'B9()تا +`)aVa9Yا NbB 9 Y
ا + ; )WY > )/1Mو ا + Uc 1 Y ، 5 ,6اZ")عا + & VS9 - )تا NbB 9 Yا +U) ر 5 YDC
ا N,) ل .
L"Mا ' " HIزو ا ' -< 3 ($ 6ت
N@ "
ef 2 a )SEIMا + g' ` ) ت ا+@-2>)h9Y1_اP& () لا N Vتأو
ا + & ' 2ضjW ) > ) تef 9 2 ة .
N@ "
ef 2 ا : a Q,) ر1_اP& ()لا N Vتأوا + & ' 2ضjW ) > ) تef 9 2 ة .
!8O = "
Zbk521MاP& () لو !VعإW) > ) تSU < 5 Y أووSV دأ ef ) ر
Wb 9 Y .
!P?(Q
ZG"9Hj1@ ) a 9 YPg V ل أl2 ا ر 1)د5Y.
ZG"9H12 Dm> (' B V 1 )تو ag) h no)1Y .
5 &fB6ا/12oG )ا Z;) ذإS2 ا ء1 'q.
!E>&GQ9kاjS2اءاتو Dmا + & U B U#ا N ` & 2ح.
و 2R ا S P -T
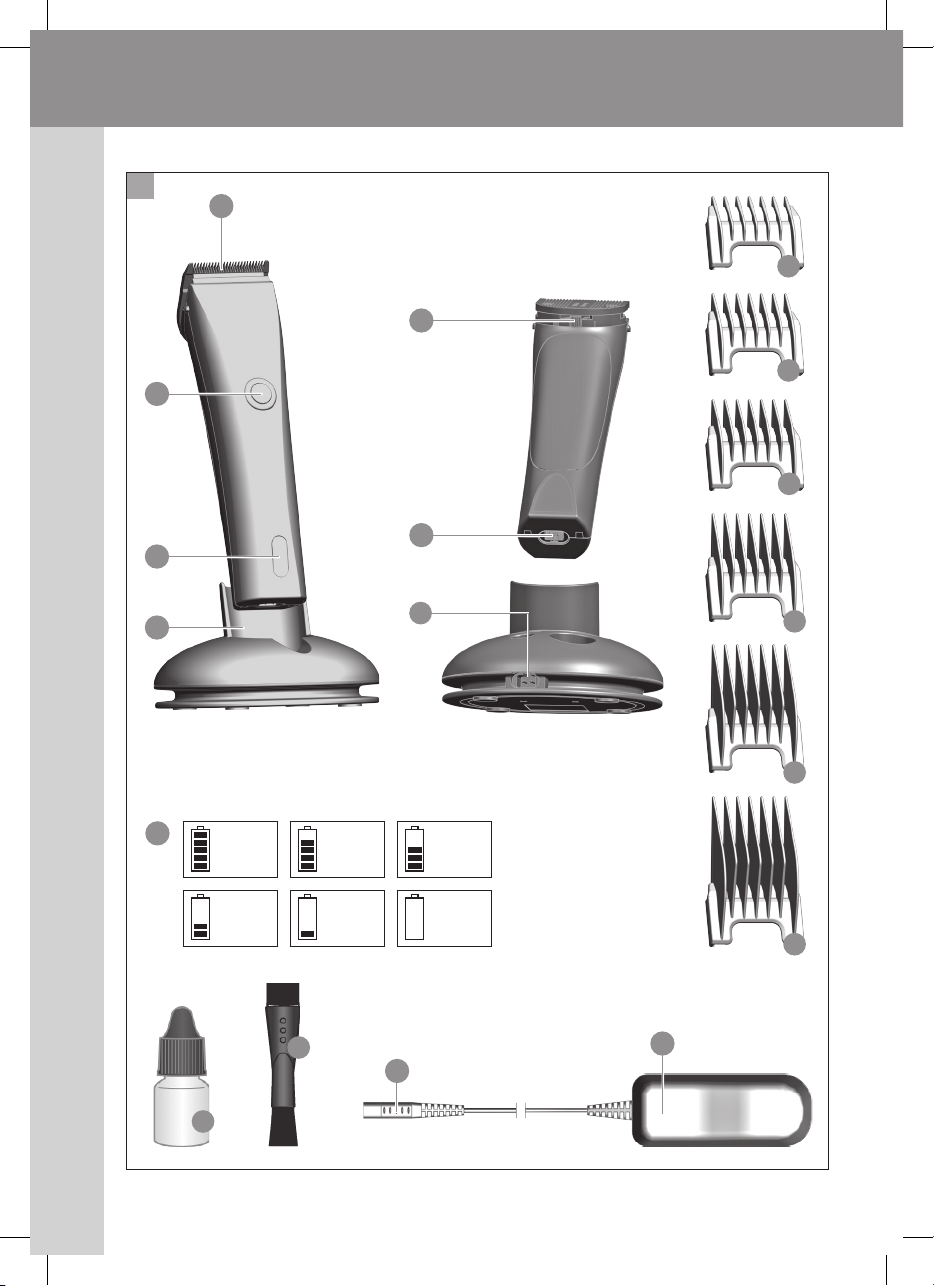
أ ,$ 6 ء ا 1#V ا ء ا S CIW %)ا ' ",X ا ' - IY( 84ر:X(1
AsQ 2 ة!tا + ?' 2
BزرZ?u 9 # /إ 5 ` )ف
C1 ws2ا +f) ! YاN&"`9Y
D! )I<ةا + ?b M
EZ'<5#xVلا + `t
F1 <e#ا + ,- ) ز+ B 2 >y>)+&9)ر
G1 zek! )I<ةا + ?b M
Hر أس1 ; gt +F" yxVلا + ?' 2 ،31E
Iر أس1 ; gt +F" yxVلا + ?' 2 ،61E
Jر أس1 ; gt +F" yxVلا + ?' 2 ،91E
Kر أس1 ; gt +F" yxVلا + ?' 2 ،121E
Lر أس
1 ; gt +F" yxVلا + ?' 2 ،181E
Mر أس1 ; gt +F" yxVلا + ?' 2 ،251E
NوP< ةا + &uk5 Yا+@-2>)h9Y
O! ) >|وP< ةا + &uk5 Y
PD 2s) ةZ G } 9~
Qز 51 ; gt +?Q 2 ةا + `t
ا'?(6W6تا '-JP(%
#5 6 ز= / وي
آ+9Yا + &?u 9 # :1b2 كذوZ9)ر1U& ( 2 >f) ر 5 Y :>f) ر 5 Yأ5Va)تا+B9]9Vم)LiFePO4(
1<ةe< 1 Yا + "f) ر 5 Y :+u)5Y9 0د!9`Y ا/>')د)ا +fVلxا + ' 2ضxا:ر Z Q )ع(:178x 46 x 501E ا + V زن:290Ç2 امZ`25")
ً1U& Vىا a " ' )ثا + FVl) ء :6 3 د 5U9 " #)A(I B^ا / ! g^ I B^
1U) D Y2 5%E ا :o & K ا ز :< 2 , 5 م/ث²
: 6[/ةا ' ;8 ]
ا/>')د
1_ا + BVازم)ا + fVلxا + ' 2ضxا:ر Z Q )ع(:96x 120 x 721E ا + V زن:9 1 Ç2 امZ`25")
ً
و^/ ة ا ' -_O=%ا ' C5" > 6 ` ( %
ا + f2 ا ز :1- ) 5Ü6000
ا%& -cكا + `<ر ة :1 2 و اطI B^ا / ! g^ DV + & 9Yا + &?u 9 # :100–240DV +/5 0–6 0o2ت
ok اا + ,- ) ز5 &VD2I B^P( ) 5 YI)ز + Yو:5g< ر أيlVl) ء :% B @ 9 Y .Z &f) >m
1 V اWQ ) تok اا + ,- ) ز1_1') 5 92و Z ' B 9 ( )تا:Zb) دا /و ر و >CاN&'B`Y> ) + & V ا Dm
ا + @ - 2 و 1 u G ) x 9 UC2004/108/EGوا+QV+&9Yا N G ; QFY2006/42/EG.
ا,- < $ 6 لا ' a5 6 ز
ا ' - 8b ( "
اP& Qâ>(V ادZ u B 9~ا + ,- ) ز+ G `#ا + ,- ) زأوا :P & Q ) ظ>H> ?@ #
آ 1MDCو !:Pm .
Z zA<1MI<مa `g) ن أيsC ء DC1b&V5)تا+&UB9E.
ا D btA)DYا /SK ا ء + B & zA<1MI<موSV دأيأl2 ا ر a )S( YIM
ا + G `#.
ا 1H 6 ن
!P?(Q!أY" ا ر W 6 #$ %[]d 3@( %N6Ee % .
ا P 2صI B^ر >yا + ,- ) ز> (g< ر Z9)ر1&2دد)A C(
واa&"Hإ +^!9(Yا + ,- <ا NkAVر ةI B^+ VPYا + -V5 Y .
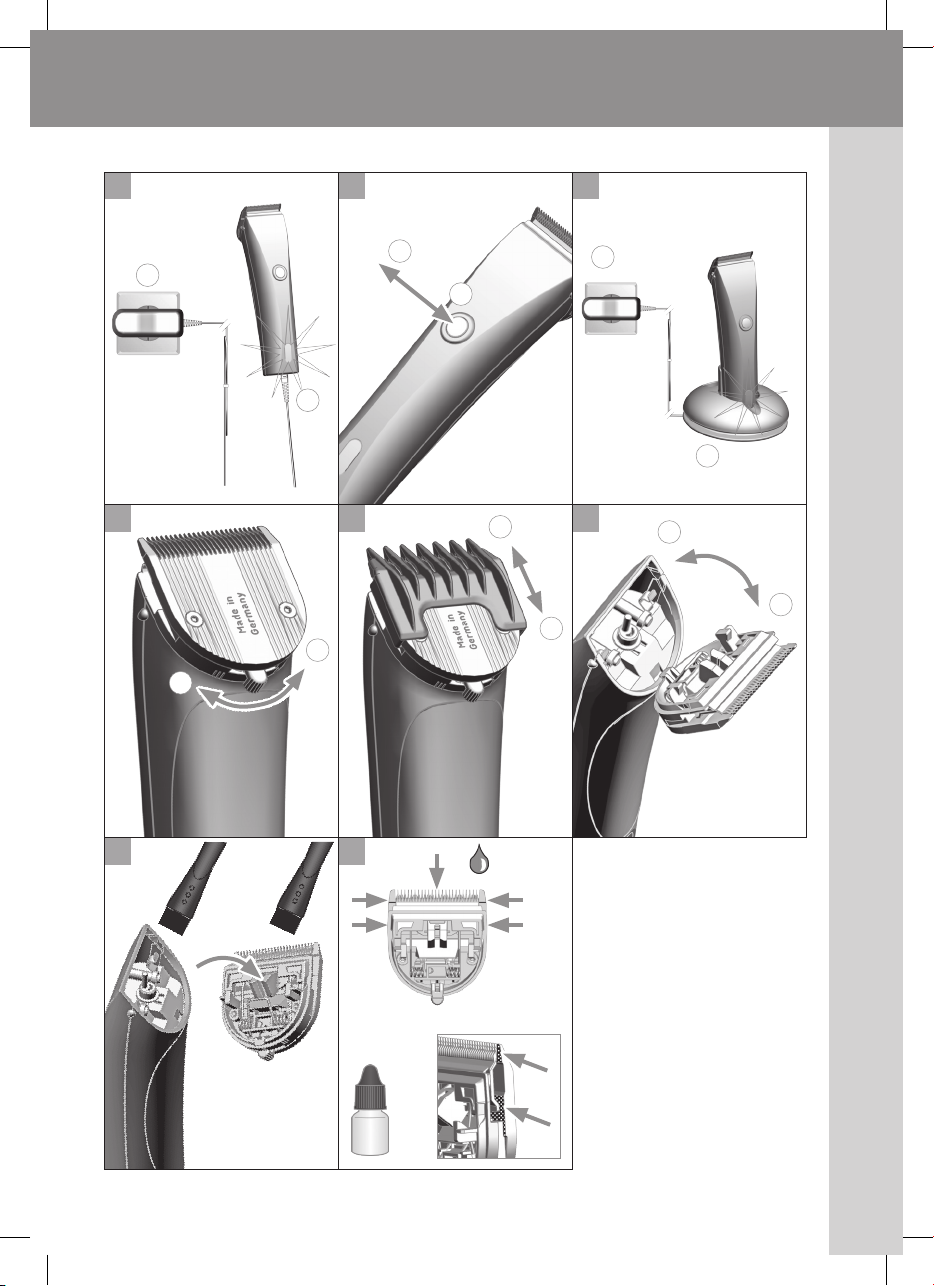
L8 ] ا ' ?@6 ر = %
1.أ دe#! ) >|وP< ةا + &uk5 Yا+@-2>)h9Y)M( DC1 <e#)G( ا + ,- ) ز)ا + 2%E
ا + & Vl9 bC4ⓐ(.
·5(@G@Eأ5F)
ً
sb M ا + ,- ) ز1Mecلر >fH1 " )s2 ة >)+&9)ر
ا+@-2>)hC
> V ا %f Y وP< ةا + &uk5 Yا+@-2>)h9Y
)ا + 2%Eا + & Vl9 bC2ⓐ/ⓑ(.
·5&VD2ا + ,- ) زI B^a}) مsb Mذ AC5bVلدونsb M
ا + "f) ر 5 Y>?@ #1Q2ط.
2.أ دeB V اوP< ةا + &uk5 YDC1g< ر ا + @-2 > ) ءا + b ) h fC
)ا + 2%Eا + & Vl9 bC4ⓑ(.
3.!E>ã5`)فا + ,- ) ز1Mecلا + Fu yI B^زرا + &?u 9 # /ا j 5 ` )ف
)ا + 2%Eا + & Vl9 bC3ⓑ(.
4.l_ ا + ,- ) زI B^! )I<ةا + ?b M )ا + 2%E ا + & Vl9 bC4(أو!E> VWB H
1 " )s2 ة1_وP< ةا + &uk5 Yا+@-2>)h9Y)ا + 2%Eا + & Vl9 bC2ⓐ/ⓑ(.>'<
ا+`9)م> k +å،%Vف5g< ر ا + ,- ) زWVZ)
ً
5 <لI B^><ا5YI( B 9 Yا + ?b M .
·ecل1<ةا + ?b M ،%Vف5 V 1çا +,K ءا N G ) %6N ws2
ا +f) ! Y+ 9 "q1U& Vىا + ?b M ا+b)+C.>'<ا%& @( ) لا + ?b M ،
Z FC ء A#أSK ا ء1 ws2ا +f) ! Y>gQ Y 1U& ( 2 ة .
·%Vف5fQÜا N ws2>'<12ورPV ا +C30\)a9YI B^إزا +Y
ا + ,- ) ز1M! )I<ةا + ?b M )a (yZVD92ا +f) ! Y (.
·5U& u 2قsb M ا + "f) ر 5 Y1MS<5<PV ا +C60د:(J%.
ا ' -;_ ( )> 6 ' ?@6 ر = %
1.su #ا + ,- ) ز1Mecلا + Fu yI B^زرا + &?u 9 #/ا j 5 ` )ف، \E!E>ã5`)DH
>'<ا:a &-) ء1Mا:%&;<ام)ا + 2%Eا + & Vl9 bC3ⓐ/ⓑ(.
·%Vف5fQÜا N ws2>'<12ورPV ا +C3 0\)a9YI B^إ 5 ` )ف
ا + ,- ) ز)a (yZVD92ا +f) ! Y (.
·>'<sb M ا + "f) ر 5 Y> ?@ #A ) 1#،5(@ Gåا%& ' ( ) لا + ,- ) ز
> <ونx) ! YA-2>)h9YN<ةZ g# إ +^9 0د:(J%.
·5(@Gåا :xcعI B^1U& Vىا + ?b M1Mecل1 ws2ا +f) ! Y
اN&"`9Y)C( .
·5 & V !~ا + ,- ) زأوZV1)Z
9@9)
ً
>'<ا +GQ)ذا +&)م+ ?b G Y ا + "f) ر 5 Y .
·ا a'<اما+'G)5Yا +@)D9Y>?Q 2 ة ا + `t5w\2>?@ #S<%B "C
I B^1<ةا%& ' ( ) + - ) .
ا ' -;_ ( )>6'C5">6ء
1.أ دe#! ) >|وP< ةا + &uk5 Yا+@-2>)h9Y)M( DC1 <e#)F(ا + ,- ) ز
)ا + 2%Eا + & Vl9 bC2ⓐ(.
2.أ دe#وP< ةا + &uk5 YDC1g< ر ا + @-2 > ) ءا + b ) h fC
)ا + 2%Eا + & Vl9 bC2ⓑ(.
3.su #ا + ,- ) ز1Mecل ا + Fu yI B^زرا + &?u 9 # /ا j 5 ` )ف، \E!E>ã5`)DH
>'<ا:a &-) ء1Mا:%&;<ام)ا + 2%Eا + & Vl9 bC3ⓐ/ⓑ(.
ا+,-./ام
!</=)Hf- Iىا ' Jh
Z&VD2sQ 2 ة ا + `gY I B^أداة+ &'<5#xVلا + `tو Dm51U&V5)ت1;& B Q Y
Z & 2 ا وح>q0,71Eو31 B 9 ( & 2 ات)ا + 2%Eا + & Vl9 bC5( .
ا ' 89 : % > 6,- < $ 6 لا ' " ؤ وسا S . kk % 'b? lHf- IىEIلا ' ;< "
5(@Gåأ5F)
ً
ا%&'()لS-)زا+bc!Y1_ا+2
ِ
ؤوساN;ggY+F"y1U&Vى
xVلا + ?' 2 .
+ B bg V ل I B^1U& V ىا + `tا NfB Vب،اl" yأداةZ'<5#1U& Vىا + `t
I B^ا + Vl_ ر!E1) ا + 2%Eا + & Vl9 bC5( .
5&VD2ا + ,- ) زI B^ا + 2 ؤ وسا+&)+9Y:31E،61E،91E،1 21E،
1 81Eو2 51E.
! " m (n/إزا'%ا ' " أسا S . kh 'b? lEIلا ' ;< "
1.!E><D_ا + 2 أسا N ; gt +F" yxVلا + ?' 2D VقsQ 2 ةا + `t>)Z,)ه
ا + U- E إ +^أن5U& ` 2DC1@) a H)ا + 2%Eا + & Vl9 bC6ⓐ(.
2.5(@Gåإزا +Yا + 2 أسا N ; gt +F" yxVلا + ?' 2D9()>'<1Mecل
%b " H >)Z,)ها + U- E)ا + 2%Eا + & Vl9 bC6ⓑ(.
ا '<P 6 =%> 6 ' a5 6 ز
! Pp(Rو2( 6 W % ا ' a5 6 ز
N@ " !2< J 6 تm5">6`(%W 6 #$ %[]!f" با ' fI ا ` ) .
!E> ãxQ ) ءا + ,- ) زو DgB H IMا +&9)را+@-2>)hC!"#ا + ?2 و ع
DCZ G}9 Q HوW9)a&H.
:Z u f|ا + ,- ) زDCاN)ء.
ا P 2صI B^I<مZU2 بأي%V ا h #إ +^د ا e#ا + ,- ) ز .
:Z`E> VW# ا + ,- ) ز>)+&9)را+@-2>)hCإ:>'<ا + & zA<1M
SQ ) D H>?@ #Z)م.
!P?(Q!أY" ا ر W 6 #$ %[]HI ا دm($6و=%:I=% .
ا%&;< ا ماNV ادا +@9()و5Yا + `V5Y!<5 w ديإ +^إ +b)قأl2 ا ر
> ) + ,- ) زو 1 Bb` ) Z H .
:ZU& ' (#أي1V اد1k5 " Yأو1gG Q 2 ة !
:ZU&;< م%Vى1V ادا + & G } 9~وز 5 VتsQ 2 ا تا + `tا + &C
5 G gn ا +g) a _> )%& ' ( ) + - ) .
5(@Gåا + bg V ل I B^>;)e)تا + & G } 9~وز 5ا +?Q 2 ا ت1M
>)h'åا NbBCأوIMx2 5 mا : Zg) ل>(2AK a )+;<1Yا+K>)hM.
>'<ا :% & ' ( ) ل ، !E>ãزا +Yا + 2 أسا N ; gt +F" y1U& V ىxVلا + ?' 2
)ا + 2%Eا + & Vl9 bC6ⓑ(\EأدرsQ 2 ة ا + `tabVا /I B^)ا + 2%E
ا + & Vl9 bC7ⓐ(.ا%& ' (#D 2s) ةا + & G } 9~jز ا + Y>`)5)ا + ?' 21M
D &b)تا + uf) ءا + ; ) ر SC+ B ,- ) زو 1MsQ 2 ة ا + `t)ا + 2%Eا + & Vl9 bC
ر!E8( .ا lu y أ5F)
ً
I B^I& B Yا + & G } 9~.ok ها + '( B 9 YZU( n>ãزا +Y>`)5)
ا + ?' 2 ا N & V اS< ة>q1?yوsQ 2 ة ا + `t> @#%- V + Y > V ا %f Y D 2s) ة
ا + & G } 9~ا N Bb` Y)EASY CLEANING(.
ا%& '(#!f' Y! ( )شa )I(Yو1" B B Y!B9c
ً
+ & G } 9~ا + ,- ) ز .
a }~sQ 2 ة!tا + ?' 2 > V ا %f Y >;)eYا + & G } 9~.
ا%&;< مز 5sQ 2 ا تا + `t+ &K59ا +?Q 2 ة)ا + 2%Eا + & Vl9 bCر!E9( .
!E>&K59sQ 2 ة!tا + ?' 2>?@ #1 G &}E+ F( ) نSV د ة
!tI) + 9YN<ةxV 5 B Y .
!E>&u992sQ 2 ة ا + `tإذا:P}أنأدا ءo)!<Z 2 ا S_>'<
1<ةا%& ' ( ) لxV 5 B YرÇEZ G}9 Q- )وZK59&-)>?@ #1 G &}E .
Wp6 ما,-;< 6 ر أ و ! I H 6 ! ( C4
5&VD2ا + ,- ) زI B^a}) ما%&?' ) رأ و Z V 1 ) Z 9 @C+îakارا N "@2DCP) + Yl2 و ر ة
Z G } 9~ا + ,- ) ز .
·5&VD2a}) ما :% & ?' ) رI B^آ+9YZU( n+H> ('2 D Y1)إذا
A)asQ2ة!tا+?'21&U;YS<ا
ً
أو+EZK5>?@#
A )ف.>'<إxQ ) ءا +,-)ز،Zg< ر إs) ر ةWV Z 9 Y و 5 V 1ç
1 ws2ا +f) ! YاN&"`9YN<ةد!9`&q.
·j 5 ` )فا js ) ر ة ا +gV Z 9 Y و ا + V 1 9ç، 5 ,6Z?u 9 #ا + ,- ) ز12 ة
أe2ىN<ةوS9 K ةوإ5`)DH1MS<5<.
·= P kr >&K59sQ 2 ة ا + `tوZ G } 9~ا + ,- ) ز!"#Z?u 9 B H
1MS<5<.ا a}2ا + Q`2ة"! Pp(Rو2( 6 W % ا ' a5 6 ز ".
·I<ماP& 2 ا مok ها+&'B9()ت!<5 w ديإ +^إ +b)قأl2 ا ر
> ) + ,- ) زو Z 'f9 B H>?@ #1"@2،1()5 w ديإ +^إ +u)ءا + F( ) ن
وI<م%25)aH.
ا,- ? / ا لLs " ة ا ' Jh
!P?(Q!N@ " ا t2 6 > % و^/ وثأ Y" ا ر H6د=%W - (a%
ا+,-./اما '_("ا '9`v .
!E> ãxQ ) ءا + ,- ) زو DgB H IMا +&9)را+@-2>)hC!"#Zu992
sQ 2 ة!tا + ?' 2 .
1.أxQÜا + ,- ) ز> V ا %f Y زرا + &?u 9 # /ا j 5 ` )ف)ا + 2%E ا + & Vl9 bC
ر!E3ⓑ(\Eا DgB H IMا +&9)را+@-2>)hC.
2.اlu yI B^sQ 2 ة!tا + ?' 2DCا:Z,) ها N ' ) A|+ uf) ءا + ,- ) ز
)ا + 2%Eا + & Vl9 bC7ⓐ(.ا Dg#sQ 2 ة!tا + ?' 2IMا + ,- ) ز .
3.jI ) د ةsQ 2 ة ا + `t+ Vl' - ) ا /W B C ، !E>&]"9اN?
ْ
"
َ
åا + ;f ) DC> Q &bY
ا+&]"9ا N & V اS< ة> ) + uf) ءا + ; ) ر SCو اlu yI B^ا +?Q 2 ة إ +^أن5U& ` 2
وl' - ) > ) + ,- ) ز)ا + 2%Eا + & Vl9 bC7ⓑ(.
H< 6 'a% ا S;6 m )
Ls " ة ا ' Jh+! Jh>;C )#( / أو!a" ا ' ;< " .
ا +U"6:sQ 2 ة ا + `t1 & U; Y أو1& óAB Y .
a }~وز 5sQ 2 ة ا + `t)ا + 2%Eا + & Vl9 bC8/9(.DCP) + Yا%& ( 2 ا ر
ا N?@ # ، !E> )%& " < ا لا +?Q 2 ة)ا + 2%Eا + & Vl9 bCر!E7( .
H/ةN/ H % ا ' ?@6 ر = %:k( " ة#/ا
ً
.
!E>&G}9~و Z K 5 9ا +?Q 2 ة >?@ #S9 <)ا + 2%E ا + & Vl9 bC8/9(.ا%&;< ا م
sQ 2 ة!t1 & U; Y وÇ921K5 & Y!<5 w ديإ +^Z `g9 2 1<ةe< 1 Yا + "f) ر 5 Y
> ) + G g~ !DCP) + Yا a ; Q )ض1<ةe<1 Yا + "f) ر 5 Y>?@ #P)د،D ãنذ+å!<
5 ' Kىإ +^ا ! & 2 اباa&-)ءI(2ا + "f) ر 5 Y .
وI(V1)
ً
،Dãن1<ةe< 1 Yا + "f) ر 5 YZ G ; Qç> )%& ( 2 ا رS2 ا ء
ا:%&;<اما + 9 V 1C+ B ,- ) ز .رÇEAV a-)1g( ( Y eg9g)
ً
+ c% & ' ( ) ل ا :P & 2 ا DCا + 9 V 1C ، Dãنا + "f) ر 5 )تا NU& ;< 1 Y Z ;F_
أ5F)
ً
+ G Q|ا+&z\92.
إ26 > % ا ' ?;" ة
ا +U"6:ا + Fu y ا N ( ) رسI B^ا + "?2 ةA"92S<ا
ً
.
! Btا + Fu yIG<ا + `t> ) + ` 2ب1Mا +,B <.
ا +U"6:sQ 2 ة!tZ)+QY.
Z zA<1MI<مZ B~أ x2 افا /% G ) نIG<ا:%&;<امو!E>&u992sQ 2 ة
ا + `tإذاا ! & F^ ا/12ذ+å.
H xL" ا '@6 : %ا S-?J(%+= b4 ء .
ا +U"6:ا + ,- ) زÇ921 VlV ع>?@ #Wb 9 n I B^! )I<ةا + ?b M .
Z zA<1Mأنا + ,- ) ز1 VlV ع>?@ #S9 <I B^! )I<ةا + ?b M .
ا +U"6:eB#> ) + &uk5 Yا+@-2>)h9Y.
Z zA<1MأنوP< ةا + &uk5 Yا+@-2>)h9Y1 VWV + Y > (g< ر ا +&9)را+@-2>)hC.
ا D btA"#ا +&9)را+@-2>)hC+ B & zA<1M%c 1 & H .
ا D btا + &uk5 Yا+@-2>)h9Y.
H xL" ا '@6 : %ا S$- 3y= I Hz
Z zA<1MأنsQ 2 ة ا + `tÇ921' ) ! YIMا + b2 A Yو> zنا +?Q 2 ة! )درةI B^
ا + &b2ك .su #ا + ,- ) زو أxQ ò H .DCP) + Yو 1 9ç1 ws2 ا +f) ! Yا N( & BÜ1M
S< 5 < ،5 2 S^ا : Zg) ل >)+")h_ا NbBCا N & ; gt أو>(2AKe<1 )تs2 A Y
WAHL.
ا ' - . 3hH]ا ' a5 6 ز
!P?(Q!إ HC 6 W ( %^/ وثأY" ا ر >(e(%d4^6 ' %[/م
ا ' - . 3hH]ا ' a5 6 ز >;C ),3 ( X .
ا P 2صI B^إ D2 اغsb G Y ا + "f) ر 5 Y!"#ا + & ; Bt1G-) !
ا + & ; Bt1Mا + ,- ) ز>?@ #1 G ) %65b) DâI B^ا+"9òY
و 5bVلدونZ ' 2ضا j aU) نوا+"9òY/يأl2 ا ر 1b& ( B Y .
IG<ا + & ; Bt1Mا /S- K ة ا+@-2>)h9YÇ92ا NU& ' ( B Y ، ا P 2صI B^اP& 2 ا م
ا N ` &F9 ) تا +`)aVa9Yا + ,) ري>-)ا + '(#.
H< 3 IH 6تN 62% > 6 ' - . 3hH]ا 1#5 V ة ا'C5">6`(%و اt' C- "وW ( %d4
ا + !86 دا 1و ر و >4:
5 ;F_ ا + & ; Bt1Mا /S- K ة ا+@-2>)h9Yد ا e#ا:Zb) د
ا /و ر و >CN,( V I Y1Mا + ` V ا aqا NbB 9 Yا + &CZ2 Z@KI B^ا + & VS9 H
ا /و ر >C2002/96/ECا + ; )ص> ) /S- K ة ا+@-2>)h9Yو اj+ @&2و a 9 Y
ا+'&9`Y.و 5 b} 2ok اا + & VS9 Hر 1Cا + ,- ) ز1_ا+GQ)5)تا + " B<5Yأو
اNGK+ 9Y.5 (@ G @åا + & ; Bt1,)a9)
ً
1Mا + ,- ) ز> V اP< ة1Ma ` )ط
S(_ا /S- K ة ا+&)>'Y+ B "B<5Yأو>(2AK1M12 اAKإI)دةZ<و52
ا+GQ)5)ت.
ar
Operation Manual
Cord/Cordless Hair Clipper

de
en
fr
it
es
pt
nl
sv
no
fi
tr
pl
cs
sk
hu
sl
ro
bg
ru
uk
el
ar
2
1
> 80%
50 - 30%
80 - 65%
30 - 10%
65 - 50%
10 - 0%
A
B
F
N
C
DG
H
I
K
L
M
J
Q
P
O
E
C

de
en
fr
it
es
pt
nl
sv
no
fi
tr
pl
cs
sk
hu
sl
ro
bg
ru
uk
el
ar
3
432
b
a
65 7
b
a
1
5
a
b
8 9
a
b
b
a

DEUTSCH
de
en
fr
it
es
pt
nl
sv
no
fi
tr
pl
cs
sk
hu
sl
ro
bg
ru
uk
el
ar
4
Allgemeine Sicherheitshinweise
Bestimmungsgemäßer Gebrauch
· Nutzen Sie Haarschneidemaschinen ausschließlich zum Schneiden
von menschlichem Haupthaar, Barthaar und Augenbrauen.
· Nutzen Sie Tierhaarschneidemaschinen ausschließlich zum Schneiden
von Tierhaaren und Tierfell.
Anforderungen an den Anwender
· Lesen Sie vor der ersten Inbetriebnahme die Betriebsanleitung voll-
ständig durch und machen Sie sich mit dem Gerät vertraut.
· Dieses Gerät ist nicht für den Gebrauch von Personen (einschließlich
Kindern) mit verringerten körperlichen, sensorischen oder geistigen
Fähigkeiten oder Mangel an Erfahrung und Wissen bestimmt, es sei
denn, sie werden beaufsichtigt oder erhielten eine Anweisung hin-
sichtlich des Gebrauches des Gerätes von einer Person, die für ihre
Sicherheit verantwortlich ist. Kinder sollten beaufsichtigt werden, um
sicherzustellen, dass sie nicht mit dem Gerät spielen.
· Das Gerät außerhalb der Reichweite von Tieren und vor Witterungs-
einflüssen geschützt ablegen.
Gefährdungen
Beachten Sie die folgenden Sicherheitshinweise!
Gefahr! Stromschlag durch Schäden am Gerät/Stecker-
schaltnetzteil.
fDas Gerät nicht benutzen, wenn es nicht ordnungsgemäß
funktioniert, wenn es beschädigt ist, oder wenn es ins Wasser
gefallen ist. Reparaturen ausschließlich von einem autorisier-
ten Service Center unter Verwendung von Original-Ersatzteilen
durchführen lassen, um Gefährdungen zu vermeiden.
fDas Gerät niemals mit einem beschädigten Stromkabel bzw.
Steckerschaltnetzteil verwenden. Ein beschädigtes Stromka-
bel bzw. Steckerschaltnetzteil, darf nur von einem autorisierten
Service Center oder einer ähnlich qualifizierten Person durch
ein Original-Ersatzteil ersetzt werden, um Gefährdungen zu
vermeiden.
fElektrogeräte dürfen nur durch elektrotechnisch ausgebildete
Fachkräfte repariert werden.
Gefahr! Stromschlag durch eintretende Flüssigkeit.
fEin ins Wasser gefallenes Elektrogerät auf keinen Fall berühren.
Sofort den Netzstecker ziehen.

DEUTSCH
de
en
fr
it
es
pt
nl
sv
no
fi
tr
pl
cs
sk
hu
sl
ro
bg
ru
uk
el
ar
5
fElektrogeräte niemals in der Badewanne oder unter der Dusche
benutzen.
fElektrogeräte stets so ablegen bzw. aufbewahren, dass sie
nicht ins Wasser (z.B. Waschbecken) fallen können. Den Kon-
takt von Elektrogeräten mit Wasser und anderen Flüssigkeiten
vermeiden.
fDas Gerät nur in trockenen Räumen benutzen und
aufbewahren.
fAls zusätzliche Sicherheitsmaßnahme wird der Einbau einer
geprüften Fehlerstrom-Schutzeinrichtung (RCD) mit einem
Bemessungsauslösestrom von nicht mehr als 30 mA in den
Badezimmerstromkreis empfohlen.
Explosionsgefahr!
fDas Gerät niemals in Umgebungen benutzen, in denen Aerosol-
(Spray-) Produkte verwendet werden, oder in denen Sauerstoff
freigesetzt wird.
fVersuchen Sie nicht, den Akku selbst auszuwechseln.
fDas Gerät nicht längere Zeit Temperaturen unter 0°C oder über
+40°C aussetzen. Direkte Sonneneinstrahlung vermeiden.
Warnung! Verletzungen durch unsachgemäße Handhabung.
fBenutzen Sie das Gerät, zum Schutz vor Verletzungen, niemals
mit beschädigtem Schneidsatz.
fSchalten Sie das Gerät immer vor dem Ablegen aus, da das
Gerät durch die Vibrationen herunterfallen kann.
Vorsicht! Schäden durch falsche Spannungsversorgung.
fBetreiben Sie das Gerät ausschließlich mit Wechselstrom mit
der auf dem Typenschild angegebenen Spannung.
Vorsicht! Schäden durch unsachgemäße Handhabung.
fVerwenden Sie ausschließlich das vom Hersteller empfohlene
Zubehör.
fVerwenden Sie zum Aufladen des Gerätes ausschließlich das
im Lieferumfang enthaltene Steckerschaltnetzteil. Ersetzen Sie
defekte Steckerschaltnetzteile nur durch Original-Ersatzteile, die
Sie über unsere Servicecenter beziehen können.
fNiemals Gegenstände in die Geräteöffnungen stecken oder fal-
len lassen.
fBeim Ausstecken des Gerätes niemals am Stromkabel oder am
Gerät selbst ziehen.

DEUTSCH
de
en
fr
it
es
pt
nl
sv
no
fi
tr
pl
cs
sk
hu
sl
ro
bg
ru
uk
el
ar
6
fDas Stromkabel nicht um das Gerät wickeln.
fDas Stromkabel und das Gerät von heißen Oberflächen
fernhalten.
fDas Gerät nicht mit verdrehtem oder abgeknicktem Kabel aufla-
den bzw. aufbewahren.
fKeine Einwegbatterien verwenden. Lassen Sie die Akkus aus-
schließlich im Service Center austauschen.
Allgemeine Benutzerhinweise
Informationen zum Gebrauch der Betriebsanleitung
fBevor Sie das Gerät zum ersten Mal in Betrieb nehmen,
muss die Betriebsanleitung vollständig gelesen und verstan-
den werden.
fBetrachten Sie die Betriebsanleitung als Teil des Produkts
und bewahren Sie sie gut und erreichbar auf.
fFügen Sie diese Betriebsanleitung bei Weitergabe des
Geräts an Dritte bei.
fBei Konflikten mit nationalen Sicherheitsbestimmungen oder
-anweisungen ist den nationalen Vorgaben Folge zu leisten.
Symbol- und Hinweiserklärung
GEFAHR
Gefahr durch Stromschlag mit möglicher schwerer
Körperverletzung oder Tod als Folge.
GEFAHR
Explosionsgefahr mit möglicher schwerer Körperver-
letzung oder Tod als Folge.
WARNUNG
Warnung vor einer möglichen Körperverletzung oder
einem gesundheitlichen Risiko.
VORSICHT
Hinweis auf die Gefahr von Sachschäden.
Hinweis mit nützlichen Informationen und Tipps.
Sie werden zu einer Handlung aufgefordert.
Führen Sie diese Handlungen in der beschriebenen
Reihenfolge durch.
f
1.
Produktbeschreibung
Bezeichnung der Teile (Abb. 1)
A Schneidsatz
B Ein-/Ausschalter
C Kapazitätsanzeige
D Ladeständer
E Schnittlängenverstellung
F Gerätebuchse
G Ladeständerbuchse
H Kammaufsatz, 3 mm Schnittlänge
I Kammaufsatz, 6 mm Schnittlänge
J Kammaufsatz, 9 mm Schnittlänge
K Kammaufsatz, 12 mm Schnittlänge
L Kammaufsatz, 18 mm Schnittlänge
M Kammaufsatz, 25 mm Schnittlänge
N Steckerschaltnetzteil
O Geräteanschlussstecker
P Reinigungsbürste
Q Öl für den Schneidsatz
Technische Daten
Handgerät
Antrieb: DC-Motor
Akku: Li-ION-Akku (LiFePO4)
Betriebsdauer Akku: bis zu 90 min
Abmessungen (LxBxH): 178 x 46 x 50 mm
Gewicht: ca. 290 g
Emissionsschalldruckpegel: max. 63 dB(A) @ 25 cm
Vibration: < 2,5 m/s
2
Ladeständer
Abmessungen
mit Zubehör (BxTxH): 96 x 120 x 72 mm
Gewicht: ca. 91 g
Steckerschaltnetzteil
Typ: Adapter 6000
Leistungsaufnahme: max. 12 W
Betriebsspannung: 100 – 240 V / 50 – 60 Hz
Das Gerät ist schutzisoliert und funkentstört. Es erfüllt die Anfor-
derungen der EU-Richtlinie Elektromagnetische Verträglichkeit
2004/108/EG und die Maschinenrichtlinie 2006/42/EG.

DEUTSCH
de
en
fr
it
es
pt
nl
sv
no
fi
tr
pl
cs
sk
hu
sl
ro
bg
ru
uk
el
ar
7
Betrieb
Vorbereitung
Bewahren Sie das Verpackungsmaterial für eine spä-
tere sichere Lagerung oder Transport auf.
fKontrollieren Sie die Vollständigkeit des Lieferumfangs.
fPrüfen Sie alle Teile auf eventuelle Transportschäden.
Sicherheit
Vorsicht! Schäden durch falsche
Spannungsversorgung.
fBetreiben Sie das Gerät ausschließlich mit Wech-
selstrom mit der auf dem Typenschild angegebe-
nen Spannung.
Akku laden
1. Stecken Sie den Geräteanschlussstecker (M) des Stecker-
schaltnetzteiles in die Ladeständerbuchse (G) (Abb. 4
ⓐ
).
· Das Gerät kann auch direkt mit dem Stecker-
schaltnetzteil zum Laden verbunden werden
(Abb. 2
ⓐ
/
ⓑ
).
· Durch ein intelligentes Lademanagement wird ein
Überladen des Akkus verhindert.
2. Stecken Sie das Steckerschaltnetzteil in die Netzsteckdose
(Abb. 4
ⓑ
).
3. Schalten Sie mit dem Ein-/Ausschalter das Gerät aus
(Abb. 3
ⓑ
).
4. Stellen Sie das Gerät in die Ladestation (Abb. 4) oder
verbinden Sie es direkt mit dem Steckerschaltnetzteil
(Abb. 2
ⓐ
/
ⓑ
). Es ertönt ein Signal – der Ladevorgang
beginnt.
· Während des Ladevorgangs blinkt je nach Lade-
zustand das jeweilige Segment der Kapazitätsan-
zeige. Bei voll geladenem Akku leuchten ständig
alle Segmente der Kapazitätsanzeige.
· Nach Entnahme des Gerätes aus dem Ladestän-
der erlischt nach ca. 30 Sekunden die Anzeige.
(Stromsparmodus).
· Die Ladezeit bis zum Erreichen der vollen Kapazi-
tät beträgt ca. 60 Minuten.
5. Sobald der Akku vollständig geladen ist ertönt ein Signal.
Akku Betrieb
1. Schalten Sie mit dem Ein-/Ausschalter das Gerät ein und
nach Gebrauch aus (Abb. 3
ⓐ
/
ⓑ
).
· Nach dem Ausschalten des Gerätes erlischt nach
ca. 30 Sekunden die Anzeige (Stromsparmodus).
· Bei voll geladenem Akku kann das Gerät bis
zu 90 Minuten ohne Netzanschluss betrieben
werden.
· Der Ladezustand des Akkus wird durch die Kapa-
zitätsanzeige (C) angezeigt.
· Bei entladenem Akku schaltet sich die Maschine
automatisch ab.
· Bei unzureichender Pflege des Schneidsatzes
kann sich die Laufzeit erheblich reduzieren.
Netzbetrieb
1. Stecken Sie den Geräteanschlussstecker (M) des Stecker-
schaltnetzteiles in die Gerätebuchse (F) (Abb. 2
ⓐ
).
2. Stecken Sie das Steckerschaltnetzteil in die Netzsteckdose
(Abb. 2
ⓑ
).
3. Schalten Sie mit dem Ein-/Ausschalter das Gerät ein und
nach Gebrauch aus (Abb. 3
ⓐ
/
ⓑ
).
Bedienung
Einstellung der Schnittlänge
Über die im Schneidsatz integrierte Schnittlängenverstellung
können Sie die Schnittlänge über 5 Positionen von 0,7 mm bis
3 mm einstellen (Abb. 5).
Schneiden mit Kammaufsätzen
Das Gerät kann auch mit Kammaufsätzen betrieben werden.
fStellen Sie die Schnittlängenverstellung auf Position 1
(Abb. 5) um die angegebene Schnittlänge zu erreichen.
Folgende Kammaufsätze sind im Lieferumfang enthal-
ten: 3 mm, 6 mm, 9 mm, 12 mm, 18 mm und 25 mm
Schnittlänge.
Kammaufsatz aufsetzen / abnehmen
1. Schieben Sie den Kammaufsatz in Pfeilrichtung bis zum
Anschlag auf den Schneidsatz (Abb. 6
ⓐ
).
2. Der Kammaufsatz lässt sich durch Schieben in Pfeilrichtung
entfernen (Abb. 6
ⓑ
).
Instandhaltung
Reinigung und Pflege
Gefahr! Stromschlag durch eintretende
Flüssigkeit.
fSchalten Sie das Gerät aus und trennen Sie es
von der Stromversorgung, bevor Sie mit der Reini-
gung und Pflege beginnen.
fDas Gerät nicht in Wasser tauchen!
fLassen Sie keine Flüssigkeiten in das Gerätein-
nere gelangen.
fSchließen Sie das Gerät nur vollständig getrock-
net wieder an die Stromversorgung an.
Vorsicht! Schäden durch aggressive Chemikalien.
Aggressive Chemikalien können das Gerät und Zube-
hör schädigen.
fVerwenden Sie keine Lösungs- oder
Scheuermittel.
fVerwenden Sie ausschließlich das vom Hersteller
empfohlene Reinigungsmittel und Schneidsatzöl.
Hygiene-Spray sowie Schneidsatzöl können Sie über
Ihren Händler oder unser Service Center beziehen.
fNehmen Sie nach jedem Gebrauch den Kammaufsatz ab
(Abb. 6
ⓑ
) und klappen Sie den Schneidsatz vom Gehäuse
ab (Abb. 7
ⓐ
). Entfernen Sie mit der Reinigungsbürste die
Haarreste aus der Gehäuseöffnung und vom Schneidsatz
(Abb. 8). Drücken Sie zusätzlich den Reinigungshebel. So
können Sie einfach die Haarreste zwischen Scherkamm
und Schermesser mit der Reinigungsbürste entfernen
(EASY CLEANING).

DEUTSCH
de
en
fr
it
es
pt
nl
sv
no
fi
tr
pl
cs
sk
hu
sl
ro
bg
ru
uk
el
ar
8
fWischen Sie das Gerät nur mit einem weichen, eventuell
leicht feuchten Tuch ab.
fReinigen Sie den Schneidsatz mit dem Hygienespray.
fÖlen Sie den Schneidsatz mit dem Schneidsatzöl (Abb. 9).
fFür eine gute und lang anhaltende Schneidleis-
tung ist es wichtig den Schneidsatz häufig zu ölen.
fWenn nach längerer Gebrauchsdauer trotz regel-
mäßigem Reinigen und Ölen die Schneidleistung
nachlässt, sollte der Schneidsatz ausgewechselt
werden.
Automatisches Sensorsystem
Zur frühzeitigen Erkennung einer dringend durchzuführenden
Pflege, wurde Ihre Haarschneidemaschine mit einem automati-
schen Sensorsystem ausgestattet.
· Das Sensorsystem erkennt selbstständig, dass
der Schneidsatz zu wenig geölt wurde bzw. stark
verschmutzt ist. Es ertönt nach dem Ausschalten
des Gerätes ein Signal-Ton und die gesamte
Kapazitätsanzeige blinkt für 2 Minuten.
· Der Signal-Ton sowie das Blinken der Kapazi-
tätsanzeige können durch ein erneutes kurzes
Ein- und Ausschalten des Gerätes quittiert (ausge-
schaltet) werden.
· Vor einem erneuten Betrieb der Maschine wird
dringend empfohlen, das Gerät zu reinigen und
den Schneidsatz zu ölen, siehe Kapitel Reinigung
und Pflege.
· Bei Nichtbeachtung kann die Maschine Schaden
nehmen und vorzeitig ausfallen. Dadurch erlischt
der Garantieanspruch.
Austausch des Schneidsatzes
Warnung! Verletzungen und Sachschäden durch
unsachgemäße Handhabung.
fSchalten Sie das Gerät aus und trennen Sie es
von der Stromversorgung, bevor Sie den Schneid-
satz austauschen.
1. Schalten Sie mit dem Ein-/Ausschalter das Gerät aus
(Abb. 3
ⓑ
) und trennen Sie es von der Stromversorgung.
2. Drücken Sie den Schneidsatz in Pfeilrichtung vom Gehäuse
weg (Abb. 7
ⓐ
). Entfernen Sie den Schneidsatz.
3. Zum Wiedereinsetzen den Schneidsatz mit dem Haken in
die Aufnahme am Gehäuse ansetzen und bis zum Einrasten
zum Gehäuse drücken (Abb. 7
ⓑ
).
Problembehebung
Schneidsatz schneidet schlecht oder rupft.
Ursache: Schneidsatz ist verschmutzt oder verschlissen.
fReinigen und ölen Sie den Schneidsatz (Abb. 8/9), sollte
dies das Problem nicht beseitigen tauschen Sie den
Schneidsatz aus (Abb. 7).
Akkulaufzeit ist zu kurz.
Reinigen und ölen Sie den Schneidsatz gewissenhaft
(Abb. 8/9). Ein stark verschmutzter und nicht geölter Schneid-
satz kann die verfügbare Akkulaufzeit halbieren! Sollte die
Akkulaufzeit dennoch viel zu kurz sein, so sind vermutlich die
Akkus nahe an ihrem Lebensende.
Generell nimmt die Akkulaufzeit der Maschine kons-
tant mit der täglichen Benutzung ab. Die eingesetzten
Akkus sind speziell für die professionelle und tägliche
Verwendung ausgelegt, unterliegen aber ebenfalls
diesem Effekt.
Hautverletzung
Ursache: Zu starker Anpressdruck auf die Haut.
fReduzieren Sie den Anpressdruck beim hautnahen
schneiden.
Ursache: Beschädigter Schneidsatz.
fKontrollieren Sie, ob beim Gebrauch Zahnspitzen beschä-
digt wurden und tauschen Sie gegebenenfalls den Schneid-
satz aus.
Kapazitätsanzeige leuchtet nicht.
Ursache: Gerät ist nicht richtig im Ladeständer positioniert.
fStellen Sie sicher, dass das Handgerät richtig im Ladestän-
der positioniert ist.
Ursache: Defekte Stromversorgung.
fStellen Sie sicher, dass das Netzteil mit der Steckdose
verbunden ist.
fÜberprüfen Sie das Stromkabel auf eventuelle
Beschädigungen.
fPrüfen Sie die Stromversorgung.
Komplette Kapazitätsanzeige blinkt
fKontrollieren Sie, dass der Schneidsatz nicht blockiert
ist und sich das Messer bewegen lässt. Schalten Sie die
Maschine ein und aus. Sollte die komplette Anzeige wieder
blinken wenden Sie sich bitte an Ihren Fachhändler oder an
ein WAHL Servicecenter.
Entsorgung
Vorsicht! Umweltschäden bei falscher Entsorgung.
fAkkus vor der Entsorgung entladen!
fDie ordnungsgemäße Entsorgung dient dem
Umweltschutz und verhindert mögliche schädliche
Auswirkungen auf Mensch und Umwelt.
Beachten Sie im Falle der Entsorgung des Geräts die jeweiligen
gesetzlichen Vorschriften.
Information zur Entsorgung von elektrischen und elektroni-
schen Geräten in der europäischen Gemeinschaft:
Innerhalb der Europäischen Gemeinschaft wird für
elektrisch betriebene Geräte die Entsorgung durch
nationale Regelungen vorgegeben, die auf der EU-
Richtlinie 2002/96/EC über Elektronik-Altgeräte
(WEEE) basieren. Danach darf das Gerät nicht mehr
mit dem kommunalen oder Hausmüll entsorgt werden.
Das Gerät wird bei den kommunalen Sammelstellen
bzw. Wertstoffhöfen kostenlos entgegengenommen.

ENGLISH
de
en
fr
it
es
pt
nl
sv
no
fi
tr
pl
cs
sk
hu
sl
ro
bg
ru
uk
el
ar
9
General safety instructions
Intended use
· Only use hair clippers to cut human hair, beard hair and eyebrows.
· Only use animal clippers to cut animal hair and animal fur.
Requirements on the user
· Read the operation manual in full and familiarise yourself with it before
the first use.
· This appliance is not intended for use by persons (including children)
with reduced physical, sensory or mental capabilities, or lack of expe-
rience and knowledge, unless they have been given supervision or
instruction concerning use of the appliance by a person responsible for
their safety. Children should be supervised to ensure that they do not
play with the appliance.
· Keep the appliance out of reach of animals and protected against the
effects of the weather.
Hazards
Please adhere to the following safety instructions!
Danger! Electric shock due to damage to appliance/plug-in
transformer.
fDo not use the appliance if it is not working correctly, if it is
damaged or if it has fallen into water. Repairs may only be per-
formed at an authorised service centre using original spare parts
in order to avoid hazards.
fNever use the appliance if the mains cable or plug-in trans-
former is damaged. A damaged mains cable or plug-in trans-
former may only be replaced with an original spare part by an
authorised service centre or another similarly qualified person, in
order to avoid hazards.
fOnly specialists properly trained in the handling of electrotechni-
cal appliances may repair electrical equipment.
Danger! Electric shock due to penetration of liquid.
fNever touch electrical equipment that has fallen into water. Dis-
connect from the mains immediately.
fNever use electrical equipment in the bath or under the shower.
fAlways position or store electrical equipment where it cannot fall
into water (e.g. washbasin). Prevent electrical equipment from
coming into contact with water and other liquids.
fOnly use and store the appliance in dry rooms.

ENGLISH
de
en
fr
it
es
pt
nl
sv
no
fi
tr
pl
cs
sk
hu
sl
ro
bg
ru
uk
el
ar
10
fAs additional safety measure, it is recommended that a tested
residual current appliance (RCD) with a residual operating cur-
rent of not more than 30 mA be installed in the bathroom circuit.
Danger of explosion!
fNever use the appliance where aerosol (spray) products are
being used or where oxygen is released.
fDo not attempt to replace the battery.
fDo not expose the appliance to temperatures below 0°C and
above +40°C for any length of time. Avoid direct exposure to
sunlight.
Warning! Injuries due to incorrect handling.
fTo prevent injury, never use the appliance if the blade set is
damaged.
fAlways switch the appliance off before storage, as the appliance
can fall down due to the vibrations.
Handle with care! Damage due to incorrect power supply.
fOnly operate the appliance with an alternating current and with
the voltage stated on the nameplate.
Handle with care! Injuries due to incorrect handling.
fOnly use accessories recommended by the manufacturer.
fOnly use the plug-in transformer that is included in the delivery
for charging the appliance. Only replace defective plug-in trans-
formers with original spare parts, which you can order via our
service centres.
fNever insert or allow objects to fall into the openings of the
appliance.
fWhen disconnecting the appliance from the mains, never pull on
the mains cable or on the appliance itself.
fDo not wind the mains cable around the appliance.
fKeep the mains cable and appliance away from hot surfaces.
fMake sure that the mains cable is not twisted or kinked when
charging or storing.
fDo not use disposable batteries. Batteries should only be
replaced at authorised service centres.

ENGLISH
de
en
fr
it
es
pt
nl
sv
no
fi
tr
pl
cs
sk
hu
sl
ro
bg
ru
uk
el
ar
11
General user information
Information about using the operation manual
fBefore using the appliance for the first time, you must read
and understand the operation manual completely.
fConsider the operation manual as part of the product and
store it in a safe and accessible place.
fInclude this operation manual if passing the appliance on
to a third party.
fIn case of conflicts with national safety specifications or
instructions, the national requirements must be followed.
Explanation of symbols and notes
DANGER
Danger of electric shock which may result in serious
physical injury or death.
DANGER
Danger of explosion which may result in serious
physical injury or death.
WARNING
Warning of possible physical injury or a health risk.
CAUTION
Information about danger of material damage.
Note with useful information and tips.
Action to be taken by owner.
Carry out these actions in the sequence described.
f
1.
Product description
Description of parts (Fig. 1)
A Blade set
B On/off switch
C Battery power indicator
D Charging stand
E Cutting-length adjustment
F Appliance socket
G Charging stand socket
H Attachment comb, cutting length 3 mm
I Attachment comb, cutting length 6 mm
J Attachment comb, cutting length 9 mm
K Attachment comb, cutting length 12 mm
L Attachment comb, cutting length 18 mm
M Attachment comb, cutting length 25 mm
N Plug-in transformer
O Appliance plug
P Cleaning brush
Q Oil for blade set
Technical data
Hand-held appliance
Drive unit: DC motor
Battery: Li-ION battery (LiFePO4)
Battery operating time: up to 90 minutes
Dimensions (LxWxH): 178 x 46 x 50 mm
Weight: approx. 290 g
Emission sound pressure level: max. 63 dB(A) @ 25 cm
Vibration: < 2.5 m/s
2
Charging stand
Dimensions
with accessories (LxWxH): 96 x 120 x 72 mm
Weight: approx. 91 g
Plug-in transformer
Type Adapter 6000
Power consumption: max. 12 W
Operating voltage: 100 – 240 V / 50 – 60 Hz
The appliance is safety insulated and radio screened. It meets
the requirements of EU Electromagnetic Compatibility Directive
2004/108/EC and Machinery Directive 2006/42/EC.

ENGLISH
de
en
fr
it
es
pt
nl
sv
no
fi
tr
pl
cs
sk
hu
sl
ro
bg
ru
uk
el
ar
12
Operation
Preparation
Keep the packaging material for safe storage or
transport later.
fCheck that the contents are complete.
fCheck all the parts for possible transport damage.
Safety
Handle with care! Damage due to incorrect power
supply.
fOnly operate the appliance with an alternating cur-
rent and with the voltage stated on the nameplate.
Charging the battery
1. Connect the appliance plug (M) on the plug-in transformer
to the charging stand socket (G) (Fig. 4
ⓐ
).
· The appliance can also be connected directly to
the plug-in transformer for charging (Fig. 2
ⓐ
/
ⓑ
).
· Battery overcharging is prevented thanks to intel-
ligent charge management.
2. Connect the plug-in transformer to the mains socket
(Fig. 4
ⓑ
).
3. Switch off the appliance using the on/off switch (Fig. 3
ⓑ
).
4. Place appliance on the charging stand (Fig. 4) or connect
directly to the plug-in transformer (Fig. 2
ⓐ
/
ⓑ
). A signal will
sound and the charging process begins.
· Depending on the charge status, the corres-
ponding segment of the battery power indicator
will flash during the charging process. Once the
battery is fully charged, all segments of the battery
power indicator will remain lit continuously.
· After the appliance has been removed from the
charging stand, the display goes out after approx.
30 seconds (power saving mode).
· It should take around 60 minutes for the appli-
ance to charge to full capacity.
5. Once the battery is fully charged, a signal will sound.
Battery operation
1. Switch on the appliance using the on/off switch and switch
off after use (Fig. 3
ⓐ
/
ⓑ
).
· After the appliance has been switched off, the
display goes out about 30 seconds later (power
saving mode).
· When the battery is fully charged, the appliance
can be used for up to 90 minutes without mains
connection.
· The charge status of the battery is displayed by
the battery power indicator (C).
· When the battery has fully run down, the appli-
ance switches itself off automatically.
· In case of insufficient maintenance of the
blade set, the operating time can be reduced
considerably.
Mains operation
1. Connect the appliance plug (M) on the plug-in transformer
to the appliance socket (F) (Fig. 2
ⓐ
).
2. Connect the plug-in transformer to the mains socket
(Fig. 2
ⓑ
).
3. Switch on the appliance using the on/off switch and switch
off after use (Fig. 3
ⓐ
/
ⓑ
).
Operation
Setting the cutting length
The cutting length can be adjusted to between 0.7mm and 3mm
(5 possible positions) using the cutting-length adjustment inte-
grated into the blade set (Fig. 5).
Cutting with the attachment comb
The appliance can also be operated with attachment combs.
fIn order to achieve the indicated cutting length, the cutting
length adjustment lever should be set to position 1 (Fig. 5).
The following attachment combs are included as
standard: 3 mm, 6 mm, 9 mm and 12 mm, 18 mm and
25 mm cutting lengths.
Attaching/removing the attachment comb
1. Slide the attachment comb on to the blade set in the direc-
tion of the arrow until it reaches the limit stop (Fig. 6
ⓐ
).
2. The attachment comb can be removed by pushing it in the
direction of the arrow (Fig. 6
ⓑ
).
Maintenance
Cleaning and care
Danger! Electric shock due to penetration of
liquid.
fSwitch the appliance off and disconnect from
the power supply, before you start with cleaning
and care.
fDo not immerse the appliance in water!
fDo not allow any liquid to get inside the appliance.
fOnly reconnect the appliance to the power supply
if it is completely dry.
Handle with care! Danger from aggressive
chemicals.
Aggressive chemicals could damage the appliance
and accessories.
fNever use solvents or scouring agents.
fOnly use cleaning agents and blade set oil recom-
mended by the manufacturer.
Hygienic spray and blade set oil are available from
your dealer or our service centre.
fRemove the attachment comb (Fig. 6
ⓑ
) after every use
and lift the blade set out of the housing (Fig. 7
ⓐ
). Use the
cleaning brush to remove any cut hairs from the housing
opening and from the blade set (Fig. 8). The cleaning lever
can also be pressed. This allows the cut hairs that accumu-
late between the bottom blade and the top blade to be eas-
ily removed using the cleaning brush (EASY CLEANING).
fOnly wipe the appliance with a soft, slightly damp cloth.

ENGLISH
de
en
fr
it
es
pt
nl
sv
no
fi
tr
pl
cs
sk
hu
sl
ro
bg
ru
uk
el
ar
13
fThe blade set using the hygienic spray.
fOil the blade set with the blade set oil (Fig. 9).
fFor a good and long-lasting cutting performance, it
is important to oil the blade set frequently
fIf the cutting performance deteriorates after long
use despite regular cleaning and oiling, the blade
set should be replaced.
Automatic sensor system
To give you advance notice of an urgent need for maintenance
care, your hair cutting appliance has been equipped with an
automatic sensor system.
· The sensor system automatically recognises when
the blade set needs oiling or cleaning. After the
appliance is switched off, an acoustic signal will
sound and the battery power indicator will flash
for 2 minutes.
· The acoustic signal and the flashing of the battery
power indicator can be cancelled (turned off) by
briefly switching the appliance on and off.
· Before using the appliance again, it is strongly
recommended to clean the appliance and oil the
blade set. See chapter Cleaning and care.
· Failure to observe these instructions may result
in damage to and early failure of the appliance,
which will void all guarantee claims.
Changing the blade set
Warning! Injuries and material damage due to
incorrect handling.
fSwitch the appliance off and disconnect from the
power supply before changing the blade set.
1. Switch the appliance off using the on/off switch (Fig. 3
ⓑ
)
and disconnect from the power supply.
2. Slide the blade set off the housing in the direction of the
arrow (Fig. 7
ⓐ
). Remove the blade set.
3. Replace the blade set by hooking it into the housing and
pressing it down until it clicks into position (Fig. 7
ⓑ
).
Problem elimination
Blade set is cutting badly or pulling hair out.
Cause: Blade set is dirty or worn out.
fClean and oil the blade set (Fig. 8/9); if this does not
resolve the problem, replace the blade set (Fig. 7).
Battery life is too short.
Carefully clean and oil the blade set (Fig. 8/9). A blade set that
is very dirty and has not been oiled can halve the available bat-
tery life! If the blade set is clean and oiled and the battery life
is still far too short, it is likely that the batteries are nearing the
end of their life.
Battery life generally decreases at a steady rate when
the appliance is used on a day-to-day basis. The bat-
teries used here are specially designed for professio-
nal and everyday use, but are also affected by this.
Skin injury
Cause: Too much contact pressure on the skin.
fReduce contact pressure when cutting close to skin.
Cause: Damaged blade set.
fCheck whether the blade edges were damaged during use
and replace the blade set if necessary.
Battery power indicator light does not light up.
Cause: Appliance has not been correctly placed on the charg-
ing stand.
fEnsure that the hand-held appliance has been correctly
placed on the charging stand.
Cause: Defective power supply.
fEnsure that the power supply unit is plugged into the mains
socket.
fCheck the mains cable for possible damage.
fCheck the power supply.
Entire battery power indicator is flashing
fCheck whether the blade set is blocked and the blade is
able to move. Switch the appliance on and off. If the entire
display is flashing, please contact your specialist retailer or
a WAHL service centre.
Disposal
Handle with care! Environmental damage in the
case of incorrect disposal.
fDischarge batteries prior to disposal!
fCorrect disposal will ensure environmental protec-
tion and prevent any potentially harmful impacts
on people and the environment.
Adhere to the relevant legal requirements when disposing of
the appliance.
Information on the disposal of electrical and electronic
appliances in the European Community:
Within the European Community, national regulations
are specified for the disposal of electrical appliances,
based on EU Waste Electrical and Electronic Equip-
ment Directive 2002/96/EC (WEEE). In accordance
with this, the appliance can no longer be disposed of
with the local or domestic waste.
The appliance will be accepted free of charge by local
collection points or recycling centres.

FRANÇAIS
de
en
fr
it
es
pt
nl
sv
no
fi
tr
pl
cs
sk
hu
sl
ro
bg
ru
uk
el
ar
14
Consignes de sécurité générales
Utilisation conforme
· Utilisez les tondeuses à cheveux et poils exclusivement pour la coupe
de cheveux, de poils de barbe et de sourcils humains.
· Utilisez les tondeuses pour animaux exclusivement pour couper les
poils et les pelages d’animaux.
Exigences envers l’utilisateur
· Avant la première mise en service, lisez intégralement le mode d’em-
ploi et familiarisez-vous avec l’appareil.
· Cet appareil n’est pas prévu pour une utilisation par des personnes
(enfants compris) dont les capacités physiques, sensorielles ou
mentales sont amoindries ou manquant d’expériences et de connais-
sances, sauf si elles sont surveillées ou ont reçu des instructions sur
l’utilisation de l’appareil de la part d’une personne responsable de leur
sécurité. Les enfants doivent être gardés sous surveillance pour éviter
qu’ils ne jouent avec l’appareil.
· Rangez l’appareil hors de portée des animaux et protégé contre les
intempéries.
Risques
Tenez compte des consignes de sécurité suivantes !
Danger ! Électrisation due à des détériorations de l’appareil /
du bloc d’alimentation à fiches.
fN’utilisez pas l’appareil s’il ne fonctionne pas correctement, s’il
est endommagé ou s’il est tombé dans l’eau. Faites effectuer
les réparations exclusivement par un SAV autorisé et avec des
pièces détachées d’origine, afin de prévenir les risques.
fN’utilisez jamais l’appareil si le câble ou le bloc d’alimentation à
fiches sont endommagés. Afin de prévenir tous risques, le câble
électrique ou le bloc d’alimentation à fiches endommagé ne doit
être remplacé que par un centre de service agréé ou une per-
sonne qualifiée similaire, et uniquement par une pièce détachée
d’origine.
fLes appareils électriques ne doivent être réparés que par des
spécialistes ayant une formation en électrotechnique.
Danger ! Électrisation liée à la pénétration de liquides.
fNe touchez en aucun cas un appareil électrique tombé dans
l’eau. Débranchez immédiatement la prise secteur.

FRANÇAIS
de
en
fr
it
es
pt
nl
sv
no
fi
tr
pl
cs
sk
hu
sl
ro
bg
ru
uk
el
ar
15
fN’utilisez jamais un appareil électrique dans la baignoire ou
sous la douche.
fRangez ou stockez toujours les appareils électriques de sorte
à ce qu’ils ne puissent pas tomber dans l’eau (par ex. lavabo).
Évitez tout contact d’un appareil électrique avec de l’eau ou tout
autre liquide.
fUtilisez et rangez l’appareil uniquement dans des endroits secs.
fLa mise en place d’un dispositif de protection contrôlé à courant
différentiel résiduel (RCD) ayant un courant de déclenchement
n’excédant pas 30 mA est recommandée à titre de mesure de
sécurité supplémentaire dans le circuit électrique de la salle de
bain.
Risques d’explosion !
fN’utilisez jamais l’appareil dans un environnement dans lequel
des aérosols sont utilisés ou dans lequel de l’oxygène est libéré.
fN’essayez pas de changer la batterie vous-même.
fN’exposez pas l’appareil pendant une durée prolongée à des
températures inférieures à 0 °C ou supérieures à +40 °C. Évitez
l’exposition aux rayons directs du soleil.
Avertissement ! Blessures liées à une utilisation
non-conforme.
fPour votre sécurité, n’utilisez jamais l’appareil avec une tête de
coupe endommagée.
fÉteignez toujours l’appareil avant de le poser, puisque les vibra-
tions émises par l’appareil pourraient provoquer sa chute.
Attention ! Dommages liés à une tension d’alimentation
erronée.
fUtilisez l’appareil exclusivement sur du courant alternatif avec la
tension indiquée sur la plaque signalétique.
Attention ! Dommages liés à une utilisation non-conforme.
fUtilisez exclusivement les accessoires recommandés par le
fabricant.
fPour charger l’appareil, utilisez exclusivement le bloc d’alimen-
tation à fiches fourni. Ne remplacez les blocs d’alimentation à
fiches défectueux que par des pièces détachées d’origine que
vous pourrez obtenir auprès de notre service après-vente.
fN’introduisez jamais et ne laissez jamais tomber des objets dans
les ouvertures de l’appareil.

FRANÇAIS
de
en
fr
it
es
pt
nl
sv
no
fi
tr
pl
cs
sk
hu
sl
ro
bg
ru
uk
el
ar
16
Conseils d’utilisation généraux
Informations concernant l’utilisation du mode d’emploi
fAvant la première mise en service de l’appareil, vous devez
avoir lu et compris intégralement le mode d’emploi.
fVous devez considérer le mode d’emploi comme partie
intégrante du produit et le conserver soigneusement et à un
endroit facilement accessible.
fJoignez ce mode d’emploi à l’appareil lorsque vous le
remettez à des tiers.
fEn cas de conflits avec les dispositions et consignes de
sécurité nationales, celles-ci sont prioritaires et doivent être
respectées.
Explication des symboles et consignes
DANGER
Danger par électrisation pouvant entraîner des bles-
sures graves ou la mort.
DANGER
Danger par explosion pouvant entraîner des blessures
graves ou la mort.
AVERTISSEMENT
Avertissement contre des blessures éventuelles ou un
risque pour la santé.
ATTENTION
Indication de risques de dommages matériels.
Indication avec des informations utiles et des astuces.
Vous êtes invité(e) à une action.
Exécutez ces actions dans l’ordre décrit.
f
1.
Description du produit
Désignation des éléments (Fig. 1)
A Tête de coupe
B Interrupteur marche/arrêt
C Indicateur de charge
D Socle de recharge
E Réglage de la longueur de coupe
F Prise de l’appareil
G Prise du socle de recharge
H Contre-peigne, longueur de coupe 3 mm
I Contre-peigne, longueur de coupe 6 mm
J Contre-peigne, longueur de coupe 9 mm
K Contre-peigne, longueur de coupe 12 mm
L Contre-peigne, longueur de coupe 18 mm
M Contre-peigne, longueur de coupe 25 mm
N Bloc d’alimentation à fiches
O Prise
P Brosse de nettoyage
Q Huile pour la tête de coupe
Caractéristiques techniques
Appareil portatif
Moteur : moteur CC
Batterie : Batterie Li-ION (LiFePO4)
Durée de fonctionnement
sur batterie : jusqu’à 90 min
Dimensions (Lxlxh) : 178 x 46 x 50 mm
Poids : env. 290 g
Niveau de pression
acoustique des émissions : max. 63 dB(A) à 25 cm
Vibrations : < 2,5 m/s
2
Socle de recharge
Dimensions
avec accessoires (Lxlxh) : 96 x 120 x 72 mm
Poids : env. 91 g
Bloc d’alimentation à fiches
Modèle : adaptateur 6000
Puissance absorbée : max. 12 W
Tension d’utilisation : 100 – 240 V / 50 – 60 Hz
L’appareil est équipé d’une double isolation et d’un antiparasi-
tage. Il satisfait les exigences de la directive UE Compatibilité
Électromagnétique 2004/108/CE et la directive relative aux
machines 2006/42/CE.
fLorsque vous débranchez l’appareil, ne tirez jamais sur le câble
électrique ou l’appareil.
fN’enroulez jamais le câble électrique autour de l’appareil.
fTenez l’appareil et le câble électrique éloignés des surfaces
chaudes.
fNe chargez pas et ne stockez pas l’appareil avec un câble vrillé
ou pincé.
fN’utilisez pas de batteries non rechargeables. Faites remplacer
vos batteries uniquement par votre SAV.

FRANÇAIS
de
en
fr
it
es
pt
nl
sv
no
fi
tr
pl
cs
sk
hu
sl
ro
bg
ru
uk
el
ar
17
Fonctionnement
Préparation :
Conservez les matériels d’emballage pour un range-
ment ou transport sûr ultérieur.
fContrôlez l’intégralité de la livraison.
fContrôlez toutes les pièces quant à des dommages de
transport.
Sécurité
Attention ! Dommages liés à une tension d’alimen-
tation erronée.
fUtilisez l’appareil exclusivement sur du courant
alternatif avec la tension indiquée sur la plaque
signalétique.
Charger la batterie
1. Mettez la prise (M) du bloc d’alimentation à fiches dans la
prise du socle de recharge (G) (Fig. 4
ⓐ
).
· L’appareil peut également être directement
branché au bloc d’alimentation à fiches pour être
rechargé (Fig. 2
ⓐ
/
ⓑ
).
· Les surcharges de la batterie sont empêchées par
un système de gestion de charge intelligent.
2. Branchez le bloc d’alimentation à fiches dans la prise sec-
teur (Fig. 4
ⓑ
).
3. Éteignez l’appareil en utilisant l’interrupteur marche / arrêt
(Fig. 3
ⓑ
).
4. Posez l’appareil dans le chargeur (Fig. 4) ou branchez-le
directement au moyen du bloc d’alimentation à fiches
(Fig. 2
ⓐ
/
ⓑ
). Un signal sonore est émis - la charge
commence.
· Pendant la charge, le segment respectif du
témoin de capacité clignote en fonction de l’état
de charge. Lorsque la batterie est entièrement
chargée, tous les segments du témoin de capacité
sont allumés.
· Lorsque l’appareil est retiré du socle de recharge,
l’indicateur s’éteint après environ 30 secondes.
(Mode économie de courant).
· Le temps de charge est d’environ 60 minutes
pour atteindre la capacité maximale.
5. Lorsque la batterie est complètement chargée, un signal
sonore est émis.
Fonctionnement sur batterie
1. Mettez l’appareil en marche avec l’interrupteur marche/arrêt
et éteignez-le après utilisation (Fig. 3
ⓐ
/
ⓑ
).
· Lorsque l’appareil est mis hors tension, l’indica-
teur s’éteint après environ 30 secondes (mode
d’économie d’énergie).
· Lorsque la batterie est complètement chargée,
l’appareil peut être utilisé jusqu’à 90 minutes
sans devoir le brancher au secteur.
· L’état de charge de la batterie est affiché sur le
témoin de capacité (C).
· Lorsque la batterie est complètement déchargée,
l’appareil s’éteint automatiquement.
· La durée d’utilisation peut considérablement
diminuer en cas d’entretien insuffisant de la tête
de coupe.
Fonctionnement sur secteur
1. Mettez la prise (M) du bloc d’alimentation à fiches dans la
prise de l’appareil (F) (Fig. 2
ⓐ
).
2. Branchez le bloc d’alimentation à fiches dans la prise sec-
teur (Fig. 2
ⓑ
).
3. Mettez l’appareil en marche avec l’interrupteur marche/arrêt
et éteignez-le après utilisation (Fig. 3
ⓐ
/
ⓑ
).
Utilisation
Réglage de la longueur de coupe
Le réglage de longueur de coupe intégré à la tête de coupe
permet de régler la longueur de coupe selon 5 positions de 0,7
mm à 3 mm (Fig. 5).
Couper avec les contre-peignes
L’appareil peut également être utilisé avec des contre-peignes.
fPour atteindre la longueur de coupe indiquée, commutez le
réglage de longueur de coupe sur la position 1 (Fig. 5).
Les contre-peignes suivants sont fournis avec l’appa-
reil : longueur de coupe 3 mm, 6 mm, 9 mm, 12 mm,
18 mm et 25 mm.
Mettre en place/enlever le contre-peigne
1. Glissez le contre-peigne sur la tête de coupe dans le sens
de la flèche, jusqu’à la butée (Fig. 6
ⓐ
).
2. Le contre-peigne peut être retiré en tirant dans le sens de la
flèche (Fig. 6
ⓑ
).
Entretien
Nettoyage et entretien
Danger ! Électrisation liée à la pénétration de
liquides.
fÉteignez l’appareil et débranchez-le de l’alimen-
tation électrique avant de procéder au nettoyage
et à l’entretien.
fNe plongez pas l’appareil dans l’eau.
fNe laissez pas de liquides pénétrer à l’intérieur
de l’appareil.
fNe rebranchez l’appareil à l’alimentation électrique
que lorsqu’il est parfaitement sec.
Attention ! Dommages liés à des produits
chimiques agressifs.
Les produits chimiques agressifs peuvent endomma-
ger l’appareil et les accessoires.
fN’utilisez pas de solvants et d’abrasifs.
fUtilisez exclusivement le détergent et l’huile pour
tête de coupe recommandés par le fabricant.
Vous pouvez vous procurer le spray hygiénique ainsi
que l’huile pour tête de coupe auprès de votre reven-
deur ou de notre SAV.

FRANÇAIS
de
en
fr
it
es
pt
nl
sv
no
fi
tr
pl
cs
sk
hu
sl
ro
bg
ru
uk
el
ar
18
fAprès chaque utilisation, retirez le contre-peigne (Fig. 6
ⓑ
)
et rabattez la tête de coupe en l’écartant du boîtier
(Fig. 7
ⓐ
). À l’aide de la brosse de nettoyage, retirez le
reste des cheveux dans l’ouverture du boîtier et dans la
tête de coupe (Fig. 8). Appuyez de plus sur le levier de net-
toyage. Les restes de cheveux entre le peigne de la tête de
coupe et la lame peuvent ainsi facilement être enlevés avec
la brosse de nettoyage (EASY CLEANING).
fEssuyez l’appareil uniquement avec un chiffon doux, éven-
tuellement légèrement humide.
fNettoyez la tête de coupe avec le spray hygiénique.
fLubrifiez la tête de coupe avec l’huile pour tête de coupe
(Fig. 9).
fPour une capacité de coupe performante et
durable, il est important d’huiler souvent la tête
de coupe.
fSi après une longue durée d’utilisation et malgré
un nettoyage et une lubrification tous deux régu-
liers, la capacité de coupe diminue, il convient de
changer la tête de coupe.
Système de détection automatique
Votre tondeuse à cheveux a été équipée d’un système de
détection automatique afin d’identifier le plus tôt possible un
besoin urgent d’entretien.
· Le système de détection constate automatique-
ment si la tête de coupe a été insuffisamment
lubrifiée ou est fortement encrassée. Après avoir
éteint l’appareil, un signal sonore retentit et
l’ensemble de témoin de charge clignote pendant
2 minutes.
· Le signal sonore et le témoin de charge clignotant
peuvent être interrompus en allumant à nouveau
puis éteignant rapidement l’appareil.
· Il est vivement recommandé de nettoyer
l’appareil et de lubrifier la tête de coupe avant
de le réutiliser, voir le chapitre Nettoyage et
entretien.
· En cas de non-respect, l’appareil peut
s’endommager et tomber en panne prématuré-
ment. Cela annule tout droit de garantie.
Changement de tête de coupe
Avertissement ! Blessures et dommages matériels
liés à une utilisation non-conforme.
fÉteignez l’appareil et débranchez-le de l’alimenta-
tion électrique avant de remplacer la tête de coupe.
1. Éteignez l’appareil en utilisant l’interrupteur marche / arrêt
(Fig. 3
ⓑ
) et débranchez-le de l’alimentation électrique.
2. Appuyez sur la tête de coupe en partant du boîtier dans le
sens des flèches (Fig. 7
ⓐ
). Retirez la tête de coupe.
3. Pour remettre la tête de coupe en place, mettez le crochet
dans le logement du boîtier et poussez jusqu’à ce qu’elle
s’emboîte (Fig. 7
ⓑ
).
Élimination des problèmes
La tête de coupe ne coupe pas correctement ou arrache
les cheveux.
Cause : La tête de coupe est encrassée ou usée.
fNettoyez et huilez la tête de coupe (Fig. 8/9) ; si le pro-
blème persiste, remplacez la tête de coupe (Fig. 7).
L’autonomie de la batterie est trop courte.
Nettoyez et huilez consciencieusement la tête de coupe
(Fig. 8/9). Une tête de coupe encrassée et non huilée peut
diviser par deux l’autonomie disponible ! Si l’autonomie est
toujours insuffisante, les batteries arrivent probablement à leur
fin de vie.
De manière générale, l’autonomie de l’appareil dimi-
nue constamment avec l’utilisation quotidienne. Les
batteries utilisées sont dimensionnées spécialement
pour l’utilisation professionnelle et quotidienne, mais
elles sont également soumises à cet effet.
Blessures de la peau
Cause : Pression trop importante sur la peau.
fDiminuez la pression lorsque vous coupez près de la peau.
Cause : Tête de coupe endommagée.
fVérifiez si les bouts des dents ont été endommagés à l’utili-
sation et remplacez la tête de coupe le cas échéant.
Le témoin de charge ne s’allume pas.
Cause : L’appareil n’est positionné correctement dans le socle
de recharge
fAssurez-vous que l’appareil portatif soit correctement posi-
tionné dans le socle de recharge.
Cause : Alimentation électrique défectueuse.
fAssurez-vous que le bloc d’alimentation soit correctement
relié à la prise.
fVérifiez le câble électrique quant à d’éventuelles
détériorations.
fVérifiez l’alimentation électrique.
Le témoin de charge complet clignote
fContrôlez si la tête de coupe n’est pas bloquée et la lame
peut être déplacée. Éteignez et allumez l’appareil. Si le
témoin de charge complet clignote de nouveau, veuillez
vous adresser à votre revendeur spécialisé ou à un centre
de service WAHL.
Élimination
Attention ! Dommages environnementaux en cas
de mise au rebut erronée.
fDéchargez les batteries avant de les jeter !
fLe traitement conforme des déchets protège
l’environnement et empêche les impacts possibles
sur l’homme et l’environnement.
Lors de la mise au rebut de l’appareil, respectez les réglemen-
tations légales en vigueur.
Informations concernant la mise au rebut d’appareils élec-
triques et électroniques dans la Communauté Européenne :
Au sein de la Communauté Européenne, des rég-
lementations nationales reposant sur la directive
UE 2002/96/CE relative aux appareils électroniques
(WEEE) définissent la mise au rebut des appareils
électriques. Selon celle-ci, l’appareil ne doit plus être
jeté dans les ordures communales ou ménagères.
L’appareil peut être remis gratuitement aux centres de
collecte communaux ou aux entreprises de traitement
de déchets.

ITALIANO
19
de
en
fr
it
es
pt
nl
sv
no
fi
tr
pl
cs
sk
hu
sl
ro
bg
ru
uk
el
ar
Avvertenze generali sulla sicurezza
Uso conforme alle norme
· Utilizzare i tagliacapelli esclusivamente per tagliare i capelli, i peli della
barba e le sopracciglia.
· Utilizzare le tosatrici per animali unicamente per tagliare il pelo di
animali.
Requisiti dell’utente
· Prima della prima messa in funzione, leggere per intero le istruzioni
per l’uso e familiarizzarsi con l’apparecchio.
· Questo apparecchio non è destinato all’impiego da parte di persone
(ivi inclusi anche i bambini) con ridotte capacità fisiche, sensoriali
o psichiche o, ancora, che non abbiano esperienza o competenza
nell’uso del medesimo, a meno che non vengano sorvegliati o rice-
vano istruzioni sull’uso dell’apparecchio da una persona che è respon-
sabile della loro sicurezza. Sorvegliare i bambini onde accertare che
non utilizzino l’apparecchio come un giocattolo.
· Conservare l’apparecchio lontano dalla portata di animali e protetto
dagli agenti atmosferici.
Pericoli
Osservare le seguenti istruzioni di sicurezza!
Pericolo! Folgorazione causata da danni all’apparecchio/ali-
mentatore switching da rete.
fMai utilizzare l’apparecchio se non funziona correttamente, se è
danneggiato o se è caduto nell’acqua. Per evitare pericoli, fare
eseguire le riparazioni esclusivamente in un centro di assistenza
autorizzato utilizzando parti di ricambio originali.
fMai utilizzare l’apparecchio con un cavo elettrico o con un ali-
mentatore switching da rete danneggiati. Per evitare pericoli, un
cavo elettrico o un
alimentatore switching da rete
danneggiato
devono essere sostituiti con un ricambio originale solo da un
centro di assistenza autorizzato o da una persona con una qua-
lifica equivalente.
fGli apparecchi elettrici devono essere riparati esclusivamente da
personale specializzato con formazione elettrotecnica.
Pericolo! Folgorazione causata dall’infiltrazione di liquido.
fNon toccare in nessun caso un apparecchio elettrico caduto in
acqua. Staccare subito la spina dalla rete.

ITALIANO
20
de
en
fr
it
es
pt
nl
sv
no
fi
tr
pl
cs
sk
hu
sl
ro
bg
ru
uk
el
ar
fNon usare mai gli apparecchi elettrici nella vasca da bagno o
sotto la doccia.
fRiporre e custodire gli apparecchi elettrici sempre in modo che
non possano cadere in acqua (ad es. nel lavandino). Evitare che
gli apparecchi elettrici vengano a contatto con l’acqua o con altri
liquidi.
fUsare e conservare l’apparecchio solo in ambienti asciutti.
fCome ulteriore misura di sicurezza si raccomanda l’installazione,
nell’impianto elettrico del bagno, di un circuito di sicurezza per
correnti di guasto (RCD) testato, con una corrente di intervento
non superiore a 30 mA.
Pericolo di esplosione!
fNon utilizzare mai l’apparecchio in ambienti in cui si fa uso di
prodotti aerosol (spray) o nei quali si liberi ossigeno.
fNon tentare di sostituire la batteria personalmente.
fNon esporre l’apparecchio per un tempo prolungato a tempe-
rature inferiori ai 0° o superiori ai +40°C. Evitare l’irradiazione
solare diretta.
Avvertenza! Lesioni causate da un uso improprio.
fPer evitare lesioni, mai utilizzare l’apparecchio con testina
danneggiata!
fSpegnere sempre l’apparecchio prima di riporlo, poiché l’appa-
recchio può cadere a causa delle vibrazioni.
Cautela! Danni causati da un’alimentazione di tensione errata.
fUsare l’apparecchio esclusivamente con corrente alternata e
con la tensione indicata sulla targhetta.
Cautela! Danni causati da un uso improprio.
fUtilizzare esclusivamente gli accessori consigliati dal produttore.
fPer caricare l’apparecchio utilizzare solo l’alimentatore switching
da rete compreso nella dotazione. Sostituire gli alimentatori
switching da rete difettosi solo con ricambi originali, acquistabili
presso il nostro centro di assistenza.
fMai infilare o far cadere oggetti nelle aperture dell’apparecchio.
fNon scollegare mai l’apparecchio tirando il cavo elettrico o l’ap-
parecchio stesso.
fNon avvolgere il cavo elettrico attorno all’apparecchio.
fTenere il cavo elettrico e l’apparecchio lontano da superfici
calde.
Table of contents
Languages:
Other Moser Hair Clipper manuals