Motobility Solax Mobie Plus User manual

Solax Mobie Plus User Manual
Proudly brought
to you by

1
Warning: Failure to heed the warnings in this manual can cause personal injury.
Notification: Failure to follow the instructions from this manual will damage your Transformers.
Dear Customer
Congratulations on your purchase and thank you for choosing the Solax Mobie Plus!
Please read this manual carefully before operating your mobility scooter. By doing so you can ensure that you are familiar
with all the components of your new scooter and are able to use it safely in a range of different situations. If you still have
questions after reading this manual, please contact your retailer for further information.
This Manual will cover the below points relating to you Solax Mobie Plus
Main structural characteristics
Main components
Function of each part
Safety requirements and instructions
Battery instructions
Matters that need extra attention
Scooter maintenance.
Finally, we hope that your new Solax Mobie Plus will help you enjoy a more comfortable, convenient, and wonderful life.
All the information and pictures contained in this manual are subject to the factory's products and are to be used only for
customer reference. The product will continue to be improved and modified without prior notice.

2
Table of Content
Table of content.......................................................................................................................................................................................... 2
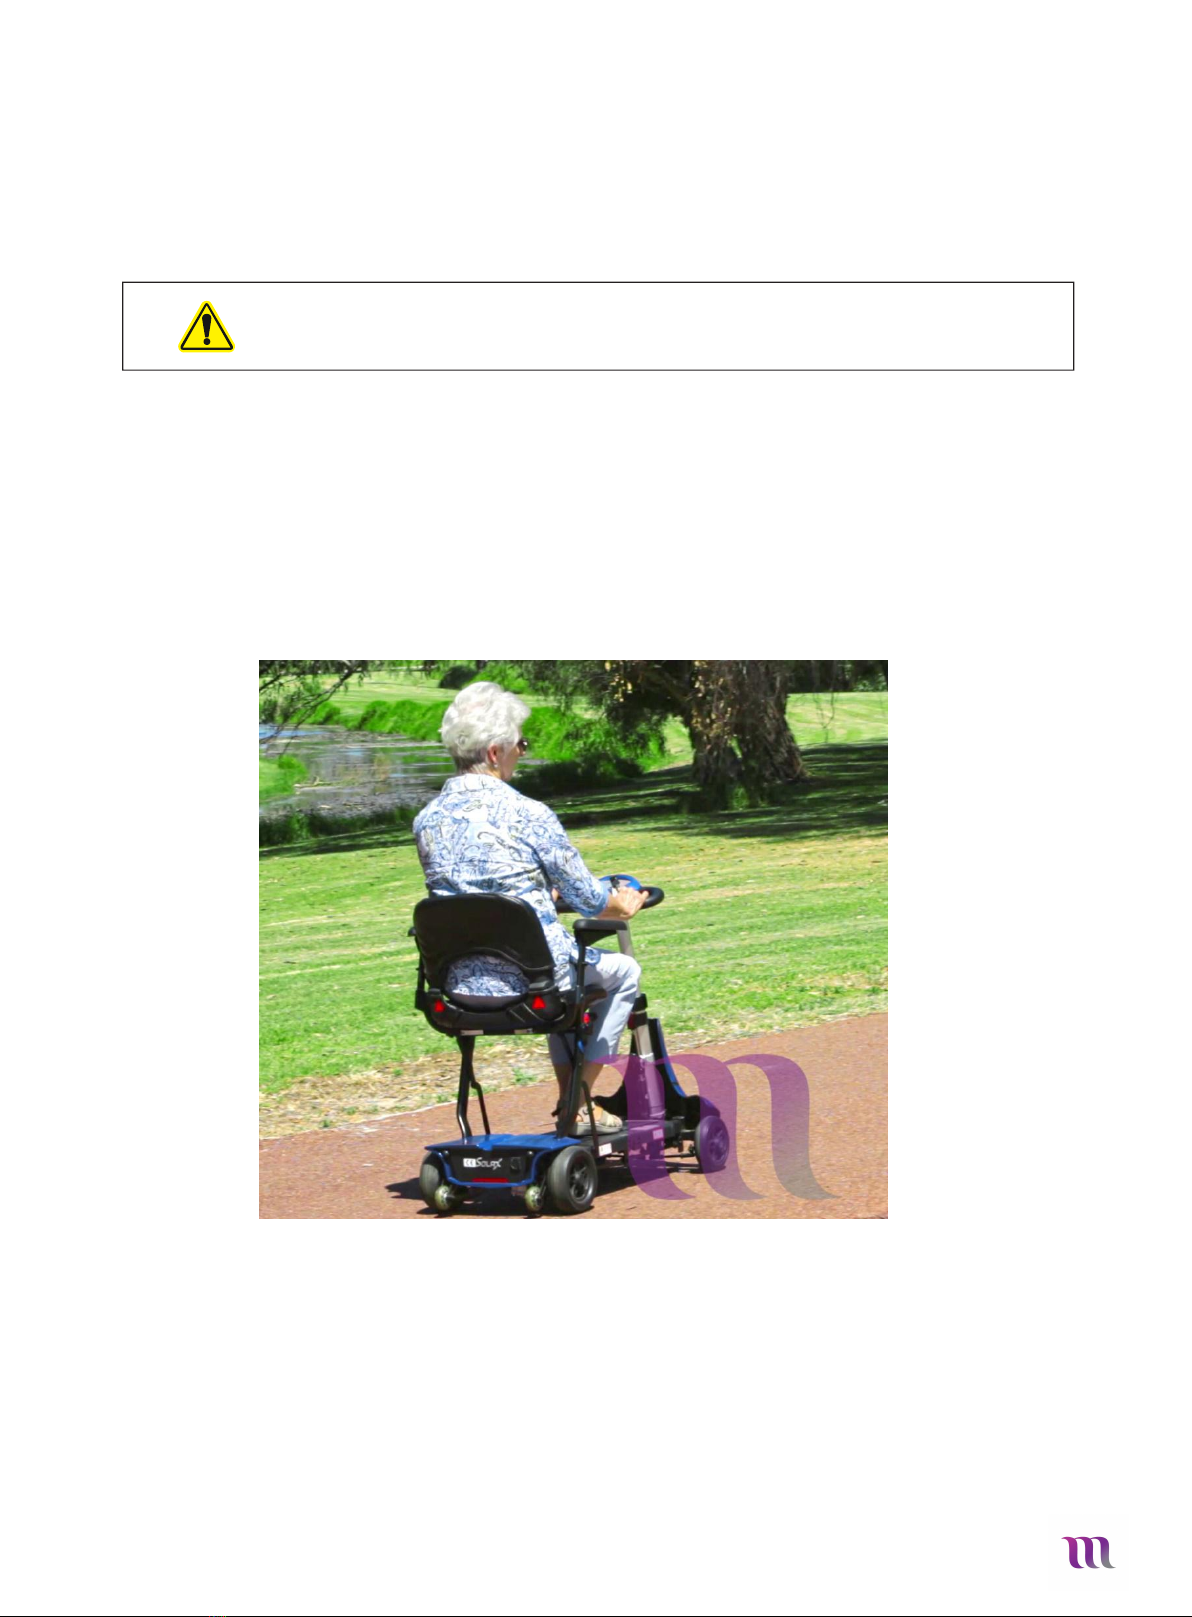
1. Features............................................................................................................................................................................................ 3
1.1 Main characteristics.......................................................................................................................................................................... 4
2. Product specifications and relevant parameters..............................................................................................................................5
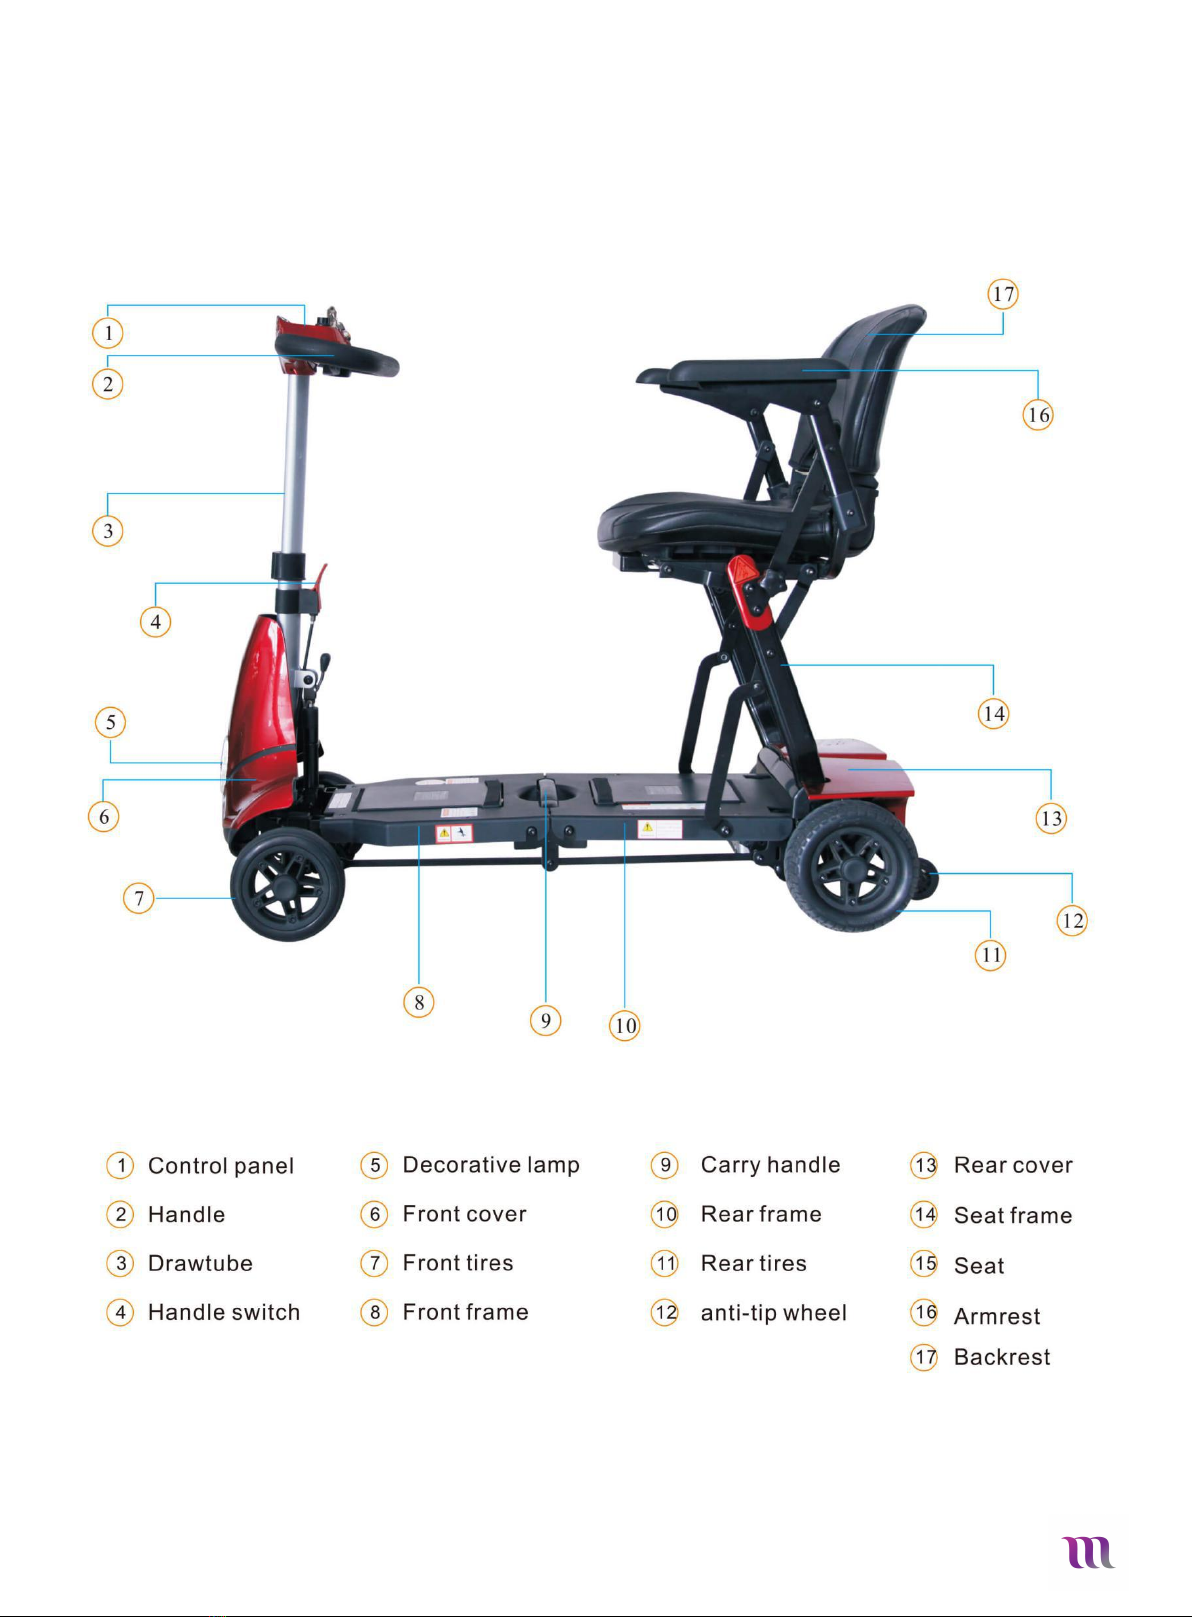
3. Main parts and relevant function......................................................................................................................................................6
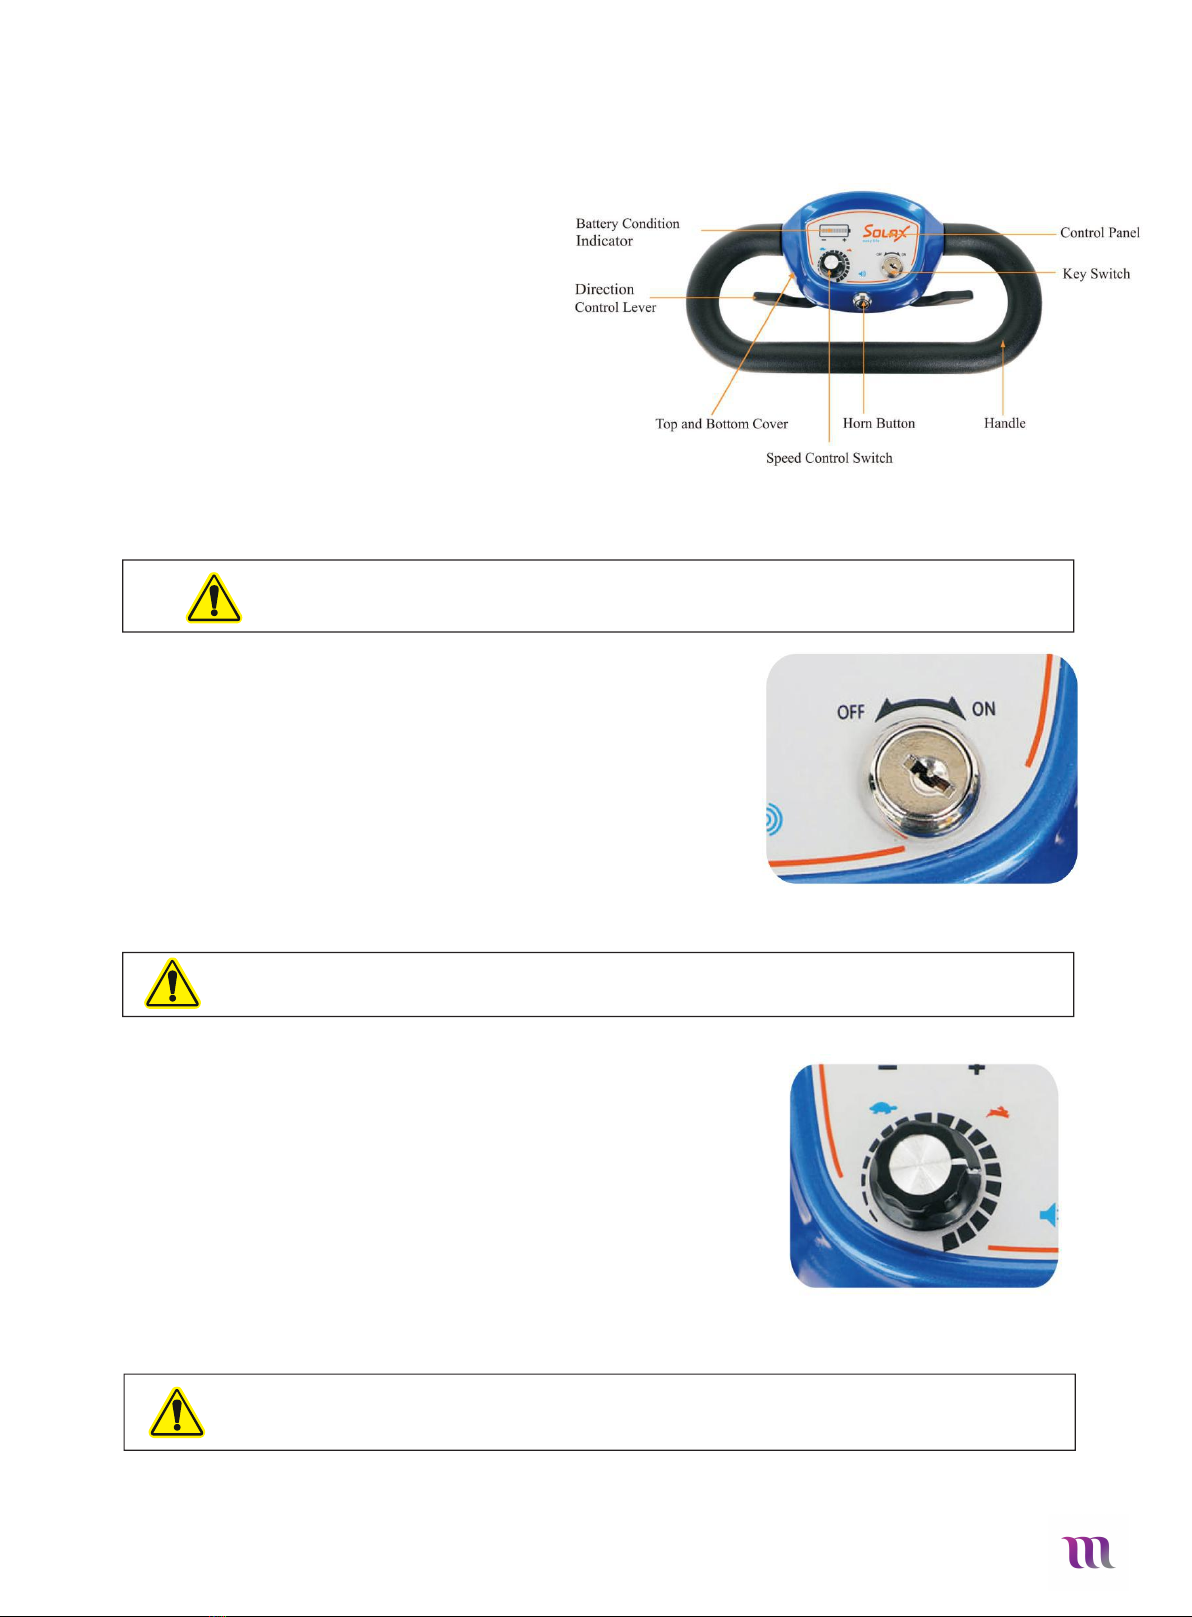
3.1 Control panel/dash ...........................................................................................................................................................................6
3.2 Key ignition .......................................................................................................................................................................................6
3.3 Speed adjustment dial ......................................................................................................................................................................6
3.4 Power indicator.................................................................................................................................................................................7
3.5 Direction control lever...................................................................................................................................................................... 7
3.6 Horn button ......................................................................................................................................................................................7
3.7 Telescopic tiller................................................................................................................................................................................. 7
3.8 Controller.......................................................................................................................................................................................... 7
3.9 Brake................................................................................................................................................................................................. 8
3.10 Freewheel lever...............................................................................................................................................................................8
3.11 Motor/transmission component.................................................................................................................................................... 8
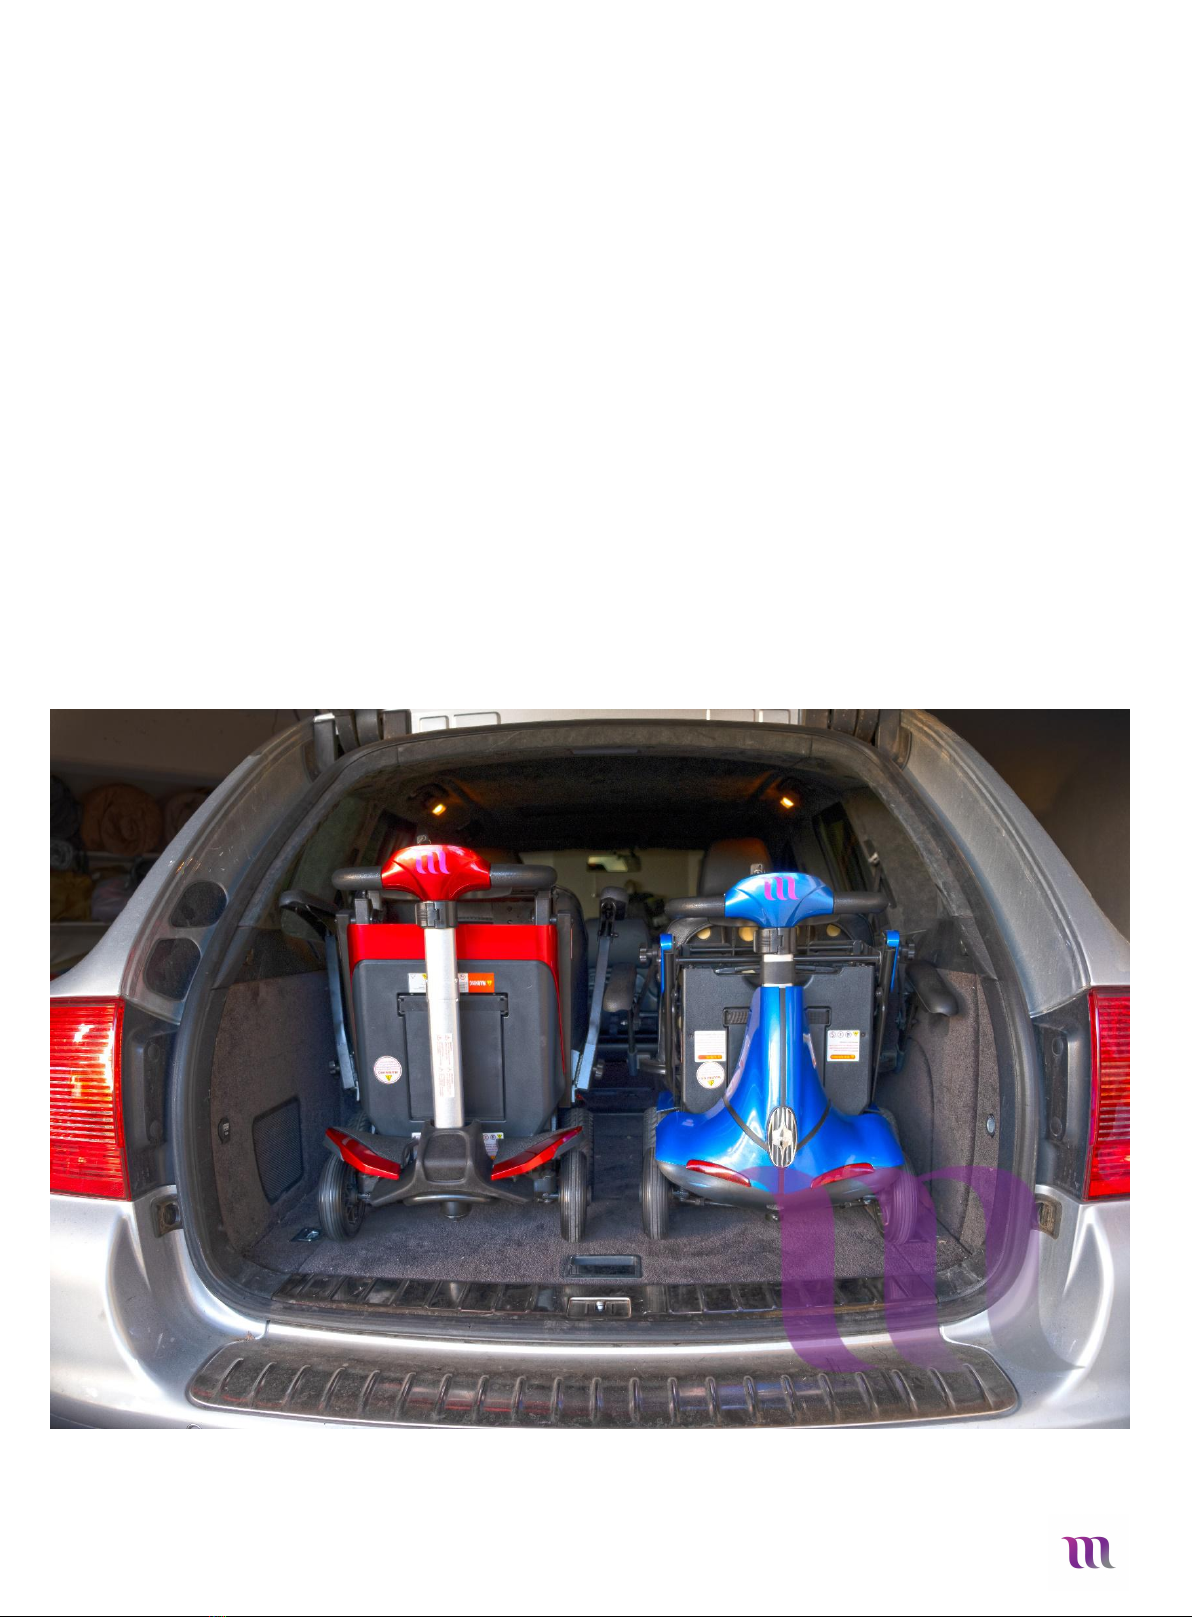
4. Manual Folding & Unfolding....................................................................................................................................................9
4.1 Manual folding.................................................................................................................................................................................. 9
4.2 Manual unfolding.............................................................................................................................................................................. 9
5. Safety Requirements........................................................................................................................................................................ 10
5.1 Driving surface and tips...................................................................................................................................................................10
5.2 Safety precautions.......................................................................................................................................................................... 10
6. Battery and Battery Charging.......................................................................................................................................................... 11
6.1 Battery charging guide.................................................................................................................................................................... 11
6.2 Guide to a safe and long-lasting battery.........................................................................................................................................12
6.2.1 How does the charger work?....................................................................................................................................................... 12
6.2.2 How does the indicator light (LED) in charger display................................................................................................................. 12
6.2.3 Can I use other chargers with my Solax scooter?........................................................................................................................ 12
6.2.4 How often should charge the battery?........................................................................................................................................ 12
6.2.5 How to achieve optimum operating distance?............................................................................................................................ 12
6.2.6 Why does the power of my new battery seem weak?................................................................................................................ 12
6.2.7 How to ensure the battery life?................................................................................................................................................... 13
7. Enc Information............................................................................................................................................................................... 13
7.1 Guide and manufacturer declaration – electromagnetic emission................................................................................................ 13
7.2 Guidance and manufacturer's declaration - electromagnetic immunity....................................................................................... 14
7.3 Guidance and manufacturer's declaration - electromagnetic immunity....................................................................................... 15
7.4 portable and mobile RF communications equipment and the 4-Wheel Folding Scooter..............................................................16
8. Basic Troubleshooting..................................................................................................................................................................... 17
8.1 Scooter not turning on.................................................................................................................................................................. 17
8.2 Scooter “cut outs” when you are driving it...................................................................................................................................17
8.3 Speed suddenly slows down when driving................................................................................................................................... 17
8.4 Remote doesn’t work / Pairing of new remote............................................................................................................................ 17
9. Maintenance.....................................................................................................................................................................................17

3
1. Features
Please refer to the diagram below to identify the different components of your scooter. Familiarise yourself with the
terminology to better understand part references throughout the Owner’s Manual.
Product images in the manual may vary slightly from the product received.

4
1.1 Main characteristics
The Solax Mobie Plus, is packed with innovative modern design features. It is safe, comfortable, easy to operate,
convenient to be folded and carried, lightweight and steady.
1. The frame is made of a lightweight aluminum alloy
2. It can be folded in one easy step
3. The padded backrest will provide a comfortable seated position. The backrest can be folded down for easier transport.
4. Once folded the Solax Mobie Plus can be transported easily and conveniently either in the boot of your car, by train,
plain or ship.
5. The easy-remove battery design allows you to simply pull the battery out of the scooter, without having to worry about
any cables or wires. Its safe Lithium design makes it perfect for air travel
6. Unlike other Solax Travel Scooters, the Mobie Plus has two compartments in it’s base, allowing you to carry a spare
battery with you during your travel. Please note that the scooter only comes with one (1) battery. A second, spare battery
can be purchased separately if desired.
7. The flip-up armrests are padded and can easily be flipped up out of the way for easier transfer
8. The tiller is adjustable in height and angle, while the delta handle design allows for multiple different grips and easy
one-handed or two-handed operation.
In conclusion, The Solax Mobie Plus is a unique scooter, that suits a large range of different users and will provide the user
with the ability to access many places and enjoy more freedom in everyday life.

5
2 Product Specifications and Relevant Parameters
Model
Solax Mobie Plus (S3031)
Maximum Product Size
930mm (L) x 450mm (W) x 865mm (H)
Product Minimum Size
450mm (L) x 450mm (W) x 570mm (H)
Seat Above Ground
560mm
Seat Width
430mm
Product weight (excluding battery)
26.6kg
Maximum Weight Capacity
125kg
Travel Distance
15km
Fastest Speed
6km/h
Turning Radius
≤1.35m
Maximum Climbing Angle
0º-12º
Drive Type
Rear Wheel Drive
Obstacle Crossing Ability
38mm
Controller
PG S-Drive 45A
Battery Specifications
Power Lithium Battery, 24V10AH
Battery Watt Hours
240Wh
Charger Planning
24V 2A (output:29.4V 2A)

6
Notice: Do not put the control panel in the humid area. If the control panel has been affected by
moisture before using, please ensure it is dry when you operate it.
Warning: If turn off the battery during operating. The electromagnetic brake will be locked and your
scooter will stop suddenly.
3 Main Parts and Relevant Function
3.1 Control Panel/Dash -Fig.01
The Dash is the “control-center” of your Solax Mobie.
It offers access to all the features and controls.
It features
Horn
Key Ignition
Speed adjustment dial
Forward and Reverse Levers
Battery Bar
USB mobile phone charging port
Fig. 01
3.2 Key Ignition – Fig. 02
1. Turn the key switch clockwise to ON, this will turn on the scooter.
2. Turn the key switch anticlockwise to OFF, to turn the scooter off.
Please turn the power off when you stop driving.
Always turn the scooter off when entering or exiting the
scooter to avoid “knocking the controls” and causing
unexpected movement.
Fig.02
3.3 Speed adjustment dial –Fig. 03
The speed adjustment dial is used for controlling the speed when
driving. You can set the speed from 0km/h to 6km/h. When you
adjust the dial to the left, it is the minimum speed; when you
adjust the knob to the very right it's the maximum speed.
Fig.03
Warning: when you turning or please, please use a slower speed setting.

7
Notice: Do not store the controller in the moisture environment. If the controller has been affected by
moisture, make sure to dry it before operation.
3.4 Power Indicator (Fig.04)
When the scooter is turned to the “on” position, your battery charge
will show on the LCD display. As you use your scooter and your
battery, the lights will snuff out, starting with the green bars on the
right hand side.
Fig.04
3.5 Direction Control Lever
The direction control lever is used to control the forward and
backward.
●
Move the lever with your right hand to drive forward.(Fig.05)
●
Move the lever with your left hand to move backward.(Fig.06)
●
When the scooter moves backward, you will hear a beeping noise
●
The control lever will return to the center position when released
and the brake will engage. Causing the scooter to stop.
Please note: The direction levers can be
“
reversed
”
if required.
Fig.05
Fig.06
3.6 Horn Button - Fig.07
When you press the button, it will sound the horn.
Fig.07
3.7 Telescopic Tiller
Lift the latch, which will allow you to lift or
collapse the tiller. Once you have adjusted it to
your preferred height, push the latch down to
lock in the position. (Fig.09).
3.8 Controller
The Controller is fixed in the rear cover and it receives the signal from the control panel and transfers the signal to
motor, brake and bulb. You shouldn’t remove the cover yourself any work on the controller needs to be carried out
by a fully trained technician or you may void your warranty.
Fig.09

8
3.9 Brake
The Solax Mobie Plus has an electromagnetic break. This means that it engages automatically as
soon as you let go of the tiller. Please see 3.10 to see how to disengage the brake.
3.10 Freewheel Lever
When you need to move the scooter manually,
you can flip the lever back to engage
“free-wheel” mode.(Fig.10).
Please note, you won’t be able to drive your
scooter in free-wheel mode. Once the lever is
back to the drive position. You may need to turn
the scooter on/off before driving.
Fig.10
3.11 Motor/Transmission component
Motor/ Transmission component as a mechanical and electrical part will convert the electrical energy to rear wheel drive.

9
4 Manual Folding & Unfolding
4.1 Manual folding
4.2 Manual Unfolding

10
WARNING—Do not exceed the maximum weight capacity (125 kg).
5 Safety Requirements
5.1 Driving Surface and Tips
The Solax Travel scooter range has been designed to be used on paved surfaces, such as carpet, well maintained
footpath, shopping centers etc. However, it may also be used on other surfaces, such as grass or walkways in parks
etc. However, there are some things that need to be considered to ensure a safe and comfortable ride.
Condition of surface – ensure the surface your driving on isn’t too soft to ensure the wheels won’t sink into
the surface and get stuck. Try to avoid loose gravel and sandstone.
Comfort – while the Solax Mobie has a padded seat, it doesn’t have any suspension and quite small tyres,
meaning it won’t absorb impact the same way as larger more rugged scooters.
Balance and Safety – Ensure you don’t exceed maximum slope allowances and keep an eye out for
potential hazards and obstacles. The scooter can handle obstacles of a certain size, but it’s best to reduce
the speed when tackling these.
Cleaning and Maintenance – Ensure to thoroughly “brush” down your scooter (including under the base)
after use on unsealed roads and grass. This will ensure that all dirt particles are removed and won’t get
“stuck” in the folding mechanism
Your ability – ensure you are feeling well and feel physically fit to operate your Solax Mobie
Please note: You should not drive your scooter if you can’t see the condition of the road ahead of you.
5.2 Safety Precautions
Do not operate your scooter before you fully read and understand this manual.
Do not carry passengers on your scooter or exceed the maximum carrying capacity
Ensure your scooter is fully unfolded before riding your scooter. The Seat sensor will start beeping if you try to sit on
your scooter before it is ready for operation.
Please slow down when driving on the uneven or soft ground.
Please slow down before turning.
Do not park on slopes.
Approach slope end, slopes, raised group and unprotected edge zone (such as curbside, vestibule and stairs
ets.) with extra care.
Do not change the scooters setting or modify your Solax Mobie in anyway. Any breeches of this may result in your
warranty being void and your scooter not operating in a safe manner.
Be careful and aware of other users when driving in the busy streets, markets or shopping centers
Hold the handle with both hands and put both feet on the foot board when driving.
Using your scooter as a seat on moving vehicle is forbidden.
Climbing or driving along the edges of roads is forbidden, otherwise, the scooter will be damaged permanently.
Do not exceed the maximum tolerance gradient when driving.
Do not reverse on uneven slopes or uneven ground; be careful when passing over slopes.
Do not use the scooter if you suffer from uncontrollable seizures, severely reduced eye sight or severely reduced
reactions.
WARNING—Do not attempt to drive on slopes more than 15 degrees.

11
Note: The scooter has a self-locking function to prevent driving when you charge the battery.
6 Battery and Battery Charging
This scooter is designed with a maintenance free, high quality Li-polymer (Lithium) battery. Please follow the below
instructions to ensure a long lasting battery life.
Charge the battery before the first operation.
Avoid your battery to go flat/fully use it’s charge as this will damage the battery
If you know that you won’t be using your scooter for a long period of time, you can follow the below instructions to
prevent severe damage
1. Fully charge the battery
2. Remove battery from scooter
3. Store the battery and scooter in a cool and dry place with steady temperature and temperatures that don’t exceed
25’C or under 10’C
6.1 Battery charging guide
You can charge your Solax Mobie in the folded or unfolded position. The Charging Socket is located in the centre of your
scooters dash. Please see image below.
1. Ensure your scooter is turned off (Set key to “off” position)
2. Slide the protective plastic tab up to reveal the charging port
3. Plug the charger into a functioning power socket or extension lead cable
4. Plug the specialized Plug into the socket on the rear of your scooter, ensuring the pins are lined up correctly
5. The light on the battery charging unit will change depending on battery status. Red & Orange light indicates
power on and charging and green light means fully charged
6. Turn off the power switch first when the battery is fully charged. Then take out the DC charging connector before
you take out the AC input power socket.
7. If the red light is off when the power on, please check whether the power plug is properly inserted.
8. Normally allows 8-14 hours for charging.
Turn the key to “off”
Warning: Ensure the pins are matched properly.
Insert charging plug into charging socket

12
Warning: Please do not dismantle the Li-polymer battery and do not add water. Failure to
observe this note will void the warranty and damage the battery and scooter.
6.2 Guide to a safe and long-lasting battery
6.2.1 How does the charger work?
When the battery voltage is low, the battery charger outputs a large current to charge the
battery.
When battery voltage is close to full, the battery charger outputs a small current, this is
known as a trickle feed.
When battery is full, the battery charger will output very little current which is almost zero.
Therefore.
The battery will continually charge after connecting the charge but will not overcharge. It is
better to charge no more than 24 hours.
6.2.2 How does the indicator light (LED) in charger display.
There are two LED indicator lights in the charger. The red indicator light is the power indicator light.
Regarding the other one, it is orange when charging and it will become green when the battery is charged fully.
The red one will sometimes stay on after pulling the charger plug out from the power socket; this is perfectly
normal, it just needs a few seconds for the red light to snuff out when the battery voltage is up to 26V.
6.2.3 Can I use other chargers with my Solax scooter?
In order to charge safely and efficiently, we highly recommend using the charger supplied by the original manufacturer or
registered dealer. Using a third-party charge may damage your battery.
6.2.4 How often should charge the battery?
If you are driving your scooter every day, you should charge it after every use. This way it is always ready for
you. The battery charging time will vary depending on how full/empty your battery is at the time of charging.
If you are driving your scooter once a week, then it’s best to charge the battery once a week. Battery
charging times will vary, depending on how full/empty the battery is.
Make sure you always fully charge the battery.
6.2.5 How to achieve optimum operating distance?
Some driving conditions such as hills, uneven and soft surface, wind conditions and user weight will affect the
driving distance and battery performance.
Fully charged your battery before driving it.
Avoid hills and soft surface.
Only to carry the necessities and reduce the luggage weight.
Keep a constant speed.
Avoid intermittent driving.
6.2.6 Why does the power of my new battery seem weak?
Deep-cycle battery use a unique chemical technology and design. It can be charged quickly and can be used for a
long time after it has been fully charged. The battery is fully charged when it leaves the factory but may change its
initial charge during transportation. The battery will lose power in high temperatures and it will extend the held
charge in low temperatures.
The battery needs a few days to adapt to the surrounding environment before performs consistently. More
importantly, deep-cycle batteries require several charging cycles (full charge and large discharge) before they will
perform at maximum capacity.

13
Please follow these steps to improve the battery performance
1. Fully charge the battery before first use
2. Use a low speed setting for the first use and don’t travel too far until you are familiar with the operation of your
scooter.
3. Try to use as much battery as possible, before giving it a second full charge. This will make the battery operate
at up to 90% capacity.
4. The battery capacity will reach 100% after four to five charging and discharging cycles as outlined above.
6.2.7 How to ensure the battery life?
A fully charged battery will provide a good performance and battery life, so keep the battery fully charged
whenever possible. Your battery performance and battery life will suffer if you
Let your battery get flat
Do not charge the battery regularly
Do not fully charge the battery.
7 Enc Information
This device complies with Medical EMC Standard IEC 60601-1-2:2014.
7.1 Guide and manufacturer declaration – electromagnetic emission
Warning: If battery was frost, it should be kept warming for several days before charging.

14
7. 2 Guidance and manufacturer's declaration - electromagnetic immunity
The 4-Wheel Folding Scooter is intended for use in the electromagnetic environment specified below. The
customer or the user of the 4-Wheel Folding Scooter should assure that it is used in such an environment.
Immunity test
IEC 60601
test level
Compliance level
Electromagnetic environment
--guidance
Electrostatic
discharge (ESD)
IEC 61000-4-2
±8 kV contact
±15 kV air
±8 kV contact
±15 kV air
Floors should be wood, concrete or
ceramic tile. If floors are covered
with synthetic material, the relative
humidity should be at least 30 %.
Electrical fast
transient/burst
IEC 61000-4-4
±2 kV for power
supply lines
±1 kV for
input/output lines
Not Applicable
Mains power quality should be that
of a typical commercial or hospital
environment or typical home
environment
Surge
IEC 61000-4-5
± 1 kV line(s) and
neutral
Not Applicable
Mains power quality should be that
of a typical commercial or hospital
environment or typical home
environment
Voltage dips,
short
interruptions and
voltage
variations
on power supply
input lines
IEC 61000-4-11
<5 %UT
(>95 %dip in UT)
for 0,5 cycle
40 %UT
(60 %dip in UT)
for 5 cycles
70 %UT
(30 %dip in UT)
for 25 cycles
<5 %UT
(>95 %dip in UT)
for 5s
Not Applicable
Mains power quality should be that
of a typical commercial or hospital
environment or typical home
environment. If the user of the
4-Wheel Folding Scooter requires
continued operation during power
mains interruptions, it is
recommended that the 4-Wheel
Folding Scooter be powered from
an uninterruptible power supply or
a battery.
Power frequency
(50/60 Hz)
magnetic field
IEC 61000-4-8
3 A/m
3A/m
Power frequency magnetic fields
should be at levels characteristic of
a typical location in a typical
commercial or hospital environment
or typical home environment.
NOTE UT is the a.c. mains voltage prior to application of the test level

15
7.3 Guidance and manufacturer's declaration - electromagnetic immunity
The 4-Wheel Folding Scooter is intended for use in the electromagnetic environment specified below. The
customer or the user of the 4-Wheel Folding Scooter should assure that it is used in such an environment.
Immunity test
IEC 60601
test level
Compliance
level
Electromagnetic environment - guidance
Conducted
RF
IEC
61000-4-6
Radiated RF
IEC
61000-4-3
3 Vrms
150 kHz to
80MHz
6Vrms in ISM
bands
3V/m
80 MHz to
2.7GHz
385MHz-
5785MHz Test
specifications
For
ENCLOSURE
PORT
IMMUNITY to
RF wireless
communicatio
n
equipment
(Refer to table
9 of EN 60601-
1-2:2015)
3 Vrms
150 kHz to
80MHz
6Vrms in ISM
bands
3 V/m
80 MHz to
2.7GHz
385MHz-
5785MHz Test
specifications
for
ENCLOSURE
PORT
IMMUNITY to
RF wireless
communication
equipment
(Refer to table
9 of EN 60601-
1-2:2015)
Portable and mobile RF communications
equipment should be used no closer to any part of
the 4-Wheel Folding Scooter, including cables,
than the recommended separation distance
calculated from the equation applicable to the
frequency of the transmitter. Recommended
separation distance
d=[3,5/V1] xP
112
d= 1.2x P1
i280 MHz to 800 MHz
d= 2.3xP1i2800 MHz to 2.5GHz
Where P is the maximum output power rating of
the transmitter in watts (W) according to the
transmitter manufacturer and d is the
recommended separation Distance in meters (m).
Field strengths from fixed RF transmitters, as
determined by an electromagnetic site survey,
ashould be less than the compliance level in each
frequency range. b
Interference may occur in the vicinity of
Equipment marked with the following symbol:
NOTE 1 At 80 MHz and 800 MHz, the higher frequency range applies.
NOTE 2 These guidelines may not apply in all situations. Electromagnetic propagation is affected by
absorption and reflection from structures, objects and people.
a. Field strengths from fixed transmitters, such as base stations for radio (cellular/cordless) telephones
and land mobile radios, amateur radio, AM and FM radio broadcast and TV broadcast cannot be predicted
theoretically with accuracy. To assess the electromagnetic environment due to fixed RF transmitters, an
electromagnetic site survey should be considered.
If
the measured field strength in the location in which
the 4-Wheel Folding Scooter is used exceeds the applicable RF compliance level above, the 4-Wheel
Folding Scooter should be observed to verify normal operation.
If
abnormal performance is observed,
additional measures may be necessary, such as re-orienting or relocating the 4-Wheel Folding Scooter.
b.
Over the frequency range 150 kHz to 80 MHz, field strengths should be less than 10 V/m.

16
7.4 portable and mobile RF communications equipment and the 4-Wheel Folding Scooter
Recommended separation distances between
portable and mobile RF communications equipment and the 4-Wheel Folding Scooter
The 4-Wheel Folding Scooter is intended for use in an electromagnetic environment in which radiated RF
disturbances are controlled. The customer or the user of the 4-Wheel Folding Scooter can help prevent
electromagnetic interference by maintaining a minimum distance between portable and mobile RF
communications equipment (transmitters) and the 4-Wheel Folding Scooter as recommended below,
according to the maximum output power of the communications equipment.
Rated maximum
output power of
transmitter (W)
Separation distance according to frequency of transmitter (m)
150 kHz to 80 MHz
d= l. 2x P
1
i
2
80 MHz to 800 MHz
d= l. 2x P1i2
800 MHz to 2.5 GHz
d= 2.3xP1i2
0.01
0.12
0.12
0.23
0.1
0.38
0.38
0.73
1
1.2
1.2
2.3
10
3.8
3.8
7.3
100
12
12
23
For transmitters rated at a maximum output power not listed above, the recommended separation
distanced in meters (m) can be estimated using the equation applicable to the frequency of the
transmitter, where P is the maximum output power rating of the transmitter in watts (W) according to the
transmitter manufacturer.
NOTEl At 80 MHz and 800 MHz, the separation distance for the higher frequency range applies.
NOTE2 These guidelines may not apply in all situations. Electromagnetic propagation is affected by
absorption and reflection from structures, objects and people.

17
8. Basic Troubleshooting
8.1 Scooter not turning on
Please check the key is inserted into the switch and turned to the on position
Check it if the battery is fully charged, if not charge the battery until the charger light turns green
If the battery capacity is insufficient, please increase the charging time/cycles.
If the issue continues, then battery may need testing. Please contact the sellers store
8.2 Scooter “cut outs” when you are driving it
Battery line may be loose
Motor carton bush is damaged
Please contact your retailer
8.3 Speed suddenly slows down when driving
Battery capacity is insufficient.
Battery aging
Please note: If you have any problems and are unsure on how to best resolve them. Please contact your
retailer for further information.
9.Maintenance
Given that the Solax scooter is a moving piece of equipment it is recommended to get it serviced by a trained service
technician on a regular basis. The service technician will check the following.
Please note: we recommend an annual service of your scooter. Services should ONLY be carried out by trained
technicians
The connection of the battery and electrodes
Ensure the electrode connections are tight and have no corrosion.
The battery should be placed flat inside the battery holder.
Wire Connector
Check all the wire connectors regularly.
Check all the wiring insulation condition, including the plug of the charger regularly.
Repair or change the damaged connector and connector joint.
ABS Plastic Cover
Control panel, front cover, foot board and back cover are all made by durable ABS plastic with baking finish on the
surface. Do not use oil or other chemical liquids to wipe the scooter. In order to prevent the electrical components
from damage, do not wash the scooter from the tap directly.
Bearings and Motor/ Transmission Parts
The components have injected lubricant and are sealed; therefore, it is unnecessary to inject lubricant any more.
Protect all the electronic components from moisture, such as control panel, battery charger and other electric
controlled components.
If some components become damp, please dry it before use.

18
Warranty Registration Card
Purchase by
Contact No.
Email Address
Shipping Address
Model
Solax Mobie Plus
Serial No.
Purchasing Date
Y M D
Warranty Period
12 months warranty from purchasing date
Manufacturer
Solax Technology Limited
Importer
Name of re-
seller /
Purchasing Store
Please complete your Warranty registration card and email through a copy to
wholesale@motobility.com.au
Warranty Statement
Materials, manufacturing or assembling problems under the normal usage is responsibility of the dealer
for the repair or replacement of parts.
Warranty Exclusions:
1. Failure to follow the proper use of operation and maintenance.
2. Not using approved spare parts, batteries, or chargers.
3. Mechanical damage caused by improper use and/or accidents, Including exceeding the weight capacity.
4. Consumables such as the inner core and outer tires, bearings, light bulbs, etc. are not covered in the
limits of the warranty.
5. Any unauthorized changes or work performed to the design or workings to the mobility scooter.
6. Any nature disasters or accidents such as typhoons, hurricanes, floods and earthquakes.

The following symbols are found on the Scooter:
.I
Manufacturer
2J Date of Manufacture
Refer to The Instruction Manual
[:r;::ill]
Medical Device
Serial Number
IREFI Catalogue Number
ILOTI Lot Number
CE Mark
WEEE Label. Do not discard the item in general waste.
Follow the local recycling policy.
Item is recyclable
Dongguan Prestige Sporting Goods Co., Ltd.
3
rd
Industrial, Qiaotou Area, Houjie Town,
Dongguan City, Guangdong Province,China.
Warning of Microwave Radiation
Do not drive in rain or snowy weather
keep loose clothing clear of the scooter
Do not operate cell phones while the
scooter is powered on.
Warning .Beware of potential hazard
Warning. Pinch hazard
Be aware of nearby transmitters, such as
radio or television stations, and avoid close
proximity .
Share Info GmbH
Heerdter Lohweg 83, 40549 Dusseldorf, Germany
-
This manual suits for next models
1
Table of contents
Other Motobility Scooter manuals