NITO NES 2020 User manual

NITO
ELECTRIC SCOOTER
OWNER AND MAINTENANCE MANUAL

Thanks for choosing NITO.
Mobility for us means more freedom,
fun and environmental regard.
The NES electric scooter is an icon of style, unequalled
in performance, design and variety of options available.
This manual represents an integral part of the product
and is provided to ensure the best safest possible use
of the NES scooter. We invite you therefore to read
these instructions paying close attention and to keep
the manual in a safe place.
WELCOME
TO THE
ELECTRIC ERA

3
NES - OWNER AND MAINTENANCE MANUAL
TABLE OF CONTENTS
WELCOME
TO THE
ELECTRIC ERA
01 general guidelines ................................................................................ 4
manual purpose.............................................................................................................5
safety ................................................................................................................................6
preliminary checks......................................................................................................7
guarantee ........................................................................................................................7
vehicle identification ................................................................................................8
motor identification..................................................................................................9
02 description and features ..................................................................... 10
scooter components .................................................................................................11
accessing obd and usb ports..................................................................................13
instrumentation............................................................................................................14
keyless ignition ............................................................................................................15
start _ stop push-button ...........................................................................................15
display functions.........................................................................................................17
03 battery use .............................................................................................. 18
accessing battery compartment and battery removal ..............................19
recharging operations .............................................................................................20
battery procedures for first scooter use .....................................................23
vehicle inactivity ........................................................................................................23
battery information ...................................................................................................24
precautions using lithium ion batteries............................................................24
routine maintenance (by user) ...............................................................................25
extraordinary maintenance (in authorised service centre)...................26
accessories line............................................................................................................27
technical data...............................................................................................................28

4
NITO ELECTRIC SCOOTER
z Read these instructions carefully before starting to use your NES
electric scooter.
z This instruction manual must be conserved safely and consulted
during the whole lifetime of the product.
z To drive the NES electric scooter you must be in possession of
the appropriate driving licence for the model chosen (NES5 or
NES10), as indicated in the Technical Data chapter of this manual.
z The scooter is not suitable for use by persons with reduced
physical, sensory or mental capabilities.
z In case of doubts or questions, please contact your local reseller or
the After-Sales NITO sending an email to support@nitobikes.it.
Failing to observe these instructions, wholly or in part, could result
in serious damage to persons, the vehicle or the environment. Under
certain circumstances, it could render the guarantee void.
The manufacturer reserves the right to make changes to the vehicle and
to this manual for the purpose of improvement without prior warning.
GENERAL
GUIDELINES
01

5
NES - OWNER AND MAINTENANCE MANUAL
The aim of this manual is to allow you to fully
appreciate the qualities of your NES scooter.
Contained here are information, warnings and advice
on how to use and maintain the vehicle correctly for
maximum safety.
It is essential to read this manual completely before
attempting to ride the vehicle for the first time.
Manual purpose

6
NITO ELECTRIC SCOOTER
Safety
z Always wear a helmet, fastening it on
correctly (ensure it is approved).
z When carrying a passenger, before moving
off make sure they are wearing a helmet
and that it is fastened on correctly.
z Do not exceed the scooter’s maximum
weight limit of 150 kg, including loads.
z On uneven roads, or in rainy, snowy or
slippery conditions you must reduce your
speed and increase the safety distance
between you and other vehicles. Proceed
with utmost caution.
z At night or in low visibility conditions
always wear reflective, florescent clothing
to maximise your visibility to other drivers.
When changing lane or turning, use
appropriate signals and the horn when
necessary.
z Be attentive to the vehicles around you
and do not assume that other drivers
can see you. Be always ready to make
an emergency stop or carry out a fast
manoeuvre to avoid obstacles.
z Carry out correct maintenance of the
scooter to maintain it always in a safe
optimal riding condition.
z Driving under the influence of alcohol,
drugs or certain medicines is very
dangerous for yourself and for others, and
is prohibited by law.
z Any modification that alters the
performance or main structure of the
scooter is prohibited by law and makes
the vehicle no longer compliant with
the approval standards and therefore
compromises safety.

7
NES - OWNER AND MAINTENANCE MANUAL
z Check that the instrument panel display
illuminates correctly and that the battery
charge level is correct.
z Check that the direction indicators,
scooter and licence plate lights are
functioning correctly.
z Examine visually the state of wear of brake
pads on both brake callipers and ensure
they are being worn uniformly on both
sides of the disk.
z At least once a month or when the tyres
seem deflated, check their pressure using
a pressure gauge and visually examine the
state of wear using a wear indicator.
Always check tyre pressure “from cold”.
z As required by law, the product is
covered by a guarantee for manufacturing
defects encountered within 2 years of the
purchase date.
Preliminary checks
Guarantee
z Check the level of the brake liquid in the
tank found in the handlebar.
z Check the saddle is closed correctly.
z Check that the battery compartment is
closed correctly.

8
NITO ELECTRIC SCOOTER
Vehicle
identification
The vehicle identification label
is situated on the rear left of the
body and indicates: manufacturer’s
name, Roadworthy Certificate (RC)
number, vehicle power and weight.
9
NES - OWNER AND MAINTENANCE MANUAL
Motor
identification
The motor’s identification code is
shown in the image on the side here.

10
NITO ELECTRIC SCOOTER
The NES electric scooter is unbeatable in terms of performance, design
and personalisations when compared with other electrical scooters on
the market today.
72 different configurations are possible with fairings in four colours,
board wood and saddle finishes each in a choice of three different
colours, and two tyre colours.
Superior performance and design allow electrical mobility to reach
everywhere.
DESCRIPTION
AND FEATURES
02

11
NES - OWNER AND MAINTENANCE MANUAL
Scooter
components
1ADJUSTABLE REAR VIEW MIRRORS
2RIGHT HANDLE WITH THROTTLE CONTROL
AND FRONT BRAKE ACTIONING LEVER
3LEFT HANDLE WITH REAR BRAKE
ACTIONING LEVER
4FRONT LED HEADLIGHT
WITH DIRECTION LIGHTS
5LIFTABLE SADDLE FOR ACCESS TO HELMET
STORAGE COMPARTMENT (IF PRESENT)
6TWIN-SPRING SUSPENSION SITUATED
BETWEEN CHASSIS AND SWINGARM
7REAR LED LAMP AND DIRECTION LIGHTS
8BRAKE DISKS
9REAR KNOBBED TYRE 130/90-10
10 FRONT KNOBBED TYRE 120/90-10
11 CENTRAL AND SIDE STAND
12 DIRECTION INDICATORS
13 BATTERY COMPARTMENT
14 BATTERY CHARGER WITH CABLE
1 1
23
5
7
6
9
8
10
4
11
14
12
13

12
NITO ELECTRIC SCOOTER
1DUAL-PISTON FRONT BRAKE
CALLIPER ACTING ON PERFORATED
STEEL DISK
2METAL BRAIDED HYDRAULIC HOSES
CONNECTING CALLIPER
TO BRAKE PUMP
3FRONT ALLOY 10” DIAMETER RIM
4FRONT MUDGUARD BOLTED TO FORK
5TELESCOPIC FORK
6REFLECTOR
7REAR MUDGUARD BOLTED
TO SWINGARM
8COIL SPRING SHOCK ABSORBER
9OSCILLATING SWINGARM HINGED
TO CHASSIS
10 DUAL-PISTON REAR BRAKE CALLIPER
ACTING ON PERFORATED STEEL DISK
11 METAL BRAIDED HYDRAULIC HOSES
CONNECTING CALLIPER
TO BRAKE PUMP
WHEEL COMPONENTS
1
6
3
5
48
7
9
2
10
11

13
NES - OWNER AND MAINTENANCE MANUAL
Accessing OBD
and USB ports
The basic model of the NES scooter comes
fitted with an USB port, an OBD port for
accessing diagnostics information and a battery
recharging socket.
To access the sockets, open the bay by simply
pressing on the side.
The USB port with led indicator and OBD
port are active only when the scooter is in ON
mode.
1BATTERY CHARGER SOCKET
2OBD PORT
3USB PORT
2
1
3

14
NITO ELECTRIC SCOOTER
1HORN PUSH-BUTTON
2DIRECTION INDICATORS
3REAR BRAKE CONTROL LEVER
4HEADLIGHT/FLASHING INDICATORS
SWITCH
5DISP L AY
6FRONT BRAKE CONTROL LEVER
7THROTTLE CONTROL
8DRIVE MODE SELECTOR
9FOUR HAZARD LIGHTS BUTTON
10 HORN PUSH-BUTTON
INSTRUMENTS AND
CONTROLS POSITIONING
2
10
5
1
7
63 4
9
8
Instrumentation
15
NES - OWNER AND MAINTENANCE MANUAL
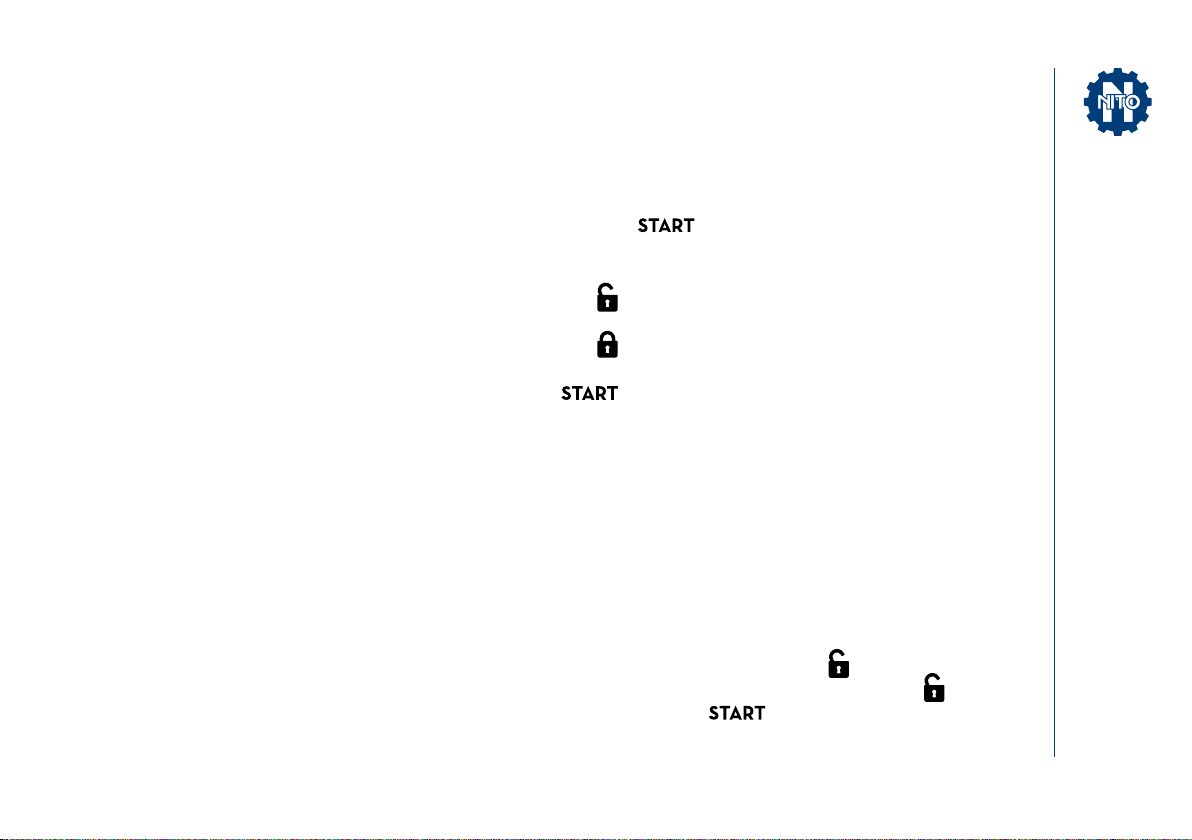
The NES scooter has a keyless ignition that can be
used for activating the electric steering lock and
anti-theft mechanism.
Pressing the system is set to ON mode and
the "READY" icon appears on the display.
The start push-button is enabled only when
the system is set to ON mode.
To power on first press the key and then
the Start_Stop push-button or press twice
and then the key .
To power off press the Start_Stop push-button.
Keyless ignition
Start_Stop Push-button
Power ON and OFF
Lock open key:
anti-theft and steering lock off
Lock closed key:
anti-theft and steering lock on
START: ignition

16
NITO ELECTRIC SCOOTER
1LEFT HANDLE
(DRIVING FUNCTION ONLY)
2REAR BRAKE LEVER
3HIGH-LOW BEAM HEADLIGHT SWITCH
4DIRECTION INDICATOR SELECTOR
(PRESS TO CANCEL)
5HORN BUTTON
(MAINTAINED PRESSURE)
6FRONT BRAKE LEVER
7RIGHT HANDLE, THROTTLE
ACTIVATED BY ROTATING HANDLE AROUND
ITS MAIN AXIS; (ON RELEASE THE SCOOTER
TENDS TO SLOW DOWN)
8LOW, ECO AND SPORT DRIVING MODES
SELECTOR
94 HAZARD LIGHTS PUSH-BUTTON
10 HORN BUTTON
(MAINTAINED PRESSURE)
DRIVING FUNCTIONS
LEVER AND CONTROL GROUP
1
2
5
4
3
6
8
7
10
9

17
NES - OWNER AND MAINTENANCE MANUAL
1BATTERY CHARGE LEVEL
2JOURNEY TOTAL MILEAGE IN KMS
3SPEED INDICATOR
4ECU TEMPERATURE TEMPERATURE INDICATOR
5DIRECTION INDICATORS
6ENGINE FAILURE INDICATOR
7HIGH-LOW BEAM LIGHT INDICATOR
8"READY" SYSTEM STATUS
Display functions
The digital display provides all the
information on vehicle status.
5 5
6 8
3
1
2
4
7

18
NITO ELECTRIC SCOOTER
The NES scooter comes fitted with a Lithium battery with an
autonomy of 90 / 100 km in ECO mode (NES 5 and NES 10),
with a lifetime of approx 1000 recharging cycles.
A number of factors affect battery autonomy:
z Use on urban or extra-urban roads requiring continual use of the
throttle.
z Use of the scooter outside normal riding conditions.
z Use on roads with a steep slope or particularly uneven surfaces.
z Prolonged thermal shocks.
BATTERY USE
03

19
NES - OWNER AND MAINTENANCE MANUAL
To access the battery compartment, insert the key
provided into the lock and turn it.
Pull the strap to lift up the wooden board.
Disconnect electrical connection 1and remove the
battery using handle 2. Remove the battery from the
bay assisted by handle 3.
WARN I NG : the scooter must be switched off before
removing the battery.
After removing the battery it must be stored in a
suitable moisture free environment with a temperature
range of 20 °C to 35 °C.
Accessing battery
compartment
and battery removal
1
2
3

20
NITO ELECTRIC SCOOTER
The battery must be recharged using the battery charger provided in the supply. The charger has a recharging
status indicator and can be connected to a power supply of 110V / 220V.
Do not use the battery charger for other purposes than that indicated here.
WARN I NG : all battery recharging and removal operations must be carried out with the scooter switched off.
Do not use a different battery charger to the one provided in the supply; any damage resulting from improper use
of incompatible battery chargers will be exclusively the responsibility of the customer.
I M P O RTANT: all recharging operations using the battery charger must be carried out by inserting the recharger
plug into the socket on the scooter or - if the battery has been removed - into the battery socket. Only afterwards
must it be connected to the electrical socket.
The NES scooter can be recharged in one of three ways:
z directly connecting the battery charger to the scooter socket
z connecting the battery charger to the battery (after removal)
z using electric columns (with OPT adaptor)
Recharging operations
Table of contents
Other NITO Scooter manuals


