Motorino XMl User manual


MOTORINO XML OWNERS’S MANUAL
TABLE OF CONTENTS
User Instructions……………………………………………………………………………….……… 1
Safety Instructions………………………………………………………………………….………… 1
Description ofComponents and Parts…………………………………………….………. 2
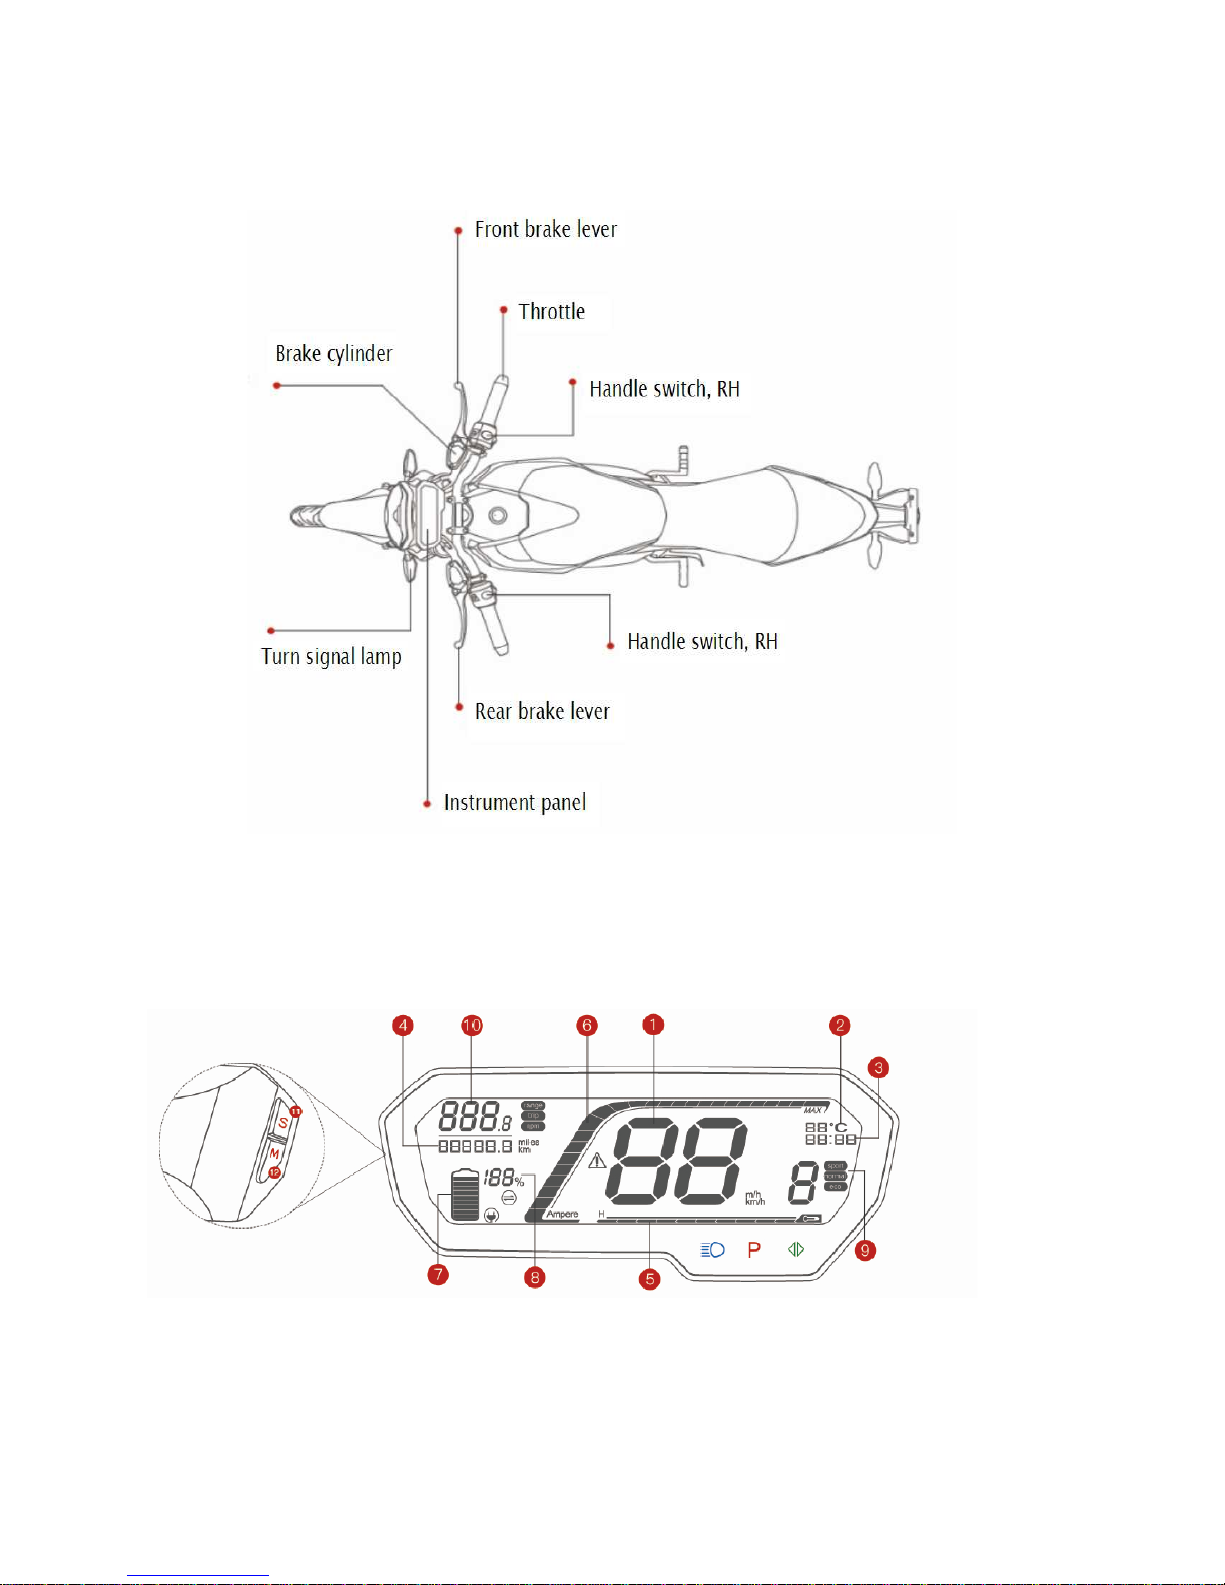
Schematic diagram of components and parts…………………….…………. 2
Diagram ofinstrument panel………………………………………………….……….3
Prompts………………………………………………………………………………….…………5
Operation Guide……………………………………………………………………………….………. 5
Switches onleft handlebar…………………………………………………….………. 5
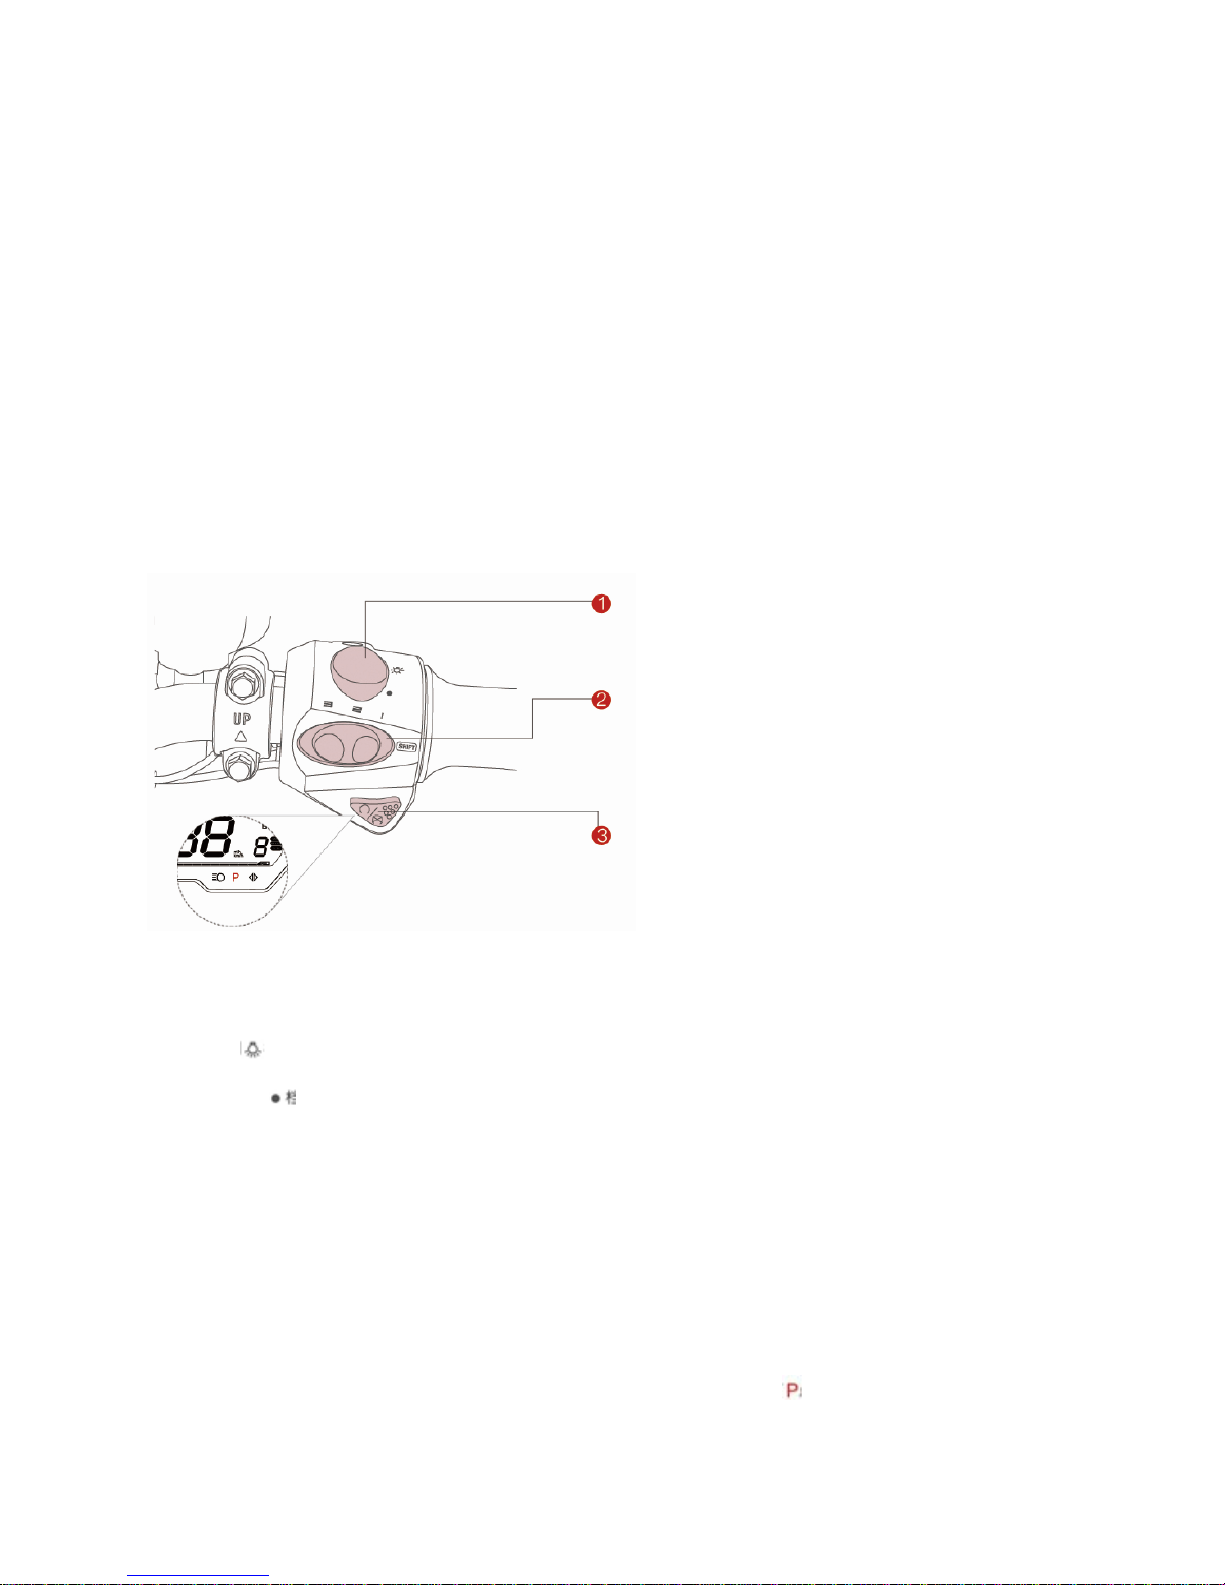
Switches onright handlebar………………………………………………….………. 6
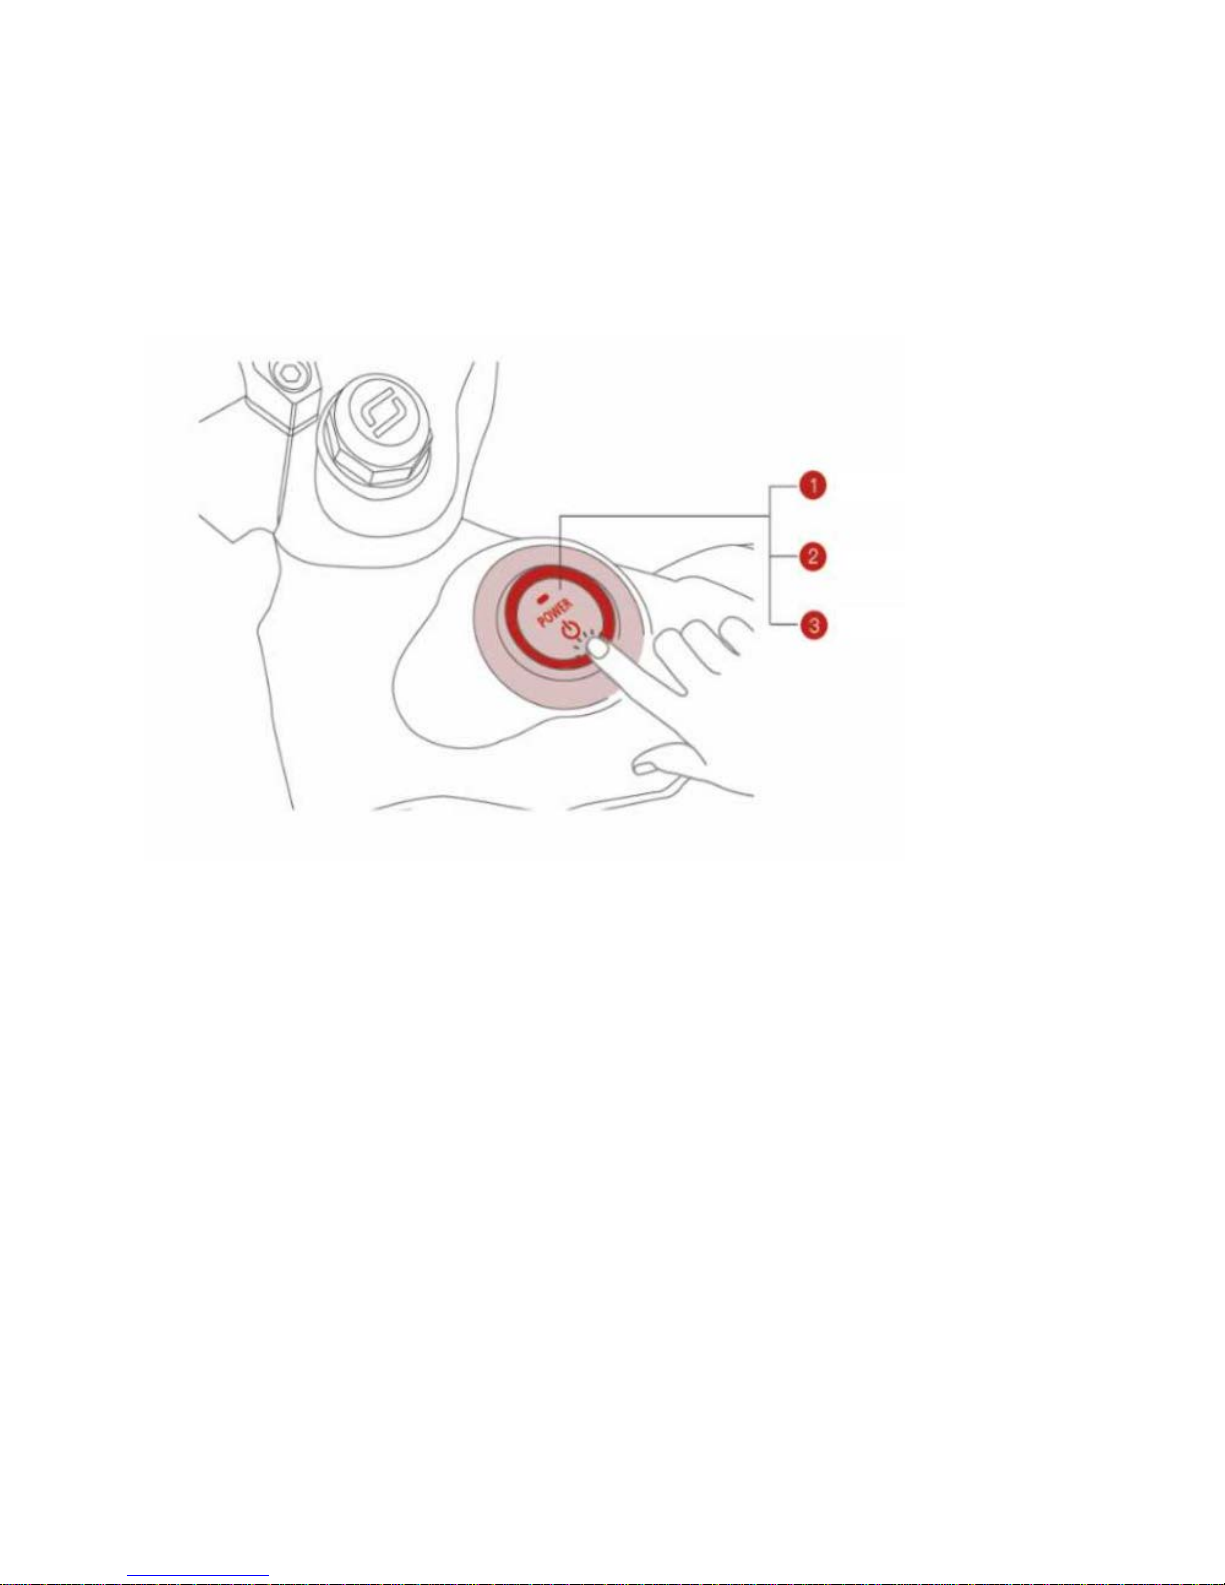
Start button…………………………………………………………………………….………. 6
Smart remote controller operation………..…………………………….………… 7
How to operate the physical handlebar lock……………………………….…8
Operation ofair switch………………………………………………………………..... 9
Operation of adjustable pedal………………………………………………………. 10
Riding Guide……………………………………………………………………………………………. 10
Checks before riding……………………………………………………………………… 10
How to start the bike………………………………………………………………………………. 12
Battery Use Instructions…………………………………………………………………………. 14
Charging methods…………………………………………………………………………. 14
Tips………………………………………………………………………………………………… 16
Storage, maintenance and transportation…………………………………… 17
Operation Instructions to Mobile Phone APP…………………………………………. 17
Lock the bike with MOTORINO XML APP……………………………………… 18
i

MOTORINO XML OWNERS’S MANUAL
Maintenance…………………………………………………………………………………………… 19
Routine cleaning and maintenance……………………………………………. 19
Regular inspection and maintenance…………………………………………. 19
Common Problems and Troubleshooting Methods………………………………. 20
Routine cleaning and maintenance……………………………………………. 20
After Sales Service………………………………………………………………………………… 21
Standards of three guarantees
(repair, replacement and return)………………………………………………… 21
ii

MOTORINO XML OWNERS’S MANUAL
User Instructions
Welcome to the family of MOTORINO XML owners! We will guide you to know every function for the
right and safe use of TS smart electric bikes. To ensure your safety, please read this manual carefully
before riding and make sure you are always following the requirements below:
Fully understand the information in this manual, including but not limited to the relevant instructions,
precautions and warnings.
Fully understand the operation and contingency measures of TS smart electric bikes.
Be fully aware of warning labels of TS smart electric bikes.
MOTORINO XML will take any responsibility resulting from the unauthorized modification, failure to use
original spare parts, or installation of components that affect the performance and safety of the bike.
Please contact the MOTORINO XML Customer Service Center at 1-877-310-0554 or email us at
[email protected]a if you have any questions about this bike. We are at your service at any time. Wish
you safe and pleasant riding experience!
Safety Instructions
To ensure the safety of you and others, please make sure to observe the following matters:
Do not ride after you take medications which may affect your riding ability, drink alcohol, or when you are
unwell.
Observe traffic regulations and traffic signs and confirm the surrounding road conditions and bike conditions at
any time, so as to actively avoid danger.
Wear safety equipment, such as helmet, and appropriate protective clothing if necessary, such as gloves and
boots.
2017 Greenwit Technologies Inc.
Page 1 of 28

MOTORINO XML OWNERS’S MANUAL
Perform a basic check each time before riding, so as to confirm the light, brake, tread and tire pressure and
check other parts for looseness or abnormal noise, and regularly go to MOTORINO XML Service Center for
maintenance.
In order to ensure the safety of you and others, please DO NOT use high beam in good lighting conditions. The
continuous use of high beam will cause the visual disturbance to vehicles and pedestrians on the opposite side,
thus affecting normal driving.
Please do not make or answer any call during riding, which is likely to cause traffic accidents.
Description of Components and Parts
Schematic diagram of components and parts
2017 Greenwit Technologies Inc.
Page 2 of 28

MOTORINO XML OWNERS’S MANUAL
Diagram of instrument panel
1 Speed / fault code
Display current speed. When fault indicator goes on, fault code will be displayed.
2017 Greenwit Technologies Inc.
Page 3 of 28

MOTORINO XML OWNERS’S MANUAL
2 Ambient temperature
Display current ambient temperature.
3 Clock
Display current time.
4Total mileage
Display the total mileage.
Long press the M12 button on the back of the instrument panel, and the trip distance will be cleared.
5 Controller temperature
Display the temperature under current operating conditions.
6Real-time current
Display current output current.
7Power display bar
Display current battery level.
8Power display
Display current battery level
9Gear display
Display current gear.
eco = Economical Gear, corresponding to the number “1”.
Normal = Cruising Gear, corresponding to the number “2”.
sport = Sport Gear, corresponding to the number “3”
10 Distance per charge/ trip distance/ rotating speed
range = remaining distance per charge.
Trip = current riding distance.
2017 Greenwit Technologies Inc.
Page 4 of 28

MOTORINO XML OWNERS’S MANUAL
rpm = current rotating speed.
Press the S11 button on the back of the instrument panel to switch the motor speed, the current riding
distance, and the remaining distance per charge.
Prompts
Operation Guide
Switches on left handlebar
1. High/low beam switch button
Press up to turn on the high beam.
Press down to turn on the low beam.
2017 Greenwit Technologies Inc.
Page 5 of 28

MOTORINO XML OWNERS’S MANUAL
2. Turn signal button
Dial to the left side to turn on the left direction indicator.
Dial to the right side to turn on the right direction indicator.
3. Horn button
Press to make a sound and release to stop.
Switches on right handlebar
1. Headlamp button
Dial up to to turn on the headlamp.
Dial down to to turn off the headlamp.
2. Gear shift button
The bike has three modes, i.e., 1 “eco”, 2 “cruise”, and 3 “sport”. Dial rightwards for “eco”, middle for
“normal” and left for “sport”.
3. Parking button
Parking button has two modes: press to park the bike and parking indicator goes on; and press again to exit
the parking status.
2017 Greenwit Technologies Inc.
Page 6 of 28

MOTORINO XML OWNERS’S MANUAL
Start Button
After unlocking the bike with the Smart Remote Controller, press the start button, and the bike will be in the
“Powered” state; press it again to turn off the bike.
1. Power button flashing,indicates the locked mode;
2. Power button lightning,indicates the standby mode;
3. Outer circle lightning, indicates the power on state.
Smart Remote Controller Operation
With the advanced Smart Remote Controller, you can easily lock or unlock your TS smart electric bike by
simply pressing the button within 50 meters.
2017 Greenwit Technologies Inc.
Page 7 of 28

MOTORINO XML OWNERS’S MANUAL
1. Lock button. When the bike is in the [Static State], press the lock button, and the start button flashes. The
bike enters the [Locked State].
2. Unlock button. Press the unlock button, and the start button stays on. The bike enters into the [Unlocked
State].
How to operate the physical handlebar lock
1 After the bike stops, turn the handlebar to the far left, insert the key into the physical handlebar lock,
and rotate it rightwards to lock the bike.
2 Insert the key into the physical handlebar lock, and rotate it leftwards to unlock the bike.
Open the storage box and saddle
2017 Greenwit Technologies Inc.
Page 8 of 28

MOTORINO XML OWNERS’S MANUAL
1. Insert the key and rotate it rightwards, and the storage box will be opened when you hear a [Click] sound.
2. Insert the key and rotate it leftwards to open the saddle. Basic tools are provided inside saddle.
Operation of Air Switch
As the protection switch for the main power of TS smart electric bike, the air switch will automatically
disconnect to ensure safety when the bike circuit is abnormal or the current caused by short circuit
exceeds the set safe value.
2017 Greenwit Technologies Inc.
Page 9 of 28

MOTORINO XML OWNERS’S MANUAL
TIPS: In order to protect your safety, please turn off the air switch when cleaning, storing the bike for a
long time, or removing the battery pack.
Operation of adjustable pedal
The original adjustable pedal provides three riding modes, and can be adjusted for comfort.
1. Open the saddle and take out the included Allen wrench;
2. Unscrew the nut under the pedal;
3. Adjust the pedal to the appropriate position (three positions) and tighten the nut.
2017 Greenwit Technologies Inc.
Page 10 of 28

MOTORINO XML OWNERS’S MANUAL
Riding Guide
Checks before Riding
Make sure to check the following items before riding a TS Smart Electric Bike, which will guarantee your safety on
the road.
Whether the handlebar is stable and flexible when turning.
Whether the switches on the right and left handlebars can work normally.
Whether the speed control handle can work normally.
Make sure the tire pressure is normal. The suggested tire pressure is 20-25psi for front wheel and 26-32
psi for rear wheel.
Check tire surface for cracks, damage, wear, and foreign matter puncture or attachment.
Whether the tread depth is sufficient (>0.8 mm).
Whether any fault warning light on the instrument panel goes on after being powered.
Whether the battery is fully charged.
Whether the head and tail lights, brake lights and turn signal lamp can work normally.
Whether the horn can work normally.
Whether the rear mirrors are clean. Adjust them to the appropriate angle.
2017 Greenwit Technologies Inc.
Page 11 of 28

MOTORINO XML OWNERS’S MANUAL
Whether the brake oil is sufficient, and whether the handbars and brake system can work normally.
For any abnormality or operational concern, please contact MOTORINO XML Customer Service Center.
Tel: 1-877-310-0554
How to start the bike
1. Press the “Unlock” button of the Smart Remote Controller, and the start button stays on.
2. Put on a helmet, ride the TS, and retract the electronic side stand.
3. Press the “Start” button, and the bike enters the “Powered” state.
2017 Greenwit Technologies Inc.
Page 12 of 28

MOTORINO XML OWNERS’S MANUAL
4. Press the “Parking” button to exit the parking state, and the parking indicator goes off
5 Gently turn the handlebar to ride on the road.
TIPS
Before riding, make sure the electronic side stand retracted and rotate the handlebar to ensure that the
handlebar lock is closed.
If the parking button is pressed when riding, the bike will be dis-energized. So DO NOT press it when
riding for avoiding danger caused by the sudden loss of power.
If the electronic side stand is extended when riding, the bike will be dis-energized. So DO NOT extend
the electronic side stand when riding for avoiding danger caused by the sudden loss of power.
2017 Greenwit Technologies Inc.
Page 13 of 28

MOTORINO XML OWNERS’S MANUAL
The bike must be fully stopped before starting. In case of abnormality during riding, please ride carefully
or push it to a safe place. DO NOT try restarting the bike during riding or on the lane so as to avoid
danger.
Battery Use Instructions
Charging Methods
How to charge the battery on the bike
1. Insert the main charger plug into the charging port of the bike.
2. Insert the charger's AC power plug into the socket, and the battery starts charging when the charger
indicator turns red.
3. The battery is fully charged if the charger indicator turns from red to green.
How to charge the battery off the bike
2017 Greenwit Technologies Inc.
Page 14 of 28

MOTORINO XML OWNERS’S MANUAL
1. Open the storage case, close the air switch and take out the storage box.
2. Disconnect the main battery plug.
3. Insert the key into the anti-theft battery lock and rotate it rightwards to remove the battery from the
bike.
4. Insert the main plug of the charger into the battery charging port, and then insert the AC power plug of
the charger into the socket. The green lights of the charger will flash in turn when charging normally.
2017 Greenwit Technologies Inc.
Page 15 of 28

MOTORINO XML OWNERS’S MANUAL
5 When the battery is fully charged, the charge indicators are all green.
TIPS
Do not expose the battery to water, and prevent it from being damped by water or rained
Charge temperature: 0-45 ℃, discharge temperature: -20-45 ℃; Battery capacity will be reduced when
placed in a low-temperature environment;
Charge the battery when you use it, but make sure to charge it before the capacity is lower than 20%.
When it is not used for a long time, please remove it from the bike;
Develop a good usage habit. DO NOT frequently yank the switch, and ride at a constant speed.
Short circuit of the cathode and the anode at the battery’s input and output ends is prohibited;
Keep it away from children, fire and heat source. It is strictly forbidden to throw it into the fire;
Violent movements, shock and extrusion are prohibited;
Only the specified charger can be used, and other chargers are prohibited to charge the battery;
2017 Greenwit Technologies Inc.
Page 16 of 28

MOTORINO XML OWNERS’S MANUAL
This product has been subject to strict inspection before leaving factory, and it is strictly prohibited to
dismantle it. Please contact our company's after-sales department for any question.
Storage, maintenance and transportation
Please charge the battery to half-saturation state when storing or transporting it (after the battery is
discharged, charge it for 3 hours). Place it in a dry and ventilated place;
Battery and charger should be kept in a clean, dry, and ventilated place. Keep them away from corrosive
materials, power source and heat source;
Storage conditions: ambient temperature -20-35 ℃, humidity ≤ 65% RH;
When storing the charger, please disconnect it from the battery.
Operation Instructions to Mobile Phone APP
Some versions are equipped with GPRS communication function, which enables the connection with the
owner’s smart phone. Through the MOTORINO XML APP, the owner can use the smart phone to
manage and inquire information of the bike.
The MOTORINO XML APP is available in iOS and Android versions. Please confirm the smart phone’s
operating system before installing the APP.
Support Apple IOS 8.4 and above
Support Android 4.4 and above
2017 Greenwit Technologies Inc.
Page 17 of 28
Table of contents