manuals.online logo
Brands
  1. Home
  2. •
  3. Brands
  4. •
  5. MotoSleep
  6. •
  7. Indoor Furnishing
  8. •
  9. MotoSleep Tilt Soft Form Series User manual

MotoSleep Tilt Soft Form Series User manual

OWNER’S MANUAL
TSF3WMS Rev 2.0 11/2021
Tilt Soft Form Series
With Motion Sensor
HOME SELECT
1
STOP
2
TV Z-G
SNORE
Installation Guide
1Open the box lid.
×1
Mattress Retainer Bar
×1
Accessories Box
2Take out all the accessories from the packaging and put them
aside. All electronics and components that need to be installed are
located in boxes under the foundation or attached to the frame.
Before discarding the packing materials, ensure that all the parts
are accounted for.
Mounting
Bracket
×2
×2
Motion
Sensor
ACCESSORIES BOX:
×4
Legs
×1
AC Power
Cord
×3
AAA
Batteries
×1
Remote
Control
HOME SELECT
1
STOP
2
TV Z-G
SNORE
×1
Power Supply with
Battery Backup Box
9V 9V
9V
(Optional)
HEAD BOARD
HEAD BOARD
3Install 4 legs, make sure the legs are tight. Take the bed out of the box, turn over onto 4 legs.
Remove the box. Uncoil the DC power cord (connected to the
control box) and put it to the side of the bed.
4
HEAD BOARD
DC power cord
×1
Sync Cord
(TXL/T/CKS/TXL+
Only)
Connect The Motion Sensor Connectors.
5Motion sensor installation = +
Motion
Sensor
Mounting
Bracket
Prepare The Motion Sensor Hardware.
STEP 1: Connect the motion
sensor to the mounting
bracket.
STEP 2:
Rotate the
mounting bracket 90 degrees
clockwise
STEP 3:
DONE !
STEP 2: Connected the motion sensor connectors as illustrated.
Note there are two connectors, one on each side of the bed.
STEP 1: Clip the mounting bracket onto the head base legs as illustrated.
HEAD BOARD
6Install the mattress retainer bar
one side after another.
2
1
7Uncoil the AC power cord, connect the DC power cord to the power supply and then
connect the power supply to the AC power source.
the remote control.
Insert the batteries into
HOME SELECT
1
STOP
2
TV Z-G
SNORE
HEAD BOARD
AC Power Cord
AC Power Source
DC Power Cord
Power Supply DONE!
Remote Control
HOME SELECT
1
STOP
2
TV Z-G
SNORE
USB
Charger
Motion
Sensor
DC
Power Cord
Power Supply
AC
Power Cord
Head Motor
Foot Motor
Neck Motor
Tilt Motor
(2 for Q/FXL/FULL)
Foot Massage
Motor
Head Massage
Motor
LED
HD Motor FT Motor Neck Motor Tilt Motor
HD Massage FT Massage
LED
SYNC MOTION
USB
VOICE
CB20B
Control Box
Electronics Quick Reference Guide
Sync Cord
Remote Control Instructions
Home Position
Head Massage on
(3 Intensity Levels)
Programmable
Positions
Anti-Snore
Preset Position
Head/Foot
Massage off
HOME SELECT
1
STOP
2
TV Z-G
SNORE
Lifts
Lowers
Select Zone
TV Position
Zero G Preset
Position
Foot Massage on
(3 Intensity Levels)
Under Bed
LED on/off
ADJUST
This button lifts the head/foot/neck/tilt section of the foundation.
This button lowers the head/foot/neck/tilt section of the foundation.
One touch programmable positions.
2
1
SETTING PROGRAMMABLE POSITION
MASSAGE FEATURES
Turn on the head massage. Cycle through 3 massage intensities.
Turn off the head/foot massage.
STOP
Turn on the foot massage. Cycle through 3 massage intensities.
ONE TOUCH BUTTON
One touch flat position.
One touch Select button.Select head or foot zone.
One touch ANTI-SNORE preset position.
SNORE
One touch TV preset position.
TV
One touch ZERO G preset position. ZERO G adjusts your legs to
a higher level than your heart, helping to relieve pressure of the
lower back and promote circulation.
Z-G
One touch underneath LED lighting on/off.
Pairing Remote
Setting Programmable Position
Setting Remote Lock
The LCD screen will show LOW once the batteries are in low power.
LOCK
UNLOCK
LOW BATTERY
Make sure the batteries are good. Replace
them when needed.
Plug the power cord back into the power source. You will hear an activation
sound in 2 seconds, indicating the remote is paired to the power foundation.
Unplug the power cord from the power source. If 9V backup batteries
were installed in the power supply, remove them.
Adjust the head, foot and neck to your desired position.
To adjust a saved position, repeat step 1 and 2 and the new position
will be saved.
Press and hold the program button for about 5 seconds until the
LCD screen shows SAVE, and press picture programmable buttons
until you hear 2 beep sounds.
1 2
Press and hold Select button until the LCD screen of the remote
control shows PAIR.
Press and hold the HOME and SELECT buttons simultaneously for about
5 seconds until the LCD screen shows LOCK.
Press and hold the HOME and SELECT buttons for about 5 seconds until
the LOCK disappears on the LCD screen.
STEP 1:
STEP 2:
STEP 3:
STEP 1:
STEP 2:
STEP 3:
STEP 4:
HOME SELECT
1
STOP
2
TV Z-G
SNORE
The original remote that comes in the box is already
paired to the foundation. No further action is required.
In the event when the remote is not paired with the
foundation, follow the following to pairing instructions.
Wireless Syncing Instruction
UN-SYNC Two Foundations
Press and hold and on both remotes at the
same time for 5 seconds,until the LCD screen
flashes and shows UN-SYNC.
STEP 1:Make sure both remotes are individualy paired to the
foundation. If the remote is not paired with the
foundation, follow the pairing instructions.
STEP 2:Make sure both foundations are at home or flat
position.
STEP 3:Press and hold and HOME on both remotes at
the same time for 5 seconds until the LCD screen
shows SYNC.
HOME SELECT
1
STOP
2
TV Z-G
SNORE
Press
and hold
HOME SELECT
1
STOP
2
TV Z-G
SNORE
Press
and hold
If simultaneous operation of two foundations is desired, please follow the
steps listed below.
Note the sync cord is needed to control two foundations with mobile APP,
follow the "Synchronizing Two Foundations with Sync Cord" instruction
to install the sync cord or follow the "Wireless Syncing Instruction".
Sync Plug
Sync Plug
Control Box 1
Control Box 2
HD Motor FT Motor Neck Motor LB Motor
HD Massage FT Massage
LED
SYNC MOTION
USB
VOICE
HD Motor FT Motor Neck Motor LB Motor
HD Massage FT Massage
LED
SYNC MOTION
USB
VOICE
Sync Cord
Synchronizing Two Foundations with Sync Cord
STEP 1:Unplug foundations from the power source.
STEP 2:Connect the male ends of the sync cord to the female sync plugs of the
control boxes (Refer to below illustration).
STEP 3:Plug foundations back into the power source.
STEP 4:Check to ensure all cords are securely attached.Either remote will
operate both foundations simultaneously.
MotoSleep APP Home Screen
Open www.motosleep.com from your browser.
Scroll down to the bottom of the page and press download.
In the download page, tap the download button to download the app.
Open the download file and install the app.
MotoSleep Mobile APP(Optional)
Open APP Store on your IOS device
Tap the Magnify Glass Icon and search with the keyword
Tap on and to install the APP
Wait for the download/installation to be complete
GET
+INSTALL
Customer Service Toll Free:1-844-696-6886
Before you start. Switch on the pairing function on your mobile device. Make sure your
MotoSleep Power Foundation is correctly connected and is power-on.
The MotoSleep APP will automatically pair your MotoSleep Power Foundation once you start
the APP and does not require additional settings.
www.motosleep.com
REMOTECONTROL
REMOTECONTROL
HEAD FOOT
REMOTECONTROL
REMOTECONTROL
1
STOP
2
REMOTECONTROL
1 2
TV Z-G
SNORE
REMOTECONTROL
2
1
STOP
REMOTECONTROL
SNORE
TV Z-G
2
1
REMOTECONTROL
1
STOP
2
TV Z-G
SNORE
OWNER’S MANUAL
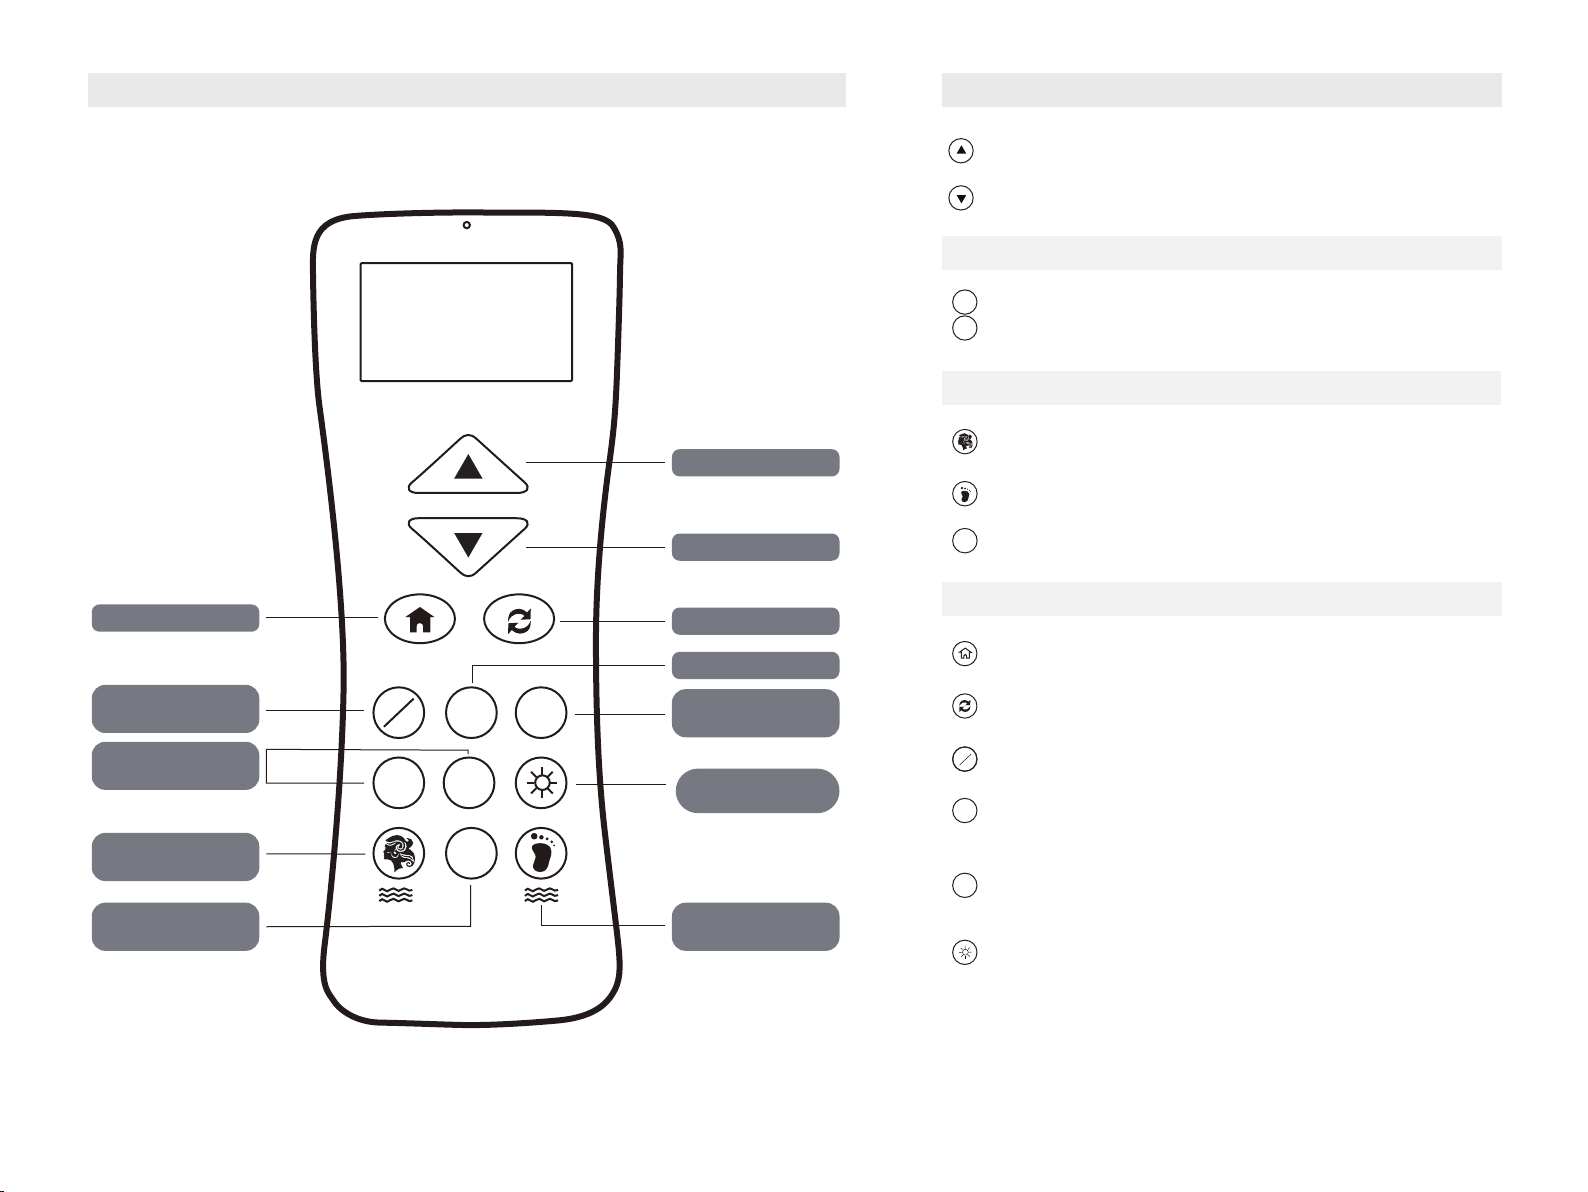
Four-button Remote Control Three-button Remote Control
Five-button Remote Control
Eleven-button Remote Control
Ten-button Remote Control
Thirteen-button Remote Control
Thank you for purchasing a MotoSleep
Power Foundation.
* The effective connection range is ± 10m
REMOTE CONTROL
1
2
8
3
5
4
6 7
9 10 11
12 14 13
1
STOP
2
TV Z-G
SNORE
1
11
12
13
14
10
9
8
7
5
4
3
2
6
Enter the Settings Page
Select Head,Foot,Neck or Tilt section
Lifting function
Lowering function
One touch flat position
Head Massage (3 different intensities)
Foot Massage (3 different intensities)
Massage Off Button
Programmable Position 1
Programmable Position 2
Under Bed Lighting
Anti-Snore Preset Position
TV Position
Zero G Preset Position
General Information
Install the MotoSleep APP
IOS
Android
The Built-in Owner’s Manual at your fingertip
Device Pairing
8
7
6
5
4
3
2
1
List of MotoSleep Products within
the connection range*
Tap the Refresh Button to refresh
the MotoSleep Products List
Enter the Settings Page
Back to the Home Screen
10
9
Serial Number of the control box
Owner’s Manual Page
Troubleshooting
Disconnect from the paired
MotoSleep Product
Rename your MotoSleep Power
Foundation of your choice
Choose the light colors, and
set up the motion sensor timer
Home Screen
Settings Page
MotoSleep APP Remote Control
Remote Control
* Remote interface varies in between different MotoSleep
Power Foundation models. If you wish to disconnect from
the current paired Power Foundation, Enter the Settings
Page and tap the Disconnect button.
10
SELECT DEVICE
BED
Refresh
3
1
2
SETTINGS
DISCONNECT
MOOD LIGHT SETTING
RENAME
OWNER’S MANUAL
Serial Number
5
4
6
7
8
TROUBLESHOOTING
9
MotoSleep Mobile APP is a mobile application to control the MotoSleep Power Foundation with
mobile devices. The application is available for both iOS and Android based smart devices.
The MotoSleep Mobile APP uses the latest technology to communicate with your MotoSleep
Power Foundation. Make sure your mobile devices has the pairing function for the APP to
work correctly.

Other MotoSleep Indoor Furnishing manuals

MotoSleep ZG Series User manual

MotoSleep

MotoSleep ZG Series User manual

MotoSleep XFB User manual

MotoSleep

MotoSleep XFB User manual

MotoSleep Tilt Soft Form Series User manual

MotoSleep

MotoSleep Tilt Soft Form Series User manual

MotoSleep H Series User manual

MotoSleep

MotoSleep H Series User manual

MotoSleep SFAB350MSATXL User manual

MotoSleep

MotoSleep SFAB350MSATXL User manual

MotoSleep XSF User manual

MotoSleep

MotoSleep XSF User manual

MotoSleep XFB User manual

MotoSleep

MotoSleep XFB User manual

MotoSleep XFB User manual

MotoSleep

MotoSleep XFB User manual

Popular Indoor Furnishing manuals by other brands

STAND STEADY TRFSEL63BLBL instruction manual

STAND STEADY

STAND STEADY TRFSEL63BLBL instruction manual

Keter MONTERO SET Assembly instructions

Keter

Keter MONTERO SET Assembly instructions

Forte HVKS721 Assembling Instruction

Forte

Forte HVKS721 Assembling Instruction

Loctek ET120 installation guide

Loctek

Loctek ET120 installation guide

Costway 42519860 user manual

Costway

Costway 42519860 user manual

Invacare IH1010 user manual

Invacare

Invacare IH1010 user manual

Furniture of America CM7389CK Assembly instructions

Furniture of America

Furniture of America CM7389CK Assembly instructions

stilum ludo Mounting instructions

stilum

stilum ludo Mounting instructions

Forte SRCL1161B Assembling Instruction

Forte

Forte SRCL1161B Assembling Instruction

KidKraft 65947 manual

KidKraft

KidKraft 65947 manual

FANCII SORA quick start guide

FANCII

FANCII SORA quick start guide

FMD Furniture PROFI 22 Assembly instructions

FMD Furniture

FMD Furniture PROFI 22 Assembly instructions

Neo Chair BLC Assembly instruction

Neo Chair

Neo Chair BLC Assembly instruction

Kogan Shangri-La NEW YORK SLNYMTBQWA user guide

Kogan

Kogan Shangri-La NEW YORK SLNYMTBQWA user guide

Onespace 50-LD0105 Assembly instructions

Onespace

Onespace 50-LD0105 Assembly instructions

Salamander Designs SYNERGY 245 Assembly manual

Salamander Designs

Salamander Designs SYNERGY 245 Assembly manual

U-Line H-4281 Assembly instructions

U-Line

U-Line H-4281 Assembly instructions

ricoo WM032 Assembly instructions

ricoo

ricoo WM032 Assembly instructions

manuals.online logo
manuals.online logoBrands
  • About & Mission
  • Contact us
  • Privacy Policy
  • Terms and Conditions

Copyright 2025 Manuals.Online. All Rights Reserved.