www.portevelo-mottez.com
www.bicyclerack-mottez.com
Porte 3 vélos
sur attelage
FR - notice d'utilisation
EN - fitting instructions
DE - bedienungsanleitung
ES - instrucciones de uso
IT - istruzioni per l'uso
NL - gebruiksaanwijzing
PR - instruções de operação
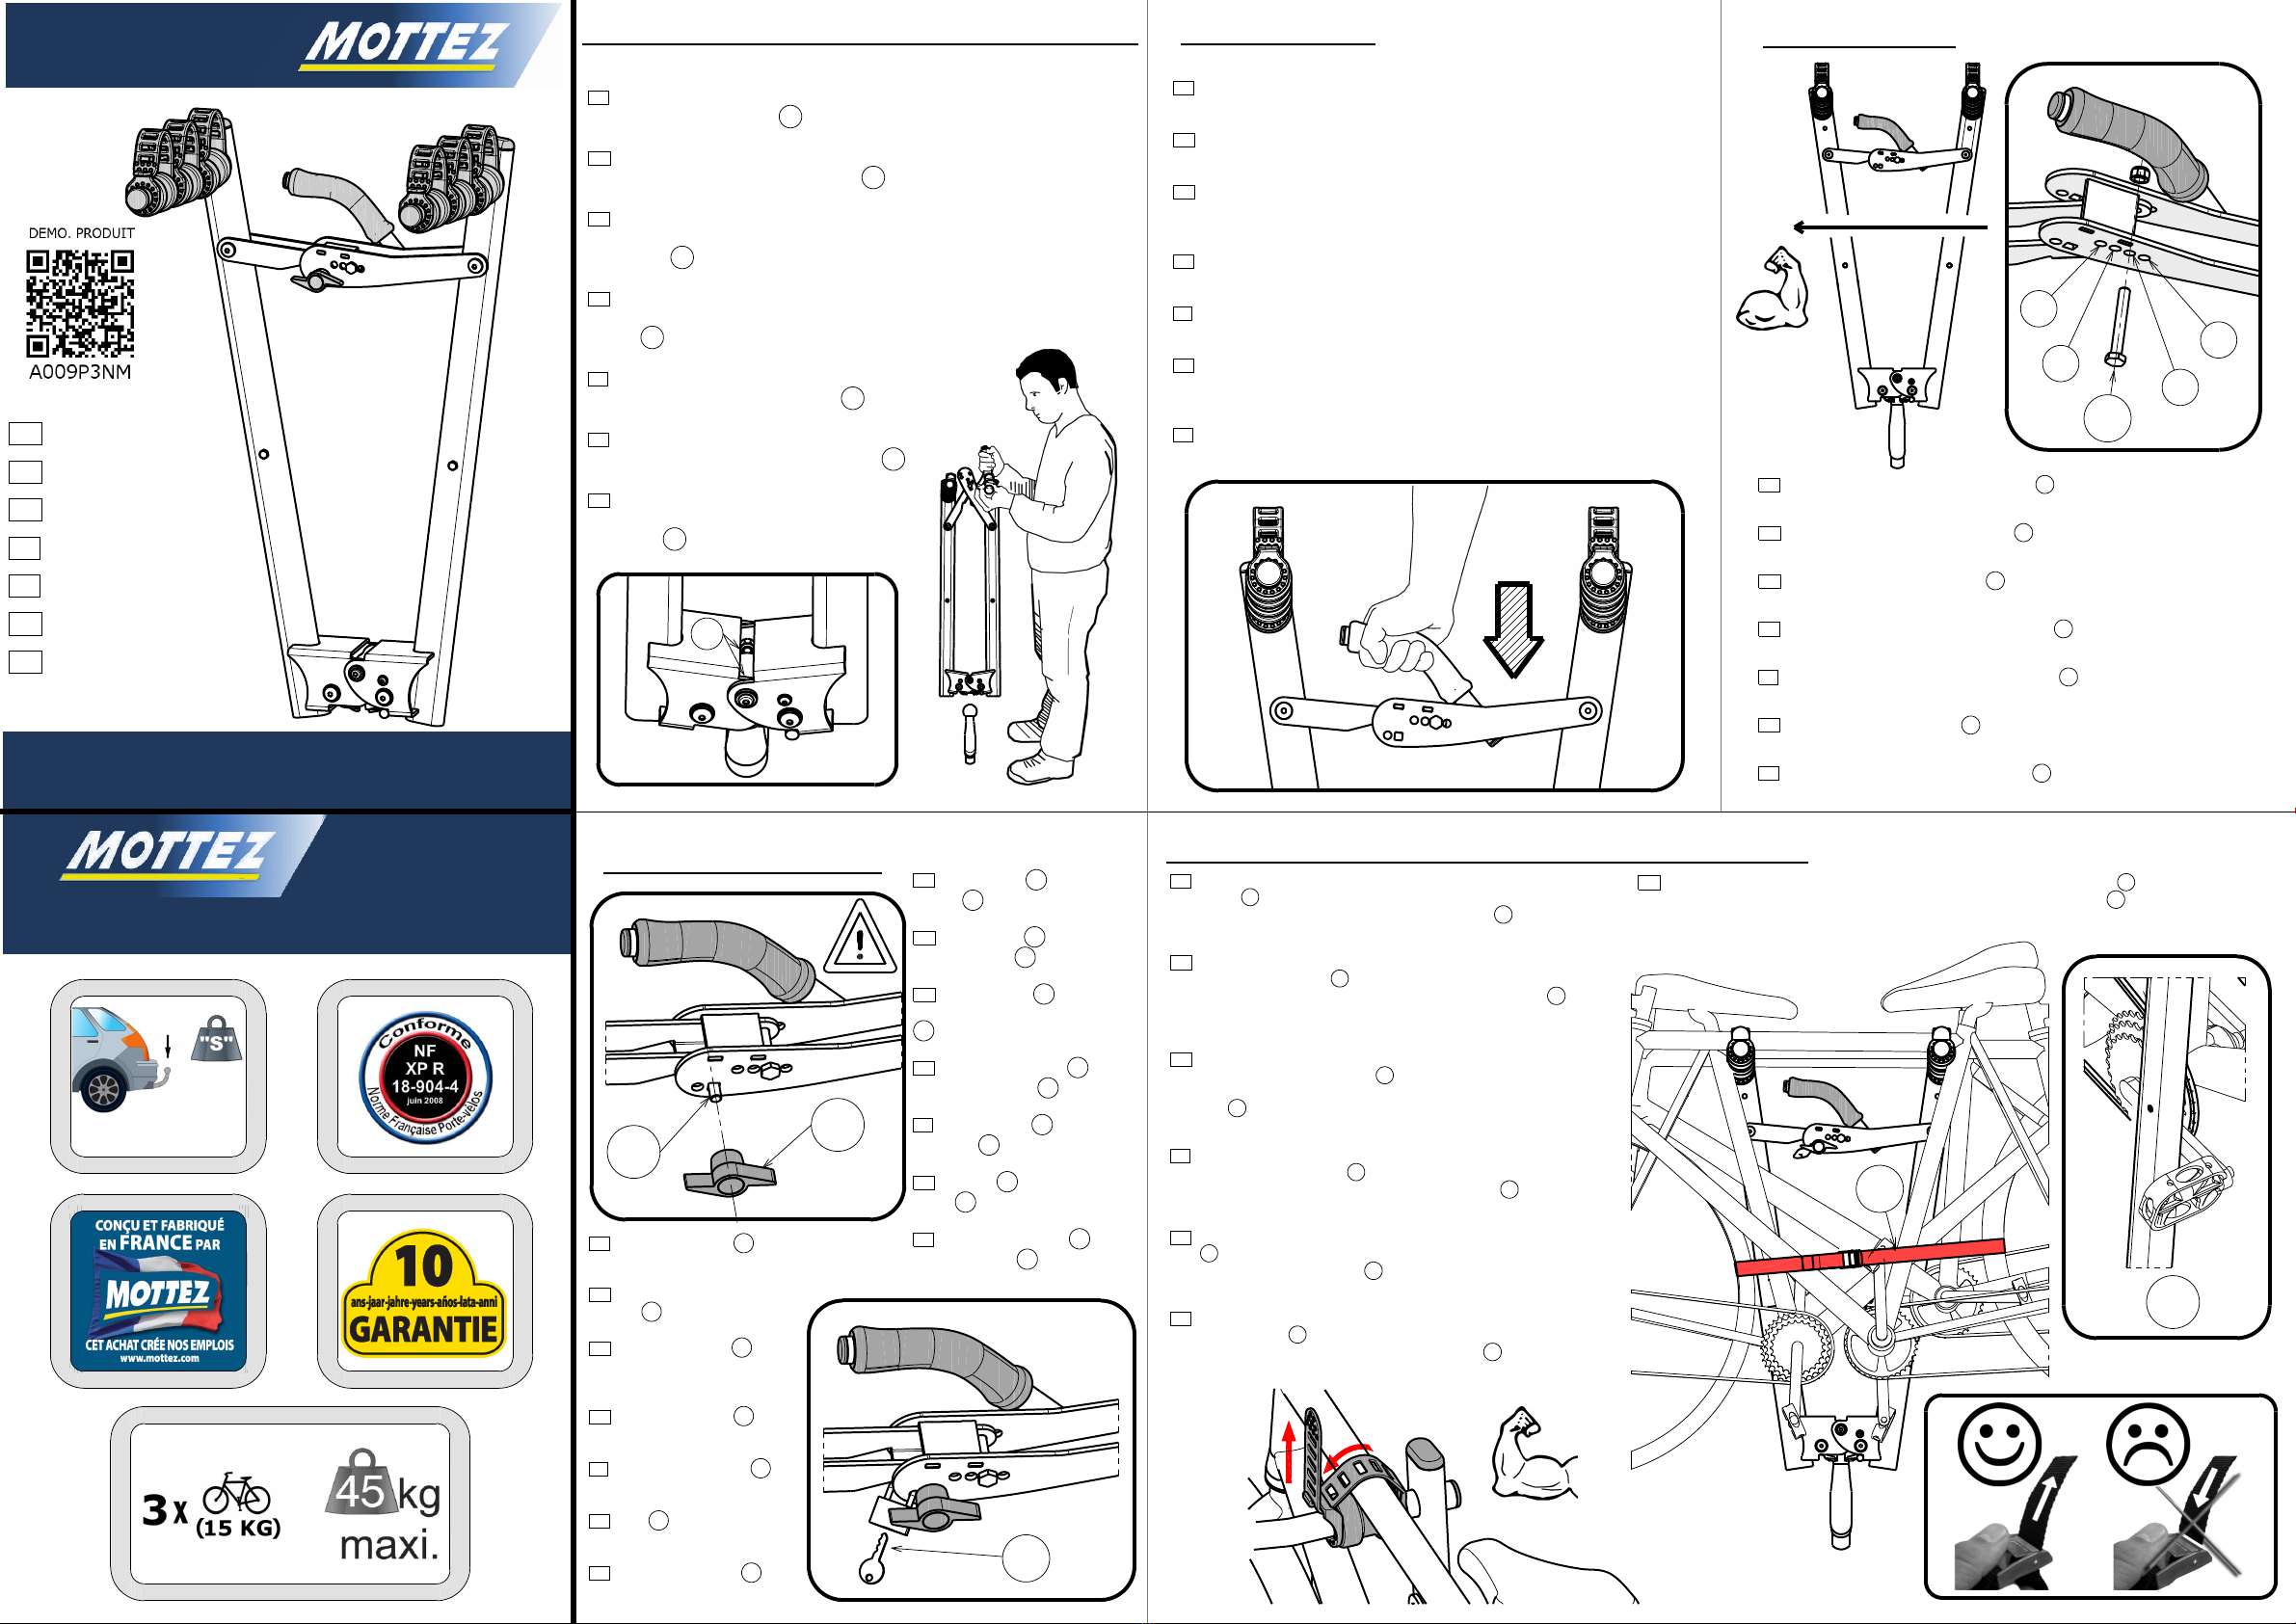
1. POSITIONNEMENT DU PORTE VELO.
CONA009P3NM 16327
FR - En position ouvert, poser le porte vélo sur la
boule, en butée sur les vis A .
EN - In the open position, fit the cycle carrier on
the towball, butting up against screws A .
DE - Den Fahrradträger in Stellung „offen“ auf die
Kupplungskugel setzen mit Anschlag an den
Schrauben A .
ES - En posición "abierto", poner el porta-
bicicletas sobre la bola, hasta el tope, en el
tornillo A .
IT - In posizione “aperta”, mettere il portabici
sulla testina, ad incastro con la vite A .
NL - De fietsdrager in ‘open’ positie op de kogel
plaatsen, in de aanslag op de schroeven A .
PT -Em posição "aberto",colocar o porta-
bicicletas sobre o elo, em batente sobre os
parafusos A .
A
2. SERRAGE.
FR - Poussez fortement la poignée vers le bas pour un serrage optimum.
Un effort de 60 kg doit être appliqué.
EN - Push the handle down firmly, to achieve the best tightening.
A force of 60 kg must be applied.
DE - Den Griff kräftig nach unten drücken, um eine optimale
Klemmverbindung zu erreichen. Es muss ein Anpressdruck von 60 kg
aufgewandt werden.
ES - Empujar con fuerza la empuñadura hacia abajo para un ajuste óptimo.
Se debe aplicar una fuerza de 60 kg.
IT - Spingere con forza la maniglia verso il basso per un serraggio ottimale.
Applicare una forza di Kg. 60.
NL - Het handvat krachtig naar beneden duwen voor een optimale
bevestiging.
Er moet een kracht van 60 kg aangebracht worden.
PT - Puxar fortemente a pega para baixo para um aperto ideal.
Deve ser aplicado um esforço de 60 kg.
60 kg
FR - Mettre le cadenas E afin de
sécuriser votre produit.
EN - Lock your carrier with the
padlock E .
DE - Vorhängeschloss E zur
Sicherung gegen Diebstahl
anbringen.
ES - Poner el candado E para
asegurar el producto.
IT - Applicare il lucchetto E per
proteggere il mezzo.
NL - Slot E plaatsen om uw
product vast te maken.
PT - Colocar o cadeado E para
colocar o produto em segurança.
E
4. VERROUILLAGE.
FR - Insérer la vis C puis serrer la
molette D .
EN - Insert screw C and then
tighten wing nut D .
DE - Die Schraube C einführen,
anschließend die Spannvorrichtung
D anziehen.
ES - Introducir el tornillo C , y
apretar la ruedecilla D .
IT - Inserire la vite C e stringere la
manopola D .
NL - Schroef C plaatsen en dan
wieltje D vastdraaien.
PT - Inserir os parafusos C e
apertar a moleta D .
CD
All our products are designed &
manufactured in France.
"S" MINI
=
55 kg
=
B
FR - Si nécessaire, permuter la position de l'axe B (de 1 à 4),
en position ouvert, pour régler le serrage. La position 1 est la plus robuste.
EN - If necessary, change the position of pin B (between 1 and 4),
while in the open position, to adjust the tightening. Position 1 is the tightest.
DE - Falls nötig, die Position des Stiftes B (von 1 bis 4) in Stellung „offen“ ändern,
um die Befestigung einzustellen. Position 1 ist die belastbarste.
ES - En caso necesario, cambiar la posición del eje B (de 1 a 4),
en posición "abierto", para regular el ajuste. La posición 1 es la más fuerte.
IT - Se necessario, scambiare la posizione dell’asse B (da 1 a 4)
in posizione “aperta”, per regolare la tenuta. La posizione 1 è la più robusta.
NL - Indien nodig de positie van as B wijzigen (van 1 tot 4),
in ‘open’ positie om de bevestiging af te stellen. Positie 1 is de krachtigste.
PT - Se necessário, permutar a posição do eixo B (de 1 a 4),
em posição "aberto", para ajustar o aperto. A posição 1 é a mais robusta.
3. REGLAGE.
1
23
4
5. MISE EN PLACE DES VELOS ET SERRAGE.
FR - Disposer le vélo le plus lourd en premier, le côté pédalier en appui sur
le bras (vue 1 ) Serrer les cadres avec les sangles en caoutchouc, puis
solidariser le tout à l'aide de la sangle de serrage totale F en passant
dans les roues : Cette sangle garanti le maintien des vélos.
DE - Das schwerste Rad zuerst positionieren, die flache Seite des Pedals
liegt an der Stange an (Bild 1 ). Die Rahmen mit den Gummigurten
festzurren, dann alles mit dem Gurt für die Komplettverspannung F , der
durch die Räder geführt wird, zusammenhalten: Dieser Gurt garantiert den
festen Halt der Räder.
ES - Colocar en primer lugar la bicicleta más pesada, con el lado de los
pedales apoyado en el brazo (vista 1 ). Apretar los cuadros con las
correas de goma, a continuación unirlo todo con la correa de ajuste
completo F , pasándola por todas la ruedas: Esta correa garantiza la
sujeción de las bicicletas.
IT - Posizionare la bicicletta più pesante per prima, il lato pedale
appoggiato sul braccio (figura 1 ). Stringere il telaio con le cinghie di
gomma e fissare il tutto con la cinghia di serraggio totale F passando
nelle ruote: questa cinghia assicura il fissaggio perfetto delle biciclette.
NL - De zwaarste fiets eerst plaatsen, de trapas tegen de arm laten steunen
(foto 1 ). De frames met de rubberen riemen vastmaken, daarna alles
vastzetten door bevestigingsriem F door de wielen te steken. Deze riem
zorgt dat de fietsen blijven vastzitten.
PT - Dispor primeiro a bicicleta mais pesada, o lado do pedal em apoio
sobre o braço (vista 1 ) Apertar os quadros com os tensores em borracha,
solidarizar tudo com a ajuda do tensor de aperto total F passando nas
rodas: Este tensor garante a segurança das bicicletas.
F
EN - Position the heaviest cycle first, the pedal side resting against the arms (inset 1 ). Secure the frames
with the rubber straps, then pull everything together with general tightening strap F , passing it through the
wheels: This strap ensures that the cycles are held firmly.
1


