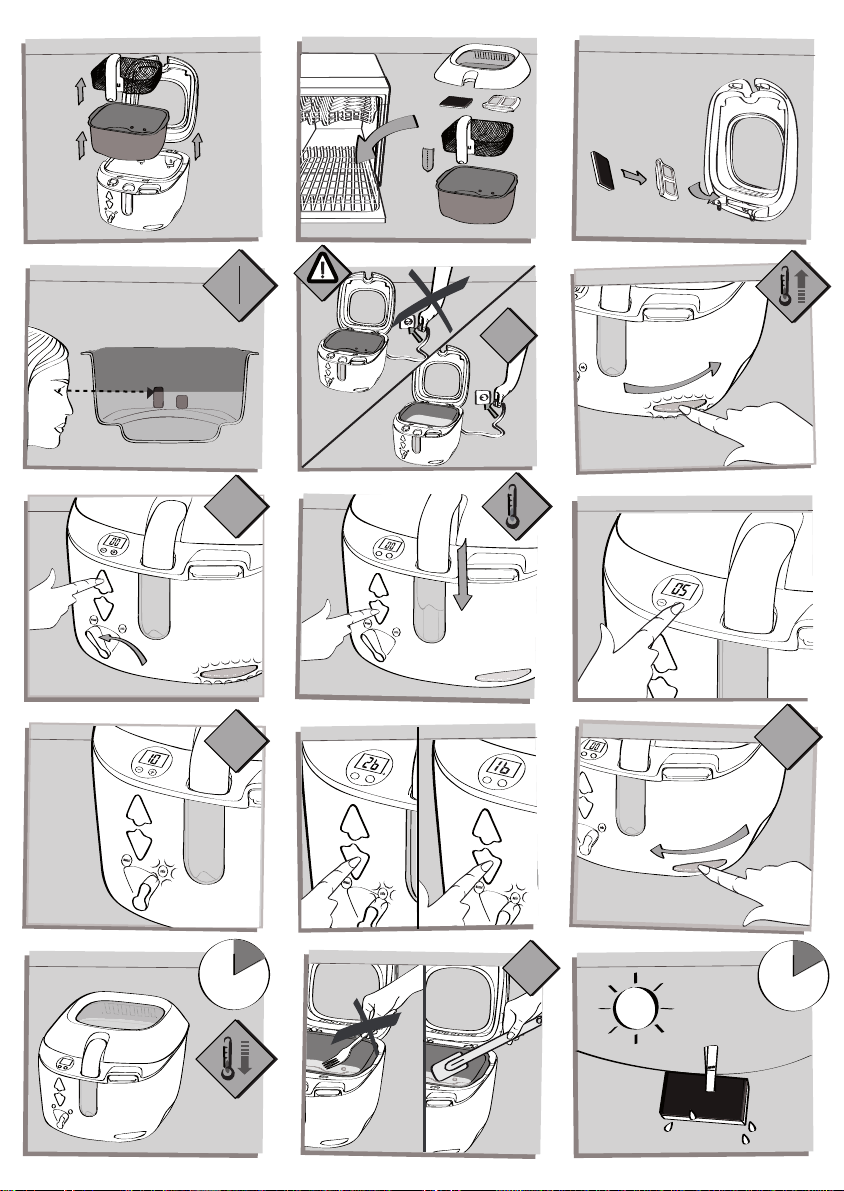
• Lorsque la température du bain d’huile
sélectionnée est atteinte, le voyant de
chauffe s’éteint et le panier descend
automatiquement. Le minuteur commence
à décompter en clignotant dès que le
panier est en position basse.
• Lorsque le temps de cuisson est écoulé, le
panier remonte automatiquement et le
sélecteur passe en position MANUAL. Le
minuteur affiche fixe et une sonnerie
retentit. Pour l’arrêter, appuyer une fois sur
l’une ou l’autre des touches +/-.
• Ouvrez le couvercle, sortez le panier et
servez.
REMARQUES
Il est possible de régler le minuteur à n’importe
quel moment pendant la cuisson en
appuyant sur les touches +/-.
En mode Automatique, le réglage du
minuteur peut aller de 00 à 30 minutes.
En mode Automatique, il est possible de
remonter le panier à n’importe quel
moment, pour cela :
• appuyer sur la touche : le sélecteur
passe automatiquement en position
MANUAL, le voyant AUTO s'éteint et le
temps de cuisson restant est mémorisé.
• Si vous repassez en mode Automatique,
le panier redescend et la cuisson
continue avec le temps mémorisé.
A la fin du temps de cuisson, le panier
remonte automatiquement.
• Si vous ne repassez pas en mode
Automatique, la cuisson continue en
mode Manuel : il faut alors appuyer sur la
touche pour faire descendre le panier.
En fin de cuisson, lorsque le minuteur
sonne, faites remonter le panier en
appuyant sur la touche .
3.
CUISSON EN 2 BAINS EN MODE
AUTOMATIQUE
Pour des frites fraîches plus croustillantes, la
cuisson en 2 bains est recommandée.
Le mode Automatique vous permet de frire
en 2 bains à la même température :
• Une fois la cuve remplie de matière grasse,
branchez la friteuse - Fig 5 : le minuteur
affiche fixe.
• Réglez le thermostat et remplissez le
panier avant de le replacer dans la cuve.
(cf paragraphe Cuisson en 1 bain en
mode Automatique).
• Positionnez le sélecteur sur AUTO : le
voyant AUTO s’allume. Pour sélectionner
le mode de cuisson en 2 bains, appuyez
1 fois sur la touche , le minuteur
affiche pendant 5 secondes - Fig 11 -
puis il indique minutes fixe - Fig 10.
• Si vous souhaitez modifier le temps de
cuisson, appuyez sur les touches +/- de
réglage du minuteur.
• Lorsque la température du bain d’huile
sélectionnée est atteinte, le voyant de
chauffe s’éteint et le panier descend
automatiquement. Le temps de cuisson
total sélectionné commence à décompter
dès que le panier est en position basse.
• Quand les 2/3 du temps de cuisson
sélectionné précédemment se sont écoulés,
le panier remonte automatiquement une
première fois : le sélecteur passe en position
MANUAL mais le voyant AUTO reste allumé.
• Quand le voyant de chauffe s’éteint à
nouveau, le panier redescend pour la
cuisson du 2ème bain.
• Lorsque le temps de cuisson sélectionné
est totalement écoulé, le panier remonte
automatiquement.
• Le minuteur affiche fixe et une sonnerie
retentit. Pour l’arrêter, appuyer une fois sur
l’une ou l’autre des touches +/-.
• Ouvrez le couvercle,sortez le panier et servez.
REMARQUES
L
’appui sur la touche doit intervenir avant
les 2/3 du temps de cuisson pour que la
cuisson en 2 bains soit prise en compte.
Si vous changez d’avis et ne désirez
finalement qu’une cuisson en un bain, un
nouvel appui sur la touche annule la
cuisson en 2 bains, ns, sera affiché pendant
5 secondes - Fig 12.
En cuisson 2 bains, il est normal que le
sélecteur repasse en mode Manuel à la fin
du 1er bain, le cycle Automatique se
poursuivra pour le 2ème bain.
4. ARRÊTER LA FRITEUSE
• Une fois la cuisson terminée, mettez le
thermostat en position Arrêt « 0/I » - Fig 13.
• Vous pouvez ranger le panier en position
haute ou basse :
•La friteuse et le cycle de cuisson
automatique sont alors programmés,
vous n’avez plus rien à faire !