Mowox EM 4640 PX-Li User manual

1
Electric 40 V battery lawn mower
EM 4640 PX-Li EM 4640 SX-Li EM 4140 PX-Li
DYM192115 DYM192215 DYM191715
Original operating instructions (EN)
Read this manual carefully prior to installing and operating
the mower. It is dangerous to operate
this
product without
being familiar with these
instructions.
Keep this manual in a
safe place and have it ready
for
future reference.
Manufacturer
Ningbo Daye Garden Machinery
Co., Ltd.
No. 58 Jinfeng Road, Yuyao
Zheijiang 315403, P.R. China
www.daye-garden.com
Importer
Daye Europe GmbH
Parkstraße 1a
66450 Bexbach, Germany
www.mowox.com
r
i
g
inal o
p
eratin
g
instructions
(
E
i
s
manua
l
ca
r
efully pr
i
o
r
to
i
nstalling
a
nd op
e
we
r
.
r
r
It
is
d
ang
e
r
o
u
s
to
opera
te
t
h
is
p
r
o
d
uct
w
amiliar with
these
instructions
Keep
this
ma
n

2
Know your lawn mower.
Read all instructions.
Read this manual carefully, observing the recommended safety instructions before, during
and after using your lawn mower. Following these simple instructions will also maintain
your lawn mower in good working order. Familiarize yourself with the controls on your
mower before attempting to operate it, but above all, be sure you know how to stop your
mower in an emergency. Retain this user manual and all other literature with your mower
for future reference.
Table of contents
1. symbols marked on the product ....................................................................... 3
2. instructions for your safety ............................................................................. 5
3. packaging contents and controls ................................................................... 10
4. technical data ............................................................................................... 11
5. assembly ...................................................................................................... 12
6. “3 IN 1” ......................................................................................................... 19
7. safety precautions ........................................................................................ 22
8. starting ........................................................................................................ 23
9. maintenance and care ................................................................................... 26
10. troubleshooting ............................................................................................ 29
11. Warranty conditions for Mowox® gardening power tools and accessories ........ 30
12. environmentally friendly disposal .................................................................. 32
13. EC-declaration of conformity ......................................................................... 33
3
1
1.
.S
SY
YM
MB
BO
OL
LS
S
M
MA
AR
RK
KE
ED
D
O
ON
N
T
TH
HE
E
P
PR
RO
OD
DU
UC
CT
T
1
1.
.1
1S
SY
YM
MB
BO
OL
LS
S
O
ON
N
T
TH
HE
E
L
LA
AW
WN
N
M
MO
OW
WE
ER
R
Read this instruction book carefully before using the lawn mower and keep it
in a safe place for future reference.
Keep bystanders away.
Beware of sharp blades. Blades continue to rotate after the motor
is switched off.
Switch off isolator key before adjusting, cleaning and before leaving the
product unattended for any period.
The charger is intended for indoor use only.
Wear hearing and eye protection
The machine is protected against ingress of water dropping
from vertical direction.
Do not expose to rain or damp conditions.
4
CE Marking
The product meets demands and regulations set by the European
Community.
WEEE Marking
C
CAUTION!
Unusable power tools do not belong to domestic waste.
They must be taken to a communal collecting point for environmentally
friendly disposal in accordance with local regulations.
Do not operate on inclines steeper than 15°. Mow parallelly
to slopes, never up and down.
Electric shock hazard.
Wait until all machine components have completely stopped
before touching them.
Keep hands and feet away

5
1
1.
.2
2S
SY
YM
MB
BO
OL
LS
S
O
ON
N
T
TH
HE
E
B
BA
AT
TT
TE
ER
RY
Y
Li-lon
Do not dispose of batteries into household waste, water or fire. Battery
packs/ batteries must be collected, recycled or disposed of in an
environmentally friendly way.
Only for EC countries:
Defective or dead batteries must be recycled according to the directive
2006/66/EC
Noise level marking
Your tool noise is not more than 92dB.
safety alert symbol
Indicates caution or warning may be used in conjunction with other
symbols or pictures.
2
2.
.I
IN
NS
ST
TR
RU
UC
CT
TI
IO
ON
NS
S
F
FO
OR
R
Y
YO
OU
UR
R
S
SA
AF
FE
ET
TY
Y
The purpose of safety rules is to attract your attention to possible dangers. The safety
symbols, and the explanations with them, require your careful attention and understanding.
The safety warnings do not by themselves eliminate any danger. The instruction or
warnings they give are not substitutes for measures of proper accident prevention.
WARNING: Failure to obey a safety warning can result in serious injury to yourself or
to others. Always follow the safety precautions to reduce the risk of fire, electric shock and
personal injury. Save owner’s manual and review frequently for continuing safe operation
and instructing others who may use this tool.
WARNING: This machine produces an electromagnetic field during operation. This
field may, under some circumstances, interfere with active or passive medical implants. To
reduce the risk of serious or fatal injury, we recommend persons with medical implants to
consult their physician and the medical implant manufacturer before operating this
machine.
WARNING: The operation of any tool can result in foreign objects being thrown into
your eyes, which can result in eyes severely damaged. When operating this power tool,
always wear safety goggles or safety glasses. Wear a full face mask in dusty conditions.

6
IMPORTANT
READ CAREFULLY BEFORE USE.
KEEP FOR FUTURE REFERENCE.
2
2.
.1
1G
GE
EN
NE
ER
RA
AL
L
I
IN
NS
ST
TR
RU
UC
CT
TI
IO
ON
NS
S
1. Read the instructions carefully. Be familiar with the controls and the correct use of the
machine.
2. Never allow children or people unfamiliar with these instructions to use the machine.
Local regulations can restrict the age of the operator
3. Never operate the machine while people, especially children, or pets are nearby.
4. Keep in mind that the operator or user is responsible for accidents or hazards occurring
to other people or their property.
2
2.
.2
2P
PR
RE
EP
PA
AR
RA
AT
TI
IO
ON
N
1. While operating the machine always wear substantial footwear and long trousers. Do
not operate the machine when barefoot or wearing open sandals. Avoid wearing
clothing that is loose fitting or that has hanging cords or ties.
2. Thoroughly inspect the area where the machine is to be used and remove all objects
which can be thrown by the machine.
3. Before using, always visually inspect to see that the blade, blade bolt and the blade
assembly are not worn or damaged. Replace worn or damaged components in sets to
preserve balance. Replace damaged or unreadable labels.
2
2.
.3
3O
OP
PE
ER
RA
AT
TI
IO
ON
N
1. Operate the machine only in daylight or in good artificial light.
2. Avoid operating the machine in wet grass.

7
3. Always be sure of your footing on slopes.
4. Walk, never run.
5. Mow parallelly to slopes, never up and down.
6. Exercise extreme caution when changing direction on slopes.
7. Do not mow excessively steep slopes.
8. Use extreme caution when reversing or pulling the machine towards you.
9. Stop the motor if the machine has to be lifted or tilted or when crossing surfaces other
than grass.
10. Never operate the machine with defective guards or shields, or without safety devices,
for example deflectors and/or
grass collector, in place.
11. Switch on the motor carefully according to instructions and with feet well away from
the blade.
12. Do not tilt the machine when switching on the motor, except if the machine has to be
tilted for starting. In this case, do not tilt it more than absolutely necessary and lift only
the part which is away from the operator.
13. Do not start the machine when standing in front of the discharge opening.
14. Do not put hands or feet near or under rotating parts. Keep clear of the discharge
opening at all times.
15. Stop the machine, and remove plug from the socket. Make sure that all moving parts
have come to a complete stop.
Stop the machine, and remove the disabling device. Make sure that all moving parts
have come to a complete stop
a. whenever you leave the machine,
b. before clearing blockages or unclogging chute,
c. before checking, cleaning or working on the machine,
16. after striking a foreign object, Inspect the machine for damage and make repairs before
restarting and operating the machine.

8
17. If the machine starts to vibrate abnormally,
a. inspect for damage,
b. replace or repair any damaged parts,
c. check for and tighten any loose parts.
2
2.
.4
4M
MA
AI
IN
NT
TE
EN
NA
AN
NC
CE
E
A
AN
ND
D
S
ST
TO
OR
RA
AG
GE
E
1. Keep all nuts, bolts and screws tight to be sure the machine is in safe working
condition.
2. Check the grass collector frequently for wear or deterioration.
3. Be careful during adjustment of the machine to prevent entrapment of the fingers
between moving blades and fixed parts of the machine.
4. Always allow the machine to cool down before storage.
5. When servicing the blade, be aware that, even though the power source is switched off,
the blades can still be moved.
6. Replace worn or damaged parts for safety. Use only genuine replacement parts and
accessories.
2
2.
.5
5S
SA
AF
FE
ET
TY
Y
A
AD
DV
VI
IC
CE
E
F
FO
OR
R
R
RE
EC
CH
HA
AR
RG
GE
EA
AB
BL
LE
E
B
BA
AT
TT
TE
ER
RY
Y
A
AN
ND
D
C
CH
HA
AR
RG
GE
ER
R
1. Use only the battery provided with the lawn mower and the provided charger.
2. Protect battery and battery charger from humidity.
3. Do not operate the battery charger outdoors.
4. When it is not in use or before cleaning and servicing, disconnect the battery charger
from the power supply.
5. Avoid dropping of items onto any hard surface and exposure to pressure or any other
form of mechanical stress.
6. Do not open or attempt to repair the battery or the battery charger. If any parts are
defective, have them repaired by a qualified technician or send them to our service
department for repair.

9
7. Remove the battery from the mower after each use and charge it. Do not store it
in the mower.
8. Charge the battery between 0ºC and +30ºC in a dry place.
9. Store the battery between -20°C and +30° in a dry place, as cold as possible.
10. Recharge the battery after 3 months of non-usage.
11. The battery is not fully charged at the factory. Before attempting to use it, it must
be fully charged firstly.
Important! Danger!
Never short-circuit the battery or expose it to moisture. Do not store it together
with any metal parts which could short-circuit the contacts. The battery could overheat, start
burning or explode.
If any person comes into contact with acid or similar internal fluids or substances contained in
the battery, wash off these substances immediately with plenty of water. If these substances
make contact with the eyes, rinse with plenty of water and see a doctor immediately.
Warning!
Do not open the battery pack to get the battery out by yourself.
Do not place the rechargeable battery into fire or water. It can explode. The rechargeable
battery should not be discarded to domestic refuse, regardless of whether used or unused.
You should return it to a local battery collection point in accordance you’re your local battery
regulations or return them to the dealer or supplier marked “used battery”.

10
3
3.
.P
PA
AC
CK
KA
AG
GI
IN
NG
G
C
CO
ON
NT
TE
EN
NT
TS
S
A
AN
ND
D
C
CO
ON
NT
TR
RO
OL
LS
S
P
Parts 8 & 13 only for EM 4640.
Part 11 only for SX.
1. upper handle 8. cover flap of side-
dischar
g
e
2. on/ off button 9. batter
y
cover fla
p
3. switch box 10. cable clam
p
4. locking nut 11. self-propulsion
control handle
5. grass catcher 12. brake control handle
6. height adjustment
lever 13. side-discharge
deflector
7. wheel 14. mulchin
g
wed
g
e
4
1
2
2
3
5
6
7
8
10
11
12
9
14
13

11
4
4.
.T
TE
EC
CH
HN
NI
IC
CA
AL
L
D
DA
AT
TA
A
Model EM 4640 SX-Li
(DYM192215)
EM 4640 PX-Li
(DYM192115)
EM 4140 PX-Li
(DYM191715)
rated voltage 40 V DC
no load speed 3000 min-1 3100 min-1
grass catcher capacity 60 l 50 l
cutting width 460 mm 460 mm 410 mm
net weight (without
battery) 23.6 kg 21 kg 18.6 kg
height adjustment 25-75 mm, 7 settings
sound pressure level at
the operator’s position
80.3 dB(A)
K = 3 dB(A)
77.3 dB(A)
K = 3 dB(A)
measured sound power
level
90.6 dB(A)
K = 1.80dB(A)
88 dB(A)
K = 1.96 dB(A)
guaranteed sound
power level 92 dB(A)
vibration max. 2.35 m/s²
K = 1.5 m/s²
max. 0.68m/s²
K = 1.5 m/s²
battery lithium-ion
model number BA 154 (DYMA154)
rated voltage 40 V DC max.
capacity 144 Wh
number of cells 20
battery charger
model number BC 82 (DYMA82)
input 220 – 240 V AC, 50 Hz, 0.6 A
output 40 V DC, 1 A
allowable charging temperature range 0-50ႏ

12
5
5.
.A
AS
SS
SE
EM
MB
BL
LY
Y
5
5.
.1
1A
AS
SS
SE
EM
MB
BL
LY
Y
O
OF
F
T
TH
HE
E
F
FO
OL
LD
DI
IN
NG
G
H
HA
AN
ND
DL
LE
E
1. Turn the latch a quarter of a circle to release the lower guide rail (Fig. 2A – 2C).
2. Rotate the handle upwards (Fig. 2D).
3. Turn the latch back to lock it to the chassis (Fig. 2E).
4. Mount the upper to the lower guide rail with the consigned washers, bolts and locking
nuts (Fig. 2F).
5. Use the cable clamps to attach cable to the lower rail (Fig. 2G).
Fig. 2A Fig. 2B
Fig. 2C Fig.2D

13
Fig. 2E Fig. 2F
Fig. 2G
5
5.
.2
2A
AD
DJ
JU
US
ST
TM
ME
EN
NT
T
F
FO
OR
R
A
AN
N
A
AP
PP
PR
RO
OP
PR
RI
IA
AT
TE
E
A
AN
NG
GL
LE
E
1. Turn the latch a quarter of a circle to release the guide rail (Fig. 3A).
2. The three holes in the brackets correspond to three heights of the lever according to
your size (Fig. 3B). 1 is highest, 3 is lowest.
3. Adjust to the proper height, then turn the latch back to lock it to the chassis .
W
Warning:
Choose the same positions on both sides of the rail.
Cable clamp
washer Locking nut
bolt

14
Fig. 3A Fig. 3B
5
5.
.3
3G
GR
RA
AS
SS
S
C
CA
AT
TC
CH
HE
ER
R
Mount and remove
1. Raise the rear cover and hitch the grass catcher on the mounting holes on the rear of
mower (Fig. 4A - 4C).
2. Do vice versa to remove.
Filling indicator
There is a level indicator on the top of the grass catcher that shows whether the catcher is
empty or full.
a. The little plastic flap will flatter during operation if grass is sucked into the
grass catcher and it’s not yet full (Fig. 4D).
b. If the flap remains still, you will need to empty the grass bag (Fig. 4E).
Keep the little flap and its mounting holes clean to maintain its function.
Fig. 4A Fig. 4B
1
2
3
Locking knob

15
Fig. 4C
Fig. 4D Fig.4E
5
5.
.4
4M
MA
AI
IN
N
K
KE
EY
Y
S
SW
WI
IT
TC
CH
H
Additionally to the visible switch on the guide rail, there is a second switch in the motor
housing operated with a key. It must be turned on, like in a car, before engaging the other
switch.
1. Lift the battery cover (Fig. 5A).
2. Insert the isolator key into the slot (Fig. 5B/ Fig. 5C).
3. Key position “0” means powered off, “1” is on.

16
Fig. 5A Fig. 5B
Fig. 5C
5
5.
.5
5B
BA
AT
TT
TE
ER
RY
Y
I
IN
NS
SE
ER
RT
TI
IO
ON
N
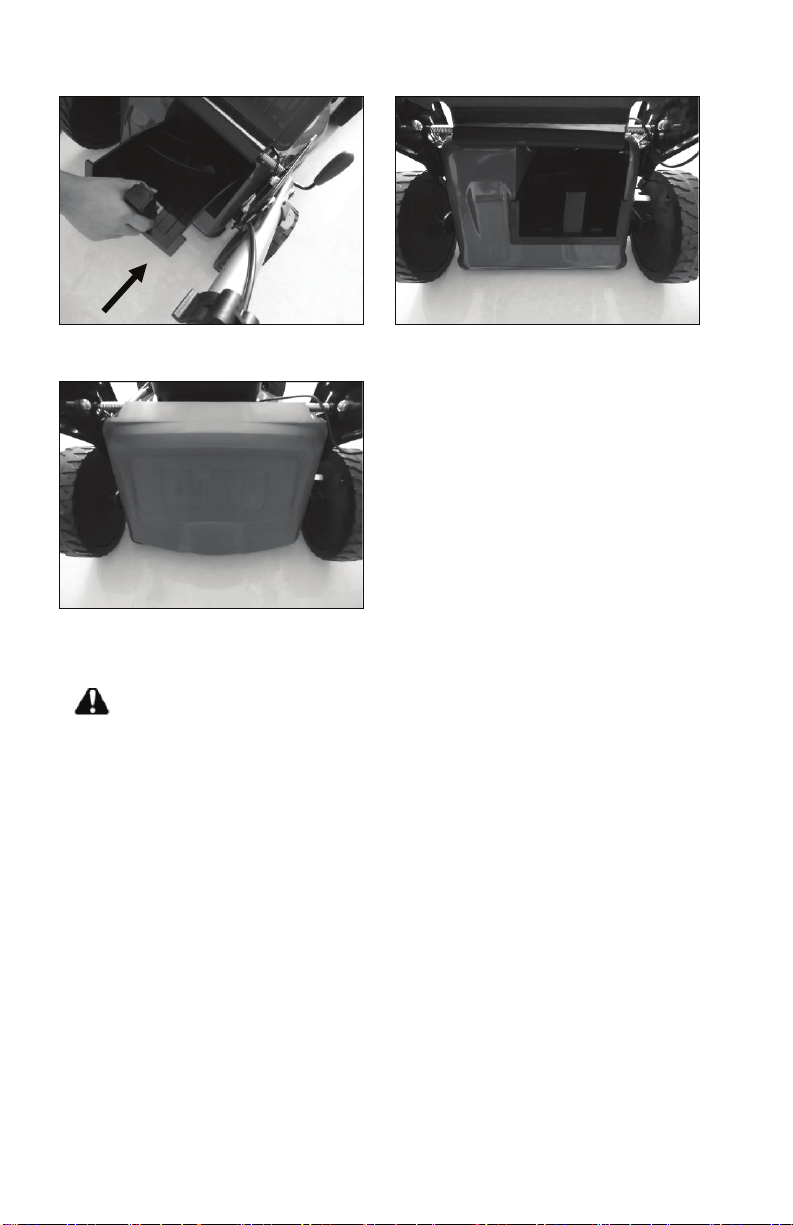
1. Lift up the battery cover.
2. Make sure the isolator key is switched off. Switch mark ”1” is ON”, “0” is “OFF” (Fig. 6A).
3. Insert the battery pack into battery holder (Fig. 6B).
4. Make sure the latch on bottom of battery pack snaps in place and that the battery pack is
fully seated (Fig. 6C).
5. Close the battery door (Fig. 6D).

17
Fig. 6A Fig. 6B
Fig. 6C Fig. 6D
5
5.
.6
6B
BA
AT
TT
TE
ER
RY
Y
R
RE
EM
MO
OV
VA
AL
L
1. Lift and hold up the battery door.
2. Press and hold the battery latch button at the bottom of the battery pack (Fig. 7).
3. Remove the battery pack from the cabinet.

18
Fig. 7
5
5.
.7
7C
CE
EN
NT
TR
RA
AL
L
A
AD
DJ
JU
US
ST
TM
ME
EN
NT
T
O
OF
F
C
CU
UT
TT
TI
IN
NG
G
H
HE
EI
IG
GH
HT
T
Apply outward pressure to disengage the lever from the rack. Move it forward and back to
adjust the height.
The central adjustment operates all wheels at the same time.
You adjust the distance of the blade to the ground, thus the cutting height.
It can be adjusted from 25 mm grass length (position 1) to 75 mm grass length (position 7),
Cf. fig.8.
Fig.8
WARNING:
Make this adjustment only when the blade is stopped.

19
6
6.
.“
“3
3
I
IN
N
1
1”
”
This formula describes 3 functions:
1. Collection of clippings in grass bag.
2. Mulching.
3. Side-discharge.
What is mulching?
During mulching, the grass is cut, grinded and returned onto the lawn as natural fertilizer; all
at the same time.
Hints for mulch-mowing:
1. Cut max. 2 cm down with this function. Do a regular cut (with collection of the clippings)
firstly if needed.
2. Use a sharp cutting knife.
3. Do not mow wet grass.
4. Walk slowly.
5. Regularly clean the mulching wedge, the underside of the deck and the housing inner
side and the blade.
Retrofitting for mulching mower
WARNING:
O
Only with a stopped motor and standstill cutter.
1. Raise the rear cover and remove the grass catcher.
2. Push the mulching wedge into the deck. Lock the mulching wedge with the button into
the opening on the deck (Fig. 9A/ Fig. 9B).
3. Lower the rear cover again (Fig.9C).
4. If put on the side discharge channel before: Remove it.
20
Fig .9A Fig. 9B
Fig.9C
Retrofitting for side-discharge mowing (only for EM 4640 models)
WARNING:
O
Only with a stopped motor and standstill cutter.
1. Lift the rear cover and remove the grass catcher.
2. Mount the mulching wedge (cf. description above).
3. Lift the sideward flap for side discharge (Fig. 9D).
4. Mount the side discharge channel on the support pins of the sideward flap (Fig. 9E).
5. Lower the sideward flap. It lies on the side discharge channel (Fig. 9F).
This manual suits for next models
5
Table of contents
Other Mowox Lawn Mower manuals

Mowox
Mowox EM 3440 P-Li User manual

Mowox
Mowox RM 600 Li BT User manual

Mowox
Mowox EM 4662 P-Li User manual

Mowox
Mowox EM 4140 PX-Li User manual

Mowox
Mowox RM 800 Li BT User manual

Mowox
Mowox PS 4015 P-N User manual
 User manual")
Mowox
Mowox EM 3440 PX(-Li) User manual

Mowox
Mowox RM 30 Li User manual

Mowox
Mowox PM 4645SEHW User manual

Mowox
Mowox PM 4030 P User manual


