Mowox PM 4030 P User manual

Rev 1
Petrol lawn mower
Original Operating Instructions (EN)
Manufacturer
Ningbo Daye Garden Machinery Co., Ltd.
No. 58 Jinfeng Road, Yuyao
Zhejiang 315403, PR China
Importer
Daye Europe GmbH
Parkstraße 1a
66450 Bexbach, Germany
www.mowox.com
PM
4030 P
(DYM161702)
PM
4650 S
(DYM1666E)
PM
4650 SHW
(DYM1626ECQ)
PM
5165 SHW
(DYM1660E2Q)
PM
5175 S
(DYM1668EC)
PM
5175 SHW
(DYM1666E3Q)
PM
5690 SHW
(DYM1669EQ)
PM
5690 SZT
(DYM1679B)
1 (EN)
You are well versed in your new lawnmower.
Because you entirely read this user manual.
Read these operating instructions for your own safety before
commissioning the device. Failure to follow the instructions can
lead to serious injuries. Familiarize yourself with the device
before each use. Keep this operating instruction well so that
the information it contains is available at all times. If you pass
on the device to third parties, add this operating instruction.
When unpacking the lawn mower, be careful not to twist or
bend the cables and not to pull the device on the cables. Other-
wise, damage to the device could be caused, which is not cov-
ered by the warranty.
1
1
I
IN
NT
TE
EN
ND
DE
ED
D
U
US
SE
E
This device may only be used for its intended purpose. Any other type of use is consid-
ered abusive. The user, not the manufacturer, is liable for damage or injury caused by
misuse.
The petrol lawn mower is intended for private home and garden use.
This refers to an operating life of up to 50 hours per year and to the preservation of
small, private lawns and private hobby gardens. Public facilities, sports fields and ap-
plications in agriculture and forestry are excluded from this.
Note that this device is not designed for commercial or industrial use. The warranty ex-
pires if the device is used for commercial, industrial or similar purposes.
The instructions for use must be followed to ensure proper use and maintenance. The
operating instructions contain important information regarding use, maintenance and
repair.
Due to the high risk of injury, this lawn mower must not be
used to cut bushes, hedges or perennials, green roof surfaces
or balcony grass surfaces, to remove (suck up) dirt and debris
on sidewalks, or to crush tree or hedge waste. In addition, the
lawn mower must also not be used as a milling machine for
flattening elevations such as molehills.
For safety reasons, the lawn mower must not be used as a drive
for other tools or equipment.

2 (EN)
Table of contents
1Intended use..................................................................................................... 1
2Safety instructions .........................................................................................3
2.1 Security icons...................................................................................................................3
2.2 Safe use..............................................................................................................................4
3Your lawn mower at a glance ....................................................................... 8
4Technical data ................................................................................................. 9
5Assembly .........................................................................................................11
5.1 Assembly of the lower part of the handle...............................................................11
5.2 Assembly of the upper part of the handle............................................................. 12
5.3 Adjustment to the operator’s body size..................................................................13
5.4 Cable guide.......................................................................................................................13
5.5 Grass bag..........................................................................................................................13
5.6 Starter handle ................................................................................................................14
6Usage ........................................................................................................15
6.1 Before commissioning..................................................................................................15
6.2 Adjustment of the cutting height.............................................................................16
6.3 Start of the engine........................................................................................................19
6.4 Stopping the engine..................................................................................................... 21
6.5 Walk the lawn mower with a running engine........................................................ 21
6.6 Rear wheel drive............................................................................................................22
6.7 Unidirectional drive......................................................................................................22
6.8 Achieve optimal results with the lawn mower......................................................23
6.9 Grass basket ...................................................................................................................23
6.10 Function “3 in 1”.............................................................................................................24
7Maintenance and care ................................................................................. 26
7.1 Maintenance plan..........................................................................................................26
7.2 Cleaning the mower......................................................................................................26
7.3 Air filter............................................................................................................................27
7.4 Engine oil.........................................................................................................................29
7.5 Blade.................................................................................................................................29
7.6 Spark plug .......................................................................................................................30
7.7 Wheels and moving parts (wire rope hoists)..........................................................31
7.8 Garden hose connection...............................................................................................31
7.9 Storage out of season..................................................................................................32
7.10 Upright storage.............................................................................................................34
8Troubleshooting............................................................................................35
9Mowox® Warranty conditions .................................................................. 36
10 Environmentally friendly disposal.............................................................37
10.1 Packaging........................................................................................................................37
10.2 Device............................................................................................................................... 37
11 EC Declaration of Conformity .................................................................... 38
3 (EN)
2
2
S
SA
AF
FE
ET
TY
Y
I
IN
NS
ST
TR
RU
UC
CT
TI
IO
ON
NS
S
2
2.
.1
1
S
SE
EC
CU
UR
RI
IT
TY
Y
I
IC
CO
ON
NS
S
1
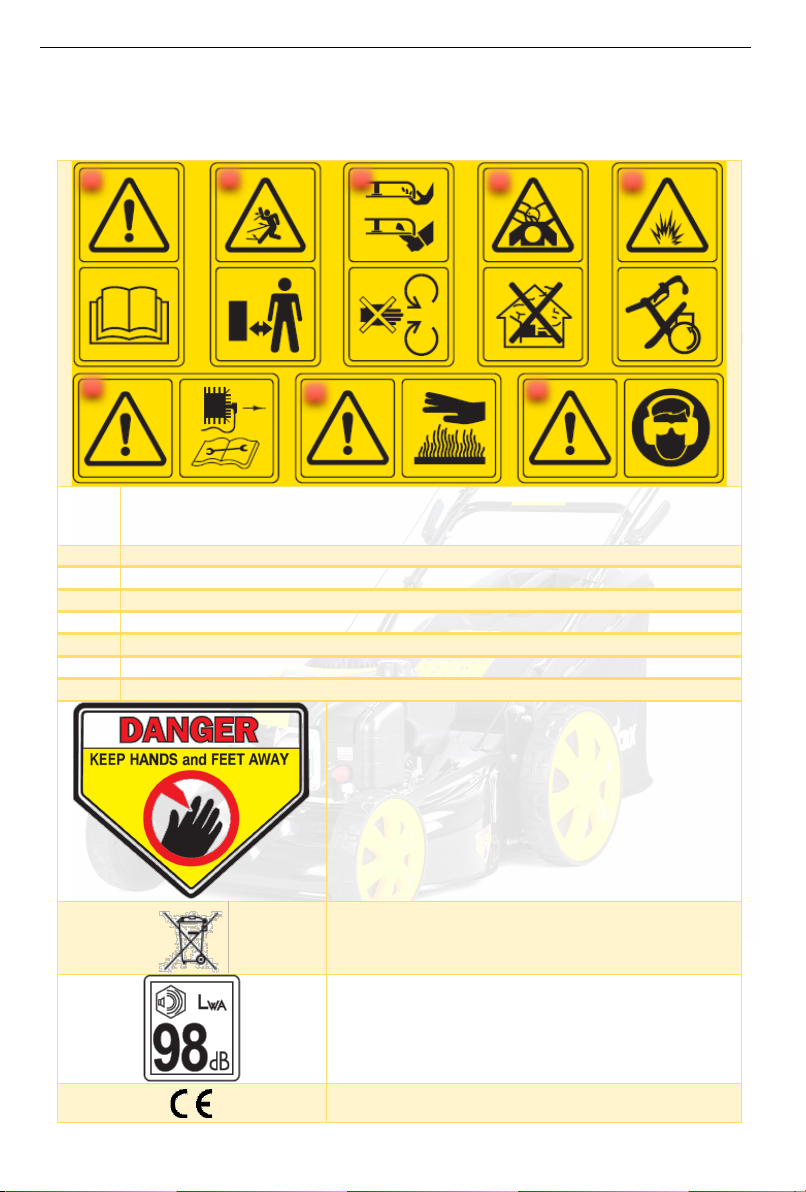
Read the operating instructions before using the device.
The device can cause dangerous situations if used improperly. Read and internalize the op-er-
ating instructions before using the device.
2
Inherent danger to other persons.
3
Risk of injury to hands and feet.
4
Combustible petrol. Keep away from fire! Do not refill petrol while the engine is running!
5
Toxic fumes. Do not use indoors.
6
High current electric ignition circuit. Disconnect the spark plug for maintenance.
7
Hot engine.
8
Wear safety goggles and ear protection during operation.
The sharp blade can cause serious injuries to limbs.
KEEP HANDS AND FEET AWAY.
This product must not be disposed of with normal household
waste at the end of its useful life. Information about recycling
can be obtained from your local authority or from your dealer.
Guaranteed sound power level: The noise level of this device is
not higher than the stated value.
The device complies with the requirements and regulations of
the European Community.
1
2
3
4
5
7
6
8
4 (EN)
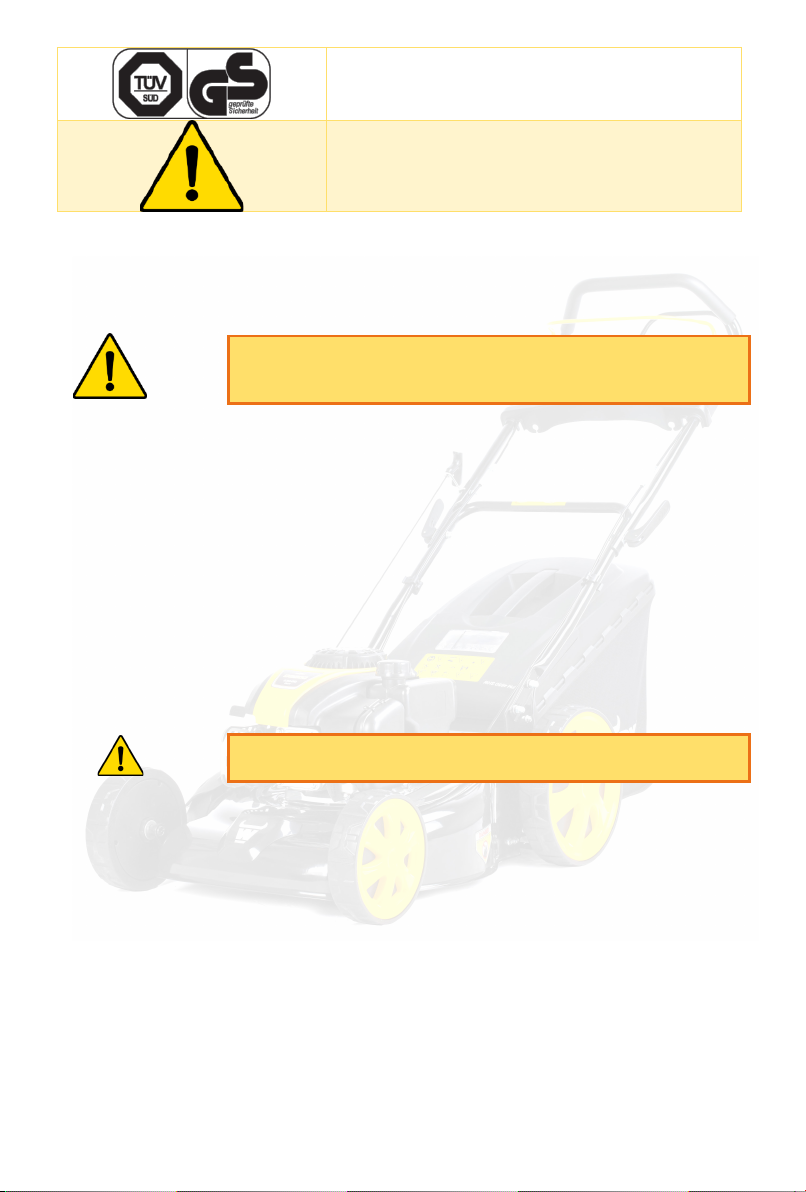
The device complies with strong safety test norms.
Warning for your safety.
You may be dangerously injured, or even possibly killed, if you
don’t follow the safety instructions.
The safety symbols on the device must always be clean and clearly visible. Replace
them if they are missing or unreadable.
2
2.
.2
2
S
SA
AF
FE
E
U
US
SE
E
Always observe the following safety instructions. Failure to
follow the warnings may result in electric shock, fire and/or
serious injury. Keep all warnings and instructions for later use.
2.2.1 Other people's safety
1. Never let children or people who are not familiar with the instructions use the de-
vice. National regulations may limit the minimum age for use.
2. Do not use the device if there are people, especially children, or animals in the
area.
3. Store the device outside the distance of children.
4. Please note that the user is liable to persons or property for accidents or danger-
ous situations.
5. Users of the device must be instructed regarding the use, setting and operation of
the device as well as of prohibited actions.
2.2.2 Preparation
Improper maintenance or misuse can cause malfunctions and
result in serious or even fatal injuries.
1. Don’t mow your lawn in the dark.
2. Check the area you want to mow carefully and remove any items such as stones,
toys, sticks and wires that can be whirled up by the device.
3. Always wear hearing protection.
4. The operation of any machine can cause foreign bodies to be thrown into the
eyes. Always wear safety glasses during operation, adjustment or repair.
5. Wear sturdy work gloves every time you come into contact with the machine.
6. Do not use the device on dusty or sandy surfaces. If you notice dust being stirred
up, interrupt operations and put on mouth-nose respiratory protection.
7. Always wear non-slip, closed shoes and long trousers during operation. Do not
wear loose clothing or shoes.
8. All screw and plug-in bindings must be checked for a fixed fit before each

5 (EN)
operation. Don’t use the machine with any loose or damaged parts.
9. Check the fuel and oil level before operation.
10. Check the air filter before operation, and, if necessary, clean it.#
11. Replace damaged silencers.
Gasoline is highly flammable.
Store gasoline in airtight canisters specifically designed for this
purpose.
Refill gasoline only outdoors and do not smoke.
Refill gasoline before turning on the engine. Never remove the
fuel cap or refill gasoline while the engine is running or when
the engine is still hot.
If gasoline gets spilled or splashed out, do not turn on the engine. The sparks during ig-
nition can cause an explosion. Move the device to another location and avoid the for-
mation of an ignition source until the fumes have evaporated.
Securely seal the covers of the fuel tank and container.
2.2.3 Operation
Engine exhaust gases contain toxic carbon monoxide. Carbon
monoxide is toxic. It can cause unconsciousness or even death
when inhaled. Do not run the engine without proper ventila-
tion; never turn on the engine indoors.
Do not use the lawn mower during thunderstorms.
The engine and exhaust gases become very hot during
operation. Keep flammable material away and do not place
objects on the engine while it is running.
1. It is recommended to limit the duration of operation to minimize hazards due to
noise and vibration.
2. Be especially careful on slopes, abysses, ditches and embankments.
3. Mow only in daylight.
4. Avoid operating on wet grass.
5. There is a risk of tripping on slopes.
6. Walk slowly, don't run.
7. Mow across slopes and never up or down.
8. Special care should be taken when changing direction on slopes.
9. Do not mow on extremely sloping slopes.
6 (EN)
10. Special care should be taken when reversing or pulling the lawn mower towards
you.
11. Stop the operation of the knives if the lawn mower needs to be tipped over when
crossing soils other than grassy areas and while transporting the lawn mower to
or from the place of use.
12. Do not use the lawn mower with defective protective devices, e.g. baffles and/or
grass collecting device.
The lawn mower must not be put into operation if the grass
trapping device or the self-closing protective device of the
outlet opening is not installed.
13. Do not make any adjustments to the engine speed.
14. The safety systems of the lawn mower must not be modified or deactivated.
15. Disable all drive couplings before turning on the engine.
16. Carefully turn on the engine according to the instructions; pay attention to a safe
distance between your feet and the knives.
17. Do not tilt the lawn mower when turning on the engine.
18. Keep hands and feet away from rotating parts. Never stand in front of the outlet
opening.
19. While the engine is running, the lawn mower must not be lifted or carried.
20. Turn off the engine and unplug the spark plug. Wait until all moving parts have
come to a standstill
a. before removing blockages or cleaning the ejection opening,
b. before checking, cleaning or maintaining the lawnmower,
c. after hitting an object with the lawnmower. Check the lawn mower for
damage and repair it before the next use,
d. if the lawn mower vibrates abnormally (check immediately),
e. before refilling petrol.
2.2.4 After use
1. Wear sturdy protective gloves when working on the device.
2. All nuts, bolts and screws must always be tightened to ensure safe operation.
3. Ensure adequate ventilation during operation or maintenance.
4. Do not store the device with gasoline in the tank in a building.
5. Allow the engine to cool before storage. Clean and maintain the lawn mower be-
fore storage.
6. To reduce fire hazards, keep the engine, muffler and fuel tank free of grass, leaves
and resin.
7. Regularly check the grass collecting device for wear and tear.
8. Replace worn or damaged parts.
7 (EN)
9. If the fuel tank needs to be emptied, do so outdoors and let it cool for at least 15
minutes first.
10. Improper maintenance, non-compliant spare parts, or the removal or modification
of safety devices can cause damage to the lawn mower and cause serious or even
fatal injuries.
11. Use only the blades and spare parts recommended by the manufacturer. The use
of non-original spare parts can cause damage to the device and injuries. Keep the
lawn mower in good working condition.
12. If the blade does not come to a stop immediately after switching off the engine,
please contact the customer service.
13. Clear the working head, blade and chain of dirt after each use. Check the chain oil
level and chain tension. Check if the chain is still sharp. Grease the hedge trimmer
blade.
14. The device is not waterproof and must not be cleaned with water.

8 (EN)
3
3
Y
YO
OU
UR
R
L
LA
AW
WN
N
M
MO
OW
WE
ER
R
A
AT
T
A
A
G
GL
LA
AN
NC
CE
E
1.
Guide bar
2.
Brake handle
3.
Handle for man-
ual start
4.
Quicklock levers
5.
Grass bag
6.
Height adjust-
ment lever
7.
Petrol valve
(only 5
690 SHW/
-ZT)
8.
Oil Filler Neck
& Oil Dipstick
9.
Mower housing
10.
Spark plug con-
nector
11.
Filler cap
12.
Cable clamp
13.
Side ejection
(not for 4030 P,
4650 S)
14.
Drive handle
(not for 4030
P)
15.
Air filter box
16.
Carburettor
17.
Silencer
18.
Washing con-
nection
(not for
4030 P)
19.
Guide bar
screws (not for
4030 P)
20.
Spark plug
wrench
21.
Primer pump
(only 4030 P,
4650 S/ -HW)
22.
Mulching wedge
(not for 4030 P,
4650 S)
23.
Locking device for
straight
running (only
5690 SZT)
1
14
2
3
4
6
5
8
7
10
11
12
21
15
19
18
20
13
9
17
22
24
12
16
23
4030 P only

9 (EN)
4
4
T
TE
EC
CH
HN
NI
IC
CA
AL
L
D
DA
AT
TA
A
Model
PM 4030 P
(DYM161702)
PM 4650 S
(DYM1666E)
PM 4650 SHW
(DYM1626ECQ)
PM 5165 SHW
(DYM1660E2Q)
Engine Type
DG 300
DG 500
DG 650
Engine design
4-stroke engine, overhead valve, 1 cylinder
Displacement; bore × stroke
80 cm3; 52 × 38 mm
135 cm3; 61 × 45 mm
149 cm3; 65 × 45
mm
Maximum power/ 3600 min-1
1.4 kW (1.9 HP)
2.4 kW (3.2 HP)
2.7 kW (3.6 HP)
Nominal power
1.2 kW (1.6 HP)
1.9 kW (2.6 HP)
2.4 kW (3.2 HP)
Fixed speed
3000 min
-1
2800 min
-1
Maximal torque
3.6 Nm/,000 min-1
6.6 Nm/2800 min-1
7.5 Nm/2800 min-1
Valve clearance (cold)
0.05 – 0.10 mm
0.10 - 0.15 mm
PTO shaft rotation
counterclockwise
clockwise
Ignition system
Transistor ignition
Ignition angle
22° ± 2°
16° ± 2°
Spark plug type
F7RTC
F6RTC
Spark plug electrode spacing
0.6 - 0.8 mm
Lubrication system
Immersion lubrication
Cooling system
Forced air cooling
Blade length
400 mm
460 mm
510 mm
Blade part number
DAYE 2105300136
DAYE 2105200263[…], 263002488,
21052003402000A or
2105200115C
DAYE
2105200262[...]
Required engine oil quantity
0.35 l
0.4 l
Capacity petrol tank
0.6 l
0.9 l
Grass bag capacity
50 l
60 l
Net weight
16.0 kg
26.6 kg
30.5 kg
31.4 kg
Cutting height adjustment
25 - 75mm, 6 posi-
tions
25 - 75mm, 10 positions
Measured sound pressure level
at the user's position (EN ISO
5395-1 Annex F
&
EN ISO 5395-
2, EN IS0 4871)
84.8 dB(A)
K = 3 dB(A)
82.9 dB(A)
K = 3 dB(A)
84.3 dB(A)
K = 3 dB(A)
86.1 dB(A)
K = 3 dB(A)
Measured sound power level
LWA
94.3 dB(A)
K = 2.08 dB(A)
94.0 dB(A)
K = 1.88 dB(A)
94.2 dB(A)
K = 2.00 dB(A)
96.4 dB(A)
K = 1.83 dB(A)
Guaranteed sound power level
L
WA G
(2000/14/EC)
96 dB(A)
96 dB(A)
96 dB(A)
98 dB(A)
Vibration (EN ISO 5395-1 Annex
G
&
EN ISO 5395-2)
2.50 m/s²
K = 1.5 m/s²
2.40 m/s²
K = 1.5 m/s²
5.64 m/s²
K = 1.5 m/s²
7.60 m/s²
K = 1.5 m/s²

10 (EN)
Model
PM 5175 S
(DYM1668EC)
PM 5175 SHW
(DYM1666E3Q)
PM 5690 SHW
(DYM1669EQ)
PM 5690 SZT
(DYM1679B)
Engine Type
DG 750
DG 900
Engine design
4-stroke engine, overhead valve, 1 cylinder
Displacement; bore × stroke
171 cm3; 67 × 48 mm
196 cm3; 70 × 51 mm
Maximum power/ 3600 min-1
3.0 kW (4.0 HP)
4.0 kW (5.4 HP)
Nominal power
2.6 kW (3.5 HP)
3.3 kW (4.4 HP)
Fixed speed
2800 min
-1
Maximal torque
9.0 Nm/2800 min
-1
10.5 Nm/2800 min
-1
Valve clearance (cold)
0.10 - 0.15 mm
0.15 - 0.25 mm
PTO shaft rotation
clockwise
Ignition system
Transistor ignition
Ignition angle
16° ± 2°
26.5° ± 2°
Spark plug type
F6RTC
F7RTC
Spark plug electrode spacing
0.6 - 0.8 mm
Lubrication system
Immersion lubrication
Cooling system
Forced air cooling
Blade length
510 mm
560 mm
Blade part number
DAYE 2105200262[...]
DAYE 2105200257[...] or
21052003412000A
Required engine oil quantity
0.4 l
0.55 l
Capacity petrol tank
0.9 l
1.8 l
Grass bag capacity
60 l
70 l
Net weight
29.5 kg
32.1 kg
38.8 kg
42.2 kg
Cutting height adjustment
25 - 75mm, 10 positions
25 - 75mm, 7 posi-
tions
Measured sound pressure level
at the user's position (EN ISO
5395-1 Annex F
&
EN ISO 5395-
2, EN IS0 4871)
85.4 dB(A)
K = 3 dB(A)
85.4 dB(A)
K = 3 dB(A)
85.1 dB(A)
K = 3 dB(A)
84.8 dB(A)
K = 3 dB(A)
Measured sound power level
LWA
96.3 dB(A)
K = 1.79 dB(A)
96.3 dB(A)
K = 1.79 dB(A)
96.2 dB(A)
K = 1.90 dB(A)
95.7 dB(A)
K = 2.01 dB(A)
Guaranteed sound power level
LWA G (2000/14/EC)
98 dB(A)
98 dB(A)
98 dB(A)
98 dB(A)
Vibration (EN ISO 5395-1 Annex
G
&
EN ISO 5395-2)
6.93 m/s²
K = 1.5 m/s²
6.93 m/s²
K = 1.5 m/s²
3.40 m/s²
K = 1.5 m/s²
3.76 m/s²
K = 1.5 m/s²

11 (EN)
5
5
A
AS
SS
SE
EM
MB
BL
LY
Y
5
5.
.1
1
A
AS
SS
SE
EM
MB
BL
LY
Y
O
OF
F
T
TH
HE
E
L
LO
OW
WE
ER
R
P
PA
AR
RT
T
O
OF
F
T
TH
HE
E
H
HA
AN
ND
DL
LE
E
5.1.1 For all models except P 4030 P and 5690 SZT
Fasten the guide bar (1) to the mower housing (9) with the consigned screws (19),
washers and bolts.
5.1.2 For model 5690 SZT
Fasten the guide bar (1) to the mower housing (9) with the consigned screws (19),
washers and bolts.
5.1.3 For model 4030 P
Turn the quick release levers (4) anticlockwise. Gently pivot the handle to its upright
position until it clicks into its position.
Washer
Bolt
Bolt
Washer
Screw

12 (EN)
Turn the levers (4) clockwise to fix the lower handlebar in its workinng position.
5
5.
.2
2
A
AS
SS
SE
EM
MB
BL
LY
Y
O
OF
F
T
TH
HE
E
U
UP
PP
PE
ER
R
P
PA
AR
RT
T
O
OF
F
T
TH
HE
E
H
HA
AN
ND
DL
LE
E
5.2.1 For all models except P 4030 P
Fold the upper handle to its upright position and then close the quick release levers (4).
If the levers do not close properly, please tighten the hex nuts on the opposite sides.
5.2.2 For model P 4030 P
Connect the upper handle and the lower handle with the consigned bolts, washers and
flower-shaped knobs.
Locking lever
Hexagonal nut
Figure 4
Washer
13 (EN)
5
5.
.3
3
A
AD
DJ
JU
US
ST
TM
ME
EN
NT
T
T
TO
O
T
TH
HE
E
O
OP
PE
ER
RA
AT
TO
OR
R’
’S
S
B
BO
OD
DY
Y
S
SI
IZ
ZE
E
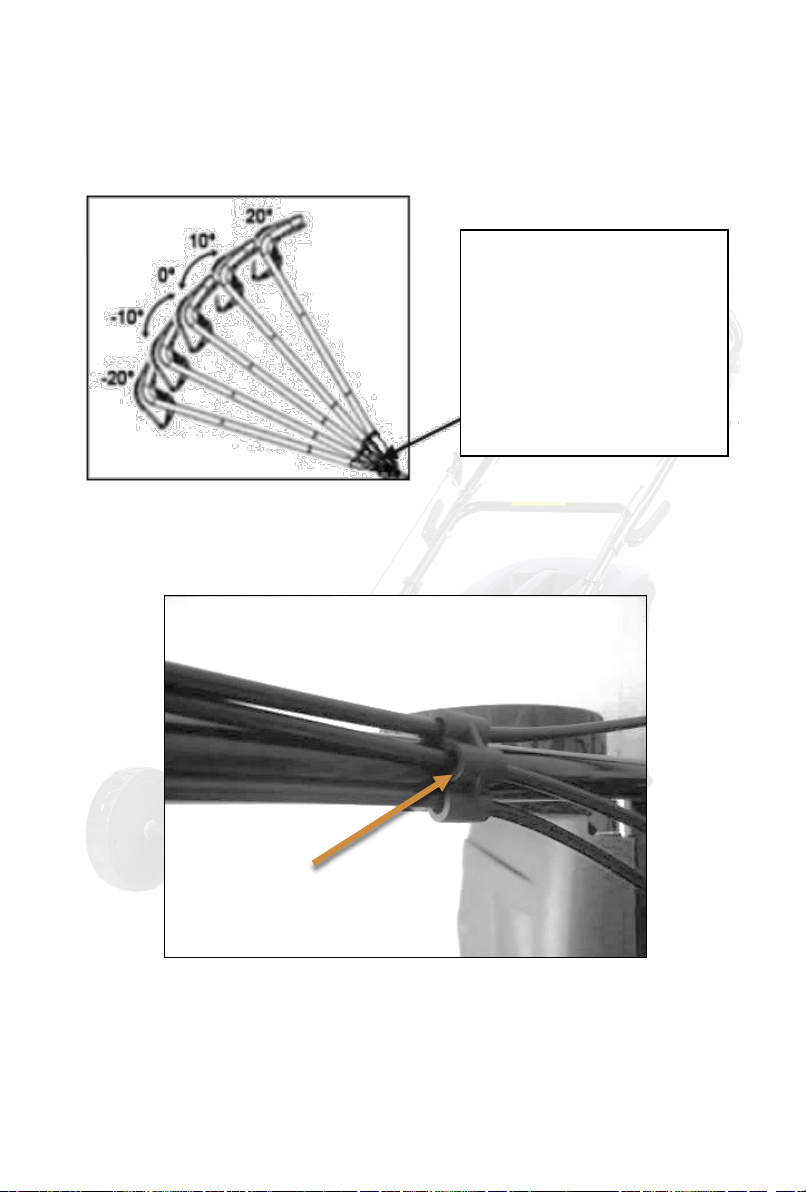
FOR PM 5690 ONLY
The round plastic parts under the locking levers (4) are folding joints with which you
can adjust the angle of inclination of the upper spar part can be set. This allows you to
adapt the device to your body size.
5
5.
.4
4
C
CA
AB
BL
LE
E
G
GU
UI
ID
DE
E
Attach the wire rope hoists at the displayed position with the consigned cable clamps.
5
5.
.5
5
G
GR
RA
AS
SS
S
B
BA
AG
G
Make sure that the net of the grass bag is attached to all edges of the frame.
Cable clamp
Angle adjustment for
working height

14 (EN)
To hang it on, liftthe back cover and attach the grass bag (5) on the rear of the housing
(9), right next to the hinges of the rear cover flap.
5
5.
.6
6
S
ST
TA
AR
RT
TE
ER
R
H
HA
AN
ND
DL
LE
E
Pull and hold the engine brake handle (2).
Then slowly pull the starter handle (3) carefully from the motor to the rope guide.
The position in the rope guide is the resting position of the starter handle.
15 (EN)
Before you start the engine, read chapter 6.
6
6
U
US
SA
AG
GE
E
6
6.
.1
1
B
BE
EF
FO
OR
RE
E
C
CO
OM
MM
MI
IS
SS
SI
IO
ON
NI
IN
NG
G
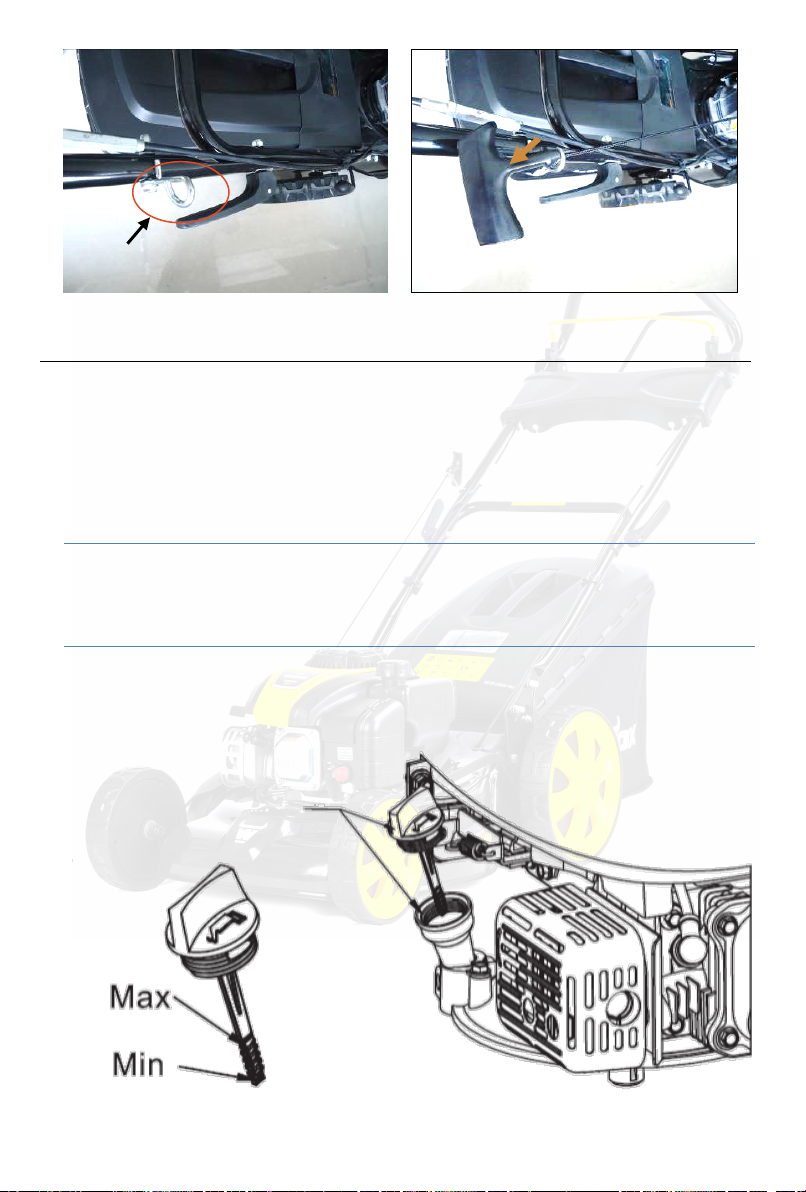
6.1.1 Fill engine oil
No oil is filled in ex works.The engine will be destroyed if you
start it without oil.
Fill the engine with four-stroke engine oil before starting. Use clean, high-quality oil in
minimum classification API SG or higher and in viscosity SAE30, or better, 15W40.
Starter handle
Figure 12
Rope guide
Figure 11
16 (EN)
Please check the required filling quantity in Chapter 4 (Tech-
nical data).
6.1.2 Check oil level
1. Check the oil level while the engine is turned off.
2. Remove the oil filler lid/dipstick and wipe it off.
3. Insert the oil filler cap/dipstick into the oil filler neck without tightening it. Pull it
out again to read the oil level.
4. If the oil level is equal to or lower than the minimum marking, fill oil of the recom-
mended grade to the top mark. Do not overfill.
5. Then reinstall the oil filler lid/dipstick.
6.1.3 Fill fuel
Gasoline is easily flammable.
Read the SAFETY INSTRUCTIONS (Chapter 2 of this guide) in
full.
USE UNLEADED GASOLINE with an octane number of 92 or higher. This engine is designed
to run on unleaded petrol. Unleaded gasoline produces less deposits on the engine and
spark plug and ensures a longer service life of the exhaust system.
The motor is E10-compatible. However, E15 or E85 may not be used.
Never use a mixture of oil and gasoline. Never use Diesel.
Turn off the engine and keep ignition sources and open fire away. Refill outddors only.
Wipe upoverfilled gasoline immediately.
Fuel can damage paints or plastic. Do not let gasoline splash during refilling. Damage
caused by spilled gasoline is not covered by the warranty. Never use stale or contami-
nated gasoline. Do not allow dirt or water to enter the tank.
1. Remove the screw cap from the fuel tank.
2. Fill the tank with gasoline up to the level limit on the neck of the tank.
3. Do not overfill. Wipe up spilled gasoline before starting the engine.
4. Turn the cap tightly.
6
6.
.2
2
A
AD
DJ
JU
US
ST
TM
ME
EN
NT
T
O
OF
F
T
TH
HE
E
C
CU
UT
TT
TI
IN
NG
G
H
HE
EI
IG
GH
HT
T
The height can be adjusted in, depending on the model, 6, 7 or 10 steps between 25 mm

17 (EN)
and 75 mm.
Press the lever (6) on the right rear wheel outwards to release it. Move the lever for-
ward or backward to adjust the cutting height accordingly. This single lever setting ap-
plies to all 4 wheels.
PM 4650
SHW
PM 5165
SHW
PM 5175
SHW
PM 5690
SHW
PM 4650 S
PM 5175 S
10 = High
(75 mm)
1 = Low
(25 mm)
1 = High
(75 mm) 10 = Low
(25 mm)

18 (EN)
PM 5690
SZT
PM 4030 P
The lever position on the far right is only for maximum space-saving stowage and
transport.
Height means distance of the blade to the ground. As a result,
more lawn can be cut off when the wheels sink in, for example on moss.
7 = High
(75 mm)
1 = Low
(25 mm)
6 = High
(75 mm)
1 = Low
(25 mm)
T = Transport po-
sition (0 mm)

19 (EN)
6
6.
.3
3
S
ST
TA
AR
RT
T
O
OF
F
T
TH
HE
E
E
EN
NG
GI
IN
NE
E
To prevent accidental starting of the lawn mower, the device
has an engine brake #2, which must be retracted before
switching on the engine. If the brake lever is released, it must
return to the starting position; at this time, the motor switches
off automatically and the blade comes to an immediate stop.
Check the tension of lever #2 before each start. Make sure the
wire rope hoist is working smoothly (i.e. it is not tangled or
knotted).
Your lawn mower is designed for mowing regular grass (up to
250 mm).
Do not try to mow exceptionally tall dry grass or piles of leaves.
Residues could accumulate on the housing or come into contact
with the engine exhaust gases, which in turn can cause fire
hazards.
Before each attempt to start, make sure that the spark plug plug connector (10) is se-
curely plugged in.
6.3.1 Cold start pump („primer pump“) (engine DG 300, DG 500)
FOR PM 4030 P, 4650 S/ -HW
For a cold start, press the primer pump (21) min. 5×.
Note: With a warm engine (up to 1 minute after stopping the engine), pumping is
This manual suits for next models
7
Table of contents
Other Mowox Lawn Mower manuals

Mowox
Mowox RM 600 Li BT User manual

Mowox
Mowox PS 4015 P-N User manual

Mowox
Mowox EM 3440 P-Li User manual

Mowox
Mowox PM 4645SEHW User manual

Mowox
Mowox EM 4640 PX-Li User manual

Mowox
Mowox EM 4140 PX-Li User manual
 User manual")
Mowox
Mowox EM 3440 PX(-Li) User manual

Mowox
Mowox RM 30 Li User manual

Mowox
Mowox EM 4662 P-Li User manual

Mowox
Mowox RM 800 Li BT User manual
Popular Lawn Mower manuals by other brands


Craftsman
Craftsman 917.25431 Operator's manual

MTD
MTD 13AP91KS308 Operator's manual

GreenWorks
GreenWorks G40LM40 Operator's manual

Spear & Jackson
Spear & Jackson S1436ER quick start guide

GÜDE
GÜDE RM 36-0.43 Translation of the original instructions

Grasshopper
Grasshopper 721D H2 Operator's manual & parts list


