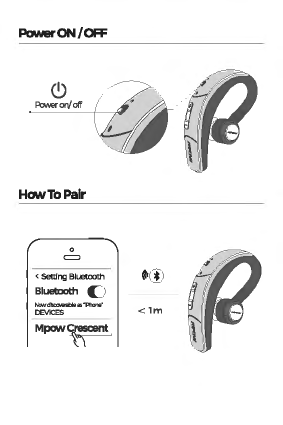
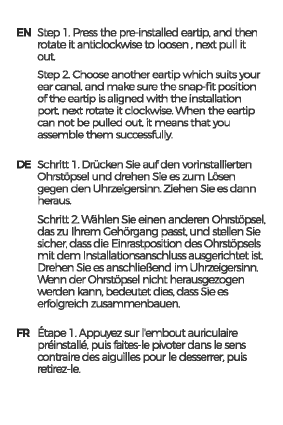
manuals.online logo
Brands
  1. Home
  2. •
  3. Brands
  4. •
  5. Mpow
  6. •
  7. Headset
  8. •
  9. Mpow BH028A User manual

Mpow BH028A User manual

NPOW
IJIEAIMlPI.ORl
·
INSl'ff
MPOW
CRESCENT
BIJSIN~
BWHOOlH
HfAOSEl
MODEL:BH028A
We
areappreciated for purchasing
our
Mpaw
Crescent
This
guidecontains
instructions
for
setting
up
and
using}<lllrMpaw
Oescent
easily.
PackageUst
C
ox,
~C'\~
•
0 Ox,
\(JV
Xl Xl
@
ox1
X1
Xl
111
t
PowerON/OFF
C)
"""'<XV"'
HawToPalr
0
=
<Setting Bluet.oath
e1.-o
-~-'lPhona"
DEVICES
Mpaw~
EN
Tum
on the
PcM<lr
swi1x:h
of
theearphone.
then
press
and hold theMultil\Jnction buttnn
(MFB)
for3-4 s
1D
enterthe pairing mode.
Search
and
c:omple!B
pairing on
),<)Ur
smartphone.
DE Schalten
Sie
den Netzschalterdes Kopfhorers
ein.
und drucken
Sie
die Multifunktionstaste
(MFB)
fur3-4
s.
um
inden Paarung-Modus
einzutreten.Suchen undschliellen
Sie
die
Paa
rung auflhrem Smartphone
ab.
~
Allumez l'interrupteurde l'ecouteur
et
le
1<7y8nt blancclignonte. puis appuyez
longuement
sur
le
bouton
multifonction
(MFB)
perdant
3-4
secondes
pourpasser
en
moded'appairage lorsque les1<7y8nlsorange
et
blanc
clignotent
Ensuite.
5electionnez
•
Mpc:MI
Crescent•dans
la
liste
bluetooth
de
l<>treportable.
ES Encienda
el
interruptor
de
encendido de
las
auria.ilares.
luego
presione
prolongadamente
el
bot6n multifunci6n (MFB)durante3-4spara
ingresar
al
mododeempa"liamiento. Busquey
oomplete
el
emparejamiento en
su
telefbno
inteligente.
rr
Aa:endere
l'int:em.Jttore
di
Aa:ensione
dell'aurtoolare.
premere
ii
pulsantedi MultifiJnzione
da 3-4secondi perentrare
la
modalitildi
collegarnento.
Poi
cercare
e
rollegare
l'aurirolare
sulcellulare.
JP ,(;,;t,1/-1;',t::,1.:L
c,
~f-'.SZ::,(Mfm,3--®llllli>
'i'!'Lc/'\71
J~-l"la:7'~ll:,o-rLc,A'<';Js1.',(i'
;t,::,~Lc,
r(?
1
J::,~~-ttll:oo
ReplaceEartip
0
8
EN Smp
1.
Press
the pre-installed eartip. and then
rotam Itanticlockwise
to
loosen. next pull It
out
Smp2 Chooseanothereartipwhichsuitsyour
ear
canal.
and
make
sure
the
snap-fit
position
of
theeartip
is
alignedwith theinstallation
port
next rotam
it
clockwise.When theeartip
can
not
be pulled
out
it
meansthat
~u
assemblethem
successful~.
DE Schritt
1.
Drucken
Sie
aufdenvorinstallierten
Ohrsropsel unddrehen
Sie
es
zum
L.osen
gegen
den
Uhrzeigersinn.
Ziehen
Sie
es
dann
heraus.
Schritt2
\11/ahlen
Sie
einen anderen Ohrstopsel.
das
zu
lhremGehorgang passt undstellen
Sie
sicher.
dass
die Einrastposition desOhrstopsels
mit
dem
lnstallationsanschlussausgerichmtist
Drehen
Sie
es
anschlieBend
im
Uhrzeigersinn.
\MlnnderOhrstopsel nicht herausgezogen
\l\oerden
kann,
bedeumt
dies.
dass
Sie
es
erfblgreich
zusammenbauen.
FR
Etape
1.
Appuyezsur l'emboutauriculaire
preinstalle. puis
mites-le
pivoterdans
le
sens
contraire
des
aiguilles
pour
le
desserrer.
puis
retirez-le.
Etape 2
Choisissez
unautreemboutqui
convient
a
\Otm
oreille
et
assurez--\OUS
que
la
position cfemboimment
de
l'emboutest
aligneesur
le
portd'installationpuis
faites-le
pi\oter
dans
le
sens
rontraire
des
aiguilles.
L.orsque
l'emboutne peut pasetJe
retire.
cela
signifieque=
les
assemblez a,,oc
succes.
ES
Paso
l.
Presione
la
punta
preinstalada,
y luego
girela
en
sentido
antihorario
para
aflojar1a,
luegoextraigala
Paso 2
Elija
otra punta
de
oidoque
se
adapm
a
su
canal
auditi\/0
y
asegUrese
de
que
la
posici6n
de
ajuste
de
la
puntaeste
alineada
cx:m
el
puerto
de
instalaci6n,
luego
girela
en
el
sentido
de
las
agujas
del
reloj.CUando
la
punta
de
la
oreja nose puede
extraer,
signif,ca que
la
ensamblas
con
exito.
IT
Passaggio
1.
Premere
aurirolari
in
silicone
preinstallati.
quindi
ruotarli
in
sense
antiorario
perallentarli. quindi
estrarli.
Passaggio
2
Scegliere
altti
aurioolari
in
silioone
al
canale
uditi\o e
assicurarsi
che
la
po.sizione
a
scattodell'aurioolare
sia
allineata
oon
la
porta
di
installazione,
quindi
ruotar1a
in
ser\SO
orario.
Quando non epossibile
estrarre
l'aurioolare.
significa
che
Ii
si
monta
correttamente.
JP -¥Jlli1.~(1
J/::-1''17-'f-•Y-fti:A'r!.-tJ-/V'f'7./'f
0)9'[C,-fl.;"[:li'IClall.;r
□
-,,?~Lll:To"'Yc-t!
•Yri>'S-1''17-'f-•y:f.li'5
l~~ll:To
-¥Jljj2-('17-'f-•y"70)9-:f.li'A'r!.-tJ-/V'f',)'/'fO)A
□
•YrlC~To'61Ciail..J.i:tJ'6..Jl'7'l'./~C-('{7
-'f--,,:f.li'ff<l'l'L,bdt-ll:To
IEL<llll
1
Jt-Jlt':>MI::-
-1'
'17-'f--,,::ll;J;
□
-,,?.!°nll:To
VolumeControl/Music
Control
~
~ Holdon(1-2s)
••ll
0 OickOnce
11111)
0 OickOnce
l+4
~ Holdon(1-2s)
Play
/Pause/
Answer/Hang Up/Reject/
Redial
<!)'
HI
CickOme
'-
~
-
Hold
en
0-25) "
<0"
Siri
Daubleclck
~
Redial
DE
wahlwlederholurg
"'
Rappel
ES
Aeman:ar
IT
Ripnxluzia,e
JP
1J1f-(i'J~
Claar
Pairing
Information/Muta
Die Paarungsinformationen
entfernen/Stumm
SUpprirrerdeslnfbrmationsd'Appariement/
Muet
Borrar
informaci6n
de
emparejamiento/Mudo
S\luolareCollegamento/Muto
/'\7'IJ::,~.liffl!;j;'J!ljl!Jri"t~/.:;:,_-~
~
<l]'
CfrckOnca
.-
....
11anecu1Y
ChargeBattery
output:
DCSV
[(jJ
FCCSl:allement
Operation
Is
subject
to
thefollowing
three
a,ndttlonso
(1)
Thisdevice
may
not
cause
hamiful interference.
and
(2)This device
must
accept
any
interference received,
including interference
that
may
cause undesired
operation.
(3)Thisdevice has
been
ewluated
1D
meet
general
RF
exp:,sure
requirement
The devicecan be used
in
portable
exp:,surecondition
without
restriction.
Note:
This
equipment has beentested and found tocomply
with
the
limits
for
a
Class
Bdigital
dE:Mce.
pursuantto
part
15
of
the
FCC
Rules.
These limits
are
designed to
prt:Nide
reasonable
protection againstharmful
interferenceina residential installation.
This
equipment
generates, usesand can radiate radiofrequencyenergy
and
if
notinstalled and used
in
accordancewith the
instructions.
may
cause harmful interferenceto radio
communications.
HC7v\/elier,
thereis no guarantee
that
interferencewill not
occur
in
a particularinstallation.
If
thisequipmentdoescause harmful interference to
radio
or
telelision reception.
which
can be
determined
i:,,,
b.Jming
the
equipment
off
and
on. theuseris
encouraged totryto correctthe interference
t::,,,one
or
more ofthefolb.Ning
measures:
• Reorient
or
relocate the
receMng
antenna.
• Increase
the
separation bet\-veen theequipmentand
receiver.
•~~~~mei,=~~~~=~~C:,~~.
• Consultthedealeroran experienced radio
/TV
technician fbr help
•
Notif"ic:ation
l.
Please
ful~
charge
it
ifit
was
going
to
lay idlefor
a long
time
and
place Itin a
oool
and
dry
place.
Please recharge
it
each 2 monthsforstorage.
2 Please
ful~
charge
It
for
the
first
use
• Benachrlchtlgung
l.
wenn
Kopfhorerfur lange
zelt
nicht
><>rwandet
wird. ladenSie bitte
es
\OIi
auf
und
bewahren
Sie
es
an
einem
kuhlen
und
trockenen
Platz.
BitteladenSie
es
alle2 Monatezur Lagerung auf.
2 Bitte ladenSie
es
fur
den
ersten Gebrauch auf.
•
Notif"ic:acion
l.
Por
fiM>r,
carguelo por
complete
si
va
a estar
inactM>
durante
mucho
tiempo, y
col6quelo
en
un
lugar
fresco
y
seen
Por
fa\.or
recarguela
cada 2 meses
para
su
almacenamiento.
2 Por
fiM>r.
cargueloc:ompletamente para el
primeruso.
� N






� N








Click Here To Read More...
Mpow Crescent Bluetooth Headset
USer Manual BH028A

Other Mpow Headset manuals

Mpow EM19 User manual

Mpow

Mpow EM19 User manual

Mpow MPBH088AR User manual

Mpow

Mpow MPBH088AR User manual

Mpow BH357A User manual

Mpow

Mpow BH357A User manual

Mpow H5 User manual

Mpow

Mpow H5 User manual

Mpow EM18 User manual

Mpow

Mpow EM18 User manual

Mpow TH1 User manual

Mpow

Mpow TH1 User manual

Mpow BH415AR User manual

Mpow

Mpow BH415AR User manual

Mpow PA071A User manual

Mpow

Mpow PA071A User manual

Popular Headset manuals by other brands

Jabra BT5020 - Headset - Over-the-ear user manual

Jabra

Jabra BT5020 - Headset - Over-the-ear user manual

Bluetake Technology BT400 G3 manual

Bluetake Technology

Bluetake Technology BT400 G3 manual

Plantronics CS500 Series user guide

Plantronics

Plantronics CS500 Series user guide

Plantronics Savi W445 user guide

Plantronics

Plantronics Savi W445 user guide

EDIFIER HECATE G33BT user manual

EDIFIER

EDIFIER HECATE G33BT user manual

Blueant Q2 user guide

Blueant

Blueant Q2 user guide

LG Tone Pro BHS-770 user guide

LG

LG Tone Pro BHS-770 user guide

LG HBM-905 user manual

LG

LG HBM-905 user manual

tt thermaltake Argent H5 user guide

tt

tt thermaltake Argent H5 user guide

Jabra BT620S - MANUAL 2 Features

Jabra

Jabra BT620S - MANUAL 2 Features

Beyerdynamic XELENTO REMOTE manual

Beyerdynamic

Beyerdynamic XELENTO REMOTE manual

Encore ENBTHS-011 datasheet

Encore

Encore ENBTHS-011 datasheet

Plantronics EXPLORER 300 user guide

Plantronics

Plantronics EXPLORER 300 user guide

Eartec LYNX quick start guide

Eartec

Eartec LYNX quick start guide

fontastic Dima user manual

fontastic

fontastic Dima user manual

fontastic ESSENTIAL BT E1 quick start guide

fontastic

fontastic ESSENTIAL BT E1 quick start guide

Radio Shack 17-890 owner's manual

Radio Shack

Radio Shack 17-890 owner's manual

Jabra GN9120 Flex Quick setup guide

Jabra

Jabra GN9120 Flex Quick setup guide

manuals.online logo
manuals.online logoBrands
  • About & Mission
  • Contact us
  • Privacy Policy
  • Terms and Conditions

Copyright 2025 Manuals.Online. All Rights Reserved.