Mr. Entertainer KAR122C Instruction Manual
KAR122C (Pink/White)
KAR122D (Black/White)
USER & SAFETY MANUAL
CD+G Karaoke System with 3.5”
screen and Bluetooth Connectivity

IMPORTANT
Owners and Users please note:
These instructions should be read carefully and left with the user of the product for future
reference.
BEFORE USE
You must inspect the karaoke machine including the power supply for any signs of damage. If the
product is damaged in any way, DO NOT USE IT, and contact your supplier immediately.
PRODUCT SAFETY
• Children should be supervised when using this unit.
• For indoor use only when using the power supply.
• Do not place the power lead beneath a carpet or rug.
• Do not use in locations where paint, petrol or other ammable liquids are used or stored.
• Do not use the unit in the immediate surroundings of a bath, shower, swimming pool or similar
damp or wet area.
• Use on a at, level, stable surface.
• Cleaning and user maintenance shall not be made by children without supervision.
• Do not allow the power cord to become a trip hazard.
• When not in use the product should be switched o and the power supply disconnected from
the mains supply.
• Do not leave the product unsupervised when switched on and connected to the mains supply.
• Do not use near sources of heat such as res, stoves etc.
• When used with batteries do not expose the product to direct sunlight or other sources of heat.
• Periodically check the product and its power supply for damage.
• There are no other user serviceable products in this product.
• Do not obscure or block the ventilation holes. This can cause a risk of overheating and lead to
damage of the product.
• Do not allow the product to be used at full volume for prolonged periods of time to protect the
hearing of both children and adults.
PRODUCT USAGE
• The user should familiarise themselves by carefully reading these user instructions before use.
Improper use can lead to damage that is not covered by the warranty.
• Only use the cleaning instructions recommended by the manufacturer.
• Use only with the power supply provided with the product.
• Always remove batteries when not in use.
• Do not use the product with power supply and batteries at the same time.
• Only use the power supply supplied with this product.

This kit contains:
1 x CDG player with Bluetooth / USB/ Aux function
1 x microphone
1 x double CDG karaoke hits disc
1 x 12V PSU
1 x 3 phono to 3 phono A/V lead
LASER INFORMATION
This product contains a semiconductor laser system inside the cabinet and is classied as
a “CLASS 1 LASER PRODUCT”. To prevent exposure to the laser beam, do not to open the
enclosure.

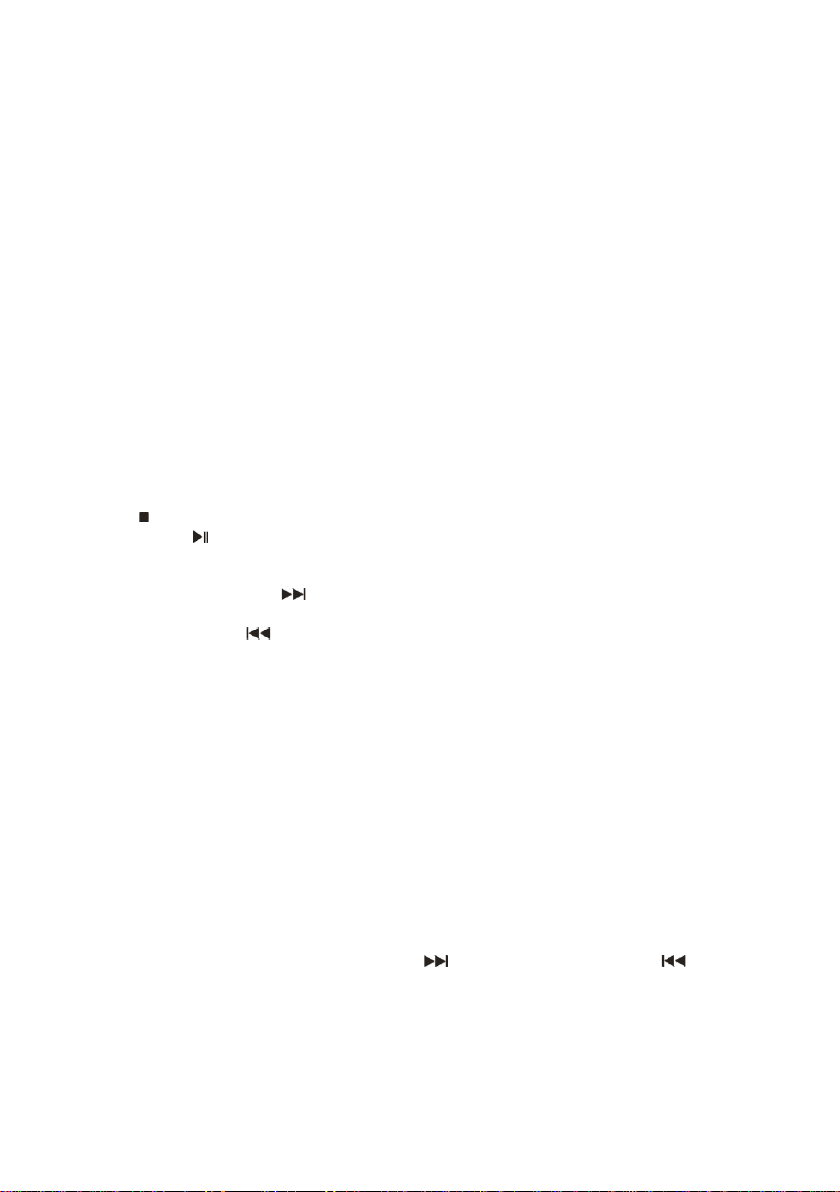
LOCATION AND MEANING OF CONTROLS
1 SPEAKERS 15 BACK SKIP BUTTON
2 CARRYING HANDLE 16 REPEAT/PROGRAM BUTTON
3 CD DOOR 17 AVC ON/OFF
4 CD DOOR OPEN/CLOSE BUTTON 18 ECHO CONTROL
5MIC VOLUME CONTROL 19 MASTER VOLUME CONTROL
6 BALANCE CONTROL 20 POWER IN DC SOCKET
7STOP BUTTON
PAIRING BUTTON 21 BATTERY DOOR
8PLAY / PAUSE BUTTON
USB/BT BUTTON 22 VIDEO OUT JACK
9 FORWARD SKIP BUTTON 23 AUDIO OUT JACK
10 PLAY/PAUSE INDICATOR 24 POWER SWITCH,
11 PROGRAM INDICATOR 25 MIC1,MIC2 JACKS
12 LED DISPLAY 26 AUX IN JACK
13 REPEAT INDICATOR 27 TFT LCD COLOR SCREEN
14 CD-G INDICATOR 28 USB JACK
CD-CDG FUNCTION
Product plays standard CD’s, karaoke CDG discs and CD-RW discs. Please note the quality of
CD-RW discs cannot be guaranteed.
1. STOP (#7) – Select this function to stop the CD/CDG from playing.
2. PLAY/PAUSE (#8)
1) Press the play/pause button to play and pause the CD, the CD tracks will show on
the LED display (#12).
3. FORWARD SKIP BUTTON (#9)
1) Press FORWARD SKIP button to select the next track.
4. BACK SKIP BUTTON (#15)
1) Press BACK SKIP button to select the previous track.
5. REPEAT/PROGRAM BUTTON (#16)
REPEAT FUNCTION
For repeat function to work, the disc must be in play mode.
1) Tap the replay/prog button (#16) once. The current playing track will then repeat and
the repeat LED indicator (#13) will ash to indicate.
2) Tap the replay/prog button (#16) twice. The current disc will play through all of the
tracks and then repeat them again. The repeat LED (#13) will be on.
3) Tap the replay/prog button (#16) three times. This will turn o the repeat function.
The repeat LED (#13) will be o.
PROGRAM FUNCTION
1) This function allows music tracks to be played in a programmed sequence.
2) NOTE: Program function can only be set when the machine is in STOP mode.
3) Press the REPEAT/PROGRAM BUTTON (#16) once. Program Number 01 will display
and PROGRAM INDICATOR will ash (#11).
4) Press the FORWARD SKIP BUTTON (#9) or BACK SKIP BUTTON (#15) to
select the track to be programmed.
5) Press the REPEAT/PROGRAM BUTTON (#16) again to store the selection. Advance
to 02 to prompt for the next input.
6) You may repeat steps #B to #C to program up to 20 tracks. As soon as you have
entered the 20th track, the LED DISPLAY (#12) will show “FU”, indicating that
program is full.
CONTINUED ON NEXT PAGE
HOW TO SET YOUR KARAOKE MACHINE UP
SOURCE SELECTION FUNCTIONS
1. Connect the power supply to the unit via the “ DC Jack” on the rear of the unit and press the
power on button on the front of the unit. Please remember to only use the power supply
provided with the karaoke machine.
2. Connect the microphone to the unit using the microphone 1 input on the front of the unit.
Before connecting the unit make sure the microphone and master volume controls are set to
minimum. A second microphone (not supplied) can be connected to Microphone input 2.
3. Source selection can be made by pressing the mode button on the front of the unit. You can
select from CDG (Disc), BT (Bluetooth), USB or Aux. Further information on how to work with
these dierent source selections can be found further down and should be used in conjunction
with this set up information.
4. After selecting your music source the microphone and master volume levels should be
adjusted to the suitable levels. By altering these levels it should be possible to achieve the
desired mix for your voice over the backing vocals and music.
5. Use the Echo control to add a reverb type eect you your voice and enhance the sound.
6. This unit also features an AVC control for use with special CD-G multiplex disc.

PROGRAM FUNCTION (CONTINUED)
7) Press the PLAY button to complete and start playing the programmed sequence of
tracks. Press STOP BUTTON (#7) to stop program play.
8) You may use the REPEAT function to repeatedly play a certain track (Repeat 1) or all
tracks (Repeat All) in the Program Play Mode.
9) The CD player will stop when all the programmed tracks have been played through
once. To repeat program play, press the PLAY/PAUSE BUTTON (#8).
10) To cancel program play, press the STOP BUTTON (#7) twice while program play is
running or open the CD DOOR (#3) in stop mode.
11) Up to 20 tracks can be programmed.
BLUETOOTH FUNCTION
1. Press and hold the PLAY/PAUSE button (#8) to select a new mode.
2. Repeat the process until you reach Bluetooth mode. This will be indicated as the red
LED light at the front the screen (#12) will ash “BT”.
3. Simply select the device name MRENTERTAINER1 to connect to the karaoke
machine from your BT compatible device. The BT indicator will stop ashing and an
audio signal will signify successful pairing.
4. Once the karaoke machine is paired to your device, simply select your tracks on the
device to play them. Please note this is audio only.
USB FUNCTION
1. Press and hold the PLAY/PAUSE button (#8) to select a new mode. Repeat the
process until you reach USB mode.
2. Attach an external device including MP3 les as USB stick to the USB Jack (#28).
The tracklist will then appear on the internal screen (#27).
3. Press the FORWARD SKIP BUTTON (#9) or BACK SKIP BUTTON (#15) to
select the intended track, and then PLAY/PAUSE button (#8) to start playback.
Please note MP3 is audio only.
AUX IN FUNCTION
1. Connect an external media player, for example IPOD/MP3 player/laptop to the Aux
in socket (#26) on the karaoke player by using a 3.5mm jack to 3.5mm jack audio cable
(not supplied).
2. Once the external player is connected to the player, select the preferred track from
the external player and it will automatically play through the internal karaoke player
speaker.
AUDIO/VIDEO OUTPUT
1. When playing a CDG disc, you can use the AV cable to connect your external
display, such as a television. This will display video output, and audio output from the
karaoke player.
2. When playing a CD disc, the karaoke player will only provide audio output.
3. When connected through Bluetooth, the external display will provide audio output
only.
SPECIFICATIONS
Output Power .....................................................................................................1.5W + 1.5W (RMS)
Speakers .............................................................................................................................2 x 3” 8Ω
Aux-in Socket......................................................................................................................... 3.5mm
Microphone Input .......................................................................600Ω Impedance with 6.3mm Jack
Microphone ............................................................................................... 1 x Dynamic Microphone
Power Source.................................................................................................AC Adaptor (Supplied)
Input ..........................................................................................................................AC 230V~50Hz
Output .......................................................................................................DC 12V 1A
Battery............................................................................................................... 8 x C (Not Supplied)
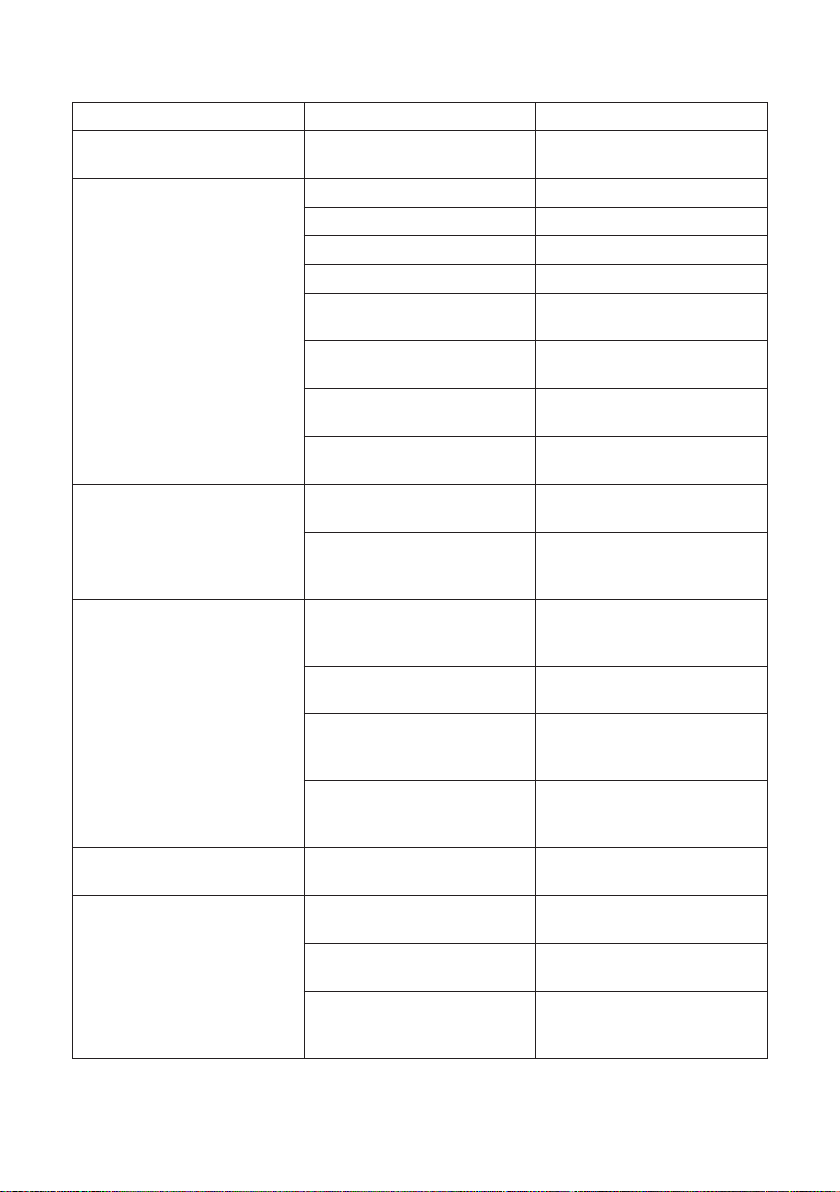
TROUBLESHOOTING
PROBLEM POSSIBLE CAUSE REMEDY
Unit is ON but there is low or no
volume
The master volume control has been
turned all the way down.
Turn the master volume control to a
higher output.
CD player of Karaoke System does
not work normally or the “No”
appears on the LED DISPLAY.
Disc is inserted upside down. Insert disc correctly.
Disc is dirty. Wipe it clean with soft cloth.
Disc is scratched. Use a new disc.
Disc is warped. Use a new disc.
A non-standard disc is inserted. Only use compatible discs
mentioned in this manual.
Lens is dirty. Clean the optical pickup with a CD
lens cleaner.
Moisture has condensed inside the
CD deck.
Wait about 20 to 30 minutes to let
it dry out.
Karaoke system needs to be reset. Disconnect the machine from power
source for 30 seconds.
No sound - If audio is going through
TV/ home stereo
Source Selection on your TV/home
stereo is not set properly.
Select AV INPUT as the source for
your TV/home stereo.
Improper connection to stereo
system or PA.
Follow directions on ‘Audio/Video
Output’ section for connecting to a
home stereo system.
No song lyrics appear on the TV
screen (CDG Mode Only)
Video cable is not connected
properly to the TV.
Connect the video cable to the
VIDEO OUT of the unit and to the
TV’s Video In jack.
Source selector on TV is not set to
VIDEO or A/V IN.
Use your TV Remote to select VIDEO
or A/V input.
TV does not have video line input.
Connect from VIDEO OUT of the unit
to a RF modulator and then to the
TV cable input.
A CD+G disc is loaded but the CDG
indicator is not lit.
Check the disc to be sure it is a
CD+G. Check disc to ensure it is
clean.
No image on TV screen TV input is not properly set. Set TV input to correct A/V input that
is connected to the unit.
Cannot sing through the mic
Improper MIC volume setting. Adjust MIC and MASTER VOLUME
CONTROLS to appropriate levels.
MIC is off. Turn on MIC with the ON/OFF switch
located on the microphone.
MIC is not properly plugged in.
Insert the mic plug fully into either
MIC 1 or MIC 2 JACK of the unit
properly.

CLEANING AND CARE
Before cleaning the machine it must be switched o and disconnected from its power supply.
Only clean with a slightly damp clean cloth. Dust can be removed from grills and vents using a
dry paint brush or similar.
SERVICE WARRANTY
• Mr. Entertainer guarantees the product free from defects in materials and workmanship for a
period of twelve months.
• The product you buy may sometimes dier slightly from illustrations. This warranty is in addition
to, and does not aect, your statutory rights.
• Our guarantee is administered by our retailers.
• If your product arrives damaged, you must contact the retailer from whom you bought it. The
retailer’s contact details will be on the invoice that arrived with the product, or on the e-mail you
received when you placed the order. Do not contact Mr.Entertainer, only your retailer can
arrange a replacement.
• If your product fails within the guarantee period, and needs to be repaired or replaced, you
must contact the retailer from whom you bought it.
• The retailer’s contact details will be on the invoice that arrived with the product, or on the e-mail
you received when you placed the order.
• If you have just received your product and require technical help in using it, please call our Help
Desk on (0845) 459 4816
• If you have any other technical queries about the product, please call our Help Desk on
(0845) 459 4816.
This symbol on the product, the battery or on the packaging indicates that the product
and the battery may not be treated as household waste. On certain batteries this
symbol might be used in combination with a chemical symbol. The chemical symbols
for mercury (Hg) or lead (Pb) are added if the battery contains more than 0.0005%
mercury or 0.004% lead. By ensuring these products and batteries are disposed of
correctly, you will help prevent potentially negative consequences for the environment and human
health which could otherwise be caused by inappropriate waste handling. The recycling of the
materials will help to conserve natural resources. In case of products that for safety, performance
or data integrity reasons require a permanent connection with an incorporated battery, this
battery should be replaced by qualied service sta only. To ensure that the battery and the
electrical and electronic equipment will be treated properly, hand over these products at end-of-
life to the applicable collection point for the recycling of electrical and electronic equipment. For
all other batteries, please view the section on how to remove the battery from the product safely.
Hand the battery over to the applicable collection point for the recycling of waste batteries.
Electrovision Ltd
Lancots Lane, Sutton,
St. Helens, Merseyside.
WA9 3EX
Website: www.electrovision.co.uk
Disposal of waste batteries and electrical and electronic
equipment (applicable in the European Union)
This manual suits for next models
1
Table of contents
Other Mr. Entertainer Karaoke System manuals


