PACKUNGSINHALT
Kinescher Druckknopf + 230 V Empfänger + Industrieband
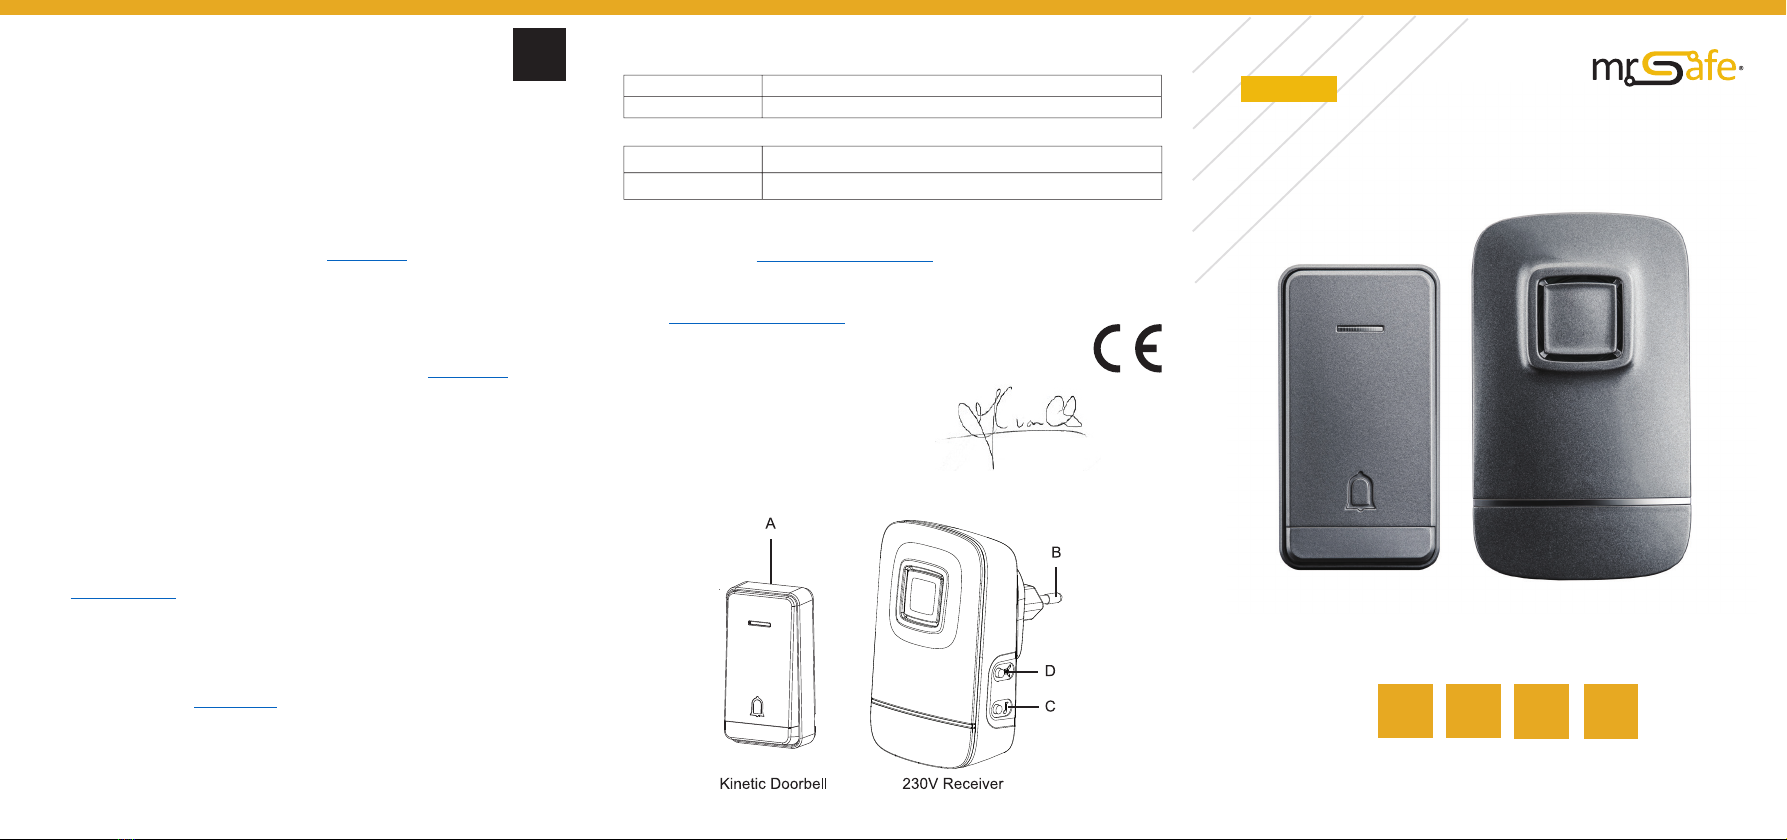
TEILE & KNÖPFE
Kinescher Druckknopf
A: Druckknopf
CONTENU DE L’EMBALLAGE
Bouton poussoir cinéque + récepteur 230 V + ruban industriel
PIÈCES ET BOUTONS
Bouton poussoir cinéque
A: Bouton poussoir
INSTALLATION ET CONNEXION DU BOUTON POUSSOIR CINÉTIQUE
Vous pouvez xer le bouton poussoir cinéque sur n’importe quelle surface à l’aide du ruban industriel
ou le visser sur le mur. Prenez la plaque en plasque avec les 2 trous de vis et maintenez-la contre le mur
auquel vous souhaitez la xer. À l’aide d’un crayon, indiquez où vous devez percer les trous. Percez 2 trous
là où l’indicaon est visible. Insérez 2 chevilles dans les trous, placez la plaque en plasque au bon endroit
et vissez-la en place.
Vous pouvez connecter plusieurs boutons poussoirs (disponibles en opon sur www.mrsafe.eu) avec le
récepteur. Appuyez simplement sur le bouton de sélecon de tonalité (C) sur le récepteur 230 V pendant
5 secondes jusqu’à ce que vous entendiez une double nocaon sonore. Appuyez sur le bouton poussoir
(A) et vous entendrez une autre nocaon sonore. Après 10 secondes, vous entendrez une autre double
nocaon sonore. Vos appareils sont maintenant connectés.
INSTALLATION ET CONNEXION DU RÉCEPTEUR 230 V
Vous pouvez brancher le récepteur 230 V sur n’importe quelle prise de votre maison, la connexion de
votre appareil a déjà été eectuée pendant la producon.
Pour connecter un récepteur 230 V supplémentaire avec votre bouton poussoir (disponible en opon
sur www.mrsafe.eu), appuyez sur le bouton de sélecon de tonalité (C) pendant 5 secondes jusqu’à
ce que vous entendiez une double nocaon sonore. Appuyez sur le bouton poussoir (A) et vous
entendrez une autre nocaon sonore. Après 10 secondes, vous entendrez une autre double
nocaon sonore. Vos appareils sont maintenant connectés.
SÉLECTION D’UNE SONNERIE ET RÉGLAGE DU VOLUME
Pour séleconner une sonnerie sur le récepteur 230 V, appuyez sur le bouton de sélecon de tonalité de
l’appareil (C) jusqu’à ce que vous entendiez la sonnerie que vous souhaitez séleconner.
Remarque: lorsque plusieurs boutons poussoirs sont associés à votre appareil, il n’est pas possible d’avoir
un son disnct pour chaque bouton poussoir.
Pour régler le volume sur le récepteur 230 V, appuyez d’abord sur le bouton de sélecon de tonalité
de l’appareil (C) pour entendre une mélodie et appuyez sur le bouton Volume de l’appareil (D) pour
séleconner volume souhaité.
SUPPORT DE CLIENTS
Pour plus d’informaons, des quesons techniques ou des demandes de retour concernant ce produit,
GARANTIE
Mr Safe est une marque déposée de TE-Group NV. La marque mr Safe conçoit des produits de qualité et
dispose d’un service après-vente exceponnel. C’est pourquoi mr Safe garant ce produit contre tout
défaut de matériel ou de fabricaon pendant une période de deux (2) ans, à compter de la date d’achat
du produit. Pour connaître les condions générales de cee garane et l’étendue des responsabilités
de mr Safe au tre de cee garane, consultez notre site web : www.mrsafe.eu
VERPAKKINGSINHOUD
Kinesche Deurbelknop + 230 V Ontvanger + Industrial tape
ONDERDELEN & KNOPPEN
Kinesche Deurbelknop
A: Deurbel drukknop
INSTALLEREN EN KOPPELEN VAN DE KINETISCHE DEURBELKNOP
U kunt de Kinesche Deurbelknop op elk oppervlak bevesgen met de meegeleverde industriële Tape
of de deurbel aan de muur schroeven. Neem het plasc plaatje met de 2 schroefgaten en houd dit
tegen de muur waartegen u de deurbel wil bevesgen. Geef met een potlood aan waar u de gaten
moet boren. Boor 2 gaten waar de indicae zichtbaar is. Steek 2 pluggen in de gaten, plaats het plasc
plaatje op de juiste plaats en schroef het vast. Plaats de voorkant van de Deurbelknop op het achterste
deel tot het op zijn plaats klikt.
U kunt meerdere Deurbelknoppen (oponeel verkrijgbaar op www.mrsafe.eu) met de ontvanger
koppelen. Druk simpelweg op de Toonseleceknop (C) op de 230 V ontvanger gedurende 5 seconden
tot u een dubbele geluidsnocae hoort. Druk op de Deurbelknop (A) en u hoort opnieuw een
geluidsnocae. Na 10 seconden hoort u nog een dubbele geluidsnocae. Uw toestellen zijn nu
gekoppeld.
INSTALLEREN EN KOPPELEN VAN DE 230 V ONTVANGER
U kunt de 230V ontvanger op elk stopcontact in uw huis aansluiten, de koppeling voor uw set is al
gebeurd jdens de produce. Om een extra 230V ontvanger te koppelen met uw Deurbelknop
(oponeel verkrijgbaar op www.mrsafe.eu) drukt u op de Toonseleceknop (C) gedurende 5 seconden
tot u een dubbele geluidsnocae hoort. Druk op de Deurbelknop (A) en u hoort opnieuw een
geluidsnocae. Na 10 seconden hoort u nog een dubbelegeluidsnocae. Uw toestellen zijn nu
gekoppeld.
BELTOON SELECTEREN EN VOLUMENIVEAU AANPASSEN
Om een beltoon te selecteren op de 230 V ontvanger, drukt u op de Toonseleceknop van het toestel
(C) tot u de beltoon hoort die u wenst te selecteren.
Opmerking: Wanneer er meerdere kinesche deurbelknoppen met uw apparaat gekoppeld zijn is het niet
mogelijk om voor elke deurbelknop een aparte beltoon te kiezen.
Om het volume van de 230 V ontvanger aan te passen, drukt u eerst op de Toonseleceknop van het
toestel (C) zodat u een beltoon hoort en vervolgens op de volumeknop van het toestel (D) om het
gewenste volume te selecteren.
KLANTENONDERSTEUNING
Voor meer informae, technische vragen of retouraanvragen met betrekking tot dit product dient u
rechtstreeks contact op te nemen met support@mrsafe.eu.
GARANTIE
Mr Safe is een gedeponeerd handelsmerk van TE-Group NV. Het merk mr Safe staat voor producten
van goede kwaliteit en een uitstekende klantenservice. Daarom garandeert mr Safe dat dit
product vrij is van materiaal- en fabricagefouten gedurende een periode van twee (2) jaar na de
oorspronkelijke aankoopdatum van het product. De voorwaarden van deze garane en de omvang
van de verantwoordelijkheid van mr Safe onder deze garane kunt u downloaden vanaf de website:
www.mrsafe.eu.
NL
230 V Ontvanger
B: Stekker
C: Toonseleceknop
D: Volumeknop
FR
Récepteur 230 V
B: Prise d’alimentaon
C: Bouton de sélecon de tonalité
D: Volume
D
230 V Empfänger
B: Netzstecker
C: Tonauswahltaste
D: Lautstärke
INSTALLATION UND KOPPELN DER KINETISCHER DRUCKKNOPF
Sie können den kineschen Druckknopf mit dem Industrieband an jeder Oberäche befesgen oder
an der Wand festschrauben. Nehmen Sie die Kunststoplae mit den 2 Schraubenlöchern und halten
Sie sie an die Wand, an der Sie sie befesgen möchten. Geben Sie mit einem Bleis an, wo Sie die
Löcher bohren müssen. Bohren Sie 2 Löcher, in denen die Anzeige sichtbar ist. Stecken Sie 2 Stopfen
in die Löcher, platzieren Sie die Kunststoplae an der richgen Stelle und schrauben Sie sie fest. Zum
beenden des Vorgangs, legen Sie die Vorderseite der Türklingel auf der Rückseite bis es einrastet.
Sie können mehrere Drucktasten (oponal unter w ww.mrsafe.eu verfügbar) m it d en Empfänger
koppeln. Drücken Sie einfach die Tonauswahltaste (C) am 230-V-Empfänger 5 Sekunden lang, bis Sie eine
doppelte Tonbenachrichgung hören. Drücken Sie die Taste (A) und Sie hören eine weitere akussche
Benachrichgung. N ach 1 0 Sekunden hören Sie e ine weitere doppelte Soundbenachrichgung. Ihre
Geräte sind jetzt gekoppelt.
INSTALLATION UND KOPPELN DER 230 V EMPFÄNGER
Sie können den 230-V-Empfänger an jede Steckdose in Ihrem Haus anschließen. Die Kopplung für Ihr
Gerät wurde bereits während der Produkon durchgeführt.
Um einen zusätzlichen 230-V-Empfänger mit Ihrer Drucktaste zu koppeln (oponal unter www.
mrsafe.eu erhältlich), drücken Sie die Tonauswahltaste (C) 5 Sekunden lang, bis Sie eine doppelte
Tonbenachrichgung hören. Drücken S ie d ie Taste ( A) u nd S ie hören e ine weitere akussche
Benachrichgung. N ach 1 0 Sekunden hören Sie e ine weitere doppelte Soundbenachrichgung. Ihre
Geräte sind jetzt gekoppelt.
KLINGELTON WÄHLEN UND LAUTSTÄRKE REGELN
Um einen Klingelton entweder am 230-V-Empfänger auszuwählen, drücken Sie die Tonauswahltaste des
Geräts (C), bis Sie den Klingelton hören, den Sie auswählen möchten.
Hinweis: Wenn mehrere Drucktasten mit Ihrem Gerät gekoppelt sind, kann nicht für jede Drucktaste ein
separater Ton ausgegeben werden.
Um die Lautstärke entweder am 230-V-Empfänger einzustellen, drücken Sie zuerst die Tonauswahltaste
des Geräts (C), um eine Melodie zu hören, und drücken Sie die Lautstärketaste des Geräts (D), um die
Lautstärke auszuwählen gewünschtes Volumen.
KUNDENDIENST
Für weitere Informationen, technische Fragen oder Rücksendungen zu diesem Produkt wenden Sie sich
bitte an: support@mrsafe.eu.
GARANTIE
Mr Safe ist ein eingetragenes Markenzeichen der TE-Group NV. Die mr Safe-Marke steht für Qualität
und hervorragenden Kundenservice. Aus diesem Grund gibt mr Safe auf dieses Produkt eine Garane
von zwei (2) Jahren auf alle Material- und Verarbeitungsfehler ab Originalkaufdatum des Produktes.
Die Bedingungen dieser Garane und der Verantwortlichkeitsumfang von mr Safe in dieser Garane
können Sie nden auf www.mrsafe.eu.