Mr Safe SS03 Installation instructions

Mr Safe
SMART HOME SOCKET SET SS03
FULL MANUAL

1. Getting Started
1.1 Installing the app
Go to the Apple App store or Google Play Store and search for “mrsafe”. If you are using an iPad
you need to make sure that you have set the search for “apps for iPhone and iPad”. If you
cannot find the App on the Google Play Store, you can download it for Android devices on
www.mrsafe.eu. Download the mrsafe smart home app onto your device.
1.2 Starting the app and registering
When you are using the app for the
first time, you need to setup an
account. Tap “Register” to enter
the registration page. The system
will automatically recognize your
country / area, or you can select it
yourself. Enter your mobile phone
number and/or your e-mail
address, type in a password and tap
“Next”.
If you have entered your phone
number you will receive a
verification code by SMS. If you
chose to register by e-mail address,
you will receive a mail with the
verification code. Use the link in
the e-mail or the code of the SMS
to verify your account. Tap “Confirm” to complete the registration.
The app will remember your account after registration.
1.3 Installing the BASE socket
The Mr Safe Home Socket consists of 3 devices. 1 is marked with BASE on the product label.
Insert this BASE socket in a wall power socket close to your Wi-Fi router. The WHITE LED on the
BASE socket will light up. Start by making sure your smartphone is connected to your Wi-Fi
Router and that both the socket and your smartphone are in the proximity of your Wi-Fi router.
Open the app and press the “+” button in the upper right corner to add a device.
When the white LED is flashing 2x per second, then click “confirm indication rapidly blinking”.
Otherwise, press the button of the BASE socket for 6 seconds. The white LED on the BASE socket
will now flash 2x/second (if the flashing is different, press the button again for 6 seconds)
When the white LED is flashing correctly you can press the button in the app “confirm indicator
rapidly blink”. The app will search for the new BASE socket. After it is found, you will have to
enter your Wi-Fi password of the modem/router and you can enter or change the name and click
done to finalize the installation.

1.4 Adding an EXTRA socket to your BASE socket
You can add an extra socket to your BASE socket by selecting the BASE socket in the app. Plug
in the extra socket close to the base socket. Tap the Base socket in the app and press “+” add
to add an extra socket. Press the button on the extra socket for 5 seconds and press “next” in
the app to confirm. The base socket will now search for the extra socket. You can change the
name and tap “save” to add the extra socket.
1.5 Operating the socket
From the app you can turn the smart sockets on or off by
pressing the GREEN (=ON) or GREY (=OFF) button in the app

2. Socket options
To enter the options menu for the sockets, select the socket and press
the “…” in the upper right corner. Here you can change the name of
the device, share the device with family members, create groups and
delete the device.
2.1 Change the name of the device
To change the name of the device, go to the options menu of the
socket (as described above) and press “Change device name”.
You can now input the desired name.
2.2 Sharing devices with your family
You can share devices with your family members so they can also
control the smart sockets. Press “share device” and then “add” to add
a family member. You will have to input their phone number or email-
address and confirm.
2.3 Device info
Here you can verify details and info of your device.
2.4 Adding sockets to a group
You can group the sockets, so that when you turn them on or off they
all execute the command with just one tap. To group sockets press
“…” in the upper right corner to enter the socket menu. Press “Create
group” to select the sockets you want to group and press confirm to
create the group.
2.5 Send feedback and search for firmware update
You can send feedback about the device to the manufacturer by
pressing “send feedback” and leaving your note. It may take up a few
days before an answer is returned.
From time to time the manufacturer will update the firmware for this
device. You can manually check for new firmware by pressing “Search
for new firmware” and installing it.
2.6 Deleting a device
Here you can also delete a device by pressing “Delete device”

3. Adding timers
You can add timers to your devices by double pressing the device in the list.
You can add a:
-Planning timer
Select the planning timer if you want your socket to go ON/OFF at certain times on
certain days. Press “Add Timer” in the lower right corner and press “add timer” to add
your timer. You can choose the days and hours the device has to go ON/OFF.
-Countdown timer
Select the countdown timer if you want the device to go ON/OFF after a countdown
time. Press “Countdown” in the lower middle to select the countdown for the device.
4. Scenes
You can add personalized scenes to your device, for example to
turn on all devices when the sun sets, or by rainfall etc.
Press “Scenes” in the app to get started with the 4 presets. If
you want to add your own customized scene, press “+” in the
upper right corner.
Optionally, you can add a condition to the scene by selecting
temperature, humidity, weather, air quality, sunrise/sunset,* …
The app will ask you to select your location and a certain
condition such as temperature below/above x°C, weather
conditions etc.
Tap “add task” to select the device and the command to execute
(ON/OFF, …)
(* availability may differ per region)

5. Support
For all questions and additional information concerning this product, please contact
support@mrsafe.eu
6. Warranty
Copyright © mr Safe®. mr Safe® is a registered trademark of TE-Group NV. The mr Safe®
brand stands for superior quality products and excellent customer service. Therefore mr
Safe® warrants this product to be free from defects in materials and workmanship for a
period of two (2) years from the original purchase date of the product.
7. Disclaimer
Copyright © 2017 TE GROUP NV
These terms and conditions give the rights to use certain features on your device. You must
agree to these terms and conditions before using the device. Your use of the device confirms
or constitutes your agreement to be bound by these terms and conditions. If you do not
agree to these terms and conditions, you may return your device to the point of purchase
within 7 or 14 days from the purchase date. These terms and conditions do not replace any
terms, disclaimers or conditions which were provided with your purchase. All such terms,
conditions and disclaimers remain in full force.
You must have a valid age to use and confirm the terms and conditions, at least 14 years,
depending on the country.
You are not allowed to analyse, modify, engineer or tamper with the software or hardware of
the device and connected software or hardware.
TE Group has the right to make any change without prior notice to the hardware, software
and the agreements, including those terms and conditions
All rights reserved.
TE Group will respect your privacy and the privacy laws.
TE Group will not be liable to you or any other party for any damage or loss or interruption or
other problem due to the or relating to the (use of) the device.

Warranty will be according to the warranty laws, and never exceed the amount of the
purchase of the device.
The software is provided ‘AS IS’ and gives you the non-exclusive, non-transferrable right to
use on 1 device under license. The software is not sold.
For warranty disclaimer: see www.mrsafe.eu and the user manual provided with the
product.

1. Starten met de SS03
1.1 Installeer de app
Ga naar de Apple App store of Google Play store en zoek naar ‘mrsafe’. Indien u een iPad
gebruikt, moet u ervoor zorgen dat u zoekt naar “Apps voor iPhone en iPad’. Indien u de App
niet op de Google Play store kan terugvinden, kan u deze ook downloaden voor Android
toestellen op www.mrsafe.eu . Download de Mr Safe Smart Home App voor uw toestel.
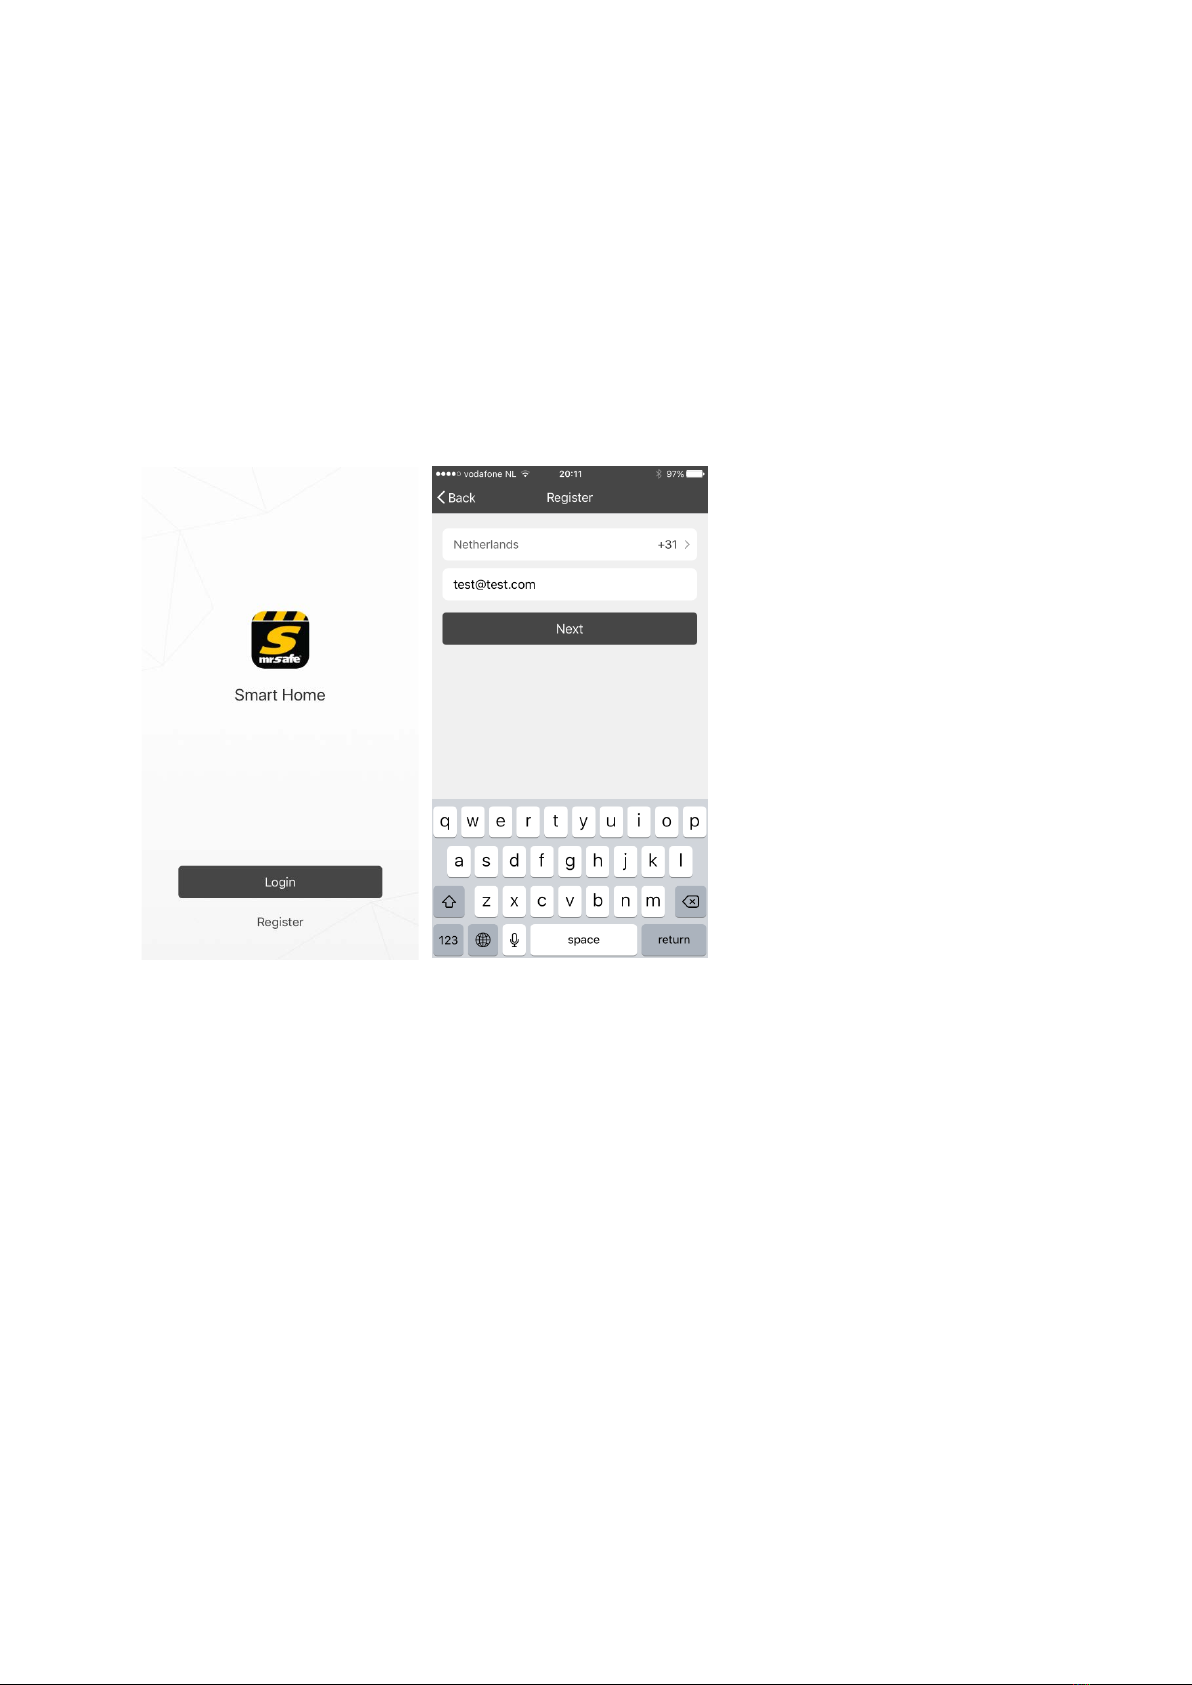
1.2 App opstarten en registreren
Wanneer u de app voor de eerste
keer gebruikt dient u een account
op te stellen. Druk op ‘Registreer’
om naar de registratiepagina te
gaan. Het system zal automatisch
uw land / region herkennen, of I
kan dit zelf instellen. Voer je
mobiele nummer en/of je e-
mailadres in, geef een wachtwoord
in en druk op “Volgende”.
Indien u uw telefoonnummer heeft
ingegeven, zal u een verificatiecode
per SMS ontvangen. Indien u
gekozen heeft om te registreren via
uw e-mailadres, ontvangt u een
mail met een verificatiecode.
Gebruik de link in deze mail of de
code van de SMS om uw account te verifiëren. Druk op “Bevestigen” om de registratie te
voltooien.
Na registratie zal de app uw account onthouden.
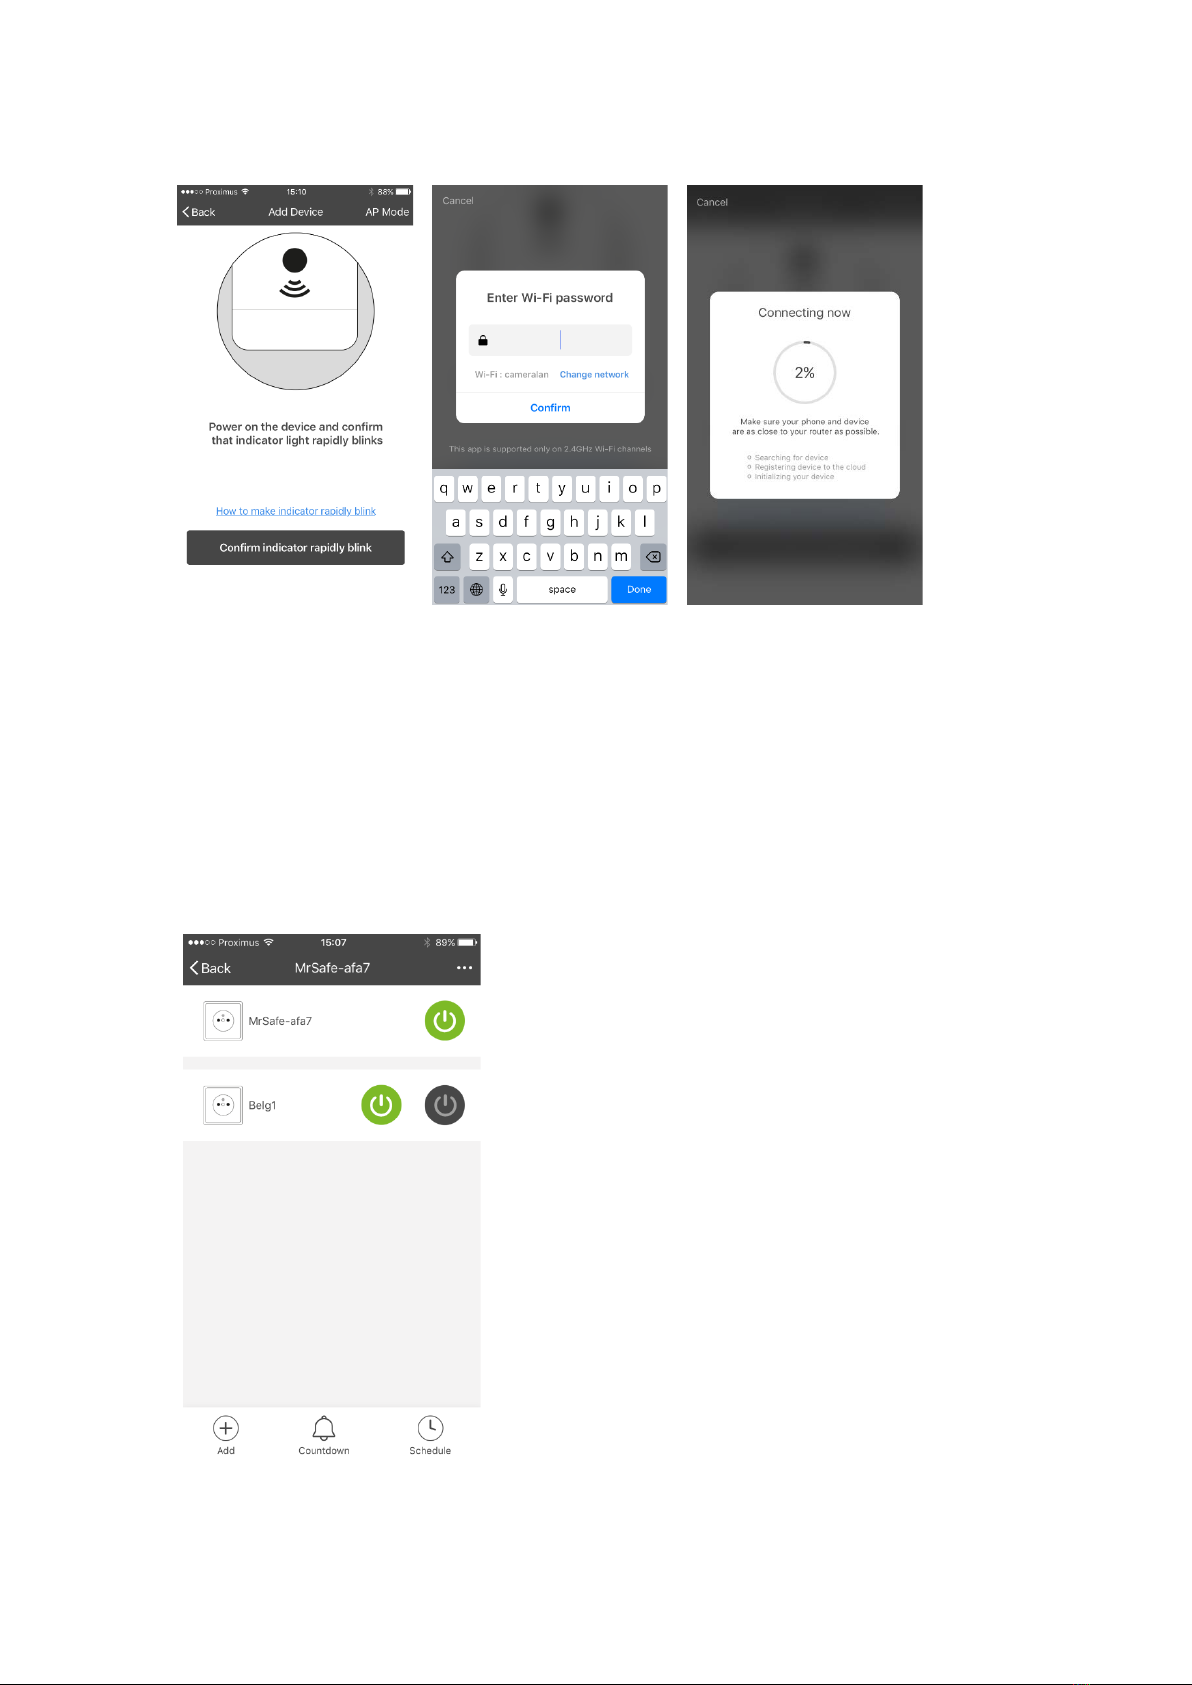
1.3 Installatie van de BASIS stekker
De Mr Safe Home Socket Set bestaat uit 3 toestellen. 1 van deze toestellen is gemarkeerd met
BASE op het productlabel. Steek deze basisstekker in een stopcontact dicht bij je Wi-Fi router.
De WITTE LED op de BASIS stekker zal oplichten. Zorg dat je smartphone verbonden is met je Wi-
Fi router en dat zowel je smartphone als de basisstekker kort bij je Wi-Fi router zijn. Open de app
en druk op de “+” toets in de rechterbovenhoek om een toestel toe te voegen.
Wanneer de witte LED 2x per seconde knippert, klik dan op “bevestig indicator snel knipperend”.
Indien dit niet het geval is, druk gedurende 6 seconden op de knop van de BASIS stekker. De
witte LED zal nu 2x per seconde knipperen. (indien het knipperen anders is, druk nogmaals op de
toets gedurende 6 seconden)
Als de witte LED correct knippert, kan u op de toets “bevestig indicator snel knipperend”
drukken. De app zal dan op zoek gaan naar de basisstekker. Nadat deze gevonden is, moet u uw

Wi-Fi wachtwoord van je modem/router ingeven, kan u de naam veranderen en klik dan op
“volgende” om de installatie te finaliseren.
1.4 Een EXTRA stekker toevoegen aan je BASIS stekker
U kan een extra stekker toevoegen aan uw BASIS stekker in de app. Steek de extra stekker in
een stopcontact kortbij de basisstekker. Druk op de BASIS stekker in de app en druk dan op
“+” om een extra stekker toe te voegen. Druk op de knop op de extra stekker gedurende 5
seconden en druk op ‘volgende’ om te bevestigen. De BASIS stekker zal nu zoeken naar de
extra stekker. U kan de naam veranderen en op “opslaan” drukken om de extra stekker op te
slaan.
1.5 De stekker bedienen
Vanuit de app kan je de intelligente stekkers aan en uit
zetten door op de GROENE (=AAN) of GRIJZE (=UIT) toets te
drukken.

2. Stekker opties
Om naar het opties-menu voor de stekkers te gaan, selecteer je de
stekker en druk je op de “….” In de rechter bovenhoek. Hier kan je de
naam van het toestel wijzigen, het toestel delen met familieleden,
stekkers groeperen en toestellen verwijderen.
2.1 Toestelnaam wijzigen
Om de toestelnaam te wijzigen, gaat u naar het opties-menu (zoals
hierboven uitgelegd) en drukt u op “Toestel naam wijzigen”. U kan nu
de gewenste naam ingeven.
2.2 Toestellen delen met je familie
U kan toestellen delen met uw familieleden zodat zij ook de stekkers
kunnen bedienen. Druk op “Toestel delen” en dan op “toevoegen” om
een familielid toe te voegen. U dient hun mobiele nummer of e-
mailadres in te geven en te bevestigen.
2.3 Toestel info
Hier kan u de details en informatie van uw toestel raadplegen.
2.4 Stekkers groeperen
U kan stekkers groeperen zodat de toestellen hetzelfde commando
uitvoeren met één druk op de knop. Om stekkers te groeperen drukt u
op de “…” in de rechter bovenhoek om in het stekker-menu te gaan.
Druk op “Groep creëren” om de stekkers te selecteren.
2.5 Feedback zenden en naar nieuwe firmware zoeken
U kan feedback over een toestel verzenden naar de fabricant door op
“feedback sturen” te drukken en een bericht te laten. Het kan enkele
dagen duren alvorens u een antwoord krijgt.
De fabrikant zal af en toe een firmware update voor de stekkers delen.
U kan manueel zoeken naar nieuwe firmware door op “Zoeken naar
nieuwe firmware” te drukken en deze te installeren.
2.6 Een toestel verwijderen
Door op “Toestel verwijderen” te drukken kan u een toestel
verwijderen.

3. Timers instellen
U kan timers toevoegen aan uw toestellen door op het toestel te dubbelklikken in de lijst.
U kan de volgende timers toevoegen:
-Planning timer
Selecteer de planning timer als u wil dat de stekker AAN/UIT gaat op bepaalde
tijdstippen op bepaalde dagen. Druk op “Timer toevoegen” in de rechter onderhoek om
uw timer toe te voegen. U kan de dagen en tijdstippen kiezen waarbij de stekker
AAN/UIT moet gaan.
-Afteltimer
Selecteer de afteltimer indien u wenst dat een toestel na een bepaalde afteltijd AAN/UIT
moet gaan. Druk op “Afteltimer” midden onderaan de app om de afteltimer te
selecteren.
4. Scenarios
U kan gepersonaliseerde scenarios toevoegen aan uw toestel om
bijvoorbeeld alle toestellen aan te laten gaan wanneer het
regent, wanneer de zon ondergaat etc.
Druk om “Scenarios” in de app om aan de slag te gaan met de 4
voorinstellingen. Indien u een gepersonaliseerd scenario wil
toevoegen, drukt u op “+” in de rechter bovenhoek.
Optioneel, kan u een voorwaarde toevoegen aan het scenario
zoals de temperatuur, luchtvochtigheid, weersomstandigheden,
luchtkwaliteit, zonsop/ondergang,* … De app zal u om uw
locatie vragen en een bepaalde voorwaarde zoals temperatuur
boven/onder x°C, weersomstandigheden etc.
Druk op “taak toevoegen” om het toestel te selecteren en het
commando voor het toestel (AAN/UIT,…)
(* beschikbaarheid afhankelijk van regio)

5. Support
Voor meer informatie, technische vragen of retouraanvragen met betrekking tot dit product dient u
6. Garantie
Copyright © mr Safe®. mr Safe® is een gedeponeerd handelsmerk van TE-Group NV. Het merk mr Safe®
staat voor producten van superieure kwaliteit en een uitstekende klantenservice. Daarom garandeert
mr Safe® dat dit product vrij is van materiaal- en fabricagefouten gedurende een periode van twee (2)
jaar na de oorspronkelijke aankoopdatum van het product. De voorwaarden van deze garantie en de
omvang van de verantwoordelijkheid van mr Safe® onder deze garantie kunt u downloaden vanaf de
website www.mrsafe.eu.
7. Disclaimer
Copyright © 2017 TE GROUP NV
Deze voorwaarden geven de rechten om bepaalde functies op uw apparaat te gebruiken. U
moet akkoord gaan met deze algemene voorwaarden voordat u het apparaat gebruikt. Uw
gebruik van het apparaat bevestigt of vormt uw akkoord om gebonden te zijn aan deze
voorwaarden. Als u deze voorwaarden niet accepteert, kunt u binnen 7 of 14 dagen na de
aankoopdatum uw apparaat terugsturen naar het aankooppunt. Deze voorwaarden zijn niet
van toepassing op eventuele voorwaarden, disclaimers of voorwaarden die bij uw aankoop
zijn verstrekt. Al deze voorwaarden, voorwaarden en disclaimers blijven in volle kracht.
U moet een geldige leeftijd hebben om te gebruiken en de voorwaarden te bevestigen,
althans 14 jaar, afhankelijk van het land.
U mag de software of hardware van het apparaat en de aangesloten software of hardware
niet analyseren, wijzigen of manipuleren.

TE Group heeft het recht om zonder voorafgaande kennisgeving aan de hardware, software
en de afspraken te wijzigen, met inbegrip van deze voorwaarden
Alle rechten voorbehouden.
TE Group respecteert uw privacy en de privacy wetten.
TE Group is niet aansprakelijk voor u of enige andere partij voor eventuele schade of verlies
of onderbreking of ander probleem als gevolg van of met betrekking tot (gebruik van) het
apparaat.
Garantie is volgens de garantiewetten en overschrijdt nooit de hoeveelheid aankoop van het
apparaat.
De software wordt geleverd 'ZOALS IS' en geeft u het niet-exclusieve, niet-overdraagbare
recht om te gebruiken op 1 apparaat onder licentie. De software wordt niet verkocht.
Voor garantie-disclaimer: zie www.mrsafe.eu en de gebruiksaanwijzing die bij het product is
geleverd.
Voor enig garantieprobleem kunt u contact opnemen met support@mrsafe.eu
Table of contents
Languages:
Other Mr Safe Accessories manuals