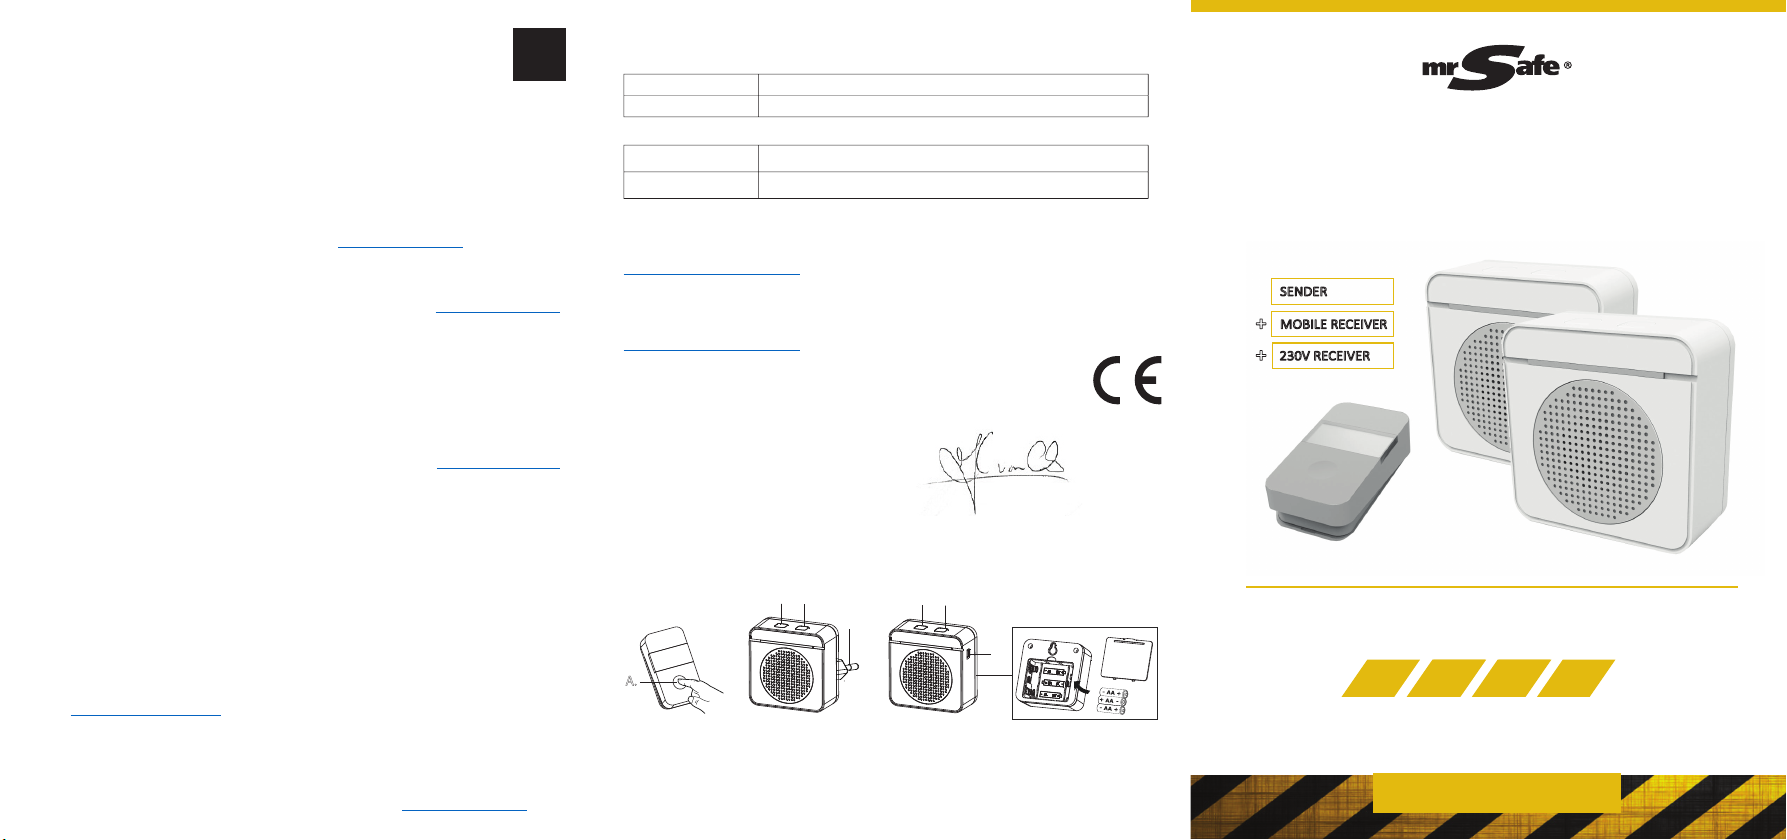
VERPAKKINGSINHOUD
Kinesche Deurbelknop + 230V Ontvanger + Mobiele Ontvanger + Industriële tape
+ schroeven + pluggen
ONDERDELEN & KNOPPEN
1. Kinesche Deurbelknop
A: Deurbel drukknop
INSTALLEREN EN KOPPELEN VAN DE KINETISCHE DEURBELKNOP
U kunt de Kinesche Deurbelknop op elk oppervlak bevesgen met de meegeleverde industriële tape
en schroeven. Neem het plasc plaatje met de 2 schroefgaten en houd dit tegen de muur waartegen u
de deurbel wil bevesgen. Geef met een potlood aan waar u de gaten moet boren. Boor 2 gaten waar
de indicae zichtbaar is. Steek 2 pluggen in de gaten, plaats het plasc plaatje op de juiste plaats en
schroef het vast. Plaats vervolgens een kant van de industriële tape op het plasc plaatje en plak de
Deurbelknop aan de andere kant.
U kunt meerdere Deurbelknoppen (oponeel verkrijgbaar op www.mrhandsfree.com) met de
ontvangers koppelen.
INSTALLEREN EN KOPPELEN VAN DE 230V ONTVANGER
U kunt de 230V ontvanger op elk stopcontact in uw huis aansluiten, de koppeling voor uw set is al
gebeurd jdens de produce. Om een extra 230V ontvanger te koppelen met uw Deurbelknop
(oponeel verkrijgbaar op www.mrhandsfree.com), steekt u de ontvanger in een stopcontact om deze
in te schakelen, de ontvanger bevindt zich nu in de koppelingsmodus gedurende 2 minuten. Druk
eenmaal op de deurbelknop (A). U hoort een geluidsmelding en ziet een rood lampje op de 230V
ontvanger om aan te geven dat uw apparaten gekoppeld zijn. Op één ontvanger kunnen maximaal
8 Deurbelknoppen worden opgeslagen. Als u probeert een negende toe te voegen, wordt de eerste
verwijderd. 1 Deurbelknop kan worden aangesloten op een onbeperkt aantal ontvangers.
INSTALLEREN EN KOPPELEN VAN DE MOBIELE ONTVANGER
Alvorens u de mobiele ontvanger installeert, dient u 3x AA-alkalinebaerijen in het baerijvak (F) te
plaatsen. Open het deksel van het baerijvak. Plaats 3 AA-alkalinebaerijen volgens het zichtbare
schema en sluit het deksel. U kunt de mobiele ontvanger overal in huis meenemen (tot 100 m), het
koppelen van uw set is al gebeurd jdens de produce.
Om een extra mobiele ontvanger te koppelen met uw Deurbelknop (oponeel verkrijgbaar op www.
mrhandsfree.com), dient u de mobiele ontvanger in te schakelen door de AAN/UIT schakelaar (E) in
de AAN-posie te schuiven. De mobiele ontvanger bevindt zich nu in de koppelingsmodus gedurende
2 minuten. Druk eenmaal op de deurbelknop (A). U hoort een geluidsmelding en ziet een rood lampje
op de mobiele ontvanger om aan te geven dat uw apparaten gekoppeld zijn. Op één ontvanger kunnen
maximaal 8 Deurbelknoppen worden opgeslagen. Als u probeert een negende toe te voegen, wordt
de eerste verwijderd. 1 Deurbelknop kan worden aangesloten op een onbeperkt aantal ontvangers.
BELTOON SELECTEREN EN VOLUMENIVEAU AANPASSEN
Om een beltoon te selecteren op zowel de 230V ontvanger als de mobiele ontvanger, drukt u op de
toonseleceknop van het apparaat (C, G) tot u de beltoon hoort die u wenst te selecteren.
Opmerking: indien u dezelfde beltoon op beide apparaten wenst, dient u deze voor elk apparaat
afzonderlijk in te stellen.
Opmerking: Wanneer er meerdere kinesche deurbelknoppen met uw apparaat gekoppeld zijn is het niet
mogelijk om voor elke deurbelknop een aparte beltoon te kiezen.
Om het volume op zowel de 230V als de mobiele ontvanger aan te passen, drukt u eerst op de
toonseleceknop van het apparaat (C, G) zodat u een beltoon hoort en vervolgens op de volumeknop
van het apparaat (D, H) om het gewenste volume te selecteren.
KLANTENONDERSTEUNING
Voor meer informae, technische vragen of retouraanvragen met betrekking tot dit product dient u
rechtstreeks contact op te nemen met support@mrhandsfree.com.
GARANTIE
Mr Handsfree is een gedeponeerd handelsmerk van TE-Group NV. Het merk mr Handsfree staat
voor producten van superieure kwaliteit en een uitstekende klantenservice. Daarom garandeert mr
Handsfree dat dit product vrij is van materiaal- en fabricagefouten gedurende een periode van twee (2)
jaar na de oorspronkelijke aankoopdatum van het product. De voorwaarden van deze garane en de
omvang van de verantwoordelijkheid van mr Handsfree onder deze garane kunt u downloaden vanaf
de website: www.mrhandsfree.com.
NL
2. 230V Ontvanger
B: Stekker
C: Toonseleceknop
D: Volumeknop
3. Mobiele Ontvanger
E: AAN/UIT schakelaar
F: Baerijcomparment
G: Toonseleceknop
H: Volumeknop
D
PAKUNGSINHALT
Kinescher Druckknopf + 230V Empfänger + Mobiler Empfänger + Industrieband
+ Schrauben + Schraubstopfen
TEILE & TASTEN
1. Kinescher Druckknopf
A: Türklingelknopf
INSTALLATION UND PAARUNG DER KINETISCHE TÜRKLINGEL
Sie können den Kinescher Druckknopf mit dem mitgelieferten Industrieband und den Schrauben an
jeder Oberäche befesgen. Nehmen Sie die Kunststoplae mit den 2 Schraubenlöchern und halten
Sie sie an die Wand, an der Sie sie befesgen möchten. Geben Sie mit einem Bleis an, wo Sie die
Löcher bohren müssen. Bohren Sie 2 Löcher, in denen die Anzeige sichtbar ist. Stecken Sie 2 Stopfen
in die Löcher, platzieren Sie die Kunststoplae an der richgen Stelle und schrauben Sie sie fest.
Legen Sie zum Abschluss eine Seite des Industriebandes auf die Kunststoplae und kleben Sie den
Druckknopf auf die andere Seite. Sie können mehrere Kinesche Druckknopfe (oponal unter www.
mrhandsfree.com erhältlich) mit den Empfängern koppeln.
INSTALLATION UND KOPPELN DER 230V EMPFÄNGER
Sie können den 230V-Empfänger an eine beliebige Steckdose in Ihrem Haus anschließen. Die
Kopplung für Ihr Gerät wurde bereits während der Produkon durchgeführt. Um einen zusätzlichen
230V-Empfänger mit Ihrem Druckknopf zu koppeln (oponal unter www.mrhandsfree.com erhältlich),
stecken Sie den Empfänger in eine Steckdose, um ihn einzuschalten. Der Empfänger bendet sich
nun 2 Minuten lang im Kopplungsmodus. Drücken Sie einmal die Türklingelknopf (A). Sie hören eine
akussche Benachrichgung und sehen ein rotes Licht am 230V-Empfänger, um anzuzeigen, dass
Ihre Geräte gekoppelt sind. Auf einem Empfänger können bis zu 8 Druckknopfe gespeichert werden.
Wenn Sie versuchen, eine neunte hinzuzufügen, wird die erste gelöscht. 1 Druckknopf kann an eine
unbegrenzte Anzahl von Empfängern angeschlossen werden.
INSTALLATION UND KOPPELN DES MOBILEMPFÄNGER
Legen Sie vor der Installaon des mobilen Empfängers 3 AA-Alkalibaerien in das Baeriefach (F) ein.
Önen Sie die Abdeckung des Baeriefachs. Legen Sie 3 AA-Alkalibaerien gemäß dem sichtbaren
Schema ein und schließen Sie die Abdeckung. Sie können den mobilen Empfänger überall in Ihrem
Haus mitnehmen (bis zu 100 m). Die Kopplung für Ihr Gerät wurde bereits während der Produkon
durchgeführt. Um einen zusätzlichen mobilen Empfänger mit Ihrem Druckknopf zu koppeln (oponal
unter www.mrhandsfree.com erhältlich), sollten Sie den mobilen Empfänger einschalten, indem
Sie den EIN/ AUS-Schalter (E) in die Posion EIN schieben. Der mobile Empfänger bendet sich nun
2 Minuten lang im Kopplungsmodus. Drücken Sie einmal die Türklingelknopf (A). Sie hören eine
akussche Benachrichgung und sehen ein rotes Licht am Empfänger, um anzuzeigen, dass Ihre Geräte
gekoppelt sind. Auf einem Empfänger können bis zu 8 Druckknopfe gespeichert werden. Wenn Sie
versuchen, eine neunte hinzuzufügen, wird die erste gelöscht. 1 Druckknopf kann an eine unbegrenzte
Anzahl von Empfängern angeschlossen werden.
KLINGELTON WÄHLEN UND LAUTSTÄRKE REGELN
Um einen Klingelton sowohl auf dem 230V-Empfänger und dem Mobilempfänger zu wählen, drücken
Sie die Tonauswahltaste am Gerät (C, G) bis Sie den gewünschten Klingelton hören.
Hinweis: Wenn Sie den gleichen Ton auf beiden Geräten wollen, müssen Sie separat für beide Geräten
die Auswahl machen.
Hinweis: Wenn mehrere kinesche Druckknopfe auf Ihrem Gerät verbunden sind, ist es nicht möglich
einen eigenen Klingelton für jede Druckknopf zu haben.
Um die Lautstärke zu regeln sowohl für dem 230V-Empfänger und dem Mobilempfänger, drücken Sie
zuerst die Tonauswahltaste am Gerät (C, G) um einen Ton zu hören und drücken Sie die Lautstärketaste
Ihres Geräts (D, H) um die gewünschte Lautstärke auszuwählen.
KUNDENDIENST
Für weitere Informaonen, technische Fragen oder Rücksendungen zu diesem Produkt wenden Sie sich
GARANTIE
Mr Handsfree ist ein eingetragenes Markenzeichen der TE-Group NV. Die mr Handsfree-Marke steht
für überragende Qualität und hervorragenden Kundenservice. Aus diesem Grund gibt mr Handsfree
auf dieses Produkt eine Garane von zwei (2) Jahren auf alle Material- und Verarbeitungsfehler ab
Originalkaufdatum des Produktes. Die Bedingungen dieser Garane und der Verantwortlichkeitsumfang
von mr Handsfree in dieser Garane können Sie nden auf www.mrhandsfree.com.
CONTENU DE L’EMBALLAGE
Bouton poussoir cinéque + Récepteur 230V + Récepteur mobile + Ruban industriel + Vis
+ Bouchons
ÉQUIPEMENT & TOUCHES
1. Bouton poussoir cinéque
A: Bouton de sonnee
INSTALLATION ET CONNEXION DU BOUTON POUSSOIR CINÉTIQUE
Vous pouvez xer le bouton poussoir cinéque à n’importe quelle surface à l’aide du ruban et des
vis fournis. Prenez la plaque en plasque avec les 2 trous de vis et maintenez-la contre le mur auquel
vous souhaitez la xer. À l’aide d’un crayon, indiquez où vous devez percer les trous. Percez 2 trous où
l’indicaon est visible. Insérez 2 bouchons dans les trous, placez la plaque en plasque au bon endroit et
vissez-la en place. Pour terminer, placez un côté du ruban industriel sur la plaque en plasque et collez le
bouton poussoir de l’autre côté.
Vous pouvez connecter plusieurs boutons poussoir (disponibles en opon sur www.mrhandsfree.com)
avec les récepteurs.
INSTALLATION ET CONNEXION DU RÉCEPTEUR 230V
Vous pouvez brancher le récepteur 230V dans n’importe quelle prise de votre maison, la connexion
a déjà été fait pendant la producon. Pour connecter un récepteur 230 V supplémentaire avec votre
bouton poussoir (disponible en opon sur www.mrhandsfree.com), branchez le récepteur dans une
prise de courant pour l’allumer, le récepteur est maintenant en mode de connexion pendant 2 minutes.
Appuyez une fois sur le bouton de sonnee (A). Vous entendrez une nocaon sonore et verrez un
voyant rouge sur le récepteur 230 V pour indiquer que vos appareils sont connectés. Jusqu’à 8 boutons
poussoir peuvent être enregistrés sur un récepteur. Si vous essayez d’ajouter un neuvième, le premier
sera supprimé. 1 bouton poussoir peut être connecté à un nombre illimité de récepteurs.
INSTALLATION ET CONNEXION DU RÉCEPTEUR MOBILE
Avant d’installer le récepteur mobile, insérez 3 baeries alcalines AA dans le comparment de baerie
(F). Ouvrez le couvercle du comparment. Insérez 3 baeries alcalines AA selon le schéma visible
et fermez le couvercle. Vous pouvez emporter le récepteur mobile n’importe où dans votre maison
(jusqu’à 100 m), la connexion a déjà été fait pendant la producon. Pour connecter un récepteur mobile
supplémentaire avec votre bouton poussoir (disponible en opon sur www.mrhandsfree.com), vous
devez allumer le récepteur mobile en faisant glisser l’interrupteur MARCHE/ARRÊT (E) sur la posion
ON, le récepteur mobile est maintenant en mode de connexion pendant 2 minutes. Appuyez une fois
sur le bouton de sonnee (A). Vous entendrez une nocaon sonore et verrez un voyant rouge sur le
récepteur mobile pour indiquer que vos appareils sont connectés. Jusqu’à 8 boutons poussoir peuvent
être enregistrés sur un récepteur. Si vous essayez d’ajouter un neuvième, le premier sera supprimé. 1
bouton poussoir peut être connecté à un nombre illimité de récepteurs.
SÉLECTIONNER UNE TONALITÉ ET AJUSTER LE VOLUME
Pour séleconner une tonalité d’appel sur le récepteur 230V et le récepteur mobile, appuyez sur le bouton
de sélecon de tonalité de l’appareil (C, G) jusqu’à ce que vous entendez la tonalité que vous souhaitez.
Remarque: Si vous voulez la même tonalité sur les deux appareils, il faut les congurer séparément pour
les deux appareils.
Remarque: Lorsque plusieurs sonnees sont connectées, il n’est pas possible d’avoir une tonalité disncte
pour chaque sonnee.
Pour ajuster le volume sur le récepteur 230V et le récepteur mobile, appuyez sur le bouton de sélecon
de tonalité (C, G) pour choisir une tonalité et appuyez sur le bouton de volume (D, H) pour séleconner
le volume souhaité.
SUPPORT DE CLIENTS
Pour plus d’informaons, des quesons techniques ou des demandes de retour concernant ce produit,
GARANTIE
Mr Handsfree est une marque déposée de TE-Group NV. La marque mr Handsfree conçoit des produits
de qualité supérieure et dispose d’un service après-vente exceponnel. C’est pourquoi mr Handsfree
garant ce produit contre tout défaut de matériel ou de fabricaon pendant une période de deux (2)
ans, à compter de la date d’achat du produit. Pour connaître les condions générales de cee garane
et l’étendue des responsabilités de mr Handsfree au tre de cee garane, consultez notre site web :
www.mrhandsfree.com.
FR
2. Récepteur 230V
B: Prise
C: Bouton de sélecon de tonalité
D: Bouton de volume
3. Récepteur mobile
E: Interrupteur MARCHE/ARRÊT
F: Comparment de baerie
G: Bouton de sélecon de tonalité
H: Bouton de volume
2. 230V Empfänger
B: Netzstecker
C: Tonauswahltaste
D: Lautstärketaste
3. Mobilempfänger
E: EIN/AUS-Schalter
F: Baeriefach
G: Tonauswahltaste
H: Lautstärketaste