MSI GAMING MOUSE 2017 User manual

MSI GAMING MOUSE 2017
User's Guide

2
Federal Communication Commission Interference
Statement
This equipment has been tested and found to comply with the limits for a Class B digital
device, pursuant to Part 15 of the FCC Rules. These limits are designed to provide
reasonable protection against harmful interference in a residential installation. This equipment
generates, uses and can radiate radio frequency energy and, if not installed and used in
accordance with the instructions, may cause harmful interference to radio communications.
However, there is no guarantee that interference will not occur in a particular installation. If
this equipment does cause harmful interference to radio or television reception, which can be
etermined by turning the equipment off and on, the user is encouraged to try to correct the
interference by one of the following measures:
Reorient or relocate the receiving antenna.
Increase the separation between the equipment and receiver.
Connect the equipment into an outlet on a circuit different from that to which the receiver
is connected.
Consult the dealer or an experienced radio/TV technician for help.
FCC Caution: Any changes or modifications not expressly approved by the party responsible
for compliance could void the user's authority to operate this equipment.
This device complies with Part 15 of the FCC Rules. Operation is subject to the following
two conditions: (1) This device may not cause harmful interference, and (2) this device must
accept any interference received, including interference that may cause undesired operation.

MSI GAMING MOUSE 2017
English
3
Overview
1. Left button (Click) 6. DPI up
2. Right button (Menu) 7. DPI down
3. Scrolling Wheel 8. Scroll up
4. Forward
Press this button to view the
previous page of the Internet
browser.
9. Scroll down
5. Backward
Press this button to view the next
page of the Internet browser.

4
USB Connection
1. Plug the USB connector to the USB port of your computer
2. The computer will detect and install the mouse automatically
3. When the installation completes, the mouse is ready to use
System Requirements
1. Windows®XP/Vista/7/8/8.1/10
2. Free USB port
3. CD-ROM driver
4. 25MB free hard disk space
Driver Installation
1. Plug the mouse into any free USB port on your computer.
2. The system will automatically detect the gaming mouse.
3. Start the installation process by clicking on the file “Setup.exe”

MSI GAMING MOUSE 2017
English
5
4. Windows®will prompt you if installation should continue despite not passing Windows logo
testing; install the driver despite this.
Note: The driver will automatically uninstall previous driver versions. For that reason it may
take a little while until the driver is installed and ready to use then repeat step3.
5. Select language
6. As soon as the installation process has completed click ‘OK’.

6

MSI GAMING MOUSE 2017
English
7
7. The symbol will now appear in the right-hand side of the Taskbar. You access the gaming

8
GAMING MOUSE Main Window
Switch Orientation
Right-handed: The right hand is suitable
Left-handed: The left hand is suitable
Mode Switch
Advanced setting allows setting two button setting and use mode switch button to switch
between Mode1 & Mode2.

MSI GAMING MOUSE 2017
English
9
Programmable Keys
Click Menu Universal Scrolling Double Click
Assign a shortcut IE Forward IE Backward
Scroll up Scroll down Assign a launch Fire button
Smart key Windows Key Open Driver Mode Switch
Note: Along with the left and right mouse buttons the mouse has 7 additional buttons which
can be freely assigned with the functions available in the driver menu. You’ll see the list
of functions that can be assigned when you click on the dropdown menu to the side of the
particular button.
Click: Left mouse button.
Menu: Right mouse button. The context menu will open when you point to a document
or folder using the mouse.
Universal scrolling: Mouse wheel function to scroll by moving the mouse.
Double-click: Left mouse button double click.
Assign a shortcut: A single keyboard command can be assigned to one of the mouse
buttons.
Note: Along with the left and right mouse buttons the mouse has 7 additional buttons
which can be freely assigned with the functions available in the driver menu. You’ll see
the list of functions that can be assigned when you click on the dropdown menu to the
side of the particular button.
Button off: Switches the button function off.
IE Forward: Select the next previously selected program or internet site.
IE Backward: Select the previous program or website
Scroll up: Scroll up the page you are currently viewing
Scroll down: Scroll down the page you are currently viewing
Assign a launch: Assign a launch program
Fire button: Left button twice click function
Smart key: The “Smart key” button click function: Hold pressed the “Smart key” button
and combined with any button pressing, then this button click function will continue to
auto-repeat working.
Windows Key: Windows system key
Open Driver: Open the gaming mouse AP

10
Create/Save Profile
Create one of five profiles. For instance, you can save all button assignments, macros,
color settings or sensitivity settings to a profile here. As each different mouse assignment
is best suited to different programs you can assign each program/game a special preset.
Once you’ve assigned all desired macros using the macro manager to different buttons,
and perhaps made different color setting changes, save these. It’s best to name the
profile after the program or game for which you’ve configured the settings. You can then
also link it to the *.exe file of the program or game by entering the relevant path when
saving the profile. By linking a program to a profile, the mouse will Automatically switch
to the relevant profile upon starting the respective game or program.
Load Profile
Edit Profile
macros for.

MSI GAMING MOUSE 2017
English
11
Marco Manager
Click on MARCO MANAGER to access the MARCO setting menu.
Function List
Assign Macro Macro Manager
Multimedia Open player Pre Track Next Track
Play/Pause Stop Mute
Volume Up Volume Down Select Player
DPI Switch DPI cycle DPI up DPI down
Windows Calculator Email WWW Favorites
WWW Forward WWW Back WWW Stop
My Computer WWW Refresh WWW Home
WWW Search
Creating a Macro(Basic Editor): Left mouse button.
1. Add a macro set by pressing [New] or delete one by pressing [Delete].
Note: Use your mouse with your favorite settings on any PC. No need to reprogram
when you change PCs because your settings wrote in on-board memory.
Each Game Profile can setup 6 Macro keys, each Macro key can recode 80 actions
(40keys).
2. If you click ‘New’ on the left hand window, you can assign a name to the macro like
‘Arcane rotation’ or ‘Sniper rifle’, Confirm the name by hitting the return/enter key.

12
3. Now you can enter a macro. To do that, Click the ‘Start Record’ button in the right-
hand window. Enter the key Combination which you need for a special action in
the game. The option ‘Record delays between key commands’ is located under the
record button. This option allows you to determine how long a certain key should be
pressed for. As a result it’s possible to create a macro that instructs a figure in the
game to only perform a specific action after a pre-determined period.
4. Click ‘Stop Record’ once you’re done entering your key combination via the keyboard.
You can now either record an additional macro in the macro set you’ve created or
create new macro set. Click ‘OK’ when you’re done. The macro can now be assigned
to any one of the six programmable buttons. You can assign the macro to a button
by clicking onto the arrow next to the box of the button you want the macro to be
assigned to. In the following dropdown menu choose ’Assign Macro’. All available
macro sets are now displayed. Select the one containing your macro of choice and
then click on the respective macro.
Note: if you’ve edited a macro that is already assigned to a particular button. You’ll
need to assign the macro to the desired mouse button again.

MSI GAMING MOUSE 2017
English
13
5. Assign the function to the mouse by clicking the ‘Apply’ Button without exiting the
ACROX menu .It may take a few seconds until the information is transferred to the
mouse. You can now store and save these settings under one of the five profiles that
can be stored on the mouse. Profiles will be easier to manage if you name them after
the game, gamer or program.
Note: Macro function can’t be stopped or revised once it’s done.
Integrate Mouse Clicks
Another special feature of the driver is that it allows you to integrate mouse clicks into a
macro along with keyboard commands. You can program a mouse event to be executed
after, before or in-between a key sequence. To do that, select the keyboard command
in the ‘Macro Manager’ before or after which you want to insert a new event. By right
clicking, you can open a window that contains various options:
1. Start Record Before: Starts recording the macro before the selected event.
2. Start Record After: Starts recording the macro after the selected event.
3. Insert Delay: Manually increase or decrease the delay between two Commands.
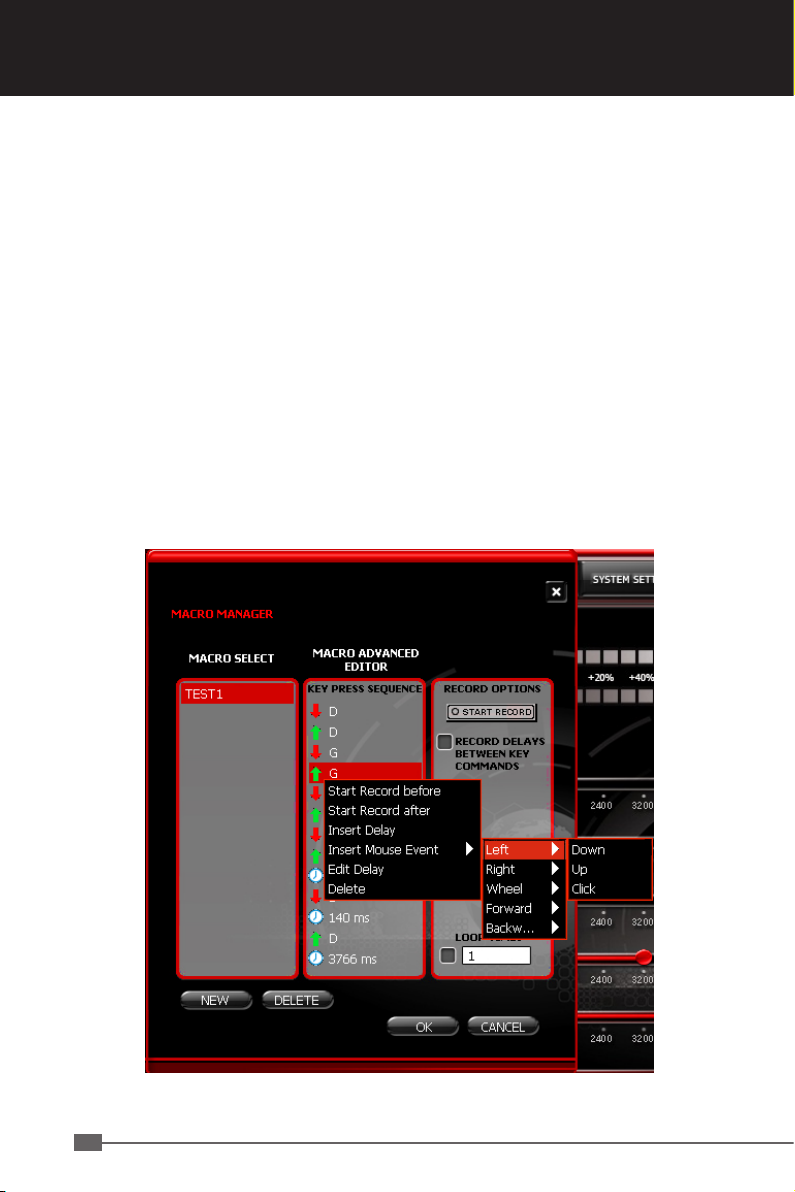
14
4. Insert Mouse Event: Specify which mouse event should be executed. The following
options are available:
Left Button: Left mouse button
Right Button: Right mouse button
Wheel: Centre mouse wheel button
Note: The mouse scroll function of the mouse wheel is not possible to be program.
Here too, only three Options are available; ‘press’. ‘release’ as well.
Forward: next previously selected program button
Backward: previous program button
There are always three events to choose from:
Down: Keeps the button depressed
UP: Releases the button
Click: Executes the commands ‘press’ and ‘release’ in turn.
5. Edit Delay: You can manually increase or decrease the delay Here. All you need to
do is enter the desired time Value; there’s no need to enter ‘ms’(milliseconds).
Note: Some games are unable to detect short delays.
6. Delete: Delete the selected step from the macro’s key sequence.

MSI GAMING MOUSE 2017
English
15
Multimedia
Open player: Start media player
Pre Track: Switch to the previous media track
Next Track: Switch to the next media track
Play/Pause: Switch between playing and pausing media
Stop: Stop playing the media in the media player
Mute: Mute (turns off) the computer's sound
Volume Up: Increase the computer's sound volume.
Volume Down: Decrease the computer's sound volume.
Profile switch
Profile cycle: Cycle switch
Profile up: Reverse cycle switch
Profile down: Positive cycle switch
Note: Mouse include memory, which can save five game profile setting (not include
Macro key record). Use one function key to switch the profile change.
Profile light: All the LED flash 5 sec and back to activate status.
DPI Switch
Windows
Calculator: Start Microsoft Calculator
Email: Start the default e-mail program
WWW Favorites: Open the Internet Explorer Favorites
WWW Forward: Select the next internet site
WWW Back: Select the previous website
WWW Stop: Web Stop
My Computer: Open My Computer
WWW Refresh: Refresh the current Web page
WWW Home: Start the default Web browser and loads the home Web page
WWW Search: Open the Internet Explorer Search panel

16
SENSITIVITY
Sensitivity options
Adjust the overall moving sensitivity of the mouse sensor.
Select a moving sensitivity level on a scale of -90%~+100%.
DPI Switcher
Select the desired resolution(s) of the mouse sensor here.
The arrow beneath the number bar shows which dpi value is currently active. We
recommend using the mouse with a resolution of 400dpi at first then increasing the dpi
resolution in steps as soon as you become accustomed to the speed.
DPI setting
Default DPI switch between 800 / 1600 / 6400, default setting is DPI 800
These DPI settings are also easily adjustable if you want to personalize your settings
From 400 – 6400
Customizable DPI setting ,use DPI function key to switch
DPI display
DPI +: DPI + LED flash 5 sec DPI - LED off then restore the original effect.
DPI -: DPI - LED flash 5 sec DPI + LED off then restore the original effect.
DPI top & bottom: DPI+ / - LED flash 5 sec then restore the original effect.
Layer Switch dispaly
Mode 1: DPI + flash 5 sec then restore the original effect.
Mode 2: DPI - flash 5 sec then restore the original effect.

MSI GAMING MOUSE 2017
English
17
ADVANCED SETTING
Polling Rate
The term ‘polling rate’ describes the number of times the computer prompts the mouse
for information. A high polling rate in conjunction with a high dpi setting ensures smooth
pointer movement. We recommend that you start off with a resolution of 400dpi and a
polling rate of 1000Hz.
Note: In general a high polling rate produces a rounder and softer pointer movement.
Color select
16 millions color for your choices.
Light effect switch
Set up Light LED ON/OFF
Light effect type options
Set up Light LED Full lightened or breathing.
Driver Reset
By clicking the RESET button, all the settings you have made will be reset to their
original factory default settings.
Smart Key SPEED
Enable to set up click delay time between 20 to 240 MS.
Scroll Menu (default 20MS) 20/40/60/80~240.

18
SYSTEM SETTING
Double Click
Configure the double-click response speed here.
Closer to 1 means the interval between two mouse clicks is long. closer to 11 means that
the interval between clicks is particularly short.
Note: Please note that all settings must be Transferred to the mouse by clicking the
‘Apply’ button.
Windows Pointer Speed
Set the speed of the mouse pointer on a scale of 1 to 11 here. This is the same as the
value that has been set in the Windows Control Panel.
Note: MSI to keep the default settings.
Mouse wheel
Here you can select how quickly your mouse wheel should scroll a document. You can
choose between 1 to 10 rows or a whole screen page per notch of the mouse wheel.
Test this function using your internet browser or in a text document and select the speed
you prefer.

MSI GAMING MOUSE 2017
English
19
OSD SETTING
A vary of information can be displayed with On Screen Display function bases on user
selection.
The contents which is selected in the AP software are shown in the OSD a minimum set of
modules for the OSD is provided as part of the AP software: Profile status, Macro execute
status, Skype.
On screen display
Profile Status
When profile is change by the profile button or key, and Driver/AP automated
showing OSD profile status panel.
Macro execute status
When any macro button or key is pressed by the user, and Driver/AP automated
showing the panel of OSD Macro execute status.
DPI Status
Color select
Purple, seven colors for your options.
Transparency
OSD transparency is adjustable from 10% to 100%.

20
Table of contents
Other MSI Mouse manuals

MSI
MSI CLUTCH GM31 User manual

MSI
MSI M98 User manual

MSI
MSI MS-6850 User manual

MSI
MSI CLUTCH GM51 LIGHTWEIGHT WIRELESS User manual

MSI
MSI CLUTCH GM30 User manual

MSI
MSI Star Mouse GS-501 Manual

MSI
MSI Star Mouse BM100 User manual

MSI
MSI Clutch GM40 User manual

MSI
MSI Star Mouse BM100 Manual

MSI
MSI GM70 User manual


