Mueller MLR010557N User manual

| 1
MANUAL MLR010557N
WITH CONICAL BURR GRINDER

2 | TABLE OF CONTENTS | 3
4IMPORTANT SAFETY INSTRUCTIONS
17 CLEANING AND MAINTENANCE
Overview of Cleaning and Descaling Tools and Procedures
24 TROUBLESHOOTING
6GETTING TO KNOW YOUR MACHINE
Overview of Parts | Control Panel and Coffee Selection |
Before First Use | Choosing the Right Coffee Grinds
10 OPERATION
Basic Operation | Grinding | Grinding Time Adjustment|
Customizing Temperature Control |
Restore to Factory Settings | Water Shortage Reminder
Tool Box and Cleaning Accessories | Clean the Grinder |
Descaling Instructions
TABLE OF CONTENTS

4 | IMPORTANT SAFETY INSTRUCTIONS WARNINGS | 5
IMPORTANT SAFETY
INSTRUCTIONS
Before using the electrical appliance, the basic precautions
below should always be followed:
Read all instructions thoroughly before use and save it for
future reference.
Before using, check that the voltage of the wall outlet
corresponds to the rated voltage marked on the rating plate.
To protect against fire, electrical shock, or personal injury, do
not immerse the appliance, power cord or plug in water or
other liquids.
Remove the power plug from the wall outlet before cleaning
or when not in use. Allow the appliance to cool down
completely before cleaning the appliance or taking off or
attaching components.
Do not operate the appliance with a damaged power cord
or plug. Do not operate the appliance if the appliance
malfunctions or is dropped or damaged in any manner.
Return the appliance to the nearest authorized service facility
for examination, repair, electrical or mechanical adjustments.
If the supply cord is damaged, it must be replaced by the
manufacturer or similarly qualified persons in order to avoid
hazards.
Do not use any accessory attachment that is not
recommended by the manufacturer, doing so may result in
fire, electrical shock, or personal injury.
Place the appliance on a flat surface. Do not hang the power
cord over the edge of a table or counter.
Ensure the power cord does not touch the hot surface of the
appliance.
Do not place the appliance on a hot surface or near an open
flame.
Always grasp the power plug to remove it from the wall outlet.
Do not pull on the power cord itself.
Do not use the appliance for anything other than its intended
use.
Steam heat can cause burns. Use extra caution when using
steam attachments.
Place the appliance in a dry environment. Do not operate or
store the coffee appliance in an environment lower than 0°F.
Do not operate the appliance in an environment with high
temperatures, a strong magnetic field, or high humidity.
Do not touch the hot surface of the appliance (such as the
steam wand and steel mesh). Use a handle or knob.
Do not operate the appliance without water.
Connect the power plug to a wall outlet before using and switch
off before removing the power plug from the wall outlet.
This appliance is not intended for use by any individual
(including children) with reduced physical, sensory, or mental
capabilities, or lack of experience or knowledge, without
proper supervision or instruction from an adult or individual
responsible for their safety and care.
Children above the age of 8 must be supervised to ensure
they do not play with the appliance.
This appliance is intended to be used in household and similar
applications such as:
– staff kitchen areas in shops, offices, and other working
environments;
– farm houses;
– by clients in hotels, motels, and other residential type
environments;
– bed and breakfast type environments.
Save these instructions.
WARNINGS
Pressure
In order to prevent hot water and steam from causing other
personal injury by scalding the body as well as to prevent
damage to this product, do not remove the water tank or
portafilter when the appliance is brewing coffee or operating
the milk frother. Before removing the portafilter to brew
another cup of coffee, be sure the coffee appliance is in
standby mode. If you want to add more water into the water
tank, please turn off the appliance by pressing the ON/OFF
button. Only the ON/OFF indicator light will be on while the
other indicator lights will turn off. When extracting coffee, be
sure the portafilter is turned to the specified position to avoid
it coming loose due to the pressure, which may cause bodily
injury.
High Temperature
To prevent burns when the appliance is working, do not place
your hands or other body parts under the portafilter or steam
outlet. Do not touch the steam tube at any time. The steam
tube should only be turned by touching the silicone sleeve
that wraps around the steam tube.

6 | GETTING TO KNOW YOUR MACHINE OVERVIEW OF PARTS | 7
GETTING TO KNOW YOUR
MACHINE
OVERVIEW OF PARTS
Single-Layer
Double-Cup Filter
Double-Layer
Double-Cup Filter
Single-Layer
Single-Cup Filter
Double-Layer
Single-Cup Filter
Cleaning Brush
Cleaning Pin
Cleaning Disc
Beans
Hopper
Beans Hopper
Cover
Water Tank
Water Tank Cover
Cleaning
Tablets Milk Cup
Tool Box
Bottomless Portafilter
Drip Plate
Drip Tray
Floater
Steam Tube
Knob
Tamper
Standard Portafilter

8 | CONTROL PANEL AND COFFEE SELECTION CHOOSING THE RIGHT COFFEE GRINDS | 9
CONTROL PANEL AND COFFEE SELECTION
BEFORE FIRST USE
Before the first use, follow the steps below to rinse and
preheat the appliance.
1. Check and ensure that all accessories are free of damage
and not missing.
2. Fill the water tank with clean water. The water level should
not exceed the MAX position. When using for the first time,
first remove the rubber plug at the bottom of the water
tank.
3. Align the portafilter with the portafilter bracket (no coffee
should be placed in the portafilter at this time). Rotate
the portafilter counterclockwise to lock it in place (place a
Single-Cup or Double-Cup filter in as needed).
4. Place a cup on the drip plate and plug in the appliance.
Press the button. The appliance will start preheating.
After preheating, the appliance will enter into standby
mode.
5. Turn the knob to the position, after a while, steam will
flow out of the steam tube. The steam tube should be
aligned with the drip tray.
6. Press the or buttons to rinse the pipes in the appliance.
Make sure to have a cup on the drip tray to collect the water
and avoid scalding.
NOTE: Do not get close to the portafilter or steam tube to
avoid scalding when the appliance is brewing hot water.
7. After water stops dispensing, empty the water in the drip
tray andcup.
8. Thoroughly clean the detachable parts of the entire
appliance with warm water.
CHOOSING THE RIGHT COFFEE
GRINDS
Coffee Grinds
The coffee should be freshly ground and subjected to deep
roasting. You may need to use French or espresso roasted
coffee beans for espresso coffee. Pre-ground coffee will keep
its aroma for 7 to 8 days. Coffee stored in a sealed container
placed in a cool place may retain its aroma longer. Do not
store ground coffee in the refrigerator or freezer. When coffee
beans are freshly ground, they will better retain their aroma
and provide higher quality coffee.
Grind
When making espresso, grinding the beans is a key step and
can take some practice to master.
– The correct grind should look like salt.
– If the beans are too finely ground, it may cause the coffee
to flow intermittently or fail to brew coffee.
– If the grind is too coarse, the water will flow through the
coffee too quickly, which will affect the aroma and taste of
the extracted coffee.
– You can adjust the coarseness of the ground coffee by
rotating the coffee bean hopper. The grinding position
necessary will vary depending on the type and quality of
the coffee beans you use, so you need to make appropriate
adjustments with each new bean used to achieve the best
results.
– For freshly-roasted coffee beans (within 1 month), the
grinding position should be set between 5–10. The Double-
Cup (Grind) setting can produce about 0.67 oz (19 g) of
coffee and the Single-Cup (Grind) setting can produce
about 0.46 oz (13 g), creating a relatively good coffee
extraction.
– To avoid creating moisture in the coffee bean hopper and
affecting the grinding and the final coffee taste, do not
overfill the bean hopper.
To obtain uniform and consistent coffee grinds and make
a cup of high-quality coffee, be sure to adjust the grinding
setting according to the type and quality of the coffee
beans.
Grind
Indicator
Hot Water Steam
Knob Indicator
Descale
Indicator
On/Off
Single-Cup
(Grind)
Double-Cup
(Grind)
Single-Cup
(Coffee)
Double-Cup
(Coffee)
Program

10 | OPERATION OPERATION | 11
OPERATION
I. Basic Operation
1. Fill the water tank with clean drinking water. The water level
should not exceed the MAX position.
2. Plug in the unit. Press the button (be sure the knob is at
position). The Power button will be half on. All the other
lights are off, which is convenient for customers to choose
and use.
3. Preheating: Press the button to set the appliance to the
preheating mode. The , and buttons will light up.
When the preheating cycle is finished, the appliance will
enter into standby mode. The bean bin indicator and the
descaling lamp will be off. The other indicators will be on
and the coffee appliance can be used normally.
4. Single-Cup Brewing: In standby mode, install the Single-
Cup filter into the portafilter and load about 0.46oz(13g)
of coffee. During the process, use the coffee tamper
and press the coffee with a force of about 12.5kg, then
align the portafilter to the portafilter bracket and turn it
counterclockwise to lock it in place. Put a coffee cup on the
drip plate. Press the button. It will flash and the Double-
Cup and Program indicators will turn off. The appliance will
start to brew a Single-Cup of coffee. When the set coffee
dose is reached (about 1oz), the appliance will stop brewing
automatically. All the indicators will then illuminate and the
appliance will enter into standby mode.
5. Double-Cup Brewing: In standby mode, install the Double-
Cup filter into the portafilter and load about 0.67oz(19g)
of coffee. During the process, use the coffee tamper
and press the coffee with a force of about 12.5 kg, then
align the portafilter to the portafilter bracket and turn it
counterclockwise to lock in place. Put a coffee cup on the
drip plate. Press the button. It will flash and the Single-
Cup and Program indicators will turn off. The appliance will
start to brew a Double-Cup of coffee. When the set coffee
dose is reached (about 2 oz), the appliance will stop brewing
automatically. All the indicators will then illuminate and the
appliance will enter into standby mode.
NOTE: If the coffee grind is too fine and oily, no coffee will
come out and the appliance will beep five times. All button
lights will start flashing and all other indicators will turn off.
Customized Settings
1. You can set the amount of each Single-Cup or Double-Cup
dose of coffee. Adjust the specific coffee dose according
to your needs.
Press and hold the Single-Cup button or the Double-Cup
button , the corresponding button will flash. The Program
and the opearting Single-Cup or Double-Cup indicator will
flash. The coffee will start to dispense. When the desired
amount of coffee is reached, release the Single-Cup button
or the Double-Cup button , the coffee will stop dispensing
and the buzzer will sound once. The appliance will record the
coffee dose and enter into standby mode. When you brew
coffee next time, the appliance will brew the coffee amount as
per the previous setting (NOTE: The max coffee dose for single
cup is 4.2 oz and for double cup is 8.5 oz).
2. Factory Reset: In standby mode, press and hold both the
Single-Cup and Program buttons, both buttons will
start to flash. The other button indicators will turn off and
the buzzer will sound once. Release both the Single-Cup
and Program buttons. The coffee dose of Single-Cup
coffee will be reset to the factory settings, and the appliance
OPERATION

12 | OPERATION OPERATION | 13
will go back to standby mode. The resettng of the Double-
Cup program is similar to the Single-Cup program resetting,
you just need to change the Single-Cup button to the
Double-Cup button during the operation.
When extracting coffee, make sure that the portafilter is
turned counterclockwise into the correct position as shown in
the figures below.
Steam and Hot Water Function: Turn the knob to the steam
or hot water indicator position. The indicator will flash and
the unit will make steam or hot water through the steam
tube. Turn the knob to the position. The appliance will stop
making steam and enter into standby mode.
NOTE:
– The steam function will generate high-temperature steam.
Please pay attention to avoid scalding when using it.
–To ensure a good frothing effect, run the steam function
for 3–5seconds. Turn the knob to the position to
extend the steam tube into the milk and then turn the
knob to the steam position to froth the milk.
– After it is finished steaming the milk, turn the knob to the
position.
– The appliance will automatically enter sleep mode after
15minutes of no operation during standby mode. You can
activate the appliance and make it enter the preheating
cycle by pressing any button.
Recommendation: You can preheat the appliance, including
the portafilter, filter, and cup before brewing coffee to
minimize the coffee effect of a cold appliance. To do this, put
the filter into the portafilter and install the portafilter onto
the portafilter bracket. Put a cup on the drip tray and press
the Single-Cup button or Double-Cup button to begin
a preheat cycle. After the appliance stops, follow the previous
instructions to begin coffee-brewing.
Using a Bottomless Portafilter
The bottomless portafilter and Single-Layer Single-Cup filter
let you brew barista style and will perfect your technique. We
suggest bottomless style brewing for advanced/expert espresso
brewers, which will allow the barista to visually see their technique
and learn how to improve upon it by diagnosing the errors.
Through adjusting the grind size, tamp pressure, and quality/age
of the coffee via the bottomless portafilter, your espresso brewing
technique will be drastically improved and you will make espresso
with richer crema.
NOTE: Using a bottomless portafilter can produce spurts
of espresso which can spray the machine, counter and/or
the user with espresso. This is caused by incorrectly dosed/
tamped powder or incorrect grind size. Avoid direct contact
with the hot liquid when using a bottomless portafilter.
a. Place the Single-Layer Single-Cup filter firmly inside of the
bottomless portafilter and ensure it is fully locked.
TIP: Ensure the filter is dry thus no coffee will stick to it.
b. Fill with extra fine ground coffee until it is slightly
overflowing and level the coffee with your fingers to fill in all
open space inside the portafilter.
NOTE: Ground coffee texture should be finer than sugar,
but not as fine as powdered sugar.
c. The bottomless portafilter can be
placed on the side of your countertop
as shown on the right to create a level
tamping surface. Using the flat side
of the included coffee scoop/ tamper,
pack (tamp) the espresso firmly into
the portafilter with approximately
30pounds of pressure.
NOTE: Use the same amount of pressure it takes to
remove a tight lid from a jar.
d. Wipe any coffee grinds from the rim of the Single-Layer
Single-Cup filter and the portafilter.
e. Insert and lock the portafilter.
II. Grinding
Before using the grind function, please make sure that all
parts are installed in accordance with the requirements below.
Fig. 1: Install the bean
hopper and screw it in
place.
NOTE: Make sure the red
circles on the bean hooper
and the rib on the top of
appliance are aligned. The
red bean hopper indicator
will turn off when the
bean hopper is installed
correctly.
There are markings to show the coffee coarseness on the bean
hopper (see Fig. 2). To adjust the grind setting, make sure
that the coffee grind setting you want on the bean hopper is
aligned with the mark on the rib on the top of the appliance.
FINE
SLOWER
EXTRACTON
MEDIUM
FASTER
EXTRACTION
COARSE
030 25 20 15 10 5
Fig. 2: From 0 to 30, the coffee powder is ground
from fine to coarse. The larger the number, the
coarser the coffee powder will be.

14 | OPERATION OPERATION | 15
Make sure the bean hopper is installed and locked in place.
When the indicator turns from red to off, the grinder is ready
for use.
Add the appropriate amount of coffee beans in the bean
hopper. To prevent moisture from building up in the hopper,
and affecting the grinding and the final coffee taste, do not
add too many coffee beans to the hopper.
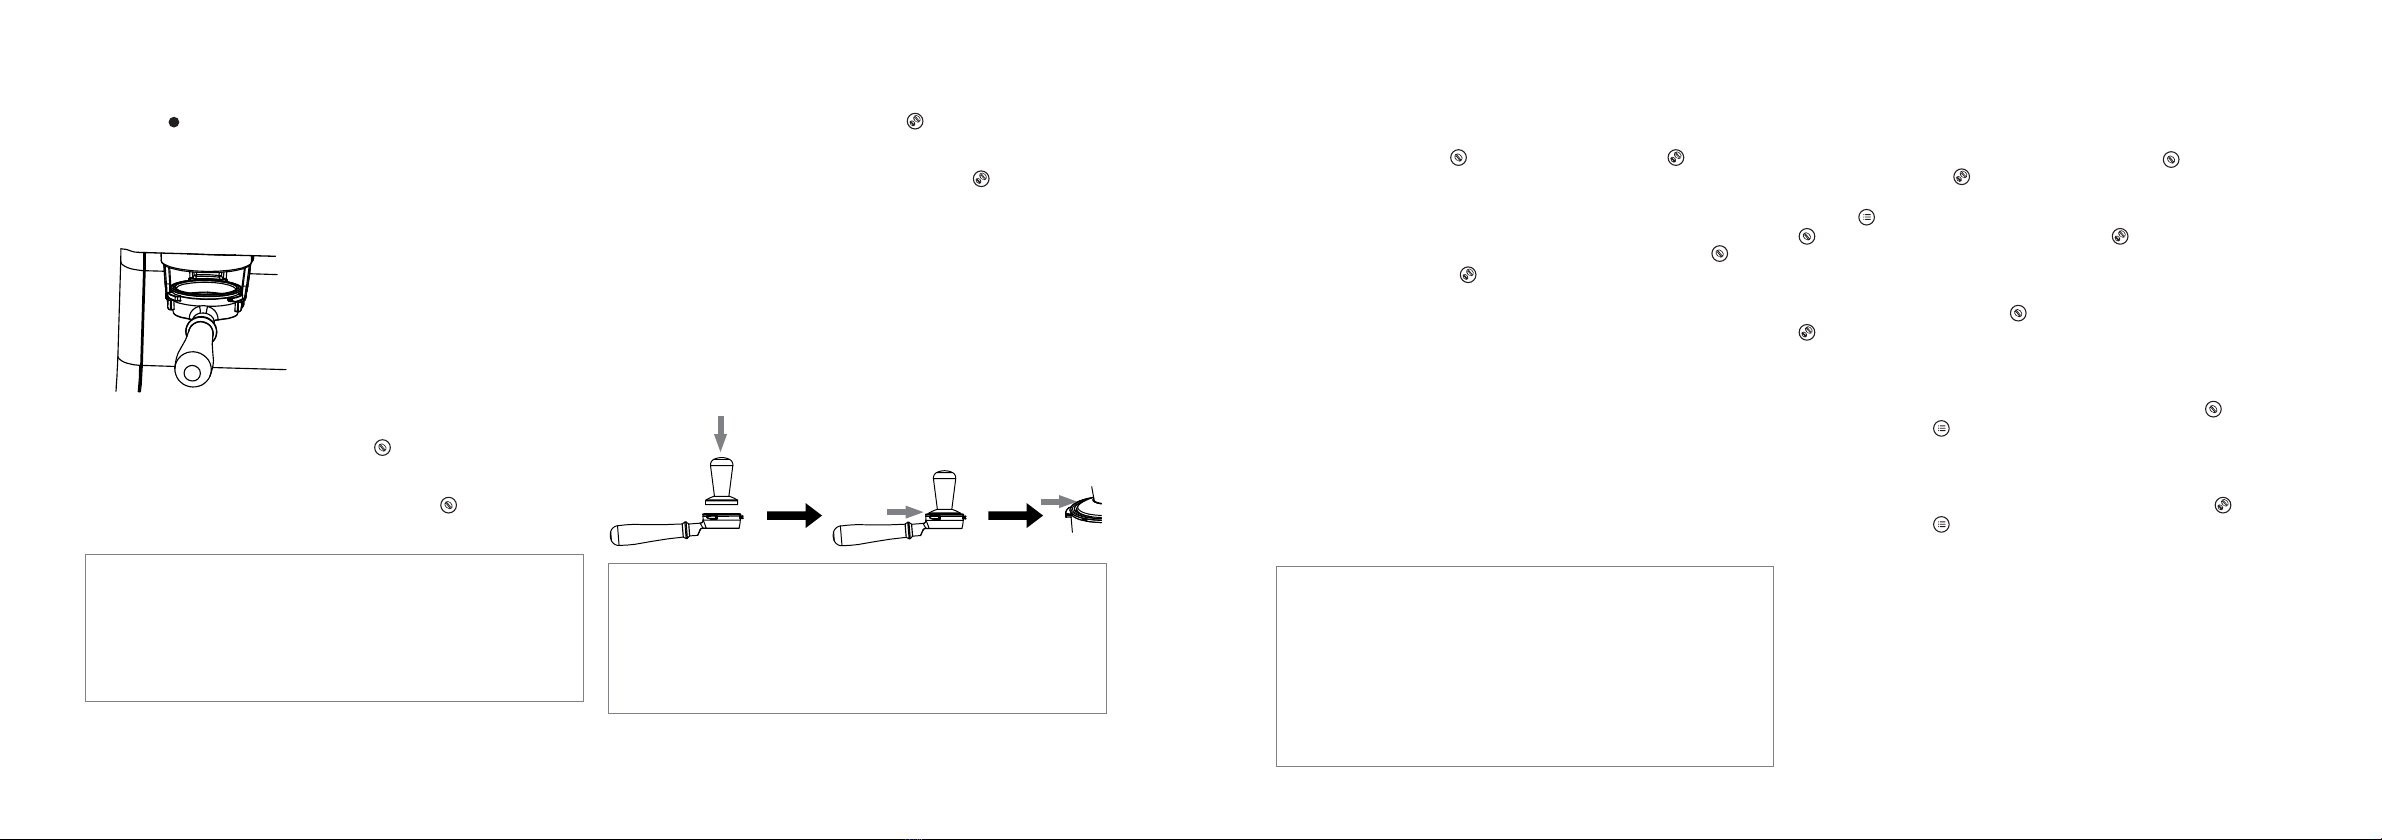
Fig. 3: Put the portafilter with
Single-Cup filter or Double-Cup
filter into the powder-receiving
bracket.
Single-Cup Grind
Press the Single-Cup (Grind) button . The button will flash
and the grinder will start to run. After the selected ground
coffee amount is reached, the grinder will stop automatically.
You can press the Single-Cup (Grind) button once to stop
the coffee grinder at any time.
NOTE: The default grinding time required for Single-Cup
dose is about 10 seconds. The grinder will produce about
0.46 oz (13 g) of coffee at the grinding settings of 5–10,
which has a relatively good coffee extraction effect. The
parameters may need to be adjusted slightly, depending
on the roast and freshness of the coffee beans.
Double-Cup Grind
Press the Double-Cup (Grind) button . The button will flash
and the grinder will start to run. After the selected ground
coffee amount is reached, the grinder will stop automatically.
You can press the Double-Cup (Grind) button once to stop
the coffee grinder at any time.
Remove the portafilter, tap the portafilter a flat surface, then
add the coffee in the filter.
Use the coffee tamper and apply it with a force of about 12.5kg
to compact the coffee by following the steps below.
Tamp the coffee
powder downward.
The edge of the
tamper should
align with the
edge of the
portafilter when
the appropriate
amount of
coffee is used.
NOTE: The default grinding time required for the Double-
Cup dose is about 14 seconds. The grinder will produce
about 0.67 oz (19 g) of powder at grinding settings of 5–10,
which has a relatively good coffee extraction effect. The
parameters may need to be adjusted slightly, depending
on the roast and freshness of the coffee beans.
NOTE:
– When the bean hopper is not installed correctly or working
abnormally, the bean hopper indicator will light red and the
Single-Cup (Grind) and Double-Cup (Grind) buttons
will be off. Three beeps will also be heard. To resolve,
reinstall the bean hopper.
– If the grinding function cannot be used normally due to
being blocked or motor self-protection, the bean hopper
indicator will light in red and the Single-Cup (Grind) and
Double-Cup (Grind) buttons will be off. Three beeps will
also be heard. To resolve, clean the grinder (refer to the
“Clean the Grinder” section on Page 20), then restart the
appliance.
– When the grinder works continuously for 3 minutes and
the intermediate rest time is less than 6 minutes, the
appliance will limit the use of the grinding function to
protect the grinding system. After the rest time reaches 6
minutes, the appliance will grind coffee beans again.
– When the grinding system is limited in use, the bean hooper
indicator will flash in red and the grinding buttons will turn
off. Three beeps will be heard. Press any grinding button, the
appliance will beep once and will not start grinding.
III. Grinding Timer Setting
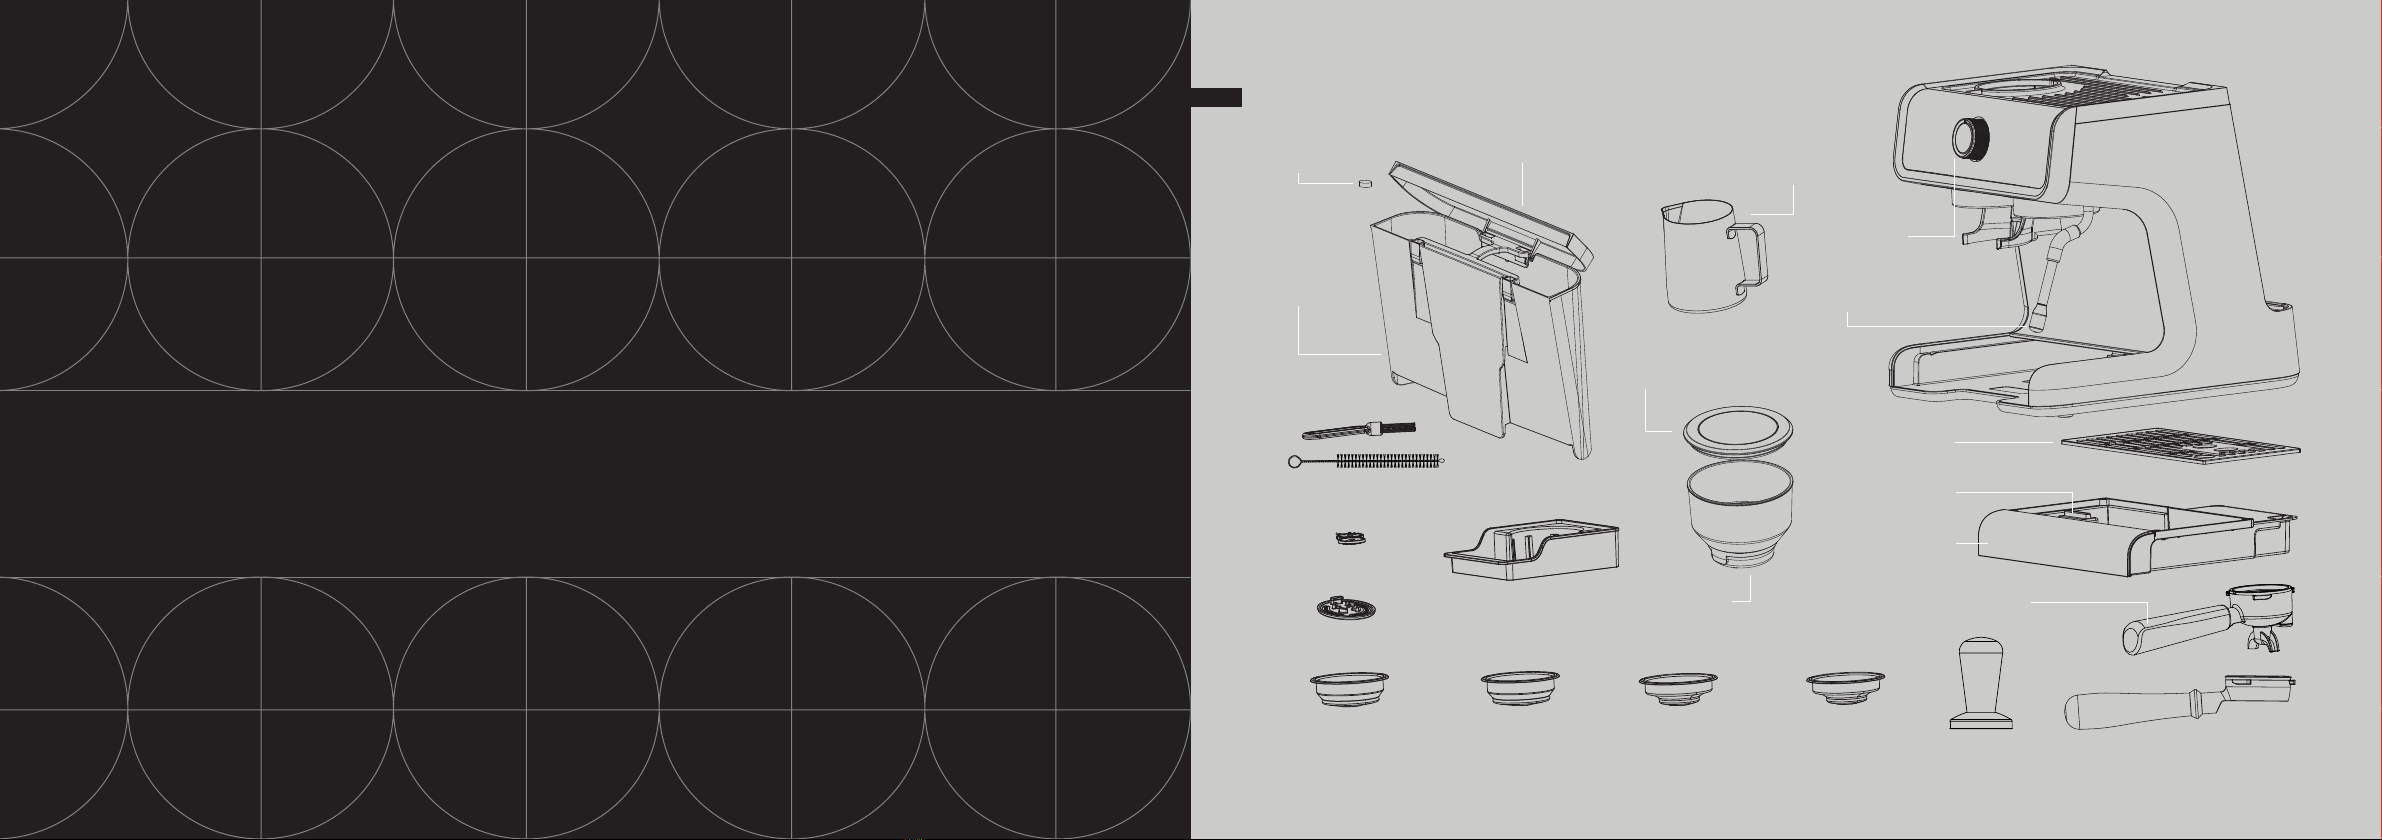
SPECIAL NOTES:
– The appliance is equipped with two single-layer filters
and two double-layer filters.
– The single-layer filters are applicable for finer coffee
powder, and it is recommended that the grinding
setting shall range between 0 and 15.
– The double-layer filters are applicable for coarser
coffee powder, and it is recommended that the
grinding setting shall range between 15 and 30.
You can set a timer for Single-Cup or Double-Cup grinding,
which will let the appliance automatically grind according to
the set time. To do so please follow the steps below:
Press and hold the Single-Cup (Grind) button — or Double-
Cup (Grind) button to start the grinding. The bean hopper
indicator, the corresponding grind button, and the Program
button will flash. Release the the Single-Cup (Grind) button
— or the Double-Cup (Grind) button when the ground
coffee amount is reached. The appliance will stop and the
timer is saved. The appliance will then go back to standby
mode. When operating the machine next time, just press the
Single-Cup (Grind) button — or Double-Cup (Grind) button
, the appliance will start and exit the grind automatically.
Factory Reset for Grinding Time
Single-Cup (Grinding)
Press and hold both the Single-Cup (Grind) button and
Program button . These two buttons will start to flash. The
other buttons will turn off. Release the buttons after one beep
is heard. The appliance will go back to standby mode.
Double-Cup (Grinding)
Press and hold both the Double-Cup (Grind) button and
Program button . These two buttons will start to flash. The
other buttons will turn off. Release the buttons after one beep
is heard. The appliance will go back to standby mode.
IV. Customizing Temperature Control
This appliance has a PID control function to ensure the coffee
will be extracted at a temperature of 197.6°F (92°C) by default.
To meet different taste requirements, you can select the
coffee-extracting temperature among 194°F (90°C), 197.6°F
(92°C), 201.2°F (94°C) and 204.8°F (96°C).

16 | OPERATION CLEANING AND MAINTENANCE | 17
– When the temperature is higher, the bitterness will be
increased and the acidity will be decreased.
– When the temperature is lower, the bitterness will be
decreased and the acidity will be increased.
To enter the mode for setting the coffee-extracting
temperature:
– Press and hold the Program button for 4 seconds, the
previous temperature indicator will light up solidly.
– Press the Single-Cup (Grind) button and adjust the
coffee-extracting temperature to 194°F (90°C), the Single-
Cup (Grind) button will light up solidly and the previous
temperature setting indicator will turn off.
– Press the Double-Cup (Grind) button and adjust the
coffee-extracting temperature to 197.6°F (92°C), the
Program button will flash, the Double-Cup (Grind)
button will light up solidly and the previous temperature
setting indicator will turn off.
– Press the Single-Cup (Coffee) button and adjust the
coffee-extracting temperature to 201.2°F (94°C), the
Program button will flash, the Single-Cup (Coffee)
button will light up solidly and the previous temperature
setting indicator will turn off. Press the Double-Cup (Coffee)
button and adjust the coffee-extracting temperature
to 204.8°F (96°C), the Program button will flash, the
Double-Cup (Coffee) button will light up solidly and the
previous temperature setting indicator will turn off.
NOTE: After setting the temperatures, press the Program
button or button again, the appliance will beep and
return to standby mode.
IMPORTANT NOTE:
– After entering the customized setting mode, the
appliance will exit from the mode and return to
standby mode if no button is pressed within 1 minute.
– To exit from the setting mode, press the Program
button or button during operation.
V. Restore to Factory Settings
In the case of incorrect settings, the user can press and hold
the button and Program button at the same time. The
appliance will beep and all the indicators will flash three times.
The appliance will return to the factory settings.
VI. Water Shortage Reminder
When the water tank is short of water, the appliance will
remind the user to refill the water. At this time, the , , , ,
, and buttons will flash for one minute accompanied by
five beeps.
NOTE:
– The appliance will buzz 5 times when the coffee grind is too
fine and the appliance cannot brew coffee.
– If the appliance is not operated within one minute after the
alert, the appliance will enter into standby mode.
CLEANING AND
MAINTENANCE

18 | CLEANING AND MAINTENANCE CLEANING AND MAINTENANCE | 19
Cleaning Brush
The cleaning brush is used for cleaning the grinding system.
After removing the bean hopper and cutter head, use the
cleaning brush to clean the chamber of the grinder and the
powder channel (Refer to the “Clean the Grinder” section on
page20).
Clean the anti-static device and coffee grinds outlet when the
coffee comes out slower than usual or the coffee grind floats.
Clean the anti-static device and the coffee grind outlet with
the attached cleaning brushes as shown in Fig. 9.
Fig. 9
Clean the chamber of the grinder and the grind channel with
the attached cleaning brush as shown in Fig. 10.
Fig. 10
Use the rear end of the cleaning brush to detach the filter
from the portafilter. (See Fig. 11)
Fig. 11
There are two kinds of funnel handles available: a Bakelite
handle and a solid wood handle. The funnel handle can be
removed and replaced. To remove it, turn the hand handle left.
To install it, turn the hand handle right. (See Fig. 12)
Solid Wood Funnel Handle
Bakelite Funnel Handle
Fig. 12
CLEANING AND MAINTENANCE
Overview of Cleaning and Descaling Tools and
Procedures
WARNING: Please unplug before cleaning to allow the
machine to cool down sufficiently to prevent scalding. Do not
immerse the appliance or the power cord plug in water or
other liquids.
After each use, put all detachable parts into water for cleaning,
adding cleaning liquid if necessary. Rinse each piece with
clean water.
Frequently use a moisture-proof sponge to scrub the exterior
of the coffee maker to remove the dirt.
NOTE:
– Do not use alcohol or detergent. Do not immerse the
appliance in water.
– Turn clockwise to remove the portafilter and discard coffee
grounds. Use a mild detergent to clean the portafilter and
metal filters. Rinse thoroughly with clean water.
– All all parts to dry completely.
– The detachable water tank cannot be washed in the
dishwasher.
I. Tool Box and Cleaning Accessories
The appliance is equipped with a tool box which is used for
storing the cleaning pin, cleaning brush, and cleaning disc.
The Single-Cup and Double-Cup filters can be stored in the
tool box as well. The tool box is placed at the left lower part of
the appliance where it can be pulled out when you remove
the drip tray from the appliance (See Fig. 6).
Cleaning Brush
Fig. 6
Cleaning Pin
Cleaning Disc
Tool Box
Cleaning Disc
Cleaning disc is used for cleaning the brewing system
by putting the cleaning disc and cleaning tablet into the
portafilter and mounting on the brewing head during the
rinsing or descaling process.
Cleaning Pin
The cleaning pin is used for cleaning the steam spout and
filters. The thicker pin end is for cleaning the steam tube
(SeeFig.7), and the thinner one is for cleaning the filters
(SeeFig.8).
Clean the steam tube
with the thicker pin end
Clean the filters with the
thinner pin end
Fig. 7
Fig. 8

20 | CLEANING AND MAINTENANCE CLEANING AND MAINTENANCE | 21
II. Clean the Grinder
Clean the powder outlet and grinder at least once every two
weeks. The grinder may be affected by coffee beans and other
factors during operation that cause the grind outlet channel
to become blocked. Please clean the grind outlet channel
when the following conditions occur:
– A reduction in the coffee grind amount. To resolve, clean
the powder passage and cutter head.
– When the coffee grinder is used to grind fine coffee, clean
the powder channel.
– The appliance is equipped with an anti-static system which
prevents coffee powder from spreading outside during
grinding. If coffee powder floats out from the portafilter,
use the cleaning brush to clean the powder entrance.
NOTE:
When cleaning the grinder, make sure there are
no beans in the bean hopper. Also ensure that when
the Single-Cup (Grind) button or Double-Cup button
(Grind) is pressed, the grinder can work properly, and
no coffee powder flows out from the powder outlet.
Step 1. Rotate the bean hopper (2) counterclockwise to remove
it.
Step 2.
Turn the internal cutter head (1) counterclockwise
to unlock. Remove the cutter head and use the included
cleaning brush to clean the cutter he
ad and remove residue
from the gears. Please note that the cutter head cannot be
directly rinsed with water.
Step 3.
Use the included cleaning brush to clean the grinding
chamber and the powder channel.
Step 4.
Do not install the cutter head at this time. Re-install
the empty bean hopper and press the Single-Cup (Grind)
button or Double-Cup button (Grind) . Allow the grinder
to run, sweeping out the powder residue in the grinding
chamber. (Ifthe powder inside is not removed completely,
please repeat Steps3 and 4).
Step 5.
Remove the bean hopper counterclockwise and install
the cutter head in position.
III. Descaling
This product has a descaling reminder function and a
descaling program. The descaling process will take about
10minutes.
NOTE: When starting the descaling program, please make sure:
– There is at least 1 liter (33.8 oz) of water in the water tank.
– Empty the drip tray and reposition it on the coffee
appliance base.
– Turn on the appliance and let it stay in standby mode.
– Put the cleaning disc and the Double-Cup filter into the
portafilter.
Cleaning Disc
– Turn the portafilter into the portafilter bracket.
– You can exit the cleaning function at any time by pressing
the button.
– When the cleaning starts, the button and the Descaling
indicator will flash. They will continue to flash throughout
the whole cleaning process.
– If the descaling cycle does not start within 1 minute, the
appliance will exit from the descaling cycle and return to
standby mode.
Descaling Instructions
It is recommended to perform the descaling once 4–6months.
You can use following descaling solutions:
– Coffee appliance descaling tablets
– Liquid descaler
– White vinegar and warm water
Descaling Cycle
NOTE: Before starting the descaling program, please
complete the following descaling preparations.
Descaling Preparation
Add the solution to the water tank (choose one of the
following three methods):
– Fill the water tank with 1 liter (33.8 oz) of water. Add the
descaling tablets and wait for the descaling tablets to fully
dissolve.
– Add half a cup of liquid descaling agent into the water tank,
then add 1 liter (33.8 oz) of warm water to allow the solution
to mix thoroughly.
– Add 1.5 scoops of white vinegar into the water tank, then
add 1liter of warm water to allow the solution to mix
thoroughly.

22 | CLEANING AND MAINTENANCE CLEANING AND MAINTENANCE | 23
Insert the water tank into place
Place a Container
Place a container (1 L / 33.8 oz) under the brewing head and
another container (1 L / 33.8 oz) under the steam tube.
1 L
(33.8 oz) 1 L
(33.8 oz)
After completing the above steps, you can start the
cleaning process as following:
When the system detects that the flow amount of the whole
appliance reaches 15 L (507 oz), the appliance will remind the
user to descale the appliance. The descaling indicator will
flash when the appliance is in standby mode and will turn off
after the descaling process finishes.
In standby mode, press and hold the Single-Cup button ,
Double-Cup button , and Program button , the appliance
will then start the descaling process.
When the Descaling indicator flashes quickly, the Program
button and the coffee buttons are turned off, and the
button starts to flash, follow the steps as below.
IMPORTANT NOTE:
– A maximum of 5 minutes is neccesary to complete the
descaling cycle.
– The steam tube and brewing head need to be cleaned
with fresh water to completely remove the descaling
solution.
Step 1: Start the Descaling Cycle
Turn the knob to position.
The Descaling indicator will light up solidly and the indicator
will flash.
The pump will start dispensing hot water from the brewing
head and steam tube. The pump will make punching noises
after 2 minutes.
When the hot water stops flowing from the brewing head and
steam tube, this step is completed.
The Descaling indicator and the button will flash. Turn the
knob to the position.
Step 2: Prepare to Clean Up
Clean the water tank and fill it with water to the maximum
level. Then empty the containers.
Step 3: Start Cleanup
Turn the knob to the position. The Descaling indicator will
light up solidly and the hot water indicator will start to flash.
The pump will start dispensing hot water from the brewing
head and steam tube. The pump will make punching noises
after 2 minutes.
When hot water stops flowing from both the brewing head
and steam tube, this step is complete.
–Completion of Descaling Cycle
When the descaling cycle is finished, the buzzer will sound
and the button will stop flashing. Then the Descaling
indicator will turn off, the button will light up solidly. Turn
the knob to the position. The appliance will then enter
standby mode.

24 | TROUBLESHOOTING TROUBLESHOOTING | 25
TROUBLESHOOTING
Problem Cause Solution
Device indicators are not lit. The device is not plugged or is not turned
on.
Connect the power plug and press the
ON/OFF button.
The indicator on the front
panel lights in red.
The bean hopper is not installed or
installed incorrectly or the grinding is
limited to use.
Refer to the grinding note on page 14.
There are water marks
at the bottom of the
appliance.
The water tank is not installed correctly.
The drip tray is full.
Make sure that the water tank and the drip
tray are installed properly and the drip tray
is empty.
If the issue is not solved, please contact
Customer Service. Do not disassemble the
unit by yourself.
A ticking sound is heard
after the appliance is
started and a hissing sound
is heard after the coffee is
dispensed.
This is normal and results from the
operation of the pressure control valve.
The grinder is running but
there is no powder comes
out.
The powder outlet channel is blocked by
coffee beans or coffee powder.
Follow the grinder cleaning process to clean
the grinding system.
Coffee powder floats out
from the portafilter.
The anti-static sensor is blocked at the
powder outlet.
Use the cleaning brush to clean the powder
oultlet.
TROUBLESHOOTING

26 | TROUBLESHOOTING TROUBLESHOOTING | 27
Problem Cause Solution
No coffee comes out from
the portafilter or come
out from the portafilter
smoothly.
The coffee powder is too fine or the
pressure for tamping coffee powder is
too high.
Rotate the bean hoper counter-clockwise to
reduce the grind fineness appropriately until
it is suitable. Do not press repeatedly with
excessive force when tamping the coffee
powder.
The portafilter cannot be
installed in the portafilter
bracket properly.
There is an excessive amount of coffee
powder.
The amount of powder should not exceed
the standard amount. Adjust the grinding
setting of the grinder appropriately until it is
suitable.
Coffee without crema. The coffee beans are damp or the coffee
powder is too coarse.
Choose fresh coffee beans and powder with
moderate grinding setting to make coffee.
No steam.
The appliance is not preheated when the
steam function is performed.
The steam nozzle is blocked.
The appliance can only produce steam after
the appliance is preheated in steam mode;
the appliance needs to be descaled, using a
cleaning pin to clean the steam nozzle.
The appliance can not
make coffee or hot water
immediately after the
steam comes out and the
appliance will pump water
automatically.
After steaming is completed, the
pressure needs to be released to reduce
the temperature. At this time, other
operations cannot be performed. The
water pumping is used for cooling down
the heating element quickly.
It takes 20–30 seconds for the appliance to
release the pressure and cool down. After
the pressure is released and the cooling
down is finished, the indicators on the
control panel will reset and you can make
coffee and hot water normally.
If you do not find the cause of the problem listed here, please contact Customer Service.
Do not disassemble the machine by yourself.

28 | TROUBLESHOOTING
37 E 18TH STREET
NEW YORK, NY 10003
UNITED STATES
MUELLERDIRECT.COM
SUPPORT@MUELLERDIRECT.COM
888-632-9981
SKU: MLR010557N PRINTED IN CHINA
happiness is homemade
WITH CONICAL BURR GRINDER
Table of contents
Other Mueller Coffee Maker manuals

Mueller
Mueller ULTRA BREW DC-760 User manual

Mueller
Mueller KC-21 User manual

Mueller
Mueller FRENCH PRESS MU-SSHYDPRESS User manual

Mueller
Mueller FRENCH PRESS User manual

Mueller
Mueller DC-550 User manual

Mueller
Mueller Ultra Brew DC 750 User manual

Mueller
Mueller Ultra Brew DC 750 User manual

Mueller
Mueller SmoothBrew CB-375 User manual

Mueller
Mueller U-700 User manual
Popular Coffee Maker manuals by other brands

Lebensstil Kollektion
Lebensstil Kollektion LKCM-112X instruction manual

Korona
Korona 10118 instruction manual

Gaggia
Gaggia Carezza operating instructions

Russell Hobbs
Russell Hobbs 24034-56 instruction manual

Kenwood
Kenwood AROMATIKA CM700 user manual

Nespresso
Nespresso Prodigio&milk C75 instruction manual