mumbi m-GM100 User manual

Claus GmbH
Sigsfeldstr. 4
45141 Essen
www.mumbi.de
mumbi Gas detector m-GM100
User manual
GB

2
Content
Scope of supply / Specifications / General .................................3-4
Natural gas ‒ Methane ...............................................................4
Liquefied petroleum gases ‒ Propane and butane ....................4
Positioning the gas detector / Installation of gas detector ........ 4-5
The gas detector is NOT suited for the following places of installati-
on: 5
Note ...........................................................................................5
What to do in the event of an alarm? .........................................5
Basic principles of an escape plan ............................................. 6
Test your gas detector / Alarm signal ........................................6
Natural gas ‒ Methane ...............................................................6
Liquefied petroleum gases ‒ Propane and butane ....................6
Maintenance and cleaning / TIP / CAUTION................................ 6 -7
Installation and mounting .........................................................7
Protecting the environment ......................................................8
Safety and maintenance advice ................................................8
Bedienungsanleitung
Mode d‘emploi
Istruzioni per l’uso
Manual de instrucciones
FR
IT
ES
DE
GB
www.mumbi.de/manuals

3
GB
m-GM100 - Gas detector
Scope of supply
• Gas detector and main power supply unit
• 9V block battery
• Installation kit and instructions
Specifications
Adapter: 12V DC / 200mA
Warning signal: ≥ 85dB at a distance of 1m
Alarm interval: 0.5 sec. signal — 0.5 sec. pause
Operating temperature: -10°C to 50°C
Air humidity: 10 - 90 %
Replacement: after 5 years
Energy consumption: 1.5W – 1.9W
Gas types detected: natural gas (methane);
Liquefied petroleum gas (propane, butane)
General
This manual contains important information regarding the installation and opera-
tion of your gas detector. Please read these instructions carefully before installing
the detector and keep these instructions for future use.
• Gas detectors are no substitute for smoke, heat or carbon monoxide
detectors!!!
This gas detector reacts to natural gas (methane) and liquefied petroleum gases
(propane, butane). Please specify prior to installation which gas needs to be de-
tected. Depending on its use, the detector may have to be installed at a diffe-
rent location. Methane gas is mostly used at home, while propane and butane
are used in caravans, tents and on boats. To detect against both methane and
propane/butane you will require 2 detectors! The danger thing about these gases
is that they mix with air, which makes them highly flammable; even the smallest
spark can cause an explosion. The gas detector comes with a main power supply
unit and works with a main voltage of 230V~50Hz. This detector is a stand-alone
alarm system which cannot be connected to another system.
WARNING: This detector will not work in the event of a power failure. Do not plug
into a switched socket. If the detector is connected directly to a 12V power supply
in a caravan or on a boat, make sure that the power cannot be switched off.
User Manual

4
IMPORTANT: This gas detector has been designed to detect natural and liquefied
petroleum gases. The detector is NOT intended for detecting smoke or fire. This
gas detector only indicates the presence of gas in the immediate vicinity of the
detector. It will not detect gas in other parts of the house or caravan.
Natural gas ‒ Methane
Natural gas is lighter than air. Leaking natural gas therefore rises and subse-
quently settles towards the bottom. Where methane gas is used, the detector
should therefore be installed a few centimetres below the ceiling.
Liquefied petroleum gases ‒ Propane and butane
Gas detectors for propane/butane are also used in campers/caravans or in gar-
den sheds. However, gas detectors may also be used in homes, which have gas
tanks. Propane/butane is heavier than air. If it leaks, it will collect near the floor,
displacing oxygen layer by layer and will then dissipate towards the top. Where
propane or butane are used, the gas detector therefore needs to be installed a
few centimetres above the floor.
Positioning the gas detector
The detector has to be installed at a minimum distance of 150cm from a combus-
tion source (e.g. stove, boiler, etc.). The level at which the detector needs to be
installed depends on the gas type to be detected. Therefore the first step is to
determine which type of gas is used.
• Methane is lighter than air and will therefore rise to the ceiling. The detector
should be installed at a distance of about 30cm from the ceiling and about
50cm from the roof ridge.
• Propane and butane are heavier than air and will therefore flow towards the
floor. The detector should be installed at a distance of about 30cm from the floor.
The gas detector is intended
for use in homes, caravans
or garages. The detector
has a heat-up time of about
4 minutes. Once it has been
plugged into a mains socket,
the red LED will flash for
about 4 minutes, after that
50cm
Do not install gas
detector in this
area.
GB
30cm
Please do not
install gas detector
in this area.
30cm

5
the LED should switch to a permanent green light. If the alarm signal sounds
every 4 seconds, the sensor is defective.
Installation of gas detector
Attach the mounting ring in the right place using 2 screws. Place detector onto
the ring and turn. Ensure that the 2 indentations of the adapter ring are aligned.
Connect the mains power supply unit to the detector: this can only be done in
one particular way. Next, plug the 230V power supply into a mains socket. The
detector will now go through a heat-up time of 4 minutes and is then ready for
use. Once the red LED has turned green, you can press the "Test" button.
The gas detector is NOT suited for the following places of installation:
• Do not install the gas detector in rooms subjected to major temperature variations
(above 50°C or below -10°C) or where the sensor can get plugged up by dust or
dirt. ⇒ In these areas, you may want to use a heat detector.
• Do not install the gas detector in a ventilated environment, e.g. in the vicinity
of air-conditioning units or ceiling fans. Do not install in places where paints,
varnishes, paint thinners or cleaning agents are being kept.
• Do not install the gas detector outdoors.
• Do not install the gas detector directly above stoves/cookers; make sure to
observe a minimum distance of 100cm.
Note
For your own safety the gas detector cannot be installed without a battery in
the battery compartment. Mount the detector onto the mounting ring. Press the
"Test" button on the front side of the detector to check that the gas detector is
working properly. Keep the "Test" button pressed until there is a loud signal and
the red LED flashes. The alarm will switch itself off automatically.
What to do in the event of an alarm?
• When the alarm sounds, evacuate the building immediately.
• Keep doors and windows open.
• Do NOT switch on any electrical appliances!
• Call the fire service. They can detect the leak.
• Do not re-enter the building until the problem has been solved and the gas has
been removed.
When the alarm sounds, the unit is stopped by pressing the "Test" button for
about 5 minutes. The red LED will flash constantly. Pressing the "Test" button
once again in the silent mode will delete the silent mode, and the unit will again
monitor the gas concentration.
GB

6
Basic principles of an escape plan
Draw up a floor plan which includes all doors and windows and the escape routes
from each room. Hold a family meeting to discuss the escape plan and tell eveyone
what they need to do in the event of an alarm. Specify a location outside of your
house as a meeting point in the event of an alarm. Familiarise everyone in your
household with the noise of the alarm system and ask that they all leave the
house if they hear this noise. Practice your alarm drill every 6 months as a mini-
mum. Such drills help you test your escape plan before you need to use it in an
emergency. It is therefore important that your children know what to do.
IMPORTANT: Do NOT press the "Test" button immediately! The sensor first has to
heat up for 4 minutes.
Test your gas detector
We recommend that you test your gas detector once a month to ensure proper
operation. Keep the "Test" button pressed for several seconds until the alarm
sounds. The gas detector must activate the alarm while the button is pressed.
The “alarm” LED (red) will come on. This indicates that the gas detector is wor-
king properly.
Alarm signal
When the gas detector detects a certain gas quantity, the red LED and the alarm
will come on automatically. The detector responds to a concentration of ≤ 10%
of an explosive gas mixture. The higher the gas concentration, the quicker the
alarm response. The alarm is a pulsating alarm during which the red and green
lamp will light up.
Natural gas ‒ Methane
• Explosion risk at a concentration of 3.8%
• The gas detector reacts at 5~20%, the concentration will then be 0.19~0.76%
• The alarm is a pulsating alarm, the red and green LEDs will be on
Liquefied petroleum gases ‒ Propane and butane
• Explosion risk at a concentration of 2.1%
• The gas detector reacts at 5~20%, the concentration will then be 0.11~0.42%
• The alarm is a pulsating alarm, the red and green LEDs will be on
Maintenance and cleaning
The green LED must always be on. This LED indicates that the detector is swit-
ched on and everything is working properly. When the green LED goes off, check
first whether the plug is still plugged into the mains socket and whether the mains
socket has power. If that is not the problem, the gas detector has an internal defect
and must be repaired or replaced.
GB

7
The device is maintenance-free, so please do not open up the gas detector. You
will invalidate your warranty if you open up the device. Clean the outside of the gas
detector with a soft, dry cloth or a brush.
Do not use any cleaning products that contain carbonic acid, benzene, alcohol or
similar substances. Such substances attack the surface of the device and their
vapours are also hazardous to health and explosive. Do not use any sharp-edged
tools, screwdrivers, wire brushes or similar to clean the device.
TIP
It is recommended to carry out a test and maintenance at least once a month. Do
not connect the device to a switched mains socket. If the detector is connected
directly to a 12 V source in a caravan or on a boat, ensure that the supply cannot
be switched off. The gas detector must be replaced after 5 years of operation;
after that time proper functioning is no longer guaranteed.
CAUTION
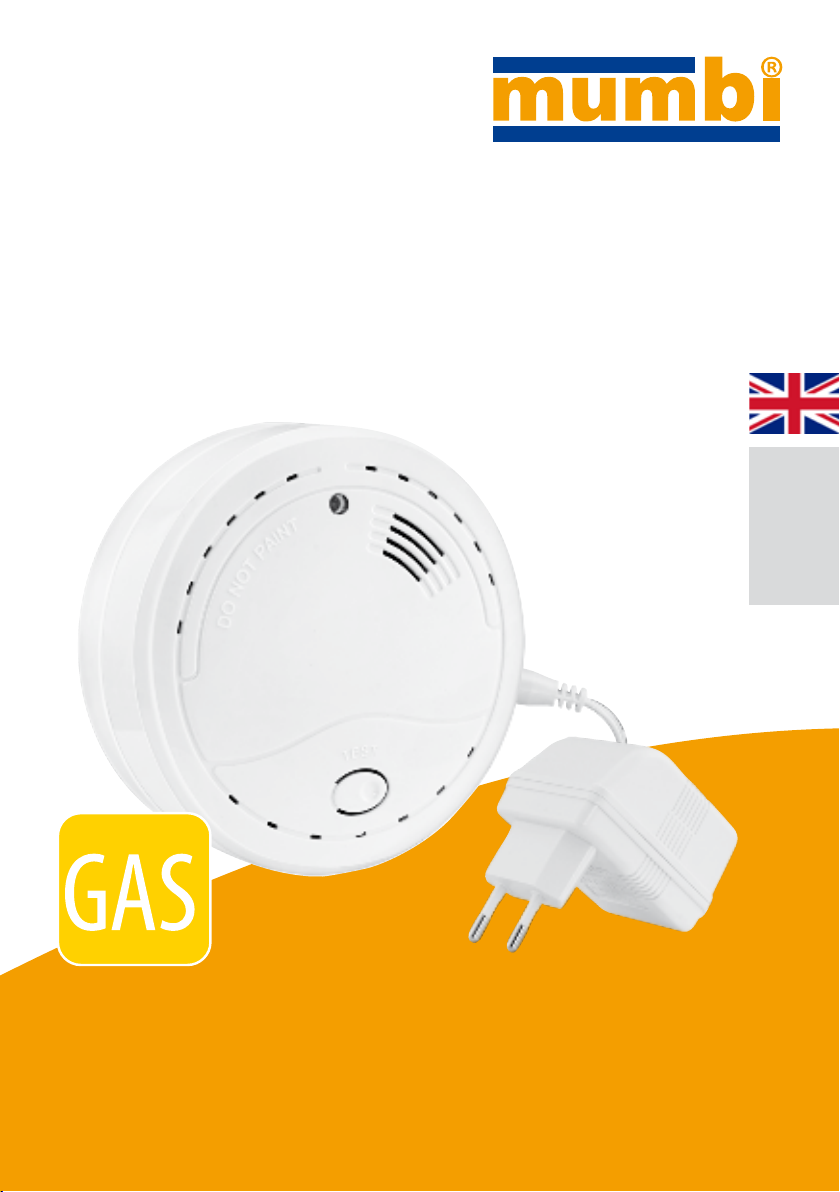
• The gas detector is only intended for indoor use. Please do not subject the
device to rain or humidity.
• For your own safety, please always use the mains power supply unit provided
and the 9 V block battery included in the scope of supply. If you do not use
both power supplies (mains unit + battery), you are not protected. In the event
of power failure the detector will automatically switch to the 9V battery and will
indicate by the flashing green light (every 3 seconds) that the gas detector is
not connected to the mains power and is therefore not working.
• Do not open or manipulate the detector as this can lead to malfunctioning.
Installation and mounting
• Having determined the best position, first ensure that there are no electric
cables or pipes located in this area.
If possible, use a locating device (cable detector) to check the installation loca-
tion before drilling any fastening holes for the mounting device. If you do not
have such a device available, ensure that the boreholes are not drilled within the
so-called installation zones specified in German standard DIN 18015.
1. Mark the two fastening holes.
2. Drill the two fastening holes in the marked positions.
3. Insert the dowels into the boreholes.
4. Screw the bracket into place. ‒ DO NOT SCREW IN THE SCREWS TOO TIGHTLY.
5. Insert a 9V battery securely into the battery compartment on the reverse side
of the detector.
GB

8
Protecting the environment
At the end of its service life, this product must not be disposed of with the normal
domestic waste. It must be taken to an assembly point for the recycling of electrical
and electronic devices. This is indicated by the symbol on the product, the instruction
manual and packaging. The materials and substances can be recycled according to
their marking.
The reutilisation of recycled substances or other forms or recycling of old devices
significantly helps the environment. Please contact your local authority for infor-
mation regarding the relevant disposal points.
Safety and maintenance advice
• Make sure that all electrical connections and cable connections to other devices
comply with the relevant guidelines and their operating manuals.
• Make sure not to overload sockets and extension cables, as this can cause fire
and electric shock.
• Should you have any doubts as to the operation, safety or connection of the
devices, please consult a specialist.
• Keep all parts in a safe place away from children.
• Please do not keep the detector in a very cold or very hot environment as this
may damage the electronic circuits.
• Avoid bumps and shocks as this may damage the electronic circuits.
• The device should only be opened and repaired by authorised specialists.
• Wireless systems are subjected to interference by wireless telephones, micro-
waves and other electronic equipment working in the 433 MHz range. Make
sure you keep a MINIMUM DISTANCE OF AT LEAST 3 METRES during installation
and operation.
GB
Claus GmbH
Sigsfeldstr. 4
45141 Essen
www.mumbi.de
Manufactured for Smartwares Safety & Lighting BV
Broekakkerweg 15, 5126BD Gilze The Netherlands
+49(0)1805010762, www.smartwares.eu
Imported for Claus GmbH, Sigsfeldstraße 4
45141 Essen, Deutschland, www.mumbi.de
EN50194:2000

9

Claus GmbH
Sigsfeldstr. 4
45141 Essen
www.mumbi.de
Table of contents