Music & Lights Pro Audio MZX84 User manual

USER MANUAL
EN
MZX84
MIXER ZONE
PEAK
SIG
PEAK
SIG
PEAK
SIG
PEAK
SIG
PEAK
SIG
PEAK
SIG
PEAK
SIG
PEAK
SIG
0 0 0 0 0 0 0 0 0 000
1
2
3
4
1
2
3
4
1
2
3
4
1
2
3
4
1
2
3
4
1
2
3
4
1
2
3
4
1
2
3
4MUTE MUTE MUTE MUTE
0 +10
LEVEL
CH 1
CH 2
CH 3
CH 4
POWER
ON
OFF
HIGH
-15 +15-15 +15
-15 +15
-15 +15
LOW
-15 +15
MID
HIGH
LOW
MID
HIGH
LOW
MID
HIGH
LOW
MID
-15 +15
-15 +15
-15 +15
-15 +15
-15 +15
-15 +15
-15 +15
HIGH
-15 +15
LOW
-15 +15
HIGH
-15 +15
LOW
-15 +15
HIGH
-15 +15
LOW
-15 +15
HIGH
-15 +15
LOW
-15 +15
CH 1 CH 2 CH 3 CH 4 CH5 CH 6 CH 7 CH 8 MASTER 4MASTER 3MASTER 2MASTER 1
-20
CLIP
0
-10
-20
SIG
CLIP
0
-10
-20
SIG
CLIP
0
-10
-20
SIG
CLIP
0
-10
SIG
MIXER ZONE
MZX84

REV.001-05/17
All rights reserved by Music & Lights S.r.l. No part of this instruction manual may be
reproduced in any form or by any means for any commercial use.
In order to improve the quality of products, Music&Lights S.r.l. reserves the right to modify the
characteristics stated in this instruction manual at any time and without prior notice.
All revisions and updates are available in the ‘manuals’ section on site www.musiclights.it

3
MZX84
CONTENTS
4
4
5
6
7
8
9
10
Safety
General instructions
Warnings and installation precautions
1 Introduction
1. 1 Features
2 Operating elements and connections
2. 1 Front Panels
2. 2 Rear Panels
2. 3 Block diagrams
2. 5 Specications
3 General criteria for installation of sound
systems
• MZX84
• User manual
Packing content:

4MZX84
Before carrying out any operations with the unit, carefully read this instruction manual, and keep it with cure
for future reference.
It contains important information about the installation, usage and maintenance of the unit.
SAFETY
General instruction
• The products referred to in this manual conform to the European Community Directives and are there-
fore marked with .
• The unit is supplied with hazardous network voltage (230V~). Leave servicing to skilled personnel only.
Never make any modications on the unit not described in this instruction manual, otherwise you will
risk an electric shock.
• Connection must be made to a power supply system tted with ecient earthing (Class I appliance ac-
cording to standard EN 60598-1). It is, moreover, recommended to protect the supply lines of the units
from indirect contact and/or shorting to earth by using appropriately sized residual current devices.
• The connection to the main network of electric distribution must be carried out by a qualied electrical
installer. Check that the main frequency and voltage correspond to those for which the unit is designed
as given on the electrical data label.
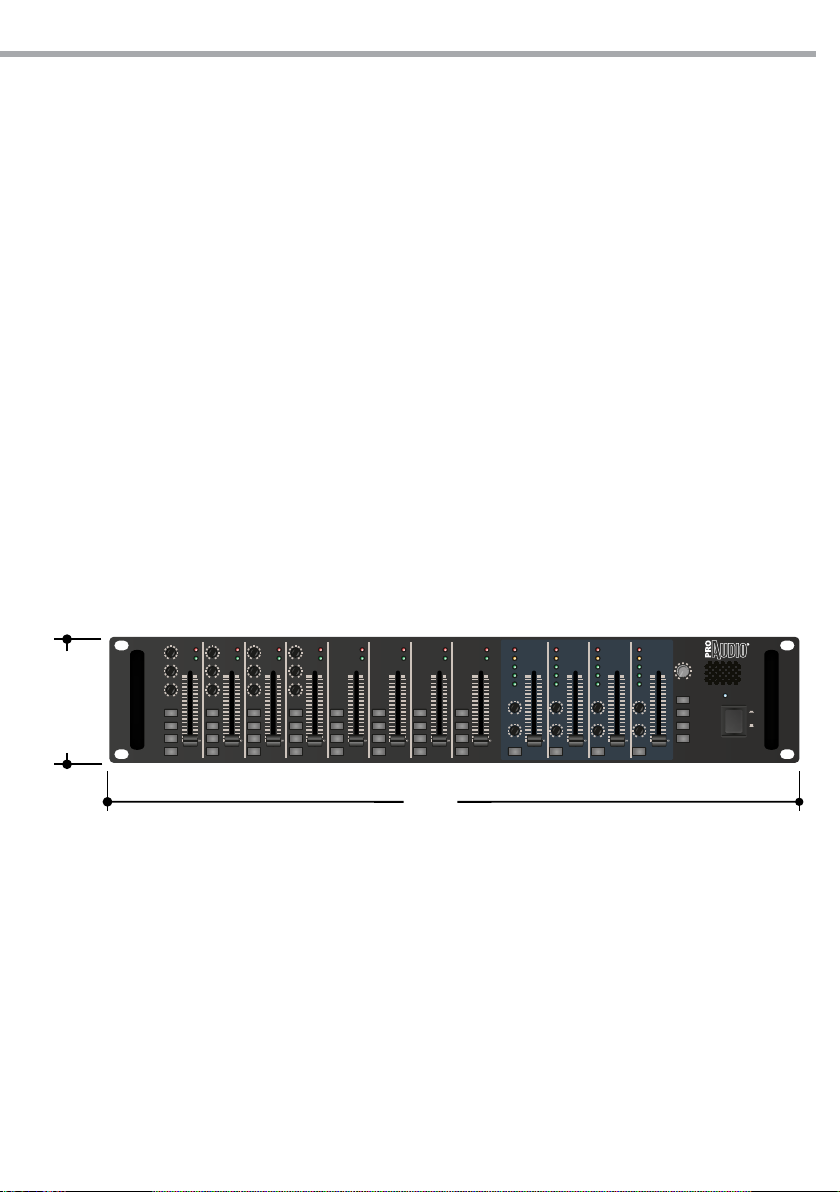
• This unit is not for home use, only professional applications.
• Make certain that no inammable liquids, water or metal objects enter the xture.
• Do not dismantle or modify the xture.
• All work must always be carried out by qualied technical personnel. Contact the nearest sales point for
an inspection or contact the manufacturer directly.
• If the unit is to be put out of operation denitively, take it to a local recycling plant for a disposal which
is not harmful to the environment.
WARNING!
Warnings and installation precautions
• This product in combination with amplier, may be capable of producing dangerous sound levels that
could cause permanent hearing loss. Do not operate for a long period of time at high volume level or
at a level that is uncomfortable.
• If this device will be operated in any way dierent to the one described in this manual, it may suer
damages and the guarantee becomes void. Furthermore, any other operation may lead to dangers like
short circuit, burns, electric shock, ect.
• Do not install the xture near sources of heat.
• The xture must be located in a place where a proper ventilation or thermal dissipation is not impeded.
Do not install the xture in a conned space.
• The output level of the amplier must never exceed the marked sensitivity.
• Do not link the output of any amplier channel back into another channel’s input. Do not parallel or
series connect an amplier’s output with any other amplier’s output.
• Make sure that the signal is correctly connected to the amplier’s input channel and set to proper input
mode.
• Please turn o the power switch before pulling o the power cord.
• Before starting any maintenance work or cleaning the unit, cut o power from the main supply.
• When cleaning unit, please do not use solvents such as acetone or alcohol, since they may damage the
of the unit outer nish and the printings on the panels.

5
MZX84
- 1 - INTRODUCTION
1.1 - Features
• Controls
– Front : 4 Mic/Line Input Level control (CH1-4) with 3-band EQ and selector switches.
4 Line Input Level control (CH5-8) with selector switches.
4 Output Level control with 2-band Tone control and Mute switch.
Monitor Level with selector switches.
– Rear : 8 Gain control for each input.
Talkover switch for CH1.
Phantom Power switches for CH1 and CH2-4.
• Connectors
– 4 XLR Electronically Balanced jack and 1/4” phone jack for CH1-4 input.
– 4 1/4” phone jack and RCA jack for CH5-8 input.
– RJ45 jack for Remote operation.
– Euro Block for 4 LINE output.
• Indicators: Power. SIG, PEAK for each input channel and SIG,-20dB,
-10dB,0dB, CLIP for each output channel.
88
420
PEAK
SIG
PEAK
SIG
PEAK
SIG
PEAK
SIG
PEAK
SIG
PEAK
SIG
PEAK
SIG
PEAK
SIG
0 0 0 0 0 0 0 0 0 000
1
2
3
4
1
2
3
4
1
2
3
4
1
2
3
4
1
2
3
4
1
2
3
4
1
2
3
4
1
2
3
4MUTE MUTE MUTE MUTE
0 +10
LEVEL
CH 1
CH 2
CH 3
CH 4
POWER
ON
OFF
HIGH
-15 +15-15 +15
-15 +15
-15 +15
LOW
-15 +15
MID
HIGH
LOW
MID
HIGH
LOW
MID
HIGH
LOW
MID
-15 +15
-15 +15
-15 +15
-15 +15
-15 +15
-15 +15
-15 +15
HIGH
-15 +15
LOW
-15 +15
HIGH
-15 +15
LOW
-15 +15
HIGH
-15 +15
LOW
-15 +15
HIGH
-15 +15
LOW
-15 +15
CH 1 CH 2 CH 3 CH 4 CH 5 CH6 CH 7 CH 8 MASTER 4MASTER 3MASTER 2MASTER 1
-20
CLIP
0
-10
-20
SIG
CLIP
0
-10
-20
SIG
CLIP
0
-10
-20
SIG
CLIP
0
-10
SIG
MIXER ZONE
MZX84
Fig.1
Technical drawing

6MZX84
1 2 3 7 8 14 15
11
12
4 5 6 9 10 13
PEAK
SIG
PEAK
SIG
PEAK
SIG
PEAK
SIG
PEAK
SIG
PEAK
SIG
PEAK
SIG
PEAK
SIG
0 0 0 0 0 0 0 0 0 000
1
2
3
4
1
2
3
4
1
2
3
4
1
2
3
4
1
2
3
4
1
2
3
4
1
2
3
4
1
2
3
4MUTE MUTE MUTE MUTE
0 +10
LEVEL
CH 1
CH 2
CH 3
CH 4
PO WER
ON
OFF
HIGH
-15 +15
LOW
-15 +15
HIGH
-15 +15
LOW
-15 +15
HIGH
-15 +15
LOW
-15 +15
HIGH
-15 +15
LOW
-15 +15
CH 1 CH 2 CH 3 CH 4 CH 5 CH 6 CH 7 CH 8
MAS TER 4MAS TER 3
MAS TER 2
MAS TER 1
-20
CLI P
0
-10
-20
SIG
CLI P
0
-10
-2 0
SIG
CLI P
0
-10
-2 0
SIG
CLI P
0
-10
SIG
-15 +15
HIGH
-15 +15
HIGH
-15 +15
HIGH
-15 +15
HIGH
-15 +15
-15 +15
MID MID
MID MID
-15 +15 -15 +15 -15 +15
MID MID
MID MID
-15 +15 -15 +15 -15 +15
MIXER ZONE
MZX84
Fig.2
- 2- OPERATING ELEMENTS AND CONNECTIONS
2.1 - Front Panels
1. INPUT CHANNEL EQ CONTROLS These controls allow to equalize the input signal from -15dB to
+15dB at 80Hz(LOW),2.5kHz(MID) and 12.5kHz(HIGH) for CH1~CH4.
2. SIGNAL INDICATORS These indicators show current input signal on the each input channels.
3. PEAK INDICATORS These indicators warn against overload shortly on the each input channels. We
would like to recommend for users to adjust TRIM control on the rear panel when PEAK indicators are
ickering to make best performance.
4. INPUT CHANNEL FADER These allow to adjust for each input level.
5. OUTPUT CHANNEL SELECTORS These selectors allow to route each input signal through out to
selected output channels.
6. OUTPUT CHANNEL EQ CONTROLS Output channels have two band equalizer which is adjustable
over a wide range as follow. HIGH : ±15dB at 12KHz / LOW : ±15dB at 80Hz
7. OUTPUT LEVEL METER These indicators show current output level.
8. CLIP INDICATORS These indicators warn against overload shortly on the each output channels. We
would like to recommend for users to adjust FADER control when CLIP indicators are ickering to make
best performance.
9. MUTE SWITCH These buttons allow to mute for each output channels.
10. OUTPUT FADER These faders allow to adjust the level for each output channels.
11. POWER INDICATOR This indicator lights when power switch is turned on.
12. POWER SWITCH This button is power on/o switch.
13. MONITOR SWITCH These switches allow you to monitor each output channel through monitor
speaker.
14. MONITOR OUTPUT CONTROL This control allow to adjust the monitor level of monitor speaker.
15. MONITOR SPEAKER

7
MZX84
MZX84
MIXER ZONE
~ AC INPUT
100 ~ 240vAC 50/60 Hz, 16W
FUSE: T500mAL/250V
DC 24V
IN
LINK
OUT
MIC
LINE
PHANTOM
MIC
LINE
MIC
LINE
MIC
LINE
CHANNEL 1CHANNEL 2CHANNEL 3CHANNEL 4
LINE
CHANNEL 5
LINELINELINE
LINE LINE LINE LINE
CHANNEL 6CHANNEL 7CHANNEL 8
REMOTE INPUT
PRIORITY
TRIM
-6/+14 -50/-30
TRIM
-6/+14 -50/-30
TRIM
-6/+14 -50/-30
TRIM
-6/+14 -50/-30
TRIM
+14 -30
+14 -30
TRIM
+14 -30
TRIM
+14 -30
LINE 1-4
LINE 5-8
TRIM
OUTPUT
CHANNEL 4
REMOTE INPUT
CHANNEL 3
REMOTE INPUT
CHANNEL 2
REMOTE INPUT
CHANNEL 1
LINE LINE LINE LINE
GND GND GND GND
COM
ALL
CH1
CH2
CH3
CH4
PHANTOM 2-4
L
R
L
R
L
R
L
R
DESIGNED AND ENGINEERED IN KOREA
MADE IN CHINA
EXT. MUTE
ON OFF
RJ45 RJ45 RJ45 RJ45
9 2 4 6 4
7
1 8 3 5
Fig.3
1. AC POWER INPUT CONNECTOR Acorrect capacity of fuse and power cable should be applied. Please
make sure the value of fuse before replacing.
2. REMOTE INPUT These RJ45 jacks allow to connect with MZR1(wall control panel) for adjusting volume
and inserting music source of remote area.
3. LINE OUTPUTS These LINE output blocks can be connected to the input of a power amplier.
4. TRIM CONTROLS These controls allow to accept variable input level. They have 44dB adjustable range
as -50dB to -6dB for microphone input channels and -30dB to +14dB for line input channels.
5. SIGNAL INPUTS This amplier provide several connectors for signal input and these connectors allow
easy connection. The channel 1~4 are balanced line and microphone input and channel 5~8 are mono
line input.
6. PRIORITY SWITCH All other input signals are muted by the input signal of channel 1 automatically
when this switch pressed on.
7. PHANTOM POWER SWITCH The phantom power can be provided to each microphone input for using
condenser microphone.
8. EXT.MUTE Mutes input signals fed to CH1~CH4 employing muting function by shortcircuiting at these
terminals.
9. DC 24V INPUT & LINK TERMINAL If connected to DC 24V.These terminals are provided for the
connection of 24V DC power source.24V DC battery source can be connected to these terminal.The
device will supply power to other device by the link output terminal.
2.2 - Rear Panels
LINE
0 10
5
ACTIVE
MIC
WA LL CONTROL
WP1
VO L
ON
WP1 WALL CONTROL
Features
• Wall Control Panel for MZA8412 and MZX84.
• Controls
– Volume control for Wall Panel Mic and Line input or Remote main
set source.
– Push Switch for Wall panel input or Remote main set source.
• Connectors
– Input : XLR for Mic & RCA for Line.
– Output : RJ 45 to connect with Remote main set on the rear.

8MZX84
2.4 - Block diagrams
Fig.7

9
MZX84
2.5 - Specifications
Technical data MZX84
Rated Output Level / Impedance 0dB / 600 Ω Balanced
Input sensitivity/ impedence mic input - 50dB~ - 6dB / 20KΩ Balanced
Input sensitivity/ impedence line input -30dB~ + 14dB / 20KΩ Balanced
Input connections XLR, Mic 1-4, 6.3mm jack for line 1 - 8, RCA
for Line 1-4, Remote control RJ45 input 1-4
Output connections Molex output 1-4
Frequency response 20/20.000Hz (±1dB)
Distortion (THD) <0.1% (1KHz)
Tone controls input 80 Hz, 2.5kHz, 12kHz (±15dB)
Tone controls output 100 Hz, 10kHz (±15dB)
Power supply AC 100~240 Volt, 50~60Hz - DC-24V
Rack units 2U
Phantom power +15VDC
Dimensions (WxHxD) 420x88x320 mm
Weight 9 kg
Technical data WP1
Output Level/Impedance 1V/600 Ω Balanced 1V/600 Ω Balanced
Input sensitivity / Impedance Mic Input - 50dB / 20KΩ Balanced
Line Input -0dB / 30KΩ Balanced
Frequency Response (-1dB) 20Hz - 20kHz 20Hz - 20kHz
T.H.D < 0.1% < 0.1%
Hum & Noise EIN > 129 dB
Residual > 100dB
Power Source DC ±15V DC ±15V
Weight (Net) 0.5 kg 0.5 kg
Dimensions (W x H x D) 80 x 80 x 50mm

10 MZX84
- 3- GENERAL CRITERIA FOR INSTALLATION OF SOUND SYSTEMS
Introduction
This guide represents a quick introduction to the criteria for the installation of a sound system at constant
voltage or constant impedance.
A sound system must be made by qualied personnel only, who must evaluate the needs of the user and the
environmental characteristics of the spaces to be covered, select the speakers according to the spaces and
the type of message to be broadcasted (ie: speech / music ), identify the suitable amplier model to drive the
complex of all the speakers and having an adequate number of inputs, evaluate the proper connection for the
speakers and determine the section of the wiring.
Constant voltage systems
In terms of selection of speakers and their connection it’s necessary to evaluate whether to use normal speak-
ers with 4/8/16Ohm impedance or speakers with transformer. The decision is usually inuenced by the desti-
nation of the system (supermarket, disco , pub, house, ...) and by the number of speakers to employ. Constant
voltage speakers are normally used into situations where it is necessary to install several speakers with low
power to get a homogeneous distribution of audio and overall low volume. The classic example is the sound
installation in airports or supermarkets. In these situations several speakers are usually placed within a short
distance between them, normally a volume low enough to not disturb and a frequency covering the entire
area with same sound pressure.
Differences between 4/8/16 Ohms systems and constant voltage systems
The 4/8/16Ohm systems are aected by problems of impedances:
• speakers connected in “series” mode add their impedance (example: 4Ohm + 4Ohm = 8Ohm)
• speakers connected in “parallel” mode divide their impedance (example: 8Ohm // = 8Ohm 4Ohm)
In the following pictures nd a few examples of connections: series, parallel, series + parallel. Also the applicable
powerisreportedaccordingtotypeandimpedanceofeachspeaker.Pleasenotepolarityindicatedforeachspeaker.
Constant voltage systems use speakers equipped with transformer. Normally they can be con-
gured on 2 or more dierent maximum power levels. In this type of system only 2 conduc-
tors are employed: the black one is connected to the negative terminal (usually marked by “0” or
“COM”), the red one is connected to one of the contacts (50V, 70V, 100V). The amplier driving all
speakers will be connected to such 2 wires paying attention that right polarities are respected.
Please note that:
• Voltage selected on speaker transformer must match the voltage selected on the amplier.
• Total sum of speakers power must not exceed power of the amplier.
• To ensure a correct reproduction of the audio signal it is important to setup the connection with no phase
shifts: the connection between positive and negative poles of the amplier must match the polarity on
speaker transformer.
• It is important that cables have an adequate section: increasing total length of the sound installation in-
volves increasing of cable section to avoid distortion or signal loss.
• Cables for connection of the speakers should be passed separately from other electrical or microphone
cables, to avoid ground loops or triggers of any kind.
• It‘s always important to use cables with twisted wires

11
MZX84
16 Ohm 120W
4 Ohm 30W
4 Ohm 30W
4 Ohm 30W 4 Ohm 30W
SERIES CONNECTION
16 Ohm 30W
16 Ohm 30W 16 Ohm 30W 16 Ohm 30W
4 Ohm 120W
PARALLEL CONNECTION
16 Ohm 30W
16 Ohm 30W
8 Ohm 60W
4 Ohm 120W
PARALLEL CONNECTION
4 Ohm 120W
8 Ohm 60W
4 Ohm 30W
4 Ohm 30W
SERIES + PARALLEL CONNECTION

MUSIC & LIGHTS S.r.l.
Via Appia, km 136,200 - 04020 Itri (LT) - ITALY
Phone +39 0771 72190 - Fax +39 0771 721955
ISO 9001:2008 Certied Company
PROAUDIO è un brand di proprietà della Music & Lights S.r.l. PROAUDIO is a brand of Music & Lights S.r.l. company. ©2017 Music & Lights S.r.l.
Table of contents
Popular Mixer manuals by other brands

CONTINENTAL EDISON
CONTINENTAL EDISON HB976CF08 Instruction booklet

Mira
Mira Element Thermostatic Mixer Installation and user guide

Princess
Princess 222021 Instructions for use

FONESTAR
FONESTAR MX-867RU instruction manual

VNS
VNS GeoBox G-602 user manual

Cleform
Cleform Gilsom Mixers 59016A Operator's guide & parts manual

TZS First AUSTRIA
TZS First AUSTRIA FA-5259-5 instruction manual

Kirby
Kirby LP800 Operation and maintenance manual

Rane
Rane MLM 103 Operator's manual

SILLA
SILLA BB 180 I Operating, maintenance, spare parts manual

VOX electronics
VOX electronics MX-1080 operating instructions

Toolex
Toolex 511182 instruction manual